| Author |
Message |
|
|
| |
Post subject: |
Re: RC Sloop of War Constellation c.1856 |
 |
|
Installing the pin-rails is a bit involved. Painting the bulwarks after the pin-rails are installed would be a huge pain-in-the-a$$.
The 3D printed hammock are on "trays" that are slightly wider than the bulwark to accommodate any irregularities. That overhang has to be ground flush with the bulwarks, so a covering board trim piece can hide the seam.
Attachment:
File comment: 3D printed trays of hammocks
 con20220420a.jpg [ 291.65 KiB | Viewed 358 times ]
Attachment:
File comment: How the model's bulwarks are constructed
 bulwark.png [ 319.12 KiB | Viewed 358 times ]
That done, any gap were filled with epoxy/sawdust putty, and the bulwarks got painted. I also painted the hammocks, but the color doesn't look canvas enough for me.
Attachment:
File comment: Hammock trays ground flush, and some paint
 con20250525c.jpg [ 623.23 KiB | Viewed 358 times ]
The covering board is a strip of stained basswood.
Attachment:
File comment: seam cover on
 con20250527b.jpg [ 418.95 KiB | Viewed 358 times ]
The 3D printed pin-rails are drilled for mounting pins, those holes are transferred to the bulwarks and 1/16" brass rod pins hold them. The pin-rails will get epoxied to the bulwarks and the supports will get installed. Then it'll be time to do the port side!
Attachment:
File comment: Pin-rails pinned
 con20250528a.jpg [ 631.22 KiB | Viewed 358 times ]
In between the step, waiting for paint and/or glue to dry, I made cradles for the boats, painted the boats, inside and out, made new crown-bitts, and blocks.
Attachment:
File comment: Boat's on their new cradles
 con20250523e.jpg [ 854.18 KiB | Viewed 358 times ]
Attachment:
File comment: New crown-bitts and an old one
 con20250525a.jpg [ 388.22 KiB | Viewed 358 times ]
Attachment:
File comment: 3D model of working and static large blocks
 blocks.png [ 492.54 KiB | Viewed 358 times ]
[size=100]Installing the pin-rails is a bit involved. Painting the bulwarks after the pin-rails are installed would be a huge pain-in-the-a$$.
The 3D printed hammock are on "trays" that are slightly wider than the bulwark to accommodate any irregularities. That overhang has to be ground flush with the bulwarks, so a covering board trim piece can hide the seam.
[attachment=7]con20220420a.jpg[/attachment]
[attachment=6]bulwark.png[/attachment]
That done, any gap were filled with epoxy/sawdust putty, and the bulwarks got painted. I also painted the hammocks, but the color doesn't look canvas enough for me.
[attachment=5]con20250525c.jpg[/attachment]
The covering board is a strip of stained basswood.
[attachment=4]con20250527b.jpg[/attachment]
The 3D printed pin-rails are drilled for mounting pins, those holes are transferred to the bulwarks and 1/16" brass rod pins hold them. The pin-rails will get epoxied to the bulwarks and the supports will get installed. Then it'll be time to do the port side!
[attachment=3]con20250528a.jpg[/attachment]
In between the step, waiting for paint and/or glue to dry, I made cradles for the boats, painted the boats, inside and out, made new crown-bitts, and blocks.
[attachment=2]con20250523e.jpg[/attachment]
[attachment=1]con20250525a.jpg[/attachment]
[attachment=0]blocks.png[/attachment]
[/size]
|
|
|
 |
Posted: Wed May 28, 2025 4:38 pm |
|
|
 |
|
|
| |
Post subject: |
Re: RC Sloop of War Constellation c.1856 |
|
|
excellent boats!!! and excellent guns !! its a great looking model getting better with each addition JIM B  excellent boats!!! and excellent guns !!
its a great looking model getting better with each addition
JIM B :thumbs_up_1:
|
|
|
|
Posted: Sat Dec 14, 2024 4:47 pm |
|
|
|
|
|
| |
Post subject: |
Pin-rails, cont. |
|
|
While checking images for other pin-rails, I found a little detail in one photo that I verified in others; the mizzen pin-rails also had a mallet-like pin in it, probably for the mizzen tops'l yard. It also had more pin, closer together than I initially modeled. Attachment:
File comment: Note the red arrow
 tenderizer.jpg [ 2.46 MiB | Viewed 2021 times ]
So I fixed the model and printed a new pair: Attachment:
File comment: Final version of aft/mizzen pin-rail
 con20241213a.jpg [ 401.23 KiB | Viewed 2021 times ]
While checking images for other pin-rails, I found a little detail in one photo that I verified in others; the mizzen pin-rails also had a mallet-like pin in it, probably for the mizzen tops'l yard. It also had more pin, closer together than I initially modeled.
[attachment=1]tenderizer.jpg[/attachment]
So I fixed the model and printed a new pair:
[attachment=0]con20241213a.jpg[/attachment]
|
|
|
|
Posted: Sat Dec 14, 2024 2:52 pm |
|
|
|
|
|
| |
Post subject: |
Re: RC Sloop of War Constellation c.1856 |
|
|
Besides working on other model besides Constellation, like my Pride of Baltimore, I went and had a stroke back near the end of June. Basically the summer was shot, as far as getting any work done. I am getting detailed things back, like handwriting, but it's gotten cold, and there's no heat in my shop/garage, so getting physical work done is still stalled. My goals for the spring are getting Pride sailing, if not finished; and beginning proper rigging of Constellation. To that end, an item Constellation needs before rigging can begin are her pin-rails. It'll be near impossible to install them once the rigging's going up, and many rigging items attach to the pin-rails. I opted to 3D print the pin-rails that attach to the bulwarks as I did the ones at the base of the masts. Attachment:
File comment: 3D printed Pin-rail at base of the fore-mast
 con20220620d.jpg [ 168.11 KiB | Viewed 2031 times ]
There are basically four pairs of pin-rails: Port and starboard at the mizzen, main, fore, and a pair at the bow on either side of the bowsprit. Building from the 3D models of the mast rails, mostly belaying pins and the shape of the rail, and getting size and shape from an 1888 spar-deck plan, and the few photos that show enough of anything to work with; I started with the aft rails. The printed with a little deformity at one end that was repairable, but I also had forgotten to account for the fact that the bulwark they attach to leaned inboard and I had not modeled in that angle. I fixed the 3D model and it printed perfectly. Attachment:
File comment: Aft pin-rails just printed
 con20241209a.jpg [ 1.79 MiB | Viewed 2031 times ]
Attachment:
File comment: Aft pin-rail sitting where they'll be installed after primer, paint, and UV protective measures
 con20241209b.jpg [ 629.07 KiB | Viewed 2031 times ]
The mid-ships and forward rails had what I thought were cavals but in better photos turned out to be big clunking square belaying pins like carpenter's mallets. ( note: I just discovered the aft pin-rails had one of these as well, so I have to fix that model again) These were also too long to print as a single piece, so I modeled them in two halves to be bonded together after printing. Attachment:
File comment: Mid-ships pin-rail printed in two parts to fit in the print-space of the printer
 con20241209c.jpg [ 402.17 KiB | Viewed 2031 times ]
Attachment:
File comment: Mid-ships pin-rail where it will go
 con20241209f.jpg [ 948.14 KiB | Viewed 2031 times ]
Attachment:
File comment: Forward pin-rails in their spot
 con20241210b.jpg [ 1.19 MiB | Viewed 2031 times ]
Next came the bow pin-rails which I appear in many photos, the best being from 1926; Attachment:
File comment: 1926 photo showing bow pin-rails
 bow.jpg [ 105.2 KiB | Viewed 2031 times ]
The bulwark here leans outboard so the back angle of the rail needed to be reversed Attachment:
File comment: Bow pin rails just printed
 con20241211a.jpg [ 271.55 KiB | Viewed 2031 times ]
Attachment:
File comment: Bow pin-rails sitting in their spots
 con20241211c.jpg [ 666.84 KiB | Viewed 2031 times ]
There's a fife-rail around the base of the mizzen (rear-most) mast, but I can find any thing showing pin-rails at the stern. There may be pin-rails in the mast tops, or just cleats seized to the shrouds. to determine this will require investigating the ship's contemporaries as I haven't found anything specific to Constellation regarding it. These rails need to be drilled for attachment pins; then primed, painted, and clear-coated before they can be installed. Besides working on other model besides [b]Constellation[/b], like my [b]Pride of Baltimore[/b], I went and had a stroke back near the end of June. Basically the summer was shot, as far as getting any work done. I am getting detailed things back, like handwriting, but it's gotten cold, and there's no heat in my shop/garage, so getting physical work done is still stalled. My goals for the spring are getting [b]Pride[/b] sailing, if not finished; and beginning proper rigging of [b]Constellation[/b].
To that end, an item [b]Constellation[/b] needs before rigging can begin are her pin-rails. It'll be near impossible to install them once the rigging's going up, and many rigging items attach to the pin-rails.
I opted to 3D print the pin-rails that attach to the bulwarks as I did the ones at the base of the masts.
[attachment=8]con20220620d.jpg[/attachment]
There are basically four pairs of pin-rails: Port and starboard at the mizzen, main, fore, and a pair at the bow on either side of the bowsprit.
Building from the 3D models of the mast rails, mostly belaying pins and the shape of the rail, and getting size and shape from an 1888 spar-deck plan, and the few photos that show enough of anything to work with; I started with the aft rails. The printed with a little deformity at one end that was repairable, but I also had forgotten to account for the fact that the bulwark they attach to leaned inboard and I had not modeled in that angle. I fixed the 3D model and it printed perfectly.
[attachment=7]con20241209a.jpg[/attachment]
[attachment=5]con20241209b.jpg[/attachment]
The mid-ships and forward rails had what I thought were [i]cavals[/i] but in better photos turned out to be big clunking square belaying pins like carpenter's mallets. ([i]note: I just discovered the aft pin-rails had one of these as well, so I have to fix that model again[/i])
These were also too long to print as a single piece, so I modeled them in two halves to be bonded together after printing.
[attachment=6]con20241209c.jpg[/attachment]
[attachment=4]con20241209f.jpg[/attachment]
[attachment=3]con20241210b.jpg[/attachment]
Next came the bow pin-rails which I appear in many photos, the best being from 1926;
[attachment=0]bow.jpg[/attachment]
The bulwark here leans outboard so the back angle of the rail needed to be reversed
[attachment=2]con20241211a.jpg[/attachment]
[attachment=1]con20241211c.jpg[/attachment]
There's a fife-rail around the base of the mizzen (rear-most) mast, but I can find any thing showing pin-rails at the stern. There may be pin-rails in the mast tops, or just cleats seized to the shrouds. to determine this will require investigating the ship's contemporaries as I haven't found anything specific to [b]Constellation[/b] regarding it.
These rails need to be drilled for attachment pins; then primed, painted, and clear-coated before they can be installed.
|
|
|
|
Posted: Fri Dec 13, 2024 3:25 pm |
|
|
|
|
|
| |
Post subject: |
Re: RC Sloop of War Constellation c.1856 |
|
|
After airbrushing on a couple of coats of Testor's Flat Olive, I painted all the hardware with Testor's Flat Steel, then cut in the Olive again to neaten things up. The rollers were lignum vitae, a very hard wood used for such things, including sheaves in blocks, and bushing blocks, and so on. These I painted "Rust." Attachment:
File comment: Getting painted
 con20240417a.jpg [ 341.05 KiB | Viewed 2224 times ]
The aft gun (left in photo) lost a roller during printing and I replaced it with a bit of mahogany dowel, and filled in the missing portions with built up resin ~ drip some in, zap with UV, drip in some more, zap again, etc. There's a little more touch-up painting, and then clear-coat to do. Attachment:
File comment: Almost ready for rigging
 con20240419a.jpg [ 589.51 KiB | Viewed 2224 times ]
These will get attached to the access hatches as shown, with two screws each. Eye-bolts will get installed along with the blocks and tackle used to shift the guns about on deck. The aft gun is set off like that and will have a few crew members around it to be more interesting, and out of the way of the spanker sheet - this is a working model after all. The forward gun is left centered and no figures will be up here to keep clear of the heads'l sheets. After airbrushing on a couple of coats of Testor's Flat Olive, I painted all the hardware with Testor's Flat Steel, then cut in the Olive again to neaten things up. The rollers were lignum vitae, a very hard wood used for such things, including sheaves in blocks, and bushing blocks, and so on. These I painted "Rust."
[attachment=1]con20240417a.jpg[/attachment]
The aft gun (left in photo) lost a roller during printing and I replaced it with a bit of mahogany dowel, and filled in the missing portions with built up resin ~ drip some in, zap with UV, drip in some more, zap again, etc. There's a little more touch-up painting, and then clear-coat to do.
[attachment=0]con20240419a.jpg[/attachment]
These will get attached to the access hatches as shown, with two screws each. Eye-bolts will get installed along with the blocks and tackle used to shift the guns about on deck. The aft gun is set off like that and will have a few crew members around it to be more interesting, and out of the way of the spanker sheet - this [i]is[/i] a working model after all. The forward gun is left centered and no figures will be up here to keep clear of the heads'l sheets.
|
|
|
|
Posted: Fri Apr 19, 2024 12:43 pm |
|
|
|
|
|
| |
Post subject: |
Re: RC Sloop of War Constellation c.1856 |
|
|
John Dahlgren submitted a drawing, dated July 31 1850, proposing his idea of the ideal armament for "First-Class Frigates" suggesting they be armed with six 10 inch pivot guns on the spar deck, and 26 9 inch guns on the gun deck. The Navy rejected the proposal, mostly; they opted for two 10 inch pivots and the gun deck armed with 8 inch shell-guns and 32# shot guns, and the big frigates, razees (cut down frigates) were armed in this manner, including Constellation, the newest, and largest sloop-of-war that wasn't a razeed frigate. Attachment:
File comment: 10 Shell Gun ~ Pivot Carriage
from Dahlgren's 1850 proposal
 x_inch_dahlgren_pivot.png [ 158.32 KiB | Viewed 2251 times ]
On a visit to the ship, years ago, they showed the Mississippi Pivot Gun plans, saying that was what Constellation was originally armed with; which were eventually replaced with Parrott rifle pivots, a plan they also showed me. I took some pictures of the Parrott plans, but went to the National Archives in College Park Maryland, to get a proper copy of the Mississippi plan. On August 26 1854, the sloop-of-war Constellation would be launched. Almost a year later, June 1855, the plan for the 10 inch pivot guns for the side-wheel frigate Mississippi was drawn. Another year on, Constellation was commissioned on July 28 1855. Attachment:
File comment: Plan for Mississippi's 10 inch pivot guns of 86cwt
 10inchpivot.jpg [ 530.23 KiB | Viewed 2251 times ]
It seemed to me to be unlikely the ship would be armed with a gun from a plan drawn a year after her launch, while her razeed contemporaries were armed with the Dahlgren around the same time, 1853~1856. So far, I haven't been able to track down any sort of documentation that can nail down precisely which 10 inch shell gun Constellation got. The Mississippi gun is, so far as I've seen, always referred to as a "10 inch shell-gun of 86cwt" while the Dahlgren simply referred to as a "10 shell-gun" or a "X inch shell-gun." I haven't yet found a references to Constellation's guns as "86cwt." The 10 inch Dahlgren is 120cwt, and I've never seen anything referring to it in that way. Since it's really isn't that big a job, being able to 3D print now; I decided to switch the model's pivot guns to Dahlgrens. Since I was already making the 3D model for my Naval Gun project, it didn't really add to the work-load. Attachment:
File comment: 3D model of X inch Dahlgren pivot
 x_dahlgren_pivot.png [ 180.97 KiB | Viewed 2251 times ]
The slide for this gun, while very like the Mississippi gun's slide, was wider and shorter. I used the slide from the 3D model of the previous pivot gun, shortened and widened, which saved some time and effort. I printed the gun in three parts; slide, carriage, and tube; to facilitate painting, and reducing what I'd need to reprint if one of the parts failed. The first gun lost one of it's rollers, but I could fix that without reprinting. The second gun printed perfectly. Attachment:
File comment: Second gun, fresh off the printer
 con20240331a.jpg [ 258.65 KiB | Viewed 2251 times ]
Attachment:
File comment: New Dahlgrens next to the gun they're replacing
 con20240331d.jpg [ 320.21 KiB | Viewed 2251 times ]
A shorter slide meant I needed to make new deck tracks, which I 3D modeled like last time, but I made them short/thinner to be more in scale. Attachment:
 new_tracks.png [ 401.46 KiB | Viewed 2251 times ]
The guns are mounted on access hatches, fore and aft. I removed the old tracks, sanded the scars best I could, and re-coated the hatch decking with polyurethane. The newly printed tracks were primed, painted, glued onto the hatches, painted again, and the whole thing was clear-coated. The guns too were primed, and the tubes painted and detailed, but the carriages and slides are waiting to be painted the same olive color as the old set. Attachment:
File comment: Deck hatches cleared of old tracks and refinished.
 con20240404a.jpg [ 242.26 KiB | Viewed 2251 times ]
Attachment:
File comment: Aft pivot
 con20240408b.jpg [ 170.75 KiB | Viewed 2251 times ]
| Attachments: |
File comment: Forward pivot

con20240408a.jpg [ 161.67 KiB | Viewed 2251 times ]
|
John Dahlgren submitted a drawing, dated July 31 1850, proposing his idea of the ideal armament for "First-Class Frigates" suggesting they be armed with [u]six[/u] 10 inch pivot guns on the spar deck, and 26 9 inch guns on the gun deck. The Navy rejected the proposal, mostly; they opted for two 10 inch pivots and the gun deck armed with 8 inch shell-guns and 32# shot guns, and the big frigates, razees (cut down frigates) were armed in this manner, including [b]Constellation[/b], the newest, and largest sloop-of-war that wasn't a razeed frigate.
[attachment=7]x_inch_dahlgren_pivot.png[/attachment]
On a visit to the ship, years ago, they showed the [b]Mississippi[/b] Pivot Gun plans, saying that was what [b]Constellation[/b] was originally armed with; which were eventually replaced with Parrott rifle pivots, a plan they also showed me. I took some pictures of the Parrott plans, but went to the National Archives in College Park Maryland, to get a proper copy of the [b]Mississippi[/b] plan.
On August 26 1854, the sloop-of-war [b]Constellation[/b] would be launched. Almost a year later, June 1855, the plan for the 10 inch pivot guns for the side-wheel frigate [b]Mississippi[/b] was drawn. Another year on, [b]Constellation[/b] was commissioned on July 28 1855.
[attachment=8]10inchpivot.jpg[/attachment]
It seemed to me to be unlikely the ship would be armed with a gun from a plan drawn a year after her launch, while her razeed contemporaries were armed with the Dahlgren around the same time, 1853~1856. So far, I haven't been able to track down any sort of documentation that can nail down precisely which 10 inch shell gun [b]Constellation[/b] got. The [b]Mississippi[/b] gun is, so far as I've seen, always referred to as a "10 inch shell-gun of 86cwt" while the Dahlgren simply referred to as a "10 shell-gun" or a "X inch shell-gun." I haven't yet found a references to [b]Constellation's[/b] guns as "86cwt." The 10 inch Dahlgren is 120cwt, and I've never seen anything referring to it in that way.
Since it's really isn't that big a job, being able to 3D print now; I decided to switch the model's pivot guns to Dahlgrens. Since I was already making the 3D model for my Naval Gun project, it didn't really add to the work-load.
[attachment=6]x_dahlgren_pivot.png[/attachment]
The slide for this gun, while very like the [b]Mississippi[/b] gun's slide, was wider and shorter. I used the slide from the 3D model of the previous pivot gun, shortened and widened, which saved some time and effort.
I printed the gun in three parts; slide, carriage, and tube; to facilitate painting, and reducing what I'd need to reprint if one of the parts failed. The first gun lost one of it's rollers, but I could fix that without reprinting. The second gun printed perfectly.
[attachment=5]con20240331a.jpg[/attachment] [attachment=4]con20240331d.jpg[/attachment]
A shorter slide meant I needed to make new deck tracks, which I 3D modeled like last time, but I made them short/thinner to be more in scale.
[attachment=3]new_tracks.png[/attachment]
The guns are mounted on access hatches, fore and aft. I removed the old tracks, sanded the scars best I could, and re-coated the hatch decking with polyurethane. The newly printed tracks were primed, painted, glued onto the hatches, painted again, and the whole thing was clear-coated. The guns too were primed, and the tubes painted and detailed, but the carriages and slides are waiting to be painted the same olive color as the old set.
[attachment=2]con20240404a.jpg[/attachment]
[attachment=0]con20240408b.jpg[/attachment]
|
|
|
|
Posted: Fri Apr 12, 2024 12:00 am |
|
|
|
|
|
| |
Post subject: |
3D printed Whale Boat |
|
|
|
I started on the 3D model of the whale-boat before the quarter boats were done, and it was complete and printed overnight on the 7th. That's the last boat for Constellation.
Since then, it's been filling, filing, sanding, and repeat, to make the seams on all the boats go away before I prime and paint them.
I realize these model's are "low-poly" but they fit in with the level of detail of the over-all model, and it's not like I'm trying to sell them. I was going to post them on Thingiverse, but most folks that would want them would want to scale them down to a more common modeling scale; like 1:85 which is what that abomination Artesania Latina pukes out claims to be. Anyway, scaled down, I doubt these models could survive the print process, so I'm not going to inflict them on anybody.
| Attachments: |
File comment: The fish skeleton phase of construction

sternboat20230103a.png [ 160.3 KiB | Viewed 2440 times ]
|
File comment: Inner planking surface made, outer surface in progress

sternboat20230104a.png [ 161 KiB | Viewed 2440 times ]
|
File comment: 3D model completed

sternboat20230107c.png [ 140.35 KiB | Viewed 2440 times ]
|
File comment: The model set-up for printing in the slicer

sternboat3d20240107.png [ 91.55 KiB | Viewed 2440 times ]
|
File comment: Whale boat printed

con20240108a.jpg [ 74.79 KiB | Viewed 2440 times ]
|
File comment: Both halves next to each other

con20240108c.jpg [ 65.01 KiB | Viewed 2440 times ]
|
File comment: All Constellation's the 3D printed boats together

con20240108g.jpg [ 169.54 KiB | Viewed 2440 times ]
|
I started on the 3D model of the whale-boat before the quarter boats were done, and it was complete and printed overnight on the 7th. That's the last boat for [b]Constellation[/b].
Since then, it's been filling, filing, sanding, and repeat, to make the seams on all the boats go away before I prime and paint them.
I realize these model's are "low-poly" but they fit in with the level of detail of the over-all model, and it's not like I'm trying to sell them. I was going to post them on Thingiverse, but most folks that would want them would want to scale them down to a more common modeling scale; like 1:85 which is what that abomination Artesania Latina pukes out claims to be. Anyway, scaled down, I doubt these models could survive the print process, so I'm not going to inflict them on anybody.
|
|
|
|
Posted: Tue Jan 09, 2024 6:18 pm |
|
|
|
|
|
| |
Post subject: |
3D Printed Quarter Boat |
|
|
Once the 2nd cutter was printed, I focused more on the quarter boats. It's one 3D model, but two of them get printed to eventually hang on davits on the aft quarters of the ship.
Attachment:
File comment: x-ray view of quarter-boat in progress
 quarterboat20231230c.png [ 143.1 KiB | Viewed 2453 times ]
Attachment:
File comment: 3D model of quarter-boat
 quarterboat20231230d.png [ 185.4 KiB | Viewed 2453 times ]
These boats look very much like the cutters, but are a little longer, not as tall, with narrower sterns. At 1:36 scale, they're about 8-7/8th inches long (22.5cm). All the boats will be too long to print in one piece, and are made in halves, but both quarter-boats can be printed at once with room to spare.
Attachment:
File comment: In the slicer; done in halves to fit in the printer's available volume.
 quarterboat3d20240101a.png [ 110.11 KiB | Viewed 2453 times ]
Printing took about 5-1/2 hours.
Attachment:
File comment: Printed and washed
 con20240102c.jpg [ 211.23 KiB | Viewed 2453 times ]
Attachment:
File comment: Two quarter-boats and the 2nd cutter
 con20240102f.jpg [ 174.5 KiB | Viewed 2453 times ]
Here's the boats sitting about where they'll live on the main model
Attachment:
File comment: Where the boats go on the main model
 con20240102g.jpg [ 168.02 KiB | Viewed 2453 times ]
[size=150]Once the 2nd cutter was printed, I focused more on the quarter boats. It's one 3D model, but two of them get printed to eventually hang on davits on the aft quarters of the ship.
[attachment=5]quarterboat20231230c.png[/attachment] [attachment=4]quarterboat20231230d.png[/attachment]
These boats look very much like the cutters, but are a little longer, not as tall, with narrower sterns. At 1:36 scale, they're about 8-7/8th inches long (22.5cm). All the boats will be too long to print in one piece, and are made in halves, but both quarter-boats can be printed at once with room to spare.
[attachment=3]quarterboat3d20240101a.png[/attachment]
Printing took about 5-1/2 hours.
[attachment=2]con20240102c.jpg[/attachment] [attachment=1]con20240102f.jpg[/attachment]
Here's the boats sitting about where they'll live on the main model
[attachment=0]con20240102g.jpg[/attachment][/size]
|
|
|
|
Posted: Tue Jan 02, 2024 11:03 pm |
|
|
|
|
|
| |
Post subject: |
Constellation's Boats: The 2nd Cutter in 3D |
|
|
As 3D printing things for the models was going pretty well, I decided to also print the remaining boats. I had already built the launch and 1st cutter, and planned to build the 2nd cutter next, in the same way, but began a 3D model back in 2020.
Attachment:
File comment: Ship's launch and 1st cutter in wood with some 3D printed parts added.
 con20231022ea.png [ 1012.3 KiB | Viewed 2480 times ]
Attachment:
File comment: 3D wire-frame for 2nd cutter started in 2020 and forgotten.
 2nd_cutter20200803a.jpg [ 269.59 KiB | Viewed 2480 times ]
Only the launch is "carvel planked" while all the rest are "clinker" or "lap-strake" with over lapping planks like house siding. That's much more tedious in 3D modeling than a smooth-hulled boat. Eventually I got something I could live with.
Attachment:
File comment: Tossed all but the keel and started over, till it was finally "planked."
 second_cutter3d20231127b.png [ 95.49 KiB | Viewed 2480 times ]
Then adding details, adjusting what seemed like everything all the time, and every one of 25 ribs.
Attachment:
File comment: Seats and a grating foredeck
 second_cutter3d20231203.png [ 157.71 KiB | Viewed 2480 times ]
Attachment:
File comment: Lots of adjustments and all the ribs in
 second_cutter3d20231217b.png [ 180.08 KiB | Viewed 2480 times ]
Finally it was ready to be printed
Attachment:
File comment: Finally ready to print
 second_cutter3d20231219.png [ 215.35 KiB | Viewed 2480 times ]
It was made in two parts so it would fit in the printer, and the parts had to be arranged and written to the STL file, for slicing.
The slicing software said it would weight 29.9 grams (1.6 ounces), use $1.05 worth of resin, and take 4h 50m 57s to print.
Attachment:
File comment: In two parts to fit in the printer
 second_cutter3d20231216a.png [ 131.37 KiB | Viewed 2480 times ]
To the printer it went...
Attachment:
File comment: Almost half printed
 con20231219a.jpg [ 112.86 KiB | Viewed 2480 times ]
Attachment:
File comment: Printing complete
 con20231219b.jpg [ 187.88 KiB | Viewed 2480 times ]
After bonding the two parts together, the seam will need some clean up with files and sanding, then it'll get primed, painted, and a UV resistant clear coat. Then it'll be placed on the 1st cutter, after I make some boat chocks.
Attachment:
File comment: sitting where it will live, stacked on the 1st cutter.
 con20231219g.jpg [ 213.1 KiB | Viewed 2480 times ]
Over-all, the whole thing leans toward being too thin, but it's usable for me. I was going to share the STL on Thingiverse, but most folks that downloaded it would probably want to scale it down to one of the more common kit scales , and most of the surfaces would become membranes if not disappear entirely.
This expectation and experience is going into the 3D models of the remaining boats. Beside being able to scale them down, they need to be thicker/stronger, because they'll hang from davits out-board, which gives them a higher chance of being damaged in handling and operation.
[size=150]As 3D printing things for the models was going pretty well, I decided to also print the remaining boats. I had already built the launch and 1st cutter, and planned to build the 2nd cutter next, in the same way, but began a 3D model back in 2020.
[attachment=9]con20231022ea.png[/attachment] [attachment=8]2nd_cutter20200803a.jpg[/attachment]
Only the launch is "carvel planked" while all the rest are "clinker" or "lap-strake" with over lapping planks like house siding. That's much more tedious in 3D modeling than a smooth-hulled boat. Eventually I got something I could live with.
[attachment=7]second_cutter3d20231127b.png[/attachment]
Then adding details, adjusting what seemed like everything all the time, and every one of 25 ribs.
[attachment=6]second_cutter3d20231203.png[/attachment] [attachment=5]second_cutter3d20231217b.png[/attachment]
Finally it was ready to be printed
[attachment=4]second_cutter3d20231219.png[/attachment]
It was made in two parts so it would fit in the printer, and the parts had to be arranged and written to the STL file, for slicing.
The slicing software said it would weight 29.9 grams (1.6 ounces), use $1.05 worth of resin, and take 4h 50m 57s to print.
[attachment=3]second_cutter3d20231216a.png[/attachment]
To the printer it went...
[attachment=2]con20231219a.jpg[/attachment] [attachment=1]con20231219b.jpg[/attachment]
After bonding the two parts together, the seam will need some clean up with files and sanding, then it'll get primed, painted, and a UV resistant clear coat. Then it'll be placed on the 1st cutter, after I make some boat chocks.
[attachment=0]con20231219g.jpg[/attachment]
Over-all, the whole thing leans toward being too thin, but it's usable for me. I was going to share the STL on Thingiverse, but most folks that downloaded it would probably want to scale it down to one of the more common kit scales , and most of the surfaces would become membranes if not disappear entirely.
This expectation and experience is going into the 3D models of the remaining boats. Beside being able to scale them down, they need to be thicker/stronger, because they'll hang from davits out-board, which gives them a higher chance of being damaged in handling and operation.[/size]
|
|
|
|
Posted: Fri Dec 22, 2023 12:56 am |
|
|
|
|
|
| |
Post subject: |
Re: RC Sloop of War Constellation c.1856 |
|
|
very very good indeed--the 3-D prints really enhance the look I was most impressed with the beautiful tracks... JIm B  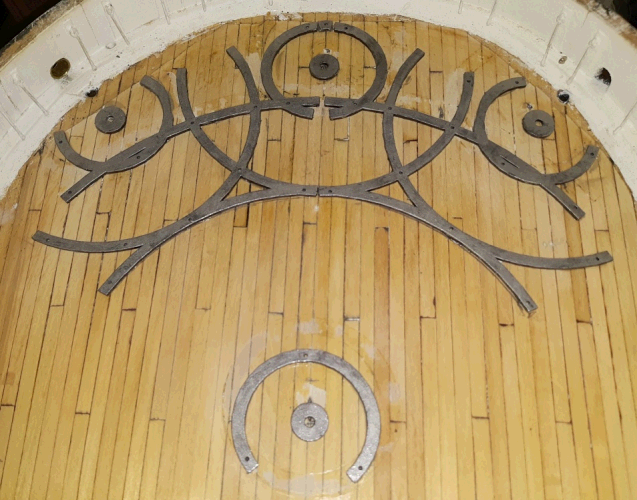 very very good indeed--the 3-D prints really enhance the look
I was most impressed with the beautiful tracks... :thumbs_up_1: :thumbs_up_1:
JIm B :wave_1:
[img]http://www.shipmodels.info/mws_forum/download/file.php?id=142156&mode=view[/img]
|
|
|
|
Posted: Fri Dec 08, 2023 6:55 pm |
|
|
|
|
|
| |
Post subject: |
Re: RC Sloop of War Constellation c.1856 |
|
|
A bit of research nailed down that the ship was rigged with rigging-screws (turnbubkles) from the start (1855), and didn't get deadeyes-and-lanyards until nearly 1914. The red arrows are the rubbing boards I was looking for when I realized this 1856 portrait of the ship showed she didn't have deadeyes-and-lanyards.Attachment:
File comment: Constellation at Naples 1856 by deSimone
 rubrails.png [ 1.02 MiB | Viewed 2586 times ]
Finding good images or specs on these things is hard, but going with the best photo I could find, I came up with... Attachment:
File comment: Constellation's rigging-screws c.1884 and 3D model on the right
 turnbuckles.png [ 353.86 KiB | Viewed 2586 times ]
Obviously, you won't find these things, especially in 1:36 scale, at any vendor, and I couldn't even find left-handed taps and dies (or steel screws and nuts to use as taps and dies) to make a functional version with. Having had good luck with 3D printed parts in a somewhat "structural" use, I opted to model and print them. I saw 3D printing used to cast jewelry, and looked into that with the idea of having solid, non-functional ones in brass, but that's not looking like something I can afford to do, or have done. Attachment:
File comment: Two rigging-screws in place to test
 con20231018b.jpg [ 64.22 KiB | Viewed 2586 times ]
After adjusting the 3D model, 45 more were printed...
| Attachments: |
File comment: 3D printed rigging-screws

con20231024a.jpg [ 599.15 KiB | Viewed 2586 times ]
|
A bit of research nailed down that the ship was rigged with rigging-screws (turnbubkles) from the start (1855), and didn't get deadeyes-and-lanyards until nearly 1914.
[i]The red arrows are the rubbing boards I was looking for when I realized this 1856 portrait of the ship showed she didn't have deadeyes-and-lanyards.[/i]
[attachment=3]rubrails.png[/attachment]
Finding good images or specs on these things is hard, but going with the best photo I could find, I came up with...
[attachment=2]turnbuckles.png[/attachment]
Obviously, you won't find these things, especially in 1:36 scale, at any vendor, and I couldn't even find left-handed taps and dies (or steel screws and nuts to use as taps and dies) to make a functional version with. Having had good luck with 3D printed parts in a somewhat "structural" use, I opted to model and print them. I saw 3D printing used to cast jewelry, and looked into that with the idea of having solid, non-functional ones in brass, but that's not looking like something I can afford to do, or have done.
[attachment=1]con20231018b.jpg[/attachment]
After adjusting the 3D model, 45 more were printed...
|
|
|
|
Posted: Wed Oct 25, 2023 2:51 pm |
|
|
|
|
|
| |
Post subject: |
Re: RC Sloop of War Constellation c.1856 |
|
|
|
Jawdroppingly awesome. Wow ...
Jawdroppingly awesome. Wow ...
|
|
|
|
Posted: Fri Dec 23, 2022 1:12 am |
|
|
|
|
|
| |
Post subject: |
Re: RC Sloop of War Constellation c.1856 |
|
|
Shifted work to another model trying to get it's controls in order. But Constellation did get some work done... Attachment:
File comment: a pit of paint on some printed parts
 con20220615d.jpg [ 218.7 KiB | Viewed 2897 times ]
Attachment:
File comment: Connected to steering wheel to the rudder servo
 con20220620.jpg [ 275.25 KiB | Viewed 2897 times ]
Attachment:
File comment: Pin rails installed at the base of the fore and main masts
 con20220620e.jpg [ 150.06 KiB | Viewed 2897 times ]
Attachment:
File comment: Futtock bands installed, and all brass blackened, even if will be painted. Holes in tops for topmast shrouds drilled.
 con20220623a.jpg [ 159.91 KiB | Viewed 2897 times ]
Attachment:
File comment: Gluing down starboard side hammocks
 con20220828a.jpg [ 261.45 KiB | Viewed 2897 times ]
Attachment:
File comment: Seam between hammock pieces and bulwark covered with a strip of basswood. Still 3/4 of the rails to do like this.
 con20220830d.jpg [ 118.44 KiB | Viewed 2897 times ]
Attachment:
File comment: Need to get these fellows painted or I'll start referring to them as The Shadows
 con20220620h.jpg [ 183.29 KiB | Viewed 2897 times ]
Shifted work to another model trying to get it's controls in order. But [b]Constellation[/b] did get some work done...
[attachment=6]con20220615d.jpg[/attachment]
[attachment=5]con20220620.jpg[/attachment]
[attachment=4]con20220620e.jpg[/attachment]
[attachment=3]con20220623a.jpg[/attachment]
[attachment=2]con20220828a.jpg[/attachment]
[attachment=1]con20220830d.jpg[/attachment]
[attachment=0]con20220620h.jpg[/attachment]
|
|
|
|
Posted: Sat Sep 10, 2022 12:28 pm |
|
|
|
|
|
| |
Post subject: |
Re: RC Sloop of War Constellation c.1856 |
|
|
The parts of the model that make it a warship - the pivot guns all painted. Attachment:
File comment: Bow pivot gun
 con20220615b.jpg [ 162.17 KiB | Viewed 3017 times ]
Attachment:
File comment: Stern pivot gun
 con20220615c.jpg [ 208.44 KiB | Viewed 3017 times ]
without paint, for reference Attachment:
File comment: Pivot gun just printed
 con20220315a.jpg [ 370.65 KiB | Viewed 3017 times ]
The parts of the model that make it a warship - the pivot guns all painted.
[attachment=2]con20220615b.jpg[/attachment] [attachment=1]con20220615c.jpg[/attachment]
without paint, for reference
[attachment=0]con20220315a.jpg[/attachment]
|
|
|
|
Posted: Thu Jun 16, 2022 9:54 pm |
|
|
|
|
|
| |
Post subject: |
Re: RC Sloop of War Constellation c.1856 |
|
|
As of the 6th of June... Attachment:
File comment: More elaborate deck circles printed
 con20220503a.png [ 340.15 KiB | Viewed 3049 times ]
Attachment:
File comment: Bow deck circles painted Steel
 con20220504a.png [ 367.68 KiB | Viewed 3049 times ]
Attachment:
File comment: Stern deck circles painted Steel
 con20220504b.png [ 249.24 KiB | Viewed 3049 times ]
Attachment:
File comment: Top rails made up, not permanently installed yet
 con20220528f.jpg [ 99.75 KiB | Viewed 3049 times ]
Attachment:
File comment: printed gratings
 con20220601a.jpg [ 123.28 KiB | Viewed 3049 times ]
Attachment:
File comment: Gratings placed in the companionway hatches at the capstan, and the bitts located and glued in place.
 con20220604e.png [ 366.52 KiB | Viewed 3049 times ]
Attachment:
File comment: When the brass square-stock came in, the outboard stuns'l boom irons got installed and painted.
 con20220605d.jpg [ 88.3 KiB | Viewed 3049 times ]
Attachment:
File comment: Yards with stuns'l booms
 con20220605e.jpg [ 203.89 KiB | Viewed 3049 times ]
Attachment:
File comment: Finally got some Olive paint that didn't need a higher credit score to get, and airbrushed the pivot gun carriages
 con20220606b.jpg [ 207.85 KiB | Viewed 3049 times ]
Attachment:
File comment: Using Testors Flat Steel to pick out the gun's iron work
 con20220606c.jpg [ 270.98 KiB | Viewed 3049 times ]
As of the 6th of June...
[attachment=9]con20220503a.png[/attachment]
[attachment=1]con20220504a.png[/attachment]
[attachment=0]con20220504b.png[/attachment]
[attachment=8]con20220528f.jpg[/attachment]
[attachment=7]con20220601a.jpg[/attachment]
[attachment=6]con20220604e.png[/attachment]
[attachment=5]con20220605d.jpg[/attachment]
[attachment=4]con20220605e.jpg[/attachment]
[attachment=3]con20220606b.jpg[/attachment]
[attachment=2]con20220606c.jpg[/attachment]
|
|
|
|
Posted: Mon Jun 06, 2022 6:04 pm |
|
|
|
|
|
| |
Post subject: |
Re: RC Sloop of War Constellation c.1856 |
|
|
increasingly excellent 3-D printed parts; makes all very intricate now! JB increasingly excellent 3-D printed parts; makes all very intricate now!
JB :thumbs_up_1:
|
|
|
|
Posted: Fri May 27, 2022 1:56 am |
|
|
|
|
|
| |
Post subject: |
Re: RC Sloop of War Constellation c.1856 |
|
|
Attachment:
File comment: Redid the skylight again so it'll close better and move the bars into the sash instead of sitting on it
 con20220523a.jpg [ 219.54 KiB | Viewed 3062 times ]
Attachment:
File comment: Made 4 sets of bitts as shown in her 1884 deck plan and earliest photos
 con20220524f.jpg [ 142.12 KiB | Viewed 3062 times ]
Attachment:
File comment: Bitts
 con20220525a.jpg [ 186.87 KiB | Viewed 3062 times ]
Attachment:
File comment: Studding sail irons for the ends of the yards 3D printed
 con20220525d.jpg [ 61.4 KiB | Viewed 3062 times ]
Attachment:
File comment: An idea of where it will live
 con20220526a.jpg [ 99.77 KiB | Viewed 3062 times ]
[attachment=4]con20220523a.jpg[/attachment]
[attachment=3]con20220524f.jpg[/attachment]
[attachment=2]con20220525a.jpg[/attachment]
[attachment=1]con20220525d.jpg[/attachment]
[attachment=0]con20220526a.jpg[/attachment]
|
|
|
|
Posted: Thu May 26, 2022 9:38 pm |
|
|
|
|
|
| |
Post subject: |
Printing till it don't print no more |
|
|
Thank you gents, for your kind words. I always intended to make the hammocks exposed as that's how the ship appears in every painting and most photos. Attachment:
File comment: Same ship, different times
 Constellations.jpg [ 391.68 KiB | Viewed 3124 times ]
The 1856 painting of the ship at Naples is the one I'm basing the model on. I was considering making some hammocks in Skulpty, making a rubber mold from that, and casting them in resin. 3D printing not only gets the end result, but I 3D modeled them hollow to save resin, make them cure better, make them lighter, and the whole thing is cheaper in terms of resin and effort, plus I can easily alter the file if need be. Here's all 200 hammocks mostly in groups of 9. Attachment:
File comment: A battalion of hammocks
 hammocks2.png [ 182.12 KiB | Viewed 3124 times ]
Attachment:
File comment: The hammocks are on "trays" of 9 hammocks each. All hollow to save resin/money and weight.
 con20220420a.jpg [ 291.65 KiB | Viewed 3124 times ]
Attachment:
File comment: About half the hammocks printed, with a quick coat of "canvas" (white with some tan) airbrushed on.
 con20220424b.jpg [ 140.7 KiB | Viewed 3124 times ]
Some of the bullseyes printed before got attached to the bobstays, and put back on the boat with temporary lanyards. Attachment:
File comment: Bobstays with 3D printed bullseyes
 con20220414a.jpg [ 212.04 KiB | Viewed 3124 times ]
I altered the oar model a little and took a shot at printing 45 at once. I didn't leave enough space between them and the supports got fused to the oars in a few places. It's been difficult to dig them out, but I'm managed 27 usable ones so far. Attachment:
File comment: The Borg Cube of oars
 con20220417a.jpg [ 267.89 KiB | Viewed 3124 times ]
I printed a new wheel to replace the too-fragile one I bought, but I liked the wooded pedestal I made for the old one better. So I sawed off the resin pedestals. Now the wheel will spin again, so I'm reverting back to plan A and connecting the ropes to the rudder servo so the wheel will spin when the rudder moves. Attachment:
File comment: Reverting back to the wheel's wooden pedestal
 con20220419c.jpg [ 299.29 KiB | Viewed 3124 times ]
The new skylight sashes and the wheel all got painted. The skylight sashes are glazed with a couple of microscope slides. Attachment:
File comment: Skylight and wheel got painted
 con20220420f.jpg [ 238.01 KiB | Viewed 3124 times ]
Attachment:
File comment: The skylight has a couple of microscope slides for glass and opens for access to the main power switch.
 con20220419g.jpg [ 286.93 KiB | Viewed 3124 times ]
The gun circles (rails on the deck for the pivot guns to slide on) were hand cut from sheet styrene and were too sloppy, too wide, and too thin. I modeled new ones using the 3D model of the gun as a reference for size and proportion. These got printed in one go, but unlike the oars, I left more space between things so the supports would stick to the parts. Attachment:
File comment: New gun circles were modeled using the 3D model for the guns as a reference to make them more accurate; and printed all in one go.
 con20220422a.jpg [ 266.32 KiB | Viewed 3124 times ]
I just replaced the LCD screen on the printed a week or two ago when it went bad. After that I found there was an upgrade for my printer available that would reduce print time by as much as half, so I ordered that. While printing trays of hammocks two at a time (all that will fit on the plate) the vat got a small leak and stuck to the LCD. Before I realized what was happening, I'd torn off the ribbon connector. The upgrade screen hasn't come in yet, so no printing's been happening for a few days. In the meantime I've been working on the 3D model of the 2nd cutter (which stacks on the 1st cutter on the main hatch). If I can get that to work, I can alter the file to also make the two quarter-boats (same boat but a little smaller) and the double-ended stern boat (whale boat). Thank you gents, for your kind words.
I always intended to make the hammocks exposed as that's how the ship appears in every painting and most photos.
[attachment=0]Constellations.jpg[/attachment]
The 1856 painting of the ship at Naples is the one I'm basing the model on.
I was considering making some hammocks in Skulpty, making a rubber mold from that, and casting them in resin. 3D printing not only gets the end result, but I 3D modeled them hollow to save resin, make them cure better, make them lighter, and the whole thing is cheaper in terms of resin and effort, plus I can easily alter the file if need be.
Here's all 200 hammocks mostly in groups of 9.
[attachment=9]hammocks2.png[/attachment] [attachment=3]con20220420a.jpg[/attachment] [attachment=2]con20220424b.jpg[/attachment]
Some of the bullseyes printed before got attached to the bobstays, and put back on the boat with temporary lanyards.
[attachment=8]con20220414a.jpg[/attachment]
I altered the oar model a little and took a shot at printing 45 at once. I didn't leave enough space between them and the supports got fused to the oars in a few places. It's been difficult to dig them out, but I'm managed 27 usable ones so far.
[attachment=7]con20220417a.jpg[/attachment]
I printed a new wheel to replace the too-fragile one I bought, but I liked the wooded pedestal I made for the old one better. So I sawed off the resin pedestals. Now the wheel will spin again, so I'm reverting back to plan A and connecting the ropes to the rudder servo so the wheel will spin when the rudder moves.
[attachment=6]con20220419c.jpg[/attachment]
The new skylight sashes and the wheel all got painted. The skylight sashes are glazed with a couple of microscope slides.
[attachment=5]con20220420f.jpg[/attachment] [attachment=4]con20220419g.jpg[/attachment]
The gun circles (rails on the deck for the pivot guns to slide on) were hand cut from sheet styrene and were too sloppy, too wide, and too thin. I modeled new ones using the 3D model of the gun as a reference for size and proportion. These got printed in one go, but unlike the oars, I left more space between things so the supports would stick to the parts.
[attachment=1]con20220422a.jpg[/attachment]
I just replaced the LCD screen on the printed a week or two ago when it went bad. After that I found there was an upgrade for my printer available that would reduce print time by as much as half, so I ordered that. While printing trays of hammocks two at a time (all that will fit on the plate) the vat got a small leak and stuck to the LCD. Before I realized what was happening, I'd torn off the ribbon connector. The upgrade screen hasn't come in yet, so no printing's been happening for a few days.
In the meantime I've been working on the 3D model of the 2nd cutter (which stacks on the 1st cutter on the main hatch). If I can get that to work, I can alter the file to also make the two quarter-boats (same boat but a little smaller) and the double-ended stern boat (whale boat).
|
|
|
|
Posted: Mon Apr 25, 2022 10:45 pm |
|
|
|
|
|
| |
Post subject: |
Re: RC Sloop of War Constellation c.1856 |
|
|
Great build and beautiful example of perseverance! Great build and beautiful example of perseverance! :thumbs_up_1: :thumbs_up_1:
|
|
|
|
Posted: Mon Apr 25, 2022 12:40 pm |
|
|
|
|
|
| |
Post subject: |
Re: RC Sloop of War Constellation c.1856 |
|
|
 most impressive home printing!!! ship looks very good ! JB :woo_hoo: :thumbs_up_1:
most impressive home printing!!!
ship looks very good !
JB
|
|
|
|
Posted: Mon Apr 11, 2022 1:29 am |
|
|
|
|