| Author |
Message |
|
|
| |
Post subject: |
Re: 1/100 Chaconia LPG carrier |
 |
|
very Impressive Neptune ! it it looks like the real thing JB  very Impressive Neptune !
it it looks like the real thing
JB :thumbs_up_1:
|
|
|
 |
Posted: Fri Apr 18, 2025 2:19 pm |
|
|
 |
|
|
| |
Post subject: |
Re: 1/100 Chaconia LPG carrier |
|
|
|
|
|
|
Posted: Fri Apr 18, 2025 1:36 pm |
|
|
|
|
|
| |
Post subject: |
Re: 1/100 Chaconia LPG carrier |
|
|
Thanks Norberto, still making progress. Mooring fittings were made using several jigs for both length and spacing of all rollers on the roller fairleads. Attachment:
 C236.jpg [ 367.27 KiB | Viewed 807 times ]
And an overview with the mooring fittings installed. Attachment:
 C237.jpg [ 596.26 KiB | Viewed 807 times ]
I also made the fixed gangways for both sides. I will only install those at the end of construction, when I'm doing the ship's side railing. Attachment:
 C240.jpg [ 452.2 KiB | Viewed 807 times ]
And after the last layer of piping, I could finally start on the catwalk over all the piping. These will be the last big pieces to go on. While working on that aft piece of catwalk I also decided to go for the final run of detailing in the areas where I'm installing the catwalk. So I'll be going aft to forward and add all details, which will not be obviously in my way for any further work. Last thing will then be the ship's side railings. Still a long way to go, but at least it looks like I'm getting somewhere and much faster than I ever expected when I suspended work on this model that many years ago. Attachment:
 C257.jpg [ 508.49 KiB | Viewed 807 times ]
Attachment:
 C260.jpg [ 467.88 KiB | Viewed 807 times ]
Thanks Norberto,
still making progress.
Mooring fittings were made using several jigs for both length and spacing of all rollers on the roller fairleads.
[attachment=4]C236.jpg[/attachment]
And an overview with the mooring fittings installed.
[attachment=3]C237.jpg[/attachment]
I also made the fixed gangways for both sides. I will only install those at the end of construction, when I'm doing the ship's side railing.
[attachment=2]C240.jpg[/attachment]
And after the last layer of piping, I could finally start on the catwalk over all the piping. These will be the last big pieces to go on. While working on that aft piece of catwalk I also decided to go for the final run of detailing in the areas where I'm installing the catwalk. So I'll be going aft to forward and add all details, which will not be obviously in my way for any further work. Last thing will then be the ship's side railings. Still a long way to go, but at least it looks like I'm getting somewhere and much faster than I ever expected when I suspended work on this model that many years ago.
[attachment=1]C257.jpg[/attachment]
[attachment=0]C260.jpg[/attachment]
|
|
|
|
Posted: Wed Nov 06, 2024 1:47 pm |
|
|
|
|
|
| |
Post subject: |
Re: 1/100 Chaconia LPG carrier |
|
|
super detailed model, a marvel  super detailed model, a marvel :smallsmile:
|
|
|
|
Posted: Tue Sep 10, 2024 7:26 am |
|
|
|
|
|
| |
Post subject: |
Re: 1/100 Chaconia LPG carrier |
|
|
|
|
|
|
Posted: Thu Aug 22, 2024 2:24 pm |
|
|
|
|
|
| |
Post subject: |
Re: 1/100 Chaconia LPG carrier |
|
|
|
|
|
|
Posted: Sun Jun 16, 2024 3:30 pm |
|
|
|
|
|
| |
Post subject: |
Re: 1/100 Chaconia LPG carrier |
|
|
|
|
|
|
Posted: Sun Mar 31, 2024 5:51 pm |
|
|
|
|
|
| |
Post subject: |
Re: 1/100 Chaconia LPG carrier |
|
|
So, here we go. First started the warm-up by adding some valve actuators on tank 3. I finished those on Tank 1, so I had a good example of what I needed to do. Attachment:
 C147.jpg [ 280.8 KiB | Viewed 1128 times ]
And then on to the real work, the cargo booster pumps and heater. Attachment:
 C148.jpg [ 283.72 KiB | Viewed 1128 times ]
Attachment:
 C151.jpg [ 310.88 KiB | Viewed 1128 times ]
And in the meanwhile I continued on the main hose handling crane, midships. I had already done some work on the aft crane somewhere last year, but that one still is not painted. The main crane is now in primer (used to be white primer, but somehow turned brown inside the can...) In any case, good enough to get rid of any contrasts, since those are difficult to get rid of underneath a white coat. Attachment:
 C150.jpg [ 182.63 KiB | Viewed 1128 times ]
Attachment:
 C152.jpg [ 250.91 KiB | Viewed 1128 times ]
So, here we go.
First started the warm-up by adding some valve actuators on tank 3. I finished those on Tank 1, so I had a good example of what I needed to do.
[attachment=4]C147.jpg[/attachment]
And then on to the real work, the cargo booster pumps and heater.
[attachment=3]C148.jpg[/attachment]
[attachment=2]C151.jpg[/attachment]
And in the meanwhile I continued on the main hose handling crane, midships. I had already done some work on the aft crane somewhere last year, but that one still is not painted.
The main crane is now in primer (used to be white primer, but somehow turned brown inside the can...) In any case, good enough to get rid of any contrasts, since those are difficult to get rid of underneath a white coat.
[attachment=1]C150.jpg[/attachment]
[attachment=0]C152.jpg[/attachment]
|
|
|
|
Posted: Tue Feb 20, 2024 2:49 pm |
|
|
|
|
|
| |
Post subject: |
Re: 1/100 Chaconia LPG carrier |
|
|
|
I have now finally restarted this build in earnest.
Main issue has been two-fold: I needed to do more research for certain areas. Each time I figured out how to build it, my time ran out...
Secondly, the cargo heater area was a serious road block. It didn't leave much open ends, where I could adjust lengths for the piping. I was affraid to tackle that, but it needed to be done before I could advance with the rest of the cargo system.
I finally found a way to do the research and make plans of it. Then I decided to tackle the road block head-on.
Due to the impossible-to-oversee amount of work, I'm forcing myself to build at least 2 parts each day (time permitting). It looks like a task without end, but it guarantees progress, which is better than nothing.
I'm having issues uploading images to the forum, as soon as I sort those out, I'll be back with new pictures.
|
|
|
|
Posted: Mon Feb 19, 2024 11:09 am |
|
|
|
|
|
| |
Post subject: |
Re: 1/100 Chaconia LPG carrier |
|
|
|
Lovely build. And HUGE!
Lovely build. And HUGE!
|
|
|
|
Posted: Mon May 18, 2020 6:52 am |
|
|
|
|
|
| |
Post subject: |
Re: 1/100 Chaconia LPG carrier |
|
|
After completing the TI Europe in 1/700, I decided to continue (and finish?!) this build. She's taking up a lot of place and would look nice when finished. Kind of forgot why I stopped this build, so I guess the interruption was long enough  During the Europe build I added a couple of parts on deck, but due to some construction work in the workshop I can't work on the hull right now. So decided to tackle and finish the accomodation block first. I started the railing a couple of years back on places where it was required, so now I continued with the railing and finally tackled some parts that I wasn't too keen on before: The magnetic compass and gyro compass repeaters on the bridge wings. The magnetic compass is just a rough shape as she'll be covered in canvas later on (I think I'll use alu foil for that). The gyro repeaters need some small detailing, but look ok for now, turned them on the lathe. I'll try to update the older pics from the photobucket account as well in the near future.
| Attachments: |
File comment: Magnetic compass in position on the top centre. The platform still needs railing as well.

C1.jpg [ 194.08 KiB | Viewed 1910 times ]
|
File comment: Gyro repeaters dry fitted. Mr. pilot is checking the heading, used that one to evaluate the height of the repeater.

C2.jpg [ 200.73 KiB | Viewed 1910 times ]
|
After completing the TI Europe in 1/700, I decided to continue (and finish?!) this build. She's taking up a lot of place and would look nice when finished.
Kind of forgot why I stopped this build, so I guess the interruption was long enough :big_grin:
During the Europe build I added a couple of parts on deck, but due to some construction work in the workshop I can't work on the hull right now.
So decided to tackle and finish the accomodation block first. I started the railing a couple of years back on places where it was required, so now I continued with the railing and finally tackled some parts that I wasn't too keen on before: The magnetic compass and gyro compass repeaters on the bridge wings.
The magnetic compass is just a rough shape as she'll be covered in canvas later on (I think I'll use alu foil for that).
The gyro repeaters need some small detailing, but look ok for now, turned them on the lathe.
I'll try to update the older pics from the photobucket account as well in the near future.
|
|
|
|
Posted: Mon May 18, 2020 6:33 am |
|
|
|
|
|
| |
Post subject: |
Re: 1/100 Chaconia LPG carrier |
|
|
the model sails very well in the water. very good Roel the model sails very well in the water.
very good Roel :thumbs_up_1:
|
|
|
|
Posted: Fri Sep 16, 2016 7:37 am |
|
|
|
|
|
| |
Post subject: |
Re: 1/100 Chaconia LPG carrier |
|
|
Quite a while since the last post. Of course the tug got priority. Not sure if I'm going to continue this build, but at least I took the chance to take the ship out to the water recently. Together with the kid I tested it on a relatively new pond that serves as a fire extinguishing water reserve for an industrial area. Excellent pond for sailing due to its stepped and reinforced sides. Only disadvantage was a lot of floating plants, but it didn't really hamper the sailing. And full speed trial. Attachment:
 C4.jpg [ 383.84 KiB | Viewed 1909 times ]
Attachment:
 C5.jpg [ 299.14 KiB | Viewed 1909 times ]
Attachment:
 C3.jpg [ 383 KiB | Viewed 1909 times ]
Now she's back on the table. Not sure what I'll do with it. I'm finishing the tug and then I'd quite modelling completely. On the other hand it would be a pitty to leave this one at this stage. She's pretty far advanced, but still requires quite a lot of work as well. We'll see, at least it's fun sailing. Quite a while since the last post. Of course the tug got priority. Not sure if I'm going to continue this build, but at least I took the chance to take the ship out to the water recently. Together with the kid I tested it on a relatively new pond that serves as a fire extinguishing water reserve for an industrial area. Excellent pond for sailing due to its stepped and reinforced sides. Only disadvantage was a lot of floating plants, but it didn't really hamper the sailing.
And full speed trial.
[attachment=2]C4.jpg[/attachment]
[attachment=1]C5.jpg[/attachment]
[attachment=0]C3.jpg[/attachment]
Now she's back on the table. Not sure what I'll do with it. I'm finishing the tug and then I'd quite modelling completely. On the other hand it would be a pitty to leave this one at this stage. She's pretty far advanced, but still requires quite a lot of work as well. We'll see, at least it's fun sailing.
|
|
|
|
Posted: Fri Sep 16, 2016 2:24 am |
|
|
|
|
|
| |
Post subject: |
Re: 1/100 Chaconia LPG carrier |
|
|
i have no words to say. this model is absolutely fantastic. good construction and good painting job. as said Dave: top noch work  i have no words to say.
this model is absolutely fantastic.
good construction and good painting job.
as said Dave: top noch work :woo_hoo:
|
|
|
|
Posted: Tue Aug 25, 2015 7:36 am |
|
|
|
|
|
| |
Post subject: |
Re: 1/100 Chaconia LPG carrier |
|
|
|
Hi Roel this is top notch work , clean and sharp finishing and your Chaconia looks just superb out on the water as well as on the bench . An interesting subject with lots of scope for detail which you have crafted well . :thumbs_up_1: :thumbs_up_1: :thumbs_up_1: :thumbs_up_1: :wave_1:
Dave Wooley
|
|
|
|
Posted: Sat Aug 22, 2015 6:27 am |
|
|
|
|
|
| |
Post subject: |
Re: 1/100 Chaconia LPG carrier |
|
|
Made some more progress. First a sea trial with the one lifeboat installed to make sure it would hold during sailing before installing the next boat. 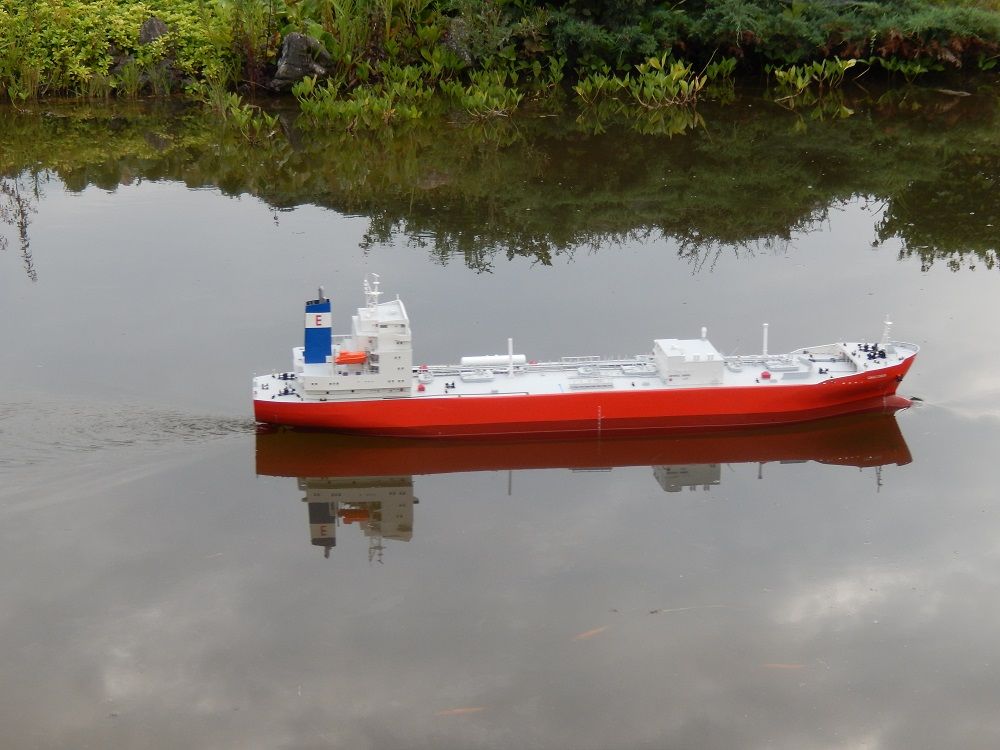 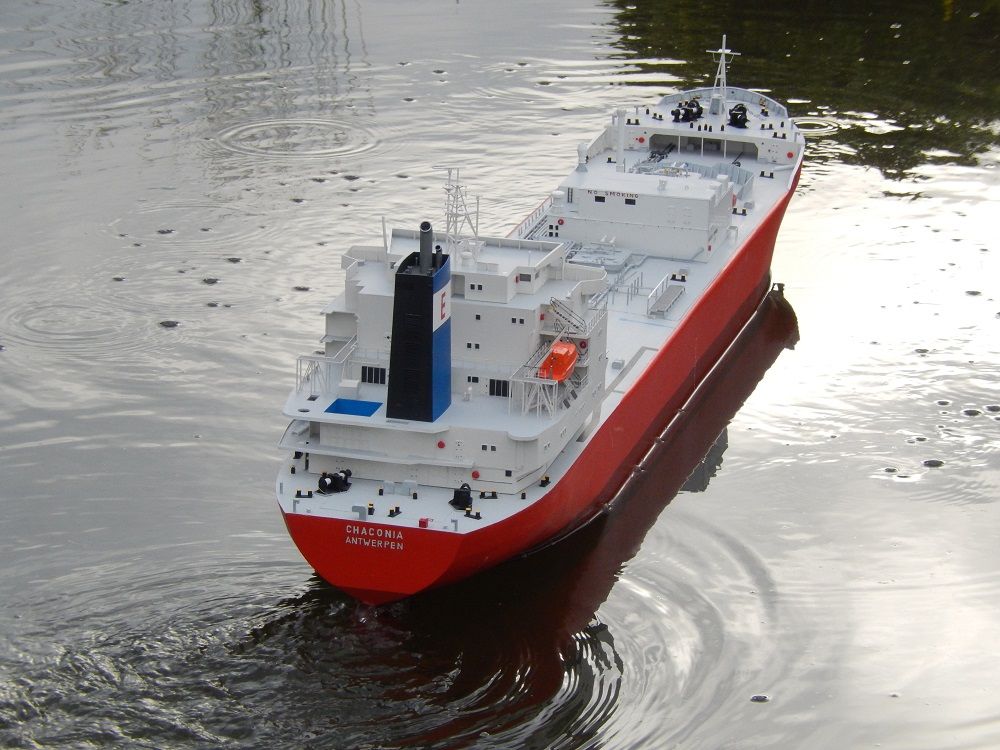 And then the second boat was installed. I was continuing with the railing and liferafts when I discovered somebody came to the idea of painting the deck area around the liferafts red, so I did that too. I like some extra colour, although this one in particular does not really improve the aesthetic appearance... 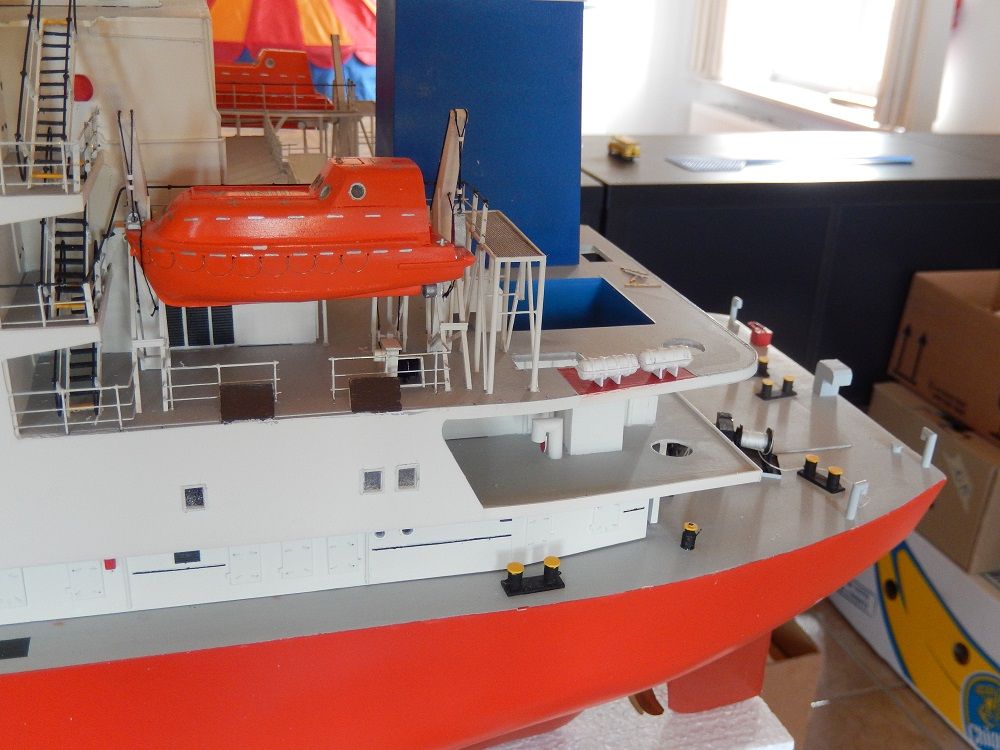 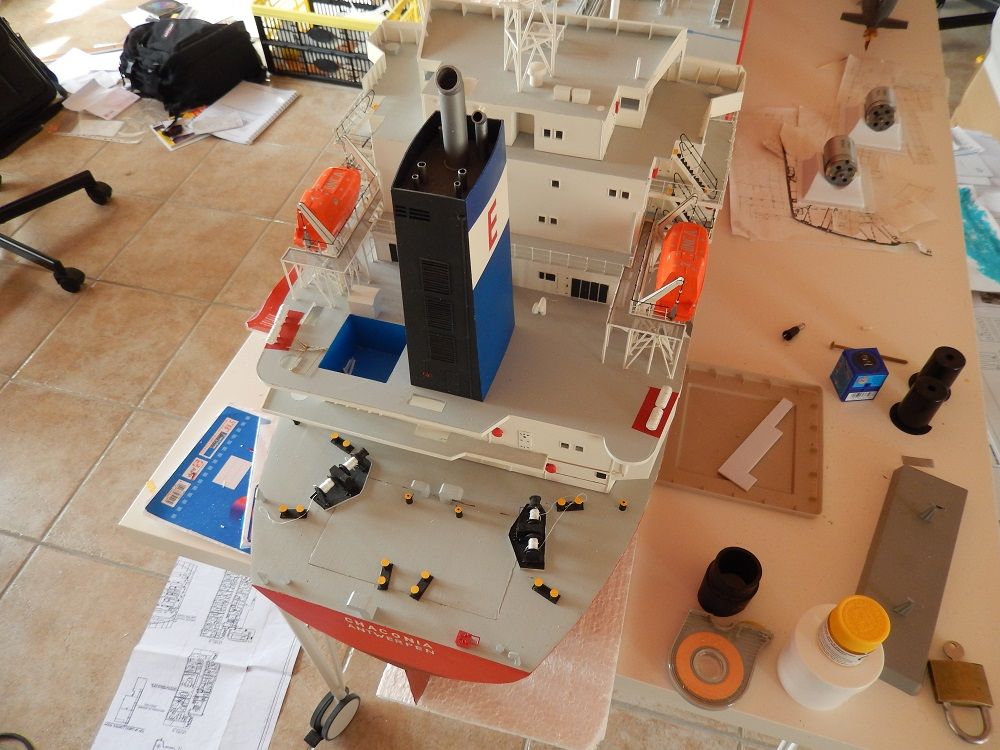 I think I'll get back to the deck area for a while before continuing the railing job on the accomodation. Made some more progress.
First a sea trial with the one lifeboat installed to make sure it would hold during sailing before installing the next boat.
[url=http://s894.photobucket.com/user/Sevmash/media/Chaconia/cov_zps4xdvgzvx.jpg.html][img]http://i894.photobucket.com/albums/ac145/Sevmash/Chaconia/cov_zps4xdvgzvx.jpg[/img][/url]
[url=http://s894.photobucket.com/user/Sevmash/media/Chaconia/LBChac_zpszkwnewp9.jpg.html][img]http://i894.photobucket.com/albums/ac145/Sevmash/Chaconia/LBChac_zpszkwnewp9.jpg[/img][/url]
And then the second boat was installed. I was continuing with the railing and liferafts when I discovered somebody came to the idea of painting the deck area around the liferafts red, so I did that too. I like some extra colour, although this one in particular does not really improve the aesthetic appearance...
[url=http://s894.photobucket.com/user/Sevmash/media/Chaconia/LRChac_zpshr72s0iw.jpg.html][img]http://i894.photobucket.com/albums/ac145/Sevmash/Chaconia/LRChac_zpshr72s0iw.jpg[/img][/url]
[url=http://s894.photobucket.com/user/Sevmash/media/Chaconia/LRChac2_zpsld7nribg.jpg.html][img]http://i894.photobucket.com/albums/ac145/Sevmash/Chaconia/LRChac2_zpsld7nribg.jpg[/img][/url]
I think I'll get back to the deck area for a while before continuing the railing job on the accomodation.
|
|
|
|
Posted: Sat Aug 22, 2015 5:57 am |
|
|
|
|
|
| |
Post subject: |
Re: 1/100 Chaconia LPG carrier |
|
|
|
|
|
|
|
| |
Post subject: |
Re: 1/100 Chaconia LPG carrier |
|
|
Thanks for the compliments. Thought an update was in place, so here it is. It shows most of the work that was done the last couple of months (on this ship at least  ) Practically I had to first put the railing and stairs on around the lifeboats before I could install the boats. At first I ordered some Dean's Marine stairs, but they were too wide and the brass was too thick to modify them. So I modified my jig to resemble Capt Haddock's and created the stairs that way. The railings on the stairs are heavily modified Dean's Marine railings and the rest of the railings are Dean's as well. Quite strong brass, easy to install and looks good. The last couple of weeks I've been testing things for the davits and finally finished the lifeboats (propulsion nozzle and grablines were remaining). For the grablines I tested a jig to make them in one turn, but actually a method with each bow seperate was working better. I wound 0.1mm brass wire (from a telephone cable) around a brass tube with a suitable diameter. Then I cut small circles from this "spring". After that I bent one end at a 90° angle to fit inside the hole in the lifeboat. I held the other end with a tweezer and like this I could vary the curve of the bow to all be more or less at same height. Once correct curve was visible, I adjusted the length on the other side to hold it just below the next hole and bent the remaining part of the wire to fit inside the hole. This relatively easy procedure was repeated for each curve. They aren't 100% equal in shape, but in reality they look much worse Here is the tube with the wire and some pre-cut circles. And a pencil for scale: Attachment:
 C4.jpg [ 195.44 KiB | Viewed 1332 times ]
And the boat more or less in place. The davit with boat was test-fitted with weights holding the cables on my workbench. Once at correct height, the cables were glued on each wheel to hold it. Once the weights were removed the davits could stand by themselves wiht the boat attached. So in these pictures the whole unit is dry-fitted and will be removed again to finish the final supports, railings and lifeboat winch before final installation. Attachment:
 C3.jpg [ 269.65 KiB | Viewed 1332 times ]
Attachment:
 C2.jpg [ 331.36 KiB | Viewed 1332 times ]
Attachment:
 C1.jpg [ 283.17 KiB | Viewed 1332 times ]
I guess my next sea trial will be with this 1 boat just to make sure it stays onboard and see if I need any addition reinforcements before starting the next boat installation. Thanks for the compliments. Thought an update was in place, so here it is. It shows most of the work that was done the last couple of months (on this ship at least :heh: )
Practically I had to first put the railing and stairs on around the lifeboats before I could install the boats. At first I ordered some Dean's Marine stairs, but they were too wide and the brass was too thick to modify them. So I modified my jig to resemble Capt Haddock's and created the stairs that way. The railings on the stairs are heavily modified Dean's Marine railings and the rest of the railings are Dean's as well. Quite strong brass, easy to install and looks good.
The last couple of weeks I've been testing things for the davits and finally finished the lifeboats (propulsion nozzle and grablines were remaining).
For the grablines I tested a jig to make them in one turn, but actually a method with each bow seperate was working better.
I wound 0.1mm brass wire (from a telephone cable) around a brass tube with a suitable diameter. Then I cut small circles from this "spring". After that I bent one end at a 90° angle to fit inside the hole in the lifeboat. I held the other end with a tweezer and like this I could vary the curve of the bow to all be more or less at same height. Once correct curve was visible, I adjusted the length on the other side to hold it just below the next hole and bent the remaining part of the wire to fit inside the hole. This relatively easy procedure was repeated for each curve. They aren't 100% equal in shape, but in reality they look much worse :big_grin:
Here is the tube with the wire and some pre-cut circles. And a pencil for scale:
[attachment=0]C4.jpg[/attachment]
And the boat more or less in place. The davit with boat was test-fitted with weights holding the cables on my workbench. Once at correct height, the cables were glued on each wheel to hold it. Once the weights were removed the davits could stand by themselves wiht the boat attached. So in these pictures the whole unit is dry-fitted and will be removed again to finish the final supports, railings and lifeboat winch before final installation.
[attachment=1]C3.jpg[/attachment]
[attachment=2]C2.jpg[/attachment]
[attachment=3]C1.jpg[/attachment]
I guess my next sea trial will be with this 1 boat just to make sure it stays onboard and see if I need any addition reinforcements before starting the next boat installation.
|
|
|
|
Posted: Fri May 29, 2015 8:19 am |
|
|
|
|
|
| |
Post subject: |
Re: 1/100 Chaconia LPG carrier |
|
|
Beautiful work Beautiful work :thumbs_up_1:
|
|
|
|
Posted: Thu May 28, 2015 3:01 am |
|
|
|
|
|
| |
Post subject: |
Re: 1/100 Chaconia LPG carrier |
|
|
|
Just found this thread. Astonishing! Really great work.
Just found this thread. Astonishing! Really great work.
|
|
|
|
Posted: Wed May 27, 2015 5:39 pm |
|
|
|


