| Author |
Message |
|
|
| |
Post subject: |
Re: 1/350 Trumpeter Admiral Chabanenko |
 |
|
Part 46 I have finally gotten to the last update. This has taken a lot longer than I expected. I took some time off from work for the holidays and figured this would be a quick finish. Unfortunately, I started feeling sick on my first day off and have been sick since. Currently, my thinking and eyesight are both a little fuzzy, but I got this done anyway. I've added a small hose reel near the front of the superstructure. There seems to only be one on the right side of the ship. I ended up dropping it on the floor 5 times before I managed to get it glued down. 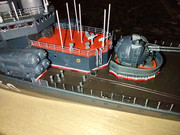 The turret is now complete. As planned, it only took a little forward leaning pressure to remove the white holding rod from the center of the turret. All of the construction went smoothly until I got to the very last part, which for me, was the water hose etch that crosses over the top of the left barrel. I dropped and lost too many of them, so I don't have any of them left for the second turret. This keeps me at never getting more than one of these built out of a box set of two. 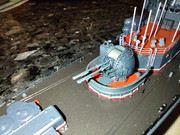 The forward railings are done. Although I did take a couple little shortcuts by leaving off the small forward platform above the anchors, and the rear end of the forward railing should have been angled inwards and attached to the front outer corner of the primary missile launcher, instead of just being next to it like the railing at the rear of the launcher 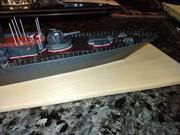 Lastly, just a couple completed pics showing the difference in color, depending on lighting.   Thanks for looking. Happy Holidays to everybody. Dan. Part 46
I have finally gotten to the last update. This has taken a lot longer than I expected. I took some time off from work for the holidays and figured this would be a quick finish. Unfortunately, I started feeling sick on my first day off and have been sick since. Currently, my thinking and eyesight are both a little fuzzy, but I got this done anyway.
I've added a small hose reel near the front of the superstructure. There seems to only be one on the right side of the ship. I ended up dropping it on the floor 5 times before I managed to get it glued down.
[url=https://postimg.cc/8f4mZMSC][img]https://i.postimg.cc/8f4mZMSC/IMG-20221228-121717829.jpg[/img][/url]
The turret is now complete. As planned, it only took a little forward leaning pressure to remove the white holding rod from the center of the turret. All of the construction went smoothly until I got to the very last part, which for me, was the water hose etch that crosses over the top of the left barrel. I dropped and lost too many of them, so I don't have any of them left for the second turret. This keeps me at never getting more than one of these built out of a box set of two.
[url=https://postimg.cc/q6GNfHjJ][img]https://i.postimg.cc/q6GNfHjJ/IMG-20221228-121808447.jpg[/img][/url]
The forward railings are done. Although I did take a couple little shortcuts by leaving off the small forward platform above the anchors, and the rear end of the forward railing should have been angled inwards and attached to the front outer corner of the primary missile launcher, instead of just being next to it like the railing at the rear of the launcher
[url=https://postimg.cc/ZW3qBD9F][img]https://i.postimg.cc/ZW3qBD9F/IMG-20221228-121848628.jpg[/img][/url]
Lastly, just a couple completed pics showing the difference in color, depending on lighting.
[url=https://postimg.cc/Tyd6N09n][img]https://i.postimg.cc/Tyd6N09n/IMG-20221228-121920595-HDR-2.jpg[/img][/url]
[url=https://postimg.cc/HJJsp3qX][img]https://i.postimg.cc/HJJsp3qX/IMG-20221228-121928108-2.jpg[/img][/url]
Thanks for looking. Happy Holidays to everybody.
Dan.
|
|
|
 |
Posted: Wed Dec 28, 2022 4:11 pm |
|
|
 |
|
|
| |
Post subject: |
Re: 1/350 Trumpeter Admiral Chabanenko |
|
|
|
Vad 26 - Ok. So, I misunderstood your original post. My entire statement is now wrong. It's nice to know how to say it right. That's what I get for trying to create a spelling based on a talking computer.
Model wise, I only have to attach one more piece. I don't plan to do the seascape right now. So the next update will be the last one for this project. And I'll call it done. After that a moderator can go ahead and move this into the completed section.
I don't know if I will post my next project. I don't see much interest in the Sachsen class around the internet.
Dan
|
|
|
|
Posted: Mon Dec 26, 2022 9:38 pm |
|
|
|
|
|
| |
Post subject: |
Re: 1/350 Trumpeter Admiral Chabanenko |
|
|
I must have spelled it wrong, sorry. Auto-translation))) "Chabanenko" is translated quite correctly (for sound)). Incorrect IMAGE of letters. Instead of the correct Russian letter "H" - a mirror ENGLISH letter "N". As a result, it turns out "Chabaieiko" .... And the letters "I" and "E" are almost the same. Even the stylization of modern Russian letters under the old spelling (a tradition for Russian warships) does not really mask errors))) Trumpeter sometimes knows how to "surprise"... 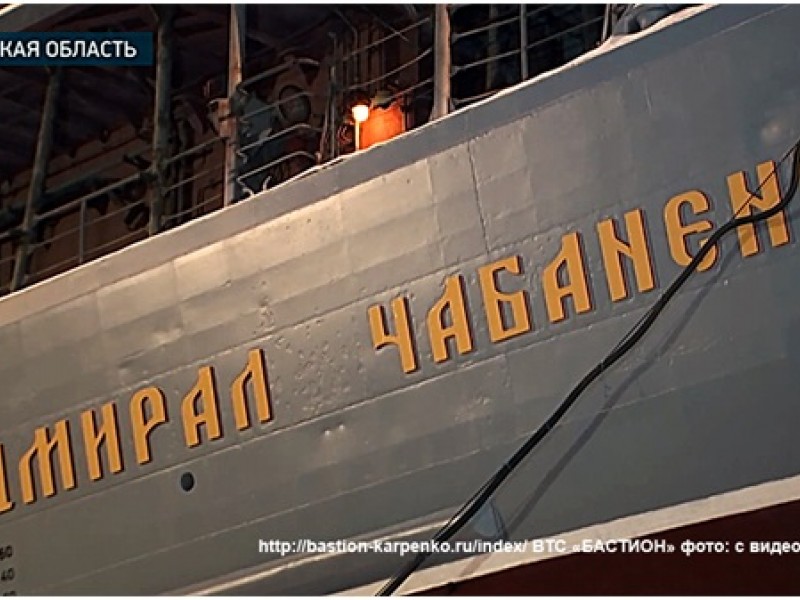 I must have spelled it wrong, sorry. Auto-translation))) "Chabanenko" is translated quite correctly (for sound)). Incorrect IMAGE of letters. Instead of the correct Russian letter "H" - a mirror ENGLISH letter "N". As a result, it turns out "Chabaieiko" .... And the letters "I" and "E" are almost the same. Even the stylization of modern Russian letters under the old spelling (a tradition for Russian warships) does not really mask errors))) Trumpeter sometimes knows how to "surprise"...
[img]http://kolanews.ru/site-specific/iskkra/upload/%D0%B7%D0%BE%D0%BB%D0%BE%D1%82%D0%B0%D1%8F%20%D0%BE%D1%81%D0%B5%D0%BD%D1%8C/10024-article-wide-preview.jpg?0=1[/img]
|
|
|
|
Posted: Mon Dec 26, 2022 12:06 pm |
|
|
|
|
|
| |
Post subject: |
Re: 1/350 Trumpeter Admiral Chabanenko |
|
|
Hi guys, Vad26 - Yeah sometimes there are words or sounds that just can't be translated properly from one language to another. I've listened to google trying to pronounce both versions of the name and they do sound different. If I had to make a guess, I'd probably spell it as Admiral Chevineyenke in English to try to pronounce it closer to Cheh-vine-yen-keh. But, I'm probably still way off and even if I did spell it like that, nobody would know what I'm talking about. So Chabanenko it is. Timmy C - Thanks. This time I drilled out/deepened every hole in the turret. And started with PE rung #3, which is actually the 4th rung up from the bottom. It's a good one to start with. It pretty much sticks straight out and hangs straight down. The rest of them are positioned relative to that first one. As a reference point, here is the "best" of my failed attempts.   Thanks for looking. Dan Hi guys,
Vad26 - Yeah sometimes there are words or sounds that just can't be translated properly from one language to another. I've listened to google trying to pronounce both versions of the name and they do sound different. If I had to make a guess, I'd probably spell it as Admiral Chevineyenke in English to try to pronounce it closer to Cheh-vine-yen-keh. But, I'm probably still way off and even if I did spell it like that, nobody would know what I'm talking about. So Chabanenko it is.
Timmy C - Thanks. This time I drilled out/deepened every hole in the turret. And started with PE rung #3, which is actually the 4th rung up from the bottom. It's a good one to start with. It pretty much sticks straight out and hangs straight down. The rest of them are positioned relative to that first one.
As a reference point, here is the "best" of my failed attempts.
[url=https://postimg.cc/ppYtdCj4][img]https://i.postimg.cc/ppYtdCj4/IMG-20221222-152250331.jpg[/img][/url]
[url=https://postimg.cc/pmw7YnKz][img]https://i.postimg.cc/pmw7YnKz/IMG-20221222-152333523.jpg[/img][/url]
Thanks for looking.
Dan
|
|
|
|
Posted: Thu Dec 22, 2022 6:52 pm |
|
|
|
|
|
| |
Post subject: |
Re: 1/350 Trumpeter Admiral Chabanenko |
|
|
|
Those ladder rungs look perfect, Dan! Well done.
Those ladder rungs look perfect, Dan! Well done.
|
|
|
|
Posted: Tue Dec 20, 2022 4:47 pm |
|
|
|
|
|
| |
Post subject: |
Re: 1/350 Trumpeter Admiral Chabanenko |
|
|
|
This is not your fault, but THREE letters in the name of the ship are incorrect. I say this as a Russian-speaking person. These ones: Admiral Chabanenko
This is not your fault, but THREE letters in the name of the ship are incorrect. I say this as a Russian-speaking person. These ones: Admiral Cha[color=#FF0000]b[/color]a[color=#FF0000]n[/color]e[color=#FF0000]n[/color]ko
|
|
|
|
Posted: Tue Dec 20, 2022 9:01 am |
|
|
|
|
|
| |
Post subject: |
Re: 1/350 Trumpeter Admiral Chabanenko |
|
|
Part 45 The experience I got from my previous failures, combined with having the right tools, has resulted in me finally building one of these turrets successfully. I thinks it's actually some of the best etch results I've had. 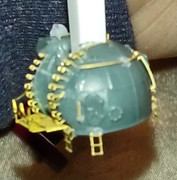 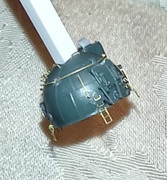 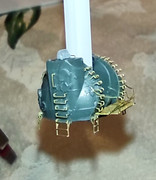 I used a hot glue gun and added the white post. My plan is to paint the turret and then glue it in place. After that, the white post should come right off with just a little pressure. Then I'll deal with the barrels. Thanks for looking. Dan Part 45
The experience I got from my previous failures, combined with having the right tools, has resulted in me finally building one of these turrets successfully. I thinks it's actually some of the best etch results I've had.
[url=https://postimg.cc/dkk1x0LN][img]https://i.postimg.cc/dkk1x0LN/IMG-20221211-165431473-2.jpg[/img][/url]
[url=https://postimg.cc/xNLd9FGK][img]https://i.postimg.cc/xNLd9FGK/IMG-20221211-170014240-2.jpg[/img][/url]
[url=https://postimg.cc/dDC3RLML][img]https://i.postimg.cc/dDC3RLML/IMG-20221211-165416358-2.jpg[/img][/url]
I used a hot glue gun and added the white post. My plan is to paint the turret and then glue it in place. After that, the white post should come right off with just a little pressure. Then I'll deal with the barrels.
Thanks for looking.
Dan
|
|
|
|
Posted: Mon Dec 19, 2022 12:29 am |
|
|
|
|
|
| |
Post subject: |
Re: 1/350 Trumpeter Admiral Chabanenko |
|
|
Part 44 Chabanenko has a simple safety rail running around its landing pad, just railing with 5 horizontal bars. No mesh or netting at all. As far as I know, nobody makes any railings with more than 5 bars. I normally try to paint the lowest bar in either deck or hull color. The result makes it look like posts and 4 rails. Since Chabanenko needs all 5 rails, my first thought was to paint them all white and just glue them down. The upper corners of each railing segment needs to be rounded off, so my second thought was to cut a little off of each upper corner to appear sort of rounded off. As it turns out, while looking through my spare etch, the GMM etch set for Kuznetsov includes the exact railing that I need. It runs up along the sides of Kuznetsov's ski jump ramp. All vertical sections and horizontal bars 1,3,and 5 are supposed to be thicker than horizontal bars 2 and 4. After priming and then spraying white over everything, I went back and put 3 or 4 more coats of brushed on white over the areas that needed to be thicker. Unfortunately, I don't really see any difference in their appearance. 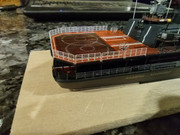 The railings come in segments that are 4 sections long and two pieces that are only two segments long. For the back, I did an initial pattern of a 4 segment then a 2 segment and then another 4 segment. The gaps that were left over seemed too wide to me. So I redid it. I used both of the supplied 2 segment parts in the middle and then cut apart a pair of 4 segment pieces and glued them together to form 3 segment sections. The new pattern of 3,2,2,3 gave me 4 pieces to glue down instead of 3 so I was able to space out the gaps a little better I think.  Now it is time to finally do the main deck gun. I prefer the large size of the Trumpeter turret, but it lacks most of the sharp details provided by the aftermarket turrets. The Veteran Models turret has a lot of etch and is slightly smaller than the Trumpeter turret. I will be using it. The turret in this photo is a 3d printed turret I purchased from Hobbyeasy. It is the smallest of the 3 turrets and although the 3d render looks great, the actual part has too many small print supports to remove, and is beyond my ability to clean up. I broke off a lot of the small hand holds, and the large hand holds are nothing more than raised lumps and not separate from the main body at all. So I wont be using it either. It also seems under sized to me.  Thanks for looking. Dan Part 44
Chabanenko has a simple safety rail running around its landing pad, just railing with 5 horizontal bars. No mesh or netting at all. As far as I know, nobody makes any railings with more than 5 bars.
I normally try to paint the lowest bar in either deck or hull color. The result makes it look like posts and 4 rails. Since Chabanenko needs all 5 rails, my first thought was to paint them all white and just glue them down. The upper corners of each railing segment needs to be rounded off, so my second thought was to cut a little off of each upper corner to appear sort of rounded off.
As it turns out, while looking through my spare etch, the GMM etch set for Kuznetsov includes the exact railing that I need. It runs up along the sides of Kuznetsov's ski jump ramp.
All vertical sections and horizontal bars 1,3,and 5 are supposed to be thicker than horizontal bars 2 and 4. After priming and then spraying white over everything, I went back and put 3 or 4 more coats of brushed on white over the areas that needed to be thicker. Unfortunately, I don't really see any difference in their appearance.
[url=https://postimg.cc/Hjhc2GTq][img]https://i.postimg.cc/Hjhc2GTq/IMG-20221204-125444574-HDR.jpg[/img][/url]
The railings come in segments that are 4 sections long and two pieces that are only two segments long. For the back, I did an initial pattern of a 4 segment then a 2 segment and then another 4 segment. The gaps that were left over seemed too wide to me. So I redid it. I used both of the supplied 2 segment parts in the middle and then cut apart a pair of 4 segment pieces and glued them together to form 3 segment sections. The new pattern of 3,2,2,3 gave me 4 pieces to glue down instead of 3 so I was able to space out the gaps a little better I think.
[url=https://postimg.cc/2LB3XwYQ][img]https://i.postimg.cc/2LB3XwYQ/IMG-20221204-125519331-HDR.jpg[/img][/url]
Now it is time to finally do the main deck gun. I prefer the large size of the Trumpeter turret, but it lacks most of the sharp details provided by the aftermarket turrets. The Veteran Models turret has a lot of etch and is slightly smaller than the Trumpeter turret. I will be using it. The turret in this photo is a 3d printed turret I purchased from Hobbyeasy. It is the smallest of the 3 turrets and although the 3d render looks great, the actual part has too many small print supports to remove, and is beyond my ability to clean up. I broke off a lot of the small hand holds, and the large hand holds are nothing more than raised lumps and not separate from the main body at all. So I wont be using it either. It also seems under sized to me.
[url=https://postimg.cc/rdQjNSqy][img]https://i.postimg.cc/rdQjNSqy/IMG-20221204-125547547-HDR.jpg[/img][/url]
Thanks for looking.
Dan
|
|
|
|
Posted: Mon Dec 05, 2022 2:09 pm |
|
|
|
|
|
| |
Post subject: |
Re: 1/350 Trumpeter Admiral Chabanenko |
|
|
Part 43 I guess my current batch of progress can be summed up as compromise. I now have the rear 2/3 of the main deck railings done. I just used sections of generic etch parts so there aren't any of the special style of openings that would be seen on the real ship. I've painted a few areas black to either represent sections that would be cable, or to give the appearance of no railing being there at all.  I reworked the staircases and their railings. The two on the forward stack still aren't the same angle, but they are better and their railings are less obstructive, so I'm calling them good enough.   I thought I had finally figured out a way to build a nice and clean version of the cage style antenna. I glued the 6 strands of line in place, but found out that even with the magnifying glasses, I still couldn't see good enough to insert the etch rings. So, no rings. The 6 strands clumped together look like a single strand as thick as a mast corner post, so I went back and cut 4 of the strands off. So the rigging ( probably not visible in these pics) will only be 2 strands between the two masts and down to the base of the double staircase area. Last for this time, is the ships boats. I painted the lower hulls red for the left ship and green for the right ship, as can be seen on Udaloy class ships some times. But I didn't like how the upper hull painting was turning out, so I ended up doing the tarp cover on them like I had done on the Rhib boat behind the rear stack. 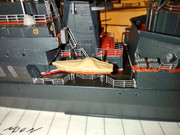  The next update should be the last of the rear railings and the custom shaped safety rails around the landing pad. It'll be Kuznetsov etch to the rescue again. There wont be the correct number of segments or the right segment lengths in some cases, but it'll basically look correct. Thanks for looking. Dan Part 43
I guess my current batch of progress can be summed up as compromise.
I now have the rear 2/3 of the main deck railings done. I just used sections of generic etch parts so there aren't any of the special style of openings that would be seen on the real ship. I've painted a few areas black to either represent sections that would be cable, or to give the appearance of no railing being there at all.
[url=https://postimg.cc/Tp0vcr3H][img]https://i.postimg.cc/Tp0vcr3H/IMG-20221121-091209383.jpg[/img][/url]
I reworked the staircases and their railings. The two on the forward stack still aren't the same angle, but they are better and their railings are less obstructive, so I'm calling them good enough.
[url=https://postimg.cc/xXqjJs3P][img]https://i.postimg.cc/xXqjJs3P/IMG-20221121-091158115.jpg[/img][/url]
[url=https://postimg.cc/2qZzTVJb][img]https://i.postimg.cc/2qZzTVJb/IMG-20221108-140442630.jpg[/img][/url]
I thought I had finally figured out a way to build a nice and clean version of the cage style antenna. I glued the 6 strands of line in place, but found out that even with the magnifying glasses, I still couldn't see good enough to insert the etch rings. So, no rings. The 6 strands clumped together look like a single strand as thick as a mast corner post, so I went back and cut 4 of the strands off. So the rigging ( probably not visible in these pics) will only be 2 strands between the two masts and down to the base of the double staircase area.
Last for this time, is the ships boats. I painted the lower hulls red for the left ship and green for the right ship, as can be seen on Udaloy class ships some times. But I didn't like how the upper hull painting was turning out, so I ended up doing the tarp cover on them like I had done on the Rhib boat behind the rear stack.
[url=https://postimg.cc/grDGM9MD][img]https://i.postimg.cc/grDGM9MD/IMG-20221121-091253779.jpg[/img][/url]
[url=https://postimg.cc/D8pnTr34][img]https://i.postimg.cc/D8pnTr34/IMG-20221121-091228814.jpg[/img][/url]
The next update should be the last of the rear railings and the custom shaped safety rails around the landing pad. It'll be Kuznetsov etch to the rescue again. There wont be the correct number of segments or the right segment lengths in some cases, but it'll basically look correct.
Thanks for looking.
Dan
|
|
|
|
Posted: Mon Nov 21, 2022 1:51 pm |
|
|
|
|
|
| |
Post subject: |
Re: 1/350 Trumpeter Admiral Chabanenko |
|
|
Part 42 I've done what paint touch up I can. Definitely easier to do on a dark subject. For future projects I really need to try to choose colors that I can both spray and brush. I've attached the rest of the staircases. I don't like how they look or fit, I think the railings extend too low and block too much of the access to the stairs. I plan to pull these 3 and their partners off and try other ones. Fit might end up being more important than having a single style. 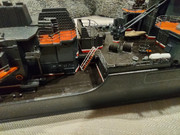 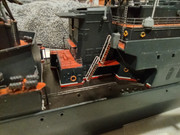 Thanks for looking. Dan Part 42
I've done what paint touch up I can. Definitely easier to do on a dark subject. For future projects I really need to try to choose colors that I can both spray and brush.
I've attached the rest of the staircases. I don't like how they look or fit, I think the railings extend too low and block too much of the access to the stairs. I plan to pull these 3 and their partners off and try other ones. Fit might end up being more important than having a single style.
[url=https://postimg.cc/nC3xw1vp][img]https://i.postimg.cc/nC3xw1vp/IMG-20221107-122634722-HDR.jpg[/img][/url]
[url=https://postimg.cc/FYSPJrF8][img]https://i.postimg.cc/FYSPJrF8/IMG-20221107-122648950-HDR.jpg[/img][/url]
Thanks for looking.
Dan
|
|
|
|
Posted: Mon Nov 07, 2022 3:52 pm |
|
|
|
|
|
| |
Post subject: |
Re: 1/350 Trumpeter Admiral Chabanenko |
|
|
Part 41 I decided to go ahead and use the first new wall I had made to go around the main deck gun. I didn't want to expend the time or effort needed to make another one. This turned out to be the correct choice. The dark color of this ship made most of the holes in the wall invisible except for the row inside the white line. So, redoing the entire wall just to correct the hole pattern would have been wasted. Although a light colored ship would have been worth it. 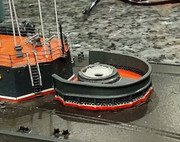 Normally I would not build a ship in this sort of sequence. The deck should have gone down very early on, but this model has some issues that I felt required the deck to be added towards the end. The main deck has a couple severe warps in it, and the sunken groove in the hull to attach the deck on is too sunken in giving too much play as to how high or low the deck is allowed to sit. The rear mast assembly needs to sit on the deck and rest its side edges on the hull. So I had to glue it to the deck first so that it could dictate how far down to allow the deck to sink. It didn't help that there was an upwards warp in the middle of that area of the deck. Forwards of that, the deck should have laid flat and then curved upwards in front of the bridge and then finally leveled off at the bow. Instead, the whole thing curved downwards like a banana. So, the forward superstructure was also an attempt to correct the curvature of the deck. It was surprisingly stubborn and resisted being reshaped much more than I expected. Plastic glue wasn't able to withstand the pressure so I had to use some Gorilla super glue. Some discoloration has happened from the glue. I will be doing a little bit of paint touch up and repair work on a couple broken parts before I continue further. 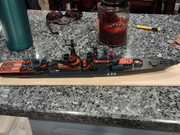 Thanks for looking. Dan Part 41
I decided to go ahead and use the first new wall I had made to go around the main deck gun. I didn't want to expend the time or effort needed to make another one. This turned out to be the correct choice. The dark color of this ship made most of the holes in the wall invisible except for the row inside the white line. So, redoing the entire wall just to correct the hole pattern would have been wasted. Although a light colored ship would have been worth it.
[url=https://postimg.cc/v19FgjPg][img]https://i.postimg.cc/v19FgjPg/IMG-20221031-163354190-HDR-2.jpg[/img][/url]
Normally I would not build a ship in this sort of sequence. The deck should have gone down very early on, but this model has some issues that I felt required the deck to be added towards the end. The main deck has a couple severe warps in it, and the sunken groove in the hull to attach the deck on is too sunken in giving too much play as to how high or low the deck is allowed to sit. The rear mast assembly needs to sit on the deck and rest its side edges on the hull. So I had to glue it to the deck first so that it could dictate how far down to allow the deck to sink. It didn't help that there was an upwards warp in the middle of that area of the deck. Forwards of that, the deck should have laid flat and then curved upwards in front of the bridge and then finally leveled off at the bow. Instead, the whole thing curved downwards like a banana. So, the forward superstructure was also an attempt to correct the curvature of the deck. It was surprisingly stubborn and resisted being reshaped much more than I expected.
Plastic glue wasn't able to withstand the pressure so I had to use some Gorilla super glue. Some discoloration has happened from the glue. I will be doing a little bit of paint touch up and repair work on a couple broken parts before I continue further.
[url=https://postimg.cc/YhzSjdnC][img]https://i.postimg.cc/YhzSjdnC/IMG-20221031-163530649.jpg[/img][/url]
Thanks for looking.
Dan
|
|
|
|
Posted: Mon Oct 31, 2022 7:23 pm |
|
|
|
|
|
| |
Post subject: |
Re: 1/350 Trumpeter Admiral Chabanenko |
|
|
Part 40 I have been looking over this project and rethinking some things. 1st) I've built two of the Kamov helicopters in the past and I've hated it both times, so I've decided not to build the helicopter at all this time. I've gone ahead and glued the rear deck assembly to the hull. It just needs the etch railings added now. 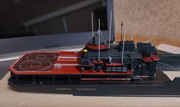 2nd) A lot of the details that the crane and other areas "absolutely need" are in fact, just "needed" with a magnifying glass. I've cut out the window areas of the crane and that will be good enough. The area around the crane is done now. I also went ahead and glued the rear stack/main mast assembly to the deck. So now, the main deck is done as far forward as the front stack assembly, except for a little railing, rigging, and boats. 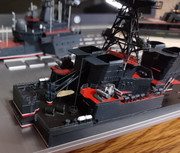 At the bow area, everything has its stripes done. Small metal anchor chain has been added and pulled tight to get the correct elevated look to the chain instead of letting it lay on the deck. I also decided that the bow would look better without the flag pole so I cut it off too. 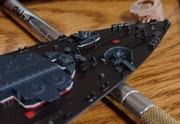 This project is finally starting to come together. I can see the light at the end of the tunnel. I think all that is left to do is a new deck gun wall, (probably just use the one I've already made, even though the hole pattern is wrong). I don't want to have to drill another 320 or so holes. After that, just glue down the front superstructure, finish rigging and etch, and finally the deck gun. Then at least the ship will be done. Thanks for looking. Dan Part 40
I have been looking over this project and rethinking some things.
1st) I've built two of the Kamov helicopters in the past and I've hated it both times, so I've decided not to build the helicopter at all this time.
I've gone ahead and glued the rear deck assembly to the hull. It just needs the etch railings added now.
[url=https://postimg.cc/N5fm46Qn][img]https://i.postimg.cc/N5fm46Qn/IMG-20221016-175505170-HDR-2.jpg[/img][/url]
2nd) A lot of the details that the crane and other areas "absolutely need" are in fact, just "needed" with a magnifying glass.
I've cut out the window areas of the crane and that will be good enough. The area around the crane is done now. I also went ahead and glued the rear stack/main mast assembly to the deck. So now, the main deck is done as far forward as the front stack assembly, except for a little railing, rigging, and boats.
[url=https://postimg.cc/MXxtRfNc][img]https://i.postimg.cc/MXxtRfNc/IMG-20221016-175604134-2.jpg[/img][/url]
At the bow area, everything has its stripes done. Small metal anchor chain has been added and pulled tight to get the correct elevated look to the chain instead of letting it lay on the deck. I also decided that the bow would look better without the flag pole so I cut it off too.
[url=https://postimg.cc/S2WqJ1Rt][img]https://i.postimg.cc/S2WqJ1Rt/IMG-20221016-175637942-HDR-2.jpg[/img][/url]
This project is finally starting to come together. I can see the light at the end of the tunnel. I think all that is left to do is a new deck gun wall, (probably just use the one I've already made, even though the hole pattern is wrong). I don't want to have to drill another 320 or so holes. After that, just glue down the front superstructure, finish rigging and etch, and finally the deck gun. Then at least the ship will be done.
Thanks for looking.
Dan
|
|
|
|
Posted: Sun Oct 16, 2022 8:44 pm |
|
|
|
|
|
| |
Post subject: |
Re: 1/350 Trumpeter Admiral Chabanenko |
|
|
Part 39 Progress has been very slow. The area around the crane just needs to be painted and have the crane actually built and added along with the flare/chaff launchers. The red and white stripes have been added to both deck levels. Most railings are done. A final antenna is located somewhere in this area. I don't know if the railing around the antenna is correct or not, but they do seem to protect their antenna in crew areas with railings. Life rafts are in place and the single RHIB is in place with a aluminum tape canvas to cover its lack of details. It took three tries to get a cable reel look that I liked. Too small, then too little amount of cable, and finally this one. 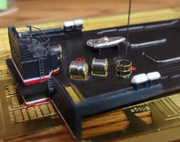 In the mid area, I've gone ahead and glued down the front stack assembly. It still needs a section of railing added at the top of the staircase. For the staircase, again, I had to use US Navy staircases because the other ones just weren't tall enough. Again, I've gone with red steps and white handrails like the landing pad stairs. The actual shape of the handrail is wrong, but multiple attempts have left me with only this design having enough pieces left to hopefully have all six mid ship staircases look alike. 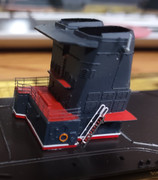 Lastly, at the bow area, I've painted the elevated area for the deck gun, most of the bow details have been painted, and the forward most red stripe still needs the white stripe added. 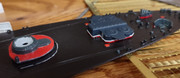 Thanks for looking. Dan Part 39
Progress has been very slow.
The area around the crane just needs to be painted and have the crane actually built and added along with the flare/chaff launchers. The red and white stripes have been added to both deck levels. Most railings are done. A final antenna is located somewhere in this area. I don't know if the railing around the antenna is correct or not, but they do seem to protect their antenna in crew areas with railings. Life rafts are in place and the single RHIB is in place with a aluminum tape canvas to cover its lack of details. It took three tries to get a cable reel look that I liked. Too small, then too little amount of cable, and finally this one.
[url=https://postimg.cc/rRChYffV][img]https://i.postimg.cc/rRChYffV/IMG-20221003-155537247-2.jpg[/img][/url]
In the mid area, I've gone ahead and glued down the front stack assembly. It still needs a section of railing added at the top of the staircase. For the staircase, again, I had to use US Navy staircases because the other ones just weren't tall enough. Again, I've gone with red steps and white handrails like the landing pad stairs. The actual shape of the handrail is wrong, but multiple attempts have left me with only this design having enough pieces left to hopefully have all six mid ship staircases look alike.
[url=https://postimg.cc/0bGYD64s][img]https://i.postimg.cc/0bGYD64s/IMG-20221003-155547733-2.jpg[/img][/url]
Lastly, at the bow area, I've painted the elevated area for the deck gun, most of the bow details have been painted, and the forward most red stripe still needs the white stripe added.
[url=https://postimg.cc/Wdh0K932][img]https://i.postimg.cc/Wdh0K932/IMG-20221003-155558694-2.jpg[/img][/url]
Thanks for looking.
Dan
|
|
|
|
Posted: Mon Oct 03, 2022 6:27 pm |
|
|
|
|
|
| |
Post subject: |
Re: 1/350 Trumpeter Admiral Chabanenko |
|
|
Part 38 In a case of not seeing the forest for the trees, I was too focused on Chabanenko's crane that I ignored the fact that the crane is a standard Udaloy style crane. Once I realized that, I had no problem finding a couple usable crane photos and have started drilling out the windows. However, I have decided that since I don't need the crane yet, I'm putting it on hold and moving on to the deck, finally. For the rear walls, I made a new wall with a ledge running along the top and down the back. Racks have been added for the life raft canisters. The wall is high enough for the 5th rung of a 5 rung railing to be able to run nicely along the top. 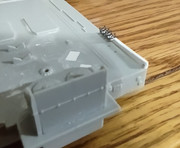 Now, onto the deck gun area. I noticed in a photo that the deck area around the gun and inside the wall is painted the red color. That made no sense. There was no reason for that area to be a different color than the deck. I had to look at a number of photos and discovered that there is a elevated deck surrounding the gun. I've started to correct the details and add the missing deck. Here is a picture of most of the errors I have found in the area. In order to widen the area between the walls, I will be making a new wall and adding it along the outside of the existing wall, which I've sanded down to a small ledge. The new wall will be closer to the width of the superstructure and will create an empty space between the elevated deck and the new wall. It looks like they store extra ammo rounds in that open space between the deck and wall.  Here is my current progress. I still need to add 3 bumps to the elevated deck. Then I think the deck will be ready to paint. The wall and gun will be worked on after that.  Thanks for looking. Dan Part 38
In a case of not seeing the forest for the trees, I was too focused on Chabanenko's crane that I ignored the fact that the crane is a standard Udaloy style crane. Once I realized that, I had no problem finding a couple usable crane photos and have started drilling out the windows.
However, I have decided that since I don't need the crane yet, I'm putting it on hold and moving on to the deck, finally.
For the rear walls, I made a new wall with a ledge running along the top and down the back. Racks have been added for the life raft canisters. The wall is high enough for the 5th rung of a 5 rung railing to be able to run nicely along the top.
[url=https://postimg.cc/PPG4C20N][img]https://i.postimg.cc/PPG4C20N/IMG-20220731-191520603-2.jpg[/img][/url]
Now, onto the deck gun area. I noticed in a photo that the deck area around the gun and inside the wall is painted the red color. That made no sense. There was no reason for that area to be a different color than the deck. I had to look at a number of photos and discovered that there is a elevated deck surrounding the gun. I've started to correct the details and add the missing deck. Here is a picture of most of the errors I have found in the area. In order to widen the area between the walls, I will be making a new wall and adding it along the outside of the existing wall, which I've sanded down to a small ledge. The new wall will be closer to the width of the superstructure and will create an empty space between the elevated deck and the new wall. It looks like they store extra ammo rounds in that open space between the deck and wall.
[url=https://postimg.cc/94MFH3Pk][img]https://i.postimg.cc/94MFH3Pk/IMG-20220731-193958681-2.jpg[/img][/url]
Here is my current progress. I still need to add 3 bumps to the elevated deck. Then I think the deck will be ready to paint. The wall and gun will be worked on after that.
[url=https://postimg.cc/8FYHh61z][img]https://i.postimg.cc/8FYHh61z/IMG-20220731-191659276-2.jpg[/img][/url]
Thanks for looking.
Dan
|
|
|
|
Posted: Sun Jul 31, 2022 10:31 pm |
|
|
|
|
|
| |
Post subject: |
Re: 1/350 Trumpeter Admiral Chabanenko |
|
|
Part 37 Most of my landscaping has been brought back up to date and is in the waste disposal stage so I can start working on this again. This is just a little update. The hull has been finished. Paint, decals, vinyl pinstripe line, and matte coat. It's hard to see in the pics, but I added the two small white "triangle" markings to the anchor tips. The ship's name decal isn't as thick as I would have liked, so the bright yellow color has been toned down by the dark hull color. The pinstripe is a little crooked in spots, but it's good enough. The camera sees some dust in and on the clear coat, but again, my eyes don't see it so it'll do. 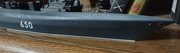  So now I'm back to the main deck. I've done a little bit of improvement to the life raft holding walls and would like to improve the main crane a little. I would like to ask, does anyone have any close up pictures of the crane window locations and climbing ladder locations? If not, I will just improvise. Thanks for looking. Dan Part 37
Most of my landscaping has been brought back up to date and is in the waste disposal stage so I can start working on this again.
This is just a little update. The hull has been finished. Paint, decals, vinyl pinstripe line, and matte coat. It's hard to see in the pics, but I added the two small white "triangle" markings to the anchor tips. The ship's name decal isn't as thick as I would have liked, so the bright yellow color has been toned down by the dark hull color. The pinstripe is a little crooked in spots, but it's good enough. The camera sees some dust in and on the clear coat, but again, my eyes don't see it so it'll do.
[url=https://postimg.cc/grWgDsZw][img]https://i.postimg.cc/grWgDsZw/IMG-20220725-091810300-HDR-2.jpg[/img][/url]
[url=https://postimg.cc/1fN43GvH][img]https://i.postimg.cc/1fN43GvH/IMG-20220725-091850541-2.jpg[/img][/url]
So now I'm back to the main deck. I've done a little bit of improvement to the life raft holding walls and would like to improve the main crane a little.
I would like to ask, does anyone have any close up pictures of the crane window locations and climbing ladder locations?
If not, I will just improvise.
Thanks for looking.
Dan
|
|
|
|
Posted: Mon Jul 25, 2022 11:56 am |
|
|
|
|
|
| |
Post subject: |
Re: 1/350 Trumpeter Admiral Chabanenko |
|
|
Part 36 The sun has finally decided to show up so most of my time has been taken up with doing postponed work outdoors. I decided to move on to the hull while waiting for the 3rd deck gun option to arrive. I drilled a hole and inserted the center shaft of the anchor into it as far as I could. The result is minor and will probably be lost once painted. Some portholes have been closed, including all of them on the lower level. All the other portholes have been drilled open. Plastic sheet has been glued into the recessed torpedo hatch to bring it more flush to the rest of the hull. For the hull cut, I ran a strip of 3mm wide tape along the bottom of the faint seam line to find a more accurate location of the waterline. An initial cut was made near the center on each side of the hull with a dremel sized circular saw blade. Then everything was cut off with an etch saw blade except the stern. For the stern area I just sanded it down to match up with everything else that was now changed. Lastly, a strip of half circle plastic rod has been glued to the bottom sides of the hull, running from about the front of the front stack, back to part way through the ship nameplate location. It should start at about the waterline at the front and end up just above the waterline at the rear, but I went ahead and just ran it straight along the waterline because it was easier and I think it will look better that way.  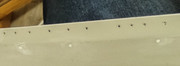   I think the next thing will be to get the hull painted and done then I'll get back to walls near the crane and the main deck gun area. Thanks for looking. Dan Part 36
The sun has finally decided to show up so most of my time has been taken up with doing postponed work outdoors. I decided to move on to the hull while waiting for the 3rd deck gun option to arrive.
I drilled a hole and inserted the center shaft of the anchor into it as far as I could. The result is minor and will probably be lost once painted.
Some portholes have been closed, including all of them on the lower level. All the other portholes have been drilled open.
Plastic sheet has been glued into the recessed torpedo hatch to bring it more flush to the rest of the hull.
For the hull cut, I ran a strip of 3mm wide tape along the bottom of the faint seam line to find a more accurate location of the waterline. An initial cut was made near the center on each side of the hull with a dremel sized circular saw blade. Then everything was cut off with an etch saw blade except the stern. For the stern area I just sanded it down to match up with everything else that was now changed.
Lastly, a strip of half circle plastic rod has been glued to the bottom sides of the hull, running from about the front of the front stack, back to part way through the ship nameplate location. It should start at about the waterline at the front and end up just above the waterline at the rear, but I went ahead and just ran it straight along the waterline because it was easier and I think it will look better that way.
[url=https://postimg.cc/S2mdM93K][img]https://i.postimg.cc/S2mdM93K/IMG-20220626-213814002-HDR-2.jpg[/img][/url]
[url=https://postimg.cc/pmGR7QQw][img]https://i.postimg.cc/pmGR7QQw/IMG-20220626-213833904-HDR-2.jpg[/img][/url]
[url=https://postimg.cc/XXsWXcmp][img]https://i.postimg.cc/XXsWXcmp/IMG-20220626-213849232-2.jpg[/img][/url]
[url=https://postimg.cc/LhcTtGr7][img]https://i.postimg.cc/LhcTtGr7/IMG-20220626-213906863-HDR-2.jpg[/img][/url]
I think the next thing will be to get the hull painted and done then I'll get back to walls near the crane and the main deck gun area.
Thanks for looking.
Dan
|
|
|
|
Posted: Mon Jun 27, 2022 12:20 am |
|
|
|
|
|
| |
Post subject: |
Re: 1/350 Trumpeter Admiral Chabanenko |
|
|
Part 35 I have finally been able to start working on the main deck. On the rear wall, I've removed the door on each side. Photos show that the one on the right shouldn't be there. I haven't seen any photos of the left side, but I think that the left door probably also isn't there, so they're both gone. There might be doors closer towards the center but I haven't seen any photos and I figure that with the dark color, shadows, and staircases will obscure the area anyway. So I'm not going to add any doors.  For the deck section, I filled in the slots for the cable reels to replace them with etched versions. Photos suggest that the right side boat isn't there anymore and that the area is more of a cargo storage/staging area, so I removed the storage rack for that boat. At the side edges I filled in the slots for the walls. The walls need to be reshaped and re-positioned a little bit further inwards. 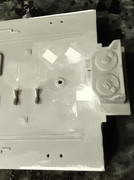 The boxes around the front of the wall around the main deck gun aren't there anymore, so I filled in the holes and will reuse six of the boxes closer to the bow. 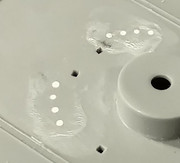 Changes to the bow are nearly finished. I opened up the spots for both ends of the anchor chains and added the four white ledges and wire hoops to keep the anchor chain elevated up off the deck. They're crude but will serve the purpose. The middle and forward pair of hoop assemblies should have been a little more towards the stern. I made the mistake of not double checking the photos before positioning them. I sanded off the raised box detail on the right side and added three of the boxes from the deck gun area to just forward of the location of the sanded off raised box. I still have to do the same thing to the box on the left side of the deck. I've added the front flag staff so that once the glue dries I can open up its base. Hopefully I can keep from breaking it off. 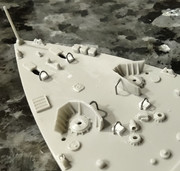 Up next will be the deck gun area. Almost everything involving the main deck gun area seems to be wrong. The gun base is shaped wrong and missing details. The wall is shaped wrong and the wrong size. And either the gun base is too low or the wall is too tall. I'm waiting for a third option of a deck gun to arrive before making a move on these problems. On a side note. The 1/700 scale signal flags arrived and are unfortunately still too big for my use on the 1/350 Takom Sachsen class ship. I've got one more manufacturer to try. I'll probably have to just make them myself. Thanks for looking. Dan Part 35
I have finally been able to start working on the main deck.
On the rear wall, I've removed the door on each side. Photos show that the one on the right shouldn't be there. I haven't seen any photos of the left side, but I think that the left door probably also isn't there, so they're both gone. There might be doors closer towards the center but I haven't seen any photos and I figure that with the dark color, shadows, and staircases will obscure the area anyway. So I'm not going to add any doors.
[url=https://postimg.cc/5YBSX0mF][img]https://i.postimg.cc/5YBSX0mF/IMG-20220605-115855413-HDR-2.jpg[/img][/url]
For the deck section, I filled in the slots for the cable reels to replace them with etched versions. Photos suggest that the right side boat isn't there anymore and that the area is more of a cargo storage/staging area, so I removed the storage rack for that boat. At the side edges I filled in the slots for the walls. The walls need to be reshaped and re-positioned a little bit further inwards.
[url=https://postimg.cc/BPc85P82][img]https://i.postimg.cc/BPc85P82/IMG-20220605-115933357-2.jpg[/img][/url]
The boxes around the front of the wall around the main deck gun aren't there anymore, so I filled in the holes and will reuse six of the boxes closer to the bow.
[url=https://postimg.cc/GHmYPzQ2][img]https://i.postimg.cc/GHmYPzQ2/IMG-20220605-120010548-2.jpg[/img][/url]
Changes to the bow are nearly finished. I opened up the spots for both ends of the anchor chains and added the four white ledges and wire hoops to keep the anchor chain elevated up off the deck. They're crude but will serve the purpose. The middle and forward pair of hoop assemblies should have been a little more towards the stern. I made the mistake of not double checking the photos before positioning them. I sanded off the raised box detail on the right side and added three of the boxes from the deck gun area to just forward of the location of the sanded off raised box. I still have to do the same thing to the box on the left side of the deck. I've added the front flag staff so that once the glue dries I can open up its base. Hopefully I can keep from breaking it off.
[url=https://postimg.cc/8FYp8WXB][img]https://i.postimg.cc/8FYp8WXB/IMG-20220605-120034756-2.jpg[/img][/url]
Up next will be the deck gun area. Almost everything involving the main deck gun area seems to be wrong. The gun base is shaped wrong and missing details. The wall is shaped wrong and the wrong size. And either the gun base is too low or the wall is too tall. I'm waiting for a third option of a deck gun to arrive before making a move on these problems.
On a side note. The 1/700 scale signal flags arrived and are unfortunately still too big for my use on the 1/350 Takom Sachsen class ship. I've got one more manufacturer to try. I'll probably have to just make them myself.
Thanks for looking.
Dan
|
|
|
|
Posted: Sun Jun 05, 2022 3:40 pm |
|
|
|
|
|
| |
Post subject: |
Re: 1/350 Trumpeter Admiral Chabanenko |
|
|
|
The signal flags arrived, so I was able to add a few to the rigging lines. I didn't like how they were looking. I don't really know why, maybe just the way they sat, the angle, or who knows. So I cut those lines off and put new empty rigging lines back on. Only the main, national flag will remain. I was a little disappointed, but figured it was ok because this was just a secondary use for the flags. I had primarily purchased the signal flags because I will need them for my next 1/350 project. Unfortunately, having them in my hands now and being able to check them against the plastic parts of my next project has shown me that these 1/350 flags are way to big for my 1/350 project. I've ordered some 1/700 flags. Hopefully they will be the size I need. So, in the end, this last weekend was a bust. A complete waste of time.
Dan
|
|
|
|
Posted: Tue May 31, 2022 10:22 pm |
|
|
|
|
|
| |
Post subject: |
Re: 1/350 Trumpeter Admiral Chabanenko |
|
|
Part 34 I am going to call this sub assembly mostly done. I've got everything assembled and painted. I tried a new kind of material for the rigging and I love it. It's so much easier and finer than any wire or fishing line I've ever used. I saw it on FB for airplane rigging from radio antenna to rudder and thought I'd try some. I've added the one flag decal that's included with the kit. I've ordered a set of Eduard signal flags from Sprue Brothers and will add a few of them once they arrive. Then this section will really be done. 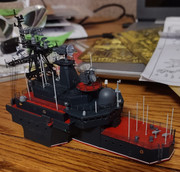 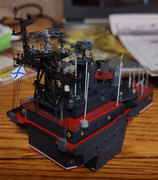   Next up will be the area of the main deck from behind the front stack assembly and back to the Missile launchers near the deck crane. It looks like it will be fairly easy. From what I can tell, it'll just be some detail removal and hole filling prior to painting. Thanks for looking. Dan Part 34
I am going to call this sub assembly mostly done. I've got everything assembled and painted. I tried a new kind of material for the rigging and I love it. It's so much easier and finer than any wire or fishing line I've ever used. I saw it on FB for airplane rigging from radio antenna to rudder and thought I'd try some. I've added the one flag decal that's included with the kit. I've ordered a set of Eduard signal flags from Sprue Brothers and will add a few of them once they arrive. Then this section will really be done.
[url=https://postimg.cc/XZyT1MBr][img]https://i.postimg.cc/XZyT1MBr/IMG-20220523-131213229-HDR.jpg[/img][/url]
[url=https://postimg.cc/jWNFQzBN][img]https://i.postimg.cc/jWNFQzBN/IMG-20220523-131227520-HDR.jpg[/img][/url]
[url=https://postimg.cc/mhV6wZpd][img]https://i.postimg.cc/mhV6wZpd/IMG-20220523-131248006-HDR.jpg[/img][/url]
[url=https://postimg.cc/cvt90Rxj][img]https://i.postimg.cc/cvt90Rxj/IMG-20220523-131303613-HDR.jpg[/img][/url]
Next up will be the area of the main deck from behind the front stack assembly and back to the Missile launchers near the deck crane. It looks like it will be fairly easy. From what I can tell, it'll just be some detail removal and hole filling prior to painting.
Thanks for looking.
Dan
|
|
|
|
Posted: Mon May 23, 2022 4:02 pm |
|
|
|
|
|
| |
Post subject: |
Re: 1/350 Trumpeter Admiral Chabanenko |
|
|
Part 33 I had more free time this week than expected, so I made good use of it and tried to get as much done as I could. On the first level, I added the supports under the outer ends of the platforms. A small sort of barrier has been added that appears to keep the electronics on each side of the platform from seeing each other. The new electronics dome has been added to the top of that barrier on the right side of the ship, to match the one mounted on the left side of the bridge roof. Only a little bit of railing has been added, mainly just to the ladder access ledge on the front side of the mast. For the third level, I added the yardarm etch, along with some extra antenna ledges at the front corners and signal flag rope eyes along the back of the yardarms. I improvised a little bit of railing, and added them partially lowered down the yardarm sides in order to allow for that rotation clearance issue with the palm frond radars again. Lastly, I've also added a small chunk of mesh etch between the two yardarm sides to create a fully connected pathway. There should be a small ladder access platform at the front of this third level like the one on the first level, but the area is getting too small and cluttered, so I didn't attempt to add one. 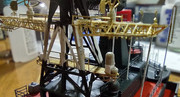  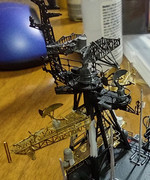 Next will be to paint this all up and maybe add the rigging as well since most of the rigging is isolated to this sub assembly anyway. After that, I will finally be able to move on to the main deck. There are only about three pages of the original Trumpeter instructions left. Too bad it wont be that quick and easy. Thanks for looking. Dan Part 33
I had more free time this week than expected, so I made good use of it and tried to get as much done as I could.
On the first level, I added the supports under the outer ends of the platforms. A small sort of barrier has been added that appears to keep the electronics on each side of the platform from seeing each other. The new electronics dome has been added to the top of that barrier on the right side of the ship, to match the one mounted on the left side of the bridge roof. Only a little bit of railing has been added, mainly just to the ladder access ledge on the front side of the mast.
For the third level, I added the yardarm etch, along with some extra antenna ledges at the front corners and signal flag rope eyes along the back of the yardarms. I improvised a little bit of railing, and added them partially lowered down the yardarm sides in order to allow for that rotation clearance issue with the palm frond radars again. Lastly, I've also added a small chunk of mesh etch between the two yardarm sides to create a fully connected pathway. There should be a small ladder access platform at the front of this third level like the one on the first level, but the area is getting too small and cluttered, so I didn't attempt to add one.
[url=https://postimg.cc/tZ7CQrYJ][img]https://i.postimg.cc/tZ7CQrYJ/IMG-20220516-174917933-HDR-2.jpg[/img][/url]
[url=https://postimg.cc/SnNKfNkc][img]https://i.postimg.cc/SnNKfNkc/IMG-20220516-174924525-HDR-2.jpg[/img][/url]
[url=https://postimg.cc/V5qM7vQh][img]https://i.postimg.cc/V5qM7vQh/IMG-20220516-174937991-HDR-2.jpg[/img][/url]
Next will be to paint this all up and maybe add the rigging as well since most of the rigging is isolated to this sub assembly anyway. After that, I will finally be able to move on to the main deck. There are only about three pages of the original Trumpeter instructions left. Too bad it wont be that quick and easy.
Thanks for looking.
Dan
|
|
|
|
Posted: Mon May 16, 2022 8:29 pm |
|
|
|
|