| Author |
Message |
|
|
| |
Post subject: |
Re: 1:160 S.M.S. WESPE Armoured Gunboat (1876) |
 |
|
Again, real life including (business) travels got in the way of progress on this project. In addition, while I was having dinner in a restaurant together with colleagues, suddenly some ‘floaters’ appeared in one eye. I went immediately to the eye-doctor, who checked my eyes thoroughly. Luckily the floaters are harmless, but annoying signs of age. No retina-detachment or something else serious. Apparently, they can spontaneously disappear or the brain sort of ignores them after a while – keep fingers crossed. For the moment they are quite bothering, when working on really small things … so on to the ensign. **************************************** The Imperial German Navy Ensign This ensign was first conceived for the navy of the North-German Alliance (Norddeutscher Bund) in 1867, bringing together the colours of the dominant powers, namely Prussia (black-white) and the Hanseatic City States, Hamburg, Bremen und Lübeck (red-white). The design obviously was inspired by the British White Ensign and makes reference to various medieval symbols, such as the cross of the Teutonic Order, and the more recent Iron Cross from the Napoleonic War. After the proclamation of the 2nd Empire on 18 January 1871, this ensign became also the ensign of the Imperial German Navy and remained it until the end of the Empire in 1919. There have been, however, some smaller modifications over the years, thus the eagle was somewhat modified and in 1902 the arms of the cross were made heavier in order to avoid confusion at distance with the White Ensign of the Royal Navy. Overall, it is rather complex design to reproduce purely manually. First, I had to find a correct image for the ensign, as it looked in about 1878 and was lucky, as the Internet furnished a digital image of sufficient size and resolution. The idea was to print it on both sides of very thin paper (the kind that was used in the old days for carbon copies on type-writer, of which I kept a small supply). Such paper, however, does not feed well through the laser-printer and aligning for double-sided printing is practically impossible. Therefore, I resorted to so-called transfer-sheets. These are a kind of waxed paper that is used to transfer laser-printouts to T-shirts, mugs and such things. Laser-printer toner is basically carbon-black mixed with some plastics powder. It can be remelted with a heat-source, such as an ironing-iron and thus transferred to another substrate. I also experimented with overhead-sheets, but the results were not as good. 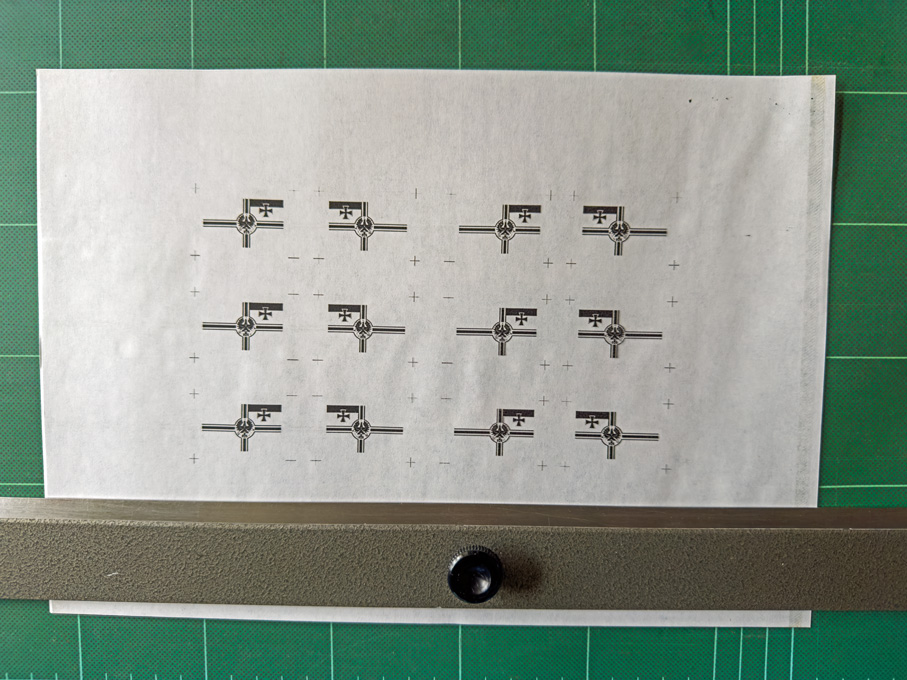 Printing layout for the ensign (as it would appear on the transfer sheet) Printing layout for the ensign (as it would appear on the transfer sheet)In a first step, the red stripe in the flag was eliminated from the image in Photoshop, as it would print grey otherwise. The ensign was then scaled to the right size on the basis of some trial-and-error, as the laser-printer prints a few percent undersize. I then added reference marks some distance from the image and duplicated this for mirroring. Several of these left-right-pairs were arranged on an A4-sheet and then printed onto the transfer-sheet using the highest quality print setting. 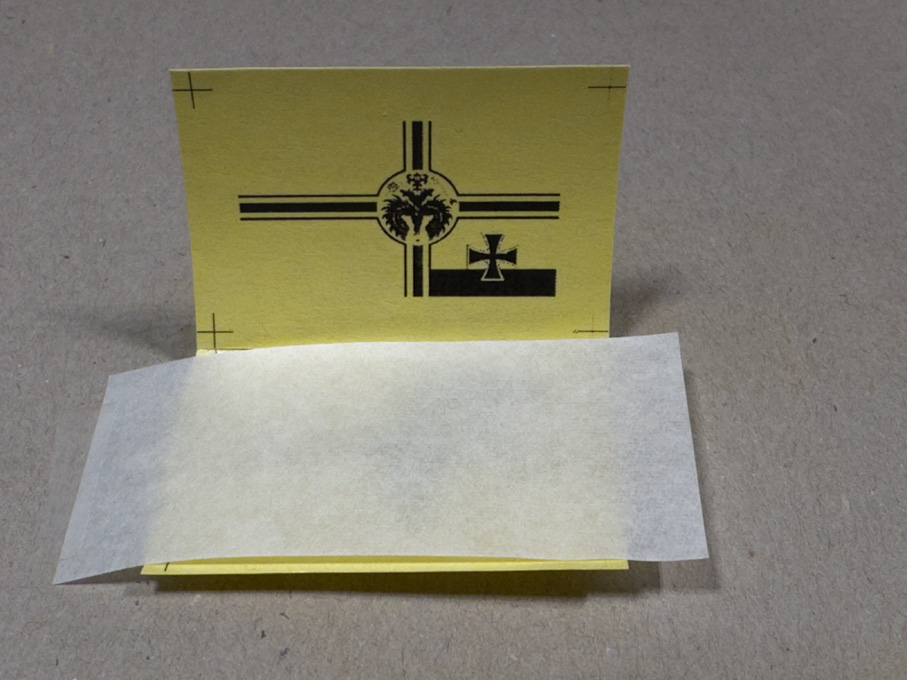 Preparing the pouch for double-sided toner-transfer to the ensign-blank Preparing the pouch for double-sided toner-transfer to the ensign-blankUsing the best matching pair, I made a small pouch (as you would do for the masks, when producing photo-etched parts), aligning the images against each other for a perfect match on an illuminated board (they can be bought for a few €/£/US$ on ebay et al. and are powered through a USB-charger). An oversized strip of the thin paper was slipped in between and everything taped down onto a piece of thick cardboard. I pressed down an ironing-iron set to the lowest temperature onto the package, which made the toner firmly stick to the paper and no residues left on the transfer-paper. And voilà, a double-sided printed flag with a very detailed eagle etc. 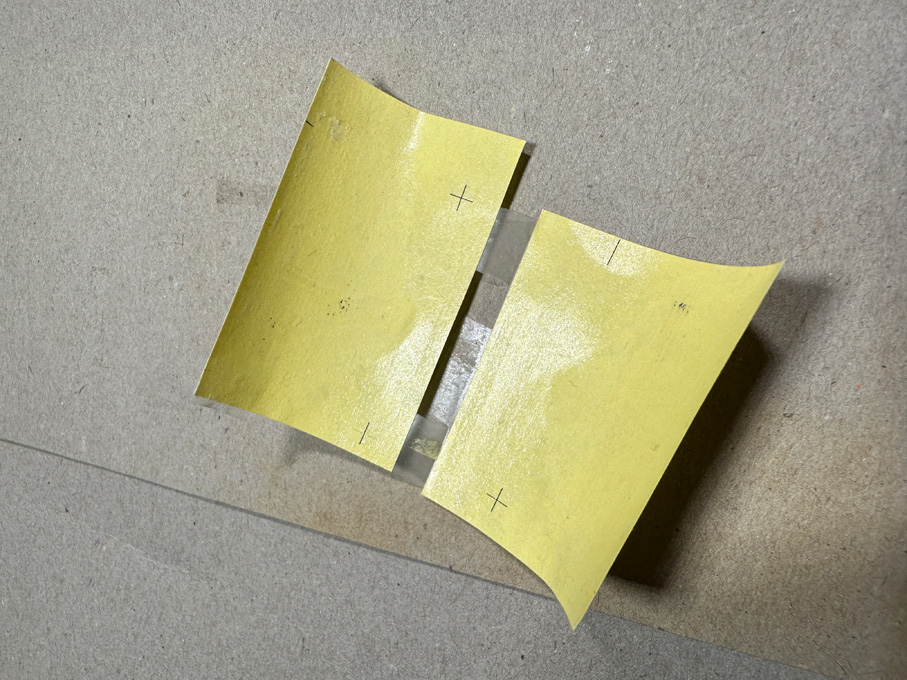 The toner is (almost) completely transferred to the ensign-blank The toner is (almost) completely transferred to the ensign-blankIn the next step the missing red stripe was added using red acrylic paint. I also added colour to the legs and beak of the Imperial Eagle, to the Imperial Insignia and the crown using yellow-ochre acrylic paint. If one has a colour laser-printer this step would not be necessary. The flag was cut out exactly to size, except for the rear, where it was left a tad longer to provide for a hollow ‘seam’ into which a thread with two loops at the end was laid The seam was glued down with some diluted white glue. This area also needed a bit of touch-up afterwards with black acrylic paint. 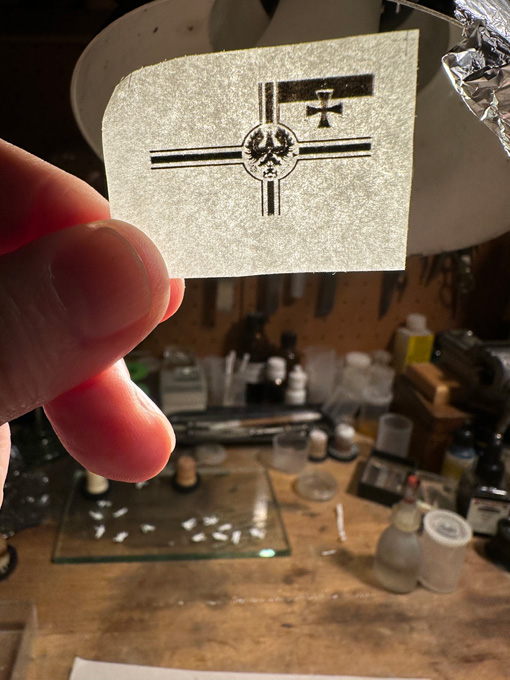 The ensign before adding the colours The ensign before adding the coloursDraping the flag is best done or least pre-arranged on the flag-staff. The paper was slightly wetted and the flag laid into diagonal folds in alternate directions. Toothpicks ensured that they became folds and not creases, which would be unnatural. Such a large ensign (2.9 m x 4.96 m) would fully unfold only in a moderate breeze and not in the light wind assumed in the scenic setting. So it flaps lazily in the wind, which I tried to reproduce.  The completed ensign The completed ensignTo the thus prepared ensign the halliard was attached as a loop. This loop was taken over the top of the flag-staff and a tiny laser-cut paper disc glued on as truck. There was no way to cross-drill the staff for the halliard. The halliard was belayed on the clamp. With this the assembly is ready for installation on the boat. But I will not hoist the ensign before the crew is on board. The recruitment process is still on-going … 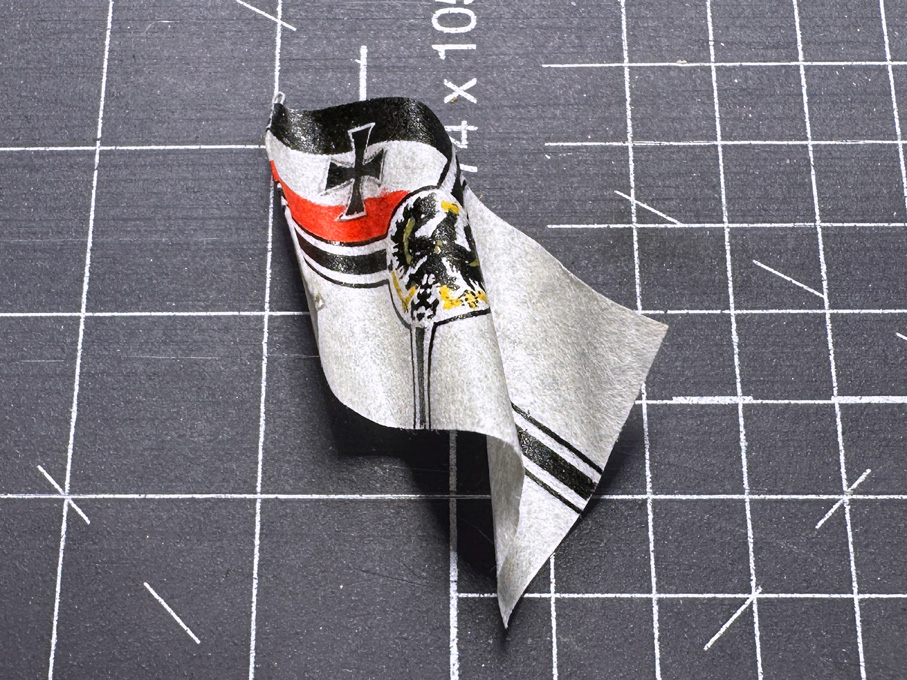 Ensign wetted and shaped Ensign wetted and shapedSorry, this was a rather lengthy essay on just and ensign, but the idea was to describe in detail, how to arrive on a reasonably realistic looking flag at such as small scale. 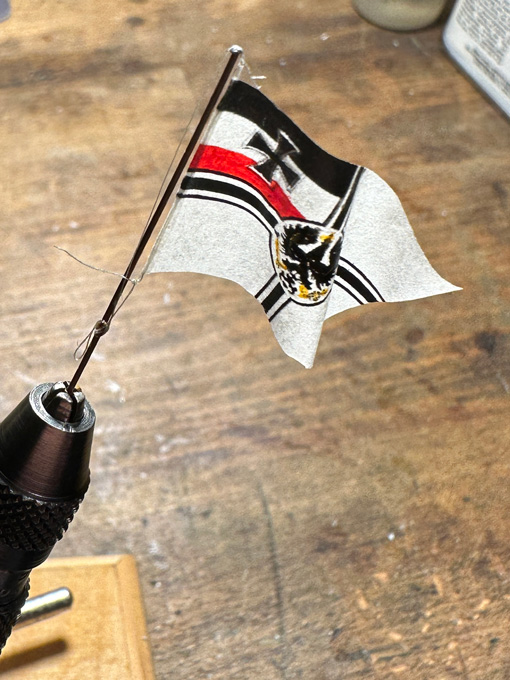 The ensign attached the flagstaffTo be continued .... The ensign attached the flagstaffTo be continued ....Again, real life including (business) travels got in the way of progress on this project. In addition, while I was having dinner in a restaurant together with colleagues, suddenly some ‘floaters’ appeared in one eye. I went immediately to the eye-doctor, who checked my eyes thoroughly. Luckily the floaters are harmless, but annoying signs of age. No retina-detachment or something else serious. Apparently, they can spontaneously disappear or the brain sort of ignores them after a while – keep fingers crossed. For the moment they are quite bothering, when working on really small things … so on to the ensign.
****************************************
[b]The Imperial German Navy Ensign[/b]
[img]https://www.maritima-et-mechanika.org/maritime/models/wespemodel/Kriegsflagge-vor-1892.png[/img]
This ensign was first conceived for the navy of the North-German Alliance (Norddeutscher Bund) in 1867, bringing together the colours of the dominant powers, namely Prussia (black-white) and the Hanseatic City States, Hamburg, Bremen und Lübeck (red-white). The design obviously was inspired by the British White Ensign and makes reference to various medieval symbols, such as the cross of the Teutonic Order, and the more recent Iron Cross from the Napoleonic War. After the proclamation of the 2nd Empire on 18 January 1871, this ensign became also the ensign of the Imperial German Navy and remained it until the end of the Empire in 1919. There have been, however, some smaller modifications over the years, thus the eagle was somewhat modified and in 1902 the arms of the cross were made heavier in order to avoid confusion at distance with the White Ensign of the Royal Navy.
Overall, it is rather complex design to reproduce purely manually. First, I had to find a correct image for the ensign, as it looked in about 1878 and was lucky, as the Internet furnished a digital image of sufficient size and resolution. The idea was to print it on both sides of very thin paper (the kind that was used in the old days for carbon copies on type-writer, of which I kept a small supply). Such paper, however, does not feed well through the laser-printer and aligning for double-sided printing is practically impossible. Therefore, I resorted to so-called transfer-sheets. These are a kind of waxed paper that is used to transfer laser-printouts to T-shirts, mugs and such things. Laser-printer toner is basically carbon-black mixed with some plastics powder. It can be remelted with a heat-source, such as an ironing-iron and thus transferred to another substrate. I also experimented with overhead-sheets, but the results were not as good.
[img]https://www.maritima-et-mechanika.org/maritime/models/wespemodel/wespe-progress-527.jpg[/img]
[b][i]Printing layout for the ensign (as it would appear on the transfer sheet)[/i][/b]
In a first step, the red stripe in the flag was eliminated from the image in Photoshop, as it would print grey otherwise. The ensign was then scaled to the right size on the basis of some trial-and-error, as the laser-printer prints a few percent undersize. I then added reference marks some distance from the image and duplicated this for mirroring. Several of these left-right-pairs were arranged on an A4-sheet and then printed onto the transfer-sheet using the highest quality print setting.
[img]https://www.maritima-et-mechanika.org/maritime/models/wespemodel/wespe-progress-528.jpg[/img]
[b][i]Preparing the pouch for double-sided toner-transfer to the ensign-blank[/i][/b]
Using the best matching pair, I made a small pouch (as you would do for the masks, when producing photo-etched parts), aligning the images against each other for a perfect match on an illuminated board (they can be bought for a few €/£/US$ on ebay et al. and are powered through a USB-charger). An oversized strip of the thin paper was slipped in between and everything taped down onto a piece of thick cardboard.
I pressed down an ironing-iron set to the lowest temperature onto the package, which made the toner firmly stick to the paper and no residues left on the transfer-paper. And voilà, a double-sided printed flag with a very detailed eagle etc.
[img]https://www.maritima-et-mechanika.org/maritime/models/wespemodel/wespe-progress-529.jpg[/img]
[b][i]The toner is (almost) completely transferred to the ensign-blank[/i][/b]
In the next step the missing red stripe was added using red acrylic paint. I also added colour to the legs and beak of the Imperial Eagle, to the Imperial Insignia and the crown using yellow-ochre acrylic paint. If one has a colour laser-printer this step would not be necessary.
The flag was cut out exactly to size, except for the rear, where it was left a tad longer to provide for a hollow ‘seam’ into which a thread with two loops at the end was laid The seam was glued down with some diluted white glue. This area also needed a bit of touch-up afterwards with black acrylic paint.
[img]https://www.maritima-et-mechanika.org/maritime/models/wespemodel/wespe-progress-530.jpg[/img]
[b][i]The ensign before adding the colours[/i][/b]
Draping the flag is best done or least pre-arranged on the flag-staff. The paper was slightly wetted and the flag laid into diagonal folds in alternate directions. Toothpicks ensured that they became folds and not creases, which would be unnatural. Such a large ensign (2.9 m x 4.96 m) would fully unfold only in a moderate breeze and not in the light wind assumed in the scenic setting. So it flaps lazily in the wind, which I tried to reproduce.
[img]https://www.maritima-et-mechanika.org/maritime/models/wespemodel/wespe-progress-531.jpg[/img]
[b][i]The completed ensign[/i][/b]
To the thus prepared ensign the halliard was attached as a loop. This loop was taken over the top of the flag-staff and a tiny laser-cut paper disc glued on as truck. There was no way to cross-drill the staff for the halliard. The halliard was belayed on the clamp. With this the assembly is ready for installation on the boat. But I will not hoist the ensign before the crew is on board. The recruitment process is still on-going …
[img]https://www.maritima-et-mechanika.org/maritime/models/wespemodel/wespe-progress-532.jpg[/img]
[b][i]Ensign wetted and shaped[/i][/b]
Sorry, this was a rather lengthy essay on just and ensign, but the idea was to describe in detail, how to arrive on a reasonably realistic looking flag at such as small scale.
[img]https://www.maritima-et-mechanika.org/maritime/models/wespemodel/wespe-progress-533.jpg[/img]
[b][i]The ensign attached the flagstaff[/i][/b]
[i]To be continued ....[/i]
|
|
|
 |
Posted: Fri Apr 19, 2024 2:59 am |
|
|
 |
|
|
| |
Post subject: |
Re: 1:160 S.M.S. WESPE Armoured Gunboat (1876) |
|
|
Well, I became aware of this class of ships in the early 1990s and started collecting material. That was in those dark pre-Internet ages with resources more difficult to access and fewer contacts. Once ‘on-line’ in the later 1990s with my own Web-site I started to collate all the information there, hoping to build contacts with other interested people. I was pondering the scale, 1/350 came into fashion just about that time, but I was more thinking of a railway scale due to the availability of material for the ‘crew’ and eventually settled on N-scale, i.e. 1/160. However, from the mid 1990s on I started in earnest to collect antique watchmaking machinery and spent much time restoring it and making attachments for it, thus greatly enhancing my machining capabilities (I did have a watchmaking lathe since 1988). Another delaying factor were three job-related international house moves. In addition, I procrastinated starting physically the project because I had no good solution for the numerous and prominent chain-rails. Then, in autumn 2006 I discovered on a German forum a thread on the WESPE-class that made reference to my own Web-site as source of information and where several models in 1/100 and 1/50 scale were built. This gave me the kick to really start the project. I also taught myself making photoetched parts, which solved many problems with flimsy and parts with surface details, such as rivets. However, it had been hit and miss, as making the masks was not always successful, and cuvette-etching often did not yield the desired quality. A move from the Netherlands to France and a grave change in my personal circumstances (marriage) stalled the project for some time, plus making more machinery and one or two smaller interim projects. The purchase of the small laser-cutter to replace photoetching was a good move, although the latter probably would have resulted in crisper parts. I like its ad-hoc availability, while photoetching requires a lot more preparation and effort. It really facilitated the production of many intricate parts that otherwise would have caused me a lot of head-scratching. I am a bit worried now, that all these CNC-techniques, such as in particular 3D-printing, make my treasured watchmaking machinery more or less obsolete. So, we are looking at something like 18 years between making the first dust to completion … Thanks to all, who had the patience to follow  Well, I became aware of this class of ships in the early 1990s and started collecting material. That was in those dark pre-Internet ages with resources more difficult to access and fewer contacts. Once ‘on-line’ in the later 1990s with my own Web-site I started to collate all the information there, hoping to build contacts with other interested people. I was pondering the scale, 1/350 came into fashion just about that time, but I was more thinking of a railway scale due to the availability of material for the ‘crew’ and eventually settled on N-scale, i.e. 1/160.
However, from the mid 1990s on I started in earnest to collect antique watchmaking machinery and spent much time restoring it and making attachments for it, thus greatly enhancing my machining capabilities (I did have a watchmaking lathe since 1988).
Another delaying factor were three job-related international house moves. In addition, I procrastinated starting physically the project because I had no good solution for the numerous and prominent chain-rails.
Then, in autumn 2006 I discovered on a German forum a thread on the WESPE-class that made reference to my own Web-site as source of information and where several models in 1/100 and 1/50 scale were built. This gave me the kick to really start the project. I also taught myself making photoetched parts, which solved many problems with flimsy and parts with surface details, such as rivets. However, it had been hit and miss, as making the masks was not always successful, and cuvette-etching often did not yield the desired quality.
A move from the Netherlands to France and a grave change in my personal circumstances (marriage) stalled the project for some time, plus making more machinery and one or two smaller interim projects.
The purchase of the small laser-cutter to replace photoetching was a good move, although the latter probably would have resulted in crisper parts. I like its ad-hoc availability, while photoetching requires a lot more preparation and effort. It really facilitated the production of many intricate parts that otherwise would have caused me a lot of head-scratching. I am a bit worried now, that all these CNC-techniques, such as in particular 3D-printing, make my treasured watchmaking machinery more or less obsolete.
So, we are looking at something like 18 years between making the first dust to completion … Thanks to all, who had the patience to follow :thanks:
|
|
|
|
Posted: Sat Mar 30, 2024 5:05 am |
|
|
|
|
|
| |
Post subject: |
Re: 1:160 S.M.S. WESPE Armoured Gunboat (1876) |
|
|
|
Eberhard,
I remember when you started on this model - and your amazing work on the gun. Can it possibly be 16 years?
Phil
Eberhard,
I remember when you started on this model - and your amazing work on the gun. Can it possibly be 16 years?
Phil
|
|
|
|
Posted: Fri Mar 29, 2024 8:17 pm |
|
|
|
|
|
| |
Post subject: |
Re: 1:160 S.M.S. WESPE Armoured Gunboat (1876) |
|
|
It is a very fine and sharp model ship-- Your sheer perseverance and tenacity to keep up the momentum at consistent quality is very impressive. I think it is fair to say--the light at the of the tunnel is NOT the locomotive coming towards you   In the grand scheme of things--you are nearly there.  Jim Baumann It is a very fine and sharp model ship--
Your sheer perseverance and tenacity to keep up the momentum at consistent quality is very impressive.
I think it is fair to say--the light at the of the tunnel is NOT the locomotive coming towards you :big_grin: :wave_1:
In the grand scheme of things--you are nearly there. :thumbs_up_1:
Jim Baumann
|
|
|
|
Posted: Fri Mar 29, 2024 6:57 pm |
|
|
|
|
|
| |
Post subject: |
Re: 1:160 S.M.S. WESPE Armoured Gunboat (1876) |
|
|
|
10 years of work on this model, what perseverance, which I will never have, it is as remarkable as the quality of the model.
10 years of work on this model, what perseverance, which I will never have, it is as remarkable as the quality of the model.
|
|
|
|
Posted: Fri Mar 29, 2024 4:19 pm |
|
|
|
|
|
| |
Post subject: |
Re: 1:160 S.M.S. WESPE Armoured Gunboat (1876) |
|
|
I am really puzzled by those many 'clicks' on this thread - 1800 in just four days ... ************************************************************************************* Anyway, just a little bit of further progress before the Easter-weekend … Stern anchor-craneThere are drawings as well as the photograph below that show the anchor-crane in some detail.  Basically, the dimensions are the same as that of the boat-davits, so that I was able to use a spare one that was left over. The ball at the end was drilled for the ring into which during service the anchor-tackle would be hooked. When not in service, the davit was steadied with two chain-stays.  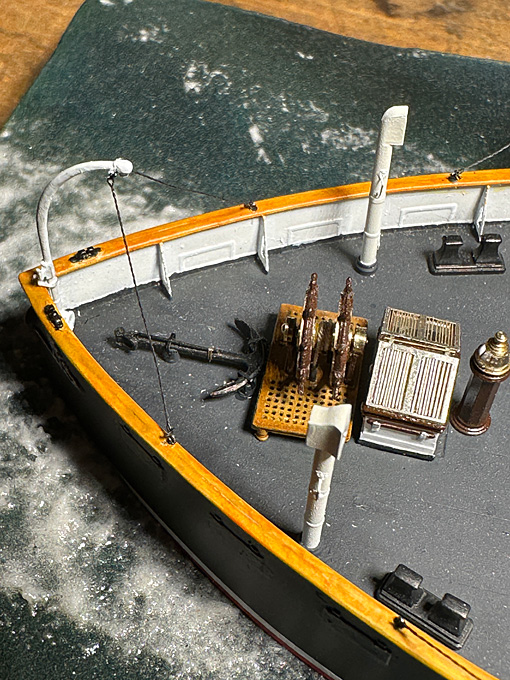 The set-up is very similar to that of the boat davits and the same processes were used. Gun-sightsGun-aiming technology didn’t significantly progress until towards the end of the 19th century. Just very basic front sights were used that sat on the trunnions, while the rear sights were adjustable in height for different distances and laterally for lead-angles. The rear sights used on the 30,5 cm gun a clearly visible on photograph below. Galster (1885) gives a detailed description. Basically, it is brass-tube of about 4 cm diameter that is set into a whole drilled vertically through the rear of the gun. In this tube runs a graduated brass-rod for setting the elevation as a function of the type of projectile used and the size of the powder charge. Firing tables were provided with the gun. On top of the rod is a cross-piece that runs in a dovetail-slot and allows to pre-set the lead-angle. The lead-angle was calculated inter alia on the basis of the estimated relative speed of the target and its distance. There was the usual V-notch on the top of cross-piece. 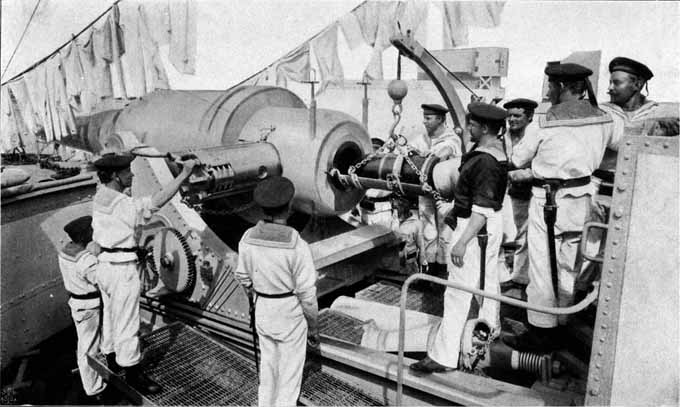 It took several tries to produce these tiny pieces. In the end their dimensions are slightly over-scale due to the limitations of machining brass. Starting from 0.8 mm brass-nails, which are slightly harder than the usual brass wire due to the forging process, a 1.5 mm length of 0.2 mm diameter was step-turned over short lengths successively. Then a 0.2 mm long length was turned down to 0.7 mm diameter and this ‘rod’ with a disc at the end parted off. Luckily, I have a 0.2 mm collet for the lathe, so that the part could be inverted and the parted-off end cleaned up. With a pair of cutting-tweezers the disc was clipped down to the size of the cross-piece. Burrs were removed with a fine file. This part fits into a 2 mm long section of 0.3 mm OD brass-tube (from Albion metals). 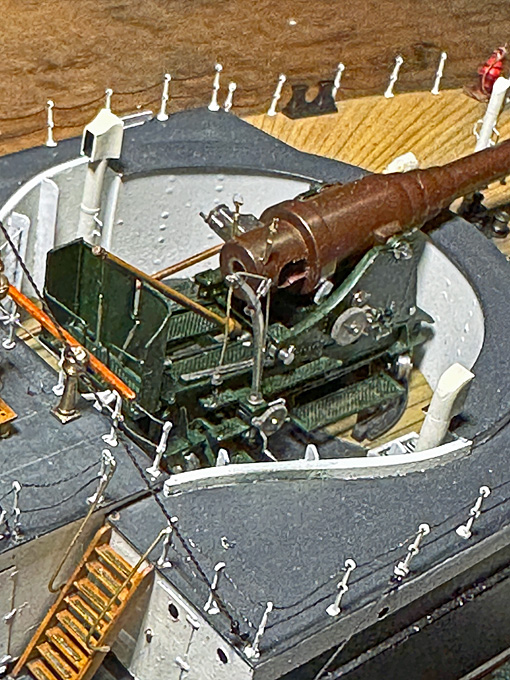 When I made the gun-barrel in about 2008, I did not have really the technology to safely drill to any depths the 0.3 mm holes for the sights, I was glad to be able to mill the flats with a broken drill that I had ground flat at the end. With my micro-milling machine and the dividing head this would not be a real issue anymore. Unfortunately, I forgot to do that before painting the barrel. Therefore, the sights had to be simply cemented onto the flats with a tiny drop of shellac. Before doing that I also added the protective frames over the sights using some 0.007 mm diameter silver-wire. 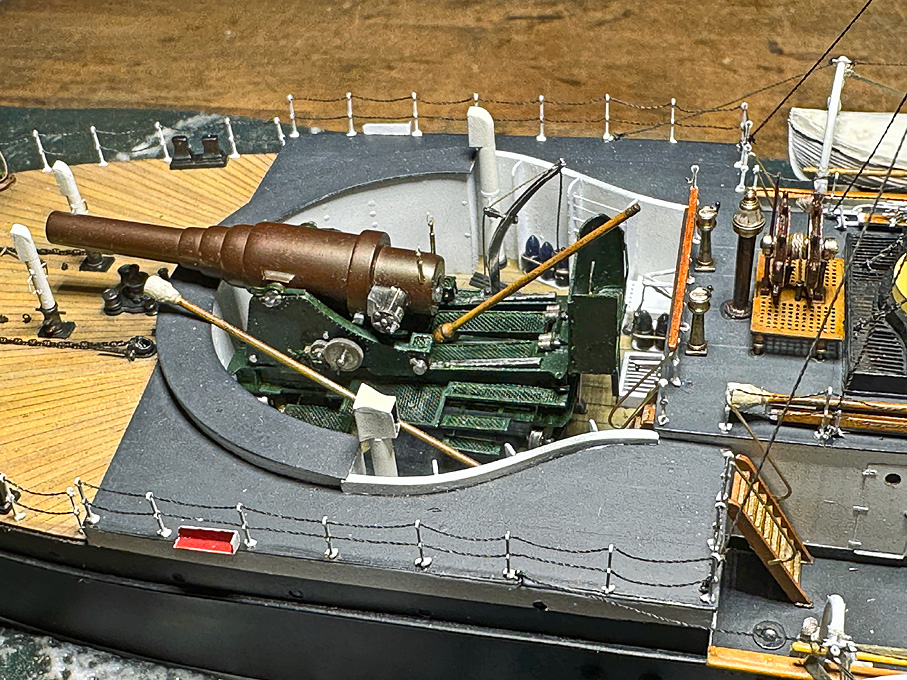 Also installed were the last two of the ventilators for the officers’ mess. What remains now is the flagstaff and the ensign. I have already found a suitable technique for the complex ensign of the Imperial German Navy, but have to still get the right red for it. And then on to the crew … To be continued ....I am really puzzled by those many 'clicks' on this thread - 1800 in just four days ...
*************************************************************************************
Anyway, just a little bit of further progress before the Easter-weekend …
[b]Stern anchor-crane[/b]
There are drawings as well as the photograph below that show the anchor-crane in some detail.
[img]https://www.maritima-et-mechanika.org/maritime/models/wespe/Laverrenz-20.jpg[/img]
Basically, the dimensions are the same as that of the boat-davits, so that I was able to use a spare one that was left over. The ball at the end was drilled for the ring into which during service the anchor-tackle would be hooked. When not in service, the davit was steadied with two chain-stays.
[img]https://www.maritima-et-mechanika.org/maritime/models/wespemodel/wespe-progress-523.jpg[/img]
[img]https://www.maritima-et-mechanika.org/maritime/models/wespemodel/wespe-progress-522.jpg[/img]
The set-up is very similar to that of the boat davits and the same processes were used.
[b]Gun-sights[/b]
Gun-aiming technology didn’t significantly progress until towards the end of the 19th century. Just very basic front sights were used that sat on the trunnions, while the rear sights were adjustable in height for different distances and laterally for lead-angles. The rear sights used on the 30,5 cm gun a clearly visible on photograph below. Galster (1885) gives a detailed description. Basically, it is brass-tube of about 4 cm diameter that is set into a whole drilled vertically through the rear of the gun. In this tube runs a graduated brass-rod for setting the elevation as a function of the type of projectile used and the size of the powder charge. Firing tables were provided with the gun. On top of the rod is a cross-piece that runs in a dovetail-slot and allows to pre-set the lead-angle. The lead-angle was calculated inter alia on the basis of the estimated relative speed of the target and its distance. There was the usual V-notch on the top of cross-piece.
[img]https://www.maritima-et-mechanika.org/maritime/models/wespe/Laverrenz-39.jpg[/img]
It took several tries to produce these tiny pieces. In the end their dimensions are slightly over-scale due to the limitations of machining brass. Starting from 0.8 mm brass-nails, which are slightly harder than the usual brass wire due to the forging process, a 1.5 mm length of 0.2 mm diameter was step-turned over short lengths successively. Then a 0.2 mm long length was turned down to 0.7 mm diameter and this ‘rod’ with a disc at the end parted off. Luckily, I have a 0.2 mm collet for the lathe, so that the part could be inverted and the parted-off end cleaned up. With a pair of cutting-tweezers the disc was clipped down to the size of the cross-piece. Burrs were removed with a fine file.
This part fits into a 2 mm long section of 0.3 mm OD brass-tube (from Albion metals).
[img]https://www.maritima-et-mechanika.org/maritime/models/wespemodel/wespe-progress-525.jpg[/img]
When I made the gun-barrel in about 2008, I did not have really the technology to safely drill to any depths the 0.3 mm holes for the sights, I was glad to be able to mill the flats with a broken drill that I had ground flat at the end. With my micro-milling machine and the dividing head this would not be a real issue anymore. Unfortunately, I forgot to do that before painting the barrel. Therefore, the sights had to be simply cemented onto the flats with a tiny drop of shellac.
Before doing that I also added the protective frames over the sights using some 0.007 mm diameter silver-wire.
[img]https://www.maritima-et-mechanika.org/maritime/models/wespemodel/wespe-progress-526.jpg[/img]
Also installed were the last two of the ventilators for the officers’ mess.
What remains now is the flagstaff and the ensign. I have already found a suitable technique for the complex ensign of the Imperial German Navy, but have to still get the right red for it.
And then on to the crew …
[i]To be continued ....[/i]
|
|
|
|
Posted: Fri Mar 29, 2024 10:52 am |
|
|
|
|
|
| |
Post subject: |
Re: 1:160 S.M.S. WESPE Armoured Gunboat (1876) |
|
|
WOW, in the meantime this building log has received 100,000 clicks. 25,000 alone the last three weeks. I am impressed and pleased ... I wonder what it made suddently so popular and hope it is not just a robot ... A big thank you for your interest WOW, in the meantime this building log has received [b]100,000[/b] clicks. 25,000 alone the last three weeks. I am impressed and pleased ... I wonder what it made suddently so popular and hope it is not just a robot ...
A big thank you for your interest :thumbs_up_1:
|
|
|
|
Posted: Mon Mar 25, 2024 12:22 pm |
|
|
|
|
|
| |
Post subject: |
Re: 1:160 S.M.S. WESPE Armoured Gunboat (1876) |
|
|
|
|
|
|
Posted: Sun Mar 17, 2024 5:56 pm |
|
|
|
|
|
| |
Post subject: |
Re: 1:160 S.M.S. WESPE Armoured Gunboat (1876) |
|
|
Ahh, the male equivalent to a 'masseuse de parquet' Ahh, the male equivalent to a 'masseuse de parquet' :big_grin:
|
|
|
|
Posted: Sun Mar 17, 2024 4:33 pm |
|
|
|
|
|
| |
Post subject: |
Re: 1:160 S.M.S. WESPE Armoured Gunboat (1876) |
|
|
wefalck wrote: In case you weren't aware, here are more: https://www.maritima-et-mechanika.orgI visited it a few monts ago, and I haven't finished yet. There's a lot of information to read and some beautiful photos. The amount of work that went into putting it all together is impressive. Your wipers are very realistic. On merchant ships, the man in charge of cleaning the engine room is still known as the "Wiper" or "Nettoyeur" in French. The appropriate term ashore is "surface technician". [quote="wefalck"]In case you weren't aware, here are more: [url]https://www.maritima-et-mechanika.org[/url][/quote]
I visited it a few monts ago, and I haven't finished yet.
There's a lot of information to read and some beautiful photos. The amount of work that went into putting it all together is impressive.
Your wipers are very realistic.
On merchant ships, the man in charge of cleaning the engine room is still known as the "Wiper" or "Nettoyeur" in French.
The appropriate term ashore is "surface technician". :big_grin:
|
|
|
|
Posted: Sun Mar 17, 2024 3:56 pm |
|
|
|
|
|
| |
Post subject: |
Re: 1:160 S.M.S. WESPE Armoured Gunboat (1876) |
|
|
Toolkit for the gunThe operation of the gun required quite a few different tools for handling the projectiles and the powder-bags, as well as for cleaning and maintenance. There were two different wipers, one for cleaning with soap-water and the other one for greasing the bore after use. This still was the era of black powder, which means that the bore had to be cleaned frequently. Loading required a rammer to push the projectile and the powder-bags into the chamber of the gun. The rammer also served to unload the gun by pushing it through the muzzle. It had a depression in the front so that one would not push onto the fuse. The large-scale instruction model in the (former) Orlogmuseet in Copenhagen came with many of the necessary tools. Their look tallies with the description of a textbook on the Imperial German naval artillery (Galster, 1885). The length of the shaft was given as the length of the barrel plus some extra for one or two men to be able to hold onto it, while it was fully inserted. If there were not enough space for such long implements, there were also versions in two parts with a brass connecting sleeve.  Wiper (top) and rammer (bottom) Wiper (top) and rammer (bottom)The body of the implements was turned from some 2 mm steel rod, as I had this to hand. The shaft is a 0.8 mm piano wire. The latter appears to be quite hefty, but seems to tally with the photographs.  Wipers and rammer before painting Wipers and rammer before paintingAs the gun will be shown undergoing a drill, the wipers are not needed and will be shown in their protective canvas covers, stored in the racks on deckhouse as per photograph below.  Wipers in their protective canvas covers Wipers in their protective canvas coversThe canvas covers were simulated with some Vallejo liquid putty. According to Galster (1885) the covers were supposed to be painted black, but the above photograph indicates that they were white, which is what I opted for. The rammer body has two copper-bands to protect it, which were simulated with paint. The limited space in barbette seems to prevent the use of a full-length rammer, so I gave the end of the shaft a connecting sleeve simulated with paint. TampionThe photograph of the instruction model in Copenhagen also shows the expanding tampion that was constructed from two brass discs with some fibre material in between that was contained by a leather sleeve. An internal screw operated by a T-shaped handle squeezed the fibres between the disc and made them expand to lock into the muzzle.  Expanding tampion for the 30,5 cm gun Expanding tampion for the 30,5 cm gunThe tampion is probably going to be the very last machined part on this model. It was turned from a length of brass rod. The handle was first turned as a thin disk and then the excess material was milled away to leave the T-shaped handle standing. The greased leather sleeve has been simulated by some brown paint. 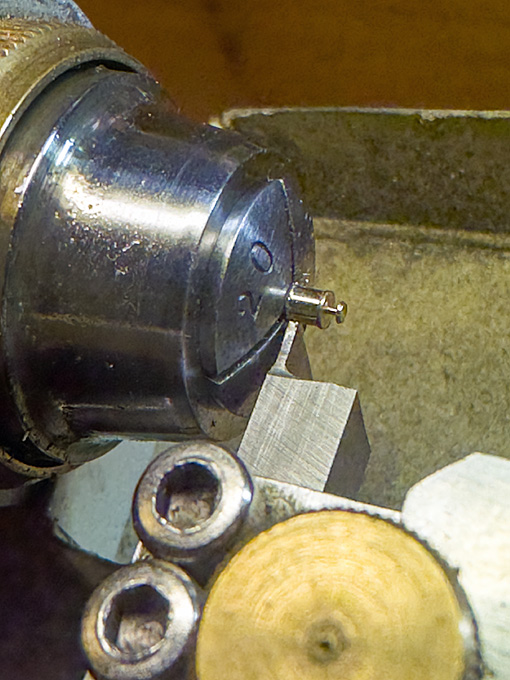 Turning the tampion Turning the tampion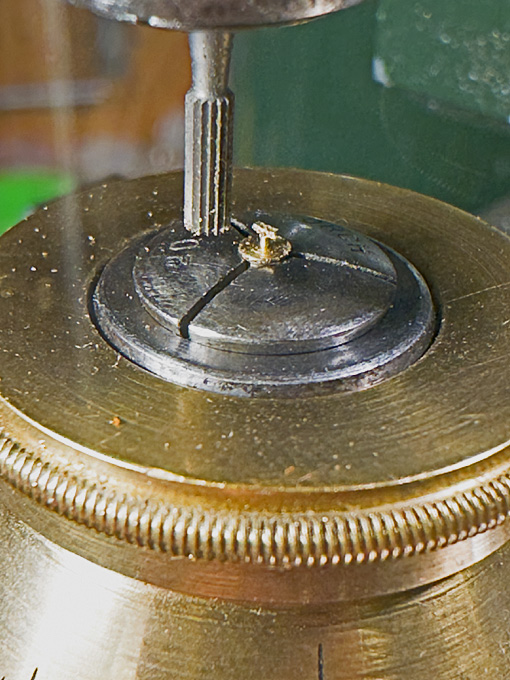 Milling the tampion T-handle Milling the tampion T-handle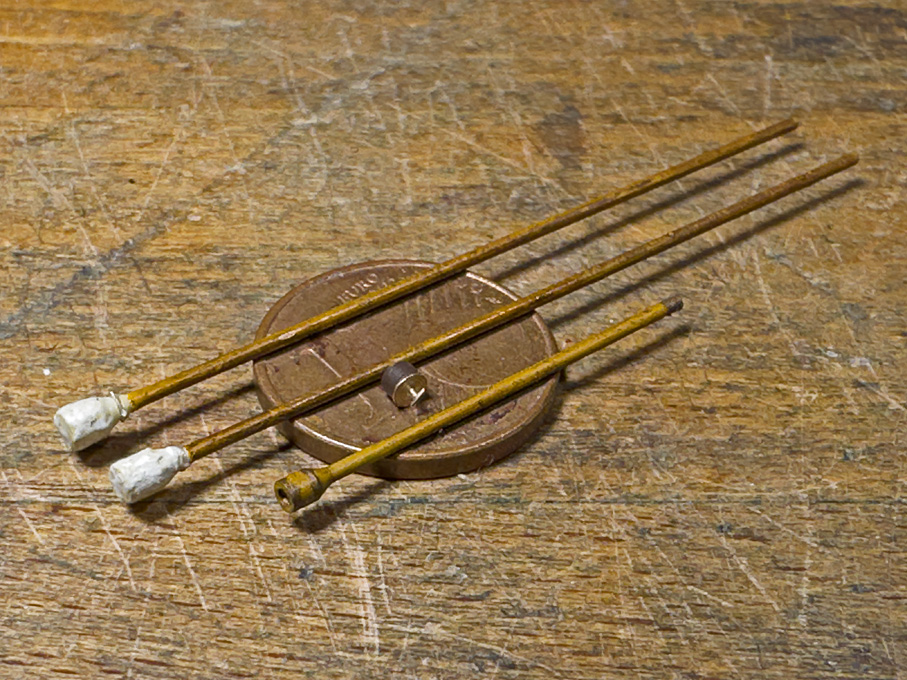 The finished wipers, rammer and tampion The finished wipers, rammer and tampionNext on the list are the anchor-crane, the flagpole and flag and finally the gun-sights To be continued ....
[b]Toolkit for the gun[/b]
The operation of the gun required quite a few different tools for handling the projectiles and the powder-bags, as well as for cleaning and maintenance.
There were two different wipers, one for cleaning with soap-water and the other one for greasing the bore after use. This still was the era of black powder, which means that the bore had to be cleaned frequently.
Loading required a rammer to push the projectile and the powder-bags into the chamber of the gun. The rammer also served to unload the gun by pushing it through the muzzle. It had a depression in the front so that one would not push onto the fuse.
The large-scale instruction model in the (former) Orlogmuseet in Copenhagen came with many of the necessary tools. Their look tallies with the description of a textbook on the Imperial German naval artillery (Galster, 1885). The length of the shaft was given as the length of the barrel plus some extra for one or two men to be able to hold onto it, while it was fully inserted. If there were not enough space for such long implements, there were also versions in two parts with a brass connecting sleeve.
[img]https://www.maritima-et-mechanika.org/maritime/models/wespe/124525-72.jpg[/img]
[b][i]Wiper (top) and rammer (bottom)[/i][/b]
The body of the implements was turned from some 2 mm steel rod, as I had this to hand. The shaft is a 0.8 mm piano wire. The latter appears to be quite hefty, but seems to tally with the photographs.
[img]https://www.maritima-et-mechanika.org/maritime/models/wespemodel/wespe-progress-518.jpg[/img]
[b][i]Wipers and rammer before painting[/i][/b]
As the gun will be shown undergoing a drill, the wipers are not needed and will be shown in their protective canvas covers, stored in the racks on deckhouse as per photograph below.
[img]https://www.maritima-et-mechanika.org/maritime/models/wespe/Laverrenz-78.jpg[/img]
[b][i]Wipers in their protective canvas covers[/i][/b]
The canvas covers were simulated with some Vallejo liquid putty. According to Galster (1885) the covers were supposed to be painted black, but the above photograph indicates that they were white, which is what I opted for.
The rammer body has two copper-bands to protect it, which were simulated with paint. The limited space in barbette seems to prevent the use of a full-length rammer, so I gave the end of the shaft a connecting sleeve simulated with paint.
[b]Tampion[/b]
The photograph of the instruction model in Copenhagen also shows the expanding tampion that was constructed from two brass discs with some fibre material in between that was contained by a leather sleeve. An internal screw operated by a T-shaped handle squeezed the fibres between the disc and made them expand to lock into the muzzle.
[img]https://www.maritima-et-mechanika.org/maritime/models/wespe/124603-72.jpg[/img]
[b][i]Expanding tampion for the 30,5 cm gun[/i][/b]
The tampion is probably going to be the very last machined part on this model. It was turned from a length of brass rod. The handle was first turned as a thin disk and then the excess material was milled away to leave the T-shaped handle standing. The greased leather sleeve has been simulated by some brown paint.
[img]https://www.maritima-et-mechanika.org/maritime/models/wespemodel/wespe-progress-519.jpg[/img]
[b][i]Turning the tampion[/i][/b]
[img]https://www.maritima-et-mechanika.org/maritime/models/wespemodel/wespe-progress-520.jpg[/img]
[b][i]Milling the tampion T-handle[/i][/b]
[img]https://www.maritima-et-mechanika.org/maritime/models/wespemodel/wespe-progress-521.jpg[/img]
[b][i]The finished wipers, rammer and tampion[/i][/b]
Next on the list are the anchor-crane, the flagpole and flag and finally the gun-sights
[i]To be continued ....[/i]
|
|
|
|
Posted: Sun Mar 17, 2024 3:32 pm |
|
|
|
|
|
| |
Post subject: |
Re: 1:160 S.M.S. WESPE Armoured Gunboat (1876) |
|
|
|
|
|
|
Posted: Sun Mar 10, 2024 6:01 am |
|
|
|
|
|
| |
Post subject: |
Re: 1:160 S.M.S. WESPE Armoured Gunboat (1876) |
|
|
Nice doc pictures! Nice doc pictures! :thumbs_up_1:
|
|
|
|
Posted: Sun Mar 10, 2024 5:30 am |
|
|
|
|
|
| |
Post subject: |
Re: 1:160 S.M.S. WESPE Armoured Gunboat (1876) |
|
|
Actually, many navies (incl. merchant) used it: 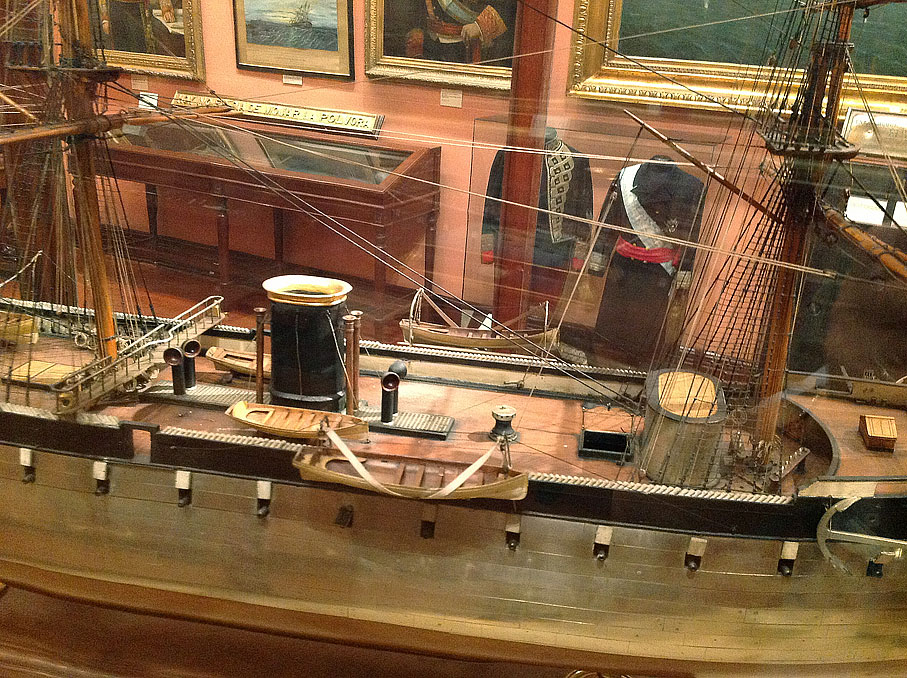 The Spanish NUMANTIA  The Swedish GÖTA 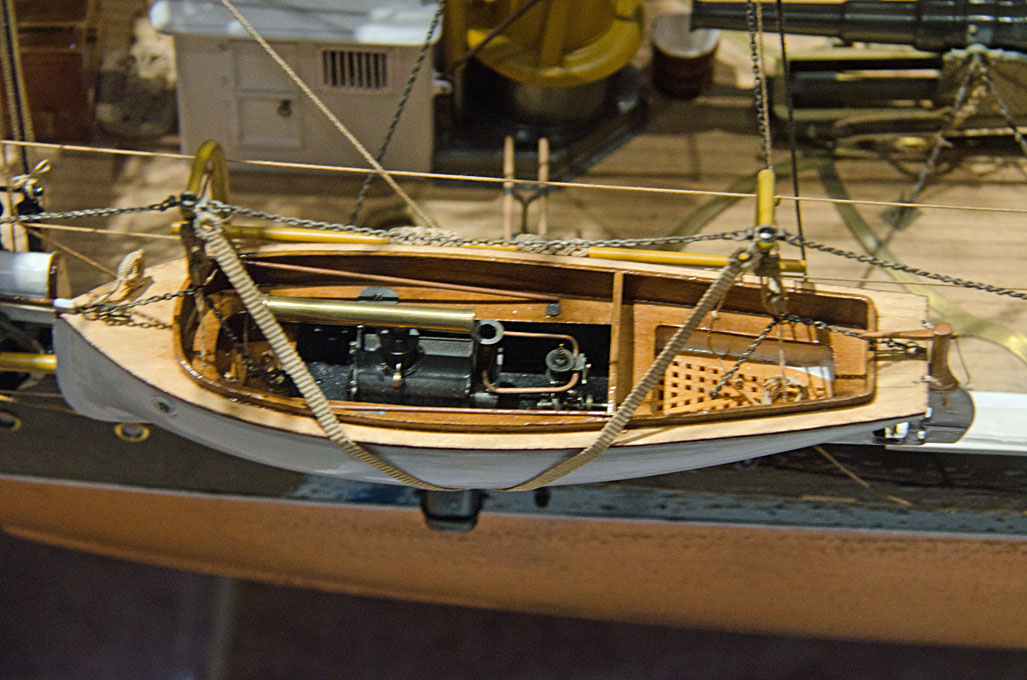 The Portuguese BENGO 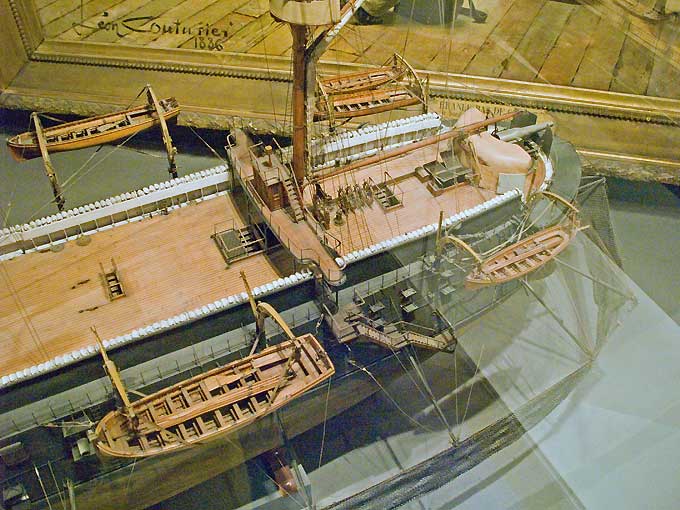 The French TRIDENT These are all examples of the time between 1867 and 1879. Sometimes simple ropes were used, as per photographic evidence. I gather these boat-ties were used as long as boats were hung outboard on davits. When boats were put on skids, gripes are used, as in the old days. Actually, many navies (incl. merchant) used it:
[img]https://www.maritima-et-mechanika.org/maritime/madrid/121137-72.jpg[/img]
The Spanish NUMANTIA
[img]https://www.maritima-et-mechanika.org/maritime/stockholm/150801-72.jpg[/img]
The Swedish GÖTA
[img]https://www.maritima-et-mechanika.org/maritime/lisboa/141834-72.jpg[/img]
The Portuguese BENGO
[img]https://www.maritima-et-mechanika.org/maritime/paris/073713-72.jpg[/img]
The French TRIDENT
These are all examples of the time between 1867 and 1879. Sometimes simple ropes were used, as per photographic evidence. I gather these boat-ties were used as long as boats were hung outboard on davits. When boats were put on skids, gripes are used, as in the old days.
|
|
|
|
Posted: Sat Mar 09, 2024 6:00 pm |
|
|
|
|
|
| |
Post subject: |
Re: 1:160 S.M.S. WESPE Armoured Gunboat (1876) |
|
|
Beautiful model!  Iceman 29 wrote: ..... I seem to have seen this strap system elsewhere, perhaps in the US Navy.
IJN also use this method: https://www.britmodeller.com/forums/ind ... of-midway/ Beautiful model! :cool_1:
[quote="Iceman 29"]..... I seem to have seen this strap system elsewhere, perhaps in the US Navy.
[/quote]
IJN also use this method:
https://www.britmodeller.com/forums/index.php?/topic/235122641-1350-aircraft-carrier-kaga-battle-of-midway/
[url=https://postimg.cc/QFGmP7wP][img]https://i.postimg.cc/QFGmP7wP/c85ad7d58c49aa5a0d4201a2e0062461.jpg[/img][/url]
|
|
|
|
Posted: Sat Mar 09, 2024 9:31 am |
|
|
|
|
|
| |
Post subject: |
Re: 1:160 S.M.S. WESPE Armoured Gunboat (1876) |
|
|
Thank you very much for your kind comments, much appreciated ! ******************************************************************** Installing the ship’s boats 3The installation was movd further to completion by tidying up the loose ends and producing the bunts for runners of the boat tackles. The runners are about five times the distance between the head of the davits and the waterline long, plus some extra for handling. However, as the rope is slightly overscale the runners were cut a bit on the short side in order to make the bunts not too bulky. The actual runners were cut above the cleats and the bunts were formed over two clothes pins driven into a piece of wood and have a loop pulled out with which they can be hung over their respective cleat.  Note that the runners for the ‘ready’ boat are not arranged in bunts but in coils, ready to be thrown loose so as to allow the boat being lowered quickly e.g. in a case of man-over-board. 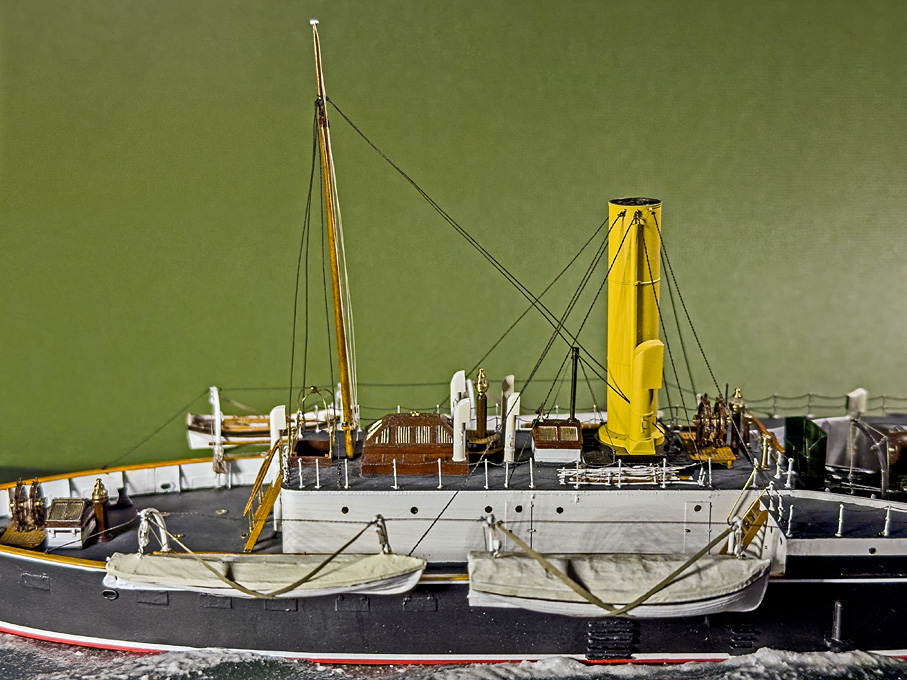 Again, working from the inside out, the next items to go on were the stays for the davits. Luckily, the stays are drawn in the lithographs so that their points of fixation are known. I had to deviate a bit from those drawings, as they pertain to the longer, turning davits for the boats stored on rack, which belong to a slightly later period. The stays are supposed to keep the davits aligned, rather than helping to swing them around. 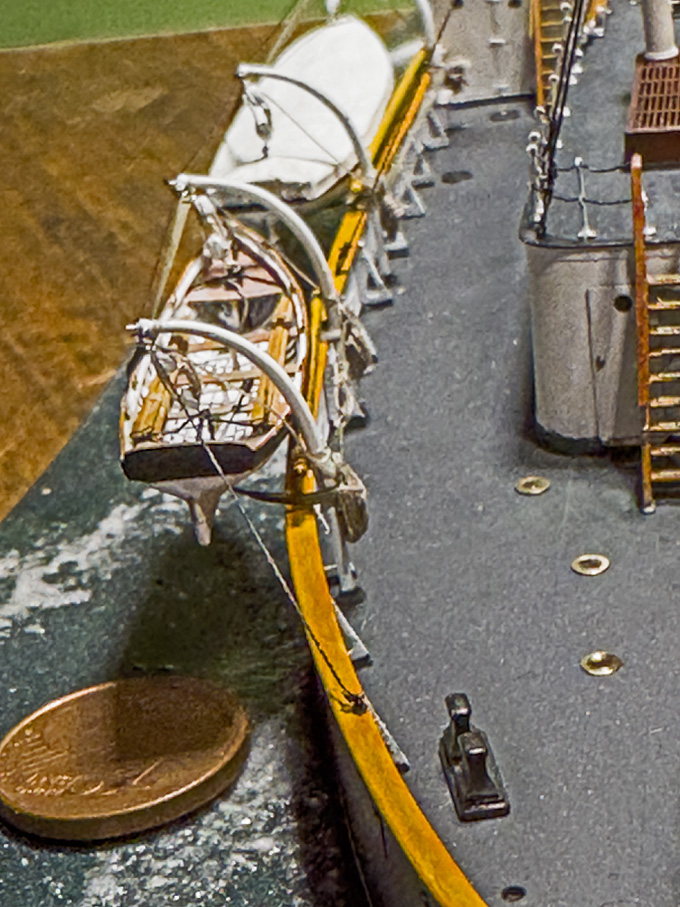 It was a bit of a trial-and-error procedure, before I came up with a protocol for making miniature fake chains of exactly the right length and with loops at both ends. The chains would have been shackled into ring-bolts at the head of the davit. No way of making shackles in this scale, so I just tied the fake chains to ring-bolts with fly-tying thread. 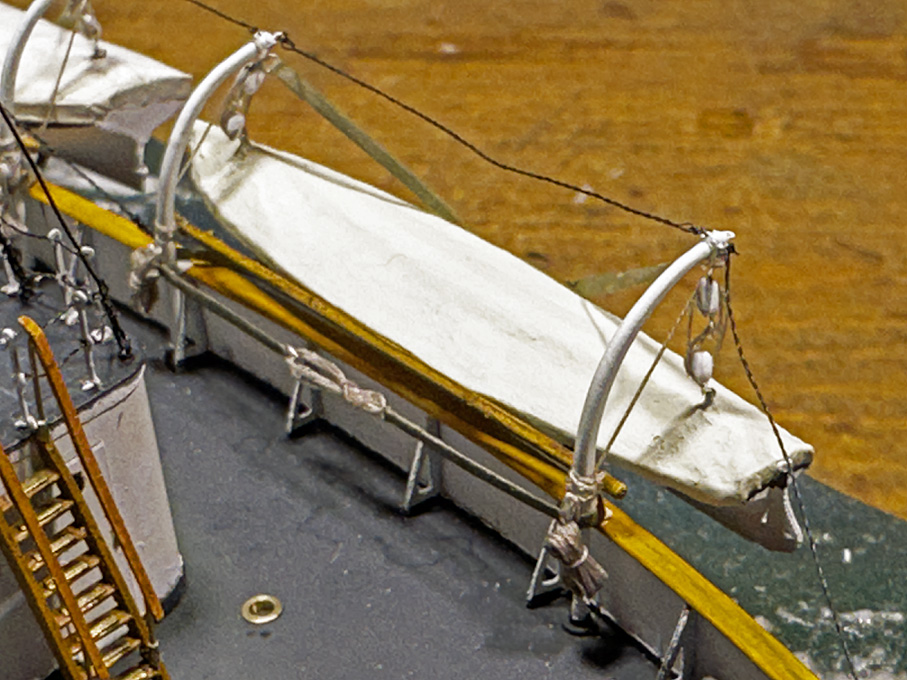 Some people may think now that’s it, but in fact there still is quite a long to-do list for little details: - davit for the stern-anchor - flag-poles and flags - for the gun: tampon, wiper, rammer, and two gun-sights - and the … crew! 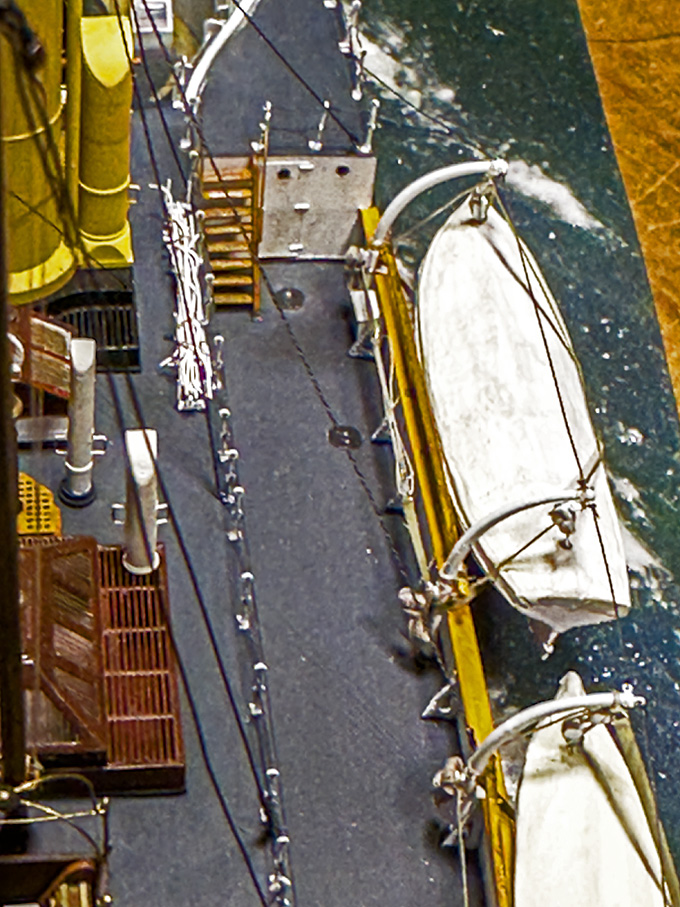 To be continued .... To be continued ....Thank you very much for your kind comments, much appreciated !
********************************************************************
[b]Installing the ship’s boats 3[/b]
The installation was movd further to completion by tidying up the loose ends and producing the bunts for runners of the boat tackles. The runners are about five times the distance between the head of the davits and the waterline long, plus some extra for handling. However, as the rope is slightly overscale the runners were cut a bit on the short side in order to make the bunts not too bulky. The actual runners were cut above the cleats and the bunts were formed over two clothes pins driven into a piece of wood and have a loop pulled out with which they can be hung over their respective cleat.
[img]https://www.maritima-et-mechanika.org/maritime/models/wespemodel/wespe-progress-511.jpg[/img]
Note that the runners for the ‘ready’ boat are not arranged in bunts but in coils, ready to be thrown loose so as to allow the boat being lowered quickly e.g. in a case of man-over-board.
[img]https://www.maritima-et-mechanika.org/maritime/models/wespemodel/wespe-progress-509.jpg[/img]
Again, working from the inside out, the next items to go on were the stays for the davits. Luckily, the stays are drawn in the lithographs so that their points of fixation are known. I had to deviate a bit from those drawings, as they pertain to the longer, turning davits for the boats stored on rack, which belong to a slightly later period. The stays are supposed to keep the davits aligned, rather than helping to swing them around.
[img]https://www.maritima-et-mechanika.org/maritime/models/wespemodel/wespe-progress-514.jpg[/img]
It was a bit of a trial-and-error procedure, before I came up with a protocol for making miniature fake chains of exactly the right length and with loops at both ends. The chains would have been shackled into ring-bolts at the head of the davit. No way of making shackles in this scale, so I just tied the fake chains to ring-bolts with fly-tying thread.
[img]https://www.maritima-et-mechanika.org/maritime/models/wespemodel/wespe-progress-515.jpg[/img]
Some people may think now that’s it, but in fact there still is quite a long to-do list for little details:
- davit for the stern-anchor
- flag-poles and flags
- for the gun: tampon, wiper, rammer, and two gun-sights
- and the … crew!
[img]https://www.maritima-et-mechanika.org/maritime/models/wespemodel/wespe-progress-516.jpg[/img]
[i]To be continued ....[/i]
|
|
|
|
Posted: Sat Mar 09, 2024 7:44 am |
|
|
|
|
|
| |
Post subject: |
Re: 1:160 S.M.S. WESPE Armoured Gunboat (1876) |
|
|
Wonderful work on those boats and davits... Wonderful work on those boats and davits... :thumbs_up_1:
|
|
|
|
Posted: Thu Feb 15, 2024 11:18 am |
|
|
|
|
|
| |
Post subject: |
Re: 1:160 S.M.S. WESPE Armoured Gunboat (1876) |
|
|
|
Very nice Wasp. What's next?
Very nice Wasp. What's next?
|
|
|
|
Posted: Thu Feb 15, 2024 6:12 am |
|
|
|
|
|
| |
Post subject: |
Re: 1:160 S.M.S. WESPE Armoured Gunboat (1876) |
|
|
|
Wonderful! Those boats add so much to the overall feel of the model. :thumbs_up_1: :thumbs_up_1: :thumbs_up_1:
|
|
|
|
Posted: Wed Feb 14, 2024 5:04 am |
|
|
|
|
|
| |
Post subject: |
Re: 1:160 S.M.S. WESPE Armoured Gunboat (1876) |
|
|
|
My congratulations, Eberhard! Finish in sight, as you described.
A very interesting ship, and a more than interesting build: research, plan and execution. I learned a lot from you in the meantime. Thanks!
My congratulations, Eberhard! Finish in sight, as you described.
A very interesting ship, and a more than interesting build: research, plan and execution. I learned a lot from you in the meantime. Thanks!
|
|
|
|
Posted: Sun Feb 11, 2024 2:43 pm |
|
|
|
|