| Author |
Message |
|
|
| |
Post subject: |
Re: HMAS Melbourne II [R21] |
 |
|
|
Looking interesting, keep us posted! Thanks for the tut on the rulers, I had no idea you could use them like that.
Good luck with the new job!
Looking interesting, keep us posted! Thanks for the tut on the rulers, I had no idea you could use them like that.
Good luck with the new job!
|
|
|
 |
Posted: Fri Aug 19, 2011 6:00 pm |
|
|
 |
|
|
| |
Post subject: |
Re: HMAS Melbourne II [R21] |
|
|
|
Thank you for those. I'll get to work.
There's been a delay of late - no job.
I start a new job Monday, and will get back into it in the following weeks.
Dave B
Thank you for those. I'll get to work.
There's been a delay of late - no job.
I start a new job Monday, and will get back into it in the following weeks.
Dave B
|
|
|
|
Posted: Fri Aug 19, 2011 5:10 pm |
|
|
|
|
|
| |
Post subject: |
Re: HMAS Melbourne II [R21] |
|
|
|
Very nice, look forward to seeing more.
Regards,
Dean
Very nice, look forward to seeing more.
Regards,
Dean
|
|
|
|
Posted: Fri Aug 19, 2011 12:32 pm |
|
|
|
|
|
| |
Post subject: |
Re: HMAS Melbourne II [R21] |
|
|
Hi gents, some recent photos of Melbourne's mirror taken at the FAA Museum.    Hope this is of some assistance. Nick Hi gents, some recent photos of [i]Melbourne[/i]'s mirror taken at the FAA Museum.
[img]http://i107.photobucket.com/albums/m320/BluenoseCod/Fleet%20Air%20Arm%20Museum/Mirror/P1000927.jpg[/img]
[img]http://i107.photobucket.com/albums/m320/BluenoseCod/Fleet%20Air%20Arm%20Museum/Mirror/P1000928.jpg[/img]
[img]http://i107.photobucket.com/albums/m320/BluenoseCod/Fleet%20Air%20Arm%20Museum/Mirror/P1000929.jpg[/img]
Hope this is of some assistance.
Nick
|
|
|
|
Posted: Fri Aug 19, 2011 7:46 am |
|
|
|
|
|
| |
Post subject: |
Re: HMAS Melbourne II [R21] |
|
|
|
I upgraded from CS2, which doesn't have "Analysis" and "3D" either. Apparently there are several versions of Photoshop now, and the "Analysis" functions are in something called "Photoshop Extended."
I upgraded from CS2, which doesn't have "Analysis" and "3D" either. Apparently there are several versions of Photoshop now, and the "Analysis" functions are in something called "Photoshop Extended."
|
|
|
|
Posted: Tue Mar 01, 2011 1:13 pm |
|
|
|
|
|
| |
Post subject: |
Re: HMAS Melbourne II [R21] |
|
|
DrPR wrote: Dave,
What Photoshop are you using? I just got CS5 (V12.0) and it doesn't have the "Analysis" and "3D" menu items. I can't find them in the menus anywhere.
Phil I use CS5 (64bit) and CS3 (32 bit). Both have the analysis tab on the toolbar for me. You could try going to Window > Workspace > Essentials (Default) and see if that resets the toolbar. Outside of that , I'm not sure what to offer except GOOGLE. [quote="DrPR"]Dave,
What Photoshop are you using? I just got CS5 (V12.0) and it doesn't have the "Analysis" and "3D" menu items. I can't find them in the menus anywhere.
Phil[/quote]
I use CS5 (64bit) and CS3 (32 bit). Both have the analysis tab on the toolbar for me.
You could try going to Window > Workspace > Essentials (Default) and see if that resets the toolbar.
Outside of that , I'm not sure what to offer except GOOGLE.
|
|
|
|
Posted: Sun Feb 27, 2011 11:41 pm |
|
|
|
|
|
| |
Post subject: |
Re: HMAS Melbourne II [R21] |
|
|
|
Dave,
What Photoshop are you using? I just got CS5 (V12.0) and it doesn't have the "Analysis" and "3D" menu items. I can't find them in the menus anywhere.
Phil
Dave,
What Photoshop are you using? I just got CS5 (V12.0) and it doesn't have the "Analysis" and "3D" menu items. I can't find them in the menus anywhere.
Phil
|
|
|
|
Posted: Sun Feb 27, 2011 11:30 pm |
|
|
|
|
|
| |
Post subject: |
Re: HMAS Melbourne II [R21] |
|
|
davids wrote: Hi there,
just in case you didn't already know, Melbourne's actual mirror landing system is on display in the Fleet Air Arm Museum at Nowra.
David Thanks David. I hope to get down there some time this year. [quote="davids"]Hi there,
just in case you didn't already know, Melbourne's actual mirror landing system is on display in the Fleet Air Arm Museum at Nowra.
David[/quote]
Thanks David.
I hope to get down there some time this year.
|
|
|
|
Posted: Sat Feb 26, 2011 4:28 pm |
|
|
|
|
|
| |
Post subject: |
Re: HMAS Melbourne II [R21] |
|
|
|
Hi there,
just in case you didn't already know, Melbourne's actual mirror landing system is on display in the Fleet Air Arm Museum at Nowra.
David
Hi there,
just in case you didn't already know, Melbourne's actual mirror landing system is on display in the Fleet Air Arm Museum at Nowra.
David
|
|
|
|
Posted: Sat Feb 26, 2011 2:13 pm |
|
|
|
|
|
| |
Post subject: |
Re: HMAS Melbourne II [R21] |
|
|
A quick Photoshop Ruler Tutorial for the forum. 1. Take your photo and find a reference with a known dimension. In this example, we'll say the edge of the mirror housing is 900mm. Click on ANALYSIS>RULER TOOL.  2. Using the ruler tool, take a measure against your known dimension,  then select ANALYSIS>SET MEASUREMENT SCALE>CUSTOM and fill in the details in the dialog box.  Because you have already made a selection using the ruler tool, click on your selection and enter the details for the known dimension - in this case 900 and mm.  You can now use the ruler tool to measure the edge of an object. The angle and measurement shows in the toolbar under the Analysis button. You can also use the STRAIGHTEN button to rotate the measured edge in the image to vertical or horizontal (whichever is closer). Where there is distortion due to perspective, you may need to recalibrate (say, using the back edge of the screen for objects in that region of the photo) to get an accurate result. Best practice on some photos of objects you can later measure and confirm to get the hang of it and you'll master on screen measuring in no time. A quick Photoshop Ruler Tutorial for the forum.
1. Take your photo and find a reference with a known dimension.
In this example, we'll say the edge of the mirror housing is 900mm.
Click on ANALYSIS>RULER TOOL.
[img]http://i537.photobucket.com/albums/ff334/Ramjet64/001-1.jpg[/img]
2. Using the ruler tool, take a measure against your known dimension,
[img]http://i537.photobucket.com/albums/ff334/Ramjet64/002-1.jpg[/img]
then select ANALYSIS>SET MEASUREMENT SCALE>CUSTOM and fill in the details in the dialog box.
[img]http://i537.photobucket.com/albums/ff334/Ramjet64/003-1.jpg[/img]
Because you have already made a selection using the ruler tool, click on your selection and enter the details for the known dimension - in this case 900 and mm.
[img]http://i537.photobucket.com/albums/ff334/Ramjet64/004.jpg[/img]
You can now use the ruler tool to measure the edge of an object. The angle and measurement shows in the toolbar under the Analysis button. You can also use the STRAIGHTEN button to rotate the measured edge in the image to vertical or horizontal (whichever is closer).
Where there is distortion due to perspective, you may need to recalibrate (say, using the back edge of the screen for objects in that region of the photo) to get an accurate result.
Best practice on some photos of objects you can later measure and confirm to get the hang of it and you'll master on screen measuring in no time.
|
|
|
|
Posted: Wed Jan 05, 2011 8:46 pm |
|
|
|
|
|
| |
Post subject: |
Re: HMAS Melbourne II [R21] |
|
|
|
Dave,
You just gave me another !DUH! moment! I have been making sketches like this (a stack about 6" deep) for my modeling project, using a real ruler to take measurements from photos on the screen.
I have been using Photoshop for years, and I totally forgot about the ruler tool!
Thanks for jogging my memory.
Phil
|
|
|
|
Posted: Wed Jan 05, 2011 7:53 pm |
|
|
|
|
|
| |
Post subject: |
Re: HMAS Melbourne II [R21] |
|
|
|
Nice work. good to see another CAD guy using his skills to build virtual ships.
Nice work. good to see another CAD guy using his skills to build virtual ships.
|
|
|
|
Posted: Wed Jan 05, 2011 10:16 am |
|
|
|
|
|
| |
Post subject: |
Re: HMAS Melbourne II [R21] |
|
|
|
Not that it's much use to anyone, but here's part of the 'creative process' (read headache) gone through to recreate the FLOLS from photos. Part of the process involved using Photoshop's ruler tool calibrating to the height of the rail around the FLOLS, which I took to be 900mm, and where the photo's aren't too distorted due to perspective, sizes were measured off the photos.
The measurements are transferred to paper, along with sketches on how things appear to go together, before trying to transfer it all to CAD as a "best guess".
Regards,
Dave.
| Attachments: |

the_process.jpg [ 146.43 KiB | Viewed 3213 times ]
|
Not that it's much use to anyone, but here's part of the 'creative process' (read headache) gone through to recreate the FLOLS from photos. Part of the process involved using Photoshop's ruler tool calibrating to the height of the rail around the FLOLS, which I took to be 900mm, and where the photo's aren't too distorted due to perspective, sizes were measured off the photos.
The measurements are transferred to paper, along with sketches on how things appear to go together, before trying to transfer it all to CAD as a "best guess".
Regards,
Dave.
|
|
|
|
Posted: Tue Jan 04, 2011 11:09 pm |
|
|
|
|
|
| |
Post subject: |
Re: HMAS Melbourne II [R21] |
|
|
|
|
|
|
|
| |
Post subject: |
Re: HMAS Melbourne II [R21] |
|
|
|
Dave,
Good to see your post. Please keep up up to date on the progress of your model, both CAD and real.
Phil
Dave,
Good to see your post. Please keep up up to date on the progress of your model, both CAD and real.
Phil
|
|
|
|
Posted: Sun Jan 02, 2011 3:18 pm |
|
|
|
|
|
| |
Post subject: |
Re: HMAS Melbourne II [R21] |
|
|
|
Hi Dave, it's looking nice. On the lower section of the base that supports the island, make sure the angled part goes well past where it would meet with the hull. Once you have your hull done, you can do an extruded cut "to surface" of the hull and it will conform to the hull perfectly.
Hi Dave, it's looking nice. On the lower section of the base that supports the island, make sure the angled part goes well past where it would meet with the hull. Once you have your hull done, you can do an extruded cut "to surface" of the hull and it will conform to the hull perfectly.
|
|
|
|
Posted: Sun Jan 02, 2011 2:13 pm |
|
|
|
|
|
| |
Post subject: |
HMAS Melbourne II [R21] |
|
|
|
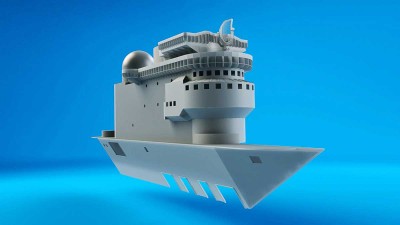
Hello all.
I've been a member here for a couple of days, and better introduce myself.
I've started working on research for the HMAS Melbourne II (R21) Majestic Class carrier. Very early days yet, but progress is already being made, and I'll use this thread to document the progress of the vessel as she takes shape.
My model will be 1:72 scale (A tad over 9' in length) and the flight deck will be used as a display platform for a number of 1:72 scale plastic model aircraft kits.
I use Solidworks to generate the solid models and dimensioned line drawings, and will be using the same program to assist a Canadian friend with a 1:350 scale resin model.
Looking forward to chatting with you all.
Kind regards,
Dave.
| Attachments: |

rofile-1.jpg [ 131.86 KiB | Viewed 3274 times ]
|
render-with-277Q-2.jpg [ 28.57 KiB | Viewed 3274 times ]
|
Hello all.
I've been a member here for a couple of days, and better introduce myself.
I've started working on research for the HMAS Melbourne II (R21) Majestic Class carrier. Very early days yet, but progress is already being made, and I'll use this thread to document the progress of the vessel as she takes shape.
My model will be 1:72 scale (A tad over 9' in length) and the flight deck will be used as a display platform for a number of 1:72 scale plastic model aircraft kits.
I use Solidworks to generate the solid models and dimensioned line drawings, and will be using the same program to assist a Canadian friend with a 1:350 scale resin model.
Looking forward to chatting with you all.
Kind regards,
Dave.
|
|
|
|
Posted: Sun Jan 02, 2011 7:34 am |
|
|
|