| Author |
Message |
|
|
| |
Post subject: |
Re: Steps to Painting Ship's Deck? |
 |
|
I've used a mixture of Humbrol H72 (Khaki) and H110 (natural wood) with various random dips of white and vanDyke brown on this test: 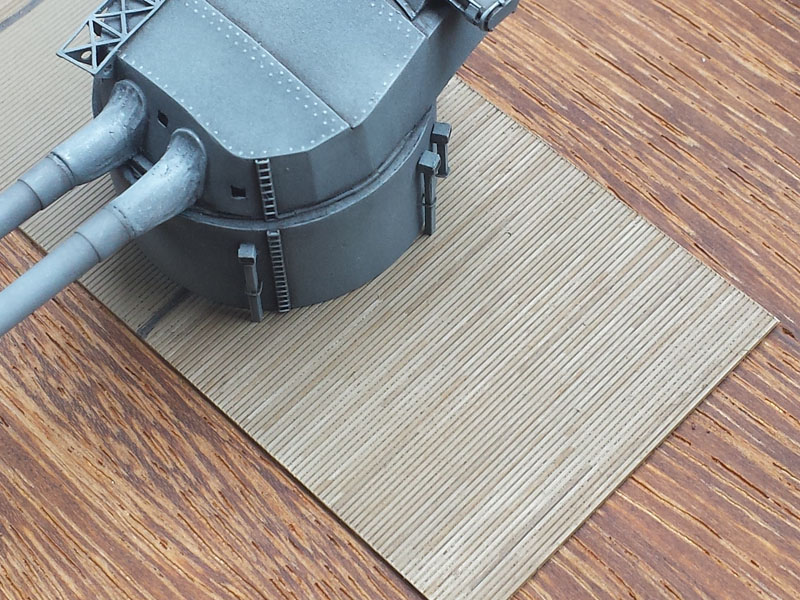 I've used a mixture of Humbrol H72 (Khaki) and H110 (natural wood) with various random dips of white and vanDyke brown on this test:
[img]http://ontheslipway.com/wp-content/uploads/2015/04/decks_19.jpg[/img]
|
|
|
 |
Posted: Mon Sep 25, 2017 4:34 am |
|
|
 |
|
|
| |
Post subject: |
Re: Steps to Painting Ship's Deck? |
|
|
|
Sargentx:
Mind if I ask which color you used for your Warspite build in the photo? Looks just right!
Thanks!
Mike E.
Sargentx:
Mind if I ask which color you used for your Warspite build in the photo? Looks just right!
Thanks!
Mike E.
|
|
|
|
Posted: Sun Sep 24, 2017 11:25 pm |
|
|
|
|
|
| |
Post subject: |
Re: Steps to Painting Ship's Deck? |
|
|
sargentx wrote: Here's my method:
I've read on here many times how modellers will paint each deck plank....each with a slightly different shade of tan to achieve an individual board look. The result is very effective but quite tedious to do. This may be nothing new, but I've discovered an incredibly easy way to achieve the exact same look in an afternoon.
I apologize if this is not a new idea.
Step 1: Before painting, use a wash of isopropyl alcohol and black pastel dust to flood the cracks of the decks. This is done right onto the primer layer. You can even do it onto bare plastic if you don't prime. Use just enough to make the lines in-between the boards come out to black. Don't worry about perfection here, just run the wash over everything, do some wiping and fiddling until the cracks pop out. I use rubbing alcohol as it evaporates quickly. Just make sure it doesn't dissolve your primer coat before you do this. I guess you could use an acrylic wash to do this, but it doesn't fill the cracks as nicely as the dust. The pastel dust is forever workable so you can fiddle with it ad-nauseum. Doing this first will save you from having to pin-wash the boards later.
Step 2:
Take a pencil, I use a B hardness. Using the sharp pencil shade the boards different darknesses. Don't be afraid to make many of the boards as dark as the pencil will go. You're going to be spraying on top of this so make it punchy. Really make the boards pop...very different from each other. Some black, some grey, some the colour of the plastic. Try to make the pattern look random and balanced. You could even use a white pencil crayon and make some lighter than your primer colour. The final result will be about 50% as visible as this step. Be bold.
Step 3:
When the boards look effectively differentiated, mix up a deck colour for your airbrush. The idea here is that you're going to lightly spray the decks until all the previous stuff is barely visible. The boards that you've shaded show through the airbrush layer and appear to be different colours/darknesses of the same wood tone. Done deal! No hand-painting, no pin washes. Pretty darn good idea. [quote="sargentx"]Here's my method:
I've read on here many times how modellers will paint each deck plank....each with a slightly different shade of tan to achieve an individual board look. The result is very effective but quite tedious to do. This may be nothing new, but I've discovered an incredibly easy way to achieve the exact same look in an afternoon.
I apologize if this is not a new idea.
Step 1: Before painting, use a wash of isopropyl alcohol and black pastel dust to flood the cracks of the decks. This is done right onto the primer layer. You can even do it onto bare plastic if you don't prime. Use just enough to make the lines in-between the boards come out to black. Don't worry about perfection here, just run the wash over everything, do some wiping and fiddling until the cracks pop out. I use rubbing alcohol as it evaporates quickly. Just make sure it doesn't dissolve your primer coat before you do this. I guess you could use an acrylic wash to do this, but it doesn't fill the cracks as nicely as the dust. The pastel dust is forever workable so you can fiddle with it ad-nauseum. Doing this first will save you from having to pin-wash the boards later.
Step 2:
Take a pencil, I use a B hardness. Using the sharp pencil shade the boards different darknesses. Don't be afraid to make many of the boards as dark as the pencil will go. You're going to be spraying on top of this so make it punchy. Really make the boards pop...very different from each other. Some black, some grey, some the colour of the plastic. Try to make the pattern look random and balanced. You could even use a white pencil crayon and make some lighter than your primer colour. The final result will be about 50% as visible as this step. Be bold.
Step 3:
When the boards look effectively differentiated, mix up a deck colour for your airbrush. The idea here is that you're going to lightly spray the decks until all the previous stuff is barely visible. The boards that you've shaded show through the airbrush layer and appear to be different colours/darknesses of the same wood tone. Done deal! No hand-painting, no pin washes.[/quote]
Pretty darn good idea.
|
|
|
|
Posted: Mon Oct 14, 2013 9:15 am |
|
|
|
|
|
| |
Post subject: |
Re: Steps to Painting Ship's Deck? |
|
|
|
Here's my method:
I've read on here many times how modellers will paint each deck plank....each with a slightly different shade of tan to achieve an individual board look. The result is very effective but quite tedious to do. This may be nothing new, but I've discovered an incredibly easy way to achieve the exact same look in an afternoon.
I apologize if this is not a new idea.
Step 1: Before painting, use a wash of isopropyl alcohol and black pastel dust to flood the cracks of the decks. This is done right onto the primer layer. You can even do it onto bare plastic if you don't prime. Use just enough to make the lines in-between the boards come out to black. Don't worry about perfection here, just run the wash over everything, do some wiping and fiddling until the cracks pop out. I use rubbing alcohol as it evaporates quickly. Just make sure it doesn't dissolve your primer coat before you do this. I guess you could use an acrylic wash to do this, but it doesn't fill the cracks as nicely as the dust. The pastel dust is forever workable so you can fiddle with it ad-nauseum. Doing this first will save you from having to pin-wash the boards later.
Step 2:
Take a pencil, I use a B hardness. Using the sharp pencil shade the boards different darknesses. Don't be afraid to make many of the boards as dark as the pencil will go. You're going to be spraying on top of this so make it punchy. Really make the boards pop...very different from each other. Some black, some grey, some the colour of the plastic. Try to make the pattern look random and balanced. You could even use a white pencil crayon and make some lighter than your primer colour. The final result will be about 50% as visible as this step. Be bold.
Step 3:
When the boards look effectively differentiated, mix up a deck colour for your airbrush. The idea here is that you're going to lightly spray the decks until all the previous stuff is barely visible. The boards that you've shaded show through the airbrush layer and appear to be different colours/darknesses of the same wood tone. Done deal! No hand-painting, no pin washes.
| Attachments: |

deckboards.jpg [ 190.68 KiB | Viewed 12872 times ]
|
Here's my method:
I've read on here many times how modellers will paint each deck plank....each with a slightly different shade of tan to achieve an individual board look. The result is very effective but quite tedious to do. This may be nothing new, but I've discovered an incredibly easy way to achieve the exact same look in an afternoon.
I apologize if this is not a new idea.
Step 1: Before painting, use a wash of isopropyl alcohol and black pastel dust to flood the cracks of the decks. This is done right onto the primer layer. You can even do it onto bare plastic if you don't prime. Use just enough to make the lines in-between the boards come out to black. Don't worry about perfection here, just run the wash over everything, do some wiping and fiddling until the cracks pop out. I use rubbing alcohol as it evaporates quickly. Just make sure it doesn't dissolve your primer coat before you do this. I guess you could use an acrylic wash to do this, but it doesn't fill the cracks as nicely as the dust. The pastel dust is forever workable so you can fiddle with it ad-nauseum. Doing this first will save you from having to pin-wash the boards later.
Step 2:
Take a pencil, I use a B hardness. Using the sharp pencil shade the boards different darknesses. Don't be afraid to make many of the boards as dark as the pencil will go. You're going to be spraying on top of this so make it punchy. Really make the boards pop...very different from each other. Some black, some grey, some the colour of the plastic. Try to make the pattern look random and balanced. You could even use a white pencil crayon and make some lighter than your primer colour. The final result will be about 50% as visible as this step. Be bold.
Step 3:
When the boards look effectively differentiated, mix up a deck colour for your airbrush. The idea here is that you're going to lightly spray the decks until all the previous stuff is barely visible. The boards that you've shaded show through the airbrush layer and appear to be different colours/darknesses of the same wood tone. Done deal! No hand-painting, no pin washes.
|
|
|
|
Posted: Fri Oct 11, 2013 11:48 am |
|
|
|
|
|
| |
Post subject: |
Re: Steps to Painting Ship's Deck? |
|
|
|
Veru intereting technique, will try it on my next ship. Thanks.
Veru intereting technique, will try it on my next ship. Thanks.
|
|
|
|
Posted: Thu Sep 10, 2009 3:18 am |
|
|
|
|
|
| |
Post subject: |
Re: Steps to Painting Ship's Deck? |
|
|
The deck shown in the above post looks a lot like what I do on my models. I start out by painting a base color of light tan until I get a uniform color. I then leave the deck alone for about a week to be sure the paint is really dry. I then use a wash of "earth brown" that I paint on the model directly with a brush. I keep brushing until the wash starts to get sticky and at that point it leaves some streaking that kinda reproduce the wood grain. Practice a bit first to get the hang of it but you'll see that it is very easy to do. And if you think the wash came out too dark you can always get some thinner on the deck and wipe the brown wash off before redoing it. That's why I wait for about a week before doing any wash on the deck. The thinner used will not be able to remove my base color that way  Once that step is done I proceed to paint all the fittings on deck with a small brush. And again I wait for another week before applying a wash of black over the deck and fittings. This wash is applied without too much brushing because I wipe most of it off with a lint free cloth. It removes most of the black paint but leaves just enough to create some depth on the deck. Note that I work with enamel paints and my wash are made using enamel thinners. I don't know if this technique would work with acrylic paints. Hope that helps! Sylvain The deck shown in the above post looks a lot like what I do on my models. I start out by painting a base color of light tan until I get a uniform color. I then leave the deck alone for about a week to be sure the paint is really dry. I then use a wash of "earth brown" that I paint on the model directly with a brush. I keep brushing until the wash starts to get sticky and at that point it leaves some streaking that kinda reproduce the wood grain. Practice a bit first to get the hang of it but you'll see that it is very easy to do. And if you think the wash came out too dark you can always get some thinner on the deck and wipe the brown wash off before redoing it. That's why I wait for about a week before doing any wash on the deck. The thinner used will not be able to remove my base color that way :thumbs_up_1:
Once that step is done I proceed to paint all the fittings on deck with a small brush. And again I wait for another week before applying a wash of black over the deck and fittings. This wash is applied without too much brushing because I wipe most of it off with a lint free cloth. It removes most of the black paint but leaves just enough to create some depth on the deck.
Note that I work with enamel paints and my wash are made using enamel thinners. I don't know if this technique would work with acrylic paints.
Hope that helps!
Sylvain
|
|
|
|
Posted: Wed Sep 02, 2009 3:14 pm |
|
|
|
|
|
| |
Post subject: |
Re: Steps to Painting Ship's Deck? |
|
|
Hello. I found this in other forum and i think it is pretty interesting. The autor says that he read the techniques in a FSM, But i do not get all the idea. Perhaps someone could help me with this. Greetings put on.I tried a new technique for simulating wooden deck,I read about this in FSM.This is to make a connoction of water,acrylic paint( Humbrol no62 service brown),and a couple of drops of washing-up liquid,making a `sludge`,This I applied with a cotton bud,and used a clean bud to remove any excess.Worked out pretty well. Bye for now Phil    Hello. I found this in other forum and i think it is pretty interesting. The autor says that he read the techniques in a FSM, But i do not get all the idea. Perhaps someone could help me with this. Greetings
put on.I tried a new technique for simulating wooden deck,I read about this in FSM.This is to make a connoction of water,acrylic paint( Humbrol no62 service brown),and a couple of drops of washing-up liquid,making a `sludge`,This I applied with a cotton bud,and used a clean bud to remove any excess.Worked out pretty well. Bye for now Phil
[img]http://i273.photobucket.com/albums/jj217/philreeder/Dido/SL271641.jpg[/img]
[img]http://i273.photobucket.com/albums/jj217/philreeder/Dido/SL271642.jpg[/img]
[img]http://i273.photobucket.com/albums/jj217/philreeder/Dido/SL271643.jpg[/img]
|
|
|
|
Posted: Sun Aug 23, 2009 12:17 am |
|
|
|
|
|
| |
Post subject: |
Re: Steps to Painting Ship's Deck? |
|
|
Irving... Thanks for that link. I will be reading through that, for sure. I've been building various models for awhile, but it never hurts to read new things....you just might learn something new.  My MO is to carefully paint the decks with a brush (using a dark tan), trying to get things as smooth, color-wise, as possible. I've also read some things that have talked about pre treating the seams for decks with a dark brown or black. That stated, I have never done it that way, since it would take forever with most "wooden" decks. Irving...
Thanks for that link. I will be reading through that, for sure. I've been building various models for awhile, but it never hurts to read new things....you just might learn something new. :cool_2:
My MO is to carefully paint the decks with a brush (using a dark tan), trying to get things as smooth, color-wise, as possible. I've also read some things that have talked about pre treating the seams for decks with a dark brown or black. That stated, I have never done it that way, since it would take forever with most "wooden" decks.
|
|
|
|
Posted: Wed Aug 19, 2009 10:06 am |
|
|
|
|
|
| |
Post subject: |
Re: Steps to Painting Ship's Deck? |
|
|
|
That latex-like stuff is generically known as liquid masks. The Mr. Hobby brand calls them "Mr. Masking Sol". Blue, and smells pretty bad. There are other brands, of course, but at least you'll know what to look for now.
That latex-like stuff is generically known as liquid masks. The Mr. Hobby brand calls them "Mr. Masking Sol". Blue, and smells pretty bad. There are other brands, of course, but at least you'll know what to look for now.
|
|
|
|
Posted: Wed Aug 19, 2009 12:39 am |
|
|
|
|
|
| |
Post subject: |
Re: Steps to Painting Ship's Deck? |
|
|
viewfinder32 wrote: Just started on Military Ships as i normally on 1/35 Armour. Normally how do you guys paint the decks of model ships? As in 1/350 scale? Assemble onto the hull first or paint the decks first?
My last model ship is the 1/350 IJN Yamato, I first assemble all the decks using cement to the hull first, nearly finish assembling all the structures on the decks, before airbrushing the decks, i masked all the anti aircraft gun positions, superstructures, etc which i had finished.
The problem is : "It was really a hell time masking", REALLY difficult to reach some areas with my masking tape. I even had to skip some steps in the manual due to painting problems after my ship is completed assembling. Now i am building the Tamiya's King George V, any good ways for painting the decks to avoid difficulty again? I still had tons of ships to go. If you got the money then you can buy this: http://www.hlj.com/product/SSGMCP017 . If you like to go for the cheap or original way then paint it with a good deck color. I recommend just prime the deck. Then spray it. And I do not know what this product is but I have seen someone getting like a Mr. Surfacer product and it was a green latex liquid gel and he wiped the deck areas he painted and tried not to get the metal parts on the decks only the wood and sprayed the whole thing with the ships default paint. Then he got a knife and scraped the latex liquid which dried up. I'll look for the link if you want it. I recall he was making a Yamato. [quote="viewfinder32"]Just started on Military Ships as i normally on 1/35 Armour. Normally how do you guys paint the decks of model ships? As in 1/350 scale? Assemble onto the hull first or paint the decks first?
My last model ship is the 1/350 IJN Yamato, I first assemble all the decks using cement to the hull first, nearly finish assembling all the structures on the decks, before airbrushing the decks, i masked all the anti aircraft gun positions, superstructures, etc which i had finished.
The problem is : "It was really a hell time masking", REALLY difficult to reach some areas with my masking tape. I even had to skip some steps in the manual due to painting problems after my ship is completed assembling. Now i am building the Tamiya's King George V, any good ways for painting the decks to avoid difficulty again? I still had tons of ships to go.[/quote]
If you got the money then you can buy this: http://www.hlj.com/product/SSGMCP017 . If you like to go for the cheap or original way then paint it with a good deck color. I recommend just prime the deck. Then spray it. And I do not know what this product is but I have seen someone getting like a Mr. Surfacer product and it was a green latex liquid gel and he wiped the deck areas he painted and tried not to get the metal parts on the decks only the wood and sprayed the whole thing with the ships default paint. Then he got a knife and scraped the latex liquid which dried up. I'll look for the link if you want it. I recall he was making a Yamato.
|
|
|
|
Posted: Wed Aug 19, 2009 12:27 am |
|
|
|
|
|
| |
Post subject: |
Re: Steps to Painting Ship's Deck? |
|
|
|
Hey Irving,
great link! Thanks for sharing!
Hey Irving,
great link! Thanks for sharing!
|
|
|
|
Posted: Wed Aug 12, 2009 3:19 pm |
|
|
|
|
|
| |
Post subject: |
Re: Steps to Painting Ship's Deck? |
|
|
Timmi you are right , but the subjects have a link if you are a rookie and want to paint a good wood effect, but if you are so new that you do not know how to do any of both. The way i see it, you can think so much how to paint, wheather, etc. but the best way is to work, sometimes you will blow up the model, but will give you experience. i found this great web page from Mike Ashey, http://mikeashey.com/BOOK-FIRST%20SHIP.htmyou can check this book an read all the tips he has. Hope this helps. greetongs Timmi you are right , but the subjects have a link if you are a rookie and want to paint a good wood effect, but if you are so new that you do not know how to do any of both. The way i see it, you can think so much how to paint, wheather, etc. but the best way is to work, sometimes you will blow up the model, but will give you experience. i found this great web page from Mike Ashey,
[size=150][url]http://mikeashey.com/BOOK-FIRST%20SHIP.htm[/url][/size]
you can check this book an read all the tips he has.
Hope this helps. greetongs
|
|
|
|
Posted: Tue Aug 11, 2009 4:24 pm |
|
|
|
|
|
| |
Post subject: |
Re: Steps to Painting Ship's Deck? |
|
|
|
Different question, Alec - one's about how to get a good wood effect, and the other's about painting order.
Different question, Alec - one's about how to get a good wood effect, and the other's about painting order.
|
|
|
|
Posted: Thu Jul 30, 2009 1:40 am |
|
|
|
|
|
| |
Post subject: |
Re: Steps to Painting Ship's Deck? |
|
|
|
Not being funny there is an open thread on the subject covered here on this site on how do I paint my deck.
Post subject: How do you paint 1/350 wood decks?Posted: Sat Jul 11, 2009 1:17 pm
Joined: Sat Jun 13, 2009 10:12 pm
Posts: 12
Location: Veracruz, Mexico. How do you paint 1/350 wood decks.
For sure you have more experience in this area. i was thinking painting the wood deck with acrilics and maybe some washes with darker colors. Do you have any tip for this. Greetings
|
|
|
|
Posted: Thu Jul 30, 2009 12:18 am |
|
|
|
|
|
| |
Post subject: |
Re: Steps to Painting Ship's Deck? |
|
|
|
I tried the method that you guys given me, it works great with no problems, painting the deck "1st" make things go much easlier a lot. Thanks soooooo much for the opinian.
I tried the method that you guys given me, it works great with no problems, painting the deck "1st" make things go much easlier a lot. Thanks soooooo much for the opinian.
|
|
|
|
Posted: Thu Jul 30, 2009 12:15 am |
|
|
|
|
|
| |
Post subject: |
Re: Steps to Painting Ship's Deck? |
|
|
Timmy C wrote: I don't worry about masking, because after painting the main deck colour, I just go back with a small brush to do the fittings. Same here. If you have a good eye, a bit of a straight hand and a good brush, this should not pose too much of a problem IMHO. Bill Keough  [quote="Timmy C"]I don't worry about masking, because after painting the main deck colour, I just go back with a small brush to do the fittings.[/quote]
Same here. If you have a good eye, a bit of a straight hand and a good brush, this should not pose too much of a problem IMHO.
Bill Keough :wave_1:
|
|
|
|
Posted: Mon Jul 27, 2009 11:30 pm |
|
|
|
|
|
| |
Post subject: |
Re: Steps to Painting Ship's Deck? |
|
|
|
If you build armor, think of it like this. If you were building a half-track or 1/2tonne you would paint the inside of the truck's beds before you add seats and equipment in the back, right? So think of the hull and maindeck as the "bed" and then work your way up the superstructure. On some pieces, you may have to paint them before you add them and then do touch-ups after gluing. If you have to sand or fill large cracks as you add superstructure pieces, you won't have any choice but to cut pieces of masking tape and take the time to mask and paint, but small cracks can be effectively hidden on painted peices with white glue painted into the cracks. I also find liquid masking agents useful in painting and touch-ups. Good Luck and don't get down on ships!!
Woody
|
|
|
|
Posted: Sun Jul 26, 2009 8:37 pm |
|
|
|
|
|
| |
Post subject: |
Re: Steps to Painting Ship's Deck? |
|
|
|
I paint the decks as one of the first things I do, long before gluing anything on. I don't worry about masking, because after painting the main deck colour, I just go back with a small brush to do the fittings.
I paint the decks as one of the first things I do, long before gluing anything on. I don't worry about masking, because after painting the main deck colour, I just go back with a small brush to do the fittings.
|
|
|
|
Posted: Sat Jul 25, 2009 1:49 pm |
|
|
|
|
|
| |
Post subject: |
Steps to Painting Ship's Deck? |
|
|
|
Just started on Military Ships as i normally on 1/35 Armour. Normally how do you guys paint the decks of model ships? As in 1/350 scale? Assemble onto the hull first or paint the decks first?
My last model ship is the 1/350 IJN Yamato, I first assemble all the decks using cement to the hull first, nearly finish assembling all the structures on the decks, before airbrushing the decks, i masked all the anti aircraft gun positions, superstructures, etc which i had finished.
The problem is : "It was really a hell time masking", REALLY difficult to reach some areas with my masking tape. I even had to skip some steps in the manual due to painting problems after my ship is completed assembling. Now i am building the Tamiya's King George V, any good ways for painting the decks to avoid difficulty again? I still had tons of ships to go.
|
|
|
|
Posted: Sat Jul 25, 2009 1:43 pm |
|
|
|
|