| Author |
Message |
|
|
| |
Post subject: |
Re: 1/350 Mine Sweeper Tripartite-Class |
 |
|
Hi Guido Excellent work  Wonderful miniature Arsenal  Ciao  Luciano Hi Guido
Excellent work :thumbs_up_1: :thumbs_up_1:
Wonderful miniature Arsenal :cool_2:
Ciao :wave_1:
Luciano
|
|
|
 |
Posted: Tue Dec 15, 2009 2:09 pm |
|
|
 |
|
|
| |
Post subject: |
Re: 1/350 Mine Sweeper Tripartite-Class |
|
|
|
Way to go, Skiper!
I'll be glad to help, if you should need assistance!
Cheers,
Guido
Way to go, Skiper!
I'll be glad to help, if you should need assistance!
Cheers,
Guido
|
|
|
|
Posted: Fri Dec 11, 2009 1:16 pm |
|
|
|
|
|
| |
Post subject: |
Re: 1/350 Mine Sweeper Tripartite-Class |
|
|
|
Fantastic work Guido. I like it so much that I ordered a ship from L'Arsenal for myself to have a go with the help of your step by step building.
Fantastic work Guido. I like it so much that I ordered a ship from L'Arsenal for myself to have a go with the help of your step by step building.
|
|
|
|
Posted: Fri Dec 11, 2009 11:41 am |
|
|
|
|
|
| |
Post subject: |
Re: 1/350 Mine Sweeper Tripartite-Class |
|
|
|
Thanks, Dave!
It was certainly a most relaxing build and good modellig fun!
Cheers,
Guido
Thanks, Dave!
It was certainly a most relaxing build and good modellig fun!
Cheers,
Guido
|
|
|
|
Posted: Fri Dec 11, 2009 11:05 am |
|
|
|
|
|
| |
Post subject: |
Re: 1/350 Mine Sweeper Tripartite-Class |
|
|
Hi Guido I have had the opportunity over the years to go aboard the a number of the Tripartite class and you a producing results just like the real ship. Dave Wooley Hi Guido I have had the opportunity over the years to go aboard the a number of the Tripartite class and you a producing results just like the real ship. :thumbs_up_1: :thumbs_up_1: :thumbs_up_1:
Dave Wooley
|
|
|
|
Posted: Thu Dec 10, 2009 8:44 am |
|
|
|
|
|
| |
Post subject: |
Re: 1/350 Mine Sweeper Tripartite-Class |
|
|
Gentlemen- Thank you guys! With a little tweaking I was able to finish and paint the Falcon ROV rig and the container within about an hour. Unfortunately, I can’t make my own PE, as the rig would be a great item to be done in that medium. Anyway, .5mm square rod would have to make do in my case. Surely, quite a bit of detail got lost on the way. 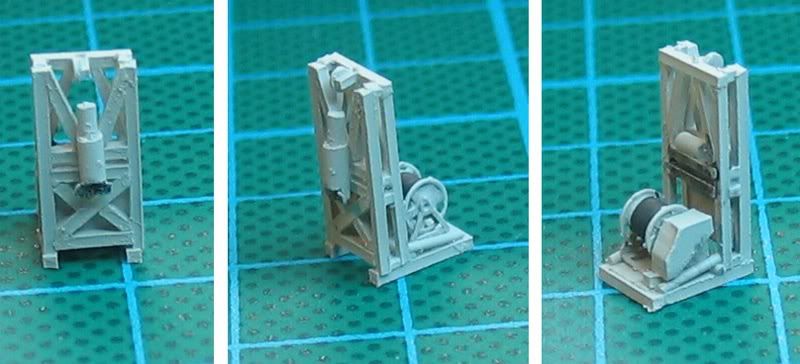 With the rig and container the aft decks got a lot more crowded instantly. 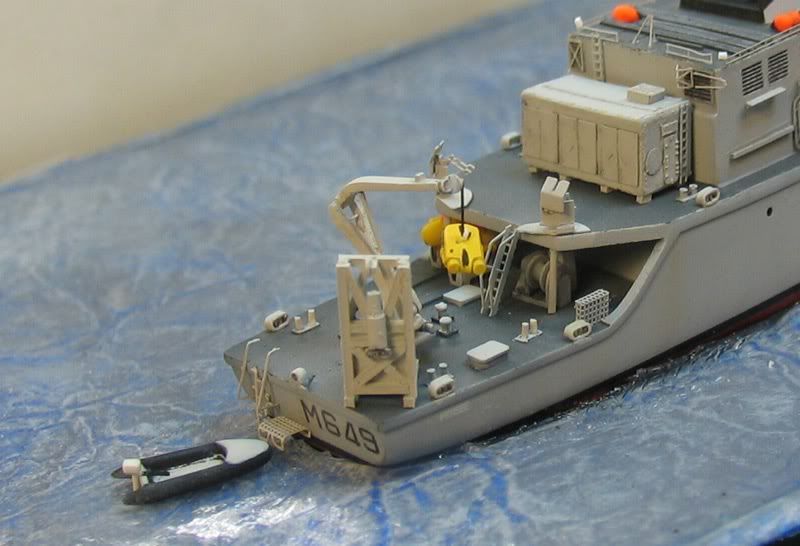 The only things left now were to add railings, antennae, crew, rigging and a bit of weathering. I was able to reconfirm “Reply/Papa/Bravo” flag signal for ongoing mine sweeping manoeuvres. I followed David Griffith’s tip to use cigarette paper as flags. I did use crayons instead of acrylic paint. However, I should try acrylics next time around. 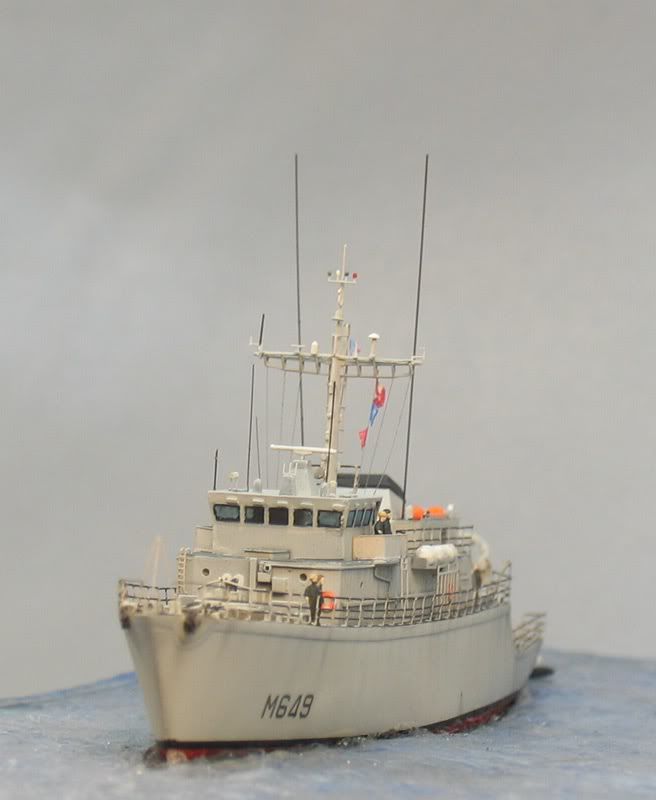 I have submitted photos for the front page news. Please expect them in the near future. Cheers, Guido Gentlemen-
Thank you guys!
With a little tweaking I was able to finish and paint the Falcon ROV rig and the container within about an hour. Unfortunately, I can’t make my own PE, as the rig would be a great item to be done in that medium. Anyway, .5mm square rod would have to make do in my case. Surely, quite a bit of detail got lost on the way.
[img]http://i157.photobucket.com/albums/t76/Guido-bay/Tripartite/Pro_40.jpg[/img]
With the rig and container the aft decks got a lot more crowded instantly.
[img]http://i157.photobucket.com/albums/t76/Guido-bay/Tripartite/Pro_41.jpg[/img]
The only things left now were to add railings, antennae, crew, rigging and a bit of weathering.
I was able to reconfirm “Reply/Papa/Bravo” flag signal for ongoing mine sweeping manoeuvres. I followed David Griffith’s tip to use cigarette paper as flags. I did use crayons instead of acrylic paint. However, I should try acrylics next time around.
[img]http://i157.photobucket.com/albums/t76/Guido-bay/Tripartite/Finish10.jpg[/img]
I have submitted photos for the front page news. Please expect them in the near future.
Cheers,
Guido
|
|
|
|
Posted: Thu Dec 10, 2009 3:57 am |
|
|
|
|
|
| |
Post subject: |
Re: 1/350 Mine Sweeper Tripartite-Class |
|
|
Nice equipment container mate! Paper is a great medium for making structures--and CA lends them permanence! JIM B Nice equipment container mate!
Paper is a great medium for making structures--and CA lends them permanence!
:thumbs_up_1: :thumbs_up_1:
JIM B :wave_1:
|
|
|
|
Posted: Sun Dec 06, 2009 4:55 am |
|
|
|
|
|
| |
Post subject: |
Re: 1/350 Mine Sweeper Tripartite-Class |
|
|
Hi Guido, a good job you doing with the "tupperware". I never would know about the complexity of the kit fm L'Arsenal, and for the nick of the class. The kit itself and decals and PE set are great, and hope you can finish with luck, and you'll have a nice model. Thanks for letting me know about your kit in the CASF for minesweeper, your model is a kind of choice. Congratulations and nice regards: Jimmy Hi Guido, a good job you doing with the "tupperware".
I never would know about the complexity of the kit fm L'Arsenal, and for the nick of the class.
The kit itself and decals and PE set are great, and hope you can finish with luck, and you'll have a nice model.
Thanks for letting me know about your kit in the CASF for minesweeper, your model is a kind of choice.
Congratulations and nice regards: :wave_1:
Jimmy
|
|
|
|
Posted: Sat Dec 05, 2009 10:32 pm |
|
|
|
|
|
| |
Post subject: |
Re: 1/350 Mine Sweeper Tripartite-Class |
|
|
Gentlemen – In with the last week I have been taking care of the water display. This time I used a Silicone method which is basically modified Ilse-Water. 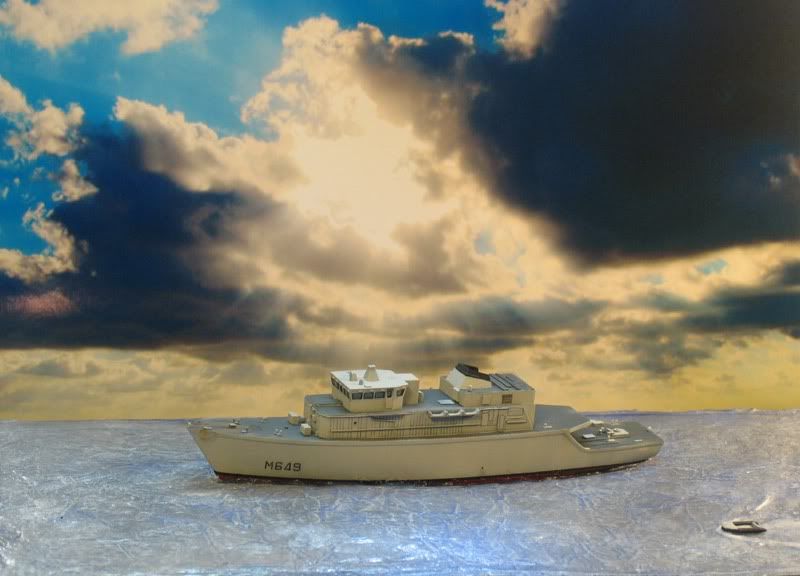 After being half-way satisfied with the result, I continued to add detail. Most of it is parts of the kit some is added according to the reference found for the Persee on the net. 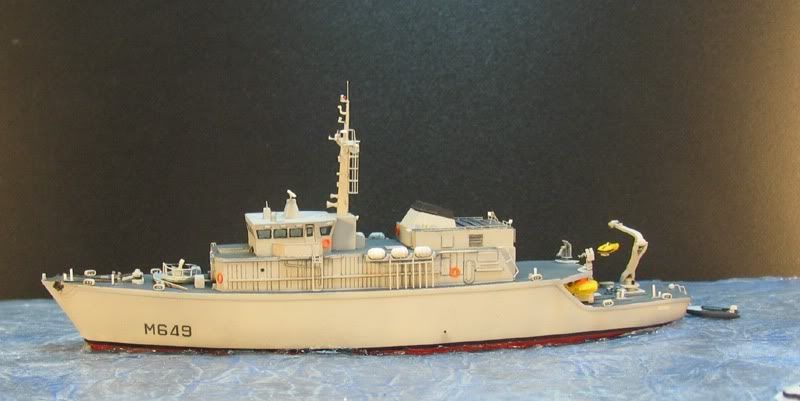 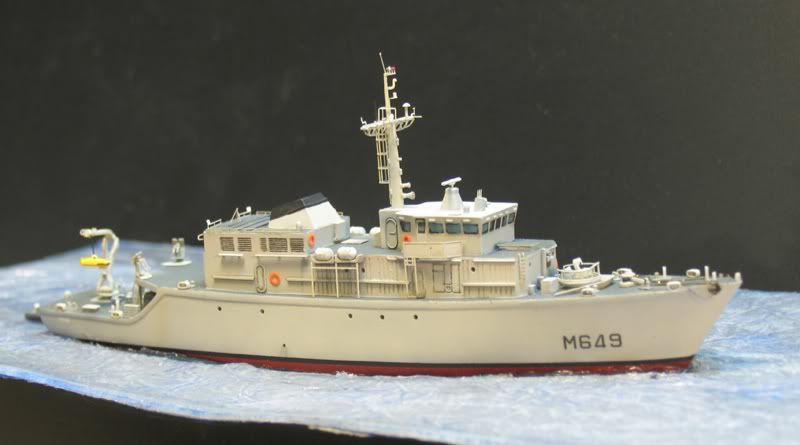 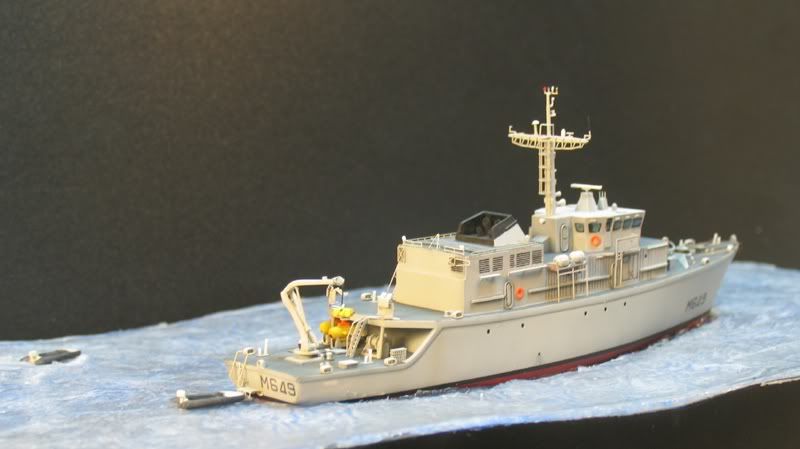 All the assembly was so painless I hardly know what I should write. Now I had decided to add the latest sweeping gear which necessitates the construction of the fitting equipment container, which is to be placed aft of the funnel house. I drew it on Photoshop and printed it on 120gr/m² paper. After building the basic container I infused highly liquid superglue for stability and added surface detail such as doors, hatches and a ladder. 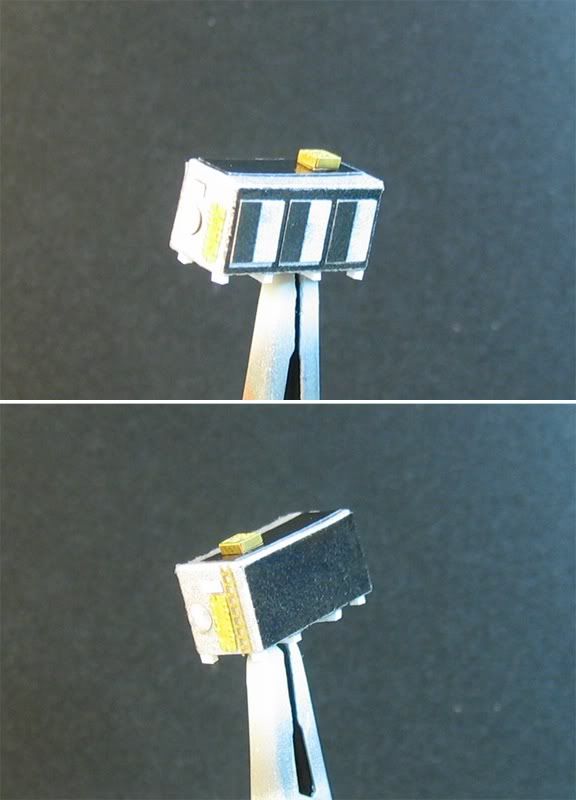 Then I went on to building the guidance cable rig for the Falcon ROV. 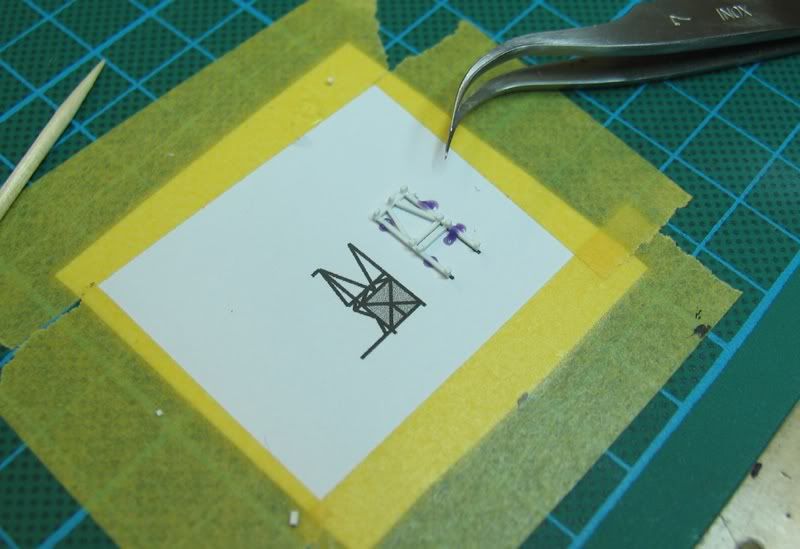 TBC Guido Gentlemen –
In with the last week I have been taking care of the water display. This time I used a Silicone method which is basically modified Ilse-Water.
[img]http://i157.photobucket.com/albums/t76/Guido-bay/water19.jpg[/img]
After being half-way satisfied with the result, I continued to add detail. Most of it is parts of the kit some is added according to the reference found for the Persee on the net.
[img]http://i157.photobucket.com/albums/t76/Guido-bay/Tripartite/Pro_30.jpg[/img]
[img]http://i157.photobucket.com/albums/t76/Guido-bay/Tripartite/Pro_31.jpg[/img]
[img]http://i157.photobucket.com/albums/t76/Guido-bay/Tripartite/Pro_32.jpg[/img]
All the assembly was so painless I hardly know what I should write.
Now I had decided to add the latest sweeping gear which necessitates the construction of the fitting equipment container, which is to be placed aft of the funnel house. I drew it on Photoshop and printed it on 120gr/m² paper. After building the basic container I infused highly liquid superglue for stability and added surface detail such as doors, hatches and a ladder.
[img]http://i157.photobucket.com/albums/t76/Guido-bay/Tripartite/Pro_33.jpg[/img]
Then I went on to building the guidance cable rig for the Falcon ROV.
[img]http://i157.photobucket.com/albums/t76/Guido-bay/Tripartite/Pro_34.jpg[/img]
TBC
Guido
|
|
|
|
Posted: Thu Dec 03, 2009 1:59 pm |
|
|
|
|
|
| |
Post subject: |
Re: 1/350 Mine Sweeper Tripartite-Class |
|
|
JIM BAUMANN wrote: ...-- we shall see a Guido fleet at Telford...??!!... 2010 will be a Gambler year! We'll be there and hopefully rock the Show once more. Clearly all the VMF-'06 are bent on going. In 2010 the show will be on 13th/14th November so it won't collide with SWMBO's and my son's birthday. Thanks Rui and Jim, Jonne and Rob for your kind comments and replies Cheers, Guido [quote="JIM BAUMANN"]...-- we shall see a Guido fleet at Telford...??!!...[/quote]
2010 will be a Gambler year! We'll be there and hopefully rock the Show once more.
Clearly all the VMF-'06 are bent on going. In 2010 the show will be on 13th/14th November so it won't collide with SWMBO's and my son's birthday. :thumbs_up_1:
Thanks Rui and Jim, Jonne and Rob for your kind comments and replies
Cheers,
Guido
|
|
|
|
Posted: Fri Nov 20, 2009 1:30 pm |
|
|
|
|
|
| |
Post subject: |
Re: 1/350 Mine Sweeper Tripartite-Class |
|
|
Tip-Top!! clean and sharp!! Good to see you building again-- we shall see a Guido fleet at Telford...??!! JIM B Tip-Top!!
clean and sharp!!
Good to see you building again-- we shall see a Guido fleet at Telford...??!!
JIM B :thumbs_up_1: :thumbs_up_1:
|
|
|
|
Posted: Fri Nov 20, 2009 1:23 pm |
|
|
|
|
|
| |
Post subject: |
Re: 1/350 Mine Sweeper Tripartite-Class |
|
|
Hallo Guido Nice work, as usual  Answer to question 3: Alpha Flag, although when divers are on small boats the "Four Flag" is usually seen (scuba divers) Cheers, Rui Hallo Guido
Nice work, as usual ;)
Answer to question 3: Alpha Flag, although when divers are on small boats the "Four Flag" is usually seen (scuba divers)
Cheers,
Rui
|
|
|
|
Posted: Fri Nov 20, 2009 11:00 am |
|
|
|
|
|
| |
Post subject: |
Re: 1/350 Mine Sweeper Tripartite-Class |
|
|
Gentlemen, I have been continuing the build by cleaning and painting all parts and details this week. Among the more prominent and evident developments are the foremast 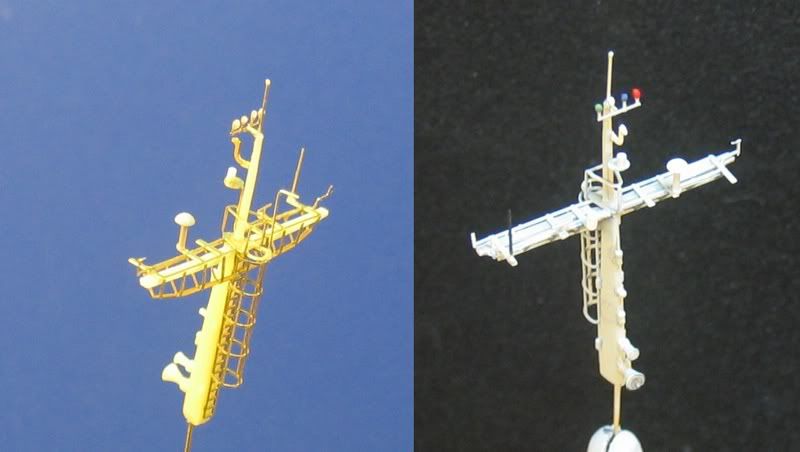 the PAP and the Falcon (ROV) 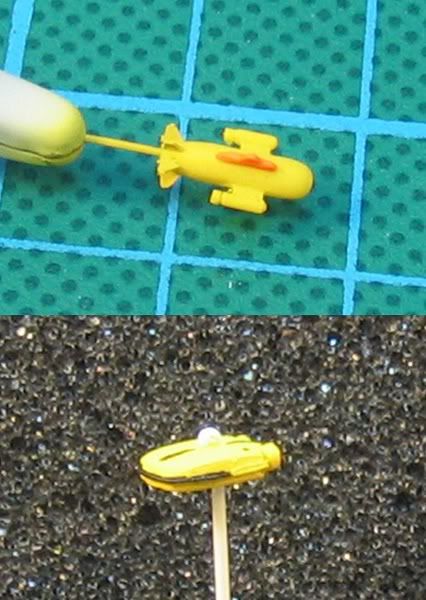 and the decals on the hull. 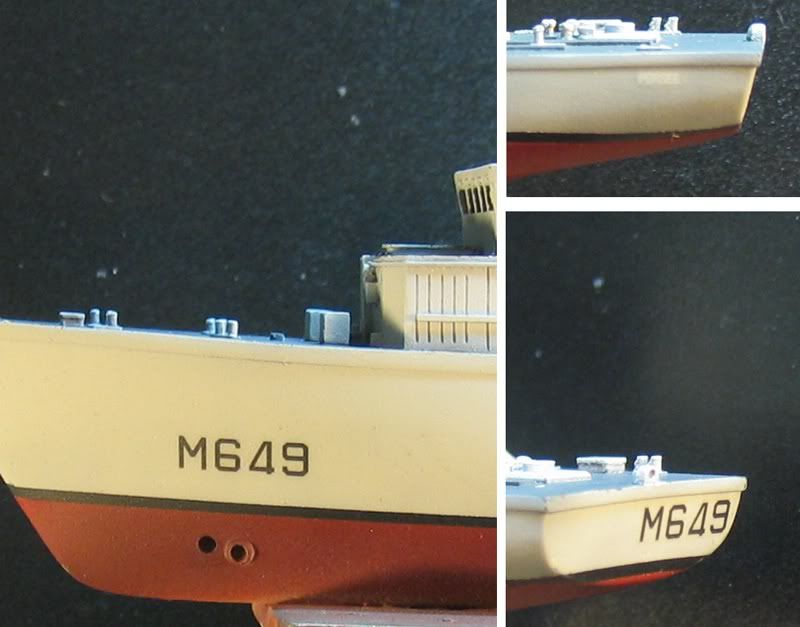 The mast turned out to be a bit on the fiddly side, but finally I managed to understand the instruction sketch. A couple of small parts “pinged” into kingdom come so I replaced them by scratch built parts and added a few “instruments” myself. If you turn down the pressure of your airbrush enough they even stay where they are supposed to be. The PAP are supplied by the kit and have very nice PE fins. These took a bit of holding my breath, but in the end worked out fine. The Falcon is scratch build after some photos on the net. The decaling was surprisingly painless: I added a thick layer of gloss coat (Revell) and let it dry overnight. The decals are in good register and the film is pretty thin, but wouldn’t break even under my decal-hating hands. A bit of Mr. Decal-Setter made them snuggle down nicely. I let them dry for 24 hours before adding a thick layer of matt clear coat No bobbles no silvering no visible film edge: It seems I am finally making my peace with decals. I have taken shots of all the prepared parts, but you can’t see a lot of detail so I safe the effort at this time and post later progress shots that will illustrate these parts a lot nicer. I have selected a fitting board for the base and will start the base within the next couple of days. Questions for the experts: 1. Where does the French navy run her colours while being underway? 2. Which flag signal will indicate “ongoing work with explosives”? 3. Which flag signal will indicate “divers in the water”? 4. Will the boats be sent out to secure a perimeter when an explosive devise is about to be set off? I seem to remember having seen in a TV report that the Germany navy does so. Can anyone confirm? Cheers, Guido Gentlemen,
I have been continuing the build by cleaning and painting all parts and details this week. Among the more prominent and evident developments are the foremast
[img]http://i157.photobucket.com/albums/t76/Guido-bay/Tripartite/Pro_23.jpg[/img]
the PAP and the Falcon (ROV)
[img]http://i157.photobucket.com/albums/t76/Guido-bay/Tripartite/Pro_20.jpg[/img]
and the decals on the hull.
[img]http://i157.photobucket.com/albums/t76/Guido-bay/Tripartite/Pro_21.jpg[/img]
The mast turned out to be a bit on the fiddly side, but finally I managed to understand the instruction sketch. A couple of small parts “pinged” into kingdom come so I replaced them by scratch built parts and added a few “instruments” myself. If you turn down the pressure of your airbrush enough they even stay where they are supposed to be.
The PAP are supplied by the kit and have very nice PE fins. These took a bit of holding my breath, but in the end worked out fine. The Falcon is scratch build after some photos on the net.
The decaling was surprisingly painless: I added a thick layer of gloss coat (Revell) and let it dry overnight. The decals are in good register and the film is pretty thin, but wouldn’t break even under my decal-hating hands. A bit of Mr. Decal-Setter made them snuggle down nicely. I let them dry for 24 hours before adding a thick layer of matt clear coat No bobbles no silvering no visible film edge: It seems I am finally making my peace with decals.
I have taken shots of all the prepared parts, but you can’t see a lot of detail so I safe the effort at this time and post later progress shots that will illustrate these parts a lot nicer.
I have selected a fitting board for the base and will start the base within the next couple of days.
Questions for the experts:
1. Where does the French navy run her colours while being underway?
2. Which flag signal will indicate “ongoing work with explosives”?
3. Which flag signal will indicate “divers in the water”?
4. Will the boats be sent out to secure a perimeter when an explosive devise is about to be set off? I seem to remember having seen in a TV report that the Germany navy does so. Can anyone confirm?
Cheers,
Guido
|
|
|
|
Posted: Fri Nov 20, 2009 10:37 am |
|
|
|
|
|
| |
Post subject: |
Re: 1/350 Mine Sweeper Tripartite-Class |
|
|
Hello Guido! Your model looks so cool! Good work, Guido! Joe Hello Guido!
Your model looks so cool!
Good work, Guido! :thumbs_up_1:
Joe
|
|
|
|
Posted: Wed Nov 18, 2009 1:47 pm |
|
|
|
|
|
| |
Post subject: |
Re: 1/350 Mine Sweeper Tripartite-Class |
|
|
|
Guido,
Interesting project and some nice work mate,
Cheers,
Rob
Guido,
Interesting project and some nice work mate,
Cheers,
Rob
|
|
|
|
Posted: Wed Nov 18, 2009 11:35 am |
|
|
|
|
|
| |
Post subject: |
Re: 1/350 Mine Sweeper Tripartite-Class |
|
|
Gentlemen, Thank you for checking in on my blog and for your offers for suppot an information. It's is quite good to have the feedback of someone who actually served on the boat one wants to build. Given the height/draught ratio one could have guesses that these boats are a bit "unconfortable" riding in deep water. Concerning the individually steered rudders, of cause I have taken my information from research off the net. Since he majority of the information is from Dutch, French and Belgian sites, you may guess that these are languages mostly used. Now neither my French, Flamish or Dutch are good enough to make a definite translation free of mistakes. I understood that the stern rudders could be manouvered indivdually both by rpm, thrust direction and steering direction. Anyway, I gladly stand corrected. I am very certain that you will find it necessary to correct me a couple more times while the build will be progressing.  Thanks for the advice on the portholes, too. I am glad that I decided to decal-mark the ship M649 "Persee" of the French Naval Forces this very morning and thus having by pure luck avoided to go at correcting the hull again.  I find that there is a lot of reference material to be found on the net and I tought that I will add the challenge to rig the boat with the MkII ROV. I understand that the big boom at the starboard stern is for the guidance able of the ROV and is lowered after the ROV is deployed. Do you have a picture of what is underneath the canvass?  TIA for your help Gentlemen,
Thank you for checking in on my blog and for your offers for suppot an information.
It's is quite good to have the feedback of someone who actually served on the boat one wants to build. Given the height/draught ratio one could have guesses that these boats are a bit "unconfortable" riding in deep water.
Concerning the individually steered rudders, of cause I have taken my information from research off the net. Since he majority of the information is from Dutch, French and Belgian sites, you may guess that these are languages mostly used. Now neither my French, Flamish or Dutch are good enough to make a definite translation free of mistakes. I understood that the stern rudders could be manouvered indivdually both by rpm, thrust direction and steering direction. Anyway, I gladly stand corrected. I am very certain that you will find it necessary to correct me a couple more times while the build will be progressing. :heh: :heh: :heh:
Thanks for the advice on the portholes, too. I am glad that I decided to decal-mark the ship M649 "Persee" of the French Naval Forces this very morning and thus having by pure luck avoided to go at correcting the hull again. :big_grin:
I find that there is a lot of reference material to be found on the net and I tought that I will add the challenge to rig the boat with the MkII ROV. I understand that the big boom at the starboard stern is for the guidance able of the ROV and is lowered after the ROV is deployed. Do you have a picture of what is underneath the canvass?
[img]http://i157.photobucket.com/albums/t76/Guido-bay/canvascover.jpg[/img]
TIA for your help
|
|
|
|
Posted: Wed Nov 18, 2009 10:04 am |
|
|
|
|
|
| |
Post subject: |
Re: 1/350 Mine Sweeper Tripartite-Class |
|
|
Guido wrote: To keep position the ships are equipped with 2 active rudders, both carrying a propulsion gondola which may be steered individually. Hi Guido your sentence here is quite unclear... the CMT's indeed are equipped with two active rudders and a bow thruster installation, with two propellers in two tubes, one plant being used to go to port, the other plant used to go to starboard. the rudders move in the same direction, port or starboard, they cannot be used separatly. The rudders rotation angle is 70° when on active electric propulsion, 35° when sailing on the main Diesel engine. The BE & NL CMT' went through a recent CUP, the paps were removed & replaced by seafoxes, the after deck also has been adapted. I've been chief engineer on the M924 Primula in the 90's, for two years and a half. I may say that those ships weren't the best ones I ever sailed on, they were intended to be coastal minehunters, but they are often sent to other areas, and those ships aren't good sea boats. for more picturial infomation about the CMT's, go to the Belgian Mil site: http://www.mil.be/navycomp/By the way, the BE & FR CMT's have the 5 portholes on the starboard side of the hull, the dutch don't have this feature, good to know when you want to model them. If you have any question about them, just ask Regards, Laurent [quote="Guido"]To keep position the ships are equipped with 2 active rudders, both carrying a propulsion gondola which may be steered individually.[/quote]
Hi Guido
your sentence here is quite unclear...
the CMT's indeed are equipped with two active rudders and a bow thruster installation, with two propellers in two tubes, one plant being used to go to port, the other plant used to go to starboard.
the rudders move in the same direction, port or starboard, they cannot be used separatly. The rudders rotation angle is 70° when on active electric propulsion, 35° when sailing on the main Diesel engine.
The BE & NL CMT' went through a recent CUP, the paps were removed & replaced by seafoxes, the after deck also has been adapted.
I've been chief engineer on the M924 Primula in the 90's, for two years and a half. I may say that those ships weren't the best ones I ever sailed on, they were intended to be coastal minehunters, but they are often sent to other areas, and those ships aren't good sea boats.
for more picturial infomation about the CMT's, go to the Belgian Mil site:
http://www.mil.be/navycomp/
By the way, the BE & FR CMT's have the 5 portholes on the starboard side of the hull, the dutch don't have this feature, good to know when you want to model them.
If you have any question about them, just ask
Regards,
Laurent
|
|
|
|
Posted: Wed Nov 18, 2009 7:23 am |
|
|
|
|
|
| |
Post subject: |
Re: 1/350 Mine Sweeper Tripartite-Class |
|
|
|
Nice subject, in a good scale too. If you need any and I really mean ANY additional reference material, just let me know. I'll sort through my stuff then, I have quite some stuff on this class. Including the recently fitted mine hunting gear, the diver support container with decompression tank etc. I also have some picture of these active rudders in the yards. Just let me know if you need anything.
Looking great already, I guess that's an advantage of resin ships, you can very rapidly "start" with the build and finish parts of it.
|
|
|
|
Posted: Tue Nov 17, 2009 6:08 am |
|
|
|
|
|
| |
Post subject: |
Re: 1/350 Mine Sweeper Tripartite-Class |
|
|
|
Guido,
What a great relaxing build that seems to be, your progress is looking very good indeed.
i look forward to seeing more from you.
Happy Modeling
John
Guido,
What a great relaxing build that seems to be, your progress is looking very good indeed.
i look forward to seeing more from you.
Happy Modeling
John
|
|
|
|
Posted: Sun Nov 15, 2009 5:45 pm |
|
|
|
|
|
| |
Post subject: |
Re: 1/350 Mine Sweeper Tripartite-Class |
|
|
Gentlemen, getting a “clean start” is always good advice. So first I remove all parts from their casting stubs and remove the flesh. Only the hull requires a bit more attention to get the stem and bottom clean. As previously mentioned I will set up a seascape display so remove the bilge keels at this point, as well. After a more than astounding 45 minutes I can start to clean up the parts using oven spray and a tooth brush. All parts are being rinsed with warm water. Finally I spray all parts with window cleaning agent that will ensure than no lime scale will encrust the parts by accelerating the evaporation process. As our tab water is quite hard, I found this quite helpful. Of cause you may use distilled water for rinsing and safe the trouble. In a next step I paint the model all over using Revell dark grey to achieve a pre-shading effect as the plane guys usually do. With the paint on the previously mentioned handful of pin holes become evident. All of them are filled using a needle and white glue. As soon as this is dry I run a couple more passes of grey over those filled up holes. Then the deck is sealed using Revell flat coat. While this dries I demark the boot topping area in black. As soon as all paints are dry the deck and boot topping line are masked off. 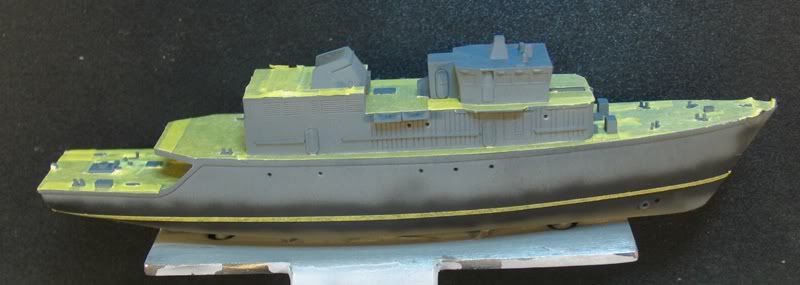 I found that WEM Admiralty light grey fits the grey used by the French Navy quite well, so I quickly decided to build a French vessel. I run multiple layers of thin coats across the hull taking care to leave a cloudy pattern simulating wear and allowing the recesses to stay a tad bit darker than the flat surfaces. 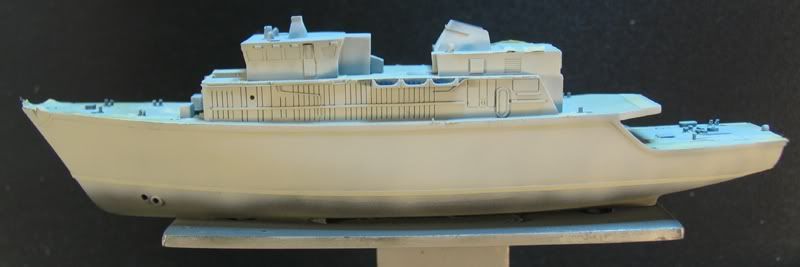 WEM asks for 6 hours of drying time, which is happily granted, even though I would wish for an acrylic colour coats line of such fine naval shades and quality. However, John and Caroline have again declined any request for a WEM acrylic paint line for good economical and quality control reasons. Anyway, six hours later the best part of the hull remains being masked off, while the bottom gets sprayed in a blend of Revell’s fiery red with a drop of black. 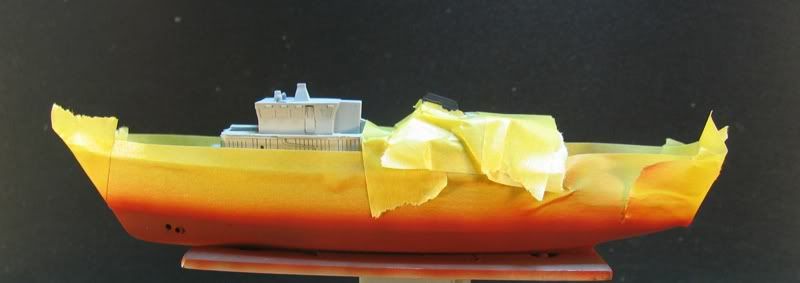 An hour later I have removed the masking and start to touch up and paint the windows.  The bridge area is quite big and if you should try to open the bridge fully and install all the dashboards, etc. you probably won’t find it too daunting. I however have decided to go for a bit of a quicker build this time. 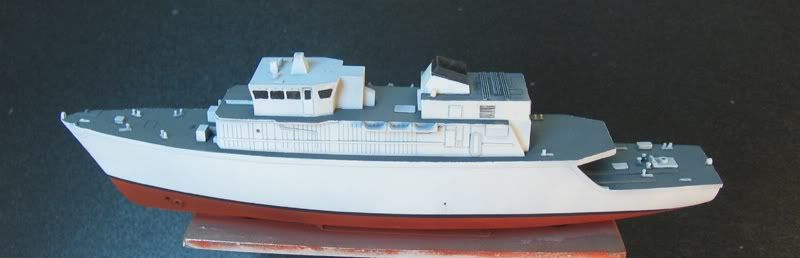 The only omissions in the hull casting are the bile pump outlets, which I have added using a .4mm drill bit. By the end of the second session of the build, I have to say that this is what I call “a straight forward build”. So far writing this report has required as much time as the build itself. I wonder if there are any tripping ropes on the way ahead. TBC Guido Gentlemen,
getting a “clean start” is always good advice. So first I remove all parts from their casting stubs and remove the flesh. Only the hull requires a bit more attention to get the stem and bottom clean. As previously mentioned I will set up a seascape display so remove the bilge keels at this point, as well. After a more than astounding 45 minutes I can start to clean up the parts using oven spray and a tooth brush. All parts are being rinsed with warm water. Finally I spray all parts with window cleaning agent that will ensure than no lime scale will encrust the parts by accelerating the evaporation process. As our tab water is quite hard, I found this quite helpful. Of cause you may use distilled water for rinsing and safe the trouble.
In a next step I paint the model all over using Revell dark grey to achieve a pre-shading effect as the plane guys usually do. With the paint on the previously mentioned handful of pin holes become evident. All of them are filled using a needle and white glue. As soon as this is dry I run a couple more passes of grey over those filled up holes. Then the deck is sealed using Revell flat coat. While this dries I demark the boot topping area in black. As soon as all paints are dry the deck and boot topping line are masked off.
[img]http://i157.photobucket.com/albums/t76/Guido-bay/Tripartite/Pro_01.jpg[/img]
I found that WEM Admiralty light grey fits the grey used by the French Navy quite well, so I quickly decided to build a French vessel. I run multiple layers of thin coats across the hull taking care to leave a cloudy pattern simulating wear and allowing the recesses to stay a tad bit darker than the flat surfaces.
[img]http://i157.photobucket.com/albums/t76/Guido-bay/Tripartite/Pro_02.jpg[/img]
WEM asks for 6 hours of drying time, which is happily granted, even though I would wish for an acrylic colour coats line of such fine naval shades and quality. However, John and Caroline have again declined any request for a WEM acrylic paint line for good economical and quality control reasons.
Anyway, six hours later the best part of the hull remains being masked off, while the bottom gets sprayed in a blend of Revell’s fiery red with a drop of black.
[img]http://i157.photobucket.com/albums/t76/Guido-bay/Tripartite/Pro_10.jpg[/img]
An hour later I have removed the masking and start to touch up and paint the windows.
[img]http://i157.photobucket.com/albums/t76/Guido-bay/Tripartite/Pro_11.jpg[/img]
The bridge area is quite big and if you should try to open the bridge fully and install all the dashboards, etc. you probably won’t find it too daunting. I however have decided to go for a bit of a quicker build this time.
[img]http://i157.photobucket.com/albums/t76/Guido-bay/Tripartite/Pro_12.jpg[/img]
The only omissions in the hull casting are the bile pump outlets, which I have added using a .4mm drill bit. By the end of the second session of the build, I have to say that this is what I call “a straight forward build”. So far writing this report has required as much time as the build itself.
I wonder if there are any tripping ropes on the way ahead.
TBC
Guido
|
|
|
|
Posted: Sun Nov 15, 2009 5:36 pm |
|
|
|
|