| Author |
Message |
|
|
| |
Post subject: |
Re: 1/350 Enterprise CV-6 |
 |
|
|
The Blue Water Hull is way off as well. John W has a lot posted on his reworking of their resin hull.
I am more oriented to scratch building so my first inclination is to just do it myself.
Paul
The Blue Water Hull is way off as well. John W has a lot posted on his reworking of their resin hull.
I am more oriented to scratch building so my first inclination is to just do it myself.
Paul
|
|
|
 |
Posted: Sat Dec 06, 2014 1:34 am |
|
|
 |
|
|
| |
Post subject: |
Re: 1/350 Enterprise CV-6 |
|
|
|
This is amazing!!! Im not sure if I missed it before, but were there significant problems with the Blue Water Navy Enterprise?
This is amazing!!! Im not sure if I missed it before, but were there significant problems with the Blue Water Navy Enterprise?
|
|
|
|
Posted: Fri Dec 05, 2014 5:05 pm |
|
|
|
|
|
| |
Post subject: |
Re: 1/350 Enterprise CV-6 |
|
|
|
Thank you for the encouragement. Although, I think it is about time to learn some Solid Works. I've been putting it off far too long.
Paul
Thank you for the encouragement. Although, I think it is about time to learn some Solid Works. I've been putting it off far too long.
Paul
|
|
|
|
Posted: Thu Dec 04, 2014 11:59 pm |
|
|
|
|
|
| |
Post subject: |
Re: 1/350 Enterprise CV-6 |
|
|
pbudzik wrote: Now I'm waiting to see what comes down from some of these injection companies. They might make me obsolete. Nooooo, not obsolete... does the assemble-yourself "furniture" warehouses make fine furniture craftsmen obsolete? I am also looking forward for more updates, as your work really motivates and inspires me. [quote="pbudzik"] Now I'm waiting to see what comes down from some of these injection companies. They might make me obsolete.[/quote]
Nooooo, not obsolete... does the assemble-yourself "furniture" warehouses make fine furniture craftsmen obsolete? I am also looking forward for more updates, as your work really motivates and inspires me.
|
|
|
|
Posted: Wed Dec 03, 2014 3:29 pm |
|
|
|
|
|
| |
Post subject: |
Re: 1/350 Enterprise CV-6 |
|
|
|
Thanks Steve,
I've gotten pretty sidetracked with the instructional videos, but I think that will be slowing down soon. Now I'm waiting to see what comes down from some of these injection companies. They might make me obsolete.
Paul
Thanks Steve,
I've gotten pretty sidetracked with the instructional videos, but I think that will be slowing down soon. Now I'm waiting to see what comes down from some of these injection companies. They might make me obsolete.
Paul
|
|
|
|
Posted: Mon Dec 01, 2014 2:02 pm |
|
|
|
|
|
| |
Post subject: |
Re: 1/350 Enterprise CV-6 |
|
|
|
Hope you'll post more here. This is a terrific build and I am learning a lot from you.
Hope you'll post more here. This is a terrific build and I am learning a lot from you.
|
|
|
|
Posted: Sun Nov 30, 2014 10:47 am |
|
|
|
|
|
| |
Post subject: |
Re: 1/350 Enterprise CV-6 |
|
|
JimRussell wrote: Paul,
Glad to see you are back at it, big scratch builds can seem to be "infinite" when you are in the middle of one.
Agree 100% with your cut vs scribe conclusion with a few quibbles.
1. You did not emphasize the dirt. Scribing with the back side generates a quantity of chips/shavings while the conventional "cut" does not (you know you are doing it right when there are plenty of white shavings).
2. Both sides of the "V" act as cutting edges not just the corners you circled in yellow.
3. The edge of the styrene piece after scribing is neither flat nor square. A few passes over a medium grit sandpaper that is resting on a FLAT surface gives a much better edge. Thanks Jim, My drawing is a bit confusing (never mastered 3d software. That "triangle" view is looking at the blade as if you were going to stick it in your eye - so it's just the cross-section at the very tip - if that makes sense. It was meant to indicate the acute corners along the entire back side of the blade. Your absolutely right about squaring up the edges, which I always do as well. I didn't go that far in my little "tutorial" but I think I'll add that on my web page. Thanks for keeping me honest. Hope to make some real progress. Paul [quote="JimRussell"]Paul,
Glad to see you are back at it, big scratch builds can seem to be "infinite" when you are in the middle of one.
Agree 100% with your cut vs scribe conclusion with a few quibbles.
1. You did not emphasize the dirt. Scribing with the back side generates a quantity of chips/shavings while the conventional "cut" does not (you know you are doing it right when there are plenty of white shavings).
2. Both sides of the "V" act as cutting edges not just the corners you circled in yellow.
3. The edge of the styrene piece after scribing is neither flat nor square. A few passes over a medium grit sandpaper that is resting on a FLAT surface gives a much better edge.[/quote]
Thanks Jim,
My drawing is a bit confusing (never mastered 3d software. That "triangle" view is looking at the blade as if you were going to stick it in your eye - so it's just the cross-section at the very tip - if that makes sense. It was meant to indicate the acute corners along the entire back side of the blade.
Your absolutely right about squaring up the edges, which I always do as well. I didn't go that far in my little "tutorial" but I think I'll add that on my web page.
Thanks for keeping me honest. Hope to make some real progress.
Paul
|
|
|
|
Posted: Mon Sep 09, 2013 11:24 am |
|
|
|
|
|
| |
Post subject: |
Re: 1/350 Enterprise CV-6 |
|
|
|
I've started using a fine scribing tool to cut styrene; one of the styles that removes a fine sliver of plastic as it scribes. Works really well.
I've started using a fine scribing tool to cut styrene; one of the styles that removes a fine sliver of plastic as it scribes. Works really well.
|
|
|
|
Posted: Mon Sep 09, 2013 10:49 am |
|
|
|
|
|
| |
Post subject: |
Re: 1/350 Enterprise CV-6 |
|
|
|
Paul,
Glad to see you are back at it, big scratch builds can seem to be "infinite" when you are in the middle of one.
Agree 100% with your cut vs scribe conclusion with a few quibbles.
1. You did not emphasize the dirt. Scribing with the back side generates a quantity of chips/shavings while the conventional "cut" does not (you know you are doing it right when there are plenty of white shavings).
2. Both sides of the "V" act as cutting edges not just the corners you circled in yellow.
3. The edge of the styrene piece after scribing is neither flat nor square. A few passes over a medium grit sandpaper that is resting on a FLAT surface gives a much better edge.
|
|
|
|
Posted: Mon Sep 09, 2013 10:23 am |
|
|
|
|
|
| |
Post subject: |
Re: 1/350 Enterprise CV-6 |
|
|
Construction of the hanger sides began with a paper template to test that things were going to line up 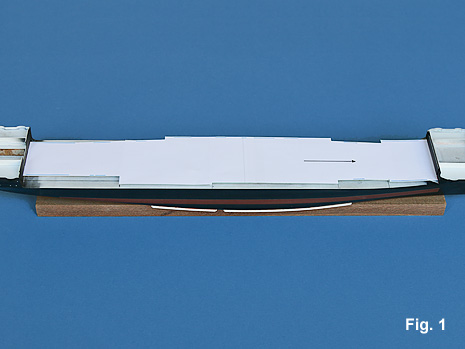 The hanger sides were cut form sheet styrene using a pretty basic method. A typical carpenters square is used against a straight edge clamped to the bench top. A block of wood is clamped to the straight edge to act as a stop. The little white square is a piece of styrene cut to the height of the sides to act as a spacer to position the square from the stop. Simply drawing the blade along the squares edge a few times creates enough of a score to fold off each side. 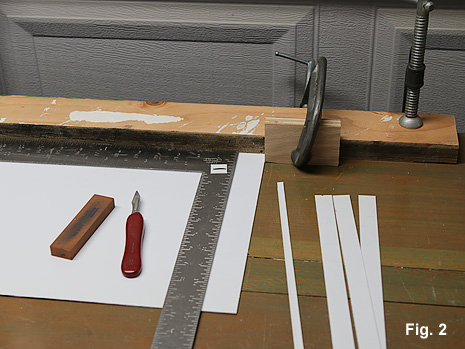 You want to draw the blade in reverse so that it acts just line a scribing tool, removing material at the corners of the blade circled in yellow. I keep a small sharpening stone handy. 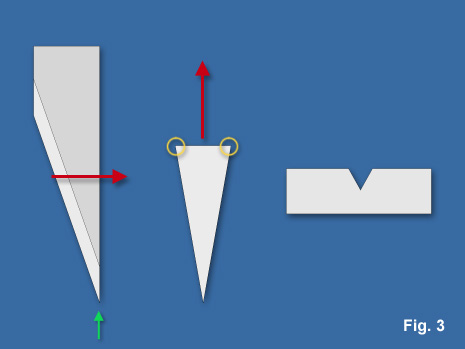 If you try and cut by running the blade with the sharp edge first, all you really do is create a trough and the blade can easily wander. 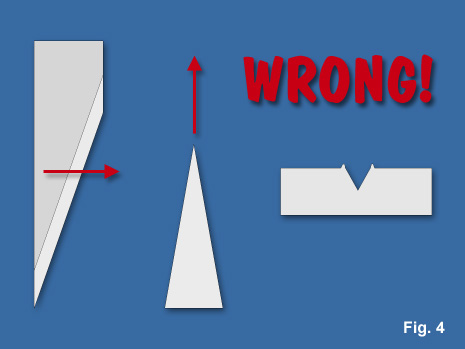 Paul Construction of the hanger sides began with a paper template to test that things were going to line up
[img]http://paulbudzik.com/current-projects/Enterprise%20Scratch/Images/uss_enterprise_scratch_401.jpg[/img]
The hanger sides were cut form sheet styrene using a pretty basic method. A typical carpenters square
is used against a straight edge clamped to the bench top. A block of wood is clamped to the straight edge
to act as a stop. The little white square is a piece of styrene cut to the height of the sides to act as a spacer
to position the square from the stop. Simply drawing the blade along the squares edge a few times
creates enough of a score to fold off each side.
[img]http://paulbudzik.com/current-projects/Enterprise%20Scratch/Images/uss_enterprise_scratch_402.jpg[/img]
You want to draw the blade in reverse so that it acts just line a scribing tool, removing material at the corners
of the blade circled in yellow. I keep a small sharpening stone handy.
[img]http://paulbudzik.com/current-projects/Enterprise%20Scratch/Images/uss_enterprise_scratch_403.jpg[/img]
If you try and cut by running the blade with the sharp edge first, all you really do is create a trough
and the blade can easily wander.
[img]http://paulbudzik.com/current-projects/Enterprise%20Scratch/Images/uss_enterprise_scratch_404.jpg[/img]
Paul
|
|
|
|
Posted: Sun Sep 08, 2013 5:20 pm |
|
|
|
|
|
| |
Post subject: |
Re: 1/350 Enterprise CV-6 |
|
|
Oh man, what a project. I too would love to have a CV-6 but after I read what needs to be done to CV-9 to make it into CV-6 I stopped. Out of my lead at the moment since I'm just starting with ship modeling, however, I sure am enjoying reading your WIP and it gives me boost of courage to tackle this project someday.  Totally awesome  Mike Oh man, what a project. I too would love to have a CV-6 but after I read what needs to be done to CV-9 to make it into CV-6 I stopped. Out of my lead at the moment since I'm just starting with ship modeling, however, I sure am enjoying reading your WIP and it gives me boost of courage to tackle this project someday.:) Totally awesome :thumbs_up_1:
Mike
|
|
|
|
Posted: Mon Sep 02, 2013 2:00 pm |
|
|
|
|
|
| |
Post subject: |
Re: 1/350 Enterprise CV-6 |
|
|
Well I screwed up and let myself get sidetracked, but it wasn't my fault. It was Ron Howard's fault with the movie "Rush." Put me back when I was working with Tamiya around FI. The time frame of the movie is when I got back into F1 after Dental School. Thanks to Tamiya, I had the opportunity to meet and talk with both Nikki Lauda and James Hunt on several occasions.  So I built display/shelves to finish off my workshop incorporating some Grand Prix diecasts:  Now back with the Enterprise, I was going over things to catch back up and start building the superstructure. I drew out the flight deck outline to use as a template. Interestingly, I found that the Trumpeter flight deck is over 12 scale feet short. At first I thought I had screwed up but rechecking the drawings and reorienting myself to the project, here is what I found. With the front of Trumpeter flight deck in position, you can see how the aft elevator does not line-up  Also, there is no aft overhang:  Hopefully these errors were not carried into the 1/200 model. Paul Well I screwed up and let myself get sidetracked, but it wasn't my fault. It was Ron Howard's fault with the movie "Rush." Put me back when I was working with Tamiya around FI. The time frame of the movie is when I got back into F1 after Dental School. Thanks to Tamiya, I had the opportunity to meet and talk with both Nikki Lauda and James Hunt on several occasions.
[img]http://paulbudzik.com/current-projects/Ferrari%20312T2/Images/Watkins_Glen_19XX.jpg[/img]
So I built display/shelves to finish off my workshop incorporating some Grand Prix diecasts:
[img]http://i42.photobucket.com/albums/e338/pbudzik/Flight-Deck-1_zpsa527681a.jpg[/img]
Now back with the Enterprise, I was going over things to catch back up and start building the superstructure. I drew out the flight deck outline to use as a template. Interestingly, I found that the Trumpeter flight deck is over 12 scale feet short. At first I thought I had screwed up but rechecking the drawings and reorienting myself to the project, here is what I found.
With the front of Trumpeter flight deck in position, you can see how the aft elevator does not line-up
[img]http://i42.photobucket.com/albums/e338/pbudzik/Flight-Deck-2_zps1f8c456c.jpg[/img]
Also, there is no aft overhang:
[img]http://i42.photobucket.com/albums/e338/pbudzik/Flight-Deck-3_zpscbf07b5a.jpg[/img]
Hopefully these errors were not carried into the 1/200 model.
Paul
|
|
|
|
Posted: Sat Aug 31, 2013 12:43 pm |
|
|
|
|
|
| |
Post subject: |
Re: 1/350 Enterprise CV-6 |
|
|
|
Man,Paul i wish i had your hull. just wonderful! :thumbs_up_1: :thumbs_up_1: :thumbs_up_1: :thumbs_up_1:
|
|
|
|
Posted: Wed Jan 02, 2013 9:26 pm |
|
|
|
|
|
| |
Post subject: |
Re: 1/350 Enterprise CV-6 |
|
|
|
I only now discovered this thread and your website. This is really excellent work!
I only now discovered this thread and your website. This is really excellent work!
|
|
|
|
Posted: Fri Dec 14, 2012 3:35 am |
|
|
|
|
|
| |
Post subject: |
Re: 1/350 Enterprise CV-6 |
|
|
hello Paul always has the quest of "more faithfully rendering" quest broadly achieved your work is superb cheers nicolas hello Paul
always has the quest of "more faithfully rendering" quest broadly achieved :thumbs_up_1:
your work is superb
cheers
nicolas
|
|
|
|
Posted: Mon Nov 26, 2012 12:10 pm |
|
|
|
|
|
| |
Post subject: |
Re: 1/350 Enterprise CV-6 |
|
|
The structure for the forward 5" gallery is done  Paul The structure for the forward 5" gallery is done
[img]http://i42.photobucket.com/albums/e338/pbudzik/forward_gallery_web.jpg[/img]
Paul
|
|
|
|
Posted: Sun Nov 25, 2012 5:48 pm |
|
|
|
|
|
| |
Post subject: |
Re: 1/350 Enterprise CV-6 |
|
|
|
Excellent work so far!
Excellent work so far!
|
|
|
|
Posted: Tue Nov 13, 2012 3:57 pm |
|
|
|
|
|
| |
Post subject: |
Re: 1/350 Enterprise CV-6 |
|
|
Hello Bob a nice precision work cheers Nicolas Hello Bob
a nice precision work :thumbs_up_1:
cheers
Nicolas
|
|
|
|
Posted: Tue Nov 13, 2012 3:53 pm |
|
|
|
|
|
| |
Post subject: |
Re: 1/350 Enterprise CV-6 |
|
|
Thanks Bob, Here is the completed side of the gallery deck superstructure. The doorway has been opened up and the plating detail engraved.  Paul Thanks Bob,
Here is the completed side of the gallery deck superstructure. The doorway has been opened up and the plating detail engraved.
[img]http://i42.photobucket.com/albums/e338/pbudzik/uss_enterprise_MWBB1.jpg[/img]
Paul
|
|
|
|
Posted: Tue Nov 13, 2012 11:58 am |
|
|
|
|
|
| |
Post subject: |
Re: 1/350 Enterprise CV-6 |
|
|
|
Sweet work, Paul.
Love how those bow chocks turned out.
Bob
Sweet work, Paul.
Love how those bow chocks turned out.
Bob
|
|
|
|
Posted: Wed Nov 07, 2012 2:46 pm |
|
|
|