| Author |
Message |
|
|
| |
Post subject: |
Re: Ironclad USS Chickasaw, 1/200 scale, from CAD model |
 |
|
Very nice indeed!  Takes me back to this classic by Shep Paine:   Very nice indeed! :thumbs_up_1:
Takes me back to this classic by Shep Paine: ;)
[img]https://images.squarespace-cdn.com/content/v1/5502fd61e4b0aba00140ed56/1432056305283-K7VAB8725VAR33V0WOF9/ke17ZwdGBToddI8pDm48kKw5NAZlB0H694uMtIURqZlZw-zPPgdn4jUwVcJE1ZvWQUxwkmyExglNqGp0IvTJZamWLI2zvYWH8K3-s_4yszcp2ryTI0HqTOaaUohrI8PIwoxAL7n0AQMhmiInkcGR2CVm0BxdOWm2sWxONo0KfpcKMshLAGzx4R3EDFOm1kBS/Monitor_2.jpg?format=1500w[/img]
|
|
|
 |
Posted: Wed Apr 22, 2020 9:02 am |
|
|
 |
|
|
| |
Post subject: |
Re: Ironclad USS Chickasaw, 1/200 scale, from CAD model |
|
|
|
That's really nice, D.
That's really nice, D.
|
|
|
|
Posted: Tue Apr 21, 2020 4:06 pm |
|
|
|
|
|
| |
Post subject: |
Re: Ironclad USS Chickasaw, 1/200 scale, from CAD model |
|
|
|
The 1/200 scale Dahlgren and carriage came out pretty good. This will be inside the turret, obviously, which I didn't plan to have visible, but maybe I'll leave one of the roofs removable and detail out the carriages in it with hand wheels, runners, etc.
| Attachments: |

2020-04-21_1652.jpg [ 95.68 KiB | Viewed 684 times ]
|
The 1/200 scale Dahlgren and carriage came out pretty good. This will be inside the turret, obviously, which I didn't plan to have visible, but maybe I'll leave one of the roofs removable and detail out the carriages in it with hand wheels, runners, etc.
|
|
|
|
Posted: Tue Apr 21, 2020 3:55 pm |
|
|
|
|
|
| |
Post subject: |
Re: Ironclad USS Chickasaw, 1/200 scale, from CAD model |
|
|
|
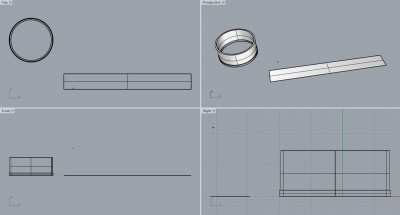
I'm still in the tinkering with the CAD for Chickasaw's components. I'm kicking off this print right now, estimated 4 hours to completion. We'll see how I've done then.
| Attachments: |

2020-04-20_1201.png [ 383.18 KiB | Viewed 711 times ]
|
I'm still in the tinkering with the CAD for Chickasaw's components. I'm kicking off this print right now, estimated 4 hours to completion. We'll see how I've done then.
|
|
|
|
Posted: Mon Apr 20, 2020 11:10 am |
|
|
|
|
|
| |
Post subject: |
Re: Ironclad USS Chickasaw, 1/200 scale, from CAD model |
|
|
marijn van gils wrote: I would leave the rivets as they are. Once painted, they will be more visible. And you can always make them pop out more with a (pin)wash. Thanks, Marijin! And I agree, a coat of black primer proves them visible enough.
| Attachments: |

2020-04-04 17.20.08.jpg [ 161.77 KiB | Viewed 738 times ]
|
[quote="marijn van gils"]I would leave the rivets as they are. Once painted, they will be more visible. And you can always make them pop out more with a (pin)wash.[/quote]
Thanks, Marijin! And I agree, a coat of black primer proves them visible enough.
|
|
|
|
Posted: Sat Apr 04, 2020 4:23 pm |
|
|
|
|
|
| |
Post subject: |
Re: Ironclad USS Chickasaw, 1/200 scale, from CAD model |
|
|
Great work Devin! Making good use of modern technology! I would leave the rivets as they are. Once painted, they will be more visible. And you can always make them pop out more with a (pin)wash. Great work Devin! Making good use of modern technology! :thumbs_up_1:
I would leave the rivets as they are. Once painted, they will be more visible. And you can always make them pop out more with a (pin)wash.
|
|
|
|
Posted: Sat Apr 04, 2020 1:39 pm |
|
|
|
|
|
| |
Post subject: |
Re: Ironclad USS Chickasaw, 1/200 scale, from CAD model |
|
|
|
It's looking good.
It's looking good.
|
|
|
|
Posted: Fri Apr 03, 2020 5:55 pm |
|
|
|
|
|
| |
Post subject: |
Re: Ironclad USS Chickasaw, 1/200 scale, from CAD model |
|
|
|
I've drawn all of the armor bolts, 600 of them to be precise, and used the very handy FlowAlongSurface command in Rhino 6 to stick them all to the turret body. I also cut out the gun ports. Pictured, you can see the resulting prints. I still need to add some interior wall detail to the turret, basically separation lines for the curtain walls, and a recess at the bottom for the gun deck. I may also increase the size of the bolts. What I have here is nearly spot-on for reference photos I have for Ericcson turrets (besides the original Monitor), but if they were a bit more visible, it may be nice. I used the Block command in Rhino to draw the original bolt, and then copied it out for the 599 other instances, so I only have to modify one bolt and the others will update automatically.
Also, my trick of shimming the gap between test turret slug print and the hull with a sheet of styrene, then using that thickness to offset the turret drawing, worked like a charm. I've got a very nice friction-fit going on.
Next up is drawing the turret roof. I'm using a paper model of Chickasaw as the template for that, which makes it simple enough. Ideally I'd laser cut the turret top and deck out of .030" acrylic at work, but today marks my first day of furlough due to the Covid-19 crisis, so I don't have access for now. I'll print them here at home and see how they turn out; weirder ideas have worked fine.
| Attachments: |
File comment: Two turrets. I printed two test pieces, as these things cost me $.18 each.

2020-04-03 08.53.20.jpg [ 266.25 KiB | Viewed 780 times ]
|
File comment: Armor bolt and gun port detail.

2020-04-03 08.53.32.jpg [ 190.93 KiB | Viewed 780 times ]
|
File comment: Current working view in Rhino 6, showing the screen capture from a paper model PDF being used for turret roof pattern.

2020-04-03_1344.png [ 213.86 KiB | Viewed 780 times ]
|
I've drawn all of the armor bolts, 600 of them to be precise, and used the very handy FlowAlongSurface command in Rhino 6 to stick them all to the turret body. I also cut out the gun ports. Pictured, you can see the resulting prints. I still need to add some interior wall detail to the turret, basically separation lines for the curtain walls, and a recess at the bottom for the gun deck. I may also increase the size of the bolts. What I have here is nearly spot-on for reference photos I have for Ericcson turrets (besides the original Monitor), but if they were a bit more visible, it may be nice. I used the Block command in Rhino to draw the original bolt, and then copied it out for the 599 other instances, so I only have to modify one bolt and the others will update automatically.
Also, my trick of shimming the gap between test turret slug print and the hull with a sheet of styrene, then using that thickness to offset the turret drawing, worked like a charm. I've got a very nice friction-fit going on.
Next up is drawing the turret roof. I'm using a paper model of Chickasaw as the template for that, which makes it simple enough. Ideally I'd laser cut the turret top and deck out of .030" acrylic at work, but today marks my first day of furlough due to the Covid-19 crisis, so I don't have access for now. I'll print them here at home and see how they turn out; weirder ideas have worked fine.
|
|
|
|
Posted: Fri Apr 03, 2020 1:04 pm |
|
|
|
|
|
| |
Post subject: |
Re: Ironclad USS Chickasaw, 1/200 scale, from CAD model |
|
|
|
As one of my friends said, when someone criticized his use of 3D printed parts on his models, because they think they won't last more than 50 years: "50 years? Then what do I care? I'll be dead!"
As one of my friends said, when someone criticized his use of 3D printed parts on his models, because they think they won't last more than 50 years: "50 years? Then what do I care? I'll be dead!"
|
|
|
|
Posted: Wed Apr 01, 2020 7:06 am |
|
|
|
|
|
| |
Post subject: |
Re: Ironclad USS Chickasaw, 1/200 scale, from CAD model |
|
|
|
Thank you for the re-assuring words..!!
My parts are custom made from Black Cat models...
-- so I hope they will outlive me!
cheers
JIM B
Thank you for the re-assuring words..!!
My parts are custom made from Black Cat models...
-- so I hope they will outlive me!
cheers
JIM B
|
|
|
|
Posted: Wed Apr 01, 2020 3:57 am |
|
|
|
|
|
| |
Post subject: |
Re: Ironclad USS Chickasaw, 1/200 scale, from CAD model |
|
|
|
I honestly have no idea how long modern printed parts -- meaning those done by SLA or DLP printers -- will last. What I can comment on is my experience with them. I started working with a DLP-style printer, one that uses UV light to cure liquid resin, about 3.5 years ago at my day job at Gulliver's Gate. We built in 1/87th scale: building fixtures, furniture, aircraft and vehicles. So far there has been zero degradation to the printed and assembled pieces, and I have several samples in my possession from the job, unpainted, that look as good now as they did on the day they came out of the vat. My understanding is that the resin used in the SLA and DLP printers -- those used by, for example, Model Monkey, Black Cat Models, etc. -- is very similar to the resin used in casting parts, such as one would find in aftermarket accessories or resin kits. So, it should last as long as those do, one would hope. I would say that the prints, though, should be kept out of direct sunlight as much as possible, especially before being primed and painted, as that'll continue the cure process and can cause degradation.
These prints from Shapeways are printed by a different technology. I know they use some sort of wax substrate, but beyond that I don't know much about it.
|
|
|
|
Posted: Tue Mar 31, 2020 2:13 pm |
|
|
|
|
|
| |
Post subject: |
Re: Ironclad USS Chickasaw, 1/200 scale, from CAD model |
|
|
JIM BAUMANN wrote: >>>> I'm shocked to see the Shapeway's parts suffering from deterioration. Are modern resin parts going to suffer similarly? <<<<hear hear !! that was the question that immediately arose in my mind as I read your posting but Owen ( ) beat me to it!!! on the Normandie.... I am using quiet a few --albeit very small-- 3 D printed parts-- granted modern 3D print- but still... if you have any thoughts on this I would like to hear your opinion...( ..??! or may be not ...eh!! ) regards JB This is a pretty well known issue for folks that print via shapeways. Supposedly it's because the printers were tweaked to run faster or something... been a long time ago since it came to light. Shapeways even involved some of us in an experiment on how we handled and finished items to see if that was impacting the finished parts. I try to brush my parts with a fiberglass brush before finishing. I've not had any finished items degrade, but I have had unfinished ones develop the crust on them. [quote="JIM BAUMANN"][i][b][u]>>>> I'm shocked to see the Shapeway's parts suffering from deterioration. Are modern resin parts going to suffer similarly? <<<<[/u][/b][/i]
hear hear !! that was the question that immediately arose in my mind as I read your posting
but Owen ( :thumbs_up_1: ) beat me to it!!!
on the Normandie.... I am using quiet a few --albeit very small-- 3 D printed parts-- granted modern 3D print-
but still...
if you have any thoughts on this I would like to hear your opinion...( ..??! or may be not ...eh!! )
regards
JB[/quote]This is a pretty well known issue for folks that print via shapeways. Supposedly it's because the printers were tweaked to run faster or something... been a long time ago since it came to light. Shapeways even involved some of us in an experiment on how we handled and finished items to see if that was impacting the finished parts. I try to brush my parts with a fiberglass brush before finishing. I've not had any finished items degrade, but I have had unfinished ones develop the crust on them.
|
|
|
|
Posted: Tue Mar 31, 2020 11:08 am |
|
|
|
|
|
| |
Post subject: |
Re: Ironclad USS Chickasaw, 1/200 scale, from CAD model |
|
|
>>>> I'm shocked to see the Shapeway's parts suffering from deterioration. Are modern resin parts going to suffer similarly? <<<<hear hear !! that was the question that immediately arose in my mind as I read your posting but Owen ( ) beat me to it!!! on the Normandie.... I am using quiet a few --albeit very small-- 3 D printed parts-- granted modern 3D print- but still... if you have any thoughts on this I would like to hear your opinion...( ..??! or may be not ...eh!! ) regards JB
[i][b][u]>>>> I'm shocked to see the Shapeway's parts suffering from deterioration. Are modern resin parts going to suffer similarly? <<<<[/u][/b][/i]
hear hear !! that was the question that immediately arose in my mind as I read your posting
but Owen ( :thumbs_up_1: ) beat me to it!!!
on the Normandie.... I am using quiet a few --albeit very small-- 3 D printed parts-- granted modern 3D print-
but still...
if you have any thoughts on this I would like to hear your opinion...( ..??! or may be not ...eh!! )
regards
JB
|
|
|
|
Posted: Tue Mar 31, 2020 4:41 am |
|
|
|
|
|
| |
Post subject: |
Re: Ironclad USS Chickasaw, 1/200 scale, from CAD model |
|
|
|
Nice to see this continuing!
I'm shocked to see the Shapeway's parts suffering from deterioration. Are modern resin parts going to suffer similarly?
- Owen
Nice to see this continuing!
I'm shocked to see the Shapeway's parts suffering from deterioration. Are modern resin parts going to suffer similarly?
- Owen
|
|
|
|
Posted: Tue Mar 31, 2020 3:51 am |
|
|
|
|
|
| |
Post subject: |
Re: Ironclad USS Chickasaw, 1/200 scale, from CAD model |
|
|
|
I don't have a lot to show, but I said I'd post, so here goes. The majority of the last week was made up of the model maker's meditation of "fill, sand, prime, repeat." Tedious work, but I've come to enjoy it, and now I have the hull smooth and ready for detailing.
It's been years since I last worked on this kit, and during that time the Shapeways prints have degraded. As you can see in the photo, the unpainted turret is growing what looks like rust from a shipwreck, and the surfaces have gone soapy. It's hard to tell from the photo, but even the turret that was primed years ago has started to break down, too, exhibiting a glittery and waxy texture as the material leeches out through the primer.
Needless to say, this won't do. I don't have any of these files that the parts were printed from, so out came the calipers and I made dozens of measurements to figure out what the diameter should be, as the parts are no longer perfectly cylindrical. I mocked up a quick turret shell, which I printed on my Epax 3D printer to test the size. It came out just a little small, so I tried small strips of styrene into the gap until I got the right thickness -- too small of a gap to get calipers into -- then offset the drawings in CAD by that amount. The next print should now be the proper diameter.
I've started preliminary work on the CAD work for the turret. Basically what you see is that turret shell I drew, with the face unrolled to a flat plane. That one teeny tiny dot just above the flat face is the first of the bolts that will cover the turret face.
| Attachments: |
File comment: Turrets showing signs of breaking down.

2020-03-30 22.35.22.jpg [ 352.29 KiB | Viewed 863 times ]
|
File comment: Slight gap between the hull and the 3D print.

2020-03-27 18.37.18.jpg [ 180.06 KiB | Viewed 863 times ]
|
File comment: The VERY start of the CAD word for turrets.
2020-03-30_2232.jpg [ 106.59 KiB | Viewed 863 times ]
|
I don't have a lot to show, but I said I'd post, so here goes. The majority of the last week was made up of the model maker's meditation of "fill, sand, prime, repeat." Tedious work, but I've come to enjoy it, and now I have the hull smooth and ready for detailing.
It's been years since I last worked on this kit, and during that time the Shapeways prints have degraded. As you can see in the photo, the unpainted turret is growing what looks like rust from a shipwreck, and the surfaces have gone soapy. It's hard to tell from the photo, but even the turret that was primed years ago has started to break down, too, exhibiting a glittery and waxy texture as the material leeches out through the primer.
Needless to say, this won't do. I don't have any of these files that the parts were printed from, so out came the calipers and I made dozens of measurements to figure out what the diameter should be, as the parts are no longer perfectly cylindrical. I mocked up a quick turret shell, which I printed on my Epax 3D printer to test the size. It came out just a little small, so I tried small strips of styrene into the gap until I got the right thickness -- too small of a gap to get calipers into -- then offset the drawings in CAD by that amount. The next print should now be the proper diameter.
I've started preliminary work on the CAD work for the turret. Basically what you see is that turret shell I drew, with the face unrolled to a flat plane. That one teeny tiny dot just above the flat face is the first of the bolts that will cover the turret face.
|
|
|
|
Posted: Mon Mar 30, 2020 9:47 pm |
|
|
|
|
|
| |
Post subject: |
Re: Ironclad USS Chickasaw, 1/200 scale, from CAD model |
|
|
|
Thanks, guys. Yes, I'm continuing on with her. I'll likely post photo updates tomorrow; right now it's mostly filling and sanding, and reverse-engineering the sizes of the turrets and such needed.
Thanks, guys. Yes, I'm continuing on with her. I'll likely post photo updates tomorrow; right now it's mostly filling and sanding, and reverse-engineering the sizes of the turrets and such needed.
|
|
|
|
Posted: Sat Mar 28, 2020 12:39 pm |
|
|
|
|
|
| |
Post subject: |
Re: Ironclad USS Chickasaw, 1/200 scale, from CAD model |
|
|
Great to see you get back to this one! The amount of Mr Surfacer seems limited so far. Hope to see more progress Great to see you get back to this one! The amount of Mr Surfacer seems limited so far.
Hope to see more progress :thumbs_up_1:
|
|
|
|
Posted: Sat Mar 28, 2020 12:03 pm |
|
|
|
|
|
| |
Post subject: |
Re: Ironclad USS Chickasaw, 1/200 scale, from CAD model |
|
|
never wrong to rescue an abandoned project..... I have a few of those also... to quote you a few years back: >>> So, almost two years later, I'm back at work on Chickasaw. <<< best wishes to see it through! JIM B  never wrong to rescue an abandoned project.....
I have a few of those also...
to quote you a few years back:
>>> So, almost two years later, I'm back at work on Chickasaw. <<<
best wishes to see it through!
JIM B :wave_1:
|
|
|
|
Posted: Sat Mar 28, 2020 8:41 am |
|
|
|
|
|
| |
Post subject: |
Re: Ironclad USS Chickasaw, 1/200 scale, from CAD model |
|
|
|
Behold the Resurrection!
Behold the Resurrection!
|
|
|
|
Posted: Sun Mar 22, 2020 7:28 pm |
|
|
|
|
|
| |
Post subject: |
Re: Ironclad USS Chickasaw, 1/200 scale, from CAD model |
|
|
|
The USS Chickasaw has been pulled down off the Shelf of Doom. While I don't yet have more down-time due to the quarantine -- the model shop I work at is walking distance from home, and we're transitioning to all CAD/Digital work tomorrow for the foreseeable -- I have been taking stock of what I want to finish and what to start next.
Starting off slow, right now I'm assessing the state of the hull. The styrene sheeting over the plywood frames has cracked in a few places. I've slathered some Mr. Surfacer over those areas, I'll first sand that down to see if that fixes the issues. I'm not entirely confident that the assembly will survive long-term, so my goal is to get it plated, bolted (not riveted, ironclads did not have rivets) and then cast a resin copy of the hull for the rest of the project.
I put Chickasaw aside due to the usual project fatigue, and being stuck on how to do several things. As you can see, it's been over 4 years since I last worked on her, and I've learned a LOT in that time. I'll be leaning on my experience in CAD, specifically Rhinoceros v6, and my resin 3D printer at home, the Epax X1, to make the turrets, guns, props, and anything else along those lines.
| Attachments: |
File comment: The hull with noticable splotches of Mr. Surfacer. The printed turret is not for Chickasaw, but rather another project, the USS Monitor, in 1/200 scale; basically testing my printer. The X-Wing in the background is the in-progress 1/72nd scale Bandai kit.

2020-03-21 10.29.39.jpg [ 349.27 KiB | Viewed 985 times ]
|
The USS Chickasaw has been pulled down off the Shelf of Doom. While I don't yet have more down-time due to the quarantine -- the model shop I work at is walking distance from home, and we're transitioning to all CAD/Digital work tomorrow for the foreseeable -- I have been taking stock of what I want to finish and what to start next.
Starting off slow, right now I'm assessing the state of the hull. The styrene sheeting over the plywood frames has cracked in a few places. I've slathered some Mr. Surfacer over those areas, I'll first sand that down to see if that fixes the issues. I'm not entirely confident that the assembly will survive long-term, so my goal is to get it plated, bolted (not riveted, ironclads did not have rivets) and then cast a resin copy of the hull for the rest of the project.
I put Chickasaw aside due to the usual project fatigue, and being stuck on how to do several things. As you can see, it's been over 4 years since I last worked on her, and I've learned a LOT in that time. I'll be leaning on my experience in CAD, specifically Rhinoceros v6, and my resin 3D printer at home, the Epax X1, to make the turrets, guns, props, and anything else along those lines.
|
|
|
|
Posted: Sun Mar 22, 2020 9:11 am |
|
|
|
|