| Author |
Message |
|
|
| |
Post subject: |
Re: WEM flaklighter in 1/350 |
 |
|
|
Thx for the interest. Been a long time since I've seen Werner. It's not that easy anymore to go to modelfairs in Belgium.
On his model it are standard mounts, and the thing provided has differentieel shields and other mountings.
Also taking a look at how you made your masts in the Akagi diorama, just to get rid off the flat PE...
Also scored some veteranen models flakvierlings and 20mm guns... These are modelkits on their own...
|
|
|
 |
Posted: Sat Mar 17, 2018 3:43 am |
|
|
 |
|
|
| |
Post subject: |
Re: WEM flaklighter in 1/350 |
|
|
Very cool project!  Very cool project! :thumbs_up_1:
|
|
|
|
Posted: Thu Mar 15, 2018 10:07 am |
|
|
|
|
|
| |
Post subject: |
Re: WEM flaklighter in 1/350 |
|
|
Hello Bart, Cool project, and great work so far! I have no info on the real thing, but this model by our friend Werner has some 37mm mounts that might be useful as an example: http://www.modelshipgallery.com/gallery ... /index.htmGroetjes, Marijn Hello Bart,
Cool project, and great work so far! :thumbs_up_1: :thumbs_up_1: :thumbs_up_1:
I have no info on the real thing, but this model by our friend Werner has some 37mm mounts that might be useful as an example:
http://www.modelshipgallery.com/gallery/dd/dkm/Z25-350-wdk/index.htm
Groetjes,
Marijn
|
|
|
|
Posted: Thu Mar 15, 2018 9:53 am |
|
|
|
|
|
| |
Post subject: |
Re: WEM flaklighter in 1/350 |
|
|
Finally some small progress: had some time to work on the main guns. Been looking for references, but that seemed a bit difficult. So I made some educational guesses: original:  then I ordered some resin Italian 100 or 105mm guns:  drew a new casemate on paper:  and cut them out, hardened the paper with CA, weakened the fold-lines and made the casemates:  The one on the left was a first try, but I forgot about the taper on the sideplates. When assembled in dryfit it looks like this:  and two parts ready for paint:  Finally some small progress:
had some time to work on the main guns. Been looking for references, but that seemed a bit difficult. So I made some educational guesses:
original:
[img]https://www.scalemates.com/albums/img/2/0/6/453206-11032-67.jpg[/img]
then I ordered some resin Italian 100 or 105mm guns:
[img]https://www.scalemates.com/albums/img/2/0/2/453202-11032-48.jpg[/img]
drew a new casemate on paper:
[img]https://www.scalemates.com/albums/img/2/0/1/453201-11032-52.jpg[/img]
and cut them out, hardened the paper with CA, weakened the fold-lines and made the casemates:
[img]https://www.scalemates.com/albums/img/2/0/3/453203-11032-95.jpg[/img]
The one on the left was a first try, but I forgot about the taper on the sideplates.
When assembled in dryfit it looks like this:
[img]https://www.scalemates.com/albums/img/2/0/4/453204-11032-44.jpg[/img]
and two parts ready for paint:
[img]https://www.scalemates.com/albums/img/2/0/5/453205-11032-50.jpg[/img]
|
|
|
|
Posted: Thu Mar 15, 2018 2:52 am |
|
|
|
|
|
| |
Post subject: |
Re: WEM flaklighter in 1/350 |
|
|
|
Hey, thx
With regards to the thickening, I first clean the PE-parts with a glassfiberpen, then I cut a little bit of solder that I flattened first. Then I added some solderflux (S39 from Griffin) to one side and heat the part with the little amount of solder to the barrel. It worked fine for some, but the 4-ling had to much small parts at a tiny surface, and the excess of solder gave troubles. Earlier I tried it with MR. Surfacer, works also fine
|
|
|
|
Posted: Sun Feb 05, 2017 7:04 am |
|
|
|
|
|
| |
Post subject: |
Re: WEM flaklighter in 1/350 |
|
|
|
I will follow this build with interest, something a bit different and should look great when done.
For the aa guns you "thickened" with siolder, how do you do this to get a consistent result (i.e. the same thickness along the barrel). Looks good so would like to try this out.
I will follow this build with interest, something a bit different and should look great when done.
For the aa guns you "thickened" with siolder, how do you do this to get a consistent result (i.e. the same thickness along the barrel). Looks good so would like to try this out.
|
|
|
|
Posted: Fri Feb 03, 2017 5:39 pm |
|
|
|
|
|
| |
Post subject: |
Re: WEM flaklighter in 1/350 |
|
|
|
thx. At the moment I decided to wait for some Veteran models flakvierling because I messed something up with the PE-parts unfortunately. I'm still looking how the 88mm and 37mm deckguns were mounted. Now busy drawing the casemate around the 88mm to be able to make it hollow
thx. At the moment I decided to wait for some Veteran models flakvierling because I messed something up with the PE-parts unfortunately. I'm still looking how the 88mm and 37mm deckguns were mounted. Now busy drawing the casemate around the 88mm to be able to make it hollow
|
|
|
|
Posted: Tue Jan 31, 2017 10:10 am |
|
|
|
|
|
| |
Post subject: |
Re: WEM flaklighter in 1/350 |
|
|
|
Interesting Subject indeed.. I can see why a PT boat would not want to tangle with one of these things..
Interesting Subject indeed.. I can see why a PT boat would not want to tangle with one of these things..
|
|
|
|
Posted: Fri Jan 27, 2017 5:00 pm |
|
|
|
|
|
| |
Post subject: |
Re: WEM flaklighter in 1/350 |
|
|
|
Interesting subject......looking forwRd to the end result.
Interesting subject......looking forwRd to the end result.
|
|
|
|
Posted: Thu Jan 26, 2017 7:33 pm |
|
|
|
|
|
| |
Post subject: |
Re: WEM flaklighter in 1/350 |
|
|
 to modelwarships.com Bart! You look to off to a good start, adidng more detail is the joy! Bravo Jim Baumann  :welcome: to modelwarships.com Bart!
You look to off to a good start, adidng more detail is the joy!
Bravo
Jim Baumann :wave_1:
|
|
|
|
Posted: Thu Jan 26, 2017 3:19 pm |
|
|
|
|
|
| |
Post subject: |
Re: WEM flaklighter in 1/350 |
|
|
|
Cool! I don't recall seeing one of these built up. You are off to a nice start.
Cool! I don't recall seeing one of these built up. You are off to a nice start.
|
|
|
|
Posted: Thu Jan 26, 2017 1:05 pm |
|
|
|
|
|
| |
Post subject: |
WEM flaklighter in 1/350 |
|
|
Hello, my name is Bart, I'm from belgium and new here. With regards to modelling I build a bit of what interests me, mostly military oriented: ships, planes and tanks. I've started construction on this flaklighter while waiting till I've got time to continue on my Tupolev. The kit is from White Ensign Models and is in 1/350.  For Operation Seelöwe our German friends had made some barges to transport their heavy equipment across the Channel. Eventually the operation was cancelled, but the barges were allready made.   (source: http://historisches-marinearchiv.de/) These were then used to evacuate Crete, but also in Norway, Italy, the black sea, Baltic sea ... They were rather large with 49m length, 6.6m width, but had a shallow draft of 4 feet, which was their greatest advantage. Most allied torpedo's were functioning ok from a draft of 8feet, so the torpedo's malfunctioned or passed under the hull. With 10 knots they were rather slow and easy prey from the air. So Germans wouldn't be Germans if they hadn't a gründliche solution for this, thus they made the Flaklighter, a heavily armed barge, that could withold itself with most foes at sea. It was armed with 2x 88mm or 105mm guns, 2x a 20mm flakvierling, 2x 20mm single guns and 1x a 37mm gun. These could all engage targets down to earth or in the sky (with exception of the 88mm/105mm guns)   Frankly, the allies didn't love this, and at first it was a complete surprice. PT-boats were instructed to avoid a confrontation with these. On to the kit: Not that much in the box: 1 solid resin hull  2x a 88 or 105mm gun emplacement, which I don't know yet if I will use them like this:  a bit PE:  and a manual with different colour schemes:  I've started slowly by adding some splinter shields at the aft. The shields that are casted in the kit are also provided in PE, don know yet if I will use these. I've soldered these first to ease the outlining on the hull (3 separate pieces to align and position at once...   and the first single 20mm gunmount has been assembled:   I thickened the PE with solder to give it some more body, PE is rather flat it seems  The 37mm is assembled (and moveable), but I'm still looking for pictures of this type of mount. I can't find any picture of it...  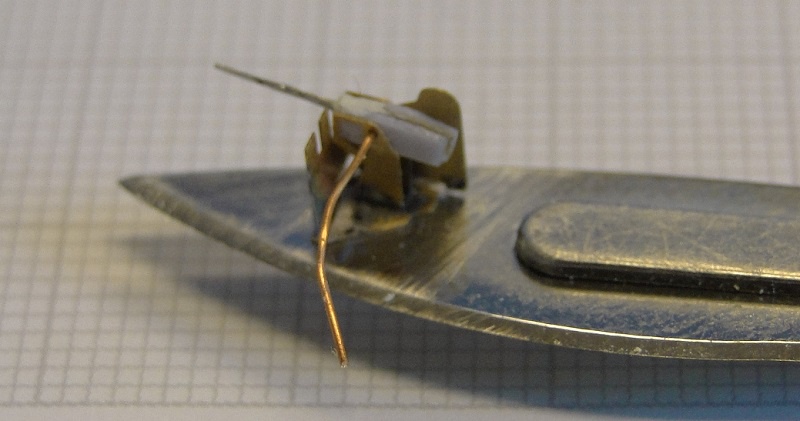 I used paper, hardened with CA to make te body and solder to make the gun more round Also the last splintershield has been soldered. i didn't intend to use it, but I don't think I will be able to paint the thing while in place:  Hello, my name is Bart, I'm from belgium and new here. With regards to modelling I build a bit of what interests me, mostly military oriented: ships, planes and tanks.
I've started construction on this flaklighter while waiting till I've got time to continue on my Tupolev. The kit is from White Ensign Models and is in 1/350.
[img]https://www.modelbrouwers.nl/media/cache/94/d4/94d4895ab3e3ddeab1947dbd71cb9db8.jpg[/img]
For Operation Seelöwe our German friends had made some barges to transport their heavy equipment across the Channel. Eventually the operation was cancelled, but the barges were allready made.
[img]https://www.modelbrouwers.nl/media/cache/5e/62/5e62b75313645e06d0fd476222f0ea1c.jpg[/img]
[img]https://www.modelbrouwers.nl/media/cache/0f/09/0f096f7516227acd71dd97b9451336c8.jpg[/img]
(source: http://historisches-marinearchiv.de/)
These were then used to evacuate Crete, but also in Norway, Italy, the black sea, Baltic sea ...
They were rather large with 49m length, 6.6m width, but had a shallow draft of 4 feet, which was their greatest advantage. Most allied torpedo's were functioning ok from a draft of 8feet, so the torpedo's malfunctioned or passed under the hull. With 10 knots they were rather slow and easy prey from the air. So Germans wouldn't be Germans if they hadn't a gründliche solution for this, thus they made the Flaklighter, a heavily armed barge, that could withold itself with most foes at sea. It was armed with 2x 88mm or 105mm guns, 2x a 20mm flakvierling, 2x 20mm single guns and 1x a 37mm gun. These could all engage targets down to earth or in the sky (with exception of the 88mm/105mm guns)
[img]https://www.modelbrouwers.nl/media/cache/f7/2a/f72a09f3fc241f880a9aa54d14f9a56d.jpg[/img]
[img]https://www.modelbrouwers.nl/media/cache/c1/7d/c17d72428153da90361a29f781ca81d9.jpg[/img]
Frankly, the allies didn't love this, and at first it was a complete surprice. PT-boats were instructed to avoid a confrontation with these.
On to the kit:
Not that much in the box:
1 solid resin hull
[img]https://www.modelbrouwers.nl/media/cache/72/8b/728bd862928f7d690870985b89b69ae6.jpg[/img]
2x a 88 or 105mm gun emplacement, which I don't know yet if I will use them like this:
[img]https://www.modelbrouwers.nl/media/cache/3d/fc/3dfc51708d778c1f92c7edd942e48461.jpg[/img]
a bit PE:
[img]https://www.modelbrouwers.nl/media/cache/19/35/19359513404c20b71635a2ac74ab1b11.jpg[/img]
and a manual with different colour schemes:
[img]https://www.modelbrouwers.nl/media/cache/16/0f/160f9482beb7aff497cf764127907dd7.jpg[/img]
I've started slowly by adding some splinter shields at the aft. The shields that are casted in the kit are also provided in PE, don know yet if I will use these. I've soldered these first to ease the outlining on the hull (3 separate pieces to align and position at once...
[img]https://www.modelbrouwers.nl/media/cache/a2/c1/a2c121c3e6262746cd986c626856018c.jpg[/img]
[img]https://www.modelbrouwers.nl/media/cache/9d/80/9d80aeb87397915b2b39da42e4f698a1.jpg[/img]
and the first single 20mm gunmount has been assembled:
[img]https://www.modelbrouwers.nl/media/cache/36/c4/36c4115a9274d1e77d54aaa6bee6425a.jpg[/img]
[img]https://www.modelbrouwers.nl/media/cache/33/44/33442446ee6edc0c77d8aaa4f41a2247.jpg[/img]
I thickened the PE with solder to give it some more body, PE is rather flat it seems ;-)
The 37mm is assembled (and moveable), but I'm still looking for pictures of this type of mount. I can't find any picture of it...
[img]https://www.modelbrouwers.nl/media/cache/7a/e9/7ae9baf25895a01dc2b02fd308380cc3.jpg[/img]
[img]https://www.modelbrouwers.nl/media/cache/0e/1a/0e1a1e4655dbc554f2cb07570967da42.jpg[/img]
I used paper, hardened with CA to make te body and solder to make the gun more round
Also the last splintershield has been soldered. i didn't intend to use it, but I don't think I will be able to paint the thing while in place:
[img]https://www.modelbrouwers.nl/media/cache/c8/81/c881f757cddff670bf9a26fec7bd9a79.jpg[/img]
|
|
|
|
Posted: Thu Jan 26, 2017 10:41 am |
|
|
|
|