| Author |
Message |
|
|
| |
Post subject: |
Re: To HMS Victory and beyond |
 |
|
Beyond amazing, dafi!  Beyond amazing, dafi! :cool_1:
|
|
|
 |
Posted: Thu Apr 11, 2024 9:56 am |
|
|
 |
|
|
| |
Post subject: |
Re: To HMS Victory and beyond |
|
|
|
... look who is talking ...
...
Thank you Marijn!
XXXDAn
... look who is talking ...
...
Thank you Marijn!
XXXDAn
|
|
|
|
Posted: Thu Apr 11, 2024 5:16 am |
|
|
|
|
|
| |
Post subject: |
Re: To HMS Victory and beyond |
|
|
Great job on such small tackles! Quite a feat to rig these like the real thing in 1/100. Bravo!  Great job on such small tackles!
Quite a feat to rig these like the real thing in 1/100. Bravo! :thumbs_up_1: :thumbs_up_1: :thumbs_up_1:
|
|
|
|
Posted: Thu Apr 11, 2024 3:43 am |
|
|
|
|
|
| |
Post subject: |
Re: To HMS Victory and beyond |
|
|
After the leechline and bowline blocks had worked out so well, we continued with the tricing lines of the yard tackles pendants. The block on the yard tackle pendant was hauled to the yard with the outer tricing line and the lower block with hooks was hauled with the inner tricing lines to the shrouds to be hooked/fastened there. Unlike other load rigs, the yard tackles were not struck off when not in use, but were also used as to support the braces in strong winds or for other purposes. And so that the whole thing doesn't get too boring, this time the blocks are 7" and 8", i.e. 2 mm in my scale. But it doesn't matter, it works just like the others  First on the filed needle, then stropped in as usual ... 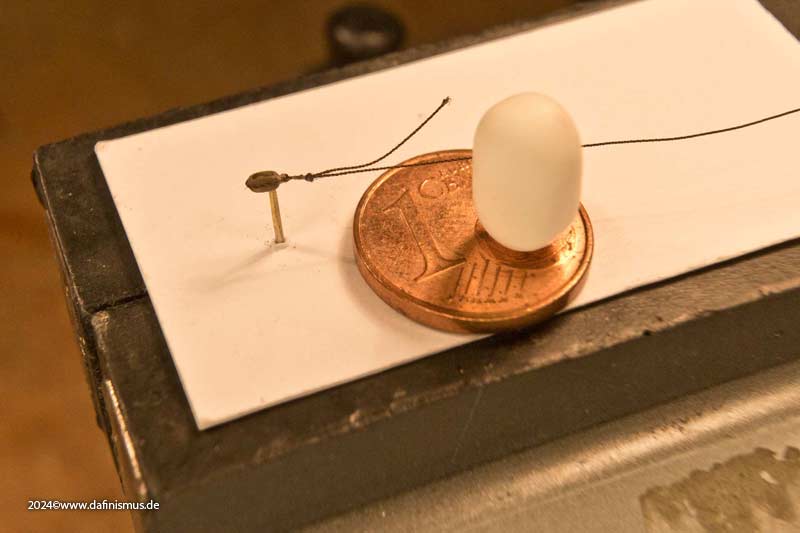 ... and succeding the function test. 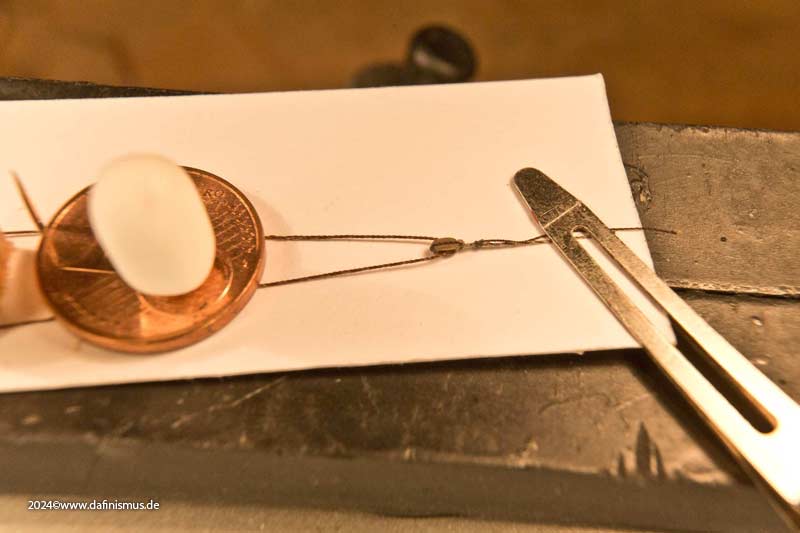 Fits. Then, as usual, tied the eyes with the pointed clamping tweezers and quickly put them all on the leash, such a stopped block is too quickly inhaled. 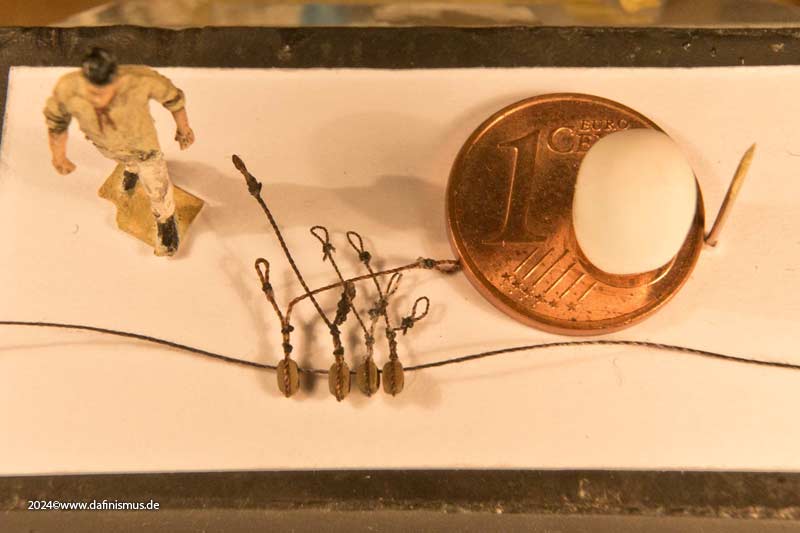 And to show that you can get these blocks to the yard even with sausage fingers like mine ... 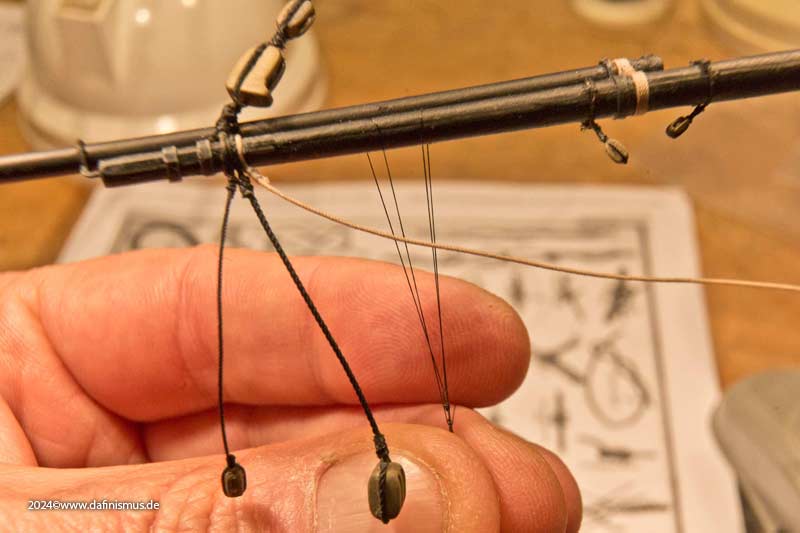 ... you just have to make sure that you … 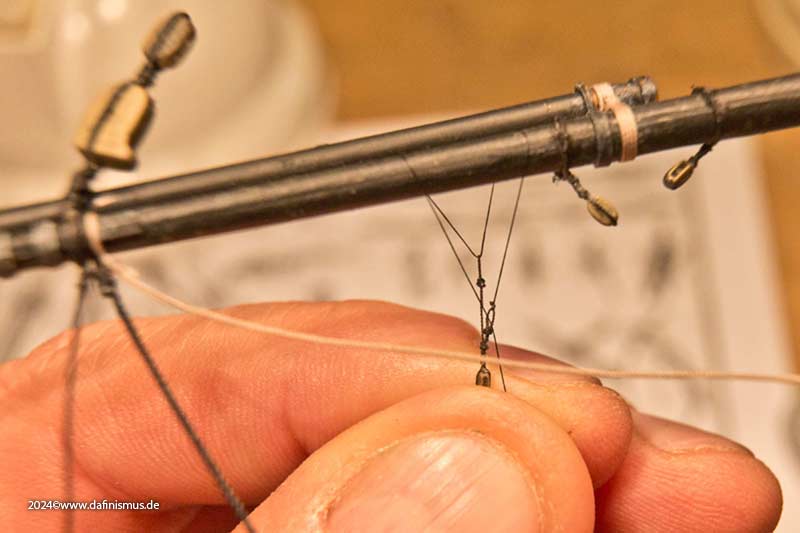 … get not tangled. And already finished. 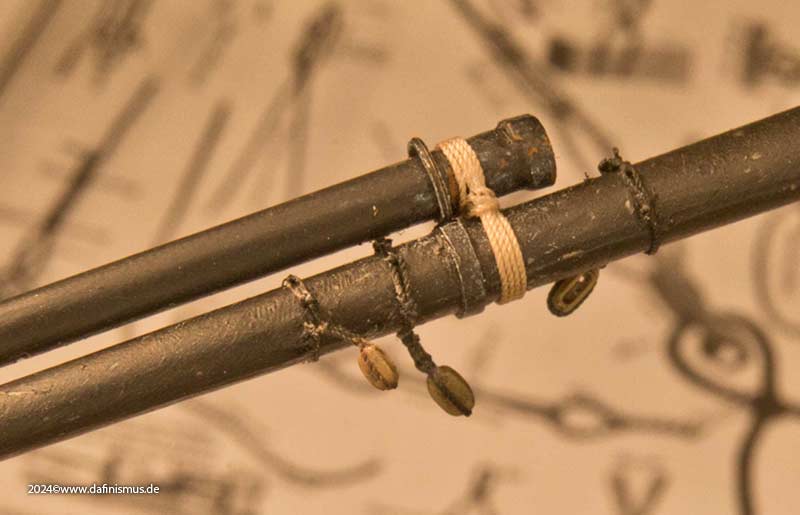 You can clearly see the noticeable difference between the 2 mm block of the tricing line and the 2.5 mm blocks of the leechline. The tricing line is one of the thinnest in the entire rigging, here hanging loosely with the yard tackle in use ... 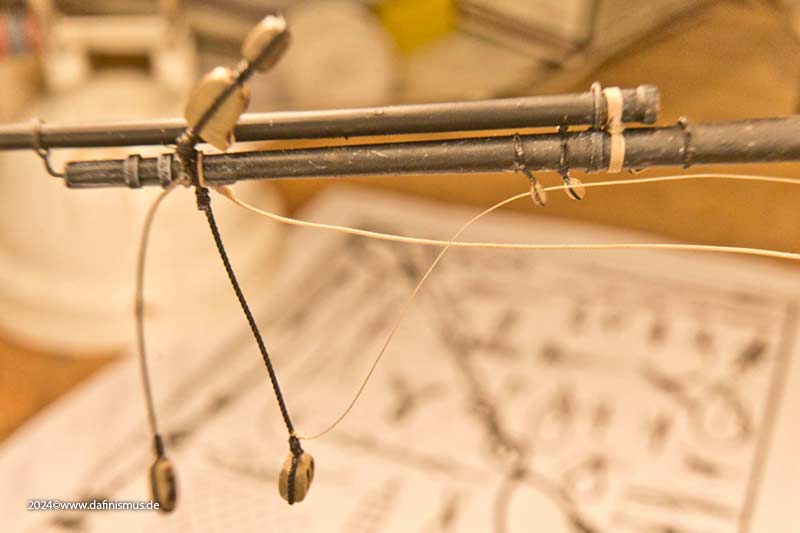 ... and with the yard tackle pulled up.  For the sake of completeness, the inner tricing line next to the 4 mm clue line block. 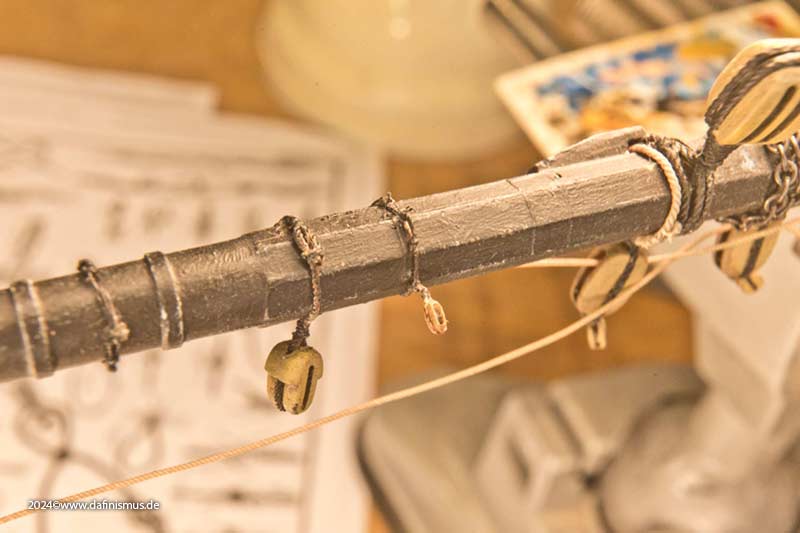 XXXDAn After the leechline and bowline blocks had worked out so well, we continued with the tricing lines of the yard tackles pendants.
The block on the yard tackle pendant was hauled to the yard with the outer tricing line and the lower block with hooks was hauled with the inner tricing lines to the shrouds to be hooked/fastened there. Unlike other load rigs, the yard tackles were not struck off when not in use, but were also used as to support the braces in strong winds or for other purposes.
And so that the whole thing doesn't get too boring, this time the blocks are 7" and 8", i.e. 2 mm in my scale. But it doesn't matter, it works just like the others :-)
First on the filed needle, then stropped in as usual ...
[img]https://www.mediaharmonists.de/bilder/Sammler39/Victory-Blocks-240331_8334.jpg[/img]
... and succeding the function test.
[img]https://www.mediaharmonists.de/bilder/Sammler39/Victory-Blocks-240331_8343.jpg[/img]
Fits. Then, as usual, tied the eyes with the pointed clamping tweezers and quickly put them all on the leash, such a stopped block is too quickly inhaled.
[img]https://www.mediaharmonists.de/bilder/Sammler39/Victory-Blocks-240401_8360.jpg[/img]
And to show that you can get these blocks to the yard even with sausage fingers like mine ...
[img]https://www.mediaharmonists.de/bilder/Sammler39/Victory-Tricing-Line-240409_8447.jpg[/img]
... you just have to make sure that you …
[img]https://www.mediaharmonists.de/bilder/Sammler39/Victory-Tricing-Line-240409_8449.jpg[/img]
… get not tangled. And already finished.
[img]https://www.mediaharmonists.de/bilder/Sammler39/Victory-Tricing-Line-240409_8450.jpg[/img]
You can clearly see the noticeable difference between the 2 mm block of the tricing line and the 2.5 mm blocks of the leechline.
The tricing line is one of the thinnest in the entire rigging, here hanging loosely with the yard tackle in use ...
[img]https://www.mediaharmonists.de/bilder/Sammler39/Victory-Tricing-Line-240409_8457.jpg[/img]
... and with the yard tackle pulled up.
[img]https://www.mediaharmonists.de/bilder/Sammler39/Victory-Tricing-Line-240409_8467.jpg[/img]
For the sake of completeness, the inner tricing line next to the 4 mm clue line block.
[img]https://www.mediaharmonists.de/bilder/Sammler39/Victory-Tricing-Line-240409_8480.jpg[/img]
XXXDAn
|
|
|
|
Posted: Thu Apr 11, 2024 1:07 am |
|
|
|
|
|
| |
Post subject: |
Re: To HMS Victory and beyond |
|
|
Thanx Jim Well, what can I say. I'm only away for a few weeks because of work and already my tinkering room doesn't want to let me back in ... "What does THIS strange man want here?!" was one of the nicer questions I had to listen to ... After some persuasion à la "man cave whisperer", I was allowed to do something in there after all. In the meantime, I had revised my lists of blocks for the Victory again. I had noticed that McKay had left out some quite some blocks in the AOTS and that there were also some errors among them. I had therefore plowed through the entire Steel of 1795 and worked through the various entries, compared them and selected the most plausible variant, possibly adding variants. All in all, there were significantly more blocks added, both the standard blocks and the special types. But more on that later. The last thing I did was to replace the square shoulder blocks, which are used on the ship today and which McKay also shows, with contemporary round ones. The main yard continues to serve as a model playing field. Here is a reminder of the last status. 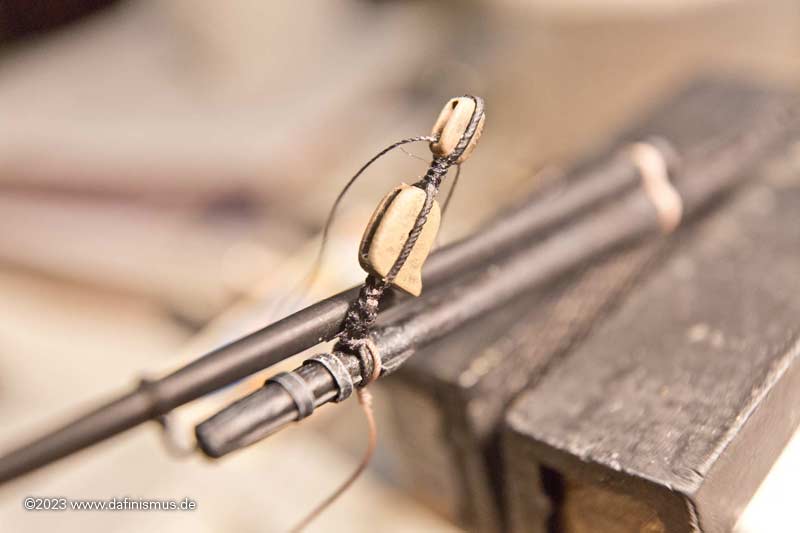  Next came 3 x 2.5 mm blocks on each side for the belly and nock gordings. 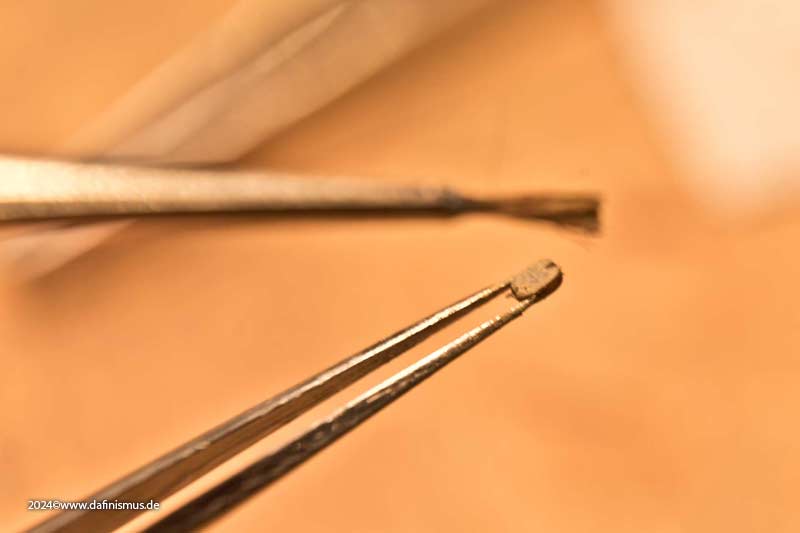 Check on the tweezers whether the paint application is complete and either brush on the tweezers immediately ... 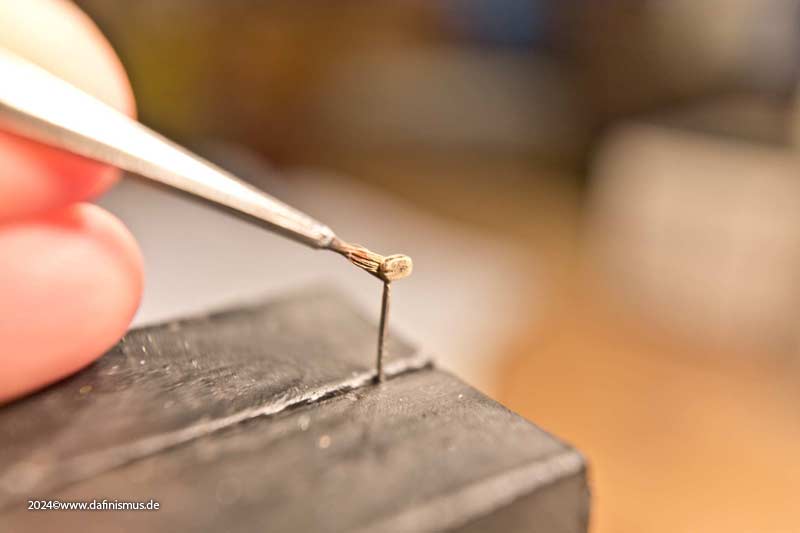 ... or after the block has been pinned. Place a strop around the fixed block as described before ... 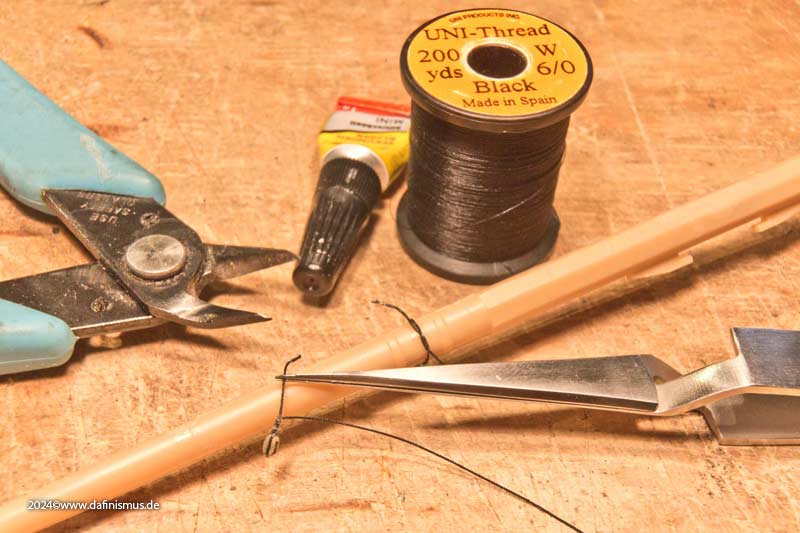 ... and checked the length in place. Since the block hangs in front of the yard, the legs must of course be different lengths. 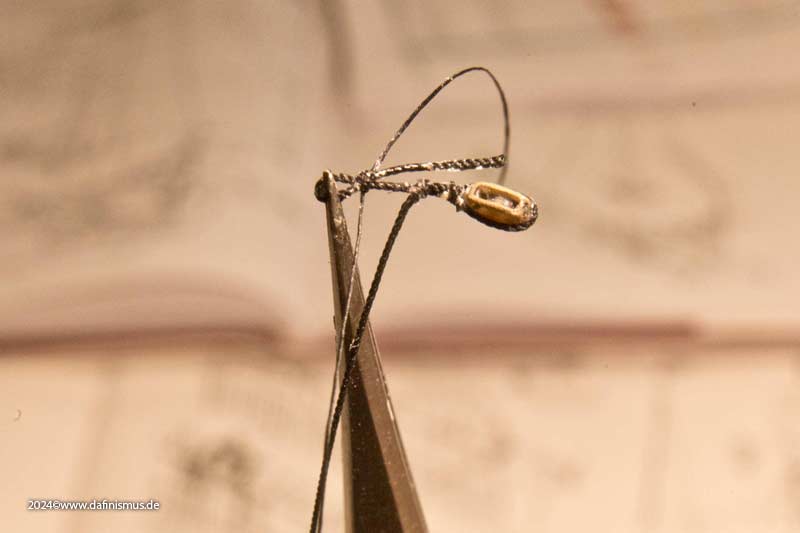 The pointed tweezers with clamping function do a good job here, first one side ... 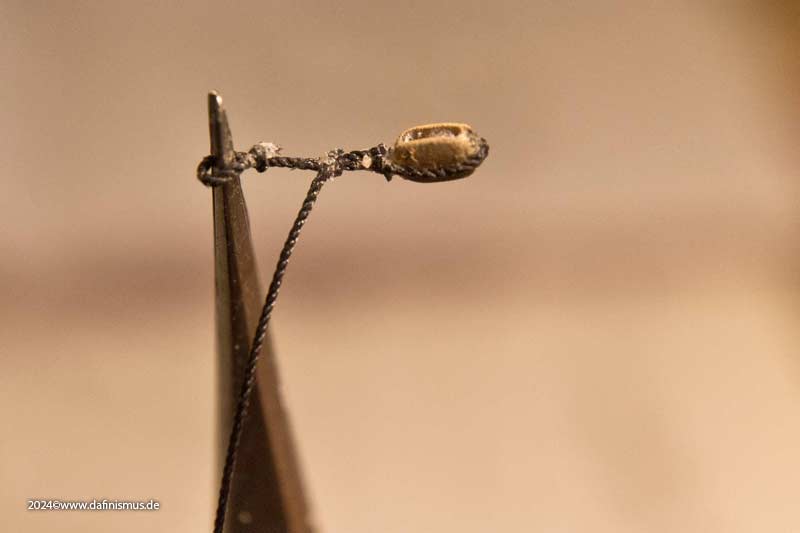 ... and neatly trimmed, and the other and you're done 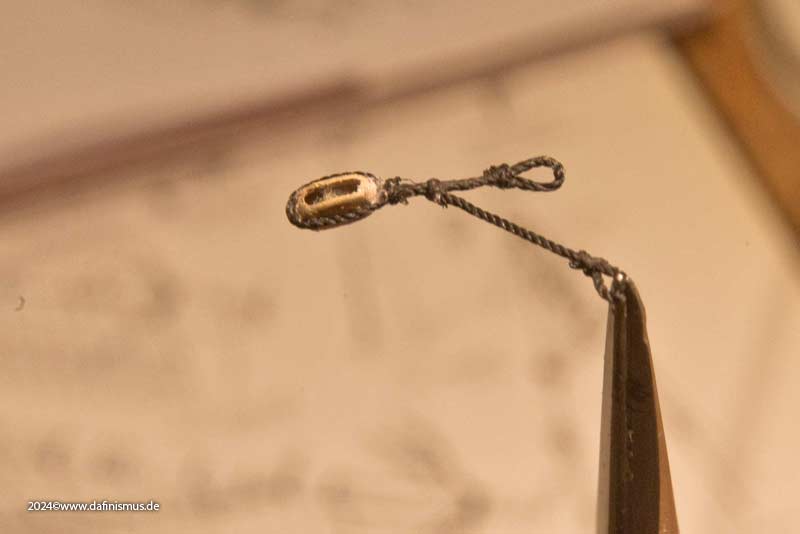 Here is a comparison of the simplified version with a simple knot on the top of the yardarm and the more correct solution with a lashing. Since the lashing is tricky to thread, a classic needle helps. 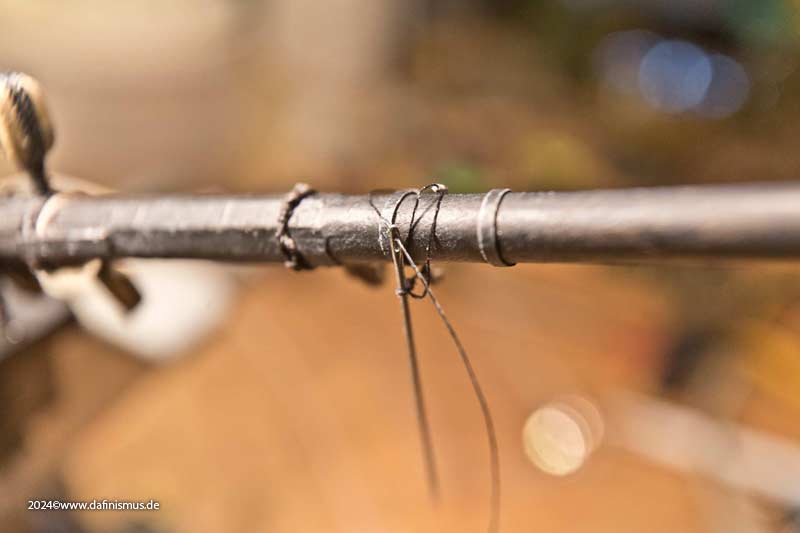 And this is how it should look 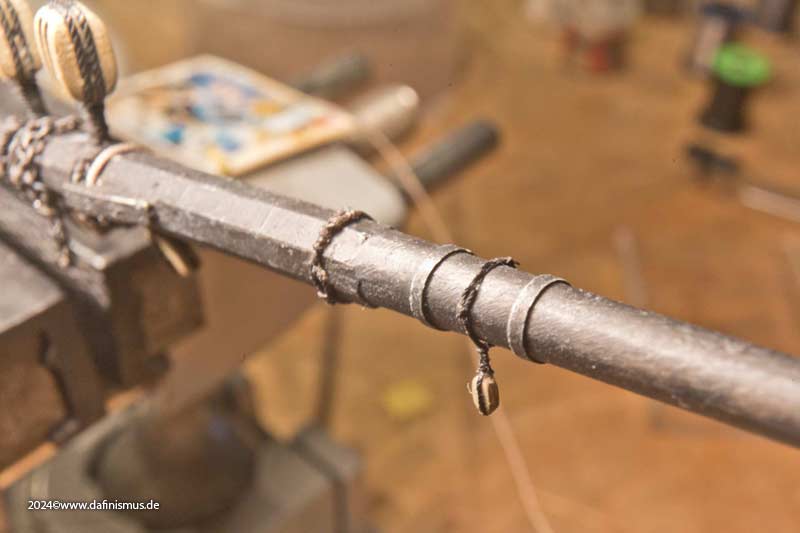 With this technique, I'm now just as fast for the small blocks as I am for the large ones XXXDAn Thanx Jim :-)
Well, what can I say. I'm only away for a few weeks because of work and already my tinkering room doesn't want to let me back in ...
"What does THIS strange man want here?!" was one of the nicer questions I had to listen to ...
After some persuasion à la "man cave whisperer", I was allowed to do something in there after all. In the meantime, I had revised my lists of blocks for the Victory again. I had noticed that McKay had left out some quite some blocks in the AOTS and that there were also some errors among them. I had therefore plowed through the entire Steel of 1795 and worked through the various entries, compared them and selected the most plausible variant, possibly adding variants. All in all, there were significantly more blocks added, both the standard blocks and the special types. But more on that later.
The last thing I did was to replace the square shoulder blocks, which are used on the ship today and which McKay also shows, with contemporary round ones. The main yard continues to serve as a model playing field. Here is a reminder of the last status.
[img]https://www.mediaharmonists.de/bilder/Sammler39/Victory-Shoulder-Blocks-240223_7589.jpg[/img]
[img]https://www.mediaharmonists.de/bilder/Sammler39/Victory-sheet-quarter-Blocks-240223_7594.jpg[/img]
Next came 3 x 2.5 mm blocks on each side for the belly and nock gordings.
[img]https://www.mediaharmonists.de/bilder/Sammler39/Victory-Blocks-240330_8271.jpg[/img]
Check on the tweezers whether the paint application is complete and either brush on the tweezers immediately ...
[img]https://www.mediaharmonists.de/bilder/Sammler39/Victory-Blocks-240330_8270.jpg[/img]
... or after the block has been pinned. Place a strop around the fixed block as described before ...
[img]https://www.mediaharmonists.de/bilder/Sammler39/Victory-Blocks-240330_8274.jpg[/img]
... and checked the length in place. Since the block hangs in front of the yard, the legs must of course be different lengths.
[img]https://www.mediaharmonists.de/bilder/Sammler39/Victory-Blocks-240330_8278.jpg[/img]
The pointed tweezers with clamping function do a good job here, first one side ...
[img]https://www.mediaharmonists.de/bilder/Sammler39/Victory-Blocks-240330_8284.jpg[/img]
... and neatly trimmed, and the other and you're done :-)
[img]https://www.mediaharmonists.de/bilder/Sammler39/Victory-Blocks-240330_8293.jpg[/img]
Here is a comparison of the simplified version with a simple knot on the top of the yardarm and the more correct solution with a lashing.
Since the lashing is tricky to thread, a classic needle helps.
[img]https://www.mediaharmonists.de/bilder/Sammler39/Victory-Blocks-240330_8317.jpg[/img]
And this is how it should look :-)
[img]https://www.mediaharmonists.de/bilder/Sammler39/Victory-Blocks-240330_8325.jpg[/img]
With this technique, I'm now just as fast for the small blocks as I am for the large ones :-)
XXXDAn
|
|
|
|
Posted: Mon Apr 08, 2024 11:54 am |
|
|
|
|
|
| |
Post subject: |
Re: To HMS Victory and beyond |
|
|
I must say that I admire your dedication; .........and I must say that the ' new' blocks do actually look a lot more as one would expect blocks-to-look-like !  JB I must say that I admire your dedication; :thumbs_up_1: :thumbs_up_1:
.........and I must say that the ' new' blocks do actually look
a lot more as one would expect blocks-to-look-like ! :thumbs_up_1: :thumbs_up_1:
:wave_1: JB
|
|
|
|
Posted: Sat Feb 24, 2024 1:35 pm |
|
|
|
|
|
| |
Post subject: |
Re: To HMS Victory and beyond |
|
|
Yes, dafi knows how to do it, dafi hasn't forgotten anything ... ... ... ... the wrecking ball! 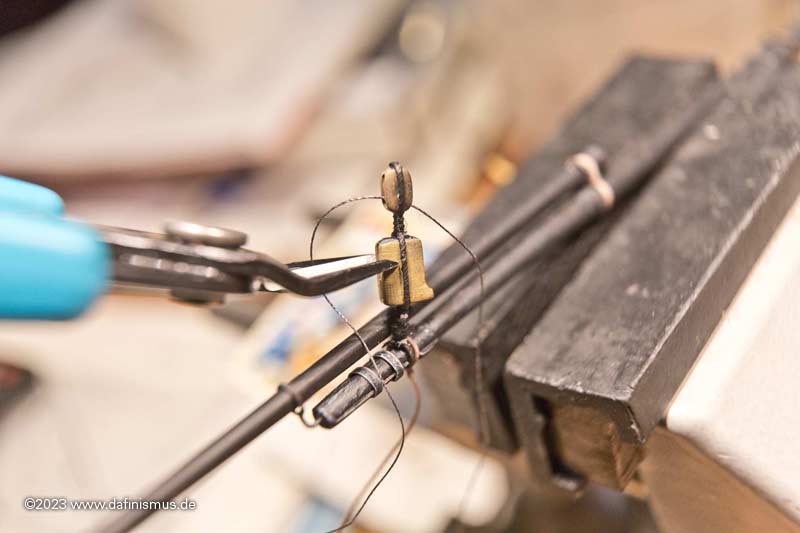 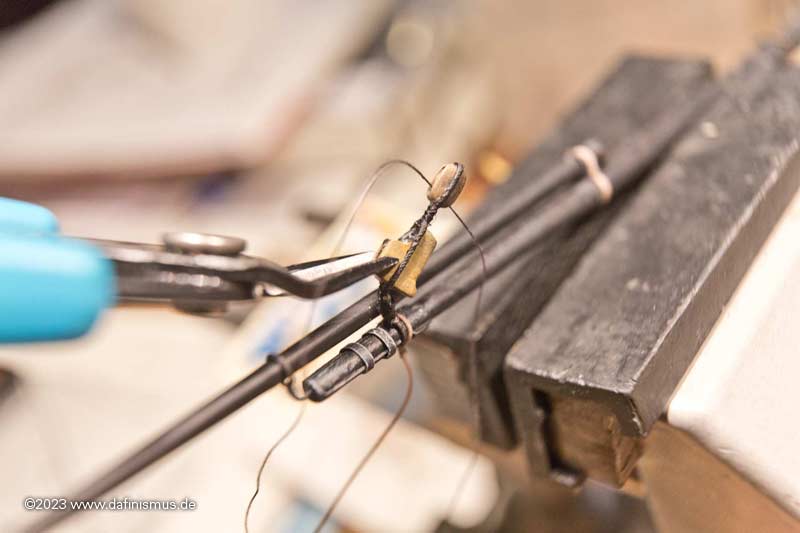 What happened again? I always say it, my biggest problem is getting the big exhibit in P. out of my head. For almost 20 years now, I've been looking forward to those great special shoulder and quarter blocks that I discovered back then back there, building them exactly according to McKay and Bugler's plans and, in my exuberance, not even realizing that they are much rounder in the classic literature ... Thank goodness there are some people in my german pack and also in the MSW who are not so obsessed and have a keen eagle eye and have pointed this out to me. Thank you! So I made new rounder blocks. I also finally did some research, as I was slightly irritated at the first pass when I noticed that these blocks on the foremast lower mast and topsail are all the same size, just like on the main mast lower mast and topsail. Thanks to druxey from the MSW for reassuring me and confirming this on the basis of Steel's information. At this point, in response to a few questions, I would like to repeat the painting method: first, using an old disheveled brush, two layers of very thin paint in a darker brown, which is the base color. The thin paint makes it easy to get to the sides without pasting over the holes. 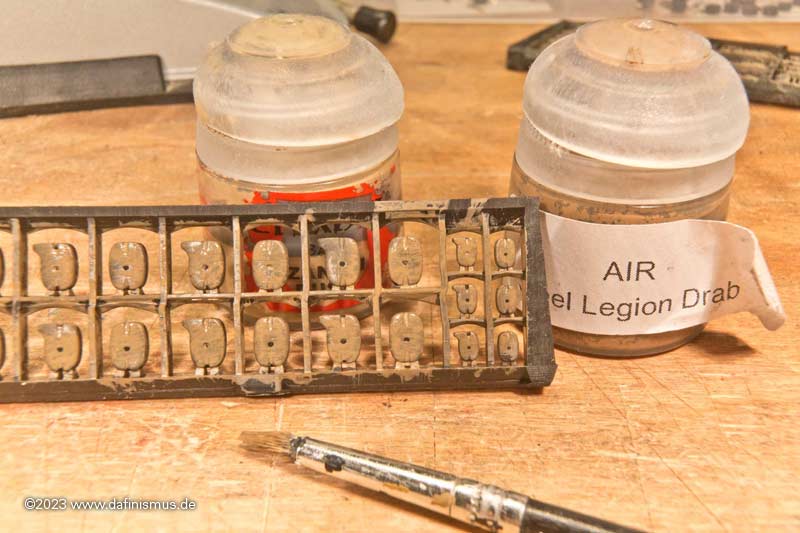 The highlighting color in a lighter brown, applied with a dry brush, is applied on top. This emphasizes the edges and the depths remain slightly darker, which gives optical depth. And the deliberately uneven application of color keeps the whole thing alive and no longer looks like plastic.  Then the grand finale: as the new round blocks are the same size as the old square ones, simply press the new ones back into the strop from the side and you're done.  The same with the sheet quarter blocks, before - after 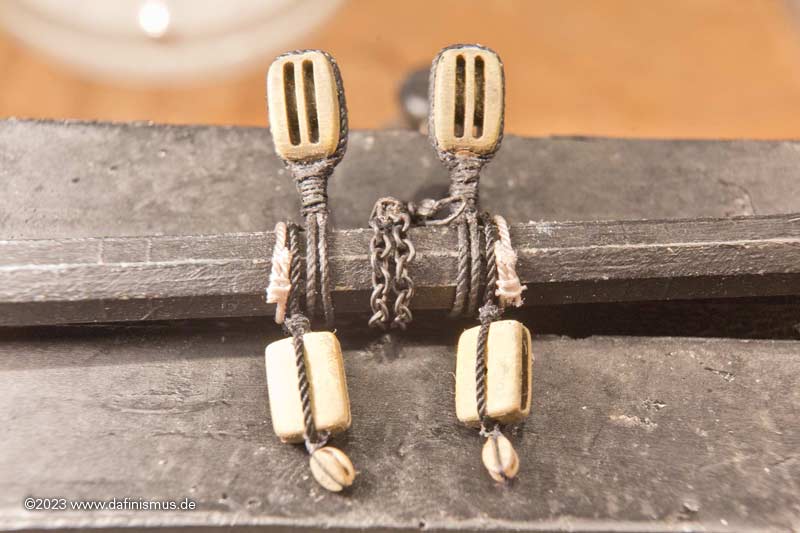 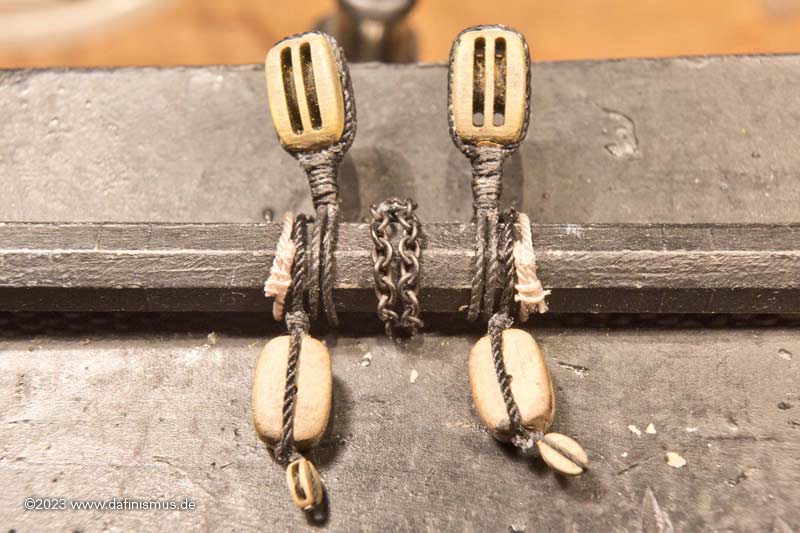 You see dafi still can do it  XXXDAn PS: All those of you that already got a delivery of blocks will get a free upgade of the blocks in question Yes, dafi knows how to do it, dafi hasn't forgotten anything ...
...
...
... the wrecking ball!
[img]https://mediaharmonists.de/bilder/Sammler39/Victory-Shoulder-Blocks-240223_7580.jpg[/img]
[img]https://mediaharmonists.de/bilder/Sammler39/Victory-Shoulder-Blocks-240223_7582.jpg[/img]
What happened again?
I always say it, my biggest problem is getting the big exhibit in P. out of my head.
For almost 20 years now, I've been looking forward to those great special shoulder and quarter blocks that I discovered back then back there, building them exactly according to McKay and Bugler's plans and, in my exuberance, not even realizing that they are much rounder in the classic literature ...
Thank goodness there are some people in my german pack and also in the MSW who are not so obsessed and have a keen eagle eye and have pointed this out to me. Thank you!
So I made new rounder blocks. I also finally did some research, as I was slightly irritated at the first pass when I noticed that these blocks on the foremast lower mast and topsail are all the same size, just like on the main mast lower mast and topsail. Thanks to druxey from the MSW for reassuring me and confirming this on the basis of Steel's information.
At this point, in response to a few questions, I would like to repeat the painting method: first, using an old disheveled brush, two layers of very thin paint in a darker brown, which is the base color. The thin paint makes it easy to get to the sides without pasting over the holes.
[img]https://mediaharmonists.de/bilder/Sammler39/Victory-Shoulder-Blocks-240223_7569.jpg[/img]
The highlighting color in a lighter brown, applied with a dry brush, is applied on top. This emphasizes the edges and the depths remain slightly darker, which gives optical depth. And the deliberately uneven application of color keeps the whole thing alive and no longer looks like plastic.
[img]https://mediaharmonists.de/bilder/Sammler39/Victory-Shoulder-Blocks-240223_7574.jpg[/img]
Then the grand finale: as the new round blocks are the same size as the old square ones, simply press the new ones back into the strop from the side and you're done.
[img]https://mediaharmonists.de/bilder/Sammler39/Victory-Shoulder-Blocks-240223_7589.jpg[/img]
The same with the sheet quarter blocks, before - after :-)
[img]https://mediaharmonists.de/bilder/Sammler39/Victory-sheet-quarter-Blocks-240223_7591.jpg[/img]
[img]https://mediaharmonists.de/bilder/Sammler39/Victory-sheet-quarter-Blocks-240223_7594.jpp[/img]
You see dafi still can do it ;-)
XXXDAn
PS: All those of you that already got a delivery of blocks will get a free upgade of the blocks in question :-)
|
|
|
|
Posted: Sat Feb 24, 2024 8:08 am |
|
|
|
|
|
| |
Post subject: |
Re: To HMS Victory and beyond |
|
|
|
It certainly is Marijn, this has got to be the best build log of Victory ever done.
It certainly is Marijn, this has got to be the best build log of Victory ever done.
|
|
|
|
Posted: Fri Feb 23, 2024 9:17 pm |
|
|
|
|
|
| |
Post subject: |
Re: To HMS Victory and beyond |
|
|
Simply splendid! Even though I won't be able to work in this much detail in 1/300 at all, I'm taking notes! Simply splendid! :thumbs_up_1: :thumbs_up_1: :thumbs_up_1:
Even though I won't be able to work in this much detail in 1/300 at all, I'm taking notes!
|
|
|
|
Posted: Thu Feb 22, 2024 9:58 am |
|
|
|
|
|
| |
Post subject: |
Re: To HMS Victory and beyond |
|
|
Thank you Jim! The wax is for the lines made of cotton or other fuzzy cords, to smoothen the small "hair" standing up from it. Ropes made from synthetics usually do not have this problem. My ropes are made from fly fishing yarn, basically a kind of tooth floss The wax is not meant to change the appearence of the rope, it´s just to make it look neat and tidy. In the contrary the white glue cover I use for some of my ropes is the imitation of serving the rope. There it is unwantetd to see the structure of the rope, as it was completely coverd by yarn. At my scale it is first rather impracticable to really serve the thinner ropes, and second it always looks overscale. Cheers, DAniel Thank you Jim!
The wax is for the lines made of cotton or other fuzzy cords, to smoothen the small "hair" standing up from it. Ropes made from synthetics usually do not have this problem. My ropes are made from fly fishing yarn, basically a kind of tooth floss :-)
The wax is not meant to change the appearence of the rope, it´s just to make it look neat and tidy. In the contrary the white glue cover I use for some of my ropes is the imitation of serving the rope. There it is unwantetd to see the structure of the rope, as it was completely coverd by yarn. At my scale it is first rather impracticable to really serve the thinner ropes, and second it always looks overscale.
Cheers, DAniel
|
|
|
|
Posted: Tue Feb 20, 2024 12:08 pm |
|
|
|
|
|
| |
Post subject: |
Re: To HMS Victory and beyond |
|
|
excellent works-- lots of attention to minutua!  but a question; ============ ==> how to you -- retrospectively..-- smooth all the hairy bits on your ropes....? In the olden days -( on larger scales) -people used to pull their modell-ropes over a piece of beeswax to smooth/' stick the down ( glaetten ) thte little hars but the wax does not work well with glue / adhesives/ CA and paint best wishes Jim B excellent works-- lots of attention to minutua! :roll_eyes:
but a question;
============
==> how to you -- retrospectively..-- smooth all the hairy bits on your ropes....?
In the olden days -( on larger scales) -people used to pull their modell-ropes over a piece of beeswax
to smooth/' stick the down ( glaetten ) thte little hars
but the wax does not work well with glue / adhesives/ CA and paint
best wishes
Jim B :thumbs_up_1:
|
|
|
|
Posted: Tue Feb 20, 2024 10:48 am |
|
|
|
|
|
| |
Post subject: |
Re: To HMS Victory and beyond |
|
|
Next, of course, was the combination of blocks with a shoulder block for the top sail sheet and a normal block for the lift on the yardarm. First the two blocks stropped together ... 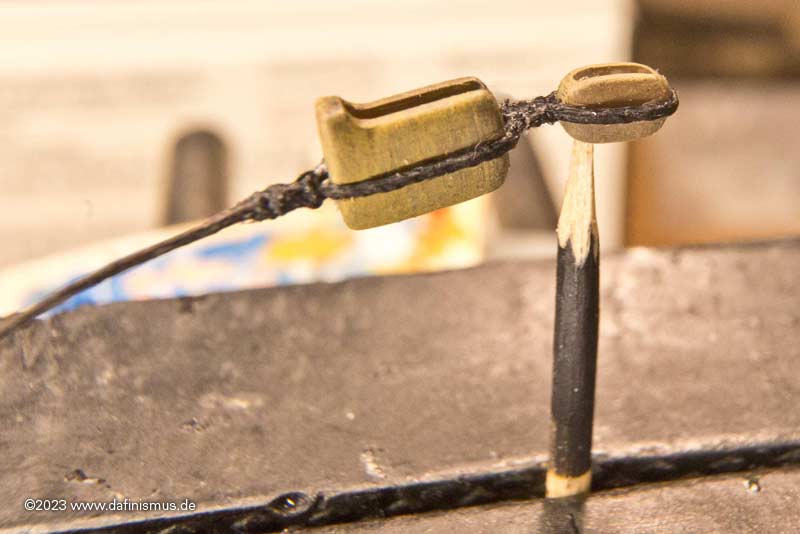 ... then still smuggled in with bright rope the loop for the horses onto the cleat and finally tied in the eye for the double block at the outside. First one side ... 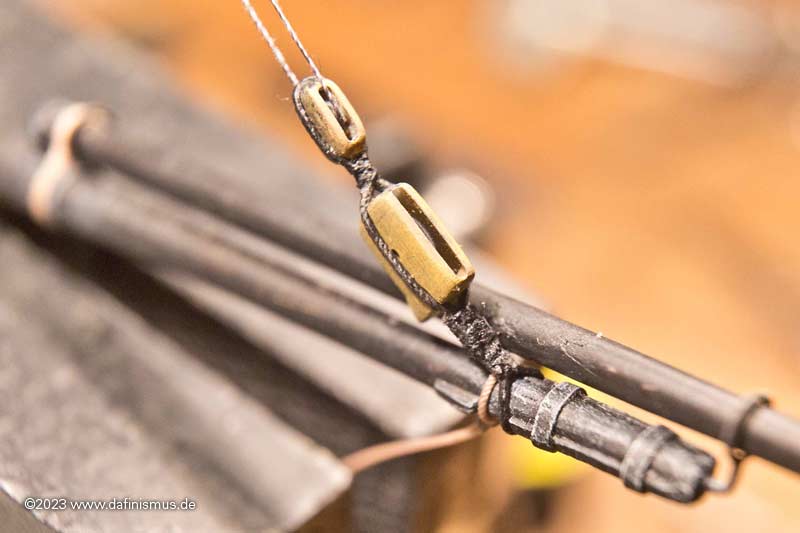 ... and then the second ... 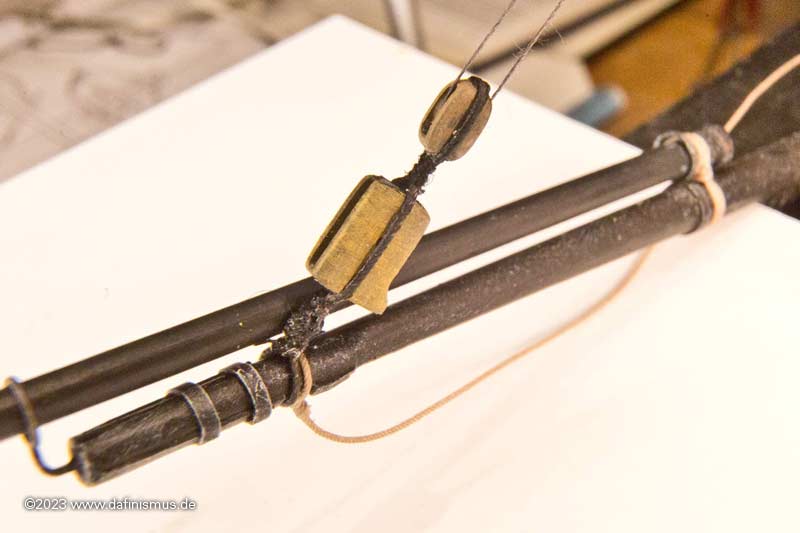 ... and everything for the lifts is on the yardarm XXXDAn Next, of course, was the combination of blocks with a shoulder block for the top sail sheet and a normal block for the lift on the yardarm.
First the two blocks stropped together ...
[img]https://mediaharmonists.de/bilder/Sammler39/Victory-lifts_7549.jpg[/img]
... then still smuggled in with bright rope the loop for the horses onto the cleat and finally tied in the eye for the double block at the outside.
First one side ...
[img]https://mediaharmonists.de/bilder/Sammler39/Victory-lifts_7563.jpg[/img]
... and then the second ...
[img]https://mediaharmonists.de/bilder/Sammler39/Victory-lifts_7558.jpg[/img]
... and everything for the lifts is on the yardarm :)
XXXDAn
|
|
|
|
Posted: Tue Feb 20, 2024 3:08 am |
|
|
|
|
|
| |
Post subject: |
Re: To HMS Victory and beyond |
|
|
I've been busy lately and haven't had much time to tinker. But the list of blocks to be used on the Vic and the corresponding rope thicknesses has finally been finalized. Time to check some of them again. As the blocks are sorted by yards and other locations, here is the block set for the main yard. 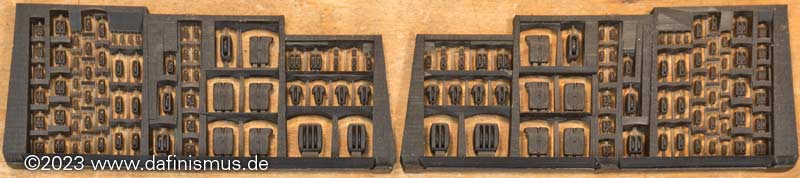 Since the main yard has already been started, I've taken on the lifts. First the hangers. As usually served with white glue and black paint. 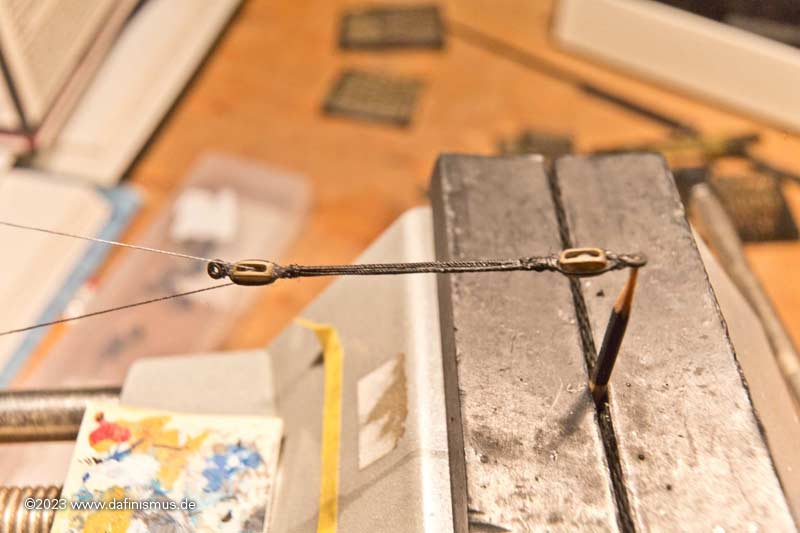 The loop underneath the cap that holds the hanger together. 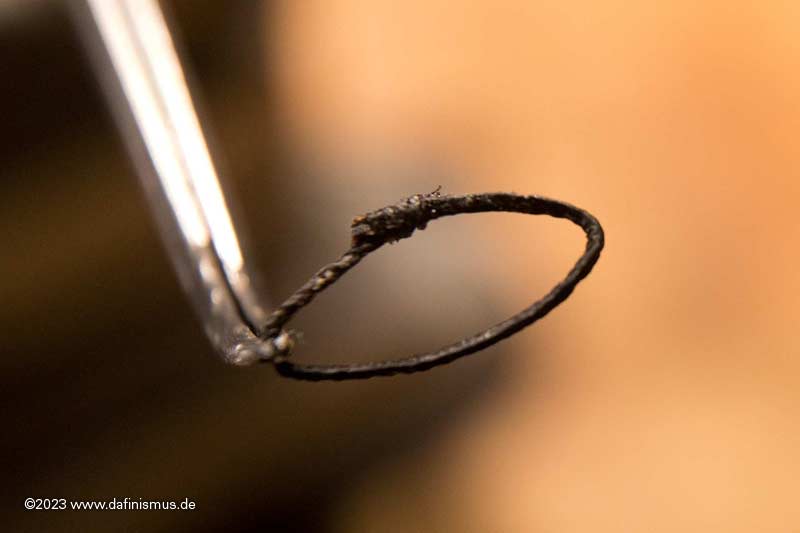 And here the assembly on a spare mast cap. 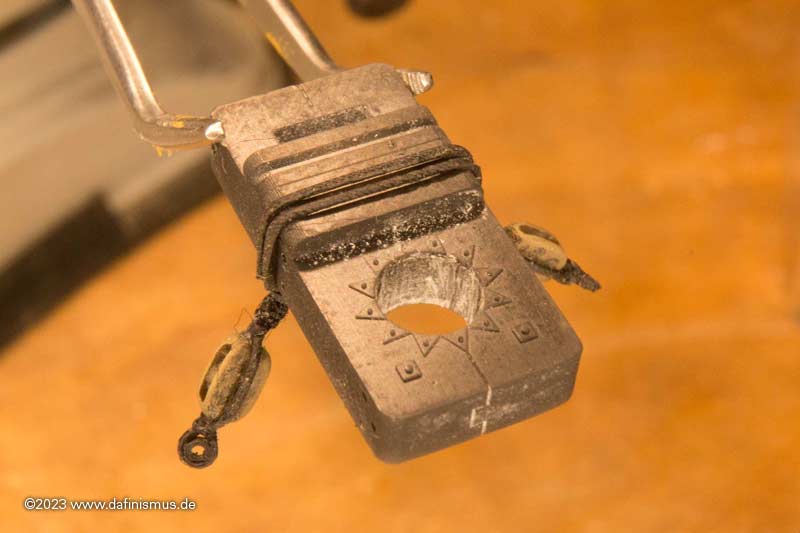 More hopefully soon. XXXDAn I've been busy lately and haven't had much time to tinker. But the list of blocks to be used on the Vic and the corresponding rope thicknesses has finally been finalized. Time to check some of them again. As the blocks are sorted by yards and other locations, here is the block set for the main yard.
[img]https://mediaharmonists.de/bilder/Sammler39/Victory%20blocks_6736.jpg[/img]
Since the main yard has already been started, I've taken on the lifts. First the hangers. As usually served with white glue and black paint.
[img]https://mediaharmonists.de/bilder/Sammler39/Victory-lifts-240118_7527.jpg[/img]
The loop underneath the cap that holds the hanger together.
[img]https://mediaharmonists.de/bilder/Sammler39/Victory-lifts-240118_7535.jpg[/img]
And here the assembly on a spare mast cap.
[img]https://mediaharmonists.de/bilder/Sammler39/Victory-lifts-240118_7543.jpg[/img]
More hopefully soon.
XXXDAn
|
|
|
|
Posted: Mon Feb 19, 2024 3:01 am |
|
|
|
|
|
| |
Post subject: |
Re: To HMS Victory and beyond |
|
|
|
Beautiful work!!
Beautiful work!!
|
|
|
|
Posted: Wed Jan 17, 2024 12:38 pm |
|
|
|
|
|
| |
Post subject: |
Re: To HMS Victory and beyond |
|
|
By mistake I printed some parrells less than half size than wanted. This printer always amazes me from new. 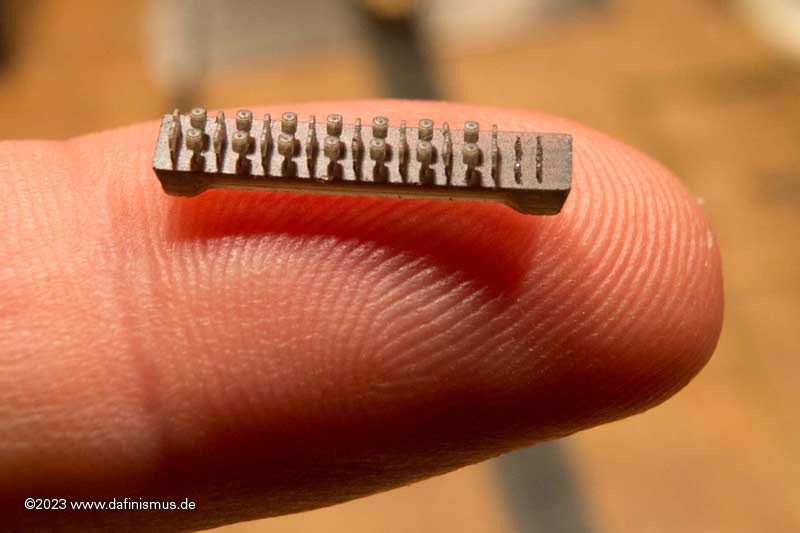 And to my big surprize I was able to thread through a 0,1 mm copper wire!  Now it is your turn @marijn van gils, it is almost your size. Just tell how much smaller you still like to have it Go for it, I am sure you know how to tie a windsor knot into an ant´s necktie! XXXDAn By mistake I printed some parrells less than half size than wanted. This printer always amazes me from new.
[img]https://mediaharmonists.de/bilder/Sammler38/Parrells_231210_7245.jpg[/img]
And to my big surprize I was able to thread through a 0,1 mm copper wire!
[img]https://mediaharmonists.de/bilder/Sammler38/Parrells_231210_7226.jpg[/img]
Now it is your turn @marijn van gils, it is almost your size. Just tell how much smaller you still like to have it ;-)
Go for it, I am sure you know how to tie a windsor knot into an ant´s necktie!
XXXDAn
|
|
|
|
Posted: Tue Dec 12, 2023 3:42 pm |
|
|
|
|
|
| |
Post subject: |
Re: To HMS Victory and beyond |
|
|
marijn van gils wrote: I think I will simulate the parrels by gluing solder balls directly to the masts. I'm not sure if I will try to add strips in between the parrels on the topmasts though... Marijn, what about using sections of 0.6 mm brass tubing and pass a wire through the sections? Time consuming maybe  , but worth a try dafi: spectacular work as usual  [quote="marijn van gils"]I think I will simulate the parrels by gluing solder balls directly to the masts. I'm not sure if I will try to add strips in between the parrels on the topmasts though...[/quote]
Marijn, what about using sections of 0.6 mm brass tubing and pass a wire through the sections? Time consuming maybe :big_grin: , but worth a try
dafi: spectacular work as usual :cool_2:
|
|
|
|
Posted: Sat Dec 09, 2023 4:04 am |
|
|
|
|
|
| |
Post subject: |
Re: To HMS Victory and beyond |
|
|
That's too small for me too! The smallest blocks I made are about 1mm: viewtopic.php?f=59&t=167367&start=660#p966067I don't plan on stropping or rigging any of them. The larger ones have the strop already built on them, for the smaller I will only paint it on. Rigging will be metal wire, which I will glue to the blocks instead of pass through them. Anything smaller than 1mm, I will simulate with blobs of white glue. Or if I need complex structures, with punched plastic discs like I did with the gun tackle: viewtopic.php?f=59&t=167367&start=1100#p1032931I think I will simulate the parrels by gluing solder balls directly to the masts. I'm not sure if I will try to add strips in between the parrels on the topmasts though...
:big_grin: :big_grin: :big_grin:
That's too small for me too! ;)
The smallest blocks I made are about 1mm: http://www.shipmodels.info/mws_forum/viewtopic.php?f=59&t=167367&start=660#p966067
I don't plan on stropping or rigging any of them. The larger ones have the strop already built on them, for the smaller I will only paint it on. Rigging will be metal wire, which I will glue to the blocks instead of pass through them.
Anything smaller than 1mm, I will simulate with blobs of white glue. Or if I need complex structures, with punched plastic discs like I did with the gun tackle: http://www.shipmodels.info/mws_forum/viewtopic.php?f=59&t=167367&start=1100#p1032931
I think I will simulate the parrels by gluing solder balls directly to the masts. I'm not sure if I will try to add strips in between the parrels on the topmasts though...
|
|
|
|
Posted: Fri Dec 08, 2023 1:50 pm |
|
|
|
|
|
| |
Post subject: |
Re: To HMS Victory and beyond |
|
|
|
This means, my 2 Millimeter blocks would be 0,666 mmm.
I would go for that just to see him suffer ...
*sadistic laugh from the off*
...
XXXDAn
This means, my 2 Millimeter blocks would be 0,666 mmm.
I would go for that just to see him suffer ...
*sadistic laugh from the off*
...
XXXDAn
|
|
|
|
Posted: Fri Dec 08, 2023 7:45 am |
|
|
|
|
|
| |
Post subject: |
Re: To HMS Victory and beyond |
|
|
Your Parrel beads are a wonderful assembly-- superb Now Marjinn needs to make his--3 x smaller!! hehehe! Your Parrel beads are a wonderful assembly-- superb
Now Marjinn needs to make his--3 x smaller!! hehehe! :big_grin:
|
|
|
|
Posted: Fri Dec 08, 2023 7:27 am |
|
|
|
|
|
| |
Post subject: |
Re: To HMS Victory and beyond |
|
|
|
Wonderful! :thumbs_up_1: :thumbs_up_1: :thumbs_up_1:
|
|
|
|
Posted: Fri Dec 08, 2023 4:30 am |
|
|
|
|