| Author |
Message |
|
|
| |
Post subject: |
Re: 1:192 & 1:384 USS Arcadia AD23 (1966) |
 |
|
pnolan48 wrote: Absolutely magnificent in every way!
One question: where did you get the winches/windlass? Thank You very much! I got all of the deck hardware, winches, davits, vents, blocks and the boats from http://www.bluejacketinc.com/fittings/index.htm. They are pricey, but worth it! One other thing I also must say about them is their knowledge of shipbuilding and boats and fittings is phenomenal! They are VERY willing to spend some time with you and answer your questions. One thing I was having trouble finding was information on the US Navy service boats. I mentioed this to their master builder and he quickly solved my problem with a website that has all of that info with this site: http://www.hnsa.org/doc/boatcat/index.htmWith that link I was able to get a good idea of what the boat dimensions and profiles were like. In the plans, they call out which boats were issued to her, and this book had them. [quote="pnolan48"]Absolutely magnificent in every way!
One question: where did you get the winches/windlass?[/quote]
Thank You very much!
I got all of the deck hardware, winches, davits, vents, blocks and the boats from [url]http://www.bluejacketinc.com/fittings/index.htm[/url].
They are pricey, but worth it!
One other thing I also must say about them is their knowledge of shipbuilding and boats and fittings is phenomenal! They are VERY willing to spend some time with you and answer your questions. One thing I was having trouble finding was information on the US Navy service boats. I mentioed this to their master builder and he quickly solved my problem with a website that has all of that info with this site: [url]http://www.hnsa.org/doc/boatcat/index.htm[/url]
With that link I was able to get a good idea of what the boat dimensions and profiles were like. In the plans, they call out which boats were issued to her, and this book had them.
|
|
|
 |
Posted: Wed Jul 17, 2013 12:09 pm |
|
|
 |
|
|
| |
Post subject: |
Re: 1:192 & 1:384 USS Arcadia AD23 (1966) |
|
|
|
Absolutely magnificent in every way!
One question: where did you get the winches/windlass?
Absolutely magnificent in every way!
One question: where did you get the winches/windlass?
|
|
|
|
Posted: Tue Jul 16, 2013 5:47 pm |
|
|
|
|
|
| |
Post subject: |
Re: 1:192 & 1:384 USS Arcadia AD23 (1966) |
|
|
Like it a lot too, thank you for the detailed explanations. I didn't know this kind of glue spray you used to (temporarely?) stick the plan, must be helpful, I must try to find some!  Like it a lot too, thank you for the detailed explanations.
I didn't know this kind of glue spray you used to (temporarely?) stick the plan, must be helpful, I must try to find some!
:thumbs_up_1:
|
|
|
|
Posted: Mon Jul 15, 2013 10:43 am |
|
|
|
|
|
| |
Post subject: |
Re: 1:192 & 1:384 USS Arcadia AD23 (1966) |
|
|
|
Thanks Neptune! Great compliments!
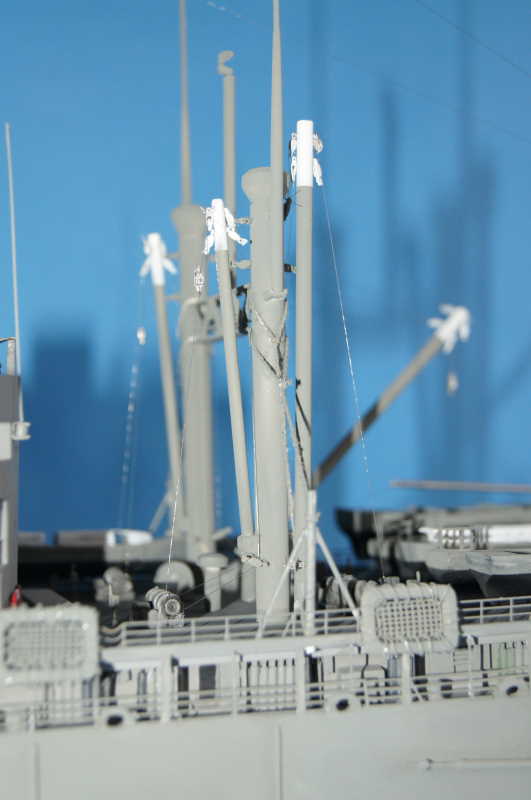
I do not believe that they are vent ducts, but they may be.
Here is how I made them: I do not have a lathe, but I did the next best thing. I sliced hollow tubing and glued them up until I achieved the proper width making sure they were even. Then I built up above and below with Tamiya White Putty. I built up coats and sanded in between. Then I took the head and clamped it into my Dremel tool chuck and used sandpaper to shape them. After a week or so and many attempts, you get good at it.. LOL
Thanks Neptune! Great compliments!
I do not believe that they are vent ducts, but they may be.
Here is how I made them: I do not have a lathe, but I did the next best thing. I sliced hollow tubing and glued them up until I achieved the proper width making sure they were even. Then I built up above and below with Tamiya White Putty. I built up coats and sanded in between. Then I took the head and clamped it into my Dremel tool chuck and used sandpaper to shape them. After a week or so and many attempts, you get good at it.. LOL
|
|
|
|
Posted: Fri Jul 12, 2013 5:42 pm |
|
|
|
|
|
| |
Post subject: |
Re: 1:192 & 1:384 USS Arcadia AD23 (1966) |
|
|
Must've slipped my attention. Pretty awesome job, I'd even say it's one of the best things I've ever seen here. Although I must admit I have a weak spot for anything merchant/transport related  Nonetheless, I love that paint job, quite subtle weathering. Can't comment on accuracy since I'm not so familiar with the details of these ships. One question though, how did you do the tops of these masts? I assume the masts doubled as ventilation shafts for below deck spaces. Either way, how did you do these heads, did you turn them on a lathe or manually file them to shape? Must've slipped my attention.
Pretty awesome job, I'd even say it's one of the best things I've ever seen here. Although I must admit I have a weak spot for anything merchant/transport related :heh:
Nonetheless, I love that paint job, quite subtle weathering. Can't comment on accuracy since I'm not so familiar with the details of these ships.
One question though, how did you do the tops of these masts? I assume the masts doubled as ventilation shafts for below deck spaces. Either way, how did you do these heads, did you turn them on a lathe or manually file them to shape?
|
|
|
|
Posted: Fri Jul 12, 2013 2:32 pm |
|
|
|
|
|
| |
Post subject: |
Re: 1:192 & 1:384 USS Arcadia AD23 (1966) |
|
|
|
No comments?
No comments?
|
|
|
|
Posted: Fri Jul 12, 2013 1:27 pm |
|
|
|
|
|
| |
Post subject: |
Re: 1:192 & 1:384 USS Arcadia AD23 (1966) |
|
|
|
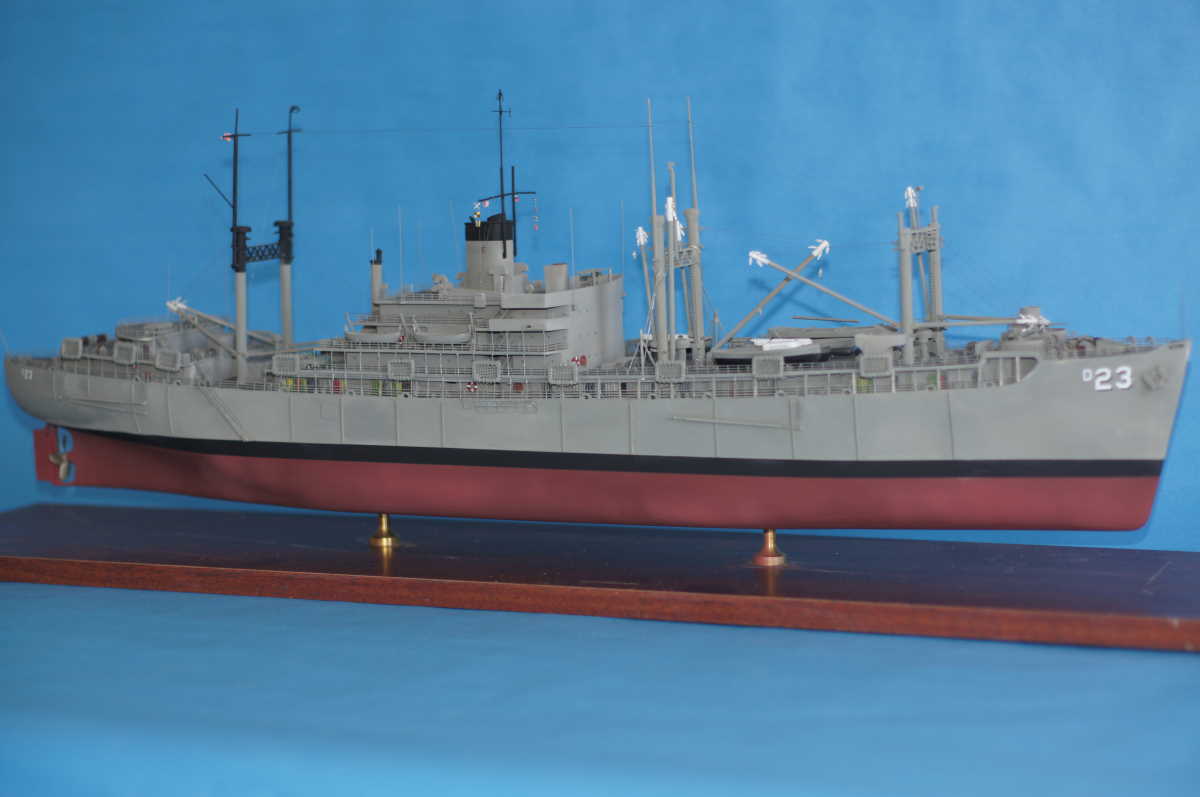
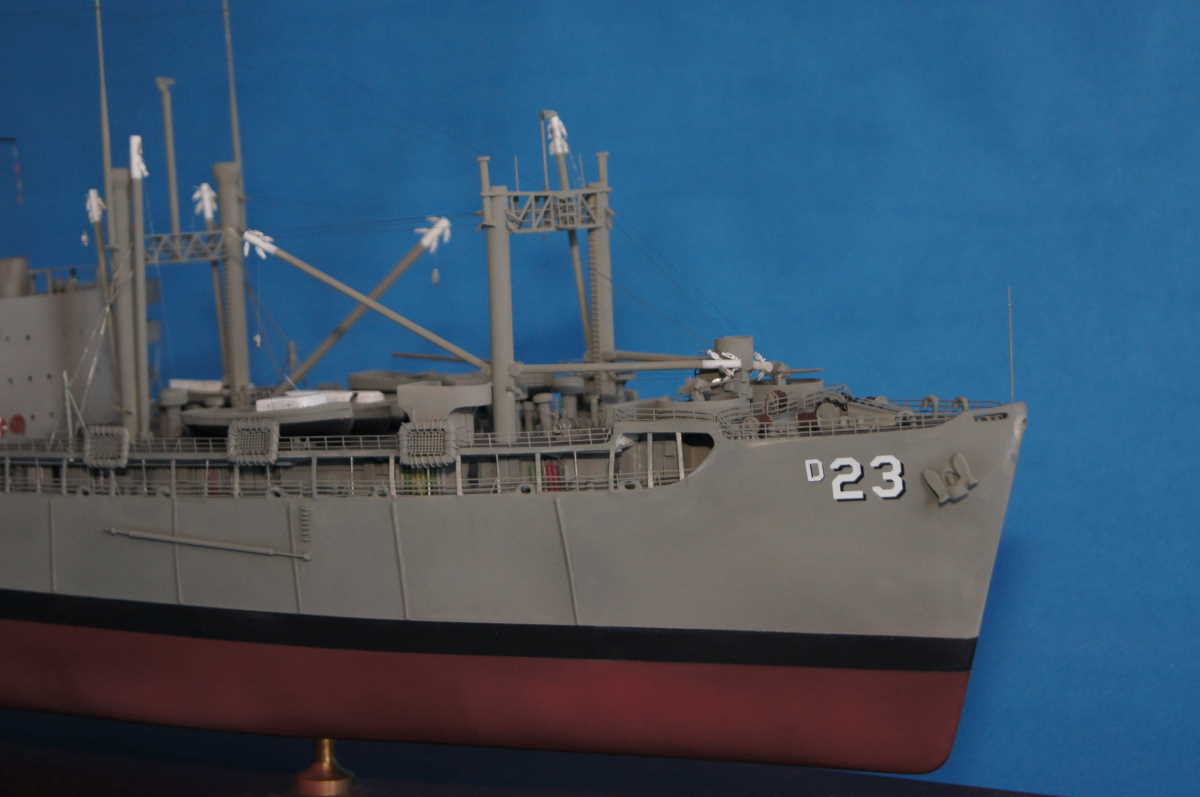
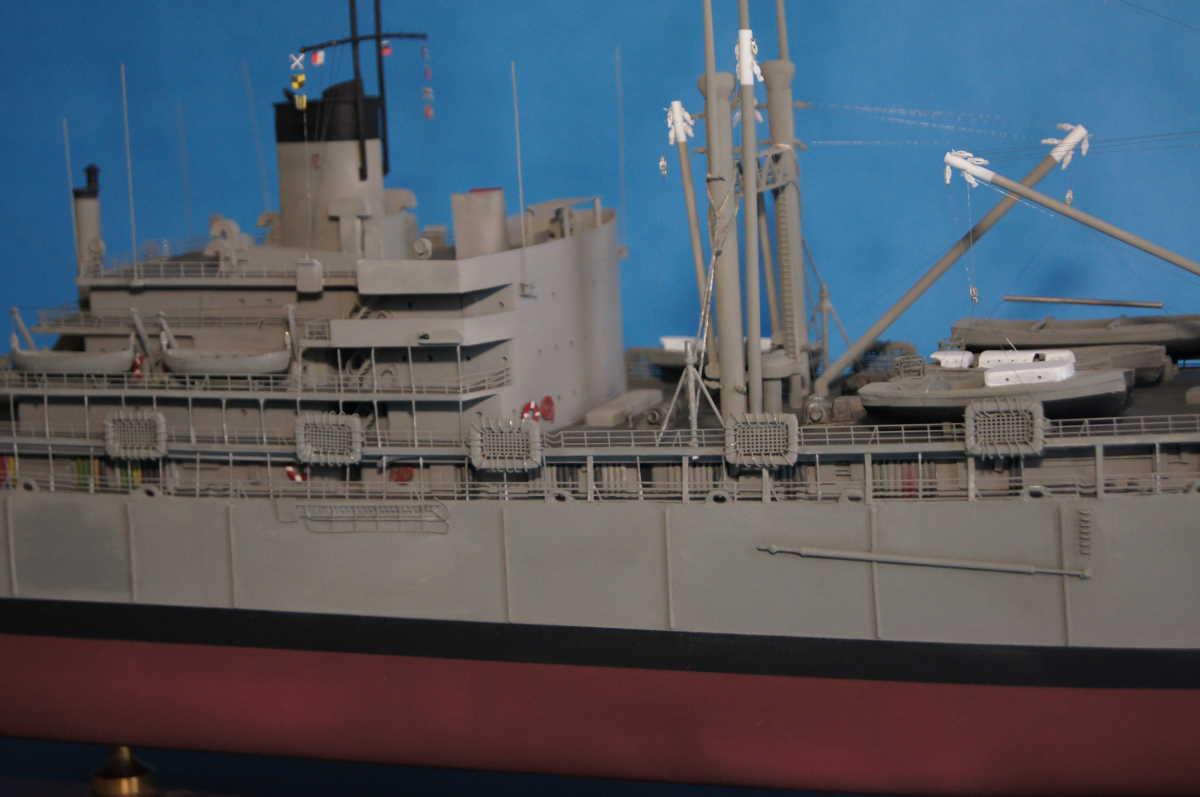
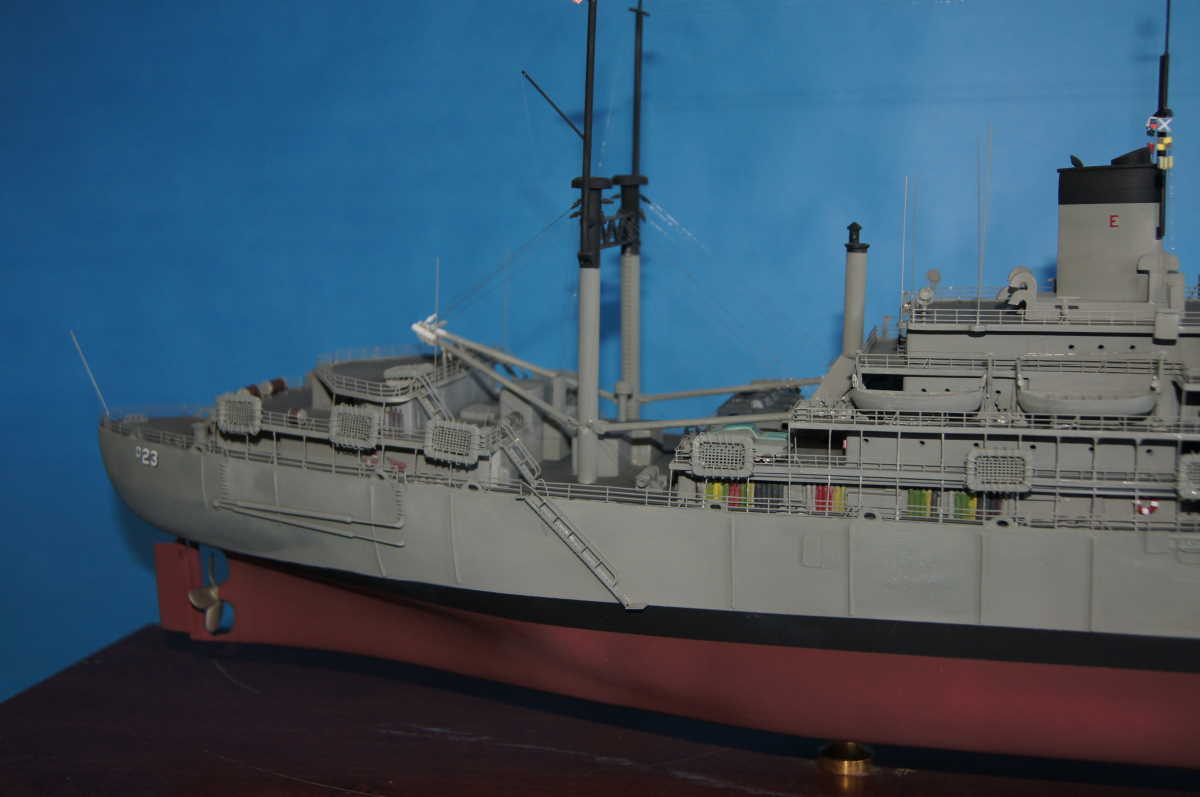
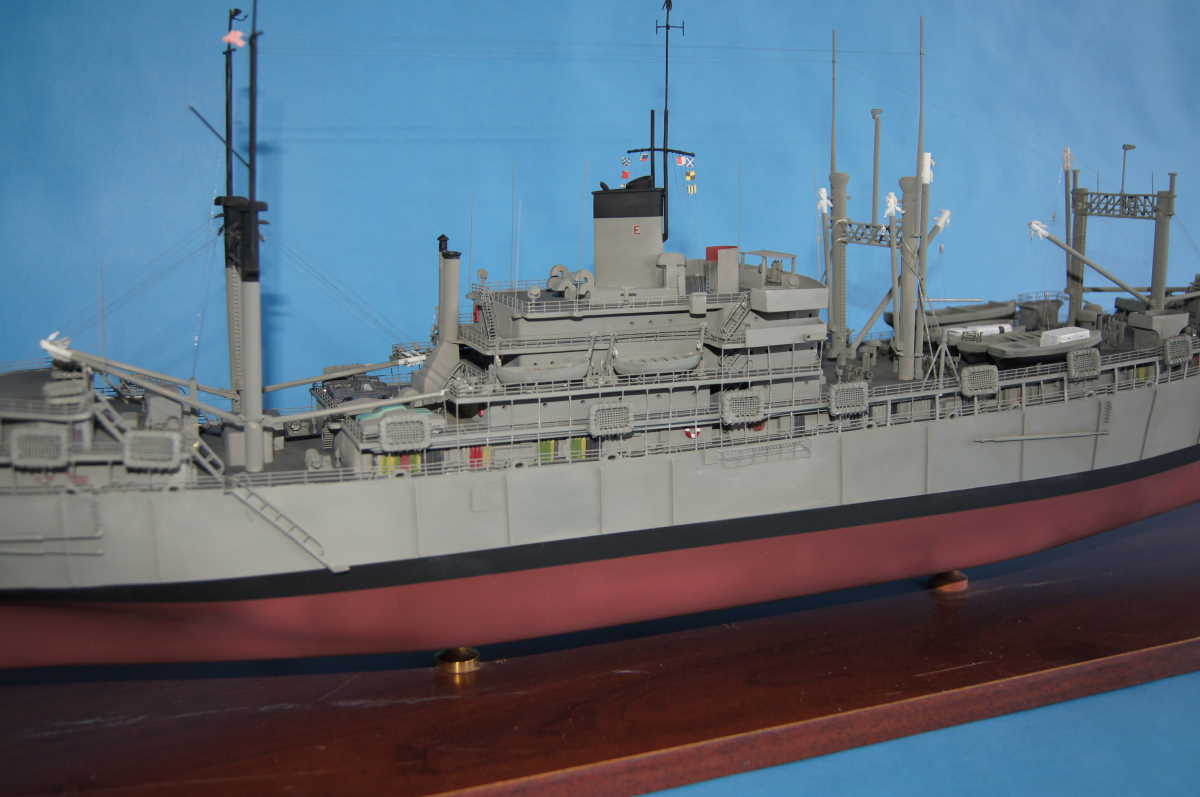
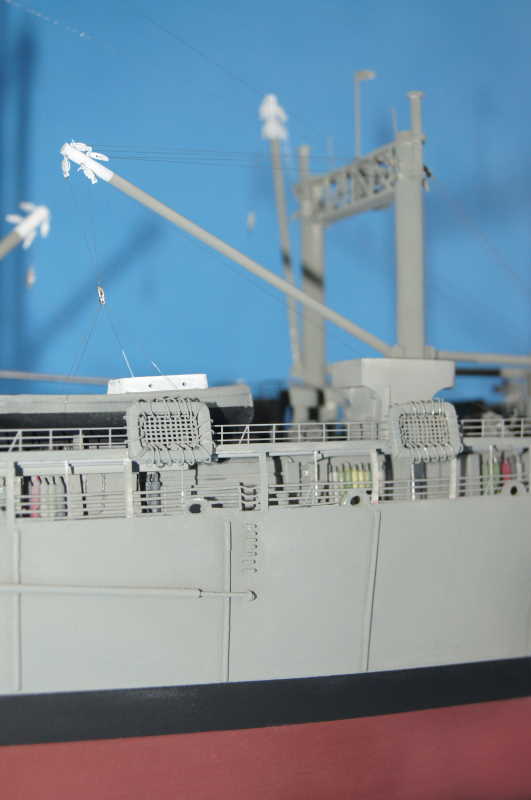
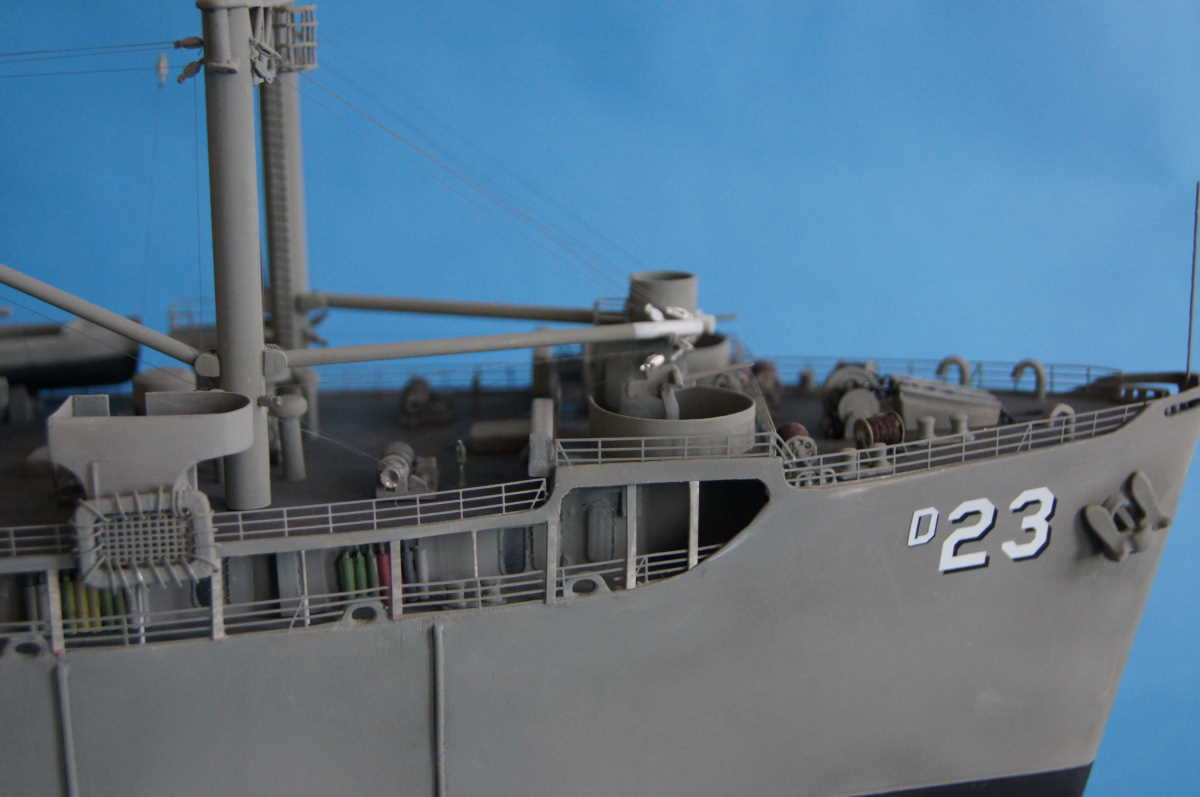
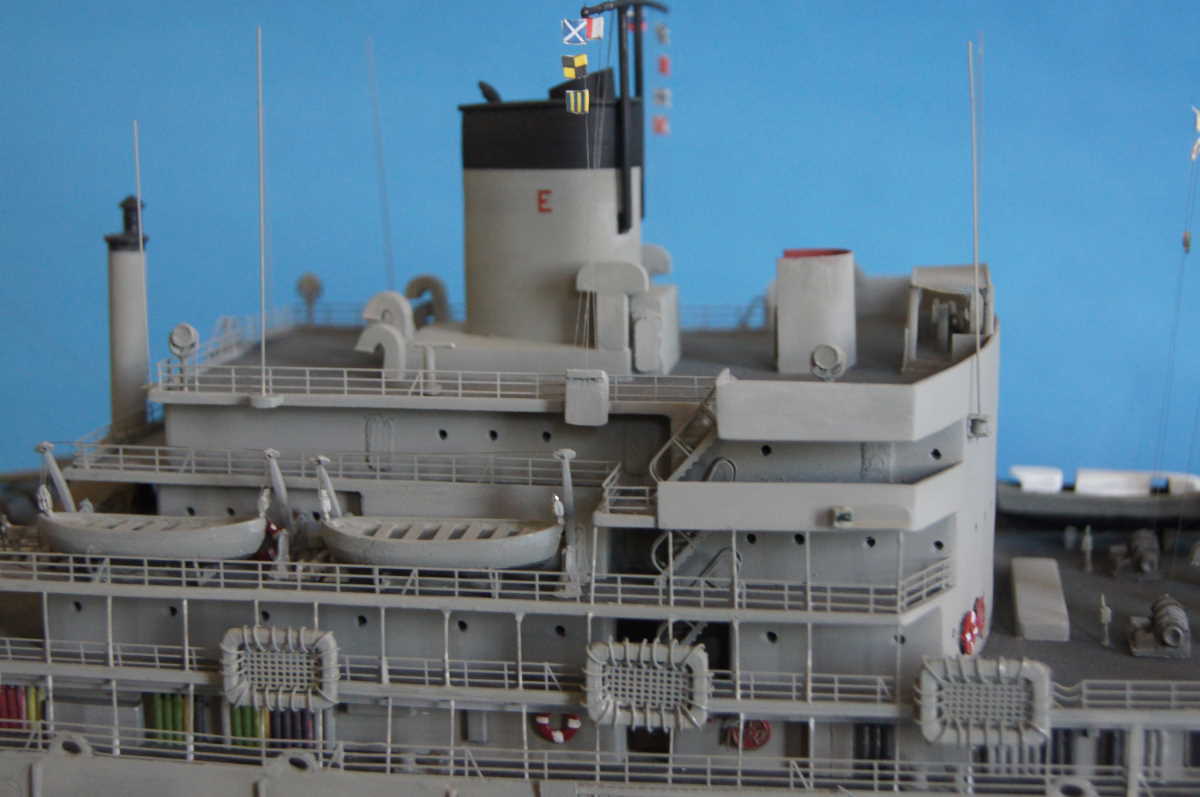
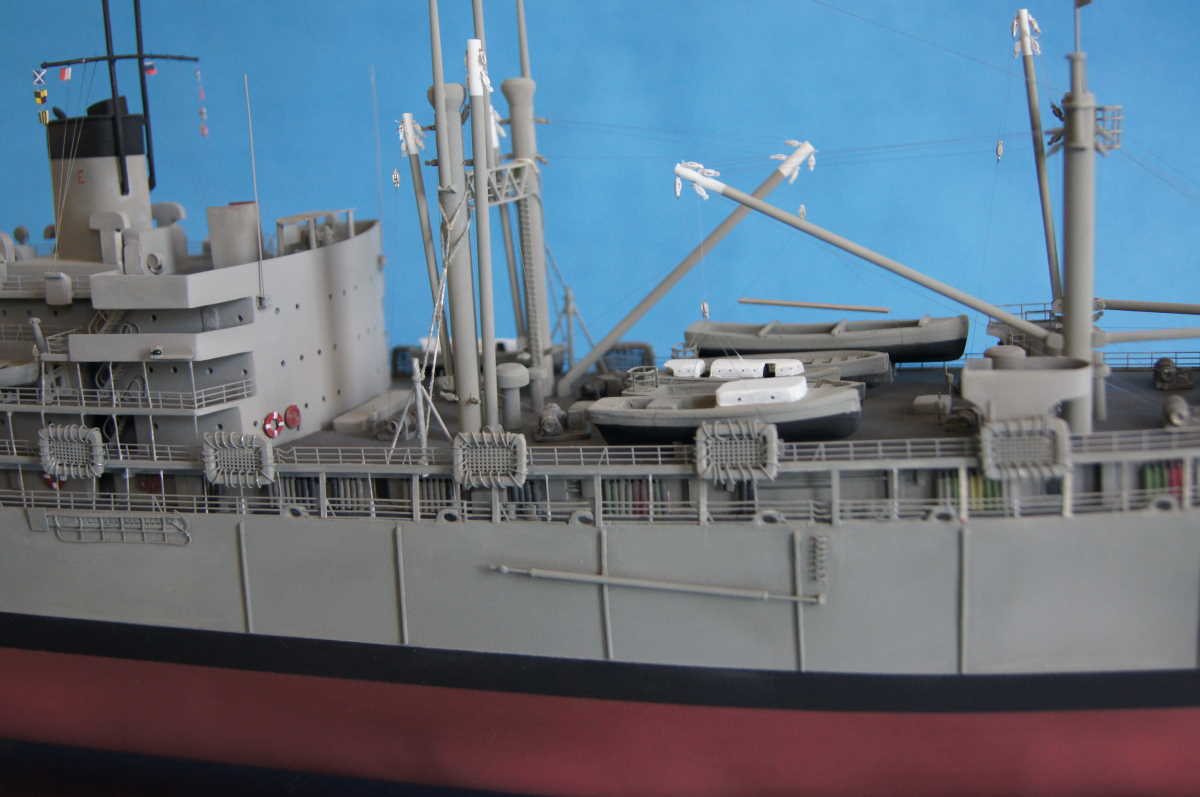
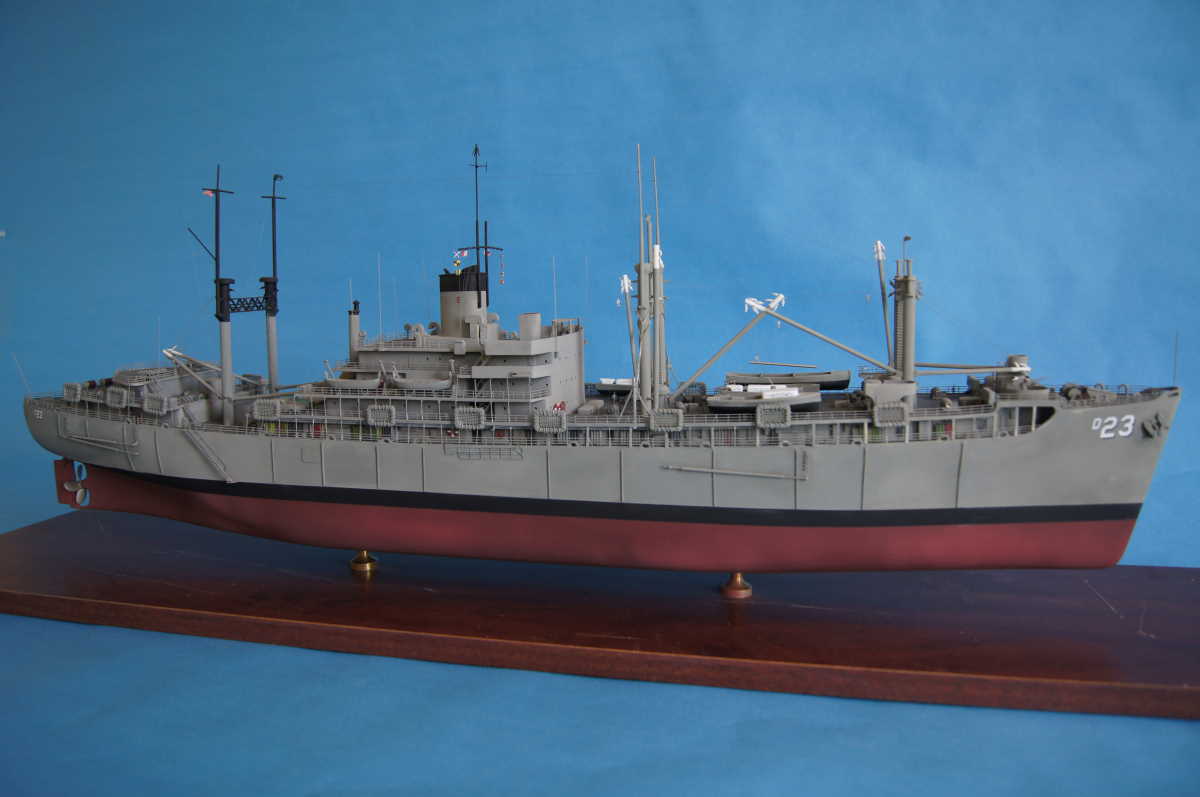
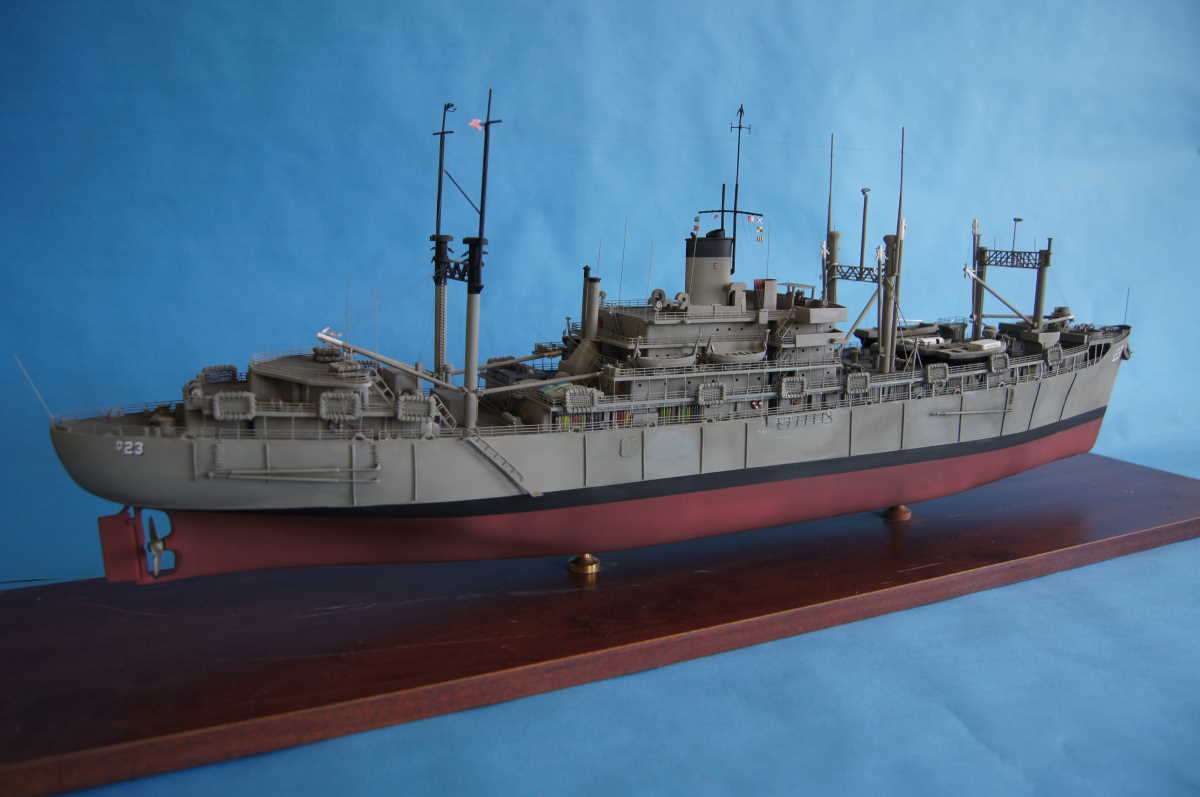
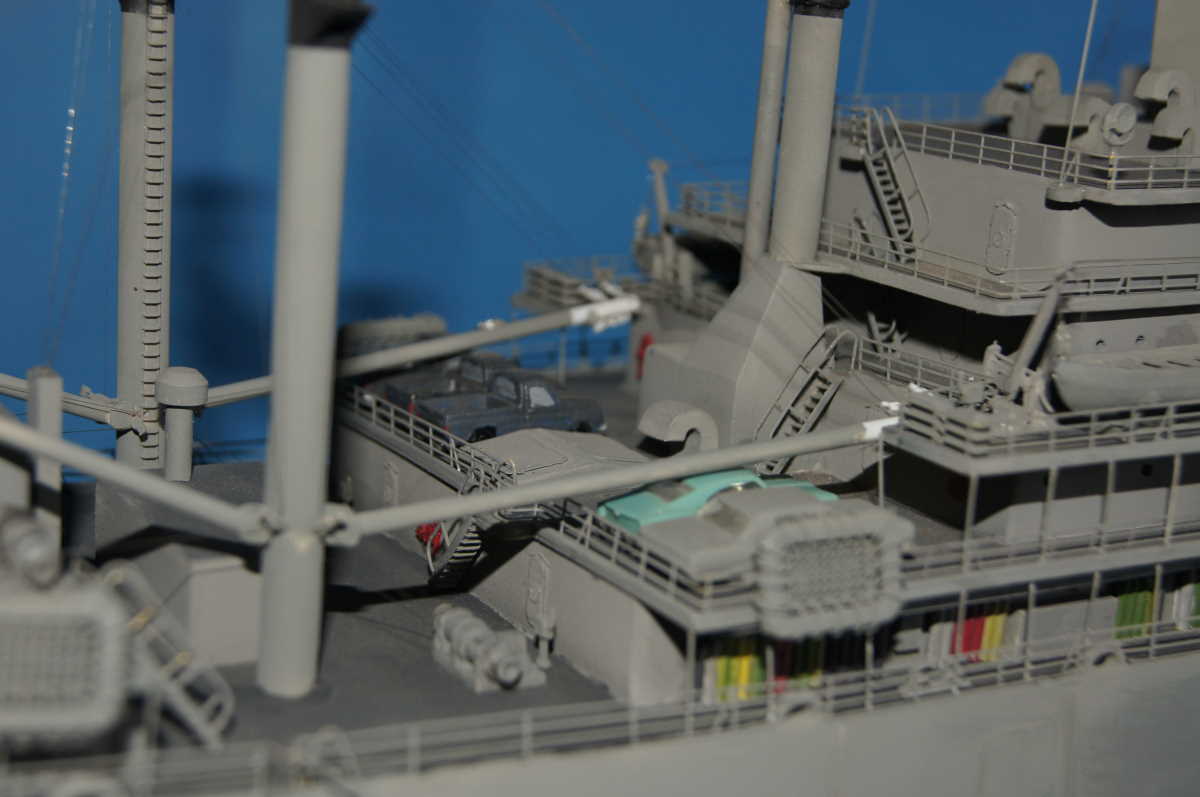
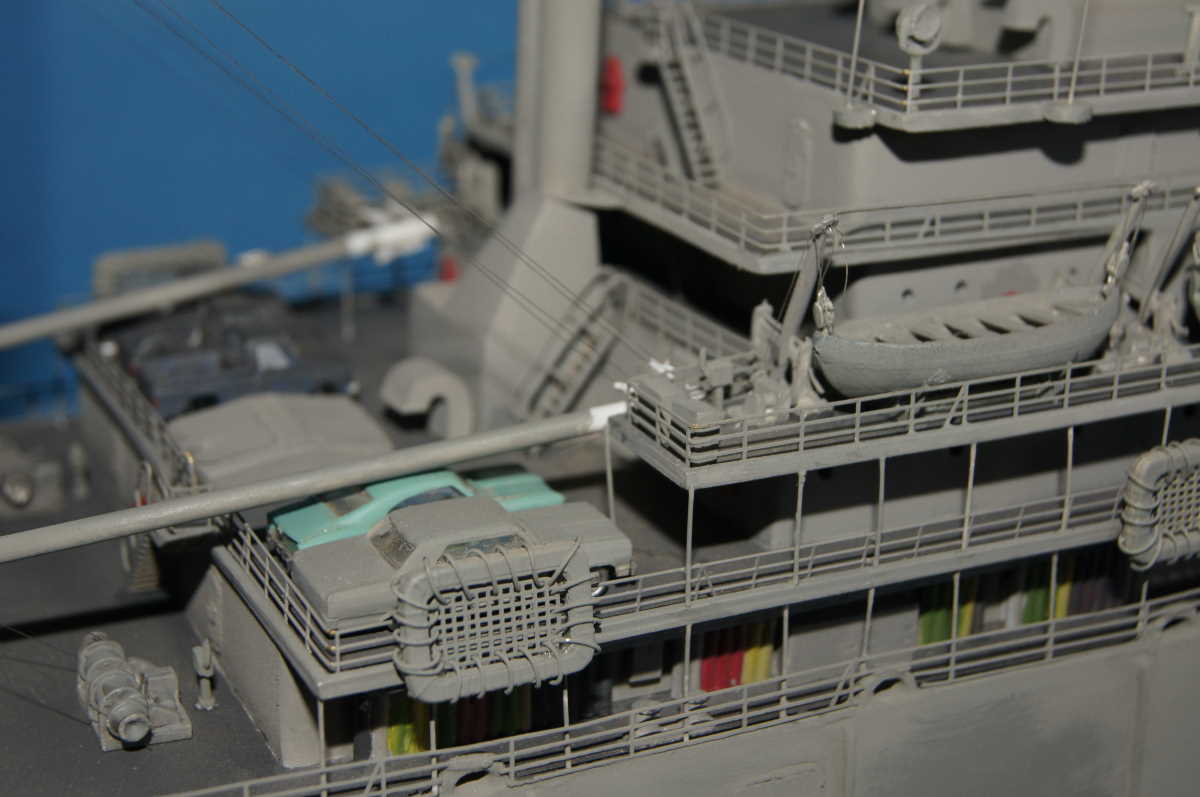
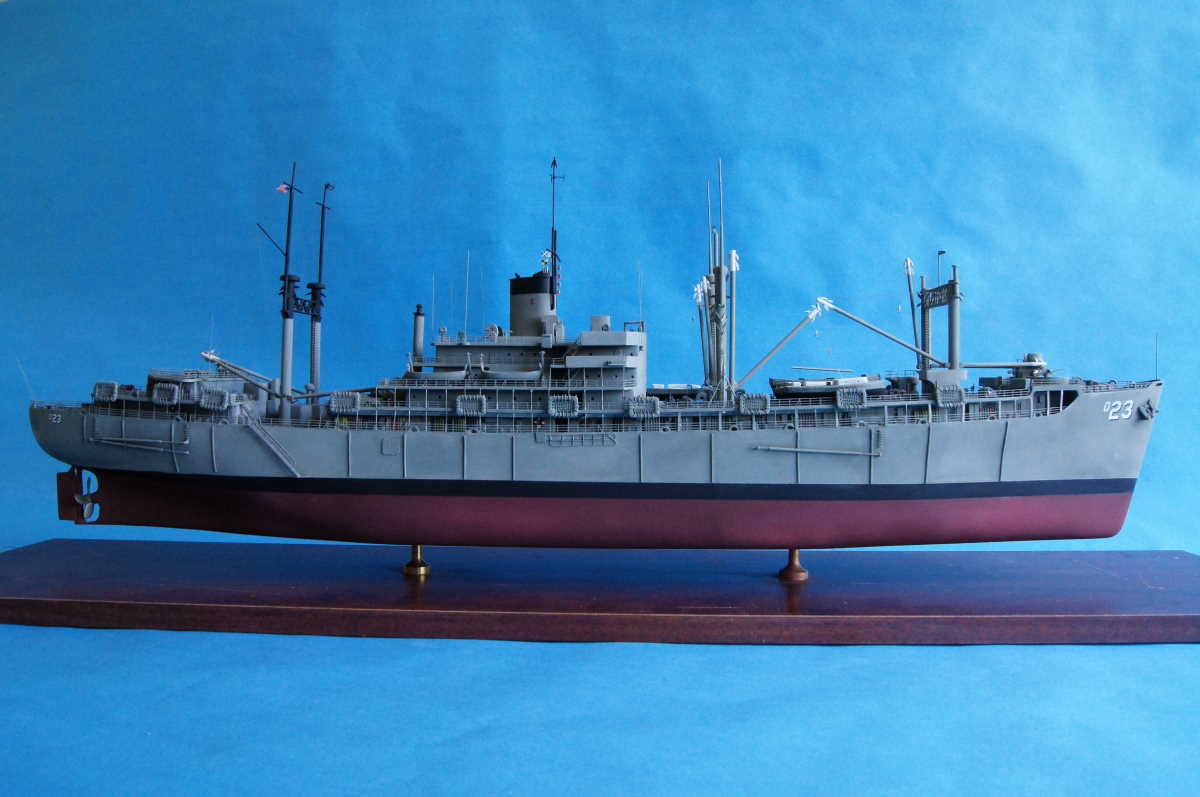
Well guys, the ship is finally "Done"! Other than some touch up painting on the sides of the hull, she's finished.
Here are some pics:
[img]http://www.michaelclare.com/models/Arcadia/A55_B0234_sm.jpg[/img]
[img]http://www.michaelclare.com/models/Arcadia/A55_B0245_sm.jpg[/img]
[img]http://www.michaelclare.com/models/Arcadia/A55_B0246_sm.jpg[/img]
[img]http://www.michaelclare.com/models/Arcadia/A55_B0251_sm.jpg[/img]
[img]http://www.michaelclare.com/models/Arcadia/A55_B0252_sm.jpg[/img]
[img]http://www.michaelclare.com/models/Arcadia/A55_B0257_sm.jpg[/img]
[img]http://www.michaelclare.com/models/Arcadia/A55_B0258_sm.jpg[/img]
[img]http://www.michaelclare.com/models/Arcadia/A55_B0262_sm.jpg[/img]
[img]http://www.michaelclare.com/models/Arcadia/A55_B0264_sm.jpg[/img]
[img]http://www.michaelclare.com/models/Arcadia/A55_B0271_sm.jpg[/img]
[img]http://www.michaelclare.com/models/Arcadia/A55_B0279_sm.jpg[/img]
[img]http://www.michaelclare.com/models/Arcadia/A55_B0283_sm.jpg[/img]
[img]http://www.michaelclare.com/models/Arcadia/A55_B0287_sm.jpg[/img]
[img]http://www.michaelclare.com/models/Arcadia/A55_B0288_sm.jpg[/img]
[img]http://www.michaelclare.com/models/Arcadia/A55_B0295_sm.jpg[/img]
[img]http://www.michaelclare.com/models/Arcadia/A55_B0296_sm.jpg[/img]
[img]http://www.michaelclare.com/models/Arcadia/A55_B0312_sm.jpg[/img]
[img]http://www.michaelclare.com/models/Arcadia/A55_B0324_sm.jpg[/img]
|
|
|
|
Posted: Fri Jun 21, 2013 2:34 pm |
|
|
|
|
|
| |
Post subject: |
Re: 1:192 & 1:384 USS Arcadia AD23 (1966) |
|
|
Thanks for sharing your project with us. Great photos!  Thanks for sharing your project with us.
Great photos! :wave_1:
|
|
|
|
Posted: Sun Jan 06, 2013 7:17 pm |
|
|
|
|
|
| |
Post subject: |
Re: 1:192 & 1:384 USS Arcadia AD23 (1966) |
|
|
|
Thanks Graham! Great compliments guys, thanks!
Mark, I didn't make those blocks. They came in a bag of brass odds n ends that I got from my local hobby shop. The K&S packs. Look for it, but just make sure the blocks are truly square, some were not.
Thanks Graham! Great compliments guys, thanks!
Mark, I didn't make those blocks. They came in a bag of brass odds n ends that I got from my local hobby shop. The K&S packs. Look for it, but just make sure the blocks are truly square, some were not.
|
|
|
|
Posted: Wed Jan 02, 2013 3:57 am |
|
|
|
|
|
| |
Post subject: |
Re: 1:192 & 1:384 USS Arcadia AD23 (1966) |
|
|
all I can say is wow lovely build  Graham all I can say is wow lovely build :cool_1:
Graham
|
|
|
|
Posted: Sat Dec 29, 2012 7:29 pm |
|
|
|
|
|
| |
Post subject: |
Re: 1:192 & 1:384 USS Arcadia AD23 (1966) |
|
|
|
Thanks for the reply.
I'm going to have to use that technique.
I like the idea of being able to do final touch ups after the railing is done.
I'm also going to be making some of those brass gauge blocks. Great idea for corners.
Thanks for the reply.
I'm going to have to use that technique.
I like the idea of being able to do final touch ups after the railing is done.
I'm also going to be making some of those brass gauge blocks. Great idea for corners.
|
|
|
|
Posted: Sat Dec 29, 2012 4:16 pm |
|
|
|
|
|
| |
Post subject: |
Re: 1:192 & 1:384 USS Arcadia AD23 (1966) |
|
|
Thank You EVERYBODY for your comments! It really makes me feel good to hear them after the years of hard work and planning that went into her. Yes, my Uncle means the world to me and he was a huge guiding force in my life growing up since i had no father. He was it for a good many years. Although I went into the Navy for my own reasons, he was, subconsciously a big factor in it. Mark - If you have any more questions, please feel free to post them here and I will try to answer them, or email me at: mclare@michaelclare.com and I will answer them there. To answer your first question about the railings, put simply, I masked them from behind. To answer in more detail the why and how, I will answer that here too. My skill set was just developing here for this too. As I said, this was/is my first scratch project and as such, there are no manuals or directions to follow, and I had never worked in such a large scale before. The scuppers (Deck edging/gutters) were the motivating factor. As you can see I had the hull pretty much done up to the main deck. I was just going to glue the PE railings to the edge of the deck and call it a day. But then I started on the 01 level (I call it the cargo deck or Big boats deck, but the actual "Boat Deck" is the 02 level where the 4 26' life boats are, so I call it the cargo deck since that's where the cargo hatches are.) and main superstructure decks. The 02-04 decks just didn't look right without them. So I took out some .040 square styrene strips and started adding them. I should have probably used smaller or thinner strips though. The .040 sq was just easier to apply and went on readily. They are no way to scale, but provided a good anchor for the PE I felt. But once I did the upper decks, the main deck just didn't look right without it, so I went back and started applying it, knowing I was going to have a re-paint nightmare ahead of me. One problem facing me was that the fairleads were in the way and in the wrong position relative to the edge of the deck. So I pried them all up carefully, hoping like hell that that would not create a new nightmare of broken deck edging since they were glued on with CA. All but one came up easily, and that one was not too bad. Bullet dodged! I took a sanding stick and lightly sanded the edges of the decks getting down to bare styrene to promote good glue adhesion. That worked out okay, and I had good bonding of the strips to the edge. I then sanded that all smooth making it look like it was one piece. Then I had to add the Fairleads back in. I measured them to the plan and then cut gaps in the scuppers with a very thin razor saw. Then I reglued the Fairleads back in place making them flush to the sides of the hull. Once that was all done I started cutting and gluing the PE railings in place. Here I glued them on top of the scuppers and not to the back of them. It just looked better. Looking back and it I had to do it again, I probably would have used .030 or .025 or maybe even .020 sq. but I did what I did and it looks okay. Once that was all in place, then yes I was confronted with a mess on the sides of the hull. Glue drips (which I seem to get no matter how little CA I try to apply!) and there were a couple of cracks in the fiberglass developing which I had to fix. I think that was from the CA kicker. After that was all sanded again and ready for paint, I masked the top of the boot line with Tamiya 18MM tape, with green masking paper that I get from Lowes in the paint section where they keep the glues and such. It comes in 6" wide and other, wider size rolls, but I get the 6" wide as that's a good working size. It is the same type of paper that auto body shops use. If you have ever been to an auto body shop (I also rebuild Mercedes cars and have three classics, so I spend a lot of time at my guy Mauricio's Body Shop here in Lancaster) you have maybe seen the cart they have that holds the paper and a roll of tape at one end, and as you pull it out the tape applies to one edge as you draw it out. I use the same method, but I don't have the cart, I do it by hand. I pull a length of tape out and stick it to the desk in front of me, (only the top half of the tape though) then I pull an equal length of paper and draw it tight and stick it to the bottom half of the tape, then I pull it up and re-stick it to the table and burnish the tape to the paper so there are no gaps and it's all tight. The Tamiya tape is perfect for that as long as your table is clean with no debris on it to dirty the tape. Then, I apply it carefully to the line to be masked. In this case it was the boot stripe. Then I burnish it down tightly and tuck it under the hull cutting slits for the mounting brass. Then I took a long piece of 18MM tape and carefully applied it to the backside of the railings so the sticky side is facing me, burnishing it to the bottom of the scuppers. Then I took cotton balls and stretched them out and stuffed them behind the tape to protect the decks and bulkheads/tanks/etc from overspray. Then I took smaller sections of masking paper and applied them to the top of the tape facing me and folded it over the cotton and taped it to the top of the open deck above. Then I used my Iwata AB set on a low PSI setting and re-shot the whole side, did a light sanding and re-shot again where needed. Then I pulled (CAREFULLY!) the tape off from behind and un-masked the rest of the area. I hope that answers your question, if you have any more, please ask! Thank You EVERYBODY for your comments! It really makes me feel good to hear them after the years of hard work and planning that went into her.
Yes, my Uncle means the world to me and he was a huge guiding force in my life growing up since i had no father. He was it for a good many years. Although I went into the Navy for my own reasons, he was, subconsciously a big factor in it.
Mark - If you have any more questions, please feel free to post them here and I will try to answer them, or email me at: mclare@michaelclare.com and I will answer them there.
To answer your first question about the railings, put simply, I masked them from behind. To answer in more detail the why and how, I will answer that here too. My skill set was just developing here for this too. As I said, this was/is my first scratch project and as such, there are no manuals or directions to follow, and I had never worked in such a large scale before. The scuppers (Deck edging/gutters) were the motivating factor. As you can see I had the hull pretty much done up to the main deck. I was just going to glue the PE railings to the edge of the deck and call it a day.
But then I started on the 01 level (I call it the cargo deck or Big boats deck, but the actual "Boat Deck" is the 02 level where the 4 26' life boats are, so I call it the cargo deck since that's where the cargo hatches are.) and main superstructure decks. The 02-04 decks just didn't look right without them. So I took out some .040 square styrene strips and started adding them. I should have probably used smaller or thinner strips though. The .040 sq was just easier to apply and went on readily. They are no way to scale, but provided a good anchor for the PE I felt.
But once I did the upper decks, the main deck just didn't look right without it, so I went back and started applying it, knowing I was going to have a re-paint nightmare ahead of me. One problem facing me was that the fairleads were in the way and in the wrong position relative to the edge of the deck. So I pried them all up carefully, hoping like hell that that would not create a new nightmare of broken deck edging since they were glued on with CA. All but one came up easily, and that one was not too bad. Bullet dodged! I took a sanding stick and lightly sanded the edges of the decks getting down to bare styrene to promote good glue adhesion. That worked out okay, and I had good bonding of the strips to the edge. I then sanded that all smooth making it look like it was one piece. Then I had to add the Fairleads back in. I measured them to the plan and then cut gaps in the scuppers with a very thin razor saw. Then I reglued the Fairleads back in place making them flush to the sides of the hull. Once that was all done I started cutting and gluing the PE railings in place. Here I glued them on top of the scuppers and not to the back of them. It just looked better. Looking back and it I had to do it again, I probably would have used .030 or .025 or maybe even .020 sq. but I did what I did and it looks okay.
Once that was all in place, then yes I was confronted with a mess on the sides of the hull. Glue drips (which I seem to get no matter how little CA I try to apply!) and there were a couple of cracks in the fiberglass developing which I had to fix. I think that was from the CA kicker. After that was all sanded again and ready for paint, I masked the top of the boot line with Tamiya 18MM tape, with green masking paper that I get from Lowes in the paint section where they keep the glues and such. It comes in 6" wide and other, wider size rolls, but I get the 6" wide as that's a good working size. It is the same type of paper that auto body shops use. If you have ever been to an auto body shop (I also rebuild Mercedes cars and have three classics, so I spend a lot of time at my guy Mauricio's Body Shop here in Lancaster) you have maybe seen the cart they have that holds the paper and a roll of tape at one end, and as you pull it out the tape applies to one edge as you draw it out. I use the same method, but I don't have the cart, I do it by hand. I pull a length of tape out and stick it to the desk in front of me, (only the top half of the tape though) then I pull an equal length of paper and draw it tight and stick it to the bottom half of the tape, then I pull it up and re-stick it to the table and burnish the tape to the paper so there are no gaps and it's all tight. The Tamiya tape is perfect for that as long as your table is clean with no debris on it to dirty the tape.
Then, I apply it carefully to the line to be masked. In this case it was the boot stripe. Then I burnish it down tightly and tuck it under the hull cutting slits for the mounting brass. Then I took a long piece of 18MM tape and carefully applied it to the backside of the railings so the sticky side is facing me, burnishing it to the bottom of the scuppers. Then I took cotton balls and stretched them out and stuffed them behind the tape to protect the decks and bulkheads/tanks/etc from overspray. Then I took smaller sections of masking paper and applied them to the top of the tape facing me and folded it over the cotton and taped it to the top of the open deck above. Then I used my Iwata AB set on a low PSI setting and re-shot the whole side, did a light sanding and re-shot again where needed.
Then I pulled (CAREFULLY!) the tape off from behind and un-masked the rest of the area.
I hope that answers your question, if you have any more, please ask!
|
|
|
|
Posted: Sat Dec 29, 2012 2:39 pm |
|
|
|
|
|
| |
Post subject: |
Re: 1:192 & 1:384 USS Arcadia AD23 (1966) |
|
|
|
Beautiful job on a very unusual modeling subject! :good_job:
:woo_hoo:
Your uncle will display it with pride. :thumbs_up_1: :thumbs_up_1: :thumbs_up_1:
I wish I had a nephew that would build models of the ships I was on! :heh:
John :wave_1:
|
|
|
|
Posted: Fri Dec 28, 2012 7:06 pm |
|
|
|
|
|
| |
Post subject: |
Re: 1:192 & 1:384 USS Arcadia AD23 (1966) |
|
|
|
Amazing build!!!
I'm newer at modeling, and didn't have a clue on how to scratch build. This is a great tutorial for people like me.
I have about a million questions, but the one that I must ask, because it will be used the most is,
In the one picture it shows you'd added the railing, then sanded the sides again, then repainted the whole area.
What did you use to mask the already painted deck?
This is a technique that I'd like to start using if it's anywhere in my skill set.
Again, great build, and fantastic learning guide.
|
|
|
|
Posted: Fri Dec 28, 2012 10:27 am |
|
|
|
|
|
| |
Post subject: |
Re: 1:192 & 1:384 USS Arcadia AD23 (1966) |
|
|
I would like to see more also . I would like to see more also . :heh:
|
|
|
|
Posted: Fri Dec 28, 2012 3:35 am |
|
|
|
|
|
| |
Post subject: |
Re: 1:192 & 1:384 USS Arcadia AD23 (1966) |
|
|
|
That is some serious work you did there! Great job so far, good luck with the remaining detailing. Hope to see some update soon! :thumbs_up_1: :thumbs_up_1: :thumbs_up_1:
|
|
|
|
Posted: Fri Dec 28, 2012 3:18 am |
|
|
|
|
|
| |
Post subject: |
Re: 1:192 & 1:384 USS Arcadia AD23 (1966) |
|
|
She built up MIGHTY nice sir, bravo, bravo indeed!!! Thank you for sharing, especially the progress shots. Its a nice primer on how to turn plans and styrene into a finished build. -Mike She built up MIGHTY nice sir, bravo, bravo indeed!!! :thumbs_up_1:
Thank you for sharing, especially the progress shots. Its a nice primer on how to turn plans and styrene into a finished build.
-Mike
|
|
|
|
Posted: Thu Dec 27, 2012 10:29 pm |
|
|
|
|
|
| |
Post subject: |
Re: 1:192 & 1:384 USS Arcadia AD23 (1966) |
|
|
Hello all! I'm back and have nearly finished the larger Arcadia. Last year I met a girl and we moved in together and I took some time off, but I resumed building back in October, and worked on her for the last three months solid, and she's almost finished! I'll kinda breeze through the steps and pics here and if anybody has any questions, feel free to ask! When I left off the hull was pretty much done and so were all of the deckhouses and I needed to start the details and assembly work. I started with the main deck, outfitting the bulkheads with lockers, panels, conduits and of course, those dreaded cylinders! I made up about 500 of them, that was like 2 weeks work, and then I attached them to .010 plastic strip to make them in gangs of like 10-20. I painted them green and orange (Looks red in the pics) and black and of course gray. Here are some main deck shots: Started small:  And worked my way up:  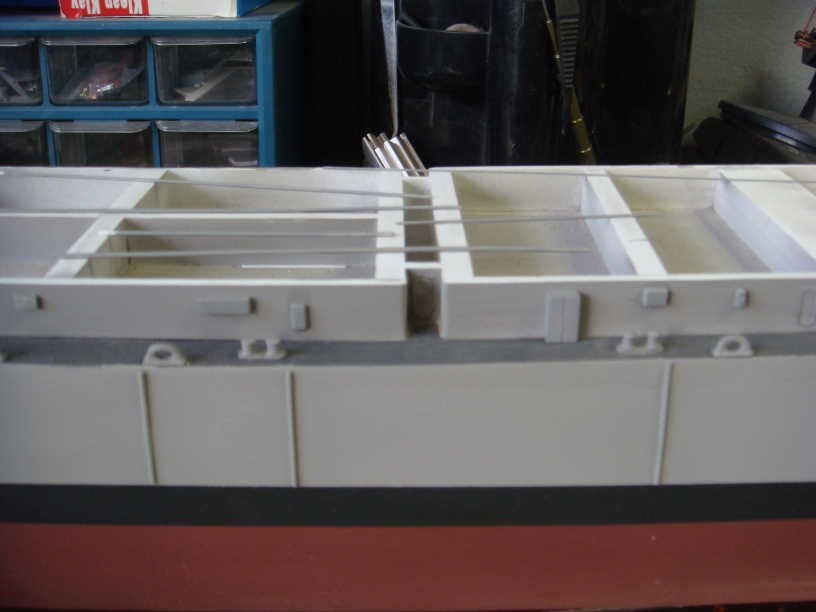 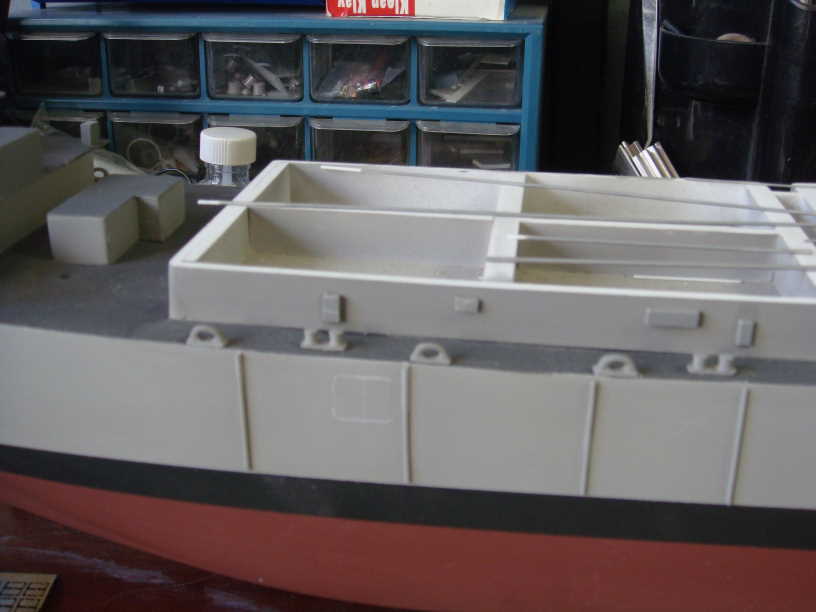 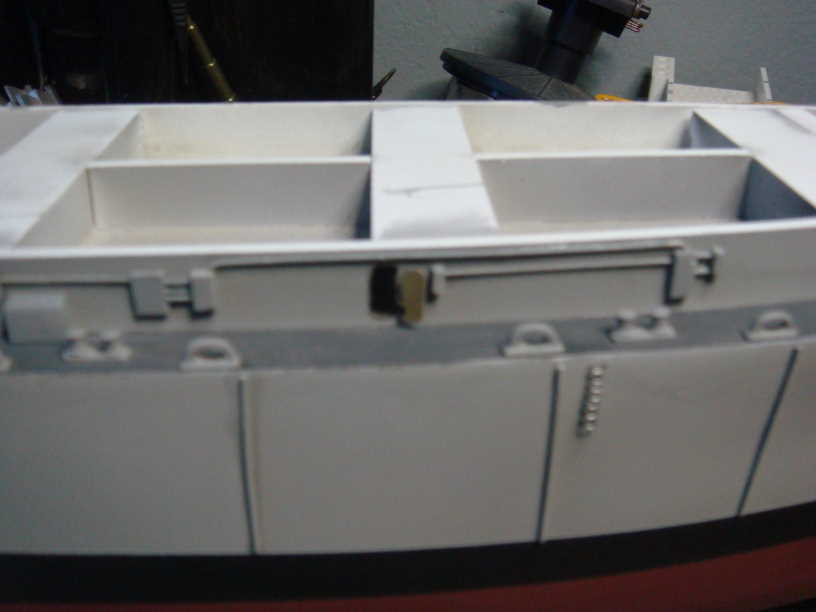 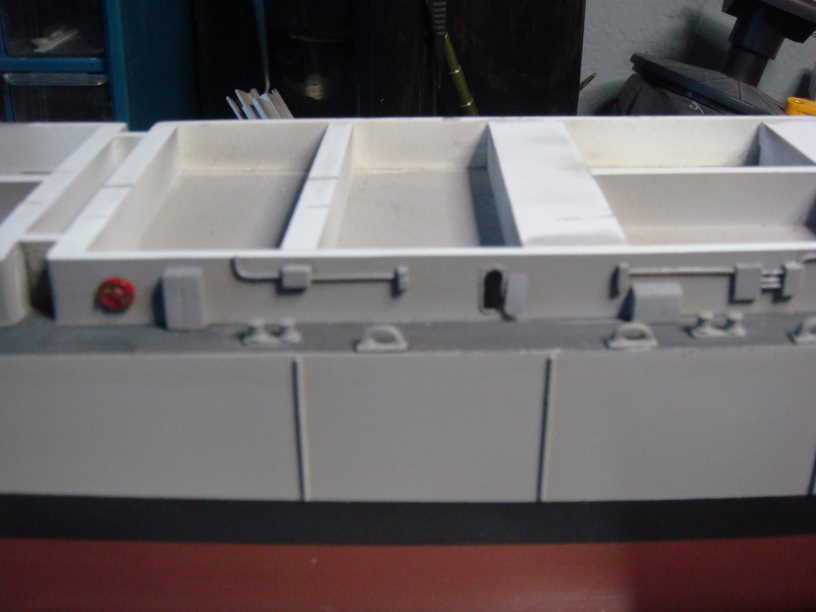 Next I glued all of the deckhouses together in the main superstructure and sanded and primed them: 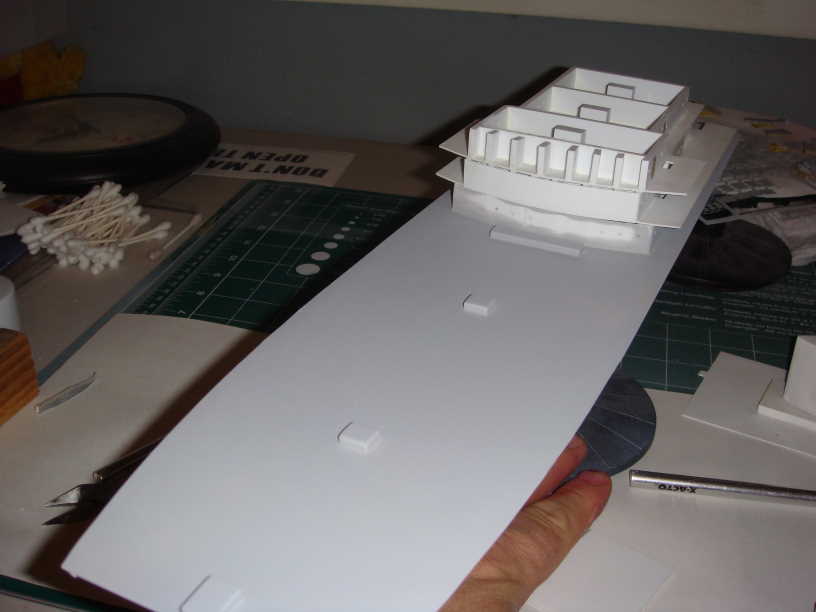  And I made the aft smokestacks for the diesel generators and incinerator room:  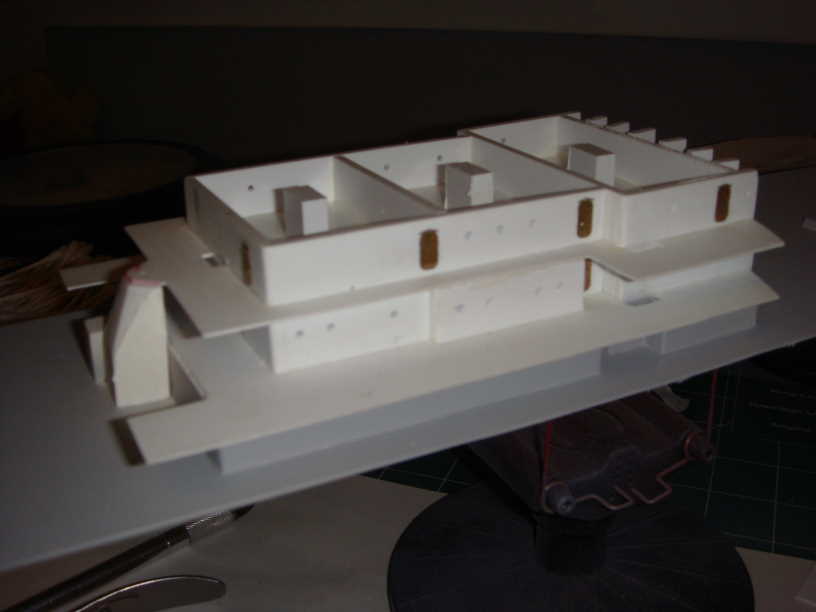 Here is the starboard side all adorned: 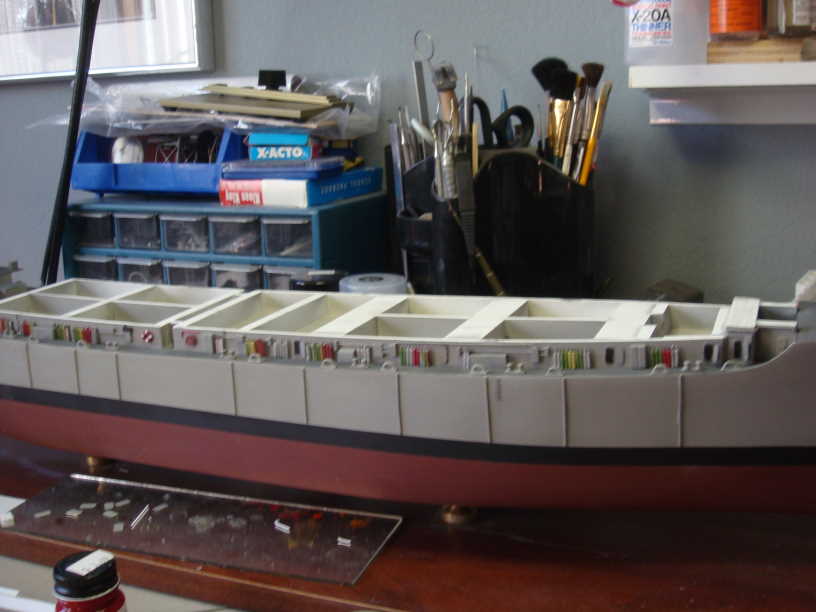 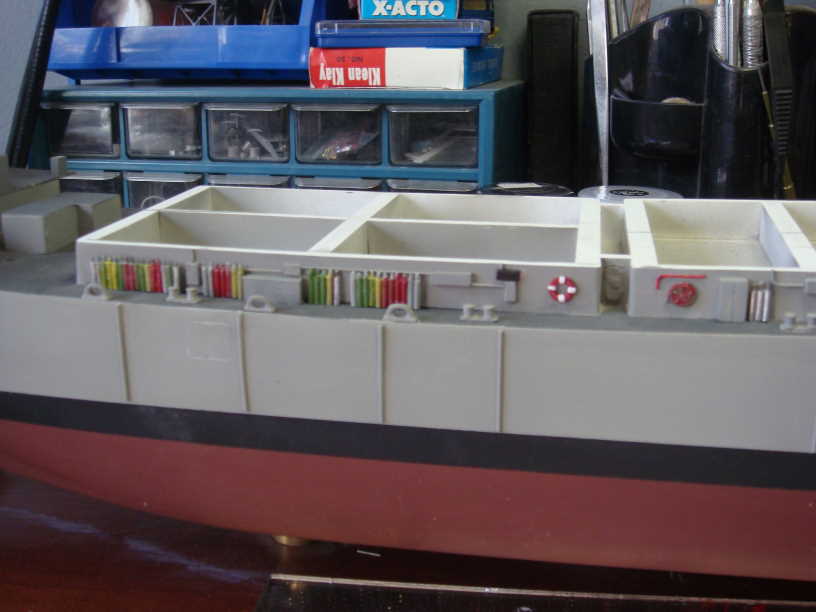 I added the top 04 level and the stack: 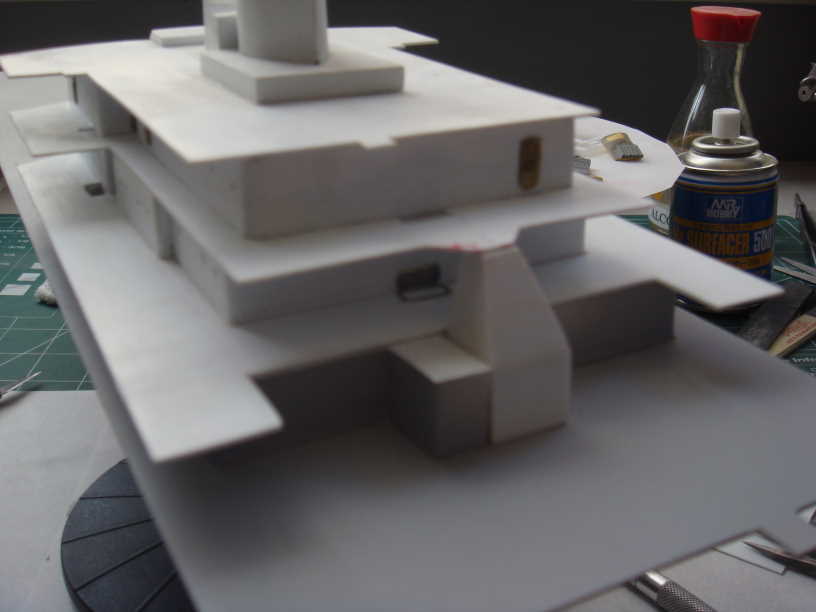 Next the front of the superstructure: 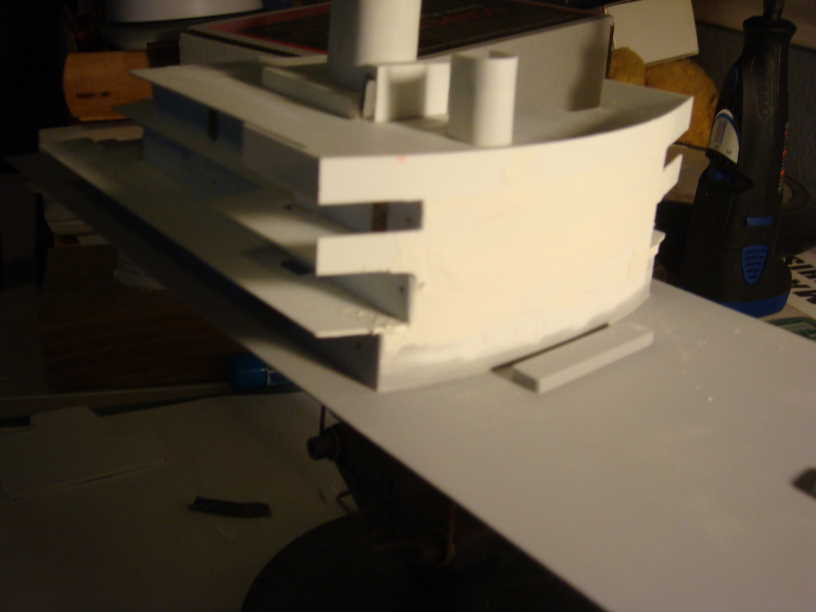 Some top deck details: 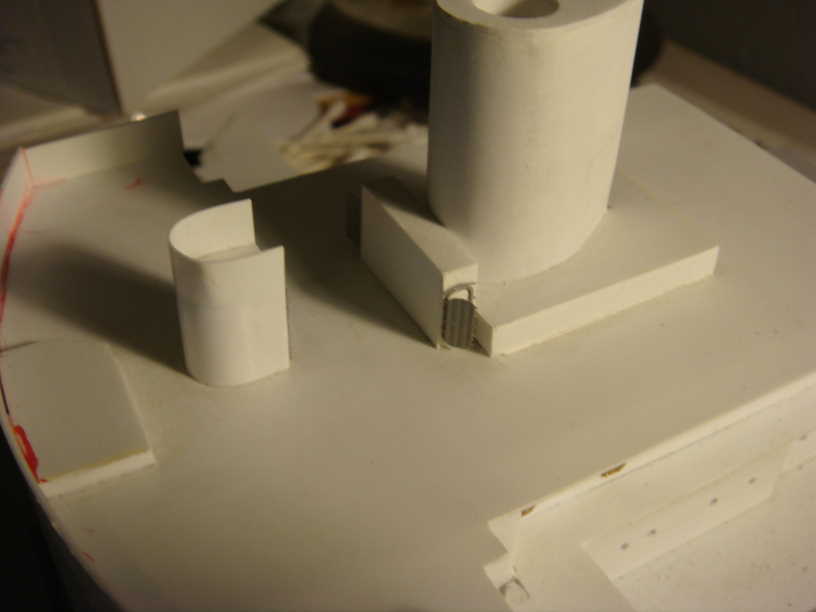 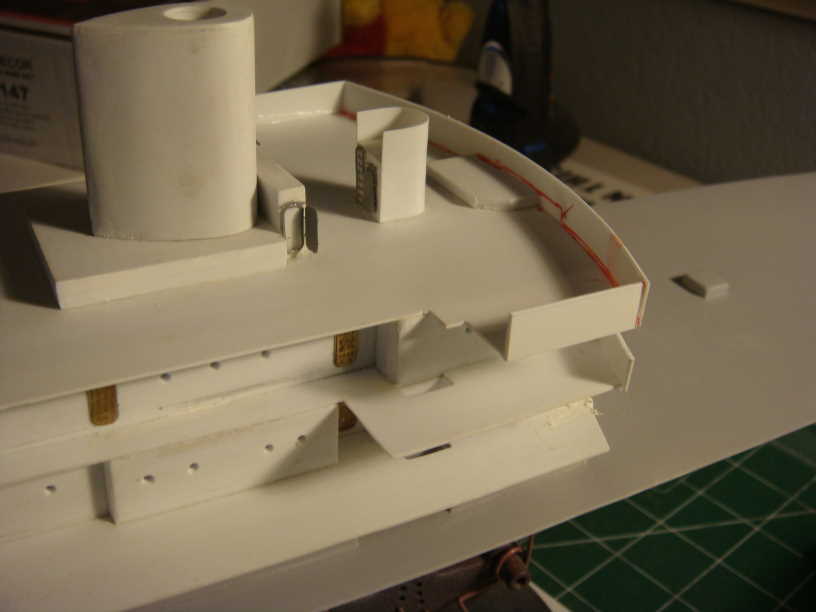 Scuppers: 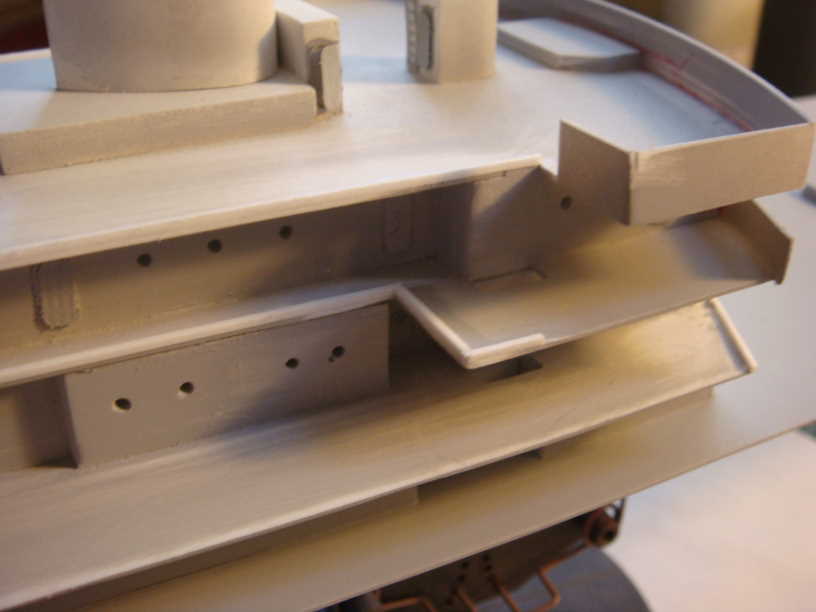 Next I shot the decks with WEM "US Navy Modern Deck Grey": 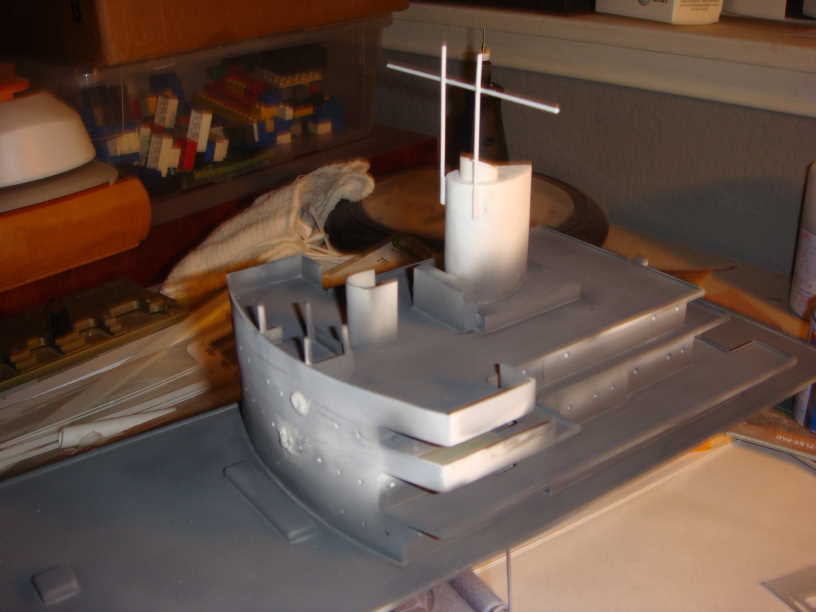 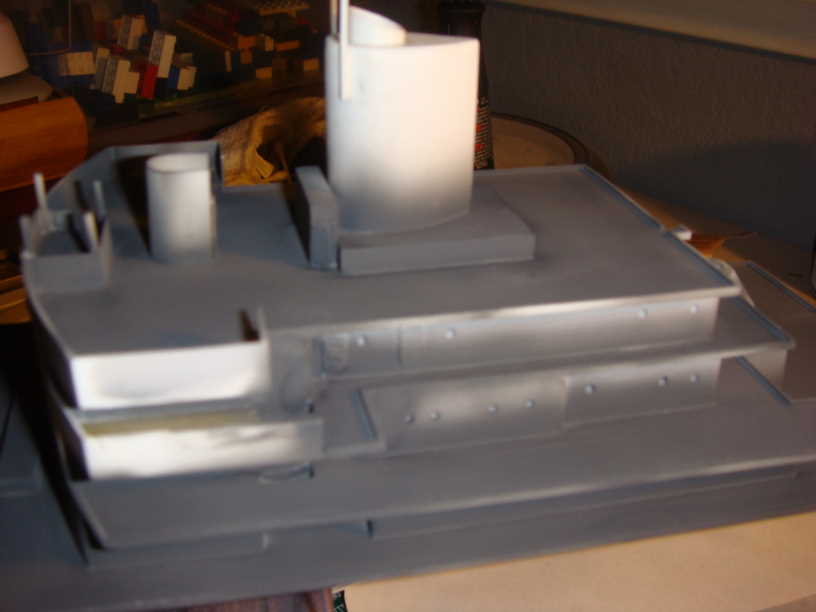 Next I had to fix a boo boo. I was using micro drill bits to drill pilot holes for the portholes, and they got stuck in, and broke off it, the vertical supports that were in earlier pics. So I had to drill them out and re-fill them and re-drill them. That was on ordeal!:  After, with the decks masked: 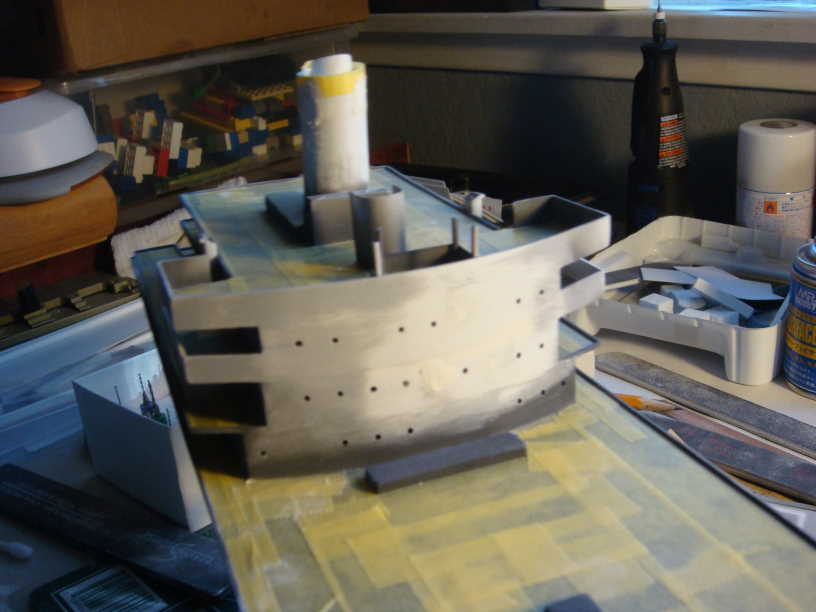 Now with the masking tape off and starting to install the ladders: 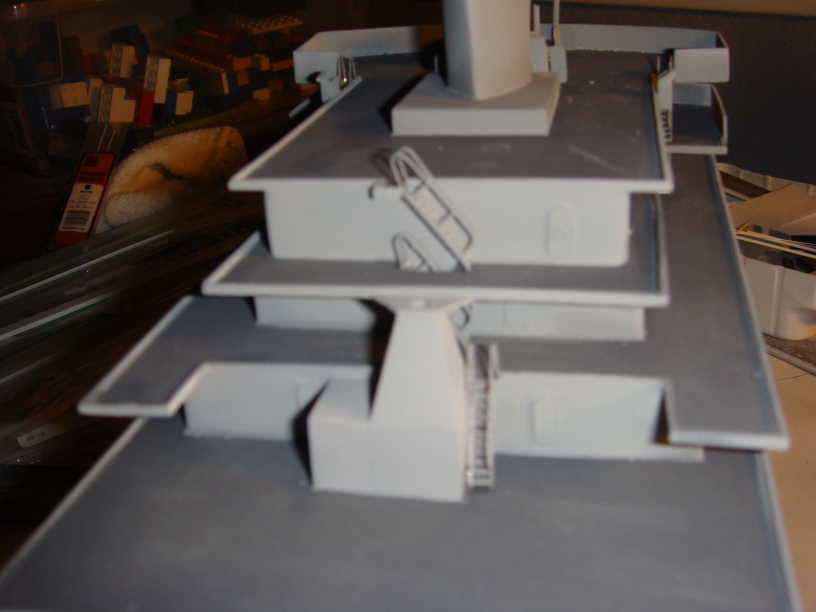 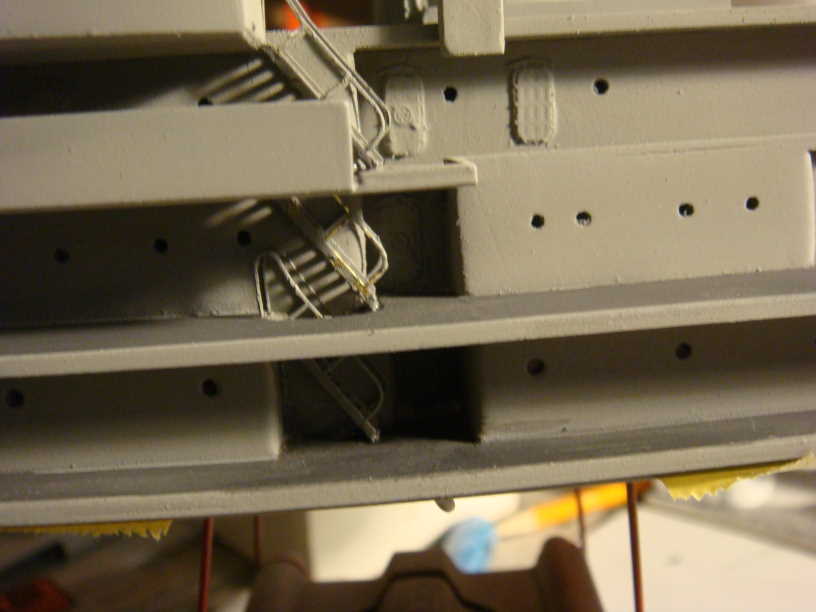 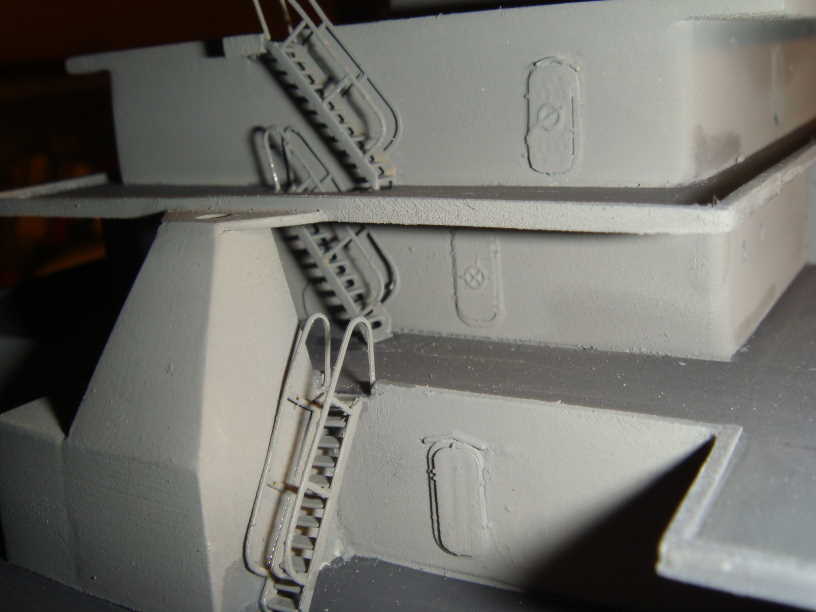 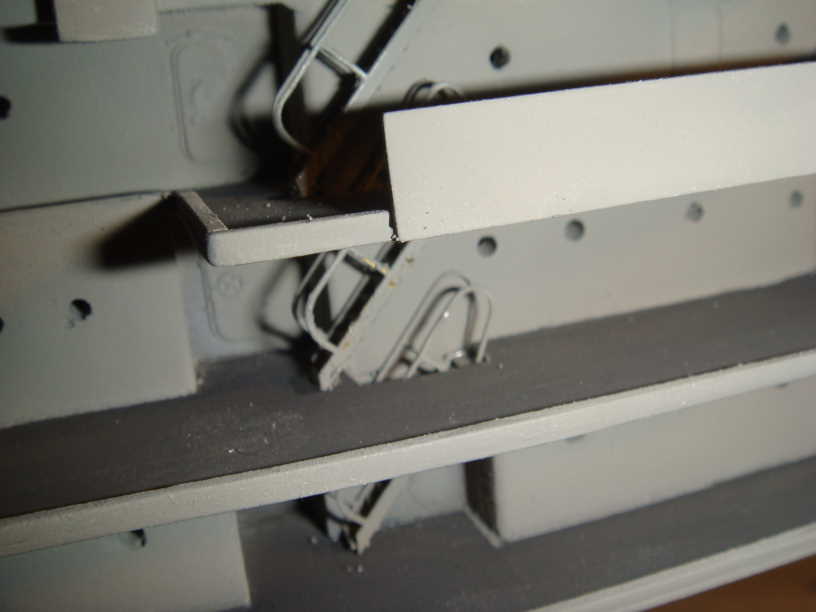 Finished front Superstructure face: 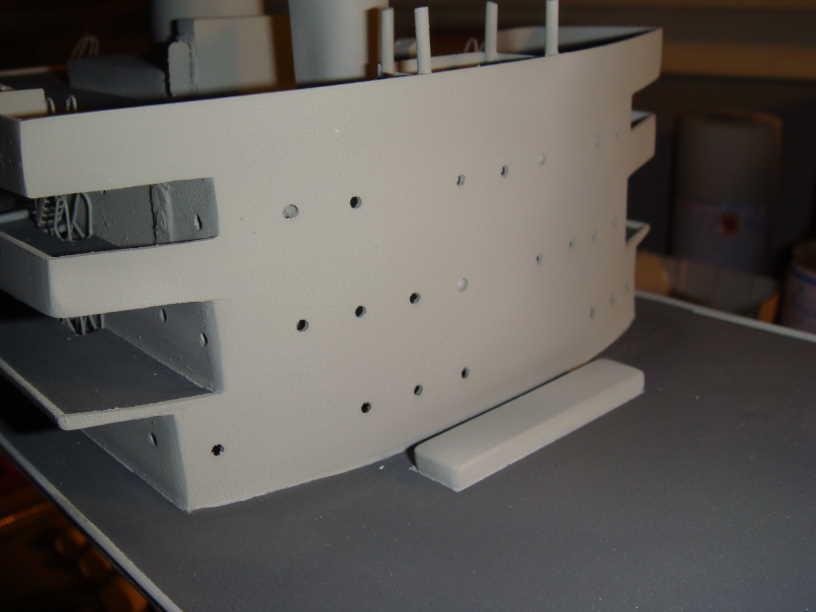 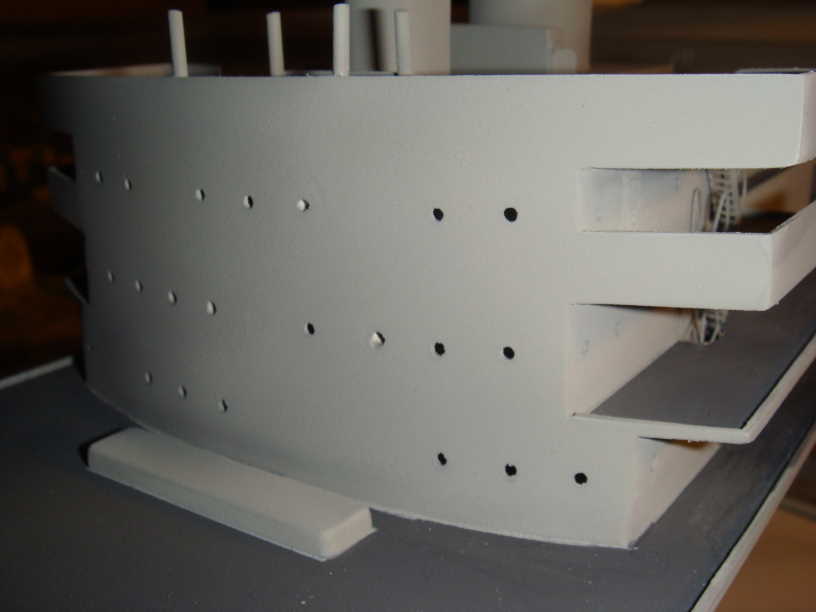 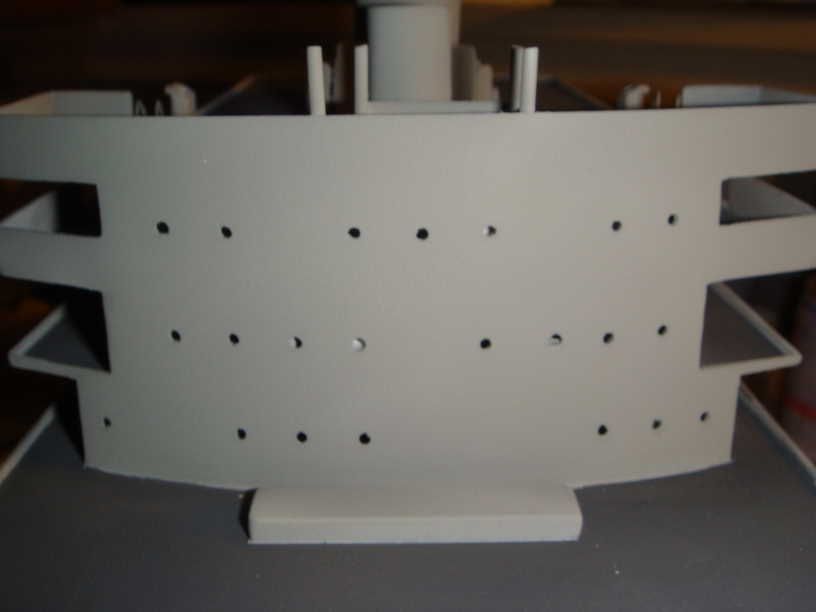 And the aft section: 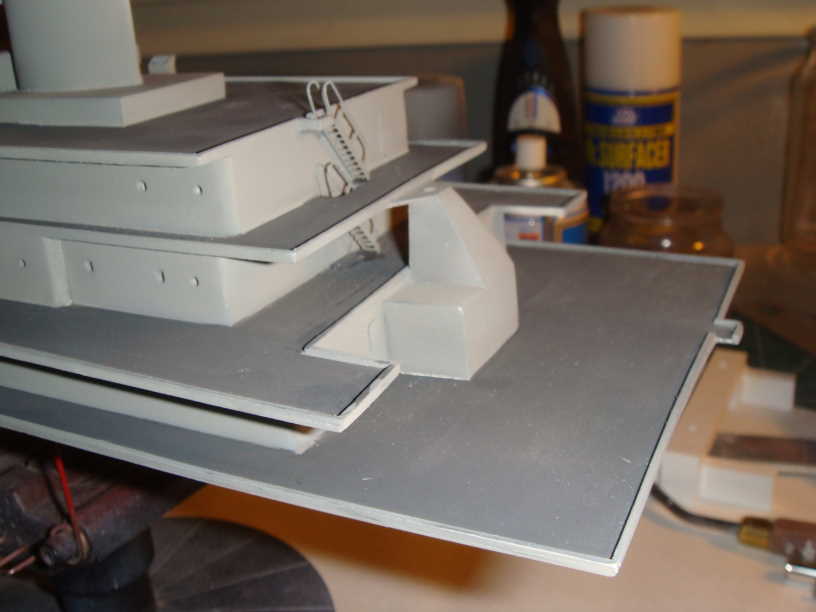 Next I glued the 01 deck and up onto the ship itself: 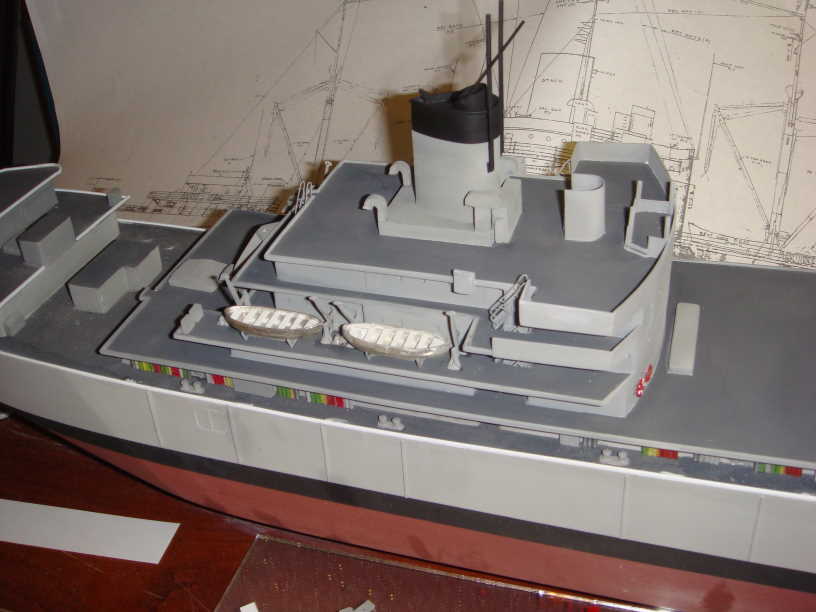 A look from up top: 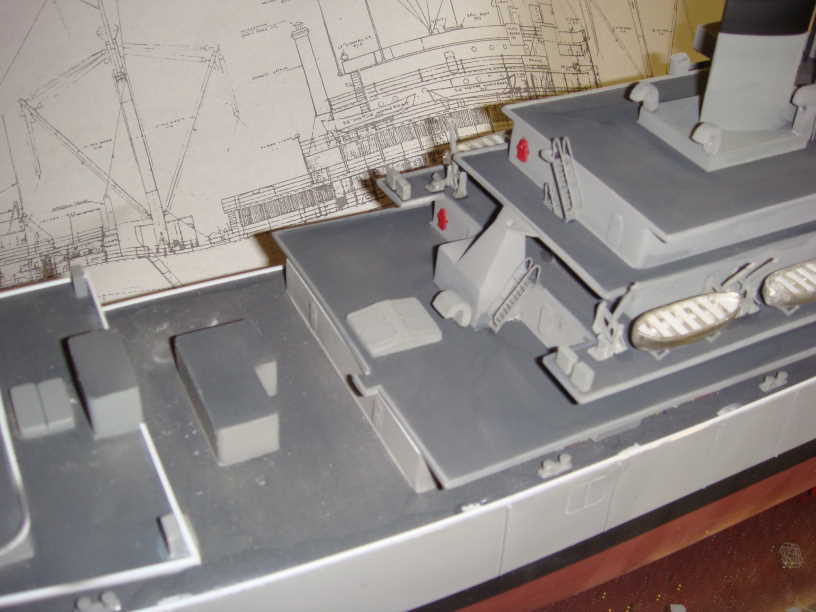 Next I had to go back and put scuppers on the main hull and aft decks. I had thought about it before, but had ruled it out. But then when I was doing the superstructure, it didn't look right without it, and also it would aid to glue the PE in place. So I went back and re did all of that! 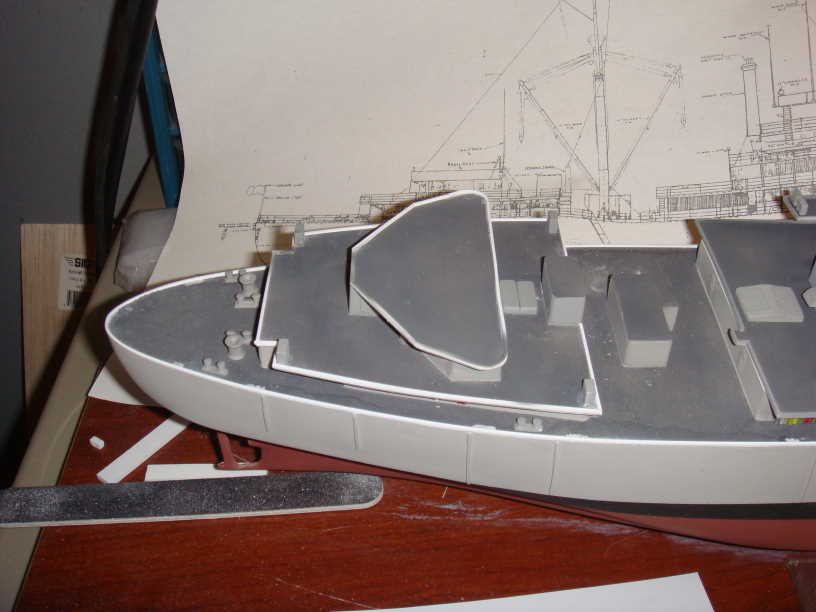 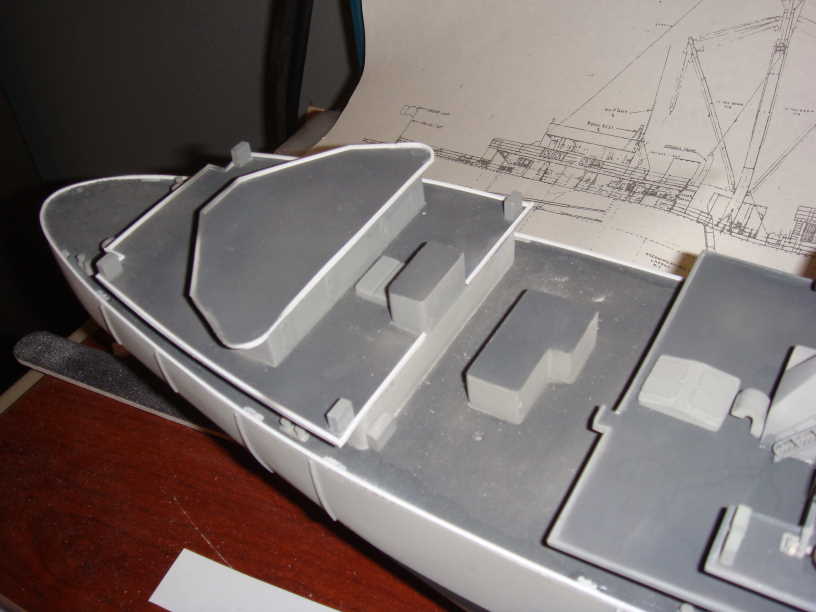 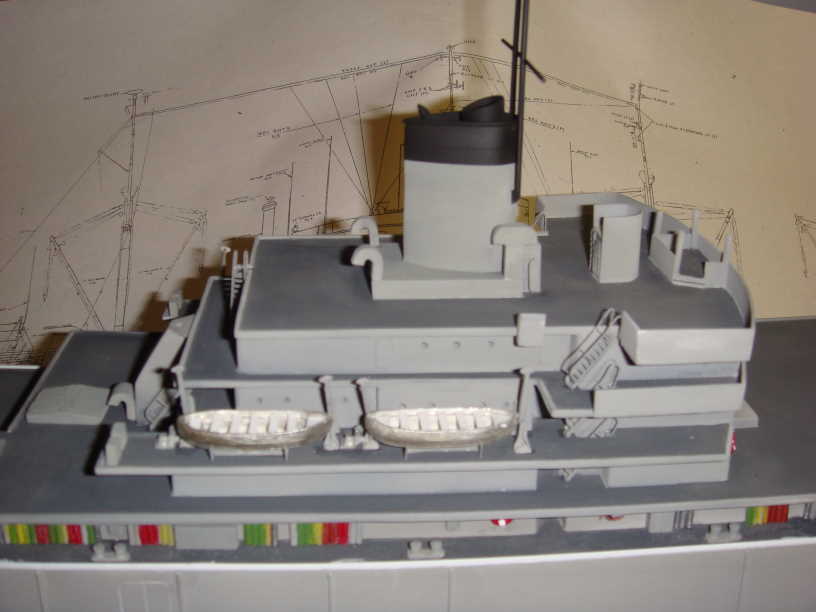 Looking pretty close to the plan!  Some attention to the fo'c'sle and the gun deck: 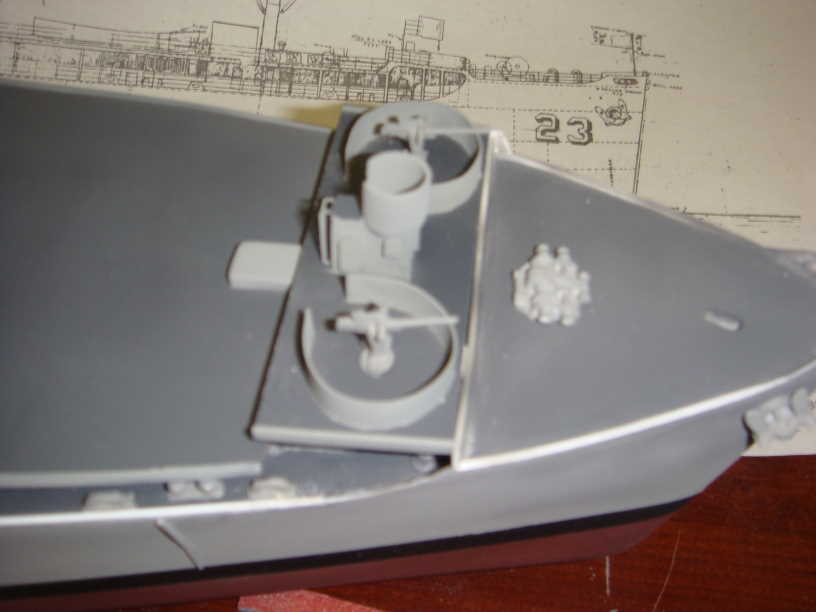  More details: 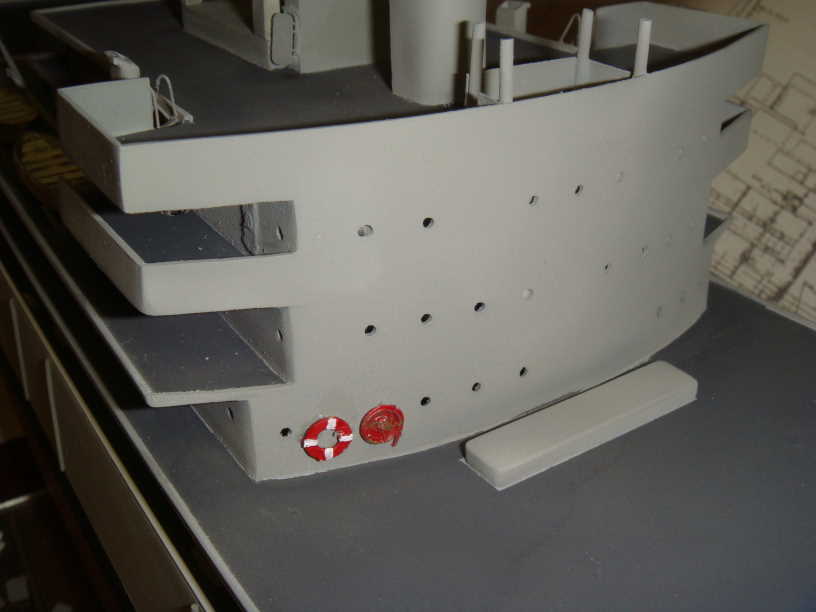 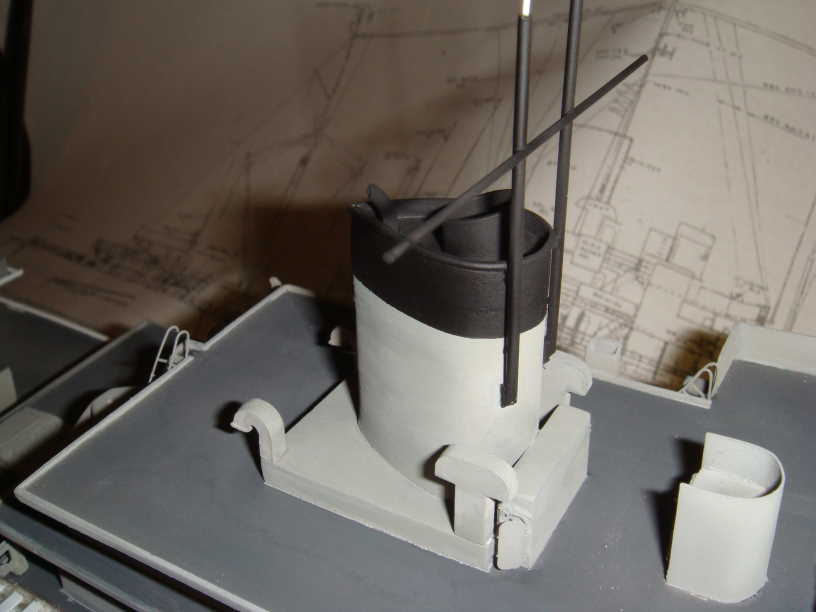 Next, the PE went on: (I left the 01 deck off to ease installing the PE) 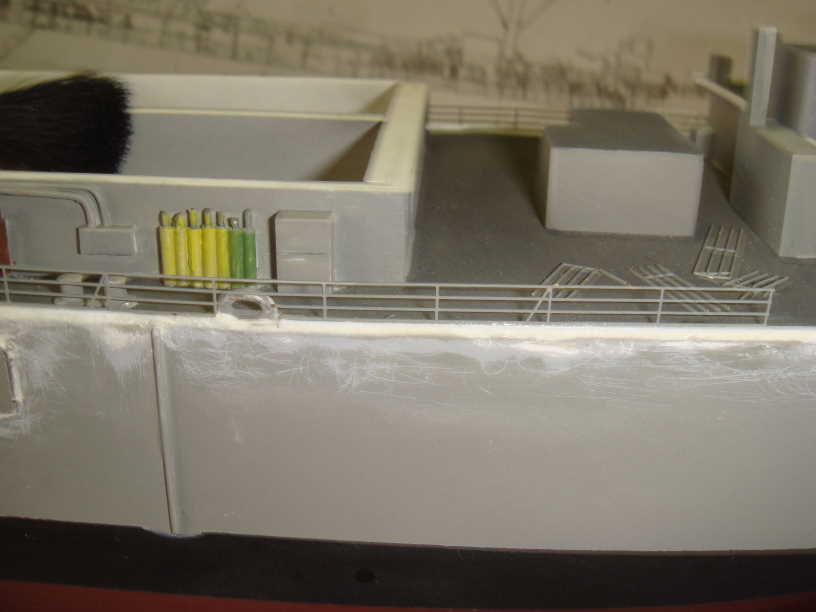 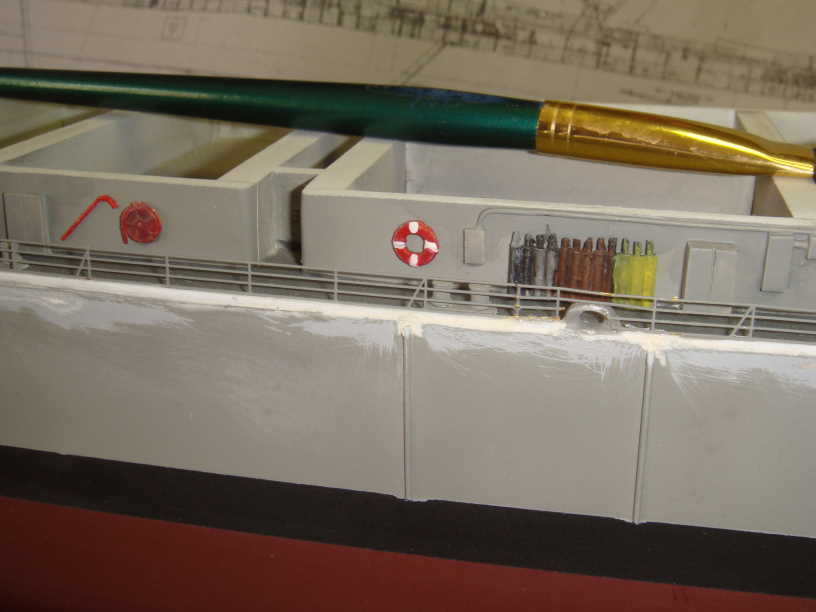 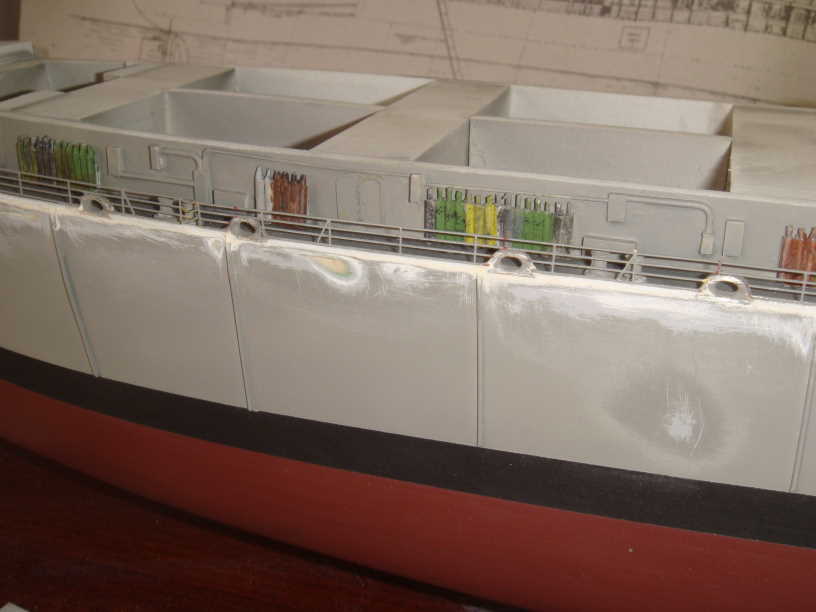 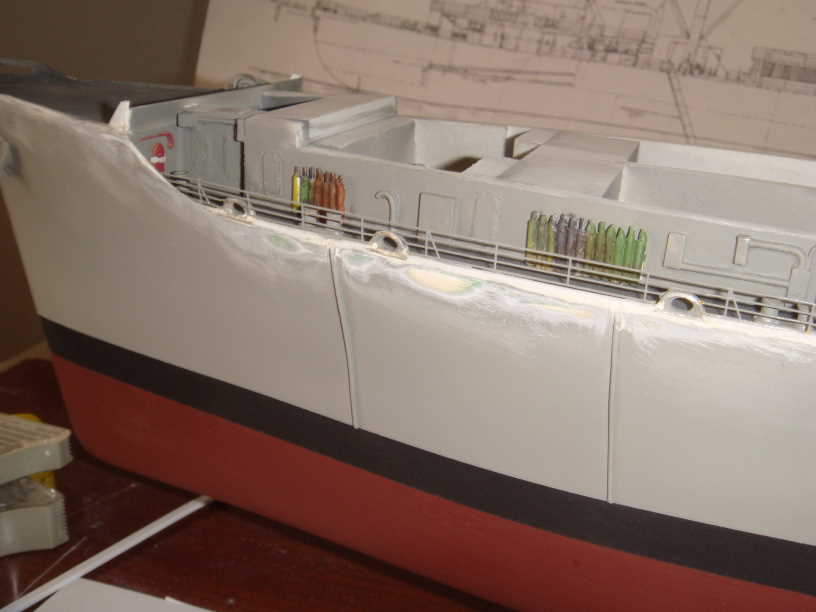 Next was time for the cargo deck and superstructure to get glued down. Now I want you all to know that I measured and measured, and cut and sanded to the plans, but when it came time to glue it down, the deck was off. So I had to add an extension, sand it all down again, and repaint it: 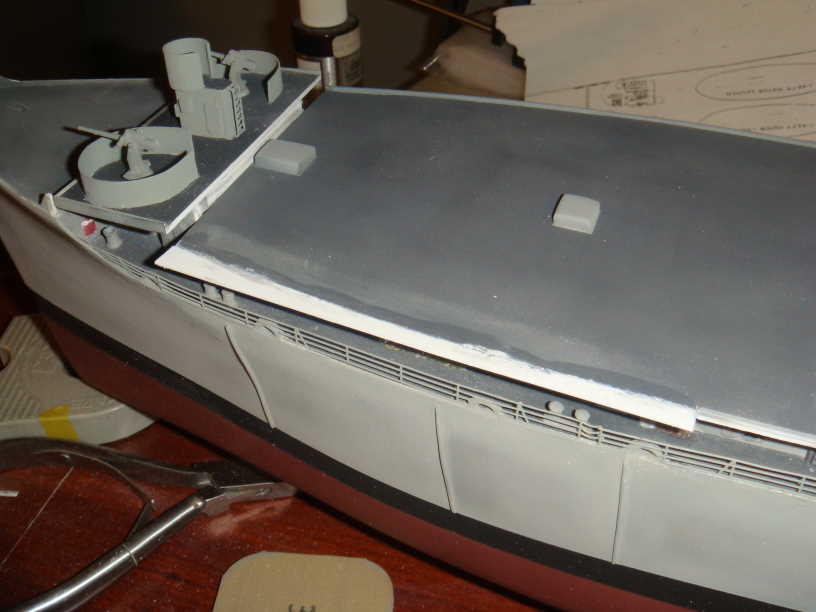 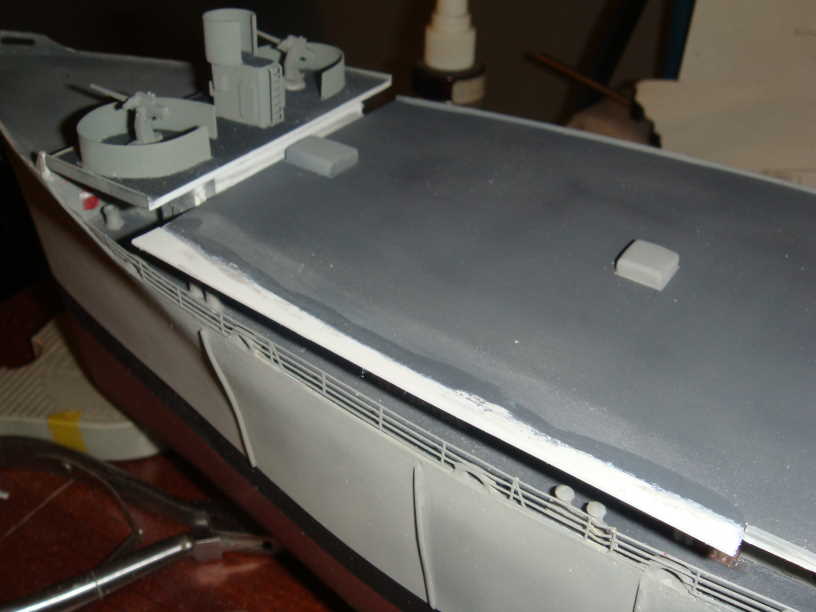 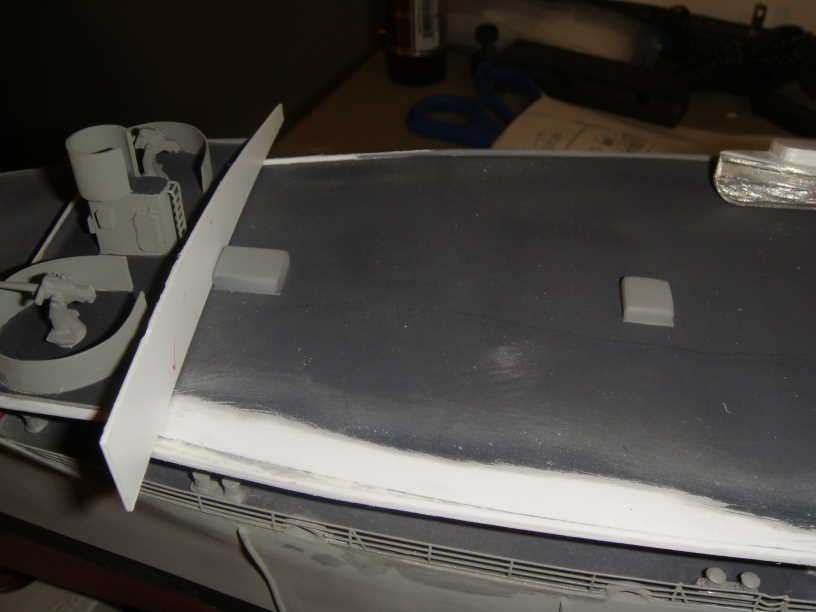 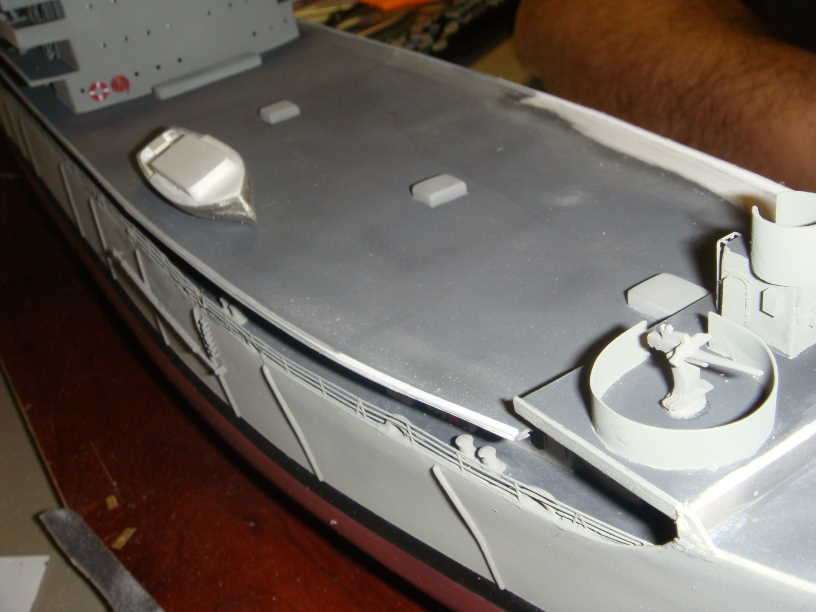 Next was time to do the "Sculptures" as I call them, the little flares on the gun decks: 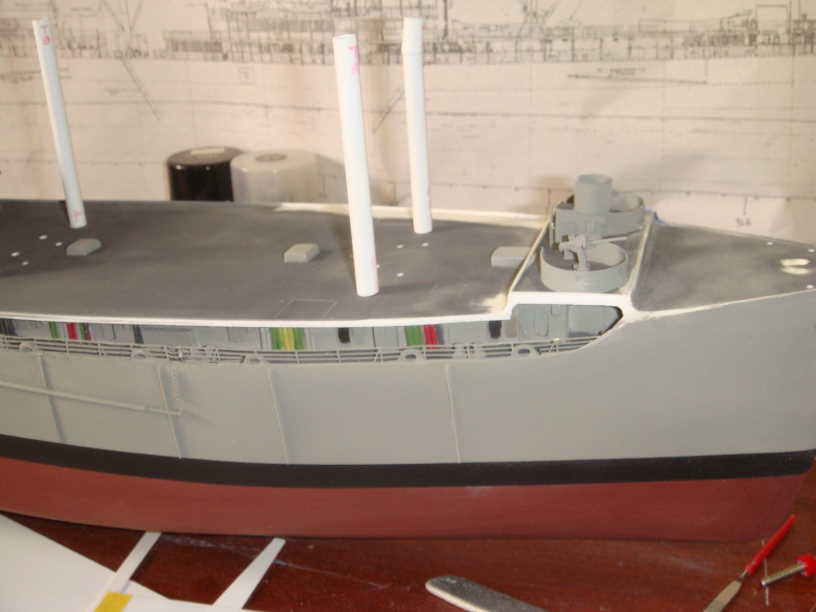 And start drilling the holes for the kingpins: 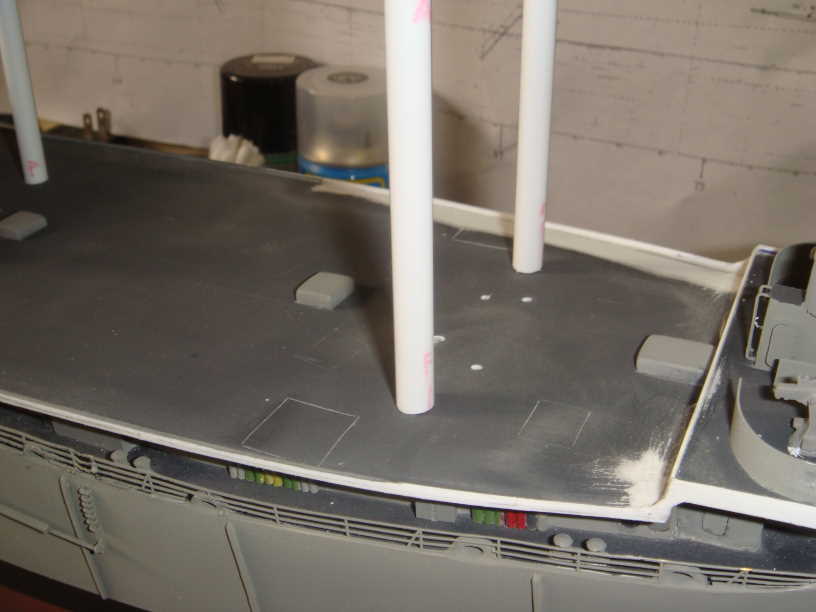  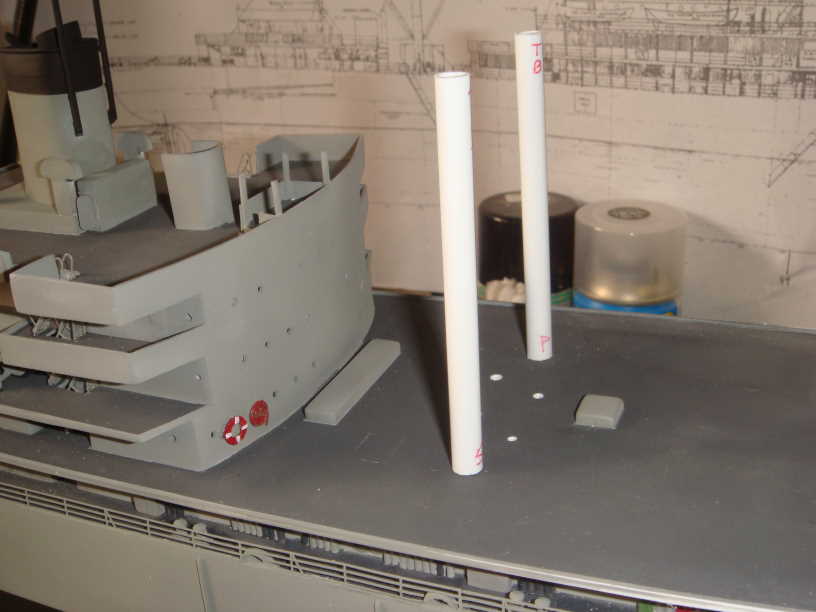 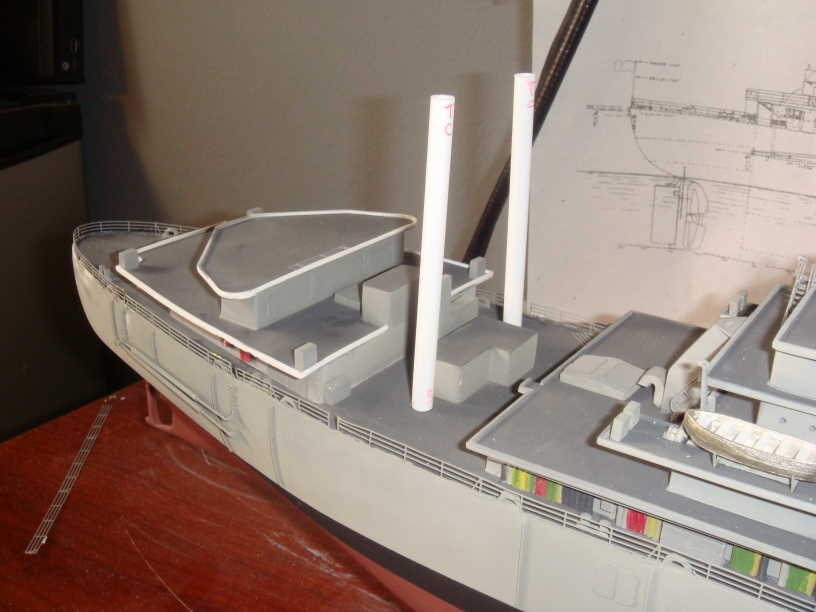 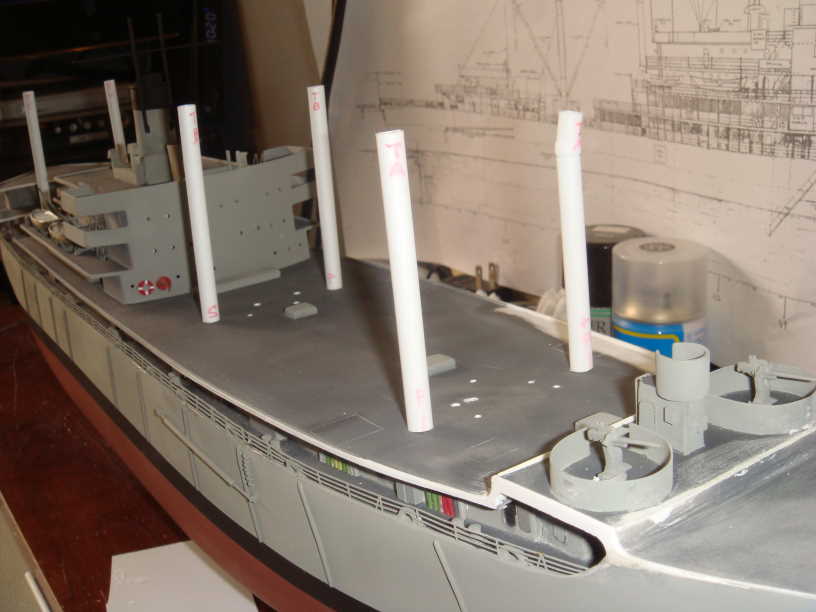 And re-shoot the deck: 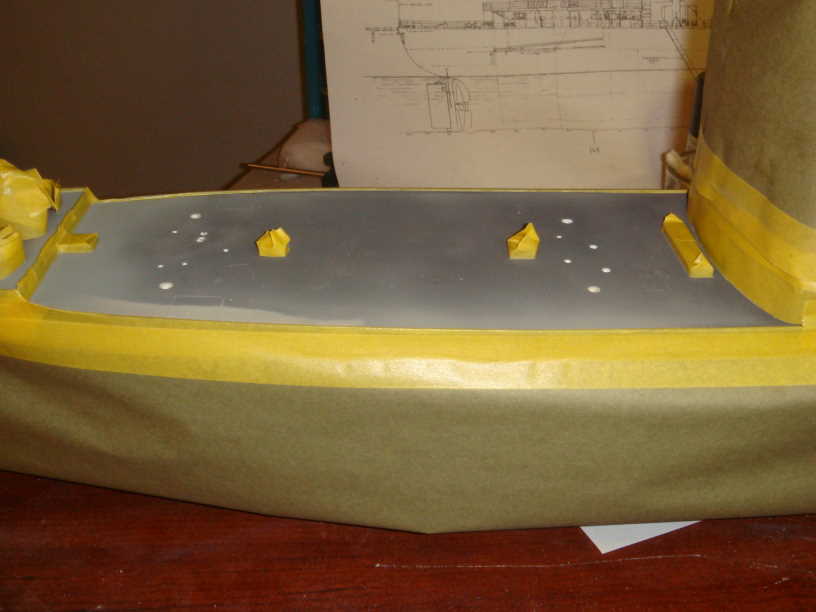 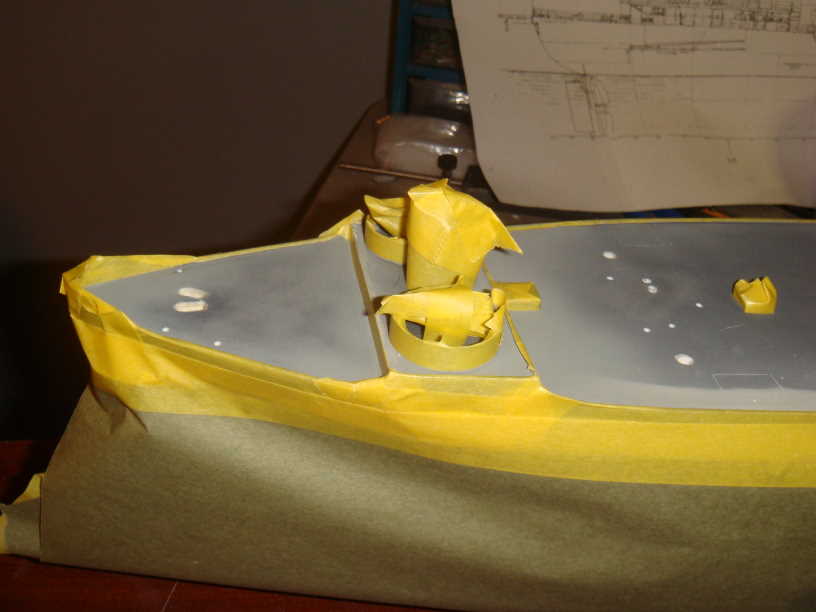 And now time for the cranes: 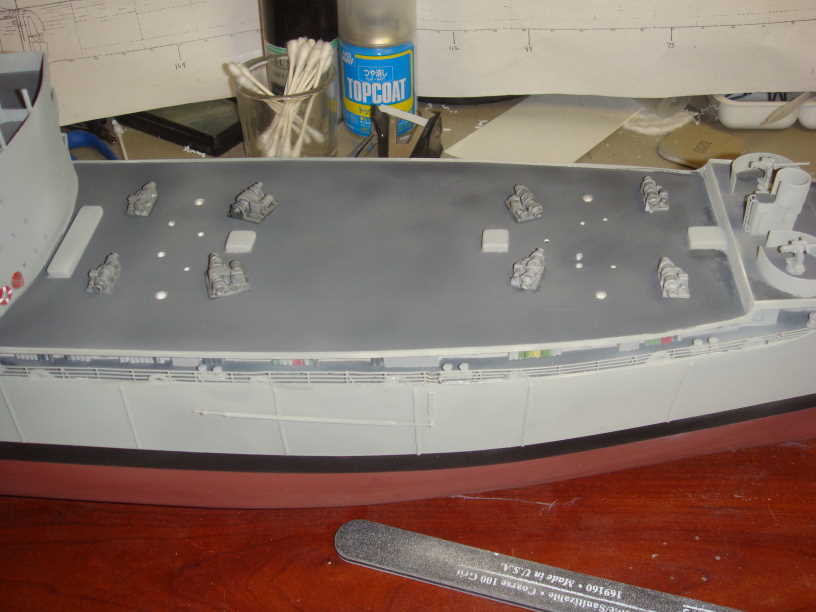 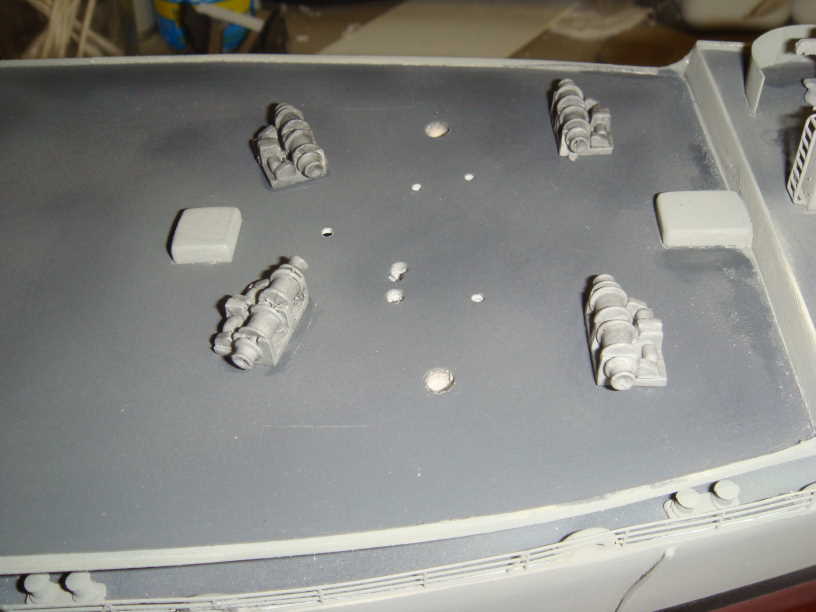 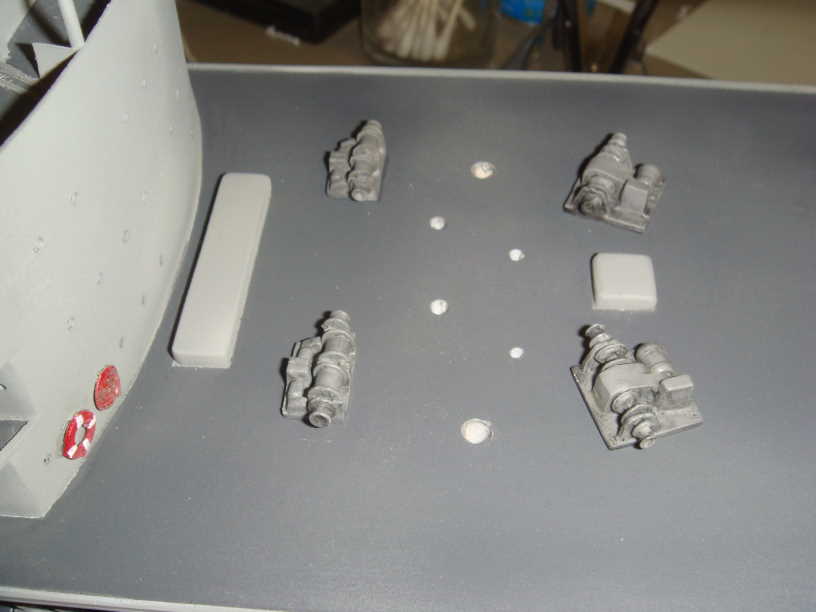 Next was a chore that I had been dreading! Making the cradles for the boats: 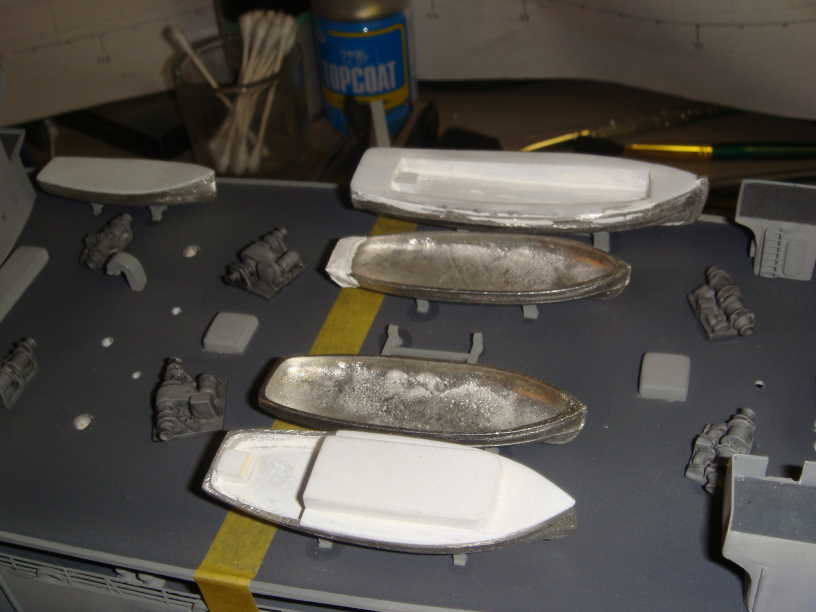 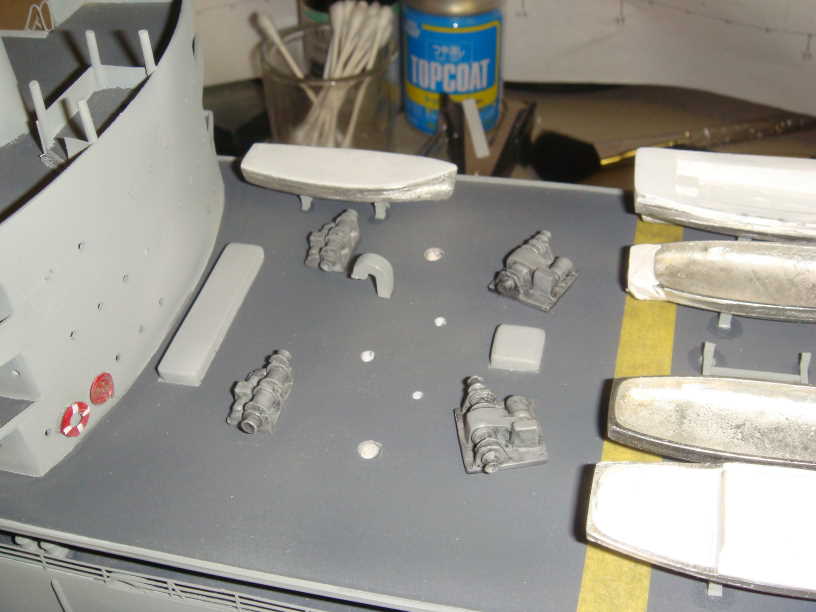 But they came out good I think? Next was to attach the forward aux gun plats: 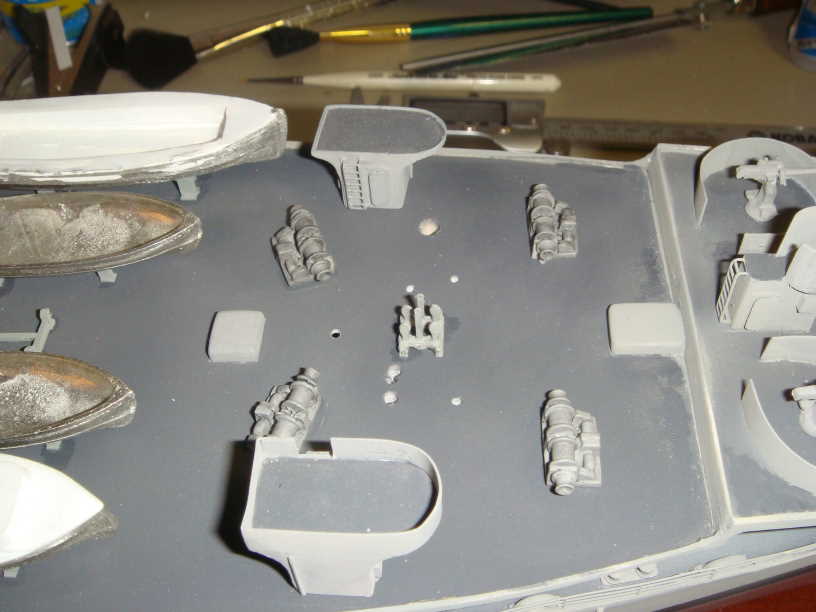 My Uncle said he used to sunbathe on the starboard one, which has a railing. Whereas the port side had a solid splinter shield. 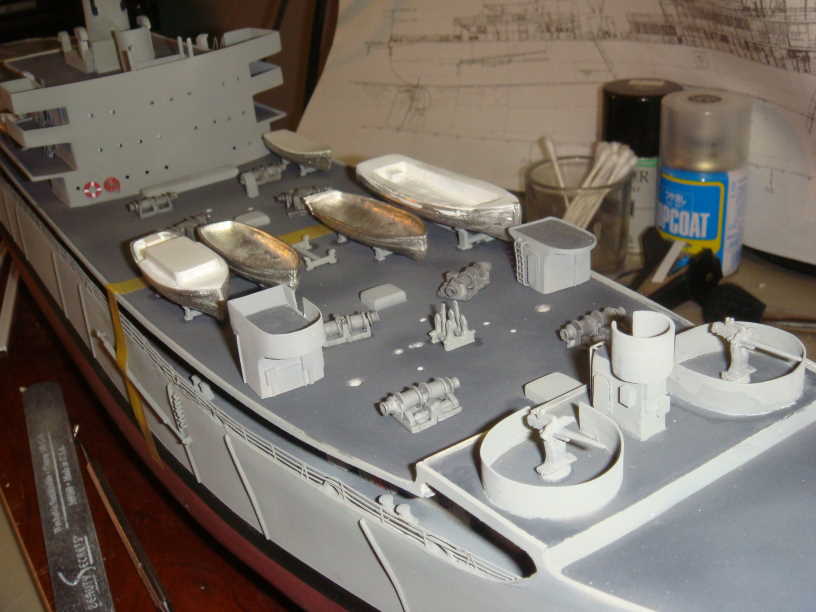 Next was time to clean up all the glue spots. They cleaned up very easily with drybrushing Deck grey over them. Can't see any mistakes now! After that was to tackle the Booms: I made up a Jig that I used to drill the holes so they would all be the same as according to the plans: 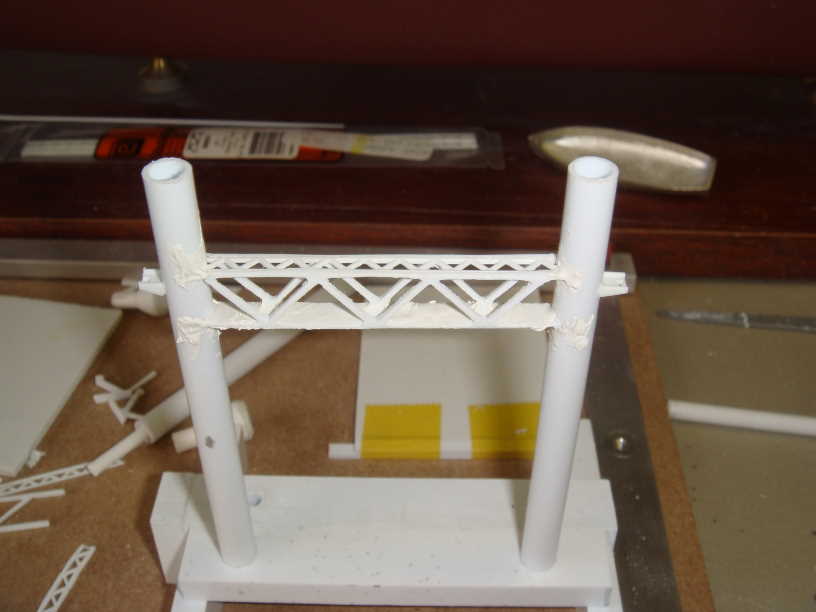 I used Plastruct angle trusses, but they needed to be thinned out a lot! And I had to drill the top hole part several times in order to get it to look right: 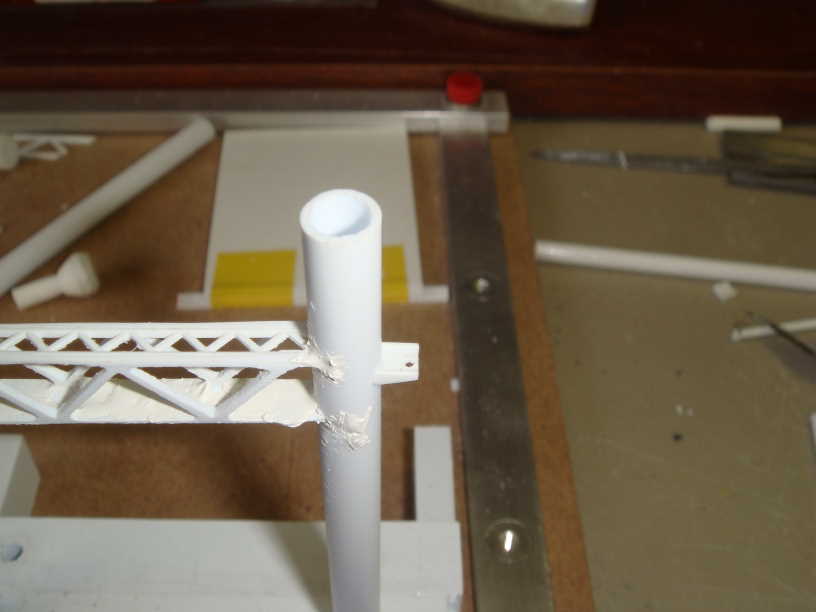 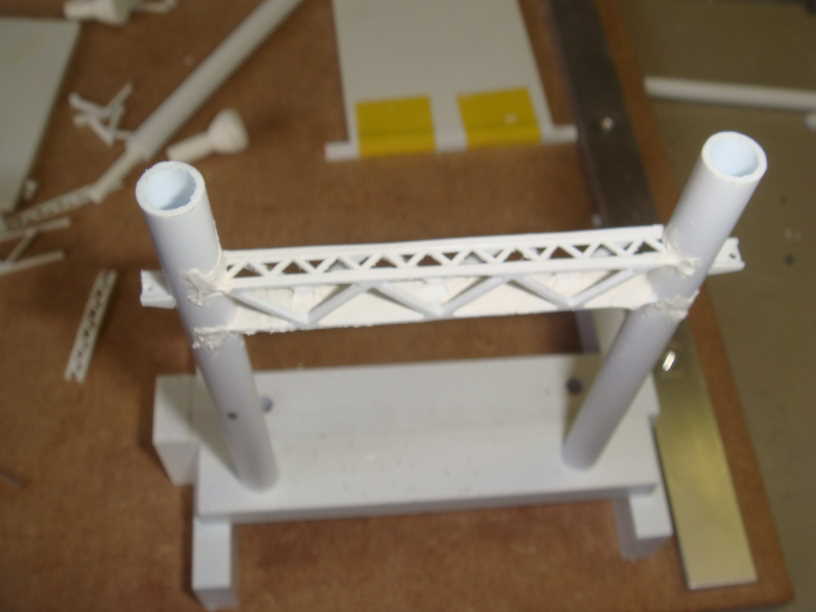 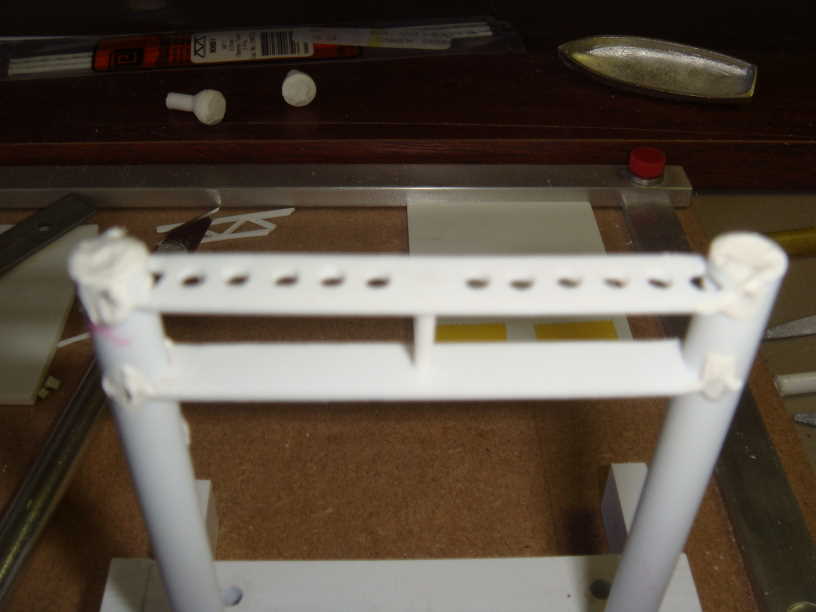   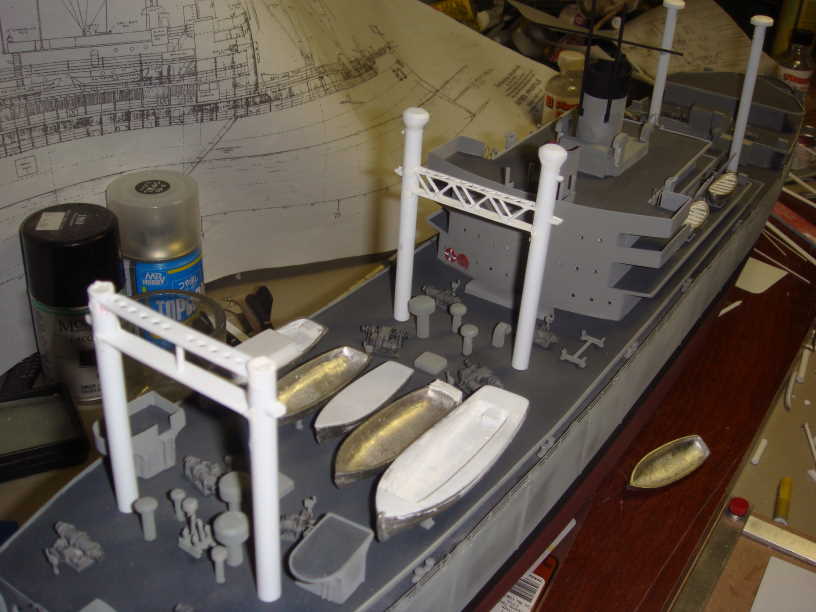  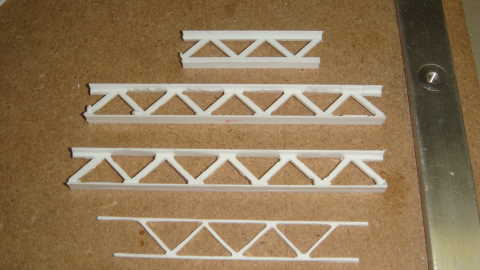 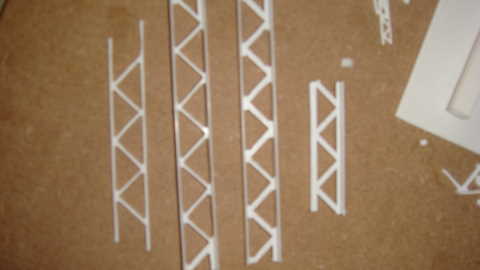 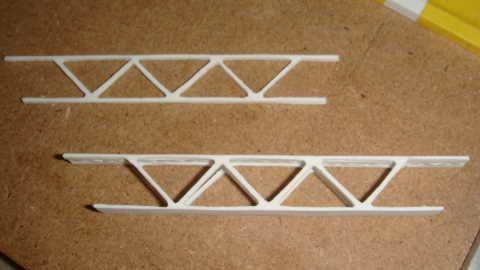 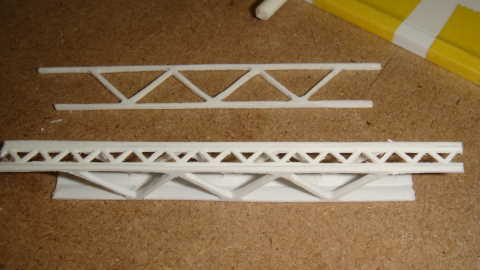 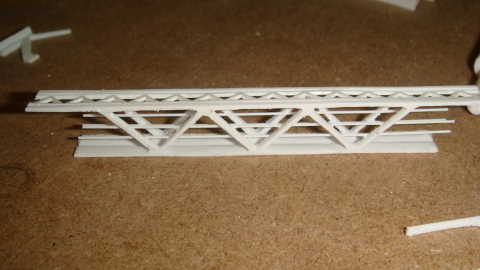 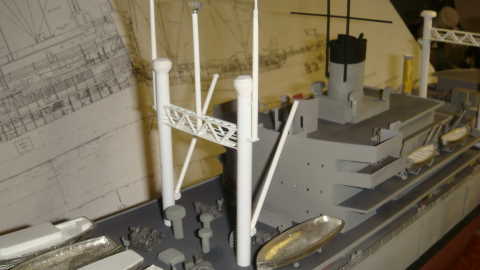 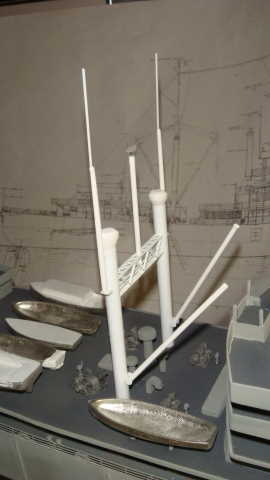 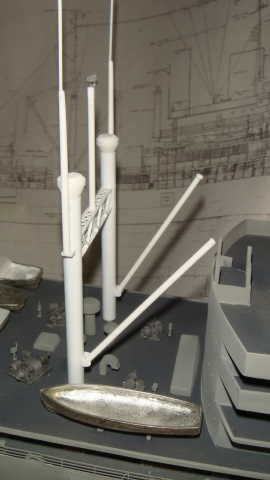 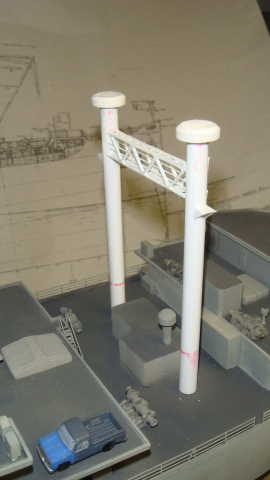 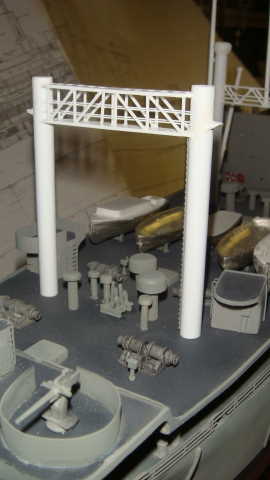 And here they are all painted: 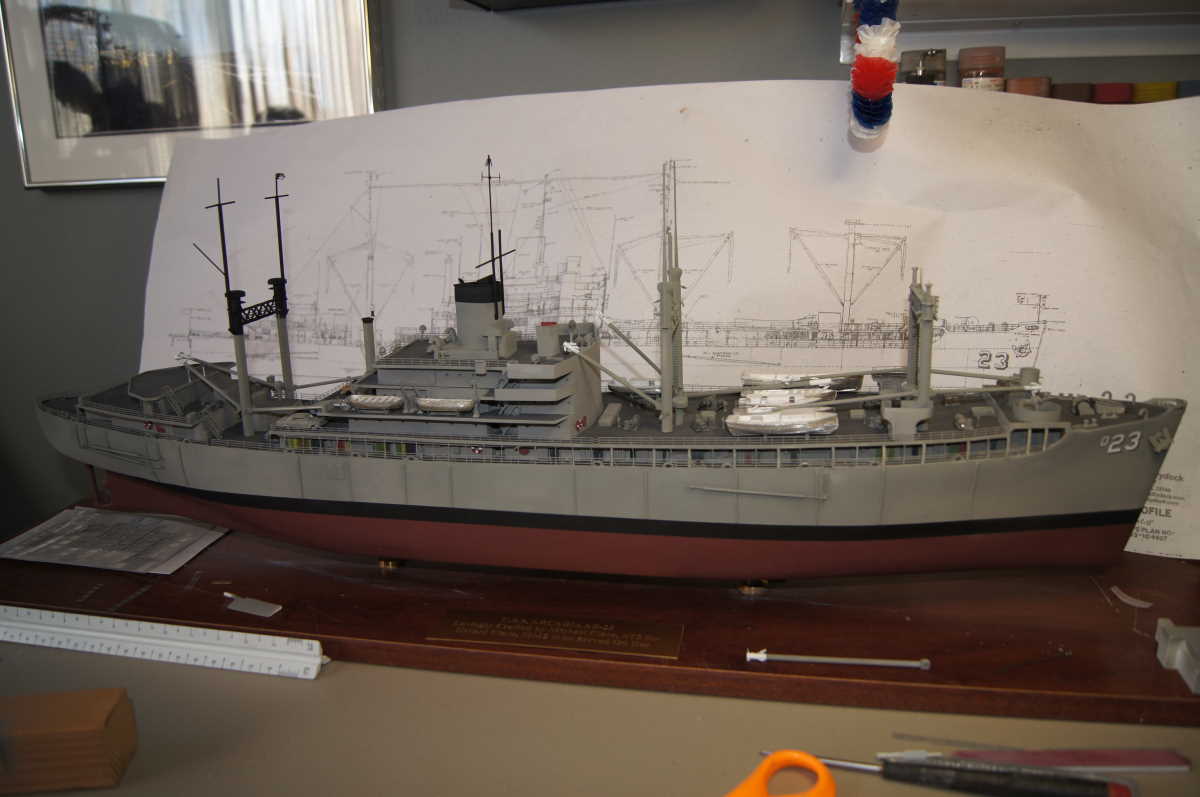 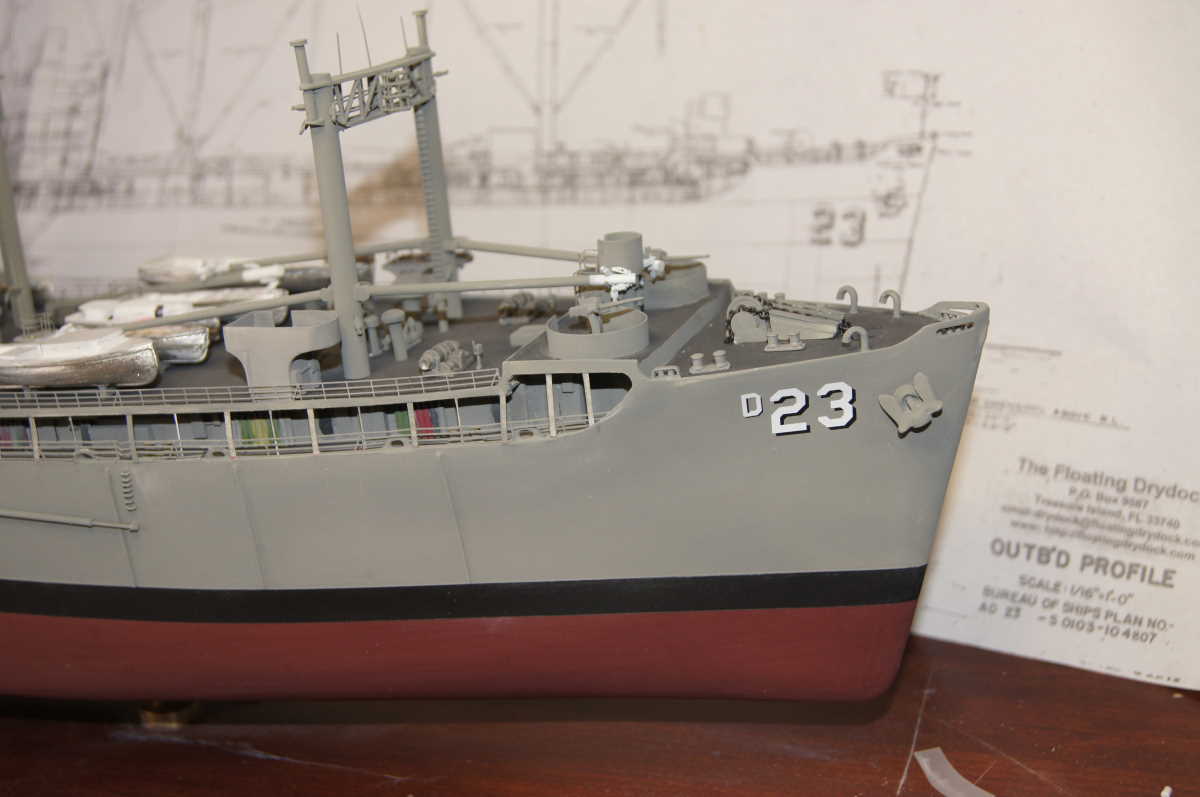 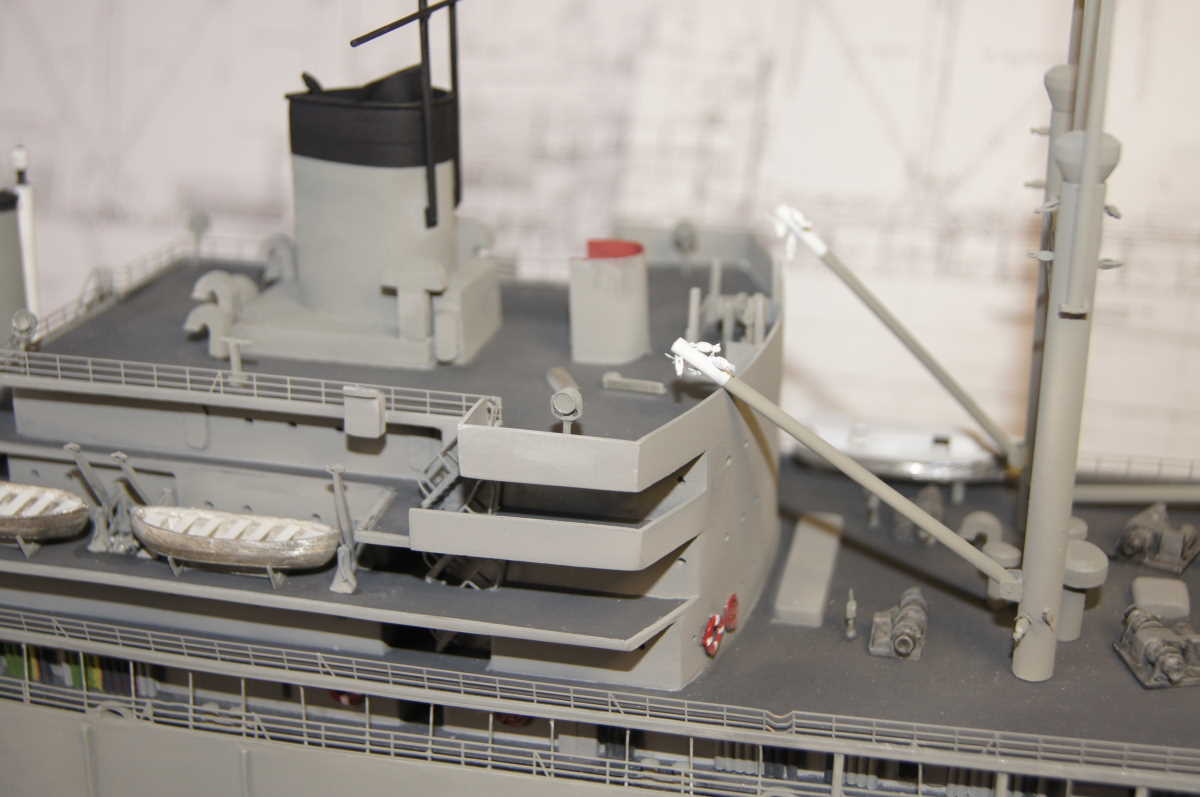 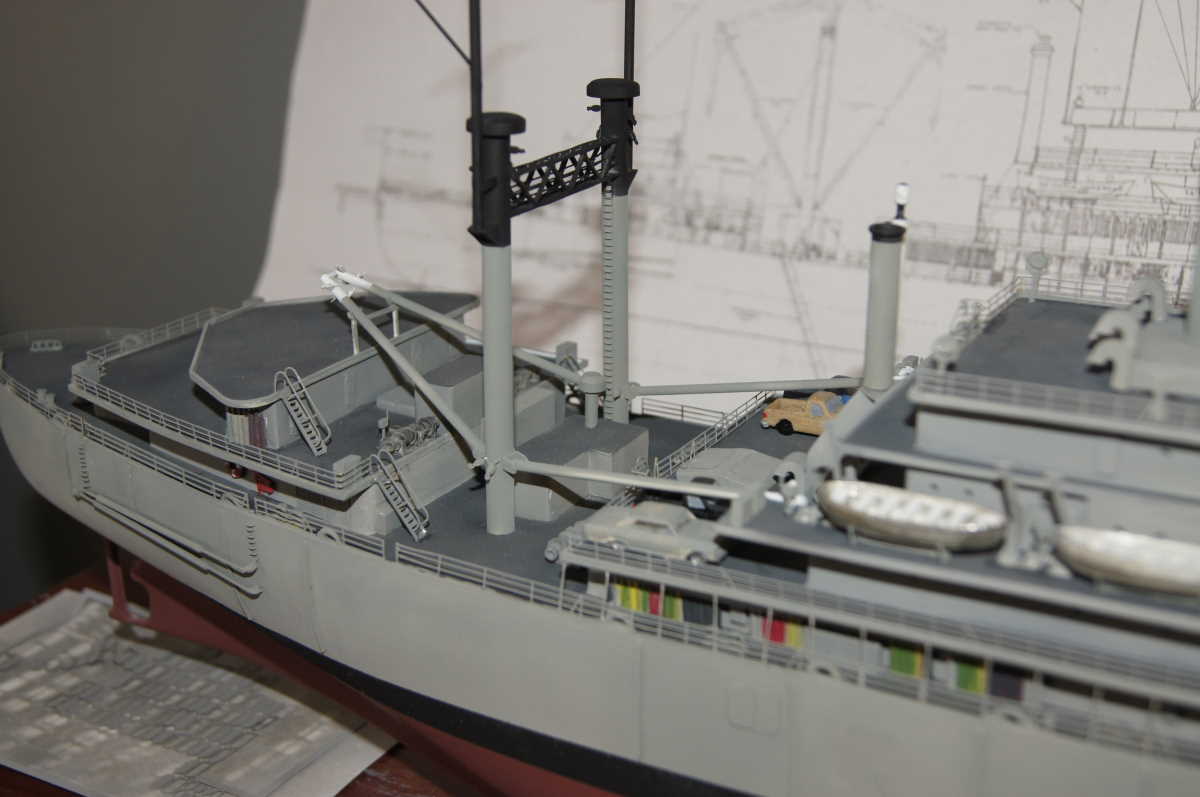 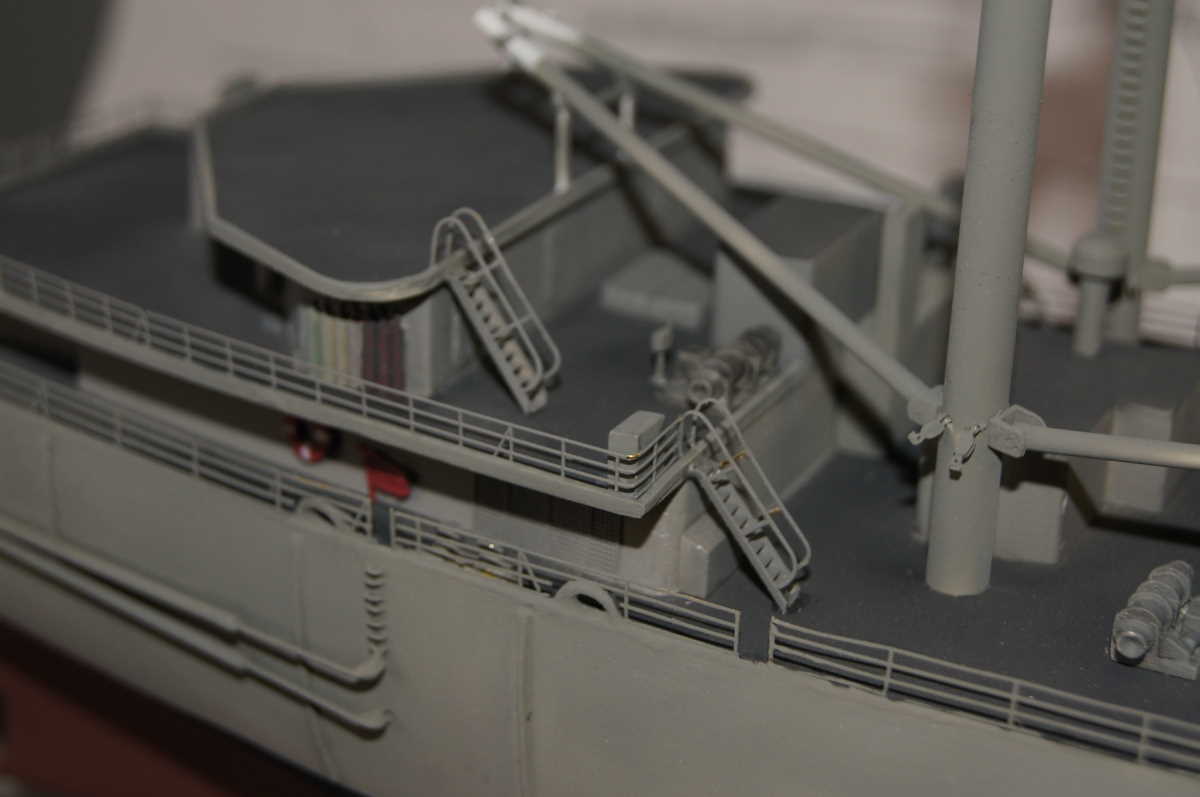 So that's where she is as of today! I still have about a couple of weeks left of work to do. Deck details and rigging for one. Also, I ran out of PE railings, so I had to order another fret from Bluejacket Shipcrafters. I got the number decals from them too, but the letter I got from BECC Model Accessories in the UK, along with cloth ensign and signal flags. I also have a bunch of deck reels to make up and a few more ladders and my Uncle says I missed a couple of hatches. But she's almost there! My Uncle is a master woodworker and when I told him about it, I told him he could make the base since that's what he does. He said gladly he would, and that he had a "Special" board that he'd been stashing for a special project. It's birdseye Maple and it looks beautiful! I will post pics of the finished ship as soon as She's done. Thanks to all who have been following my project! My next one I think is going to be a 1/350 scale USS America, scratchbuilt of course, since I served on her! Note to Mods: Please delete the previous post where I did not login. Thanks! Hello all! I'm back and have nearly finished the larger Arcadia. Last year I met a girl and we moved in together and I took some time off, but I resumed building back in October, and worked on her for the last three months solid, and she's almost finished!
I'll kinda breeze through the steps and pics here and if anybody has any questions, feel free to ask!
When I left off the hull was pretty much done and so were all of the deckhouses and I needed to start the details and assembly work. I started with the main deck, outfitting the bulkheads with lockers, panels, conduits and of course, those dreaded cylinders! I made up about 500 of them, that was like 2 weeks work, and then I attached them to .010 plastic strip to make them in gangs of like 10-20. I painted them green and orange (Looks red in the pics) and black and of course gray.
Here are some main deck shots:
Started small:
[img]http://www.michaelclare.com/models/Arcadia/T70_12118_sm.jpg[/img]
And worked my way up:
[img]http://www.michaelclare.com/models/Arcadia/T70_12124_sm.jpg[/img]
[img]http://www.michaelclare.com/models/Arcadia/T70_12126_sm.jpg[/img]
[img]http://www.michaelclare.com/models/Arcadia/T70_12127_sm.jpg[/img]
[img]http://www.michaelclare.com/models/Arcadia/T70_12131_sm.jpg[/img]
[img]http://www.michaelclare.com/models/Arcadia/T70_12132_sm.jpg[/img]
Next I glued all of the deckhouses together in the main superstructure and sanded and primed them:
[img]http://www.michaelclare.com/models/Arcadia/T70_12140_sm.jpg[/img]
[img]http://www.michaelclare.com/models/Arcadia/T70_12141_sm.jpg[/img]
And I made the aft smokestacks for the diesel generators and incinerator room:
[img]http://www.michaelclare.com/models/Arcadia/T70_12142_sm.jpg[/img]
[img]http://www.michaelclare.com/models/Arcadia/T70_12143_sm.jpg[/img]
Here is the starboard side all adorned:
[img]http://www.michaelclare.com/models/Arcadia/T70_12151_sm.jpg[/img]
[img]http://www.michaelclare.com/models/Arcadia/T70_12154_sm.jpg[/img]
I added the top 04 level and the stack:
[img]http://www.michaelclare.com/models/Arcadia/T70_12156_sm.jpg[/img]
Next the front of the superstructure:
[img]http://www.michaelclare.com/models/Arcadia/T70_12158_sm.jpg[/img]
Some top deck details:
[img]http://www.michaelclare.com/models/Arcadia/T70_12170_sm.jpg[/img]
[img]http://www.michaelclare.com/models/Arcadia/T70_12173_sm.jpg[/img]
Scuppers:
[img]http://www.michaelclare.com/models/Arcadia/T70_12176_sm.jpg[/img]
Next I shot the decks with WEM "US Navy Modern Deck Grey":
[img]http://www.michaelclare.com/models/Arcadia/T70_12184_sm.jpg[/img]
[img]http://www.michaelclare.com/models/Arcadia/T70_12185_sm.jpg[/img]
Next I had to fix a boo boo. I was using micro drill bits to drill pilot holes for the portholes, and they got stuck in, and broke off it, the vertical supports that were in earlier pics. So I had to drill them out and re-fill them and re-drill them. That was on ordeal!:
[img]http://www.michaelclare.com/models/Arcadia/T70_12188_sm.jpg[/img]
After, with the decks masked:
[img]http://www.michaelclare.com/models/Arcadia/T70_12193_sm.jpg[/img]
Now with the masking tape off and starting to install the ladders:
[img]http://www.michaelclare.com/models/Arcadia/T70_12195_sm.jpg[/img]
[img]http://www.michaelclare.com/models/Arcadia/T70_12202_sm.jpg[/img]
[img]http://www.michaelclare.com/models/Arcadia/T70_12208_sm.jpg[/img]
[img]http://www.michaelclare.com/models/Arcadia/T70_12210_sm.jpg[/img]
Finished front Superstructure face:
[img]http://www.michaelclare.com/models/Arcadia/T70_12216_sm.jpg[/img]
[img]http://www.michaelclare.com/models/Arcadia/T70_12217_sm.jpg[/img]
[img]http://www.michaelclare.com/models/Arcadia/T70_12218_sm.jpg[/img]
And the aft section:
[img]http://www.michaelclare.com/models/Arcadia/T70_12223_sm.jpg[/img]
Next I glued the 01 deck and up onto the ship itself:
[img]http://www.michaelclare.com/models/Arcadia/T70_12224_sm.jpg[/img]
A look from up top:
[img]http://www.michaelclare.com/models/Arcadia/T70_12226_sm.jpg[/img]
Next I had to go back and put scuppers on the main hull and aft decks. I had thought about it before, but had ruled it out. But then when I was doing the superstructure, it didn't look right without it, and also it would aid to glue the PE in place. So I went back and re did all of that!
[img]http://www.michaelclare.com/models/Arcadia/T70_12227_sm.jpg[/img]
[img]http://www.michaelclare.com/models/Arcadia/T70_12228_sm.jpg[/img]
[img]http://www.michaelclare.com/models/Arcadia/T70_12230_sm.jpg[/img]
Looking pretty close to the plan!
[img]http://www.michaelclare.com/models/Arcadia/T70_12231_sm.jpg[/img]
Some attention to the fo'c'sle and the gun deck:
[img]http://www.michaelclare.com/models/Arcadia/T70_12232_sm.jpg[/img]
[img]http://www.michaelclare.com/models/Arcadia/T70_12233_sm.jpg[/img]
More details:
[img]http://www.michaelclare.com/models/Arcadia/T70_12241_sm.jpg[/img]
[img]http://www.michaelclare.com/models/Arcadia/T70_12242_sm.jpg[/img]
Next, the PE went on: (I left the 01 deck off to ease installing the PE)
[img]http://www.michaelclare.com/models/Arcadia/T70_12247_sm.jpg[/img]
[img]http://www.michaelclare.com/models/Arcadia/T70_12248_sm.jpg[/img]
[img]http://www.michaelclare.com/models/Arcadia/T70_12249_sm.jpg[/img]
[img]http://www.michaelclare.com/models/Arcadia/T70_12250_sm.jpg[/img]
Next was time for the cargo deck and superstructure to get glued down. Now I want you all to know that I measured and measured, and cut and sanded to the plans, but when it came time to glue it down, the deck was off. So I had to add an extension, sand it all down again, and repaint it:
[img]http://www.michaelclare.com/models/Arcadia/T70_12255_sm.jpg[/img]
[img]http://www.michaelclare.com/models/Arcadia/T70_12256_sm.jpg[/img]
[img]http://www.michaelclare.com/models/Arcadia/T70_12258_sm.jpg[/img]
[img]http://www.michaelclare.com/models/Arcadia/T70_12261_sm.jpg[/img]
Next was time to do the "Sculptures" as I call them, the little flares on the gun decks:
[img]http://www.michaelclare.com/models/Arcadia/T70_12262_sm.jpg[/img]
And start drilling the holes for the kingpins:
[img]http://www.michaelclare.com/models/Arcadia/T70_12263_sm.jpg[/img]
[img]http://www.michaelclare.com/models/Arcadia/T70_12264_sm.jpg[/img]
[img]http://www.michaelclare.com/models/Arcadia/T70_12265_sm.jpg[/img]
[img]http://www.michaelclare.com/models/Arcadia/T70_12266_sm.jpg[/img]
[img]http://www.michaelclare.com/models/Arcadia/T70_12270_sm.jpg[/img]
And re-shoot the deck:
[img]http://www.michaelclare.com/models/Arcadia/T70_12285_sm.jpg[/img]
[img]http://www.michaelclare.com/models/Arcadia/T70_12286_sm.jpg[/img]
And now time for the cranes:
[img]http://www.michaelclare.com/models/Arcadia/T70_12287_sm.jpg[/img]
[img]http://www.michaelclare.com/models/Arcadia/T70_12289_sm.jpg[/img]
[img]http://www.michaelclare.com/models/Arcadia/T70_12290_sm.jpg[/img]
Next was a chore that I had been dreading! Making the cradles for the boats:
[img]http://www.michaelclare.com/models/Arcadia/T70_12293_sm.jpg[/img]
[img]http://www.michaelclare.com/models/Arcadia/T70_12294_sm.jpg[/img]
But they came out good I think?
Next was to attach the forward aux gun plats:
[img]http://www.michaelclare.com/models/Arcadia/T70_12295_sm.jpg[/img]
My Uncle said he used to sunbathe on the starboard one, which has a railing. Whereas the port side had a solid splinter shield.
[img]http://www.michaelclare.com/models/Arcadia/T70_12296_sm.jpg[/img]
Next was time to clean up all the glue spots. They cleaned up very easily with drybrushing Deck grey over them. Can't see any mistakes now!
After that was to tackle the Booms:
I made up a Jig that I used to drill the holes so they would all be the same as according to the plans:
[img]http://www.michaelclare.com/models/Arcadia/T70_12302_sm.jpg[/img]
I used Plastruct angle trusses, but they needed to be thinned out a lot! And I had to drill the top hole part several times in order to get it to look right:
[img]http://www.michaelclare.com/models/Arcadia/T70_12302_sm.jpg[/img]
[img]http://www.michaelclare.com/models/Arcadia/T70_12303_sm.jpg[/img]
[img]http://www.michaelclare.com/models/Arcadia/T70_12304_sm.jpg[/img]
[img]http://www.michaelclare.com/models/Arcadia/T70_12305_sm.jpg[/img]
[img]http://www.michaelclare.com/models/Arcadia/T70_12306_sm.jpg[/img]
[img]http://www.michaelclare.com/models/Arcadia/T70_12307_sm.jpg[/img]
[img]http://www.michaelclare.com/models/Arcadia/T70_12308_sm.jpg[/img]
[img]http://www.michaelclare.com/models/Arcadia/T70_12309_sm.jpg[/img]
[img]http://www.michaelclare.com/models/Arcadia/T70_12408_sm.jpg[/img]
[img]http://www.michaelclare.com/models/Arcadia/T70_12409_sm.jpg[/img]
[img]http://www.michaelclare.com/models/Arcadia/T70_12410_sm.jpg[/img]
[img]http://www.michaelclare.com/models/Arcadia/T70_12411_sm.jpg[/img]
[img]http://www.michaelclare.com/models/Arcadia/T70_12412_sm.jpg[/img]
[img]http://www.michaelclare.com/models/Arcadia/T70_12413_sm.jpg[/img]
[img]http://www.michaelclare.com/models/Arcadia/T70_12414_sm.jpg[/img]
[img]http://www.michaelclare.com/models/Arcadia/T70_12415_sm.jpg[/img]
[img]http://www.michaelclare.com/models/Arcadia/T70_12416_sm.jpg[/img]
[img]http://www.michaelclare.com/models/Arcadia/T70_12418_sm.jpg[/img]
And here they are all painted:
[img]http://www.michaelclare.com/models/Arcadia/A55_03111_sm.jpg[/img]
[img]http://www.michaelclare.com/models/Arcadia/A55_03112_sm.jpg[/img]
[img]http://www.michaelclare.com/models/Arcadia/A55_03114_sm.jpg[/img]
[img]http://www.michaelclare.com/models/Arcadia/A55_03116_sm.jpg[/img]
[img]http://www.michaelclare.com/models/Arcadia/A55_03119_sm.jpg[/img]
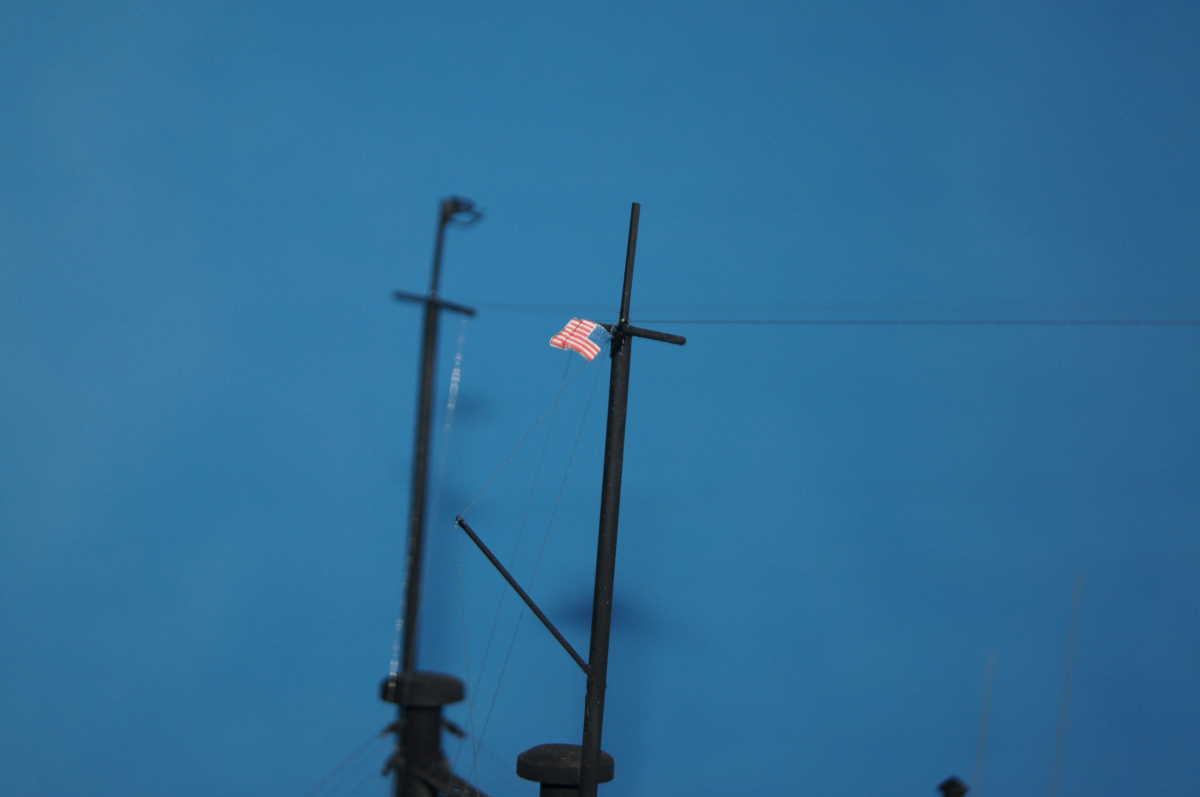
So that's where she is as of today! I still have about a couple of weeks left of work to do. Deck details and rigging for one. Also, I ran out of PE railings, so I had to order another fret from Bluejacket Shipcrafters. I got the number decals from them too, but the letter I got from BECC Model Accessories in the UK, along with cloth ensign and signal flags. I also have a bunch of deck reels to make up and a few more ladders and my Uncle says I missed a couple of hatches.
But she's almost there! My Uncle is a master woodworker and when I told him about it, I told him he could make the base since that's what he does. He said gladly he would, and that he had a "Special" board that he'd been stashing for a special project. It's birdseye Maple and it looks beautiful! I will post pics of the finished ship as soon as She's done.
Thanks to all who have been following my project! My next one I think is going to be a 1/350 scale USS America, scratchbuilt of course, since I served on her!
Note to Mods: Please delete the previous post where I did not login. Thanks!
|
|
|
|
Posted: Thu Dec 27, 2012 10:24 pm |
|
|
|
|
|
| |
Post subject: |
Re: 1:192 & 1:384 USS Arcadia AD23 (1966) |
|
|
Hello all! I'm back and have nearly finished the larger Arcadia. Last year I met a girl and we moved in together and I took some time off, but I resumed building back in October, and worked on her for the last three months solid, and she's almost finished! I'll kinda breeze through the steps and pics here and if anybody has any questions, feel free to ask! When I left off the hull was pretty much done and so were all of the deckhouses and I needed to start the details and assembly work. I started with the main deck, outfitting the bulkheads with lockers, panels, conduits and of course, those dreaded cylinders! I made up about 500 of them, that was like 2 weeks work, and then I attached them to .010 plastic strip to make them in gangs of like 10-20. I painted them green and orange (Looks red in the pics) and black and of course gray. Here are some main deck shots: Started small:  And worked my way up:      Next I glued all of the deckhouses together in the main superstructure and sanded and primed them:   And I made the aft smokestacks for the diesel generators and incinerator room:   Here is the starboard side all adorned:   I added the top 04 level and the stack:  Next the front of the superstructure:  Some top deck details:   Scuppers:  Next I shot the decks with WEM "US Navy Modern Deck Grey":   Next I had to fix a boo boo. I was using micro drill bits to drill pilot holes for the portholes, and they got stuck in, and broke off it, the vertical supports that were in earlier pics. So I had to drill them out and re-fill them and re-drill them. That was on ordeal!:  After, with the decks masked:  Now with the masking tape off and starting to install the ladders:     Finished front Superstructure face:    And the aft section:  Next I glued the 01 deck and up onto the ship itself:  A look from up top:  Next I had to go back and put scuppers on the main hull and aft decks. I had thought about it before, but had ruled it out. But then when I was doing the superstructure, it didn't look right without it, and also it would aid to glue the PE in place. So I went back and re did all of that!    Looking pretty close to the plan!  Some attention to the fo'c'sle and the gun deck:   More details:   Next, the PE went on: (I left the 01 deck off to ease installing the PE)     Next was time for the cargo deck and superstructure to get glued down. Now I want you all to know that I measured and measured, and cut and sanded to the plans, but when it came time to glue it down, the deck was off. So I had to add an extension, sand it all down again, and repaint it:     Next was time to do the "Sculptures" as I call them, the little flares on the gun decks:  And start drilling the holes for the kingpins:      And re-shoot the deck:   And now time for the cranes:    Next was a chore that I had been dreading! Making the cradles for the boats:   But they came out good I think? Next was to attach the forward aux gun plats:  My Uncle said he used to sunbathe on the starboard one, which has a railing. Whereas the port side had a solid splinter shield.  Next was time to clean up all the glue spots. They cleaned up very easily with drybrushing Deck grey over them. Can't see any mistakes now! After that was to tackle the Booms: I made up a Jig that I used to drill the holes so they would all be the same as according to the plans:  I used Plastruct angle trusses, but they needed to be thinned out a lot! And I had to drill the top hole part several times in order to get it to look right:                  And here they are all painted:      So that's where she is as of today! I still have about a couple of weeks left of work to do. Deck details and rigging for one. Also, I ran out of PE railings, so I had to order another fret from Bluejacket Shipcrafters. I got the number decals from them too, but the letter I got from BECC Model Accessories in the UK, along with cloth ensign and signal flags. I also have a bunch of deck reels to make up and a few more ladders and my Uncle says I missed a couple of hatches. But she's almost there! My Uncle is a master woodworker and when I told him about it, I told him he could make the base since that's what he does. He said gladly he would, and that he had a "Special" board that he'd been stashing for a special project. It's birdseye Maple and it looks beautiful! I will post pics of the finished ship as soon as She's done. Thanks to all who have been following my project! My next one I think is going to be a 1/350 scale USS America, scratchbuilt of course, since I served on her! Hello all! I'm back and have nearly finished the larger Arcadia. Last year I met a girl and we moved in together and I took some time off, but I resumed building back in October, and worked on her for the last three months solid, and she's almost finished!
I'll kinda breeze through the steps and pics here and if anybody has any questions, feel free to ask!
When I left off the hull was pretty much done and so were all of the deckhouses and I needed to start the details and assembly work. I started with the main deck, outfitting the bulkheads with lockers, panels, conduits and of course, those dreaded cylinders! I made up about 500 of them, that was like 2 weeks work, and then I attached them to .010 plastic strip to make them in gangs of like 10-20. I painted them green and orange (Looks red in the pics) and black and of course gray.
Here are some main deck shots:
Started small:
[img]http://www.amg-registry.com/models/T70_12118_sm.jpg[/img]
And worked my way up:
[img]http://www.amg-registry.com/models/T70_12124_sm.jpg[/img]
[img]http://www.amg-registry.com/models/T70_12126_sm.jpg[/img]
[img]http://www.amg-registry.com/models/T70_12127_sm.jpg[/img]
[img]http://www.amg-registry.com/models/T70_12131_sm.jpg[/img]
[img]http://www.amg-registry.com/models/T70_12132_sm.jpg[/img]
Next I glued all of the deckhouses together in the main superstructure and sanded and primed them:
[img]http://www.amg-registry.com/models/T70_12140_sm.jpg[/img]
[img]http://www.amg-registry.com/models/T70_12141_sm.jpg[/img]
And I made the aft smokestacks for the diesel generators and incinerator room:
[img]http://www.amg-registry.com/models/T70_12142_sm.jpg[/img]
[img]http://www.amg-registry.com/models/T70_12143_sm.jpg[/img]
Here is the starboard side all adorned:
[img]http://www.amg-registry.com/models/T70_12151_sm.jpg[/img]
[img]http://www.amg-registry.com/models/T70_12154_sm.jpg[/img]
I added the top 04 level and the stack:
[img]http://www.amg-registry.com/models/T70_12156_sm.jpg[/img]
Next the front of the superstructure:
[img]http://www.amg-registry.com/models/T70_12158_sm.jpg[/img]
Some top deck details:
[img]http://www.amg-registry.com/models/T70_12170_sm.jpg[/img]
[img]http://www.amg-registry.com/models/T70_12173_sm.jpg[/img]
Scuppers:
[img]http://www.amg-registry.com/models/T70_12176_sm.jpg[/img]
Next I shot the decks with WEM "US Navy Modern Deck Grey":
[img]http://www.amg-registry.com/models/T70_12184_sm.jpg[/img]
[img]http://www.amg-registry.com/models/T70_12185_sm.jpg[/img]
Next I had to fix a boo boo. I was using micro drill bits to drill pilot holes for the portholes, and they got stuck in, and broke off it, the vertical supports that were in earlier pics. So I had to drill them out and re-fill them and re-drill them. That was on ordeal!:
[img]http://www.amg-registry.com/models/T70_12188_sm.jpg[/img]
After, with the decks masked:
[img]http://www.amg-registry.com/models/T70_12193_sm.jpg[/img]
Now with the masking tape off and starting to install the ladders:
[img]http://www.amg-registry.com/models/T70_12195_sm.jpg[/img]
[img]http://www.amg-registry.com/models/T70_12202_sm.jpg[/img]
[img]http://www.amg-registry.com/models/T70_12208_sm.jpg[/img]
[img]http://www.amg-registry.com/models/T70_12210_sm.jpg[/img]
Finished front Superstructure face:
[img]http://www.amg-registry.com/models/T70_12216_sm.jpg[/img]
[img]http://www.amg-registry.com/models/T70_12217_sm.jpg[/img]
[img]http://www.amg-registry.com/models/T70_12218_sm.jpg[/img]
And the aft section:
[img]http://www.amg-registry.com/models/T70_12223_sm.jpg[/img]
Next I glued the 01 deck and up onto the ship itself:
[img]http://www.amg-registry.com/models/T70_12224_sm.jpg[/img]
A look from up top:
[img]http://www.amg-registry.com/models/T70_12226_sm.jpg[/img]
Next I had to go back and put scuppers on the main hull and aft decks. I had thought about it before, but had ruled it out. But then when I was doing the superstructure, it didn't look right without it, and also it would aid to glue the PE in place. So I went back and re did all of that!
[img]http://www.amg-registry.com/models/T70_12227_sm.jpg[/img]
[img]http://www.amg-registry.com/models/T70_12228_sm.jpg[/img]
[img]http://www.amg-registry.com/models/T70_12230_sm.jpg[/img]
Looking pretty close to the plan!
[img]http://www.amg-registry.com/models/T70_12231_sm.jpg[/img]
Some attention to the fo'c'sle and the gun deck:
[img]http://www.amg-registry.com/models/T70_12232_sm.jpg[/img]
[img]http://www.amg-registry.com/models/T70_12233_sm.jpg[/img]
More details:
[img]http://www.amg-registry.com/models/T70_12241_sm.jpg[/img]
[img]http://www.amg-registry.com/models/T70_12242_sm.jpg[/img]
Next, the PE went on: (I left the 01 deck off to ease installing the PE)
[img]http://www.amg-registry.com/models/T70_12247_sm.jpg[/img]
[img]http://www.amg-registry.com/models/T70_12248_sm.jpg[/img]
[img]http://www.amg-registry.com/models/T70_12249_sm.jpg[/img]
[img]http://www.amg-registry.com/models/T70_12250_sm.jpg[/img]
Next was time for the cargo deck and superstructure to get glued down. Now I want you all to know that I measured and measured, and cut and sanded to the plans, but when it came time to glue it down, the deck was off. So I had to add an extension, sand it all down again, and repaint it:
[img]http://www.amg-registry.com/models/T70_12255_sm.jpg[/img]
[img]http://www.amg-registry.com/models/T70_12256_sm.jpg[/img]
[img]http://www.amg-registry.com/models/T70_12258_sm.jpg[/img]
[img]http://www.amg-registry.com/models/T70_12261_sm.jpg[/img]
Next was time to do the "Sculptures" as I call them, the little flares on the gun decks:
[img]http://www.amg-registry.com/models/T70_12262_sm.jpg[/img]
And start drilling the holes for the kingpins:
[img]http://www.amg-registry.com/models/T70_12263_sm.jpg[/img]
[img]http://www.amg-registry.com/models/T70_12264_sm.jpg[/img]
[img]http://www.amg-registry.com/models/T70_12265_sm.jpg[/img]
[img]http://www.amg-registry.com/models/T70_12266_sm.jpg[/img]
[img]http://www.amg-registry.com/models/T70_12270_sm.jpg[/img]
And re-shoot the deck:
[img]http://www.amg-registry.com/models/T70_12285_sm.jpg[/img]
[img]http://www.amg-registry.com/models/T70_12286_sm.jpg[/img]
And now time for the cranes:
[img]http://www.amg-registry.com/models/T70_12287_sm.jpg[/img]
[img]http://www.amg-registry.com/models/T70_12289_sm.jpg[/img]
[img]http://www.amg-registry.com/models/T70_12290_sm.jpg[/img]
Next was a chore that I had been dreading! Making the cradles for the boats:
[img]http://www.amg-registry.com/models/T70_12293_sm.jpg[/img]
[img]http://www.amg-registry.com/models/T70_12294_sm.jpg[/img]
But they came out good I think?
Next was to attach the forward aux gun plats:
[img]http://www.amg-registry.com/models/T70_12295_sm.jpg[/img]
My Uncle said he used to sunbathe on the starboard one, which has a railing. Whereas the port side had a solid splinter shield.
[img]http://www.amg-registry.com/models/T70_12296_sm.jpg[/img]
Next was time to clean up all the glue spots. They cleaned up very easily with drybrushing Deck grey over them. Can't see any mistakes now!
After that was to tackle the Booms:
I made up a Jig that I used to drill the holes so they would all be the same as according to the plans:
[img]http://www.amg-registry.com/models/T70_12302_sm.jpg[/img]
I used Plastruct angle trusses, but they needed to be thinned out a lot! And I had to drill the top hole part several times in order to get it to look right:
[img]http://www.amg-registry.com/models/T70_12302_sm.jpg[/img]
[img]http://www.amg-registry.com/models/T70_12303_sm.jpg[/img]
[img]http://www.amg-registry.com/models/T70_12304_sm.jpg[/img]
[img]http://www.amg-registry.com/models/T70_12305_sm.jpg[/img]
[img]http://www.amg-registry.com/models/T70_12306_sm.jpg[/img]
[img]http://www.amg-registry.com/models/T70_12307_sm.jpg[/img]
[img]http://www.amg-registry.com/models/T70_12308_sm.jpg[/img]
[img]http://www.amg-registry.com/models/T70_12309_sm.jpg[/img]
[img]http://www.amg-registry.com/models/T70_12408_sm.jpg[/img]
[img]http://www.amg-registry.com/models/T70_12409_sm.jpg[/img]
[img]http://www.amg-registry.com/models/T70_12410_sm.jpg[/img]
[img]http://www.amg-registry.com/models/T70_12411_sm.jpg[/img]
[img]http://www.amg-registry.com/models/T70_12412_sm.jpg[/img]
[img]http://www.amg-registry.com/models/T70_12413_sm.jpg[/img]
[img]http://www.amg-registry.com/models/T70_12414_sm.jpg[/img]
[img]http://www.amg-registry.com/models/T70_12415_sm.jpg[/img]
[img]http://www.amg-registry.com/models/T70_12416_sm.jpg[/img]
[img]http://www.amg-registry.com/models/T70_12418_sm.jpg[/img]
And here they are all painted:
[img]http://www.amg-registry.com/models/A55_03111_sm.jpg[/img]
[img]http://www.amg-registry.com/models/A55_03112_sm.jpg[/img]
[img]http://www.amg-registry.com/models/A55_03114_sm.jpg[/img]
[img]http://www.amg-registry.com/models/A55_03116_sm.jpg[/img]
[img]http://www.amg-registry.com/models/A55_03119_sm.jpg[/img]
So that's where she is as of today! I still have about a couple of weeks left of work to do. Deck details and rigging for one. Also, I ran out of PE railings, so I had to order another fret from Bluejacket Shipcrafters. I got the number decals from them too, but the letter I got from BECC Model Accessories in the UK, along with cloth ensign and signal flags. I also have a bunch of deck reels to make up and a few more ladders and my Uncle says I missed a couple of hatches.
But she's almost there! My Uncle is a master woodworker and when I told him about it, I told him he could make the base since that's what he does. He said gladly he would, and that he had a "Special" board that he'd been stashing for a special project. It's birdseye Maple and it looks beautiful! I will post pics of the finished ship as soon as She's done.
Thanks to all who have been following my project! My next one I think is going to be a 1/350 scale USS America, scratchbuilt of course, since I served on her!
|
|
|
|
Posted: Thu Dec 27, 2012 7:11 pm |
|
|
|
|
|
| |
Post subject: |
Re: 1:192 & 1:384 USS Arcadia AD23 (1966) |
|
|
Richard J OMalley wrote: Thanks for the compliment! I got the plans through The Floating Drydock http://floatingdrydock.com/G.htm which I am sure most of you are aware of. They are the "G" series plans, or the General Booklet of plans copies. It was a decent plan set and had most of the major views, but did not have as many hull sections as I would have liked. But they were in 1/192 and that was a cool scale as I had never worked in that scale before. I have never done this level of build, and seeing how that T3 oilier hull was constructed, I might have done it that way had I more cross sections, and were to try it again. I was shocked just to see the plans for it at all, and that is what inspired me to try this. [quote="Richard J OMalley"]Very nice work on a interesting and over looked subject .Were did you get the plans for this fine ship ? :huh: I am watching with great interest . :thumbs_up_1: :thumbs_up_1: :thumbs_up_1:[/quote]
Thanks for the compliment! I got the plans through The Floating Drydock [url]http://floatingdrydock.com/G.htm[/url] which I am sure most of you are aware of. They are the "G" series plans, or the General Booklet of plans copies.
It was a decent plan set and had most of the major views, but did not have as many hull sections as I would have liked. But they were in 1/192 and that was a cool scale as I had never worked in that scale before. I have never done this level of build, and seeing how that T3 oilier hull was constructed, I might have done it that way had I more cross sections, and were to try it again. I was shocked just to see the plans for it at all, and that is what inspired me to try this.
|
|
|
|
Posted: Sun Jan 01, 2012 4:59 am |
|
|
|
|


 I am watching with great interest .