| Author |
Message |
|
|
| |
Post subject: |
Re: 1/700 Fleet Submarine SS-212 Gato - ca 1941 (early fit) |
 |
|
|
Thabk you guys!
Moderators please moce the thread to completed builds!
Thabk you guys!
Moderators please moce the thread to completed builds!
|
|
|
 |
Posted: Sat Mar 02, 2019 10:02 pm |
|
|
 |
|
|
| |
Post subject: |
Re: 1/700 Fleet Submarine SS-212 Gato - ca 1941 (early fit) |
|
|
|
Very nice. The weathering turn out good.
Very nice. The weathering turn out good.
|
|
|
|
Posted: Sat Feb 23, 2019 11:25 am |
|
|
|
|
|
| |
Post subject: |
Re: 1/700 HB Gato class - another little project |
|
|
pascalemod wrote: Last bit to address is the superstructure. Not much to add here - just a PE ladder, railings, and a bell made out of spare outrigger and bit of glue on it for volume. It will do.
I realized that I drilled one hole too many (or rather, HB puts 8 holes on the front of the sail, 4 on each side - that is wrong, there were 7, and they were I think bigger and 1 was in center, three on sides, plus a life preserver ring after that). So I will have to correct this further...
Beautiful job with the drill and fantastic work on the shafts too. I saw a photo of your kit before and I was sure it was 1/350. Excellent PE work too. With that small a kit I would be sure to bend the rails accidentally. I now have a terrific example to follow for my 3 HB Gato kits. Nino [quote="pascalemod"]Last bit to address is the superstructure. Not much to add here - just a PE ladder, railings, and a bell made out of spare outrigger and bit of glue on it for volume. It will do.
I realized that I drilled one hole too many (or rather, HB puts 8 holes on the front of the sail, 4 on each side - that is wrong, there were 7, and they were I think bigger and 1 was in center, three on sides, plus a life preserver ring after that). So I will have to correct this further...
[/quote]
Beautiful job with the drill and fantastic work on the shafts too. I saw a photo of your kit before and I was sure it was 1/350.
Excellent PE work too. With that small a kit I would be sure to bend the rails accidentally. I now have a terrific example to follow for my 3 HB Gato kits.
Nino
|
|
|
|
Posted: Fri Feb 22, 2019 9:09 pm |
|
|
|
|
|
| |
Post subject: |
Re: 1/700 Fleet Submarine SS-212 Gato - ca 1941 (early fit) |
|
|
|
It is a beautiful piece of work. It definitely turned out alright.
I've been silently admiring your rapidly expanding and improving fleet of ships.
It is a beautiful piece of work. It definitely turned out alright.
I've been silently admiring your rapidly expanding and improving fleet of ships.
|
|
|
|
Posted: Fri Feb 15, 2019 12:35 pm |
|
|
|
|
|
| |
Post subject: |
Re: 1/700 Fleet Submarine SS-212 Gato - ca 1941 (early fit) |
|
|
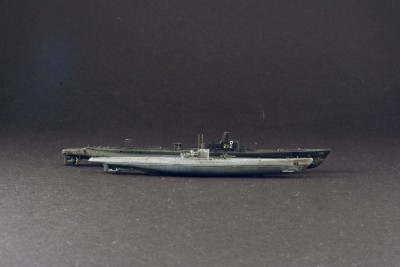
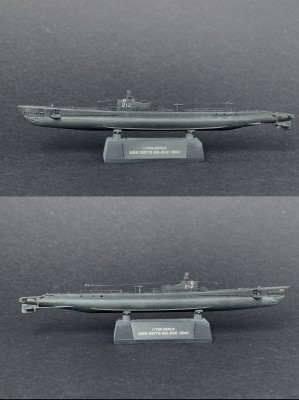
The project is complete. It is a nice little kit but for sure could use a lot of improvements on the tail section. Were I to build a Balao which is the same kit basically, I would full rebuild the props, shafts, and rudders too. I much prefer the all black paint scheme of the early Gato's, which was tricky to depict. I have painted it all Nato black (Tamiya XF69), then I give it a green-gray wash on the lower hull, and brown-black wash on the upper hull. After this I added a bit of a muck line, and all the rust and streaks on the upper hull. Next I've used XF69 diluted 9:1 with thinner and sprayed it in parts on the hull to town down the sharp effect those streaks had. I think if you manage smoothly the weathering there is no need for it, but I had to do it. As a result the sub looks rather nice and stealthy, and for sure more to scale. Antennas are based on 0.2mm brass wire rods and modelkasten 0.06mm tungsten wire. Insulators are made using the KristalKlear shiny glue thing, which is used to make windows usually. I might dull it down later but overall it will do. Final touch is the life ring on the sail. Some boats had it, some didn't, it was white or red. I made mine white and stuck it using kristal clear, so I can take it off with water if needed. Here is the result, final, next to a Type 9C Uboat (Gato is BIG), and next to some Battleships (Gato is SMALL) and to a destroyer (Gato is SAME). 
| Attachments: |
File comment: Gato

_MG_0328.JPG [ 264.14 KiB | Viewed 1664 times ]
|
File comment: Gato

_MG_0331.JPG [ 253.01 KiB | Viewed 1664 times ]
|
File comment: Next to USS Washington

_MG_0314.JPG [ 205.58 KiB | Viewed 1664 times ]
|
File comment: Next to HMS Hood

_MG_0317.JPG [ 219.23 KiB | Viewed 1664 times ]
|
File comment: Next to Mikasa, a pre-dreadnought

_MG_0322.JPG [ 146.48 KiB | Viewed 1664 times ]
|
File comment: Next to USS Ward, a WW1 destroyer

_MG_0306.JPG [ 213.3 KiB | Viewed 1664 times ]
|
File comment: Next to an ocean going U-boat

_MG_0294.JPG [ 202.31 KiB | Viewed 1664 times ]
|
File comment: Next to an ocean going U-boat
_MG_0298.JPG [ 162.25 KiB | Viewed 1664 times ]
|
File comment: Next to an '88 nuke sub. Again, Gato was a BIG boat!

_MG_0289.JPG [ 231.21 KiB | Viewed 1664 times ]
|
The project is complete.
It is a nice little kit but for sure could use a lot of improvements on the tail section. Were I to build a Balao which is the same kit basically, I would full rebuild the props, shafts, and rudders too.
I much prefer the all black paint scheme of the early Gato's, which was tricky to depict. I have painted it all Nato black (Tamiya XF69), then I give it a green-gray wash on the lower hull, and brown-black wash on the upper hull. After this I added a bit of a muck line, and all the rust and streaks on the upper hull.
Next I've used XF69 diluted 9:1 with thinner and sprayed it in parts on the hull to town down the sharp effect those streaks had. I think if you manage smoothly the weathering there is no need for it, but I had to do it. As a result the sub looks rather nice and stealthy, and for sure more to scale.
Antennas are based on 0.2mm brass wire rods and modelkasten 0.06mm tungsten wire. Insulators are made using the KristalKlear shiny glue thing, which is used to make windows usually. I might dull it down later but overall it will do.
Final touch is the life ring on the sail. Some boats had it, some didn't, it was white or red. I made mine white and stuck it using kristal clear, so I can take it off with water if needed.
Here is the result, final, next to a Type 9C Uboat (Gato is BIG), and next to some Battleships (Gato is SMALL) and to a destroyer (Gato is SAME). :D
|
|
|
|
Posted: Fri Feb 15, 2019 9:32 am |
|
|
|
|
|
| |
Post subject: |
Re: 1/700 Fleet Submarine SS-212 Gato - ca 1941 (early fit) |
|
|
Harpy wrote: Looks good. Eager to see your weathering.  ask and you shall receive! The project is done. Did a lot of weathering and then post that have sprayed the boat with mist of black paint heavily diluted. It nicely tied everything together I think. Much better pics to come, this is just iphone.
| Attachments: |

IMG_7661.jpg [ 292.36 KiB | Viewed 1714 times ]
|
IMG_7659.jpg [ 255.42 KiB | Viewed 1714 times ]
|
[quote="Harpy"]Looks good. Eager to see your weathering.[/quote]
:thumbs_up_1: ask and you shall receive!
The project is done. Did a lot of weathering and then post that have sprayed the boat with mist of black paint heavily diluted. It nicely tied everything together I think.
Much better pics to come, this is just iphone.
|
|
|
|
Posted: Wed Feb 13, 2019 8:54 am |
|
|
|
|
|
| |
Post subject: |
Re: 1/700 Fleet Submarine SS-212 Gato - ca 1941 (early fit) |
|
|
|
Looks good. Eager to see your weathering.
Looks good. Eager to see your weathering.
|
|
|
|
Posted: Tue Feb 12, 2019 2:02 pm |
|
|
|
|
|
| |
Post subject: |
Re: 1/700 Fleet Submarine SS-212 Gato - ca 1941 (early fit) |
|
|
Very nice result! I like your eye for details. And that on 1/700... my admiration! :thumbs_up_1: Very nice result! I like your eye for details. And that on 1/700... my admiration!
|
|
|
|
Posted: Tue Feb 12, 2019 6:26 am |
|
|
|
|
|
| |
Post subject: |
Re: 1/700 SS-212 Gato / 1941 |
|
|
Here the boat is Primed and then Painted! She looks way better in all black now.  As you see I shaved off most of the hull plating which was super exaggerated. Final touches ahead - black pin wash, dry brushing, wash the lower hull in gray-green, and add rust and salt streaks here and there. Rigging will be last, hope to be done with this one soon.
| Attachments: |

IMG_7493.JPG [ 374.41 KiB | Viewed 1860 times ]
|
Here the boat is Primed and then Painted!
She looks way better in all black now. :) As you see I shaved off most of the hull plating which was super exaggerated.
Final touches ahead - black pin wash, dry brushing, wash the lower hull in gray-green, and add rust and salt streaks here and there. Rigging will be last, hope to be done with this one soon.
|
|
|
|
Posted: Mon Feb 11, 2019 5:59 am |
|
|
|
|
|
| |
Post subject: |
Re: 1/700 SS-212 Gato / 1941 |
|
|
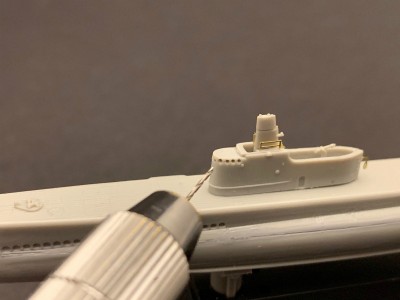
Main PE bits have been added. While probably not 100% accurate this is best I can do in this scale with PE I have. On lower pic you can see the work done on the prop guards (early style, as I gathered, hope I got this right but I had zero clarity on it based on instructions from PE set). Toms Modelworks just writes "see reference pics for detail" which is often not good enough.
| Attachments: |
IMG_7451.JPG [ 188.24 KiB | Viewed 1861 times ]
|

IMG_7416.jpg [ 227.75 KiB | Viewed 1860 times ]
|
Main PE bits have been added. While probably not 100% accurate this is best I can do in this scale with PE I have. :)
On lower pic you can see the work done on the prop guards (early style, as I gathered, hope I got this right but I had zero clarity on it based on instructions from PE set). Toms Modelworks just writes "see reference pics for detail" which is often not good enough.
|
|
|
|
Posted: Mon Feb 11, 2019 5:56 am |
|
|
|
|
|
| |
Post subject: |
Re: 1/700 HB Gato class - another little project |
|
|
|
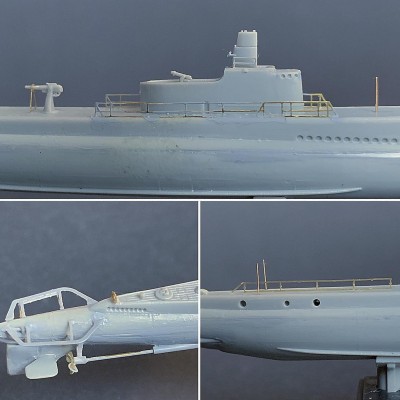
Last bit to address is the superstructure. Not much to add here - just a PE ladder, railings, and a bell made out of spare outrigger and bit of glue on it for volume. It will do.
I realized that I drilled one hole too many (or rather, HB puts 8 holes on the front of the sail, 4 on each side - that is wrong, there were 7, and they were I think bigger and 1 was in center, three on sides, plus a life preserver ring after that). So I will have to correct this further...
To be continued.
Next phase is railings, masts, and decision whether to add prop guards or not... I heard that one is a bit of tricky one.
| Attachments: |
IMG_7258.jpg [ 194.95 KiB | Viewed 1967 times ]
|
File comment: All Dry Fitted!

IMG_7312.jpg [ 202.03 KiB | Viewed 1967 times ]
|
Last bit to address is the superstructure. Not much to add here - just a PE ladder, railings, and a bell made out of spare outrigger and bit of glue on it for volume. It will do.
I realized that I drilled one hole too many (or rather, HB puts 8 holes on the front of the sail, 4 on each side - that is wrong, there were 7, and they were I think bigger and 1 was in center, three on sides, plus a life preserver ring after that). So I will have to correct this further...
To be continued.
Next phase is railings, masts, and decision whether to add prop guards or not... I heard that one is a bit of tricky one.
|
|
|
|
Posted: Mon Feb 04, 2019 4:31 am |
|
|
|
|
|
| |
Post subject: |
Re: 1/700 HB Gato class - another little project |
|
|
|
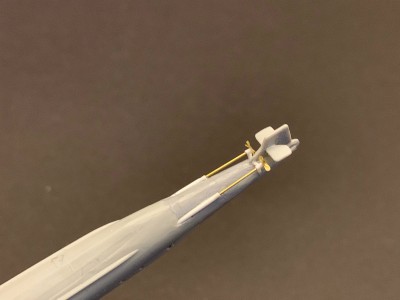
Another area that is problematic, shall we say, is the bow area.
The anchors look pathetic - bow and stern ones dont really match, the bow planes supports are missing (understandable though in this scale) and the flood holes are not drilled out. So that bit I took care of in the next photo.
Not visible in this photo but I also drilled out the towing hole, bullnose or whatever it is called, sorry not good with sub terminology yet! The bow looks proper now!
| Attachments: |

IMG_7278.jpg [ 239.09 KiB | Viewed 1968 times ]
|
Another area that is problematic, shall we say, is the bow area.
The anchors look pathetic - bow and stern ones dont really match, the bow planes supports are missing (understandable though in this scale) and the flood holes are not drilled out. So that bit I took care of in the next photo.
Not visible in this photo but I also drilled out the towing hole, bullnose or whatever it is called, sorry not good with sub terminology yet! The bow looks proper now!
|
|
|
|
Posted: Mon Feb 04, 2019 4:27 am |
|
|
|
|
|
| |
Post subject: |
Re: 1/700 HB Gato class - another little project |
|
|
So the first thing that jumped at me were how poorly done the whole rear section was, rudders ok, I wont touch, just make a scribe for the actual rudder area but the props... oh dear, two little crosses? So - Toms model works provides nice little screws I can use but frankly speaking the whole area is a mess. So I decided to fit some plastic tubing, drill holes in them, and then stick some brass rods for shafts, and then cap the ends with plastic tubes again (pre drilled) and follow it up with some struts from precut styrene. Here is the result, I think it looks a bit smarter now... Still need to figure out how to do the tips of the screws, any ... tips?  PS: to anyone trying to do this mod, I suggestion to first fit the guides - supports for the screws near the rudder, and THEN attach the shafts. I think that will ensure a better fit. I saw online one guy use metal tubes and piano wires to set them, but I dont think it is the best way also. using plastic tubing to attach into the hull you let yourself some wiggle room with normal glue. Much easier. In fact, I screwed up my end by following that guides order of assembly and my props are not super straight now. But - if you do the supports first, it is much simpler to then rest the shafts against them at the exact angle. Actual process is much simpler and I can do it again next time - after all Toms Modelworks contains PE for 2 boats, so a Balao is on the cards, potentially...
| Attachments: |
File comment: Progress in between
IMG_7290.jpg [ 270.56 KiB | Viewed 1968 times ]
|
File comment: The New

IMG_7245.jpg [ 197.99 KiB | Viewed 1968 times ]
|
File comment: The Old

IMG_7225.jpg [ 266.08 KiB | Viewed 1968 times ]
|
So the first thing that jumped at me were how poorly done the whole rear section was, rudders ok, I wont touch, just make a scribe for the actual rudder area but the props... oh dear, two little crosses?
So - Toms model works provides nice little screws I can use but frankly speaking the whole area is a mess. So I decided to fit some plastic tubing, drill holes in them, and then stick some brass rods for shafts, and then cap the ends with plastic tubes again (pre drilled) and follow it up with some struts from precut styrene.
Here is the result, I think it looks a bit smarter now... Still need to figure out how to do the tips of the screws, any ... tips? :heh:
PS: to anyone trying to do this mod, I suggestion to first fit the guides - supports for the screws near the rudder, and THEN attach the shafts. I think that will ensure a better fit. I saw online one guy use metal tubes and piano wires to set them, but I dont think it is the best way also. using plastic tubing to attach into the hull you let yourself some wiggle room with normal glue. Much easier. In fact, I screwed up my end by following that guides order of assembly and my props are not super straight now. But - if you do the supports first, it is much simpler to then rest the shafts against them at the exact angle. Actual process is much simpler and I can do it again next time - after all Toms Modelworks contains PE for 2 boats, so a Balao is on the cards, potentially...
|
|
|
|
Posted: Mon Feb 04, 2019 4:21 am |
|
|
|
|
|
| |
Post subject: |
1/700 Fleet Submarine SS-212 Gato - ca 1941 (early fit) |
|
|
|
|
|
|