Welcome back after looooooooooooooong break in posting here. But it doesn't mean nothing happened with a model.
I had hard times with my build and I hope that now I shall post here more regularly. My model has changed a lot. But let me describe everything one by one.
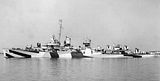
First, since at this stage it can be any Fletcher build I decided to rename her to USS Van Valkenburgh. I have found some photos showing her bit unique equipment configuration. Besides like USS Heermann, she has quite interesting history. USS Van Valkenburgh was commissioned as one of the last Fletchers build. She become famous during Okinawa operation where as one of the 10 (!) of the all destroyers used there was not damage. For her actions USS Van Valkenburgh was awarded with Navy Unit Commendation. I like so much also her camouflage Ms 31/9D
I succeeded to remove those "bumps" I shown last time. But price to be paid was high. Extensive sanding caused that all hull shell become very thin and... easy do damage. It happen during one beautiful Sunday, that on almost finished hull felt down Olfa knife (hand side). It opened nice hole. After calming down I checked hull carefully and I have found that it is very thin - like a Japanese paper. Decision was short and executed same day - Dremel tool and cut'em all. So now model is in waterline version.
Well, don't think that cutting of the hull bottom solved everything. Since I applied 1mm styrene sheet to the open bottom I had a lot of problems with cracking hull sides just near the cutting line.
I have found that great stimulator for fighting with all problems was my Wife and her: " I knew that it will happen..." So it did not happened! I was still working on this project. After long weeks of evenings work I have hull ready for further work, ie. adding hull plating and all stuff I will be able to make.
On the photos is a model as yesterday night. Freshly sprayed with Surfacer 1000 (it was planned to be final one, but photos shown some very minor corrections needed to be made. Some more I have found this morning in daylight).
On the hull visible above will be applied 10.mm styrene sheets as hull plating and other things. Of course I need to drill hawse pipes opening too.
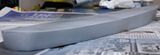
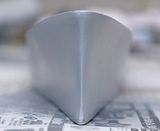
Before the disaster I had feeling that something wrong is with the stern (kind of brain itching). Comparing with plans and photos it seemed to be too much rounded. I rescaled part of the BWN plans and compared with the model it was clear that it shall be not so round. I have applied 0.3mm styrene stripes (photos below) and coated everything with a putty. Then a lot of sanding.
Final effect you can see at the photos above. In between the sanding sessions I have prepared internal bracing for superstructures. But there is nothing exciting to show.
That's all for now.
--
Welcome back after looooooooooooooong break in posting here. But it doesn't mean nothing happened with a model.
I had hard times with my build and I hope that now I shall post here more regularly. My model has changed a lot. But let me describe everything one by one.
First, since at this stage it can be any Fletcher build I decided to rename her to USS Van Valkenburgh. I have found some photos showing her bit unique equipment configuration. Besides like USS Heermann, she has quite interesting history. USS Van Valkenburgh was commissioned as one of the last Fletchers build. She become famous during Okinawa operation where as one of the 10 (!) of the all destroyers used there was not damage. For her actions USS Van Valkenburgh was awarded with Navy Unit Commendation. I like so much also her camouflage Ms 31/9D
[url=http://s216.photobucket.com/albums/cc212/Sleepwalker000/656vanvalkenburgh_01.jpg][img]http://i216.photobucket.com/albums/cc212/Sleepwalker000/th_656vanvalkenburgh_01.jpg[/img][/url]
I succeeded to remove those "bumps" I shown last time. But price to be paid was high. Extensive sanding caused that all hull shell become very thin and... easy do damage. It happen during one beautiful Sunday, that on almost finished hull felt down Olfa knife (hand side). It opened nice hole. After calming down I checked hull carefully and I have found that it is very thin - like a Japanese paper. Decision was short and executed same day - Dremel tool and cut'em all. So now model is in waterline version.
Well, don't think that cutting of the hull bottom solved everything. Since I applied 1mm styrene sheet to the open bottom I had a lot of problems with cracking hull sides just near the cutting line.
I have found that great stimulator for fighting with all problems was my Wife and her: " I knew that it will happen..." So it did not happened! I was still working on this project. After long weeks of evenings work I have hull ready for further work, ie. adding hull plating and all stuff I will be able to make.
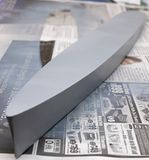
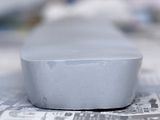
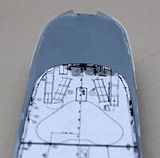
On the photos is a model as yesterday night. Freshly sprayed with Surfacer 1000 (it was planned to be final one, but photos shown some very minor corrections needed to be made. Some more I have found this morning in daylight).
[url=http://s216.photobucket.com/albums/cc212/Sleepwalker000/bowtop.jpg][img]http://i216.photobucket.com/albums/cc212/Sleepwalker000/th_bowtop.jpg[/img][/url] [url=http://s216.photobucket.com/albums/cc212/Sleepwalker000/stern.jpg][img]http://i216.photobucket.com/albums/cc212/Sleepwalker000/th_stern.jpg[/img][/url] [url=http://s216.photobucket.com/albums/cc212/Sleepwalker000/bow.jpg][img]http://i216.photobucket.com/albums/cc212/Sleepwalker000/th_bow.jpg[/img][/url] [url=http://s216.photobucket.com/albums/cc212/Sleepwalker000/sternclose.jpg][img]http://i216.photobucket.com/albums/cc212/Sleepwalker000/th_sternclose.jpg[/img][/url]
On the hull visible above will be applied 10.mm styrene sheets as hull plating and other things. Of course I need to drill hawse pipes opening too.
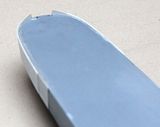
Before the disaster I had feeling that something wrong is with the stern (kind of brain itching). Comparing with plans and photos it seemed to be too much rounded. I rescaled part of the BWN plans and compared with the model it was clear that it shall be not so round. I have applied 0.3mm styrene stripes (photos below) and coated everything with a putty. Then a lot of sanding.
[url=http://s216.photobucket.com/albums/cc212/Sleepwalker000/widening.jpg][img]http://i216.photobucket.com/albums/cc212/Sleepwalker000/th_widening.jpg[/img][/url] [url=http://s216.photobucket.com/albums/cc212/Sleepwalker000/widening2.jpg][img]http://i216.photobucket.com/albums/cc212/Sleepwalker000/th_widening2.jpg[/img][/url]
Final effect you can see at the photos above. In between the sanding sessions I have prepared internal bracing for superstructures. But there is nothing exciting to show.
That's all for now.
--