If it doesn't work this time then it ain't happening....
I'm giving up on preserving the moulded porthole detail in the hope that I can get the right shape. I console myself by realising that I can now fill and redrill the bow portholes which are those horrible ovals you get as the mould tooling has to extract sideways. A trivial thing but given the ffort so far, why not?
And I can redo the eyebrows. When I look at pictures of the real ships the eyebrows are very difficult to see which I take to be because they are much finer and closer to the porthole than Trumpeter have moulded - and it looks like they arch further around the porthole.
Off came the side platforms as well. I now have carte blanche to hack away. And suddenly it becomes so much easier.
This mid-process picture shows the extent that the original moulded hull gets cut away:
It also reveals that I did not put enough plastic backing in place - the white is plastic, the rear is just the 1/16" wood locator piece I added on top of the main wood insert to line it up. I should have added at least a couple more inches of plastic card before gluing it all together. And thicker the 40 thou used in the center (where you can see the most white exposed). The yellow is Elmers wood filler which seems sticks to plastic/paint just as well as wood. It's used in areas where the moulding has a slight depression and it's easier to raise the surface rather than sand a much larger area around it down (also used where I got over enthusiastic in sanding elsewhere too....)
As before, there follows more sanding, painting, sanding, just trying to achieve smooth curves in the general style of the original ship lines. Everytime I put a coat of paint on in the assumption I'm done reveals a slight but definite bump somewhere that needs to go; particulalry towards the top where the hull is supposed to be slightly concave. I think I've written off about half a dozen finishes now because of this.
I have, however, reached a point where I am actually satisfied...

I've taken time out to draw some frame and deck lines on the hull before the final paint finish to illustrate the lines I've got. I've also taken some head-on photographs from the font and bottom which I've scaled to compare with the original line drawings and finalise my own lines.
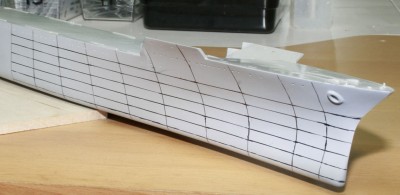
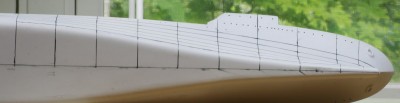
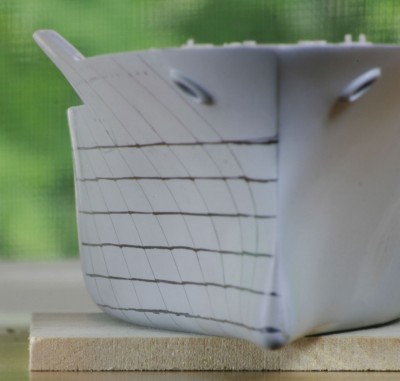
Comparing to the original builders plans, it works well from the hold up to the 4th deck. Hoorah. Above that, my hull widens out more as I have to end up matching the moulded hull at the main deck level, even if it is only 1/4" high. Not very hoorah at all. The only solution to this is to either build the hull from scratch (I can't see any practical way of getting that pronounced inward curve under the main deck with any part of the Trumpeter hull) or go for a late war Enterprise (option 3: accept that it looks graceful but has errors elsewhere doesn't work for me, I am too finickity by far). I'm leaning towards the former as I like playing around with bass wood and I already have the latter built in 1/700. But that's much later as this was supposed to be a short distraction from my 1/700 Takao.
Anyhoo, here are the lines I ended up with (starting from buiders plan and modifying from measurement and photograph). The original builders lines are in red. I am bemused slightly by the 2nd and 3rd deck lines being so much narrower as around the rasied forecastle area (forward of frame 40) I have achieved quite a steep inward curve (reasonably comparable to real hull sections) yet my lines are much wider. Further back I can understand as the real hull is narrower than Trumpeters anyway. Still, it is what it is. These drawings are not 1/350 but are the same size relative to each other.
Hold
2nd Platform
1st platform
4th deck
3rd Deck
2nd Deck
If it doesn't work this time then it ain't happening....
I'm giving up on preserving the moulded porthole detail in the hope that I can get the right shape. I console myself by realising that I can now fill and redrill the bow portholes which are those horrible ovals you get as the mould tooling has to extract sideways. A trivial thing but given the ffort so far, why not?
And I can redo the eyebrows. When I look at pictures of the real ships the eyebrows are very difficult to see which I take to be because they are much finer and closer to the porthole than Trumpeter have moulded - and it looks like they arch further around the porthole.
Off came the side platforms as well. I now have carte blanche to hack away. And suddenly it becomes so much easier.
This mid-process picture shows the extent that the original moulded hull gets cut away:
[attachment=9]art13.jpg[/attachment]
It also reveals that I did not put enough plastic backing in place - the white is plastic, the rear is just the 1/16" wood locator piece I added on top of the main wood insert to line it up. I should have added at least a couple more inches of plastic card before gluing it all together. And thicker the 40 thou used in the center (where you can see the most white exposed). The yellow is Elmers wood filler which seems sticks to plastic/paint just as well as wood. It's used in areas where the moulding has a slight depression and it's easier to raise the surface rather than sand a much larger area around it down (also used where I got over enthusiastic in sanding elsewhere too....)
As before, there follows more sanding, painting, sanding, just trying to achieve smooth curves in the general style of the original ship lines. Everytime I put a coat of paint on in the assumption I'm done reveals a slight but definite bump somewhere that needs to go; particulalry towards the top where the hull is supposed to be slightly concave. I think I've written off about half a dozen finishes now because of this.
I have, however, reached a point where I am actually satisfied... :lol_3:
I've taken time out to draw some frame and deck lines on the hull before the final paint finish to illustrate the lines I've got. I've also taken some head-on photographs from the font and bottom which I've scaled to compare with the original line drawings and finalise my own lines.
[attachment=8]art14.jpg[/attachment]
[attachment=7]art15.jpg[/attachment]
[attachment=6]art16.jpg[/attachment]
Comparing to the original builders plans, it works well from the hold up to the 4th deck. Hoorah. Above that, my hull widens out more as I have to end up matching the moulded hull at the main deck level, even if it is only 1/4" high. Not very hoorah at all. The only solution to this is to either build the hull from scratch (I can't see any practical way of getting that pronounced inward curve under the main deck with any part of the Trumpeter hull) or go for a late war Enterprise (option 3: accept that it looks graceful but has errors elsewhere doesn't work for me, I am too finickity by far). I'm leaning towards the former as I like playing around with bass wood and I already have the latter built in 1/700. But that's much later as this was supposed to be a short distraction from my 1/700 Takao.
Anyhoo, here are the lines I ended up with (starting from buiders plan and modifying from measurement and photograph). The original builders lines are in red. I am bemused slightly by the 2nd and 3rd deck lines being so much narrower as around the rasied forecastle area (forward of frame 40) I have achieved quite a steep inward curve (reasonably comparable to real hull sections) yet my lines are much wider. Further back I can understand as the real hull is narrower than Trumpeters anyway. Still, it is what it is. These drawings are not 1/350 but are the same size relative to each other.
Hold
[attachment=5]art17.jpg[/attachment]
2nd Platform
[attachment=4]art18.jpg[/attachment]
1st platform
[attachment=3]art19.jpg[/attachment]
4th deck
[attachment=2]art20.jpg[/attachment]
3rd Deck
[attachment=1]art21.jpg[/attachment]
2nd Deck
[attachment=0]art22 copy.jpg[/attachment]