Thanks for your suggestions Guido... I have already revarnished the whole model and then did some wet very light washes in white and black once again and toned it down quite a lot. Very pleased with the final result.
The first few attempts at the torpedo net HAD wire rings around it every 10 or 12mm... but after having a few failed attempts and that being by far the most time consuming, I decided to try the next version without the rings fitted... as it happened, that was the one I went with. I COULD still add brailing loops by adding brown coloured fishing line and threading them behind the lace and down through the net shelf and then a spot of superglue to tie them off... not sure... I'll see how a feel later on... may just leave it as it is though...
Gordon was looking for the flaws I was complaining about... well, you can see them on the picture below. The wood deck, combined with not a particularly great fit (or parts breakdown) meant the two casemates for the 6" guns on the underside of the boat deck at either end don't fit properly. I had fitted them onto the underside of the boat deck prior to painting as I felt it would be easier to paint them off the model rather than dealing with overspray on the wooden deck and the fact it is nigh on impossible to mask. This meant that the boat deck parts had to be fitted with the casemates in place and this proved to be a problem on both sides, particularly on the starboard side which tells me it would have been possible to have got this right. The result is a small gap under each casemate. I spent ages trying to refit it, removed part of the wooden deck to re-seat the whole assembly, tried using heavy books to keep it clamped in place... all sorts of things. The problem is, there is a built in 'spring' which is meant to help you fit the guns in place and it's that very spring that makes clamping things together to get rid of the gap at this stage nigh on impossible. The frustrating thing is, I know I could have avoided this with better planning. On top of the unsightly gap issues, it also meant that the 6' guns were a struggle to fit which resulted in a crack appearing and there was nothing I could do about it. I'll just have to leave it.
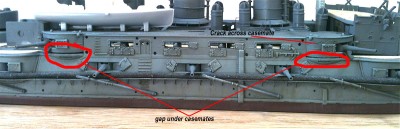
- Flaws in the build as described earlier. I'll have to let it go. The problem was the main deck is in three parts and the centre part could have been fitted a touch lower to allow for the thickness of the wooden deck. I tried to get all parts level, assuming that was what was required. Ah well....
Anyway, that was the flaw/flaws I was referring to Gordon... even did it with the red circles as requested!:big_grin:

It's easier to see in black and white... and so is the variation in tone in the greys now as there is none of the weird colour cast I seem to be getting under natural light with my sons older iPhone 3

- Black and white shot showing the flaws more clearly...
Anyway, that's it for now. I'll have to live with it and move on to the bridge assemblies and the rest of the model...so thanks moomoon... it helps!
Onwards!!!

(PS... I know the boat on the boat deck looks crude and heavy... its the original basic kit part...lots of work to do yet to bring that up to the same level of detail...).
Thanks for your suggestions Guido... I have already revarnished the whole model and then did some wet very light washes in white and black once again and toned it down quite a lot. Very pleased with the final result.
The first few attempts at the torpedo net HAD wire rings around it every 10 or 12mm... but after having a few failed attempts and that being by far the most time consuming, I decided to try the next version without the rings fitted... as it happened, that was the one I went with. I COULD still add brailing loops by adding brown coloured fishing line and threading them behind the lace and down through the net shelf and then a spot of superglue to tie them off... not sure... I'll see how a feel later on... may just leave it as it is though...
Gordon was looking for the flaws I was complaining about... well, you can see them on the picture below. The wood deck, combined with not a particularly great fit (or parts breakdown) meant the two casemates for the 6" guns on the underside of the boat deck at either end don't fit properly. I had fitted them onto the underside of the boat deck prior to painting as I felt it would be easier to paint them off the model rather than dealing with overspray on the wooden deck and the fact it is nigh on impossible to mask. This meant that the boat deck parts had to be fitted with the casemates in place and this proved to be a problem on both sides, particularly on the starboard side which tells me it would have been possible to have got this right. The result is a small gap under each casemate. I spent ages trying to refit it, removed part of the wooden deck to re-seat the whole assembly, tried using heavy books to keep it clamped in place... all sorts of things. The problem is, there is a built in 'spring' which is meant to help you fit the guns in place and it's that very spring that makes clamping things together to get rid of the gap at this stage nigh on impossible. The frustrating thing is, I know I could have avoided this with better planning. On top of the unsightly gap issues, it also meant that the 6' guns were a struggle to fit which resulted in a crack appearing and there was nothing I could do about it. I'll just have to leave it.
[attachment=1]IMG_0941_2 small.jpg[/attachment]
Anyway, that was the flaw/flaws I was referring to Gordon... even did it with the red circles as requested!:big_grin: :thumbs_up_1:
It's easier to see in black and white... and so is the variation in tone in the greys now as there is none of the weird colour cast I seem to be getting under natural light with my sons older iPhone 3
[attachment=0]IMG_0939 small.jpg[/attachment]
Anyway, that's it for now. I'll have to live with it and move on to the bridge assemblies and the rest of the model...so thanks moomoon... it helps! :thumbs_up_1:
Onwards!!! :big_grin:
(PS... I know the boat on the boat deck looks crude and heavy... its the original basic kit part...lots of work to do yet to bring that up to the same level of detail...).