by sargentx » Fri May 30, 2014 4:52 pm
I got tired of waiting for my North Star figures to come and wondered if there might be a way that I could make my own figures for my current titanic build. I putzed around and came up with this solution. From about 12" The results aren't bad to my eye and are more satisfying than the gingerbread men from Tamiya and some other manufacturers. They're no Northstar figures, but could work in a pinch. This little method has the added benefit of allowing one to make women, children, men etc. The technique would be more than adequate for dockside crowds or densely peopled dioramas. it only takes about a minute or so to make one. I did my entire Titanic crew and people in a morning.
the pictures say it all.
- Attachments
-

- You will need brass wire and artist's gel medium. I use the extra heavy kind.
-

- cut off a length of wire and bend a small loop in it. make the loop nearly as small as it can go but not quite. Bend some shoulders and trail the ends off parallel down to make legs and a 'cage' for the torso.
-

- Use Gel medium to fill up the head and torso. Pay attention to the proportion of head to chest. If it's a woman with a dress, simply make a longer triangle shape. The two brass ends will be the legs for a man. You can thicken them a bit.
-

- I usually paint my figures the majority colour first, then do head, then hair/hat, hands.
-

-

-
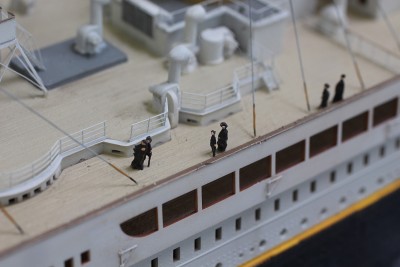
- With some patience, it wasn't too hard to affect some hats, a woman and baby, and even a sense of gesture and pose. It would certainly work for a crowd scene.
I got tired of waiting for my North Star figures to come and wondered if there might be a way that I could make my own figures for my current titanic build. I putzed around and came up with this solution. From about 12" The results aren't bad to my eye and are more satisfying than the gingerbread men from Tamiya and some other manufacturers. They're no Northstar figures, but could work in a pinch. This little method has the added benefit of allowing one to make women, children, men etc. The technique would be more than adequate for dockside crowds or densely peopled dioramas. it only takes about a minute or so to make one. I did my entire Titanic crew and people in a morning.
the pictures say it all.