by Plastic Habit » Wed Jun 18, 2014 2:00 am
Ahoy mates!!
I have enjoyed this site for all the wonderful builds people have shared and even more greatful for the help I personally have received. Therefore, I feel I should contribute in some small way.
I have decided to start a topic on how to solder photo-etch pieces over using CA for all pieces. Don't get me wrong, CA will still be needed where soldering is not the preferred route. Hopefully this will be informative and I will continue posting as different parts are brought together.
Items that are needed are:
Soldering Iron
Solder
Flux(water soluble preferably)
Brushes
Sand paper
Tweezers
Other items as seen fit:
Diamond File
Lighter or Candle
With most aftermarket PE sets only a standard soldering iron is needed. Scratch builders may want to opt for a regulated to use with different thicknesses of material. Solder can be of rosin core or not, as the flux will give the fluidity that is needed. I feel water soluble flux is a better choice just because of when it comes to cleaning up the pieces. The brushes should be large enough to cover the area to be soldered. Flat brushes are good for face to face soldering and round for face to edge. Tweezers, at minimum for holding pieces while soldering. The metal will get really hot.
When soldering it is important to clean the faces and/or edges that will come in contact with one another. This serves two purposes: most importantly is that it removes the small layer of oxidized metal that naturally takes place; second, it creates minute scratches for the filler metal to hold onto as the pieces are joined.
Use enough flux so that the filler metal will flow into the joint, but don't over do it. Where the flux and heat are the filler is sure to follow.
Tinning!! Tinning is an important step in many ways. But what do we mean by tinning. Tinning is the process of depositing a thin layer of solder on the surface of the edges and/or faces of the pieces to be joined. By pre-depositing enough filler metal the joint will be crisp and neat. If you try to go straight at it without tinning you may deposit to much filler. This could creates glups and globs that may be hard to sand off or be in a place where it might destroy the pieces by trying to sand. Because tinning leaves such a small layer of filler on surfaces it gets onto you can choose whether to sand if off or not. In a sense its about controlling the amount of filler metal being used to make a strong bond.
Below are a few pic of soldering with PE. I will post more as I build up different sections.
- Attachments
-

- Solder and Flux
-
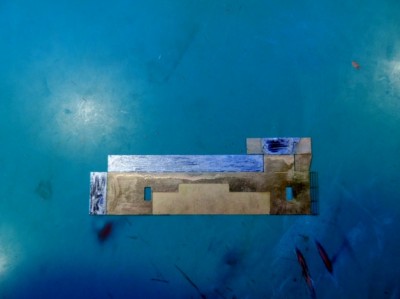
- Tinning prepared for face to face soldering.
-

- Pieces soldered together.
-
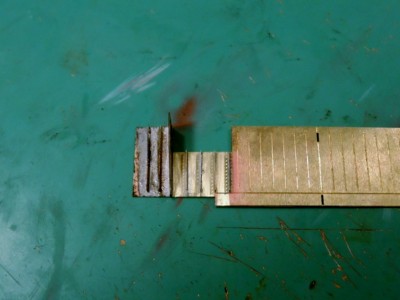
- Soldering of face to edge. On the left portion of pieces attached the tinning is still present. The right portion has been cleaned up with sand paper.
Ahoy mates!!
I have enjoyed this site for all the wonderful builds people have shared and even more greatful for the help I personally have received. Therefore, I feel I should contribute in some small way.
I have decided to start a topic on how to solder photo-etch pieces over using CA for all pieces. Don't get me wrong, CA will still be needed where soldering is not the preferred route. Hopefully this will be informative and I will continue posting as different parts are brought together.
Items that are needed are:
Soldering Iron
Solder
Flux(water soluble preferably)
Brushes
Sand paper
Tweezers
Other items as seen fit:
Diamond File
Lighter or Candle
With most aftermarket PE sets only a standard soldering iron is needed. Scratch builders may want to opt for a regulated to use with different thicknesses of material. Solder can be of rosin core or not, as the flux will give the fluidity that is needed. I feel water soluble flux is a better choice just because of when it comes to cleaning up the pieces. The brushes should be large enough to cover the area to be soldered. Flat brushes are good for face to face soldering and round for face to edge. Tweezers, at minimum for holding pieces while soldering. The metal will get really hot.
When soldering it is important to clean the faces and/or edges that will come in contact with one another. This serves two purposes: most importantly is that it removes the small layer of oxidized metal that naturally takes place; second, it creates minute scratches for the filler metal to hold onto as the pieces are joined.
Use enough flux so that the filler metal will flow into the joint, but don't over do it. Where the flux and heat are the filler is sure to follow.
Tinning!! Tinning is an important step in many ways. But what do we mean by tinning. Tinning is the process of depositing a thin layer of solder on the surface of the edges and/or faces of the pieces to be joined. By pre-depositing enough filler metal the joint will be crisp and neat. If you try to go straight at it without tinning you may deposit to much filler. This could creates glups and globs that may be hard to sand off or be in a place where it might destroy the pieces by trying to sand. Because tinning leaves such a small layer of filler on surfaces it gets onto you can choose whether to sand if off or not. In a sense its about controlling the amount of filler metal being used to make a strong bond.
Below are a few pic of soldering with PE. I will post more as I build up different sections.