Hello, my name is Bart, I'm from belgium and new here. With regards to modelling I build a bit of what interests me, mostly military oriented: ships, planes and tanks.
I've started construction on this flaklighter while waiting till I've got time to continue on my Tupolev. The kit is from White Ensign Models and is in 1/350.

For Operation Seel�we our German friends had made some barges to transport their heavy equipment across the Channel. Eventually the operation was cancelled, but the barges were allready made.


(source:
http://historisches-marinearchiv.de/)
These were then used to evacuate Crete, but also in Norway, Italy, the black sea, Baltic sea ...
They were rather large with 49m length, 6.6m width, but had a shallow draft of 4 feet, which was their greatest advantage. Most allied torpedo's were functioning ok from a draft of 8feet, so the torpedo's malfunctioned or passed under the hull. With 10 knots they were rather slow and easy prey from the air. So Germans wouldn't be Germans if they hadn't a gr�ndliche solution for this, thus they made the Flaklighter, a heavily armed barge, that could withold itself with most foes at sea. It was armed with 2x 88mm or 105mm guns, 2x a 20mm flakvierling, 2x 20mm single guns and 1x a 37mm gun. These could all engage targets down to earth or in the sky (with exception of the 88mm/105mm guns)


Frankly, the allies didn't love this, and at first it was a complete surprice. PT-boats were instructed to avoid a confrontation with these.
On to the kit:
Not that much in the box:
1 solid resin hull

2x a 88 or 105mm gun emplacement, which I don't know yet if I will use them like this:

a bit PE:

and a manual with different colour schemes:

I've started slowly by adding some splinter shields at the aft. The shields that are casted in the kit are also provided in PE, don know yet if I will use these. I've soldered these first to ease the outlining on the hull (3 separate pieces to align and position at once...


and the first single 20mm gunmount has been assembled:


I thickened the PE with solder to give it some more body, PE is rather flat it seems

The 37mm is assembled (and moveable), but I'm still looking for pictures of this type of mount. I can't find any picture of it...

I used paper, hardened with CA to make te body and solder to make the gun more round
Also the last splintershield has been soldered. i didn't intend to use it, but I don't think I will be able to paint the thing while in place:

Hello, my name is Bart, I'm from belgium and new here. With regards to modelling I build a bit of what interests me, mostly military oriented: ships, planes and tanks.
I've started construction on this flaklighter while waiting till I've got time to continue on my Tupolev. The kit is from White Ensign Models and is in 1/350.
[img]https://www.modelbrouwers.nl/media/cache/94/d4/94d4895ab3e3ddeab1947dbd71cb9db8.jpg[/img]
For Operation Seel�we our German friends had made some barges to transport their heavy equipment across the Channel. Eventually the operation was cancelled, but the barges were allready made.
[img]https://www.modelbrouwers.nl/media/cache/5e/62/5e62b75313645e06d0fd476222f0ea1c.jpg[/img]
[img]https://www.modelbrouwers.nl/media/cache/0f/09/0f096f7516227acd71dd97b9451336c8.jpg[/img]
(source: http://historisches-marinearchiv.de/)
These were then used to evacuate Crete, but also in Norway, Italy, the black sea, Baltic sea ...
They were rather large with 49m length, 6.6m width, but had a shallow draft of 4 feet, which was their greatest advantage. Most allied torpedo's were functioning ok from a draft of 8feet, so the torpedo's malfunctioned or passed under the hull. With 10 knots they were rather slow and easy prey from the air. So Germans wouldn't be Germans if they hadn't a gr�ndliche solution for this, thus they made the Flaklighter, a heavily armed barge, that could withold itself with most foes at sea. It was armed with 2x 88mm or 105mm guns, 2x a 20mm flakvierling, 2x 20mm single guns and 1x a 37mm gun. These could all engage targets down to earth or in the sky (with exception of the 88mm/105mm guns)
[img]https://www.modelbrouwers.nl/media/cache/f7/2a/f72a09f3fc241f880a9aa54d14f9a56d.jpg[/img]
[img]https://www.modelbrouwers.nl/media/cache/c1/7d/c17d72428153da90361a29f781ca81d9.jpg[/img]
Frankly, the allies didn't love this, and at first it was a complete surprice. PT-boats were instructed to avoid a confrontation with these.
On to the kit:
Not that much in the box:
1 solid resin hull
[img]https://www.modelbrouwers.nl/media/cache/72/8b/728bd862928f7d690870985b89b69ae6.jpg[/img]
2x a 88 or 105mm gun emplacement, which I don't know yet if I will use them like this:
[img]https://www.modelbrouwers.nl/media/cache/3d/fc/3dfc51708d778c1f92c7edd942e48461.jpg[/img]
a bit PE:
[img]https://www.modelbrouwers.nl/media/cache/19/35/19359513404c20b71635a2ac74ab1b11.jpg[/img]
and a manual with different colour schemes:
[img]https://www.modelbrouwers.nl/media/cache/16/0f/160f9482beb7aff497cf764127907dd7.jpg[/img]
I've started slowly by adding some splinter shields at the aft. The shields that are casted in the kit are also provided in PE, don know yet if I will use these. I've soldered these first to ease the outlining on the hull (3 separate pieces to align and position at once...
[img]https://www.modelbrouwers.nl/media/cache/a2/c1/a2c121c3e6262746cd986c626856018c.jpg[/img]
[img]https://www.modelbrouwers.nl/media/cache/9d/80/9d80aeb87397915b2b39da42e4f698a1.jpg[/img]
and the first single 20mm gunmount has been assembled:
[img]https://www.modelbrouwers.nl/media/cache/36/c4/36c4115a9274d1e77d54aaa6bee6425a.jpg[/img]
[img]https://www.modelbrouwers.nl/media/cache/33/44/33442446ee6edc0c77d8aaa4f41a2247.jpg[/img]
I thickened the PE with solder to give it some more body, PE is rather flat it seems ;-)
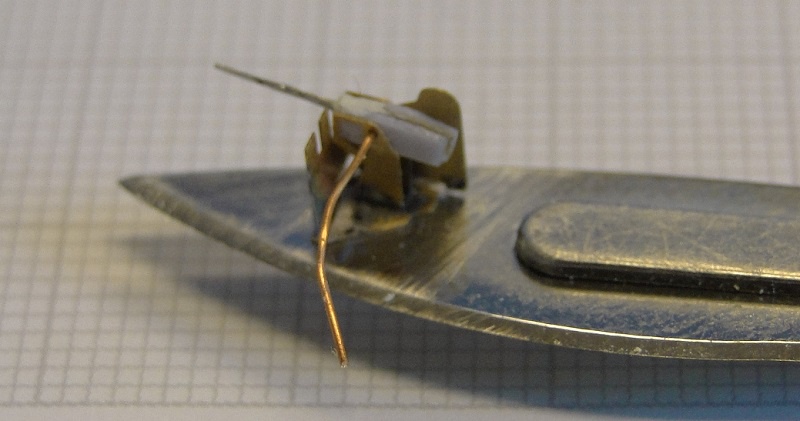
The 37mm is assembled (and moveable), but I'm still looking for pictures of this type of mount. I can't find any picture of it...
[img]https://www.modelbrouwers.nl/media/cache/7a/e9/7ae9baf25895a01dc2b02fd308380cc3.jpg[/img]
[img]https://www.modelbrouwers.nl/media/cache/0e/1a/0e1a1e4655dbc554f2cb07570967da42.jpg[/img]
I used paper, hardened with CA to make te body and solder to make the gun more round
Also the last splintershield has been soldered. i didn't intend to use it, but I don't think I will be able to paint the thing while in place:
[img]https://www.modelbrouwers.nl/media/cache/c8/81/c881f757cddff670bf9a26fec7bd9a79.jpg[/img]