by John M Johnsey » Fri Jun 20, 2014 5:38 pm
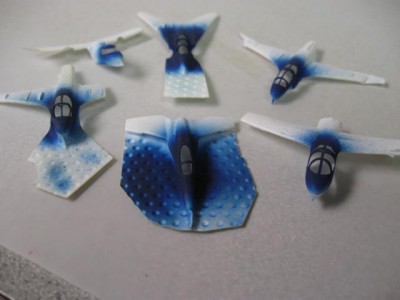
Ive had a couple of requests to explain my technique of painting aircraft canopies since my George Washington CVN 73 photos were just published here. This technique was for 1/350 aircraft but would work for any scale. The thought of applying hundreds of tiny decals to the air wing of a modern carrier just didn't seem the best way to go about this. There had to be a better, faster, cleaner, way to do this. What I came up with was to vacu-form a model aircraft and simply cut out the area of the canopy and then airbrush the canopy in. After the stencil is vacu-formed I take a #11 exacto blade and cut out the area of the canopy. The Tamiya aircraft have a simple raised or recessed line denoting the canopy which amazingly shows up on the vacu-formed sheet. It can be a little "fiddly" cutting it out (see helicopter photo) but just keep telling yourself you only have to do one. After its cut out air brush the canopy with the color of your choice. I choose blue but green, silver, or black would also look good. Don't spray a heavy coat as it might run under your stencil and it also looks better if the area is lightly covered. Sort of like a reflection. Good luck with yours.
- Attachments
-
-

Ive had a couple of requests to explain my technique of painting aircraft canopies since my George Washington CVN 73 photos were just published here. This technique was for 1/350 aircraft but would work for any scale. The thought of applying hundreds of tiny decals to the air wing of a modern carrier just didn't seem the best way to go about this. There had to be a better, faster, cleaner, way to do this. What I came up with was to vacu-form a model aircraft and simply cut out the area of the canopy and then airbrush the canopy in. After the stencil is vacu-formed I take a #11 exacto blade and cut out the area of the canopy. The Tamiya aircraft have a simple raised or recessed line denoting the canopy which amazingly shows up on the vacu-formed sheet. It can be a little "fiddly" cutting it out (see helicopter photo) but just keep telling yourself you only have to do one. After its cut out air brush the canopy with the color of your choice. I choose blue but green, silver, or black would also look good. Don't spray a heavy coat as it might run under your stencil and it also looks better if the area is lightly covered. Sort of like a reflection. Good luck with yours.