The Ship Model Forum
http://www.shipmodels.info/mws_forum/

Merit Yorktown Hull Plating "Fix" Photo Archive
http://www.shipmodels.info/mws_forum/viewtopic.php?f=12&t=158618
Page 1 of 3

Author:  MartinJQuinn [ Wed Jan 14, 2015 2:39 pm ]
Post subject:  Merit Yorktown Hull Plating "Fix" Photo Archive

Post your images of how you are fixing the overstated hull plating on the Merit CV-5 here.

Author:  rtheriaque [ Wed Jan 14, 2015 7:49 pm ]
Post subject:  Re: Merit Yorktown Hull Plating "Fix" Photo Archive

I apologize for the lack of pictures, but I'll get them in here soon. Maybe this can be a support group, too...

I started by drilling out portholes in the forward quarter on the starboard side. I'm a novice and removing later will be easier than adding back.

Thirty minutes of hard sanding have me a smooth area from just aft of the 5" galleries to the edge of the bow. Given the amount of time it'd take me to make a hull from scratch (roughly 250 years...), this seems like an okay bet.

I'm wet sanding under a constant stream from the faucet. I'm using hard foam as a backing for various grits of paper to prevent damage.

It's hard work, it's unfortunate that such a great kit requires such a silly fix (extra thanks for our resident extras for trying to dissuade Merit!), but there's a very nice hull hiding under a thin layer of bad plastic!

Author:  John W. [ Thu Jan 15, 2015 2:21 pm ]
Post subject:  Re: Merit Yorktown Hull Plating "Fix" Photo Archive

Starting down the second side having learned from the first side. It's going more quickly this side.. Here are some quick tips.
Sanding sticks are OK in some spots, but not in most. Use sanding shapes that mirror the area being sanded. I use some black rubber shapes that are convex and concave.
I start sanding in the center of the raised area first in areas that are concave using the convex (mirror) sanding shape. After the center thickness is reduced, I work toward the edge of the raised area. Just remember the plate is not flat if it is on a convex or concave part of the hull. Using a flat sandi;ng stick will not give you the correct shape without a lot of work.
I am starting with 150 grit and getting close, then stepping down to finer grits.
As you work, sight down the length of the hull. It should always be smooth with no bumps or valleys. Keep looking at it frequently so you don't create problems. Hull lines are always smooth and flowing.
By doing the above, I am going about twice as fast as the first side. The key is using the shapes under the sandpaper, not flat sticks, in the right spots. I don't recall where I got them, but I got a whole range of them when I scratch built my HORNET hull.

Author:  John W. [ Thu Jan 15, 2015 4:26 pm ]
Post subject:  Re: Merit Yorktown Hull Plating "Fix" Photo Archive

Just to add, Google "tadpole sanding grips" and you'll see the rubber sanding tools to which I refer. They are pretty inexpensive and work really well on surfaces with lots of compound curves like this hull.

Author:  rtheriaque [ Sat Jan 17, 2015 7:40 pm ]
Post subject:  Re: Merit Yorktown Hull Plating "Fix" Photo Archive

Pictures tomorrow...

I'm about 95% done. There's really no trick that worked for me- just a brute force approach.

There's a nasty sink in the bow that brings the plating sub-flush. That'll require some putty to bring level.

The area around the platform supports is impossible to sand clean without damaging the supports. Plan on replacing them. I cut them off and saved them as templates.

The stern is particularly annoying as the plating gets thicker and wider. I ended up working this area by hand- no tool supports for the paper.

There's a slight flare outward about an eighth of an inch below the top of the hull. Make sure not to sand this flush as you bring that plating down.

Use primer as you get close. As you've brought the plating down the plastic will show lighter in those areas. It'll fool you into seeing an uneven surface where one doesn't exist.

Most importantly... The biggest mistake I always see with sandpaper is foolish economy. Don't try to get the last bit out of every piece. Change often and save yourself the effort. The stuff is cheap- cheaper than your time or effort.

Author:  rtheriaque [ Sun Jan 18, 2015 8:40 pm ]
Post subject:  Re: Merit Yorktown Hull Plating "Fix" Photo Archive

Okay, so long promised...

I hit it with a glosscoat to try to pick things up.

As I said in my last post, my technique was nothing but brute force.

I used some putty in a few areas to smooth transitions where I couldn't cut plastic. I used Mr. Surfacer 1000 to smooth out any areas where I couldn't obliterate my cut marks.

I'm ecstatic I finally have a hull for a 1/350 CV-6 at Midway. My excitement knows no bounds at all after all the pain of the Trumpeter Hornet release.

I went through some spells of irrational anger at whoever applied the hull plating. As somebody that does design work in 3D, it's easy for me to understand what was done (flat plating profile applied on the flat surface). I still got pretty badly tweaked as I sanded. And sanded. And sanded.

I wish I had a trick, but I don't. Only pitfalls. I nearly blew away one of the shaft exits and had to rebuild it. The outboard props are in an unfortunate area as related to the bilge keel and the plating- they're easily toasted if you aren't paying attention. I wasn't, apparently.

Take your time, sand under a water stream, and change your paper more frequently than you should. Apply putty where you can't make the lines disappear. Apply putty at the bow sink (apologies for no picture).

Try to have fun- the good part is ahead of me now, right? Right? ...?

Attachments:
File comment: Overall
IMG_7861.JPG
IMG_7861.JPG [ 89.39 KiB | Viewed 5039 times ]
File comment: Starboard bow quarter
IMG_7862.JPG
IMG_7862.JPG [ 77.51 KiB | Viewed 5039 times ]
File comment: Port stern quarter
IMG_7863.JPG
IMG_7863.JPG [ 75.88 KiB | Viewed 5039 times ]
File comment: Port bow quarter
IMG_7864.JPG
IMG_7864.JPG [ 77.73 KiB | Viewed 5039 times ]
File comment: Starboard stern quarter
IMG_7865.JPG
IMG_7865.JPG [ 78.05 KiB | Viewed 5039 times ]

Author:  Devin [ Sun Jan 18, 2015 8:44 pm ]
Post subject:  Re: Merit Yorktown Hull Plating "Fix" Photo Archive

Very nice. Now that looks proper. Good to know that while there's a lot of work involved, it is possible, and a damn sight easier to correct than the Trumpeter hull.

Thanks for sharing.

Author:  Tracy White [ Sun Jan 18, 2015 8:46 pm ]
Post subject:  Re: Merit Yorktown Hull Plating "Fix" Photo Archive

rtheriaque wrote:
I'm about 95% done. There's really no trick that worked for me- just a brute force approach.


A downed tree and power outtage (no way to get out) gave me the motivation (and more importantly, time - it's amazing how many honey dos require power! :big_grin:) to work on this and my port side is 95% done. Just using coarse sanding sticks for now - the trick, as was mentioned earlier, is to use shapes and to think about how you are "carving" as you sand. Don't just lay it down and move it back and forth. Keep a mental image of what you want that surface to do and what you need to focus on to get it to that point.

rtheriaque wrote:
There's a nasty sink in the bow that brings the plating sub-flush. That'll require some putty to bring level.


Same experience on mine. It's maybe a dime in size.

rtheriaque wrote:
The area around the platform supports is impossible to sand clean without damaging the supports. Plan on replacing them. I cut them off and saved them as templates.


This is literally the case unless you are absolutely amazing with filler. The strake line is right where the bottom of the middle supports end.

rtheriaque wrote:
The stern is particularly annoying as the plating gets thicker and wider. I ended up working this area by hand- no tool supports for the paper.


The stern was a bit easier for me as it was convex - the concave sections gave me the most trouble due to the sanding sticks I used. Will be looking for rubber shapes before the opposite side!

rtheriaque wrote:
Most importantly... The biggest mistake I always see with sandpaper is foolish economy. Don't try to get the last bit out of every piece. Change often and save yourself the effort. The stuff is cheap- cheaper than your time or effort.


When I was younger I worried about going too far, or creating deep scratches that would take effort to remove. Holy crap that takes too long! Go coarse and whack it down faster - we have thin fillers now that can take those deep scratches out quickly.

Author:  TOMLABEL [ Sun Jan 18, 2015 9:24 pm ]
Post subject:  Re: Merit Yorktown Hull Plating "Fix" Photo Archive

Congratulations!!!

And thank you for posting your pics!! I too noticed the sink spot on both sides of the bow, but only after I was in the process of sanding it. It seems that it is hidden with the hull plating in place.

I'm about 30% done as I have sanded the the complete bow from hangar deck catapult support forward but will now focus on one side at a time. Thanks for the info on the supports.

I appreciate all the things you mentioned to look out for and you pics show me what the end result will look like!!!! Until you posted those, I was hoping I was not creating a disaster by sanding it!

TOMLABEL

Author:  rtheriaque [ Sun Jan 18, 2015 9:36 pm ]
Post subject:  Re: Merit Yorktown Hull Plating "Fix" Photo Archive

To be clear...

I'm the least modeler among you guys- a kit assembler at best. You guys will do it better, cleaner, and smoother. I appreciate the praise, but just wait for the pros!

Author:  Tracy White [ Sun Jan 18, 2015 9:45 pm ]
Post subject:  Re: Merit Yorktown Hull Plating "Fix" Photo Archive

Don't sell yourself short. There's a lot of builders who are so afraid of "ruining" a kit that they would never even start such a project such as this. A lot of "pros" are simply people who said, "I bet I can do this...."

Author:  TOMLABEL [ Sun Jan 18, 2015 10:09 pm ]
Post subject:  Re: Merit Yorktown Hull Plating "Fix" Photo Archive

Tracy White wrote:
Don't sell yourself short. There's a lot of builders who are so afraid of "ruining" a kit that they would never even start such a project such as this. A lot of "pros" are simply people who said, "I bet I can do this...."


I echo this as well!!!

TOMLABEL

Author:  JTninja [ Mon Jan 19, 2015 2:22 am ]
Post subject:  Re: Merit Yorktown Hull Plating "Fix" Photo Archive

Great job. It seems im the only person will leave the hull as is (have to build oob), but is nice to see an excellent hull with a little bit of work (whereas with the Trumpeter Hornet you literally had to move mountains..). Ill be doing it when I build a CV-6 next.

Just a heads up though, some of the island P/e might be a little difficult, like the small enclosures. Once bent into shape, gaps are noticeable and will most likely need to be filled in..

Author:  John W. [ Mon Jan 19, 2015 8:28 pm ]
Post subject:  Re: Merit Yorktown Hull Plating "Fix" - Knuckle Down!

Tracy White wrote:
Don't sell yourself short. There's a lot of builders who are so afraid of "ruining" a kit that they would never even start such a project such as this. A lot of "pros" are simply people who said, "I bet I can do this...."


+1 !

Absolutely a great start and a good job. Jumping off the cliff can be hard sometimes. Good for you!

For those not wishing do go to this amount of effort, your kit will still build into a fine model. Do what pleases you. You probably could skip the remainder of my post below as well.

Sorry not to post sooner, I've been out of town for over a week and was not able to post pictures, just text.
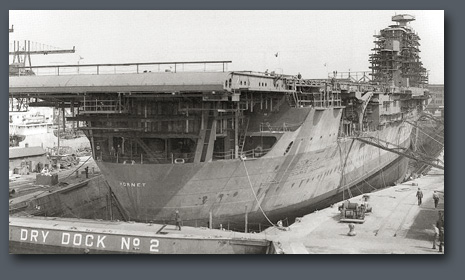
For anyone who's going to the effort to do this, here are a couple more things to at least consider. When you get the hull smooth by removing the oversized plating, you have done a lot of work. There are a couple more things to consider - at least, I think are worth considering - once you have gotten this far. There are some distinctive features of the YORKTOWN hull you can add which will enhance the look and bring it even closer to the real ship. There are a couple of knuckles in the hull which are prominent and add to the character of the hull. One occurs where the shell plating under the aft 5" platforms meets the hull at the main deck / hangar deck level. Full disclosure - the first two pictures are taken of my HORNET hull in-progress. I have gotten close on my Merit YORKTOWN, but not to this point quite yet because of my travel.

Attachment:
pre-paint 004.JPG
pre-paint 004.JPG [ 17.87 KiB | Viewed 4941 times ]

The knuckle is visible in this picture. Look at navsource's photo gallery for all the YORKTOWNs for additional pix.


Attachment:
Pre-paint hi res 2.JPG
Pre-paint hi res 2.JPG [ 41.6 KiB | Viewed 4941 times ]

There is also a knuckle halfway down the forward 5" platform shell plating at the focs'l deck level, half the length of the platform. It can be seen in this model photo, and in some ship photos when the sun angle is right. Trust me (or don't), it is there on the real ship and in the plans (MD Silver).


Attachment:
HORNET stern comp.jpg
HORNET stern comp.jpg [ 44.92 KiB | Viewed 4941 times ]

One final thing. As this picture shows (HORNET in drydock), the hull is actually concave under the aft 5" gun platforms. The red line in the picture shows, somewhat exaggerated, the concave curve, the knuckle, and the shell plating angle just below the platform.

How do you get these features in a smooth hull? Use sanding forms for the sandpaper that have fairly large radii and carefully sand the features into the plastic hull. I have used a piece of 4" PVC pipe, maybe 20 degrees of the full circle (as viewed from the end) and two inches long along the length of the pipe to get a wide radius convex sanding surface. The plastic model hull is thick enough to do this and provide a very good representation. Proceed carefully. Hold the hull up to a bright light frequently and look inside it so you can see if the hull is getting too thin before it's too late. Depending on how thin you sand it, you can laminate a piece or two of Evergreen 0.020 plastic inside to reinforce the area without distorting your work.

As far as the sink area in the bow, I am planning to push in a tapered plastic wedge into the void on the inside to push the hull outward at that point. This will also make it easier to thin the stem really thin. This is a theory right now until I actually do it. I'll report back when I do. Paul B used a good analogy in the 'April Fool's' CV-5 thread - the hull should resemble a hollow-ground knife blade at the bow. In other words, with the hull laying on the table and bottom side up toward you, the actual waterline as seen from that perspective (looking directly down on the bottom) is a very long and thin wedge which is slightly concave inward as you move from bow toward midships. I emphasize the 'slightly'. The Merit hull is really good as is, but I plan to make the cutwater thinner and sharper than it is. I theorize the wedge inside will make the stem area more rigid and give me more thickness to sand into.

Author:  rtheriaque [ Tue Jan 27, 2015 4:53 pm ]
Post subject:  Re: Merit Yorktown Hull Plating "Fix" Photo Archive

Continuing to refine my hull... Another note- there's a vertical strake adjacent to the hawse pipe. It's a difficult area to get clean without damaging the detail. Many modelelers are comfortable scratching this area- I am not. Just a total PITA.

Quick note to John W- a wedge will not fix this area. The sink is in a solid area of plastic. Indeed, that's its cause- uniform plastic thickness is a must to prevent sink in injection molding. There's no way to get steel in this area, so the plastic thickness suddenly doubles where the two sides of the hull meet. Putty is probably the only option here.

Author:  pbudzik [ Wed Jan 28, 2015 10:17 am ]
Post subject:  Re: Merit Yorktown Hull Plating "Fix" Photo Archive

While you're cleaning up the hull, you will also have to get rid of this...

Image

Not having the kit, I can't tell if it is part of the deck or what, but it has no business there.

Image

Paul

Author:  rtheriaque [ Wed Jan 28, 2015 10:21 am ]
Post subject:  Re: Merit Yorktown Hull Plating "Fix" Photo Archive

I think that's how they're representing the degaussing cable. It's a separate part, not integral to the hull.

Author:  Devin [ Wed Jan 28, 2015 10:22 am ]
Post subject:  Re: Merit Yorktown Hull Plating "Fix" Photo Archive

Correct. Just leave those pieces off, as it is over scale. That's something we tried to get them to do in PE.

Author:  pbudzik [ Wed Jan 28, 2015 10:23 am ]
Post subject:  Re: Merit Yorktown Hull Plating "Fix" Photo Archive

Thanks Devin and rtheriaque

Author:  sirpaul [ Fri Feb 06, 2015 9:35 pm ]
Post subject:  Re: Merit Yorktown Hull Plating "Fix" Photo Archive

Can't wait to get one. Really looks great and the fixes should be a piece of cake.

Page 1 of 3 All times are UTC - 6 hours [ DST ]
Powered by phpBB® Forum Software © phpBB Group
https://www.phpbb.com/