The Ship Model Forum

The Ship Modelers Source
It is currently Tue Apr 23, 2024 9:28 am

All times are UTC - 6 hours [ DST ]


Post new topic Reply to topic  [ 385 posts ]  Go to page Previous  1 ... 6, 7, 8, 9, 10, 11, 12 ... 20  Next
Author Message
PostPosted: Sun Oct 17, 2021 2:20 pm 
Offline
User avatar

Joined: Wed Sep 28, 2011 12:04 pm
Posts: 1820
Location: Paris
Thanks for the kind words !

Constantly hunting for better materials, I checked on Strathmore paper, but it seems to be brand with many different types of papers. What kind of paper did you actually use ?

Incidentally, paper is not necessarily my favourite material, as one cannot really sand it, it tends to become fuzzy. I did not try to impregnate it with CA though yet. Perhaps this works better than the lacquers I used so far. The reason, I used paper is that this is what my small laser-cutter can cope with.

_________________
Eberhard

Former chairman Arbeitskreis historischer Schiffbau e.V. (German Association for Shipbuilding History)

--------------------------------------------------------------------------------------------------------------------------------------------------------------------------------------------

Image Image Image Image


Report this post
Top
 Profile  
Reply with quote  
PostPosted: Sun Oct 17, 2021 8:53 pm 
Offline

Joined: Wed Jan 02, 2013 1:15 am
Posts: 5012
I used "Bristol Board", it has a smooth surface. The main difference in their papers other than weight are the surfaces. Back in the day, it was a favorite of model railroaders. Thinner papers can be coated with CA which soaks in and makes a useable model material.

Best regards! Tom


Report this post
Top
 Profile  
Reply with quote  
PostPosted: Mon Oct 18, 2021 2:35 am 
Offline
User avatar

Joined: Wed Sep 28, 2011 12:04 pm
Posts: 1820
Location: Paris
Yes, Bristol board makes a good material for straight surfaces, such as railway carriage or building walls. However, I found it to be difficult to work with, when you have to simulate iron or steel panels. It is never as smooth as the various plastics and exposed edges are problematic.

I am not a great friend of CA. Not in principle, but the maintenance of the bottles is a pain. Perhaps I should indeed try to impregnate the paper with with it and see how it works then.

_________________
Eberhard

Former chairman Arbeitskreis historischer Schiffbau e.V. (German Association for Shipbuilding History)

--------------------------------------------------------------------------------------------------------------------------------------------------------------------------------------------

Image Image Image Image


Report this post
Top
 Profile  
Reply with quote  
PostPosted: Mon Oct 18, 2021 7:34 am 
Offline

Joined: Wed Jan 02, 2013 1:15 am
Posts: 5012
I have used this material a lot for such curved items as gun tubs as it can be made to take a set whereas styrene seems to keep wanting to uncurl. Perhaps this is a result of inadequate technique on my part? It does have decent archival qualities, I have some 60 year old models without deterioration. If it were available I would probably use it more, but the closest hobby store is a 600 Km drive. On Alaska I used all styrene and plexiglass but have replaced a couple of styrene items that did not like to take and keep the desired curves with 3D printed items. Of course the longevity of these cured resin items is currently unknown to me. Another item which I have use rdsucessfuly is aircraft aluminum. Again a result of having it available at the time of construction. The hull of my LSM is about 90% Aluminum.

You have achieved a good mastery of your materials. I can see where Bakelite might be interesting, though not something I have encountered outside of items produced circa WWII.

A worthy goal to achieve a level of detail found at a larger scale. Perhaps I aspire to do this in the 1:120 scale. It's a little oddball and people pointed out that virtually no aftermarket parts were available, but to some extent that is the point. I like it as a user of imperial units as 0.1 inch=1 foot so my handy calipers which read either in mm or inches, can read off feet without conversion. The irony is that I am designing and building using mm for 3D printing.

It is obvious that you enjoy the challenges and it is inspiring!

Best regards: Tom


Report this post
Top
 Profile  
Reply with quote  
PostPosted: Mon Oct 18, 2021 9:01 am 
Offline
User avatar

Joined: Wed Sep 28, 2011 12:04 pm
Posts: 1820
Location: Paris
The archival qualities of Bristol board from reputable sources was one reason why I ventured into its use and also that some people have used it successfully.

For parts with rotational symmetry I would use the lathe and develop it from the solid or a suitable tube perhaps. There are limitations imposed by the capacity of the lathe of course and also what kind of material you can lay your hand on. The half-round casemate wall was made from a tube I wound from Bristol board glued with PVA glue - I just didn't have any other suitably sized material at the time.

UV-curing resins are likely to be quite long-term stable, as they normally do not contain plasticers. However, it depends a bit on the polymer-mixture they used. In general and to my knowledge, they are acrylic resins and acrylics are know to be stable. I have some pieces of Plexiglas-sheet (my father worked at one of their daughter companies) of which I know that they are at least 60 years old and they look like new. I have seen WW2 aircraft canopies in Plexiglas that are also in good shape.

We have Bakelite artefacts that are at least 120 years old and they are in good shape. All so-called duroplastics are likely to be long-term stable, which is one of the reasons, why I chose it as building material. The other reason is that it is harder and stiffer than styrene.

Many polymeric plastics have a certain 'memory', i.e. they have the tendency to return to their original shape when formed cold. This memory-effect often can be eliminated by 'tempering' the part, i.e. by keeping it at certain temperature (depends on the material) for some time until the polymer-chains had time to relax and re-adjust themselves. Not doing this can lead to so-called stress-corrosion, i.e. fine-fissures, that eventually can lead to failure.

I chose the 1:160 scale, because it is a popular model-railroad scale and you can easily get figurines. The same would apply to the 1:120 scale, which is the TT model-railroad scale (I gather it was never very popular, but in Germany there are various manufacturers catering for it).

_________________
Eberhard

Former chairman Arbeitskreis historischer Schiffbau e.V. (German Association for Shipbuilding History)

--------------------------------------------------------------------------------------------------------------------------------------------------------------------------------------------

Image Image Image Image


Report this post
Top
 Profile  
Reply with quote  
PostPosted: Tue Oct 19, 2021 12:53 am 
Offline

Joined: Wed Jan 02, 2013 1:15 am
Posts: 5012
Thank you for the good information! This is one of the very professional aspects of this forum. Yes I have often laminated or otherwise constructed items from Strathmore using PVA glue. It make a joint with initial good tack which can be useful. Your ability to make the inclined ladders with Bakelite is undoubtedly superior compared to my paper ones. With the 3D I can include the small lightening holes in the side of the rails and also print the rails, which were always an adventure to correctly shape and solder from brass wire. I went back on the PAA and removed almost all the existing ladders I was always amazed that Song built his 1:200 ladders from wood! I see in his latest project he as incorporated both some PE and use of Styrene. As a superb craftsman his adaption to new materials has been spectacular.

One has to avoid as much as possible the measure with a micrometer, draw with a crayon and cut with a Chainsaw that can be an inevitable progression. Pascal has stayed with the 3D medium, which avoids some of these pitfalls, but comes with other limitations.

My modeling, technique and enthusiasm benefits from the international input here.

Kindest regards: Tom


Report this post
Top
 Profile  
Reply with quote  
PostPosted: Sun Oct 24, 2021 7:34 am 
Offline
User avatar

Joined: Wed Sep 28, 2011 12:04 pm
Posts: 1820
Location: Paris
More Paintwork

According to the 1874 ordinance on paintwork, the ships were to have a white boot-topping stripe and a somewhat narrower white stripe just below the main rail. This scheme is clearly visible on the old photograph shown in the previous post. At that time also all the scroll-work was to be painted in a sober white, rather than the ochre/gold of later paint-schemes.

Image

It occurred to me that the easiest way to apply the white stripes on such a small model would be to cut narrow strips of white decal sheet and to place them appropriately. However, the latter part resulted in a lot of stress, fumbling and cursing. These long, narrow strips needed a lot of coercing and touching up with white acrylic in places. As I do not work with decals very often these days, I did not have any decal-softener to hand, which might have made this operation somewhat easier. In the end, the strips had to fixed additionally by infiltrating dilute satin varnish underneath them with a brush. In order to blend everything together, the hull then was given a coat of satin varnish. Perhaps the Prince August Air varnish was too viscous still for the air-brush, but when sprayed on it turned out rather matt and made the hull grey! Brushing on another thin layer got me over the shock moment.

Image

Perhaps it would have been easier to air-brush everything in white and then cut a narrow strip of Tamiya masking tape to mask the area of the white stripes and also to mask strategically for painting the hull in red and black …

The scroll-work at the bow and stern then was picked out in white acrylics using a spotter brush and a (reasonably) steady hand.

Image
Wooden decking for the barbette and the forecastle.

I also painted the only two pieces of wood decking on this ship, namely that on the forecastle with the distinct radial plank pattern (to minimise blast damage from the heavy gun) and within the barbette. The planks had been engraved a long time ago already with a hand-graver. The pieces were given a base coat of Prince August 77 (bois-wood) with the air-brush. This was followed by a light wash of 834 (bois transparent), which has a slightly lighter tone, applied with a flat hair-brush. Some planks were given another light wash of Vallejo 71.074 (beige) with a small brush. The planks then were followed with 0.05 mm black pigmented ‘fine-liner’. The excess was immediately wiped off with a clean finger-tip. In this way a narrow to scale seam remains.

Image
Forecastle deck put into place temporarily.


To be continued ....

_________________
Eberhard

Former chairman Arbeitskreis historischer Schiffbau e.V. (German Association for Shipbuilding History)

--------------------------------------------------------------------------------------------------------------------------------------------------------------------------------------------

Image Image Image Image


Report this post
Top
 Profile  
Reply with quote  
PostPosted: Sun Oct 24, 2021 10:16 am 
Offline

Joined: Wed Jan 02, 2013 1:15 am
Posts: 5012
The coloration of the planking has worked very well! The non porosity of the surface has allowed uu to apply and wipe the tarred lines between the planks.

Cheers: Tom


Report this post
Top
 Profile  
Reply with quote  
PostPosted: Sun Oct 24, 2021 11:05 am 
Offline
User avatar

Joined: Wed Sep 28, 2011 12:04 pm
Posts: 1820
Location: Paris
... it would have been even better to apply a coat of gloss paint in that respect, but I didn't mind a bit of smear for added realism.

_________________
Eberhard

Former chairman Arbeitskreis historischer Schiffbau e.V. (German Association for Shipbuilding History)

--------------------------------------------------------------------------------------------------------------------------------------------------------------------------------------------

Image Image Image Image


Report this post
Top
 Profile  
Reply with quote  
PostPosted: Sun Oct 24, 2021 2:50 pm 
Offline

Joined: Wed Jan 02, 2013 1:15 am
Posts: 5012
Perhaps your current surface allowed a good adherence of the fine line ink! Always compromises. I haven't done any of this in a half century, but I used to make HO scale buildings from Strathmore papers, using scoring for planks and various techniques such as watercolors etc to construct weathered buildings, to quite good effect. Part of the charm of the RR scenarios was the weathered seediness and disrepair, that would be uncommon for any warship. For the APA before I got into 3D printing, I made various ventilators and fan hoods by sawing and shaping wooden forms from basswood and then laying a thin cotton bond type pair ofer a CA saturated surface, the soaking with more CA. This presented a quite nice surface that responded well to wet sanding with very fine papers, producing a very good surface for paint.

The techniques you are using produce first rate results and appear to be the result of considerable ingenuity and experimentation! Certainly some of the laser techniques offer precision.

Best regards! Tom


Report this post
Top
 Profile  
Reply with quote  
PostPosted: Mon Oct 25, 2021 2:46 am 
Offline
User avatar

Joined: Wed Sep 28, 2011 12:04 pm
Posts: 1820
Location: Paris
You are right, that a glossy surface would provide less key to the ink. However, I actually slightly re-ran the 'seams' with a graver before in order clean out the paint and better define them.

I like to experiment with new materials and new procedures in order to obtain the appearance I am looking for.

The deck is a piece of 0.4 mm thick bakelite paper. This material is stiff and sands well, but the edges of the engraved lines have a slight tendency to chip, as the phenolic resin is rather brittle. Most of the chipping could be smoothed out by rubbing the bakelite after engraving with fine steel-wool.

I am trying to get hold of some 0.5 mm thick black styrene, which doesn't seem to be so easy. Thicknesses of 1 mm and above are not a problem, but the deck-planks are only 7 to 8 cm thick, which translates to 0.4 to 0.5 mm on the model. If I succeed, I may make a new variant of the deck by first engraving the seams, painting it and then re-running the engraved lines in order to reveal the black styrene underneath. One probably has to leave the acrylic paint to cure very well, otherwise it might have the tendency to rip out in shreds. Using one of those hooke-engraving tools (which actually are dentists' scale scrapers) might be better, than the engravers' graver that I normally use - sheet styrene is so soft that such graver would dig in.

_________________
Eberhard

Former chairman Arbeitskreis historischer Schiffbau e.V. (German Association for Shipbuilding History)

--------------------------------------------------------------------------------------------------------------------------------------------------------------------------------------------

Image Image Image Image


Report this post
Top
 Profile  
Reply with quote  
PostPosted: Mon Oct 25, 2021 7:55 am 
Offline

Joined: Wed Jan 02, 2013 1:15 am
Posts: 5012
Yes, using a black styrene would do a good simulation of the tarred lines. I know that such material is in existence, Hank Stub had some, but I don't know of what thicknesses. The Bakelite is an interesting material, I don't think I have ever seen sheets of this, though undoubtedly it is available somewhere. It was in use during WWII for various items and that would be my memory of it. A hard surface and brittle would be my impression. I can see where it would be suitable for your machining techniques. The plexiglass and styrene are not so good for this as they tend to melt even when being sawed. With my scroll saw or band saw, I will make items from sheet plexiglass which I have left over from photo framing. The tower and stack on Alaska were made from plexiglass. However it is necessary to use a lubricant to saw any but very short cuts.

The scribing of the radial pattern on your foredeck required some precision to achieve regularity! Nice work!

Tom


Report this post
Top
 Profile  
Reply with quote  
PostPosted: Mon Oct 25, 2021 9:03 am 
Offline
User avatar

Joined: Wed Sep 28, 2011 12:04 pm
Posts: 1820
Location: Paris
I have a certain affinity for Plexiglas, as my father worked for their pharmaceutical daugther company (using acrylics for various medical applications) and I had easy access to this material then. I also got their full technical manual on how to work with Plexiglas.

Essentially, one better uses woodworking tools than metalworking tools because the more acute cutting angle causes less strain and therefore less heat build-up. One has to run saws quite slowly or advance the material slowly - Plexiglas conducts heat poorly and when too much material is removed per cut it tends to melt. One can cool using water or air. In professional applications, when high transparency is required, the machined parts are tempered in an oven to remove heat-stress - otherwise fine cracks can develop, which is called stress corrosion.

Plexiglas turns very well, but the swarf is messy, as it becomes eletrostatically charged.

Indeed, the melting point of styrene and its heat conductivity are low, so it does melt quickly and is not really suitable for machining.

Plexiglas and styrene can be glued or rather welded together quite effectively, as both respond to the same solvents, namely dichloromethane (which is usually a major constituent of liquid plastic cement).

I went to bakelite because it is long-term stable, not containing plasticisers, and available down to thicknesses of 0.2 mm (e.g. as electrical insulation). Plexiglas is also long-term stable, but not available in thicknesses below 0.8 mm.

_________________
Eberhard

Former chairman Arbeitskreis historischer Schiffbau e.V. (German Association for Shipbuilding History)

--------------------------------------------------------------------------------------------------------------------------------------------------------------------------------------------

Image Image Image Image


Report this post
Top
 Profile  
Reply with quote  
PostPosted: Tue Oct 26, 2021 4:44 pm 
Offline
User avatar

Joined: Mon Jan 10, 2005 5:30 pm
Posts: 5386
Location: Nr Southampton England
EXCELLENT progress !

white paint is indeed a cruel mistress...-- but yours looks good in that scale

apropos...

" >>>the easiest way to apply the white stripes on such a small model would be to cut narrow strips of white decal sheet and to place them appropriately. <<<

i would not trust myself to have sufficient skill or sharp enough blades
to cut a PERFECT and EXACT white strip decal sheet--

so...- I cheat...( Ok I call it... a refinement...!)

ergo...--

I have a refinement on that... I place on the hull at correct t level a WIDE white strip of white decal stripe

( German firm TL decals--by far and away the best--only ONE edge has carrier film beyond the colour
--this is important--see below!)

--and get is sharp, straight and then varnish it to seal ( this is essential! )

once dry

I apply another decal-- but in red/ green etc over the white

I do this on 1/700 models and the layers are sooo thin

NO ONE can see it and it is razor sharp.

and it works well !

Image

Image

Image


Image

Image

same method in 1/350....

Image

_________________
....I buy them at three times the speed I build 'em.... will I live long enough to empty my stash...?
http://www.modelshipgallery.com/gallery ... index.html

IPMS UK SIG (special interest group) www.finewaterline.com


Report this post
Top
 Profile  
Reply with quote  
PostPosted: Sun Oct 31, 2021 11:50 am 
Offline
User avatar

Joined: Wed Sep 28, 2011 12:04 pm
Posts: 1820
Location: Paris
Thanks Jim, for the idea with the layered decals. Haven't thought about this. I though about these German decals, but their lenghts were too short for this model and my original intention was to apply them full length, hence the white decal sheet. Now it is done, but I will sort this layered decal idea into my mental drawers for such tips
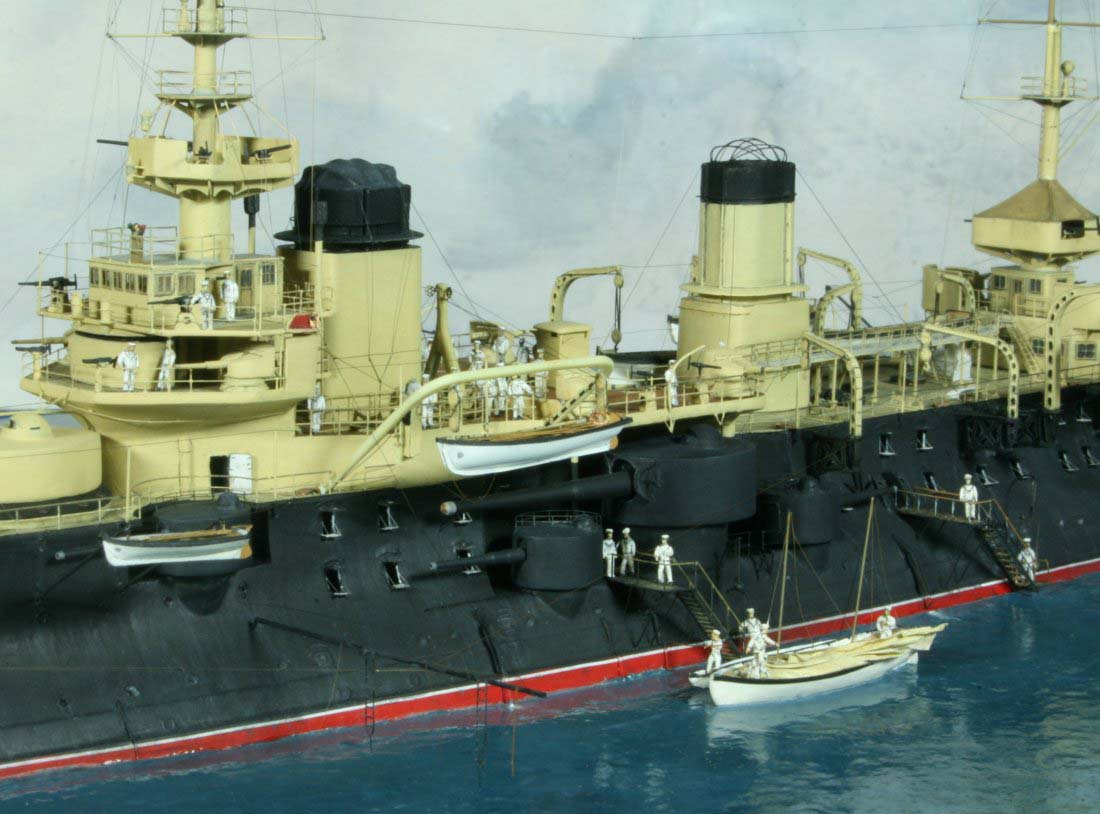
 :wave_1:

*******************************************

Kitting out the deck

Painting the various parts takes quite a bit of time. Some parts can be spray-painted, while other parts need to be brush-painted because either they are difficult to mask for different paints or because the parts are too delicate for this.

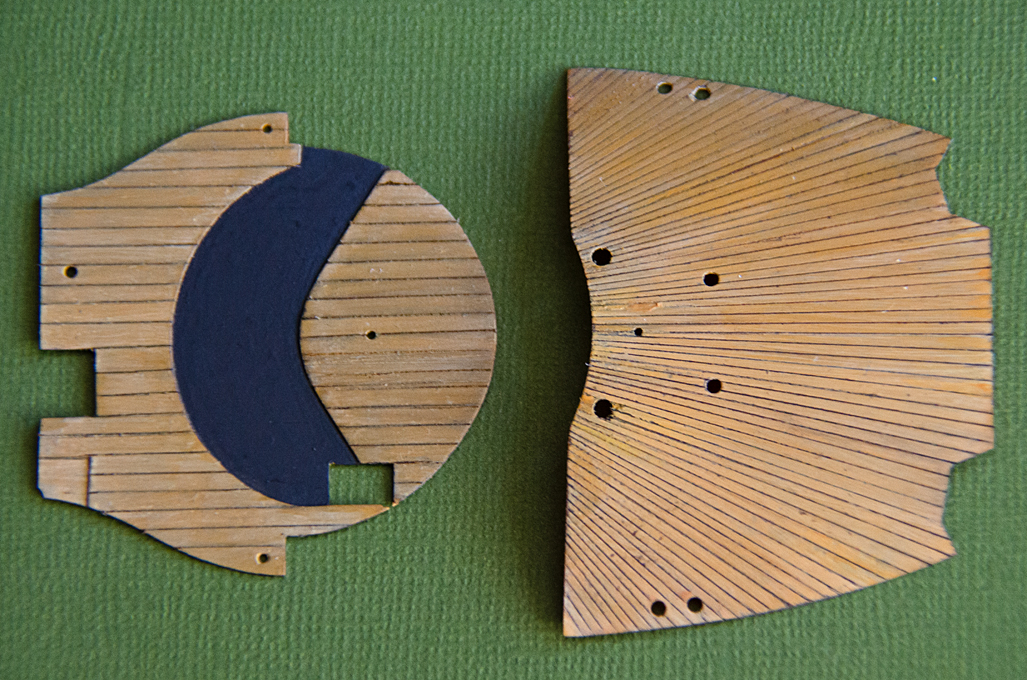
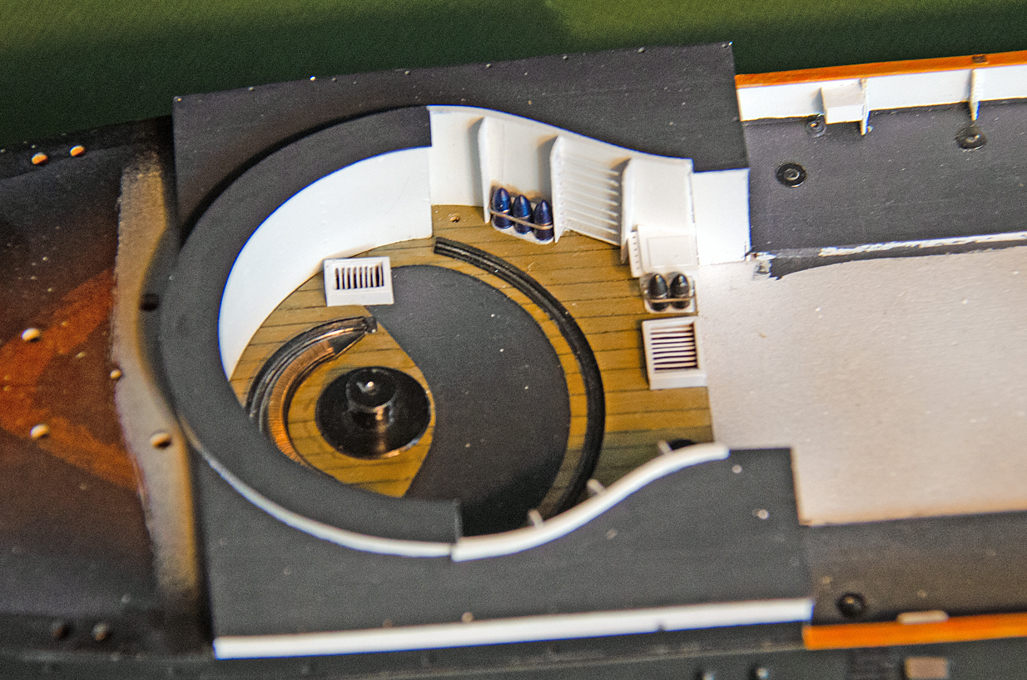
The deck of the barbette was fitted with the pivot, races for the gun and the rack that is used in training it. These parts were made a long time ago. The races are turned from steel, because I always think nothing looks like metal as real metal. Although, the races were probably rolled iron (like railway tracks), they looked to bright. So they were painted black all over and then the areas that likely show wear from the rollers of the lower carriage were rubbed with a lead pencil. In some areas also the paint come off again. Overall this gives the races a used look. The toothed rack was bronze and hence was made from bronze.

There is also the lid of the opening through which the powder-charged was man-handled up from the powder-chamber beneath.

Image
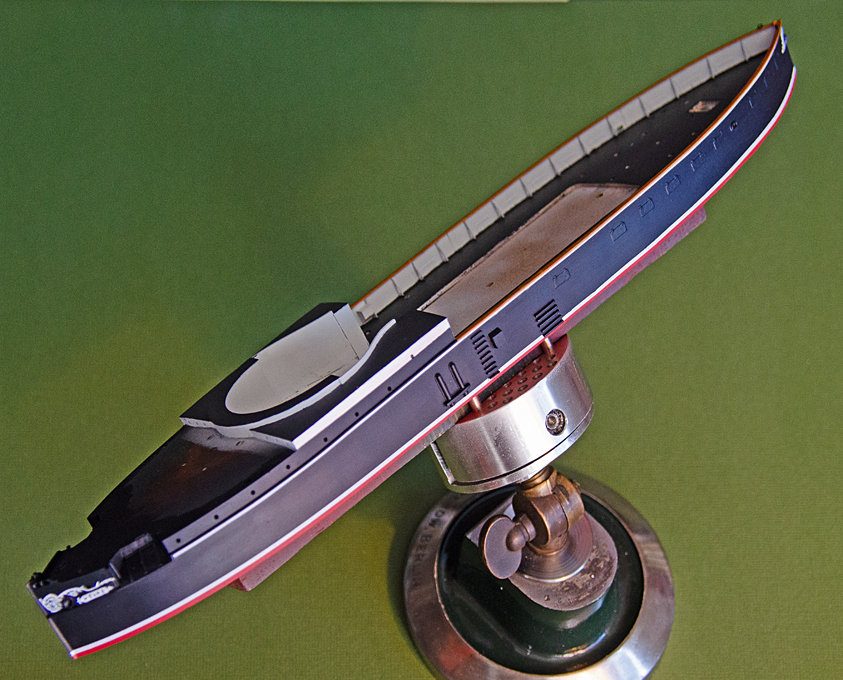
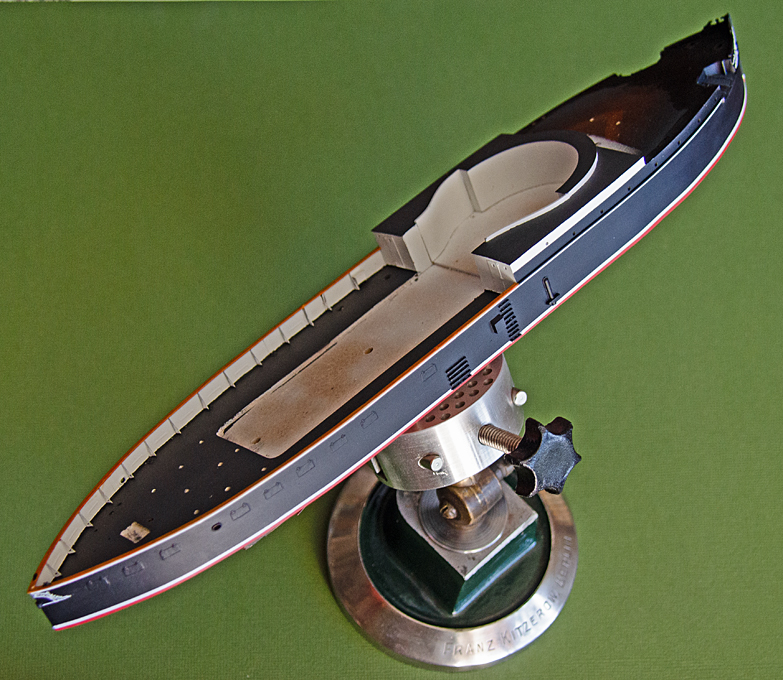
Deck for the barbette with pivot and races for the gun installed

The rear deck was fitted with the brass skylights that illuminated the quarters of the officers and other rooms. These were like portholes, but not moveable and had thick glass inserts. On the underside the inserts were shaped as multifaceted pyramids to collect and distribute the light from the deck above. The brass insert were turned and the glass simulated by pushing the brass parts into a drop of Acrifix 192 on a piece of smooth aluminium foil. The bright side of the aluminium-foils imparts a glass-like finish to the cured Plexiglas glue disc. I left the brass bright for a bit of contrast and interest to the deck. At the moment it looks to ‘model-like’, but over the years the brass will dull by oxidation to a more realistic colour and sheen – though I have no information on what they really looked like at that time. The glasses presumably dulled with time by the crew walking over them. It might have been better to imitate with a drop of white glue instead.
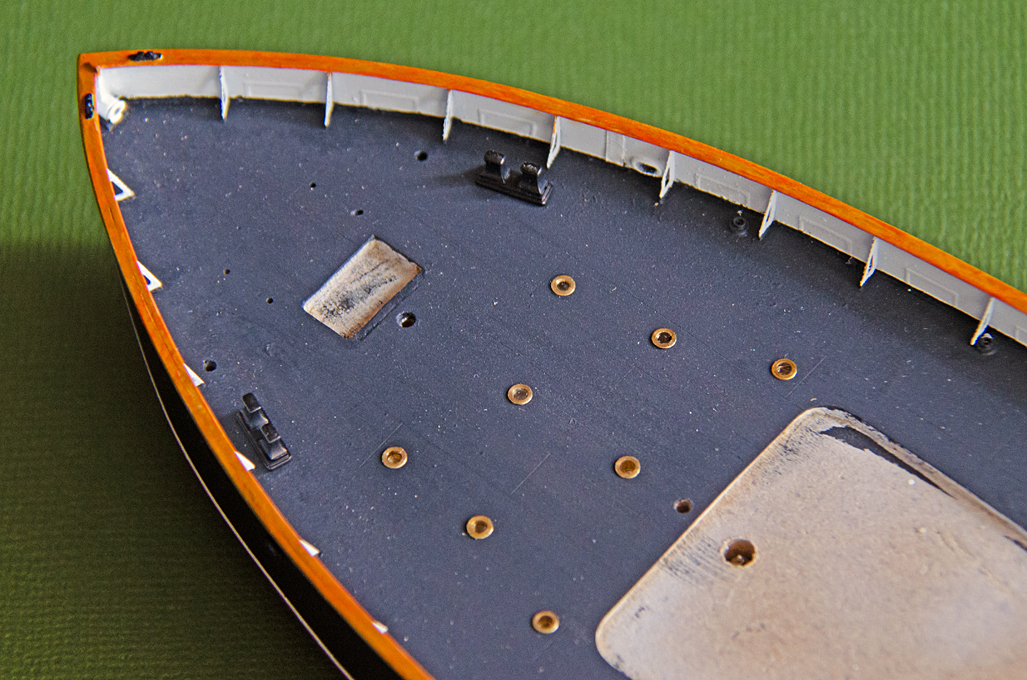
The double bollards and coal-scuttles (not visible on the image) were painted black as per prototype and installed

Image
Rear deck with sky-lights and bollards installed

To be continued ....

_________________
Eberhard

Former chairman Arbeitskreis historischer Schiffbau e.V. (German Association for Shipbuilding History)

--------------------------------------------------------------------------------------------------------------------------------------------------------------------------------------------

Image Image Image Image


Report this post
Top
 Profile  
Reply with quote  
PostPosted: Sun Oct 31, 2021 4:22 pm 
Offline

Joined: Wed Jan 02, 2013 1:15 am
Posts: 5012
Interesting details, thank you for sharing your materials and philosophy. Certainly the weathering over time will achieve an otherwise authenticity not obtainable.

Cheers. Tom


Report this post
Top
 Profile  
Reply with quote  
PostPosted: Sun Oct 31, 2021 5:00 pm 
Offline
User avatar

Joined: Fri Dec 12, 2008 12:44 pm
Posts: 1778
Location: Herk-de-Stad, Belgium
This ship is getting beautiful, Wefalck! I like the relatively fresh colour tones you use.

_________________
"I've heard there's a wicked war a-blazing, and the taste of war I know so very well
Even now I see the foreign flag a-raising, their guns on fire as we sail into hell"
Roger Whittaker +9/13/2023


Report this post
Top
 Profile  
Reply with quote  
PostPosted: Tue Nov 02, 2021 1:43 pm 
Offline
User avatar

Joined: Wed Sep 28, 2011 12:04 pm
Posts: 1820
Location: Paris
Thanks, gentlemen, for your kind words !

******************************************

Fitting out the barbette

As small update: I have further kitted out the barbette with the ladders that allowed the gun-crew to scramble over its sides into it and with the racks for the ready-ammunition. Also installed were the gratings over the stairs down into the crew-accommodation below the barbette (which also housed the cranking mechanisms for turning the gun) and over the hatch through which the shells would be lifted up. These gratings are somewhat conjectural, as the existing drawings could also be interpreted as showing stairs. However, I assume that hatch down to the turning mechanism must have been covered to prevent crew from tumbling down, but also open to allow voice communication with the guys cranking away. For the access to the shell-room, the grating must have been hinged in some way. There was a small gallows-like crane above it to allow the shells being lifted up.

Also, there is a box in one corner with a kind of rack attached to it. Their function cannot be deducted from the drawings and the hand-written explanations are not readable in the scans available to me.

Image
Barbette with shell-racks, ladders and hatchways installed

The next step will be to install the various portholes in the deckhouse and the hull. Their actual look is quite well-known, as one specimen has been recovered some years ago from the wreck of SMS SALAMANDER off a Dutch beach and which is now in private hands and of which I obtained pictures. However, on the model only a narrow brass ring will be visible from the outside. They were actually very small, only about 16 cm in diameter, which translates to 1 mm on the model.

My idea was to dip thin-walled pieces of brass tube into Acrifix 192, as was done for the skylights, but this glue is too viscous into the 0.8 mm diameter opening of the brass tubes. I have to figure out a different way …


To be continued ....

_________________
Eberhard

Former chairman Arbeitskreis historischer Schiffbau e.V. (German Association for Shipbuilding History)

--------------------------------------------------------------------------------------------------------------------------------------------------------------------------------------------

Image Image Image Image


Report this post
Top
 Profile  
Reply with quote  
PostPosted: Tue Nov 02, 2021 5:13 pm 
Offline
User avatar

Joined: Tue Sep 29, 2020 4:35 pm
Posts: 1721
Location: Bretagne, France
This is really beautiful.

_________________
Pascal

•Battleship Bretagne 3D: https://vu.fr/FvCY
•SS Delphine 3D: https://vu.fr/NeuO
•SS Nomadic 3D: https://vu.fr/tAyL
•USS Nokomis 3D: https://vu.fr/kntC
•USS Pamanset 3D: https://vu.fr/jXGQ


Report this post
Top
 Profile  
Reply with quote  
PostPosted: Tue Nov 02, 2021 11:33 pm 
Offline
User avatar

Joined: Sun Mar 07, 2010 12:01 am
Posts: 1645
Location: Corvallis, Oregon, USA
wefalck,

I have been following this build since 2014. Your detailed research and meticulous work are very interesting, especially on the gun! So now you are finally nearing the installation of the beautiful gun into its position in the barbette! That is something that I am sure many of us have been waiting to see. There are lots of models of cannons on ships, including pivot guns. And many with gun houses and turrets around the guns. But this type of open barbette gun is not often modeled.

Have you tried heating the Acrifix 192? Viscous liquids often become runnier when warmed. Of course, heat should cause it to cure faster.

Phil

_________________
A collision at sea will ruin your entire day. Aristotle


Report this post
Top
 Profile  
Reply with quote  
Display posts from previous:  Sort by  
Post new topic Reply to topic  [ 385 posts ]  Go to page Previous  1 ... 6, 7, 8, 9, 10, 11, 12 ... 20  Next

All times are UTC - 6 hours [ DST ]


Who is online

Users browsing this forum: No registered users and 36 guests


You can post new topics in this forum
You can reply to topics in this forum
You cannot edit your posts in this forum
You cannot delete your posts in this forum
You cannot post attachments in this forum

Jump to:  
Powered by phpBB® Forum Software © phpBB Group