The Ship Model Forum

The Ship Modelers Source
It is currently Sat Jul 05, 2025 8:14 pm

All times are UTC - 6 hours [ DST ]


Post new topic Reply to topic  [ 301 posts ]  Go to page Previous  1, 2, 3, 4, 5 ... 16  Next
Author Message
PostPosted: Wed Jul 07, 2010 8:30 am 
Offline
User avatar

Joined: Sun Mar 13, 2005 11:51 am
Posts: 2432
Location: Belgium
Well, as Dave said, fine grain wood is what you are looking for. Balsa is also excellent. I hadn't worked with it before, but for the bow I did need balsa. It's very expensive over here, although some people seem to come up with blocks out of nowhere too. Don't know where they got that, yet I had to buy mine the normal way in the store.
It came in a bar shape of 5cm x 5cm x 1m, so I'm puzzling them together now.

Anyway I'm still thinking about that stern and the dimension problem there, but with the good weather I decided to tackle the bulb first. At first I thought of going from wide and large towards small, but I changed method and went from small to large (forward to aft) following the frames step by step. First I cut the blocks to shape using the linesplan taken from the top to have the biggest horizontal cut. After that I glued them in place. Next step was to cut small triangles away from the block to reducing sanding work. I also made a transverse cut to avoid the triangles shaving off too far. That way I achieved an edge to lay the sanding block against. to nicely follow the frame up and down.
Image
This one shows the edge created by cutting off the parts.
Image
Here you can see the different steps of the process. Forward finished, going towards the cut off parts, ready for sanding and finally towards the hull the rough block.
Image

_________________
The merchant shipyard


Report this post
Top
 Profile  
Reply with quote  
PostPosted: Fri Jul 09, 2010 10:55 am 
Offline
User avatar

Joined: Sun Mar 13, 2005 11:51 am
Posts: 2432
Location: Belgium
And here is yet another update on that bow. It starts to look like it. Guess I'll rename her "Blunt Nose". The contrast with the sharp Udaloy bow could hardly be bigger!

The starboard side is already in "good" shape. The portside needs some more sanding in some places. I also got some filler now, first I'll close some gaps with normal wood filler. Then I'll sand her smooth, fibreglass the hull and apply car body filler to finish it off. I'll also make the rudder in the mean time and I still have that aft balsa block around the propellor shaft to do.

Image
Image

I also intend to drill the anchor hawse pipes first, perhaps install a brass tube as hawse pipe. The real Chaconia has these big extensions for the anchors, so I suppose with a brass tube I can build these extensions up from filler around the tubes.

_________________
The merchant shipyard


Report this post
Top
 Profile  
Reply with quote  
PostPosted: Fri Jul 09, 2010 11:09 am 
Offline
User avatar

Joined: Sat Jan 22, 2005 10:18 am
Posts: 4131
Location: Liverpool
Hi Roel This is developing well . The bow and stern are indeed the tricky bits but you seem to have mastered them well.
Dave Wooley :thumbs_up_1: :thumbs_up_1: :thumbs_up_1: :wave_1:


Report this post
Top
 Profile  
Reply with quote  
PostPosted: Sat Jul 10, 2010 3:32 am 
Offline
User avatar

Joined: Tue Jan 01, 2008 7:15 am
Posts: 1205
Location: ATHENS, GREECE
OooooooooooooooH.. This is really beautiful stuff... Superb craftmanship.... Well done

More progress and pictures please... :thumbs_up_1: :thumbs_up_1:

_________________
NIKOS (NICK)
ΜΕΓΑ ΤΟ ΤΗΣ ΘΑΛΑΣΣΗΣ ΚΡΑΤΟΣ
(GREAT IS THE NATION THAT MASTERS THE SEAS)


Report this post
Top
 Profile  
Reply with quote  
PostPosted: Sun Jul 11, 2010 4:52 am 
Offline
User avatar

Joined: Sun Mar 13, 2005 11:51 am
Posts: 2432
Location: Belgium
Well thanks both of you! It's very encouraging to hear this.
Today I'm glueing the forward and aft brass strips for the bow and prop shaft and I'm adding more wood filler to fill up the holes in the hull. Up till now it seems to be working as now the hull looks like it's really sealed of major gaps.

Once the brass strips are dried and fixed I'll fill up with some car body filler and start sanding again. The bow will be slightly reshaped along with the hull to form a nice uniform surface. The angle towards the top part will be less pronounced as it is now. Before I can add the deck of the forecastle I'll have to do some detailing on the deck below it as I can't do that detailing afterwards. Just below that forecastle there is a slight "indent" which houses the forward liferaft, some immersion suits and lifejackets along with the forward entry to the ballast tank and hold space. On both sides of that there are closed lockers which are flush with the edge of the forecastle deck. So I'll have to add the lockers and "indent" along with its details before I add the fo'csle deck.

Image

Image

_________________
The merchant shipyard


Report this post
Top
 Profile  
Reply with quote  
PostPosted: Mon Jul 19, 2010 12:00 pm 
Offline
User avatar

Joined: Sun Mar 13, 2005 11:51 am
Posts: 2432
Location: Belgium
And a small update. I'm a little freewheeling now, don't really know what to do or where to go. I can work on different aspects of the ship, making the side and front bulwark, work on the aft and finish that part as well as making some of the details below that fo'csle. The latter being something that has to be done before I can install the main deck on the fo'csle and afterwards make that front bulwark. I don't really have good measurements of these details, so I'm a little stuck there.

Anyway i started doing some work there.
Image

The main deck will be bent over towards the sides.
Image

A general view, upside down.
Image

And the bow, another thing that I could actually get over with, but for some reason I haven't sanded any further....
Image

_________________
The merchant shipyard


Report this post
Top
 Profile  
Reply with quote  
PostPosted: Mon Jul 19, 2010 12:46 pm 
Offline
User avatar

Joined: Sat Jan 22, 2005 10:18 am
Posts: 4131
Location: Liverpool
Hi Roel You are nearly there , your hull form is coming together :thumbs_up_1: :thumbs_up_1: :thumbs_up_1: :wave_1:
Dave Wooley


Report this post
Top
 Profile  
Reply with quote  
PostPosted: Sat Jul 31, 2010 3:28 am 
Offline
User avatar

Joined: Sun Mar 13, 2005 11:51 am
Posts: 2432
Location: Belgium
After stopping for a small re-planning I've continued to complete the hull shape in order to get her ready for G4 treatment and polyester/fibreglass.

First was the front, with the bulwarks remaining. With Dave's help I concluded to use 0.8mm Birch ply. It's pretty sturdy yet flexible. First I intended to use litho for this, but I think it would bend when you try to fibreglass over that. So in came the birch. Pretty expensive for a small sheet and it becomes very expensive the narrower you get. Anyhow it was worth its price.

Step 1 was sanding off with the proxxon sanding disk a part of the wood next to the deck and on the aft edge of the forecastle planking. I sanded off about 1mm deep and approx 2-3mm "high". This would give a good hold for the bulwarks.
On the forecastle itself for the forward bulwark I've sanded off part of the deckplank to fit in the bulwark. I could actually fill out the small gaps around these bulwarks, but that's not necessary considering there will be polyester on top along with a layer of filler.
The main problem was holding everything into place for a couple of hours to let the glue dry. The birch is fairly strong and will have a lot of resistance against the bending. I made it wet and held it in place for a while until it was dry. That at least helped to reduce the outward pressures a little.
For the forward bulwark however I had to place some blocks, I used Cyano to put these blocks in place and afterwards covered their faces with some packaging plastic to avoid any real wood glue coming on them. Then I put the bulwark over it and afterwards removed the blocks.
Before all this I have to mention I used some paper and cardboard templates to creat the shape of the bulwark to minimise the waste.
You can clearly recognise her odd shapes now. All that is remaining is the aft part where I have to add the deck to reach a nice equal height and sand it even with the rest of the hull. After that I can start treating it with G4 (thanks Laurent :wave_1: ) to avoid the wood from rotting. After that I'll put the fibreglass and polyester resin.
Image
Image
Image
Image

_________________
The merchant shipyard


Report this post
Top
 Profile  
Reply with quote  
PostPosted: Sun Aug 01, 2010 1:08 am 
Offline
User avatar

Joined: Sun Aug 01, 2010 12:37 am
Posts: 7
Location: B.C Canada
Hi everyone I am a newbie here, just joined today after stumbling on this thread and I am sure glad I did :thumbs_up_1: Great job Neptune I will be following your thread closely, as i too am planning on building a tanker from scratch. I got the plans from Taubman plans for the EXXON VALDEZ 1/192 scale. Like this build, it is going to be a major task, as not much can be found on the ship other than the disaster related to it :Mad_6: yet I must say the plans are of superb quality with a vast amount of detail, and worth the $125.00!!! I had also purchased from Don at Taubmans plans the plans for the Hapag Lloyd container the Stuttgart Express in 1/200 scale, I might venture into building this first as there seems to be a bit more data on the ship, and there are several others in the fleet which are similiar. I will definatley keep you all posted as the progress go's. Which is the book you mention in regard to building techniques? Take care :thumbs_up_1:


Attachments:
exxon_valdez_.jpg
exxon_valdez_.jpg [ 31.78 KiB | Viewed 2194 times ]
Report this post
Top
 Profile  
Reply with quote  
PostPosted: Sun Aug 01, 2010 8:15 am 
Offline
User avatar

Joined: Sun Mar 13, 2005 11:51 am
Posts: 2432
Location: Belgium
Thanks for the comments.
Well the best book I have for hull construction is Dave Wooley's "Warships and Warship modelling". Another writer with good books is Brian King, a combination of his books with Dave's gave me the kick-start on this one. A few details that weren't covered in Dave's book were covered in the other books and of course you can view all the topics here, in which the "Iron Duke" topic from ARH (Ron) was most educational for me as I decided to tackle it the same way as he did (for the hull I mean).

Container ships aren't that difficult as a lot of things are standard sized, it'll be a little repetitive I guess, but the curves of the hull will be easier than the curves of a tanker (it's generally more sleek/warship-like).

_________________
The merchant shipyard


Report this post
Top
 Profile  
Reply with quote  
PostPosted: Thu Aug 05, 2010 3:15 pm 
Offline
User avatar

Joined: Sun Mar 13, 2005 11:51 am
Posts: 2432
Location: Belgium
So, now disaster struck. Well actually, I made the disaster myself. Warts'n all, well here you have some big warts.
First I applied G4, something like turpentine I guess. It sort of plastifies the wood and seals it, so it doesn't start to rot (polyester resin isn't entirely waterproof I've heard). That wasn't really the problem either. First use some 50/50 solution of G4, then a layer with 75% G4 and then a layer of 100% G4, the solution helps to soak it up into the wood, afterwards the G4 makes a nice hard layer on top of the wood. I've treated both outside and much of the inside with G4. Everything went well and looked still ok.
Image

Image

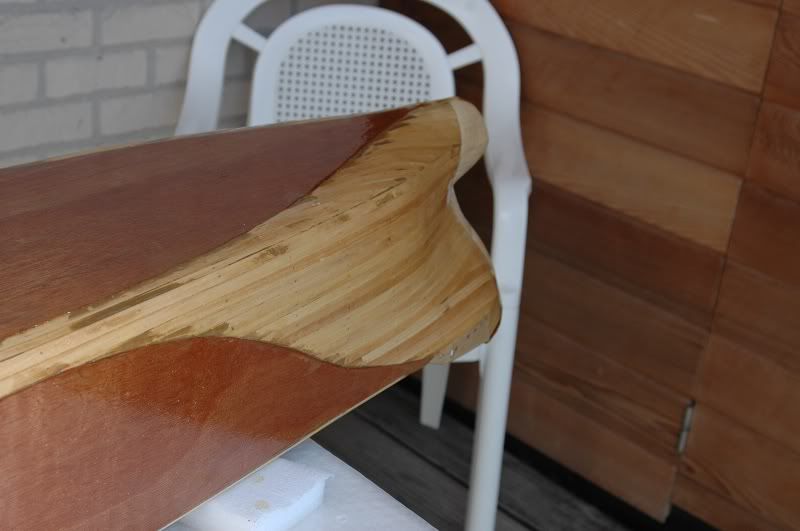
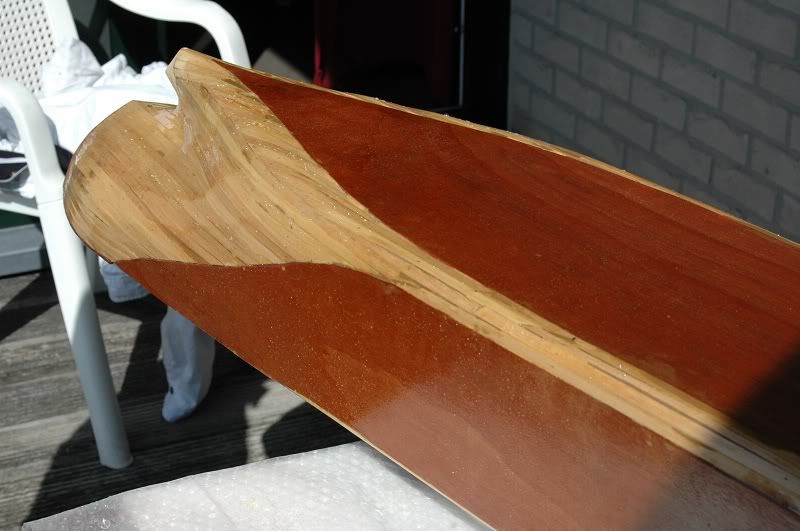
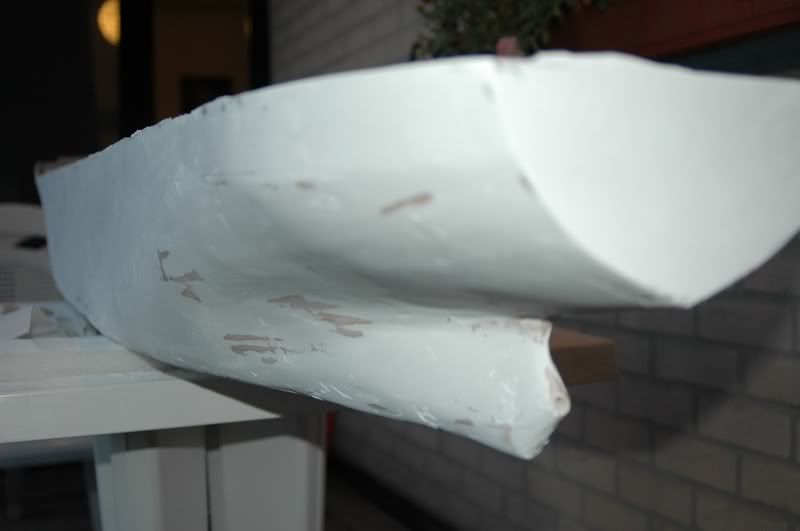
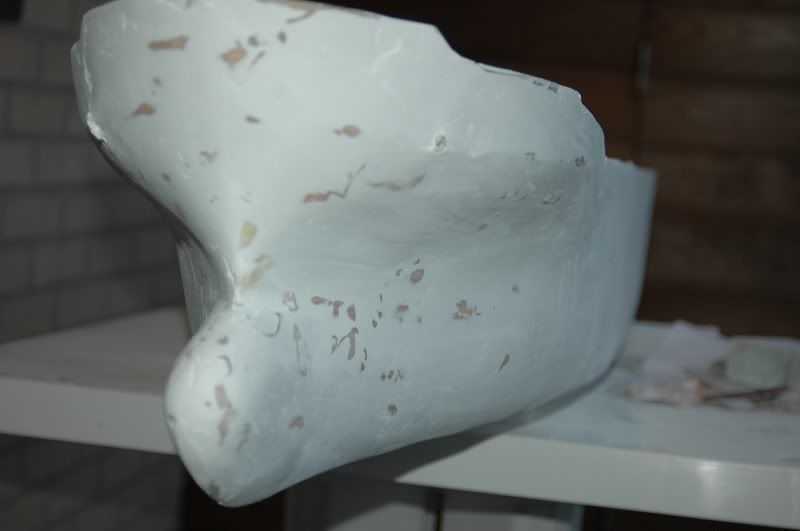
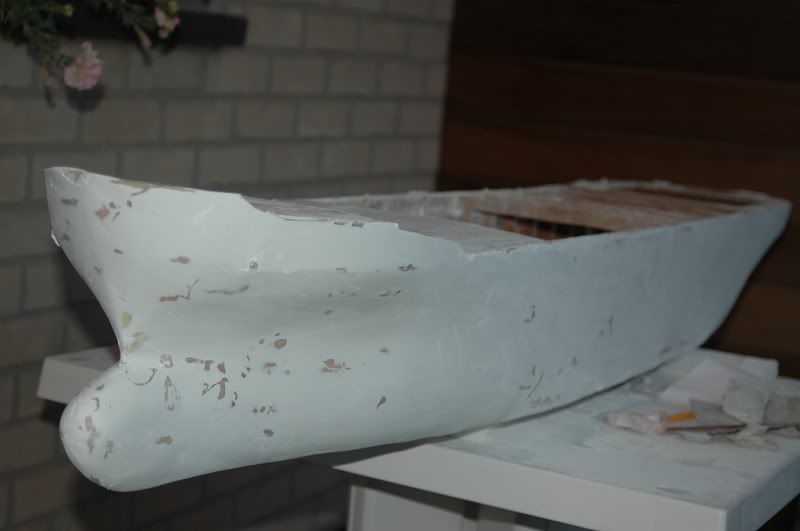
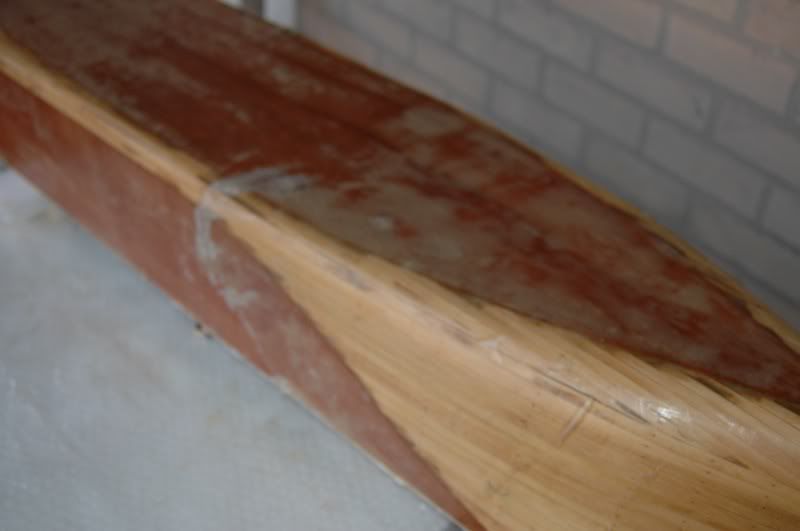
Then came the process of polyester and fibrematting. Well it appears that I won't be doing that ever again. I've used a very light mat, 80g/sqm. The curves weren't actually the problem, but I soon started having some big bubbles. All together not such a disaster, most of them were removable. But after a while they weren't removable anymore...
I was sort of on a crossroad I guess. I wanted to tear off the matting and just apply the resin, would have worked too I guess. Perhaps it would have been better than what I have now.
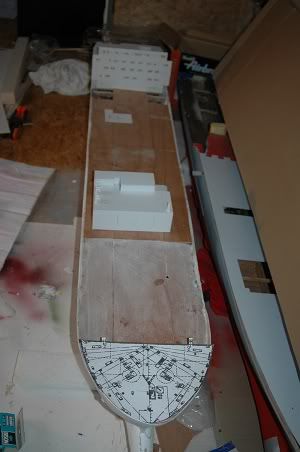
Anyhow, I continued under the supervising eye of the CIC (and with her help), eventually some parts were ok.
However now I'm thinking whether I should try to remove the matting and resin and cut it up in pieces to fit in the stove or to sink it as an artificial reef in the pond or creek nearby. I could probably salvage some of that hull with a lot of cutting and mountain of filler, but that will take a very long time to finish and I have my doubts whether it would be worth the effort regarding the final result.

Another problem that only appeared later on was the G4. It creates bubbles when it's curing, it's using the air humidity to cure. On the can however is written that when you use it as a priming layer for polyester that you should apply the polyester after 30 minutes but before 4 hours. I waited 2 hours, however the top wasn't entirely dry. I thought that perhaps that was what was needed to have a good grip with the polyester. Well... It was not. After applying the polyester the G4 kept curing and more importantly, create bubbles underneath the polyester/fibre layer. Resulting an all-bubble hull. I suppose the only real limit for applying polyester on G4 would be when it is really dry dry!
Image

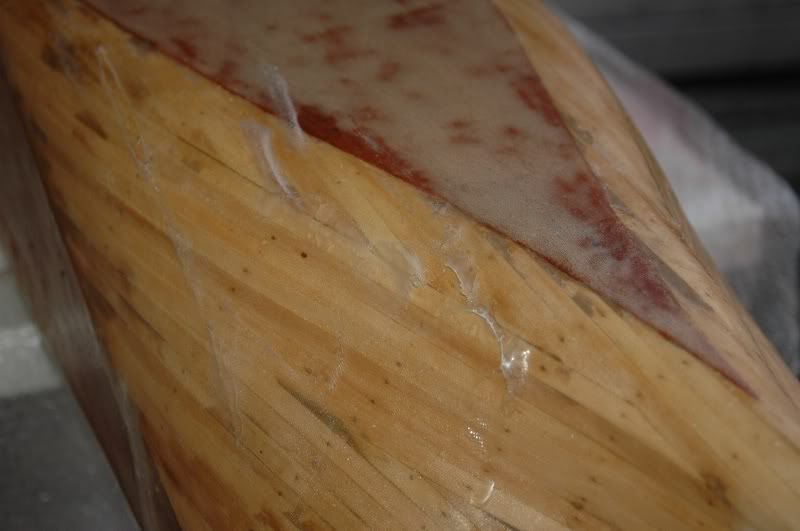
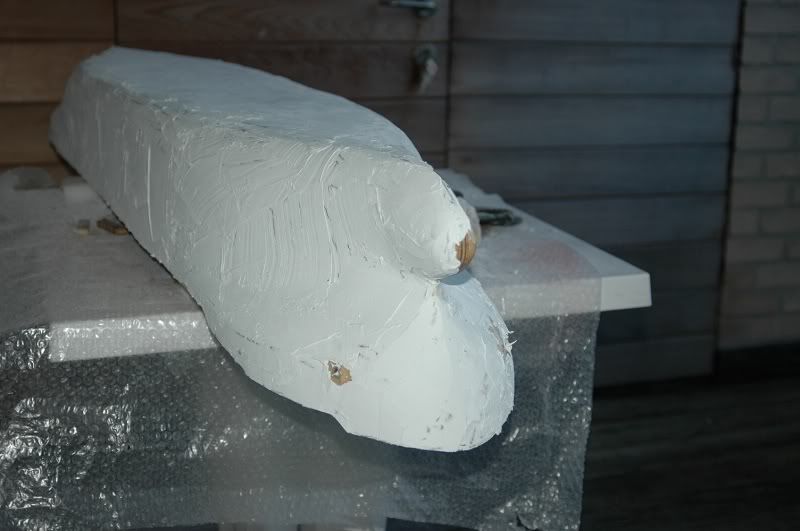
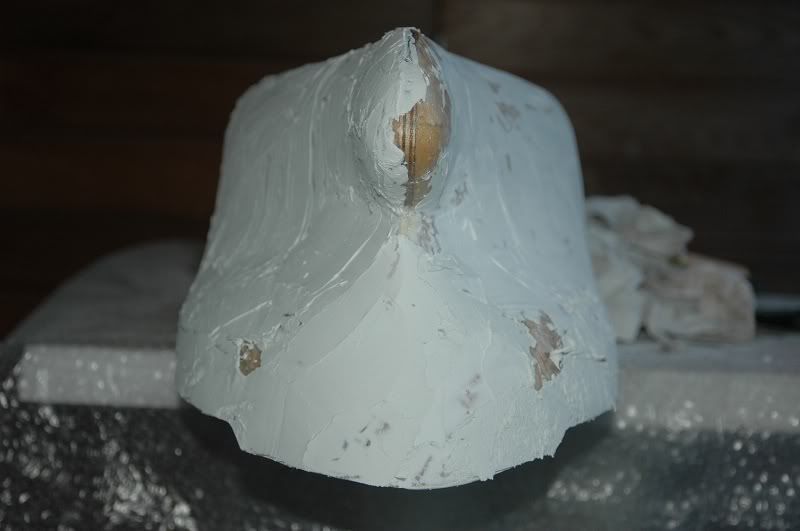
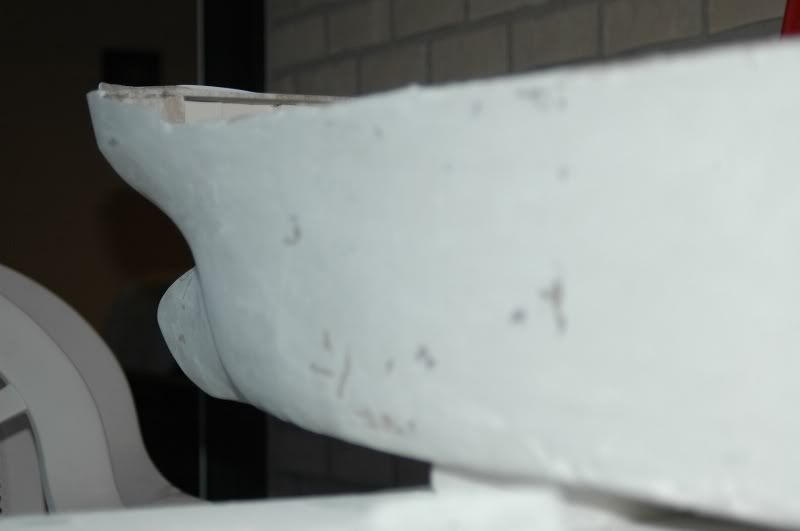
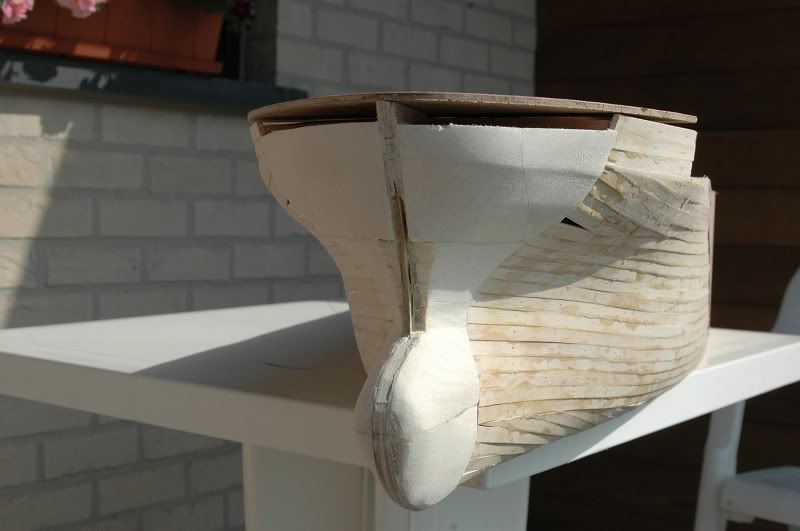
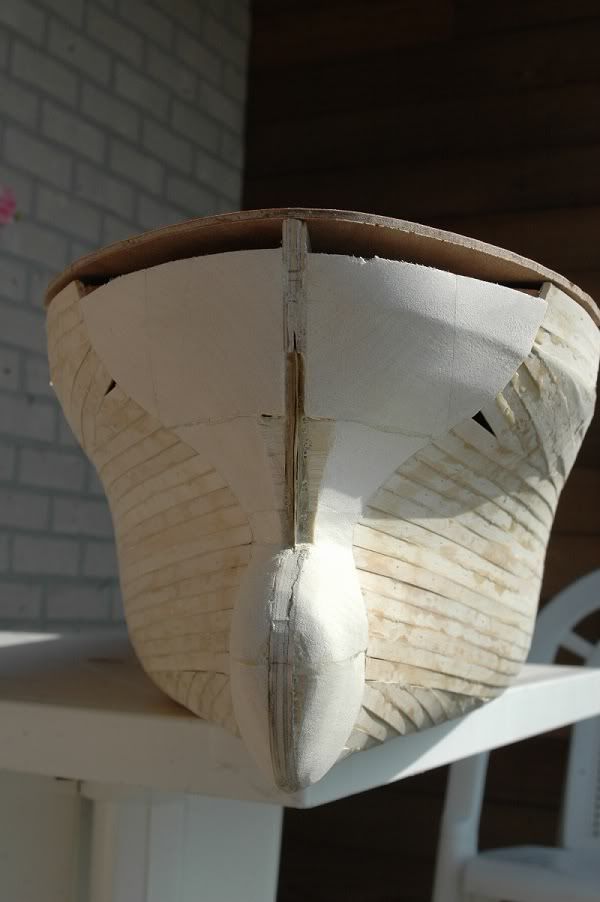
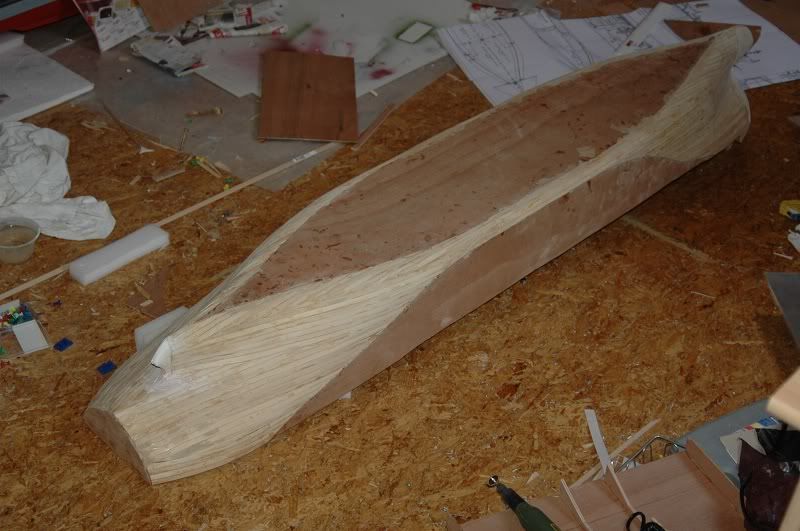
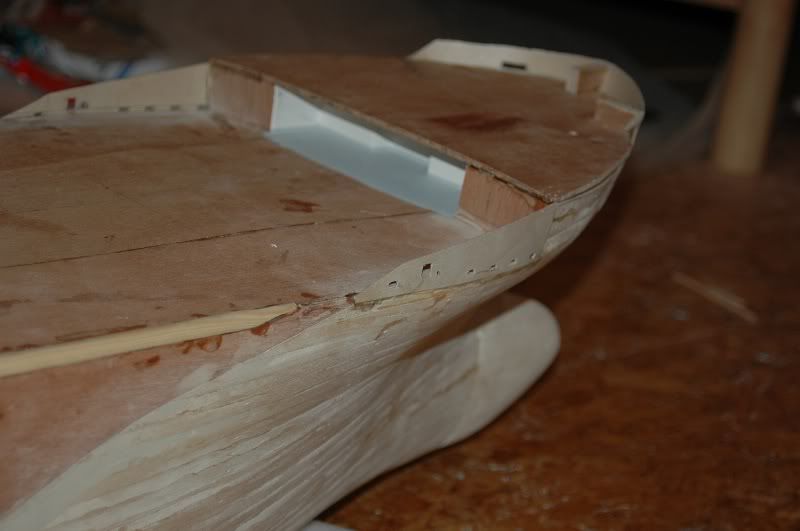
The flat parts, which I thought would be easy eventually became a disaster, with most of the large bubbles there.
Image

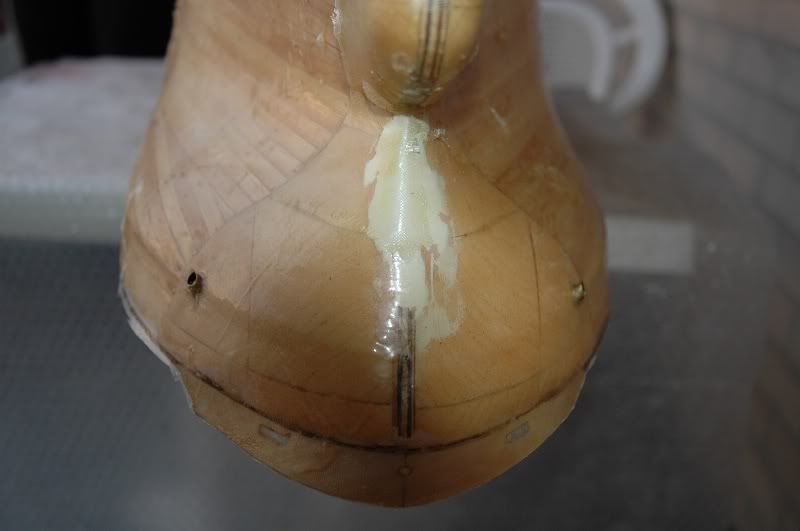
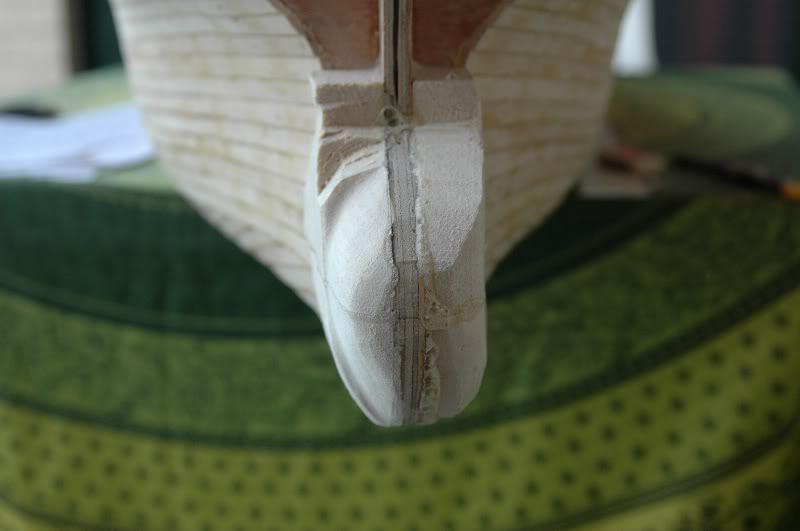
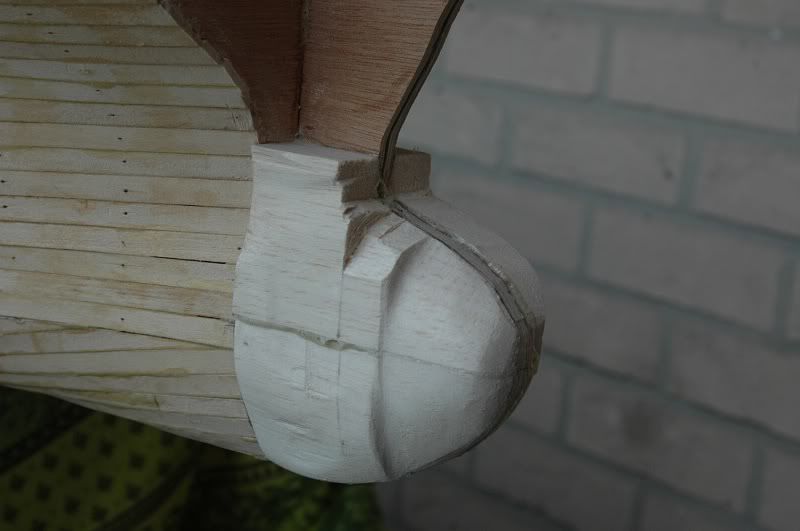
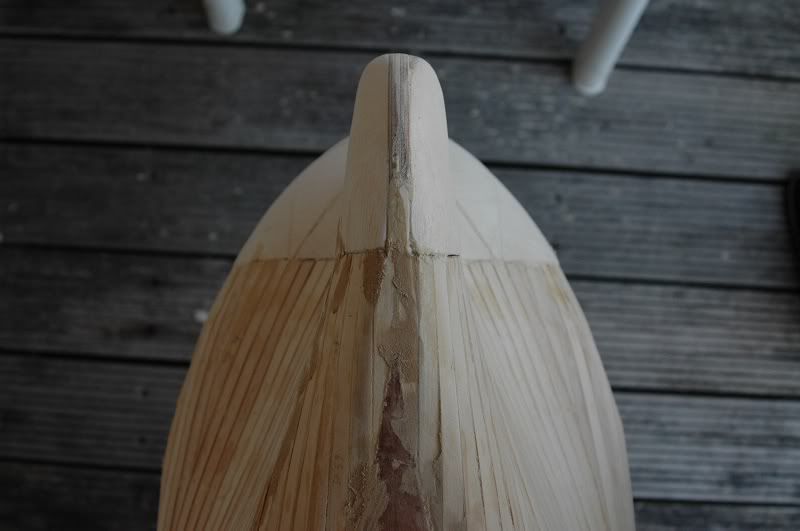
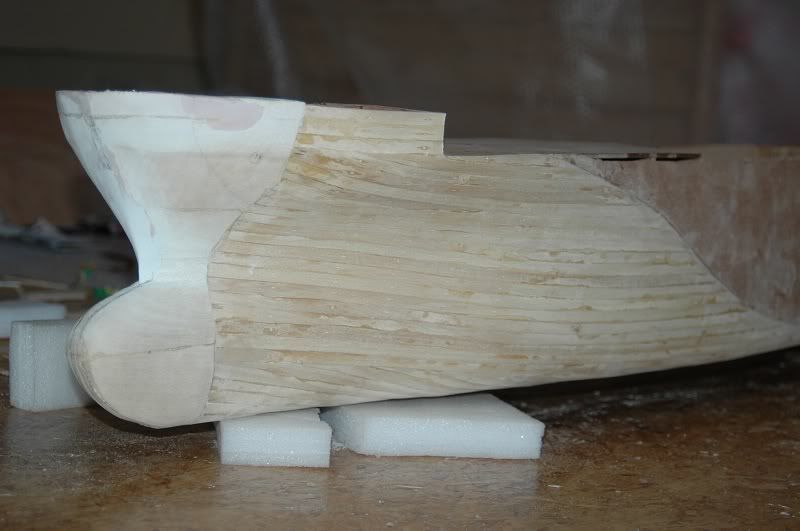
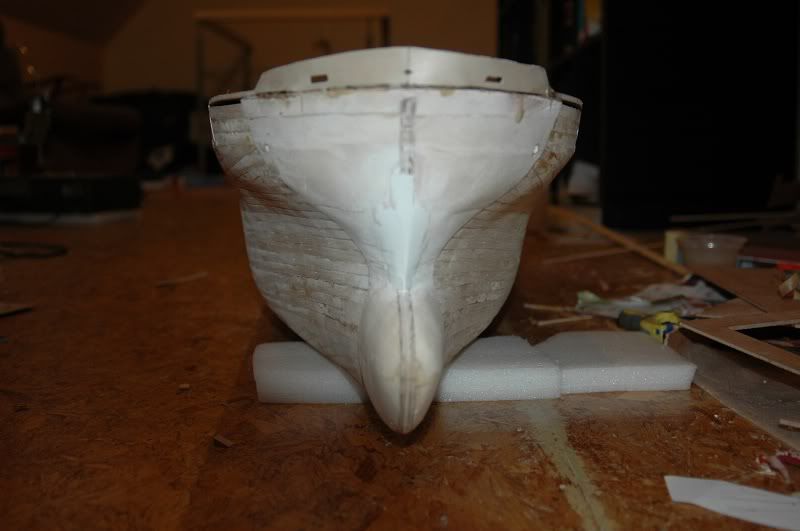
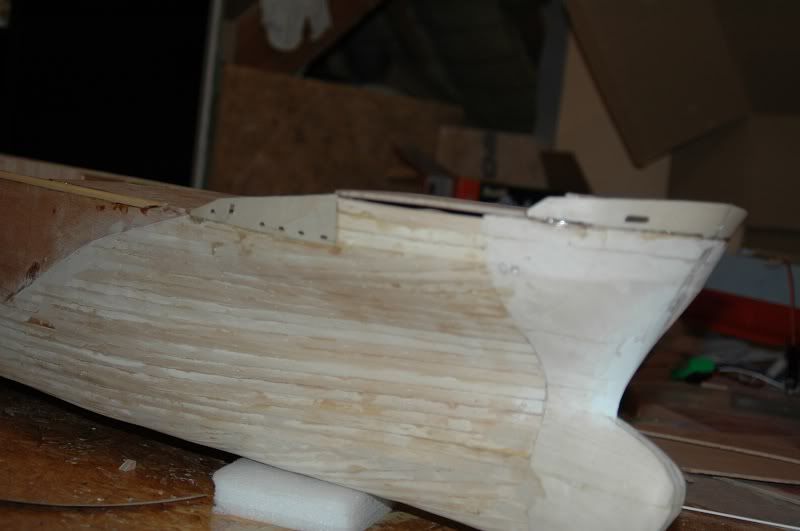
To my greater surprise the bow actually came out more or less acceptable, it can be fixed with minor work.
Image

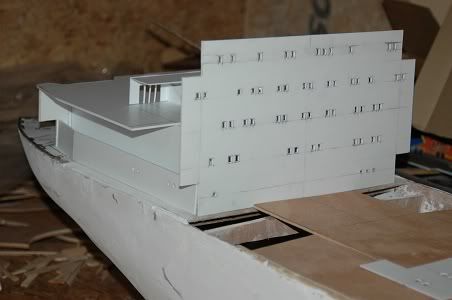
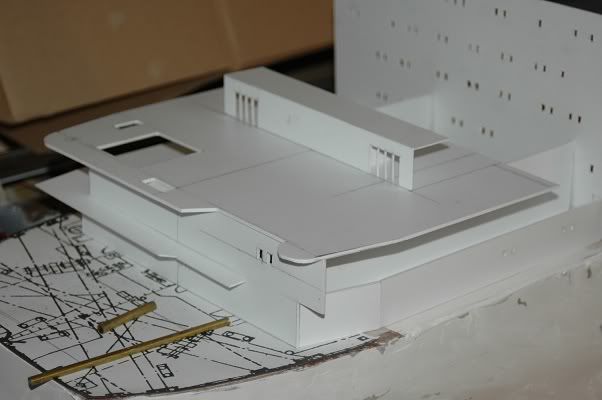
Perhaps the end of this story, this is the reason why I hadn't started building anything else for this ship like winches or superstructure, which I could have easily done during the waiting time for the gluing. I'm happy I decided against that and that I opted for a small scale build, which was something proven for me and which is at least showing some nice results by now.

_________________
The merchant shipyard


Report this post
Top
 Profile  
Reply with quote  
PostPosted: Thu Aug 05, 2010 4:00 pm 
Offline
User avatar

Joined: Tue Apr 17, 2007 9:18 am
Posts: 1993
Location: Brasil
Great Job on hull Neptune...
is taken a good form :wave_1:


Report this post
Top
 Profile  
Reply with quote  
PostPosted: Thu Aug 05, 2010 6:59 pm 
Offline
User avatar

Joined: Sun Aug 01, 2010 12:37 am
Posts: 7
Location: B.C Canada
:thumbs_up_1: Good job neptune, I would'nt worry to much about it, you can still fix it. What I had planned on doing with my hull was getting it to a some what nice smooth finished spec, and then making a fiberglass plug or (mould) for it so the hull could be reproduced more than once. This still could be an option for you if you sand down the fiberglass cloth and try maybe to apply thin coats of autobody filler or (bondo) if you apply and wait until it is almost cured yet still soft you can shape it with a rasp or 50 to 80 grit sand paper. Then you could use a thick sandable primer to get the surface smooth repeat the process until it is ready to be set into a mould for copying. I have even seen people get to the point where your at and then use drywall putty to get the rest of the hull finished ready to mould. Check this link out maybe it might help http://www.robse.dk/pages/Emma/BasicHull.asp


Report this post
Top
 Profile  
Reply with quote  
PostPosted: Sun Aug 08, 2010 2:57 pm 
Offline
User avatar

Joined: Sun Mar 13, 2005 11:51 am
Posts: 2432
Location: Belgium
I'm not planning on making this a plug or mould (certainly not, as I can't seem to work with fibreglass!).
Anyhow I've cut out ALL the air bubbles and started covering the entire hull with filler to fill the bubbles and started some sanding. I'll have to continue this process a couple of times before I'll get anything reasonable I suppose. The filler does sand very smoothly, but I guess I'll lose a little of my hull accuracy by using it.
Image

Image

Due to the short working time with this filler I have to do small parts at a time, this is just the first coat. I'll and it smooth and fill up some holes (along with the place near the bulb and around the small brass hawse pipes) and sand again. For the bilge I intend to add a couple of layers of filler and make a couple of external frames out of 8mm ply. Glue these pieces together and use the inside with sanding paper to get a more correct bilge shape (that has been a problem with the planks I've used as the bilge radius is really tight!).

_________________
The merchant shipyard


Report this post
Top
 Profile  
Reply with quote  
PostPosted: Thu Aug 12, 2010 2:39 pm 
Offline
User avatar

Joined: Sun Mar 13, 2005 11:51 am
Posts: 2432
Location: Belgium
couldn't let this project slip due to some bad fibreglassing. Can't let the people down who supported me so much for this project, so on we go. I'm a bit on a time shortage though, I'm working nearly full days on the boat now, but soon I'll have to stop and leave for a couple of months. The biggest problem is that when I come back it'll be nearly freezing here, so I won't be able to continue with the filling and sanding process. I want to get over with it before I leave, but we'll see where I get...
The bow looks promising for now. I've started portside bow, then flat side, then portside stern and so on. I'm tackling part by part untill I'm more or less satisfied with that particular part.
The bilge curves will be difficult, mainly filling and then getting a correct curved shape seems difficult, even with an external frame.
Anyhow I'm making progress on that area too.
Stern part, one or two layers to go.
Image
A very odd, but familiar curve
Image
Image
Portside bow, fairly smooth, but needs some additional filler on the bulb as well as near the hawse pipe.
Image

A small overview, the stern curves look pretty well in this view.
Image

I'm thinking about making the rudder, but as this is a balanced rudder with a support somewhere halfway the rudder, it's not such an easy operation.

_________________
The merchant shipyard


Report this post
Top
 Profile  
Reply with quote  
PostPosted: Thu Aug 12, 2010 3:00 pm 
Offline
User avatar

Joined: Tue Apr 17, 2007 9:18 am
Posts: 1993
Location: Brasil
I am certain that it will be a great model when finished...
your hull is very good and with a good form...
we can wait... :wave_1: :thumbs_up_1:


Report this post
Top
 Profile  
Reply with quote  
PostPosted: Sat Dec 11, 2010 6:01 am 
Offline
User avatar

Joined: Sun Mar 13, 2005 11:51 am
Posts: 2432
Location: Belgium
It's been a while, but we're still on!!!

I got one side of the hull which is reasonably good, but needs some more work, and one side which is less and hence needs a little more work.
It's too cold now for the filler (and I'm not going to do that inside), so I started with the main superstructure, the accomodation block and funnel. It's a pretty big block. The small superstructure midships houses the reliquefaction plant and was actually made before the hull was started (although I'll have to redo some parts of it).

Two main lessons learned with the superstructure are:
Don't use 2mm styrene for exterior walls, it's ok for structural members, but use 1mm for exterior walls. 2mm is a pain to cut any windows or details in.

Secondly, use a sort of bottom template and build from the bottom up. I didn't do that as I was scared it wouldn't fit on the hull anymore, I wanted to use the facing (front wall) as a reference, but couldn't do that since it had to have the windows etc. cut in first.
Now most of the windows are cut, but not filed to shape yet. I noticed on Jimmy Woods' superior models that he even has the upstanding edge on his windows, something I'd like to have too, although I'm still thinking on how he does it! A small detail that makes a big difference in quality! I hope I can figure it out soon, I'm a bit stuck in construction because I can't close anything without the windows glazed and finished.
Image

Image

Image

Most of it is dry fitted for now. The squarish hole on the top deck is the swimming pool.

_________________
The merchant shipyard


Report this post
Top
 Profile  
Reply with quote  
PostPosted: Sat Dec 11, 2010 8:33 am 
Offline
User avatar

Joined: Sat Jan 22, 2005 10:18 am
Posts: 4131
Location: Liverpool
Hi Roel Good to see back on the build. A really sharp job on one of the most difficult parts of the deck housing , windows of course. Yes you are right about using 1mm thinkness as apposed to 2mm. Is that your Udaloy in the background?
Dave Wooley :thumbs_up_1: :thumbs_up_1: :thumbs_up_1: :wave_1:


Report this post
Top
 Profile  
Reply with quote  
PostPosted: Sat Dec 11, 2010 6:58 pm 
Offline
Site Admin
Site Admin
User avatar

Joined: Sat Jan 08, 2005 4:31 pm
Posts: 3579
Location: Plattsburg, Missouri
Hi Roel,

That's going to be a huge project! Your definitely going to need a bigger place. But at this scale you have some major plumbing to do on that main deck.

_________________
Timothy Dike
Owner & Administrator
ModelWarships.com


Report this post
Top
 Profile  
Reply with quote  
PostPosted: Sat Dec 11, 2010 7:25 pm 
Offline
User avatar

Joined: Mon Jan 10, 2005 5:30 pm
Posts: 5568
Location: Nr Southampton England
AHOI Roel

Looking good!

>>> and started covering the entire hull with filler <<<

Good!

They do that with luxury yachts one offs--called fairing--they use large sanding boards and expoxy high grip fillers on the fibreglass/ carbon to get a mirror finish--you are merely mimicking 1:1 scale practice!


Jim Baumann :wave_1:

_________________
....I buy them at three times the speed I build 'em.... will I live long enough to empty my stash...?
http://www.modelshipgallery.com/gallery ... index.html

IPMS UK SIG (special interest group) www.finewaterline.com


Report this post
Top
 Profile  
Reply with quote  
Display posts from previous:  Sort by  
Post new topic Reply to topic  [ 301 posts ]  Go to page Previous  1, 2, 3, 4, 5 ... 16  Next

All times are UTC - 6 hours [ DST ]


Who is online

Users browsing this forum: No registered users and 4 guests


You can post new topics in this forum
You can reply to topics in this forum
You cannot edit your posts in this forum
You cannot delete your posts in this forum
You cannot post attachments in this forum

Jump to:  
Powered by phpBB® Forum Software © phpBB Group