The Ship Model Forum

The Ship Modelers Source
It is currently Tue Apr 16, 2024 5:12 pm

All times are UTC - 6 hours [ DST ]


Post new topic Reply to topic  [ 171 posts ]  Go to page Previous  1, 2, 3, 4, 5, 6, 7, 8, 9  Next
Author Message
PostPosted: Sun Dec 08, 2013 11:59 am 
Offline
User avatar

Joined: Mon Jan 10, 2005 10:46 am
Posts: 2411
Location: Hoboken, NJ
Oh, really? They went all out on her, then. Glad I asked before I start working on the Verlinden 1/200 kit I have.

_________________
We like our history sanitized and theme-parked and self-congratulatory, not bloody and angry and unflattering. - Jonathan Yardley


Report this post
Top
 Profile  
Reply with quote  
PostPosted: Sun Dec 08, 2013 12:57 pm 
Offline

Joined: Wed Nov 19, 2008 9:14 am
Posts: 107
Devin wrote:
Oh, really? They went all out on her, then. Glad I asked before I start working on the Verlinden 1/200 kit I have.


Yes you should really sand off all the rivets and make the sides flat from the deck to the knuckle below the waterline. One point where the Whitney and Corbett drawings agree is that the sides were NOT completely convex; they were flat for easily 70% of her length. They do fair into a domed planform at the bow and stern though, which is what I think causes some of the confusion about hull shape.


Report this post
Top
 Profile  
Reply with quote  
PostPosted: Thu Dec 26, 2013 8:47 pm 
Offline

Joined: Wed Nov 19, 2008 9:14 am
Posts: 107
Here is the forward gun deck nearing completion. It is designed to fire black powder via radio control with the system hidden almost completely under the deck. I still have quite a bit of detailing to do, but most of the hard stuff is done. While the barrel is fully capable of firing scale (.32 caliber) lead shot, I doubt that the carriage and deck could stand up to the recoil, so I plan to just fire powder only.

Image

Image

Here is the radio control system installed under the deck. It is an onboard glow driver system for large scale radio control planes.

Image

I put a tube in the center of the gun carriage to feed the glow driver and grounding wire to the underside of the gun barrel.

Image

Here are the glow and grounding wires fed through the tube.

Image

To absorb the shock from firing black powder, I installed threaded rods into the barrel trunnion bearings and fed the rods all the way through the carriage and gun deck, then bolted them from underneath. This allows reasonable access for removing and replacing the glow plug when needed.

Image

I will post a Youtube link when I do a video of the test firing. I will gradually build up the amount of black powder until I get the desired combination of smoke and boom. I may use some wadding but it will have to be nonflammable to avoid scorching the main deck.

Next I have to do the same thing for the aft cupola!


Report this post
Top
 Profile  
Reply with quote  
PostPosted: Thu Dec 26, 2013 8:52 pm 
Offline
User avatar

Joined: Mon Jan 10, 2005 10:46 am
Posts: 2411
Location: Hoboken, NJ
Amazing work. Have I yet asked who made the Dahlgrens? I've asked to have some made at a couple of places, for 1/96th scale, but there's somethign about the reverse curve (?) that makes it hard to machine, evidently.

_________________
We like our history sanitized and theme-parked and self-congratulatory, not bloody and angry and unflattering. - Jonathan Yardley


Report this post
Top
 Profile  
Reply with quote  
PostPosted: Thu Dec 26, 2013 9:12 pm 
Offline

Joined: Wed Nov 19, 2008 9:14 am
Posts: 107
Devin wrote:
Amazing work. Have I yet asked who made the Dahlgrens? I've asked to have some made at a couple of places, for 1/96th scale, but there's somethign about the reverse curve (?) that makes it hard to machine, evidently.


Thanks Devin. I think as good as you're going to get in 1/96 are the white metal ones from William Blackmore at CIM. I understand that Steve Nutall did some brass CNC ones which I am sure are beautiful, but also very hard to find. I had a gunsmith turn these barrels for me, along with the 1/16 ones. He used the Verlinden barrels as patterns, which unfortunately resulted in a little sharper angles than I would have liked. If they bother me too much I will smooth them out with bondo. The carriages are extensively modified Verlinden, which are near perfect copies of what is shown in the 1866 Naval Ordnance Instructions. The barrels all appear to be slightly different on the real Dahlgrens and the Keokuk barrels were a little more angular than some, especially on the cascabels.


Report this post
Top
 Profile  
Reply with quote  
PostPosted: Fri Dec 27, 2013 1:52 am 
Offline
User avatar

Joined: Mon Jul 01, 2013 6:55 am
Posts: 421
Location: Madrid (Spain)
Wow, impresive. I want more

_________________
Currently working on:

USS Nimitz 1/200
http://www.shipmodels.info/mws_forum/viewtopic.php?f=13&t=153310


Report this post
Top
 Profile  
Reply with quote  
PostPosted: Fri Dec 27, 2013 9:12 am 
Offline
User avatar

Joined: Mon Jan 10, 2005 10:46 am
Posts: 2411
Location: Hoboken, NJ
Glen,

Thanks for the info. Yes, I've spoken with William at Cottage Industries, and when it's time to arm the Carondelet, I'll be working out a special order with him for the Dahlgrens, and then possibly turning my own for the Army guns she carried (already have done that with the 32 pounder).

Really looking forward to seeing this. Hopefully in person some day!

-Devin

_________________
We like our history sanitized and theme-parked and self-congratulatory, not bloody and angry and unflattering. - Jonathan Yardley


Report this post
Top
 Profile  
Reply with quote  
PostPosted: Fri Dec 27, 2013 11:56 am 
Offline

Joined: Wed Nov 19, 2008 9:14 am
Posts: 107
Devin wrote:
Glen,

Thanks for the info. Yes, I've spoken with William at Cottage Industries, and when it's time to arm the Carondelet, I'll be working out a special order with him for the Dahlgrens, and then possibly turning my own for the Army guns she carried (already have done that with the 32 pounder).

Really looking forward to seeing this. Hopefully in person some day!

-Devin


I wanted to have it ready for the sesquicentennial of the attack on Charleston and her sinking, but life got in the way. I still plan to put it in the water off Fort Sumter and over the wreck site (on a dead calm day). Also take it to the WRAM and Weak Signals shows in 2015.

By the way, I started messing with the Verlinden 1/200 model last week and gave up. There is a drawing out there someplace that has the fore and aft cupolas with different diameters and Verlinden used it. The aft cupola should have the same beam-wise diameter as the forward unit, and it is way undersize. I decided to just bandsaw a new model out of basswood and have hollow cupolas because most of the details on the Verlinden model that make it worth building are incorrect.


Report this post
Top
 Profile  
Reply with quote  
PostPosted: Tue Dec 31, 2013 1:25 pm 
Offline

Joined: Wed Nov 19, 2008 9:14 am
Posts: 107
Here is a video of my forward Dahlgren being fired via radio control. My camera audio clearly didn't like the sound of the boom as it's less than a third of the actual volume, compared to my voice. Using wadding will help keep the gunpowder from falling out of the barrel, but I am concerned that the backpressure may be too much for the mount and deck, since you can see the deck moving back slightly with just the small amount of unwadded powder I used. I will be also test firing the stern gun with .32 caliber lead shot before I add any details.

http://www.youtube.com/watch?v=Um5L4Gld ... e=youtu.be

Happy New Year - I'm bringing it in with a bang!


Report this post
Top
 Profile  
Reply with quote  
PostPosted: Tue Dec 31, 2013 3:19 pm 
Offline

Joined: Sun Nov 14, 2010 4:54 pm
Posts: 329
Cool.

Congratulations and best wishes for 2014.


Report this post
Top
 Profile  
Reply with quote  
PostPosted: Thu Jan 02, 2014 10:01 am 
Offline

Joined: Wed Mar 18, 2009 12:29 pm
Posts: 247
Location: Amiens - FRANCE
Hello Glen,

Felicitations for your amazing work, its' very beautiful and clean!

I note your good idee for the firing with a glow, it will be a good idea for my Missouri!
I want to know where you find the figurine near the gun?.

One more time, very good job!

Alain


Report this post
Top
 Profile  
Reply with quote  
PostPosted: Thu Jan 02, 2014 11:42 am 
Offline

Joined: Wed Nov 19, 2008 9:14 am
Posts: 107
AlainFR wrote:
Hello Glen,

Felicitations for your amazing work, its' very beautiful and clean!

I note your good idee for the firing with a glow, it will be a good idea for my Missouri!
I want to know where you find the figurine near the gun?.

One more time, very good job!

Alain


Thanks Alain and I very much admire your Monitor and Montery(?)! The figure is Verlinden from a two-figure set that includes this sailor and the same officer provided with the Dahlgren kit. I'm not sure of the kit number.


Report this post
Top
 Profile  
Reply with quote  
PostPosted: Thu Jan 02, 2014 1:31 pm 
Offline
User avatar

Joined: Sun Mar 13, 2005 11:51 am
Posts: 2407
Location: Belgium
That's some awesome work Glen, love the gun!

_________________
The merchant shipyard


Report this post
Top
 Profile  
Reply with quote  
PostPosted: Sat Jan 04, 2014 12:16 am 
Offline

Joined: Fri Jan 03, 2014 5:45 pm
Posts: 2
Absolutely amazing!! Thanks for posting this thread.

I'm new here but have been involved with R/C cars and helicopters for 30 years, and more recently steam powered boats. Later this year I'll be converting a picket boat model of the boat that sank the Albemarle to live steam R/C, with hopefully a working torpedo.

Anyway, my 2c, I think you should use universal joints on your motor shafts. I'm sure you've aligned everything perfectly, but it's also protection against running aground or shock that comes through the propeller.

Also, have you tested buoyancy? She's going to weigh a ton...are you sure she will float?

Looking forward to seeing the rest!


Report this post
Top
 Profile  
Reply with quote  
PostPosted: Sat Jan 04, 2014 6:22 pm 
Offline

Joined: Wed Nov 19, 2008 9:14 am
Posts: 107
SteamSurge wrote:
Absolutely amazing!! Thanks for posting this thread.

I'm new here but have been involved with R/C cars and helicopters for 30 years, and more recently steam powered boats. Later this year I'll be converting a picket boat model of the boat that sank the Albemarle to live steam R/C, with hopefully a working torpedo.

Anyway, my 2c, I think you should use universal joints on your motor shafts. I'm sure you've aligned everything perfectly, but it's also protection against running aground or shock that comes through the propeller.

Also, have you tested buoyancy? She's going to weigh a ton...are you sure she will float?

Looking forward to seeing the rest!


Thanks for the kind words. The props are protected by the keel and beam, so the only way I might get into trouble is backing down on something, which I will avoid. Besides I only know of one type of coupler that actually provides any protection for prop strikes or fouling and it's a shear pin arrangement that's a little too Rube Goldberg for me.

As for weight, no problems there! I am expecting to have to add at least 20 lbs of ballast. Even filled, the steam units don't weigh much more than large amp 12V batteries.

As far as buoyancy, the bow and stern sections are filled solid with balsa blocks and the flanks use 1/2" thick balsa filler blocks between each frame. I'm not sure this thing would stay underwater if you tried to hold it there!


Last edited by Glen the Rotorhead on Tue Jan 07, 2014 8:49 am, edited 1 time in total.

Report this post
Top
 Profile  
Reply with quote  
PostPosted: Sun Jan 05, 2014 1:47 pm 
Offline

Joined: Fri Jan 03, 2014 5:45 pm
Posts: 2
Good to hear!
Looking forward to seeing more.


Report this post
Top
 Profile  
Reply with quote  
PostPosted: Thu Feb 13, 2014 9:00 am 
Offline

Joined: Wed Nov 19, 2008 9:14 am
Posts: 107
Here is the forward gun deck with just about all the details added. Just missing, crew, tools, and handle for the elevation screw. Amati makes some really nice scale rope!

Image


Report this post
Top
 Profile  
Reply with quote  
PostPosted: Thu Feb 13, 2014 9:25 am 
Offline

Joined: Wed Nov 19, 2008 9:14 am
Posts: 107
It took a little research to figure out what kind of gratings were used on Keokuk, as initially I couldn't make any sense of what Corbett showed in the hatchways and on top of the armored coaming for the smokestack. I was expecting the usual wood gratings. These however appeared to be thin flat slats in one direction and round bars in the other. Then I stumbled across this photo of USS Galena. It appears that the ironclads used iron gratings instead of wood. You can see one laying in front of the open hatchway in the foreground and a second one lashed semi-upright next to the hatchway in the rear. No doubt they were quite heavy, evidenced by the rear grating appearing to bow under its own weight.

Image

Based on the Corbett dimensions, the gratings were made of 1 inch by 8 inch bars connected with 2 inch diameter bars (both presumed to be iron) spaced 12 inches between centers. On Keokuk, Corbett shows the gratings installed with the round bars running fore and aft. Not sure that it makes any difference on the hatchways, since they were square. These gratings of course would have provided much better protection from shot coming down the hatchways compared to wooden gratings.

I made each grating by stacking the correct number of bars (cut oversize), end gluing and clamping them, and drilling the holes for the bars. Shown below is the smokestack grating with the bars installed on the rods. I have the center one in position. I then glued each bar in place with thin CA, added shims, and glued the next bar in place (being careful not to permanently attach the shims in the process!)

Image

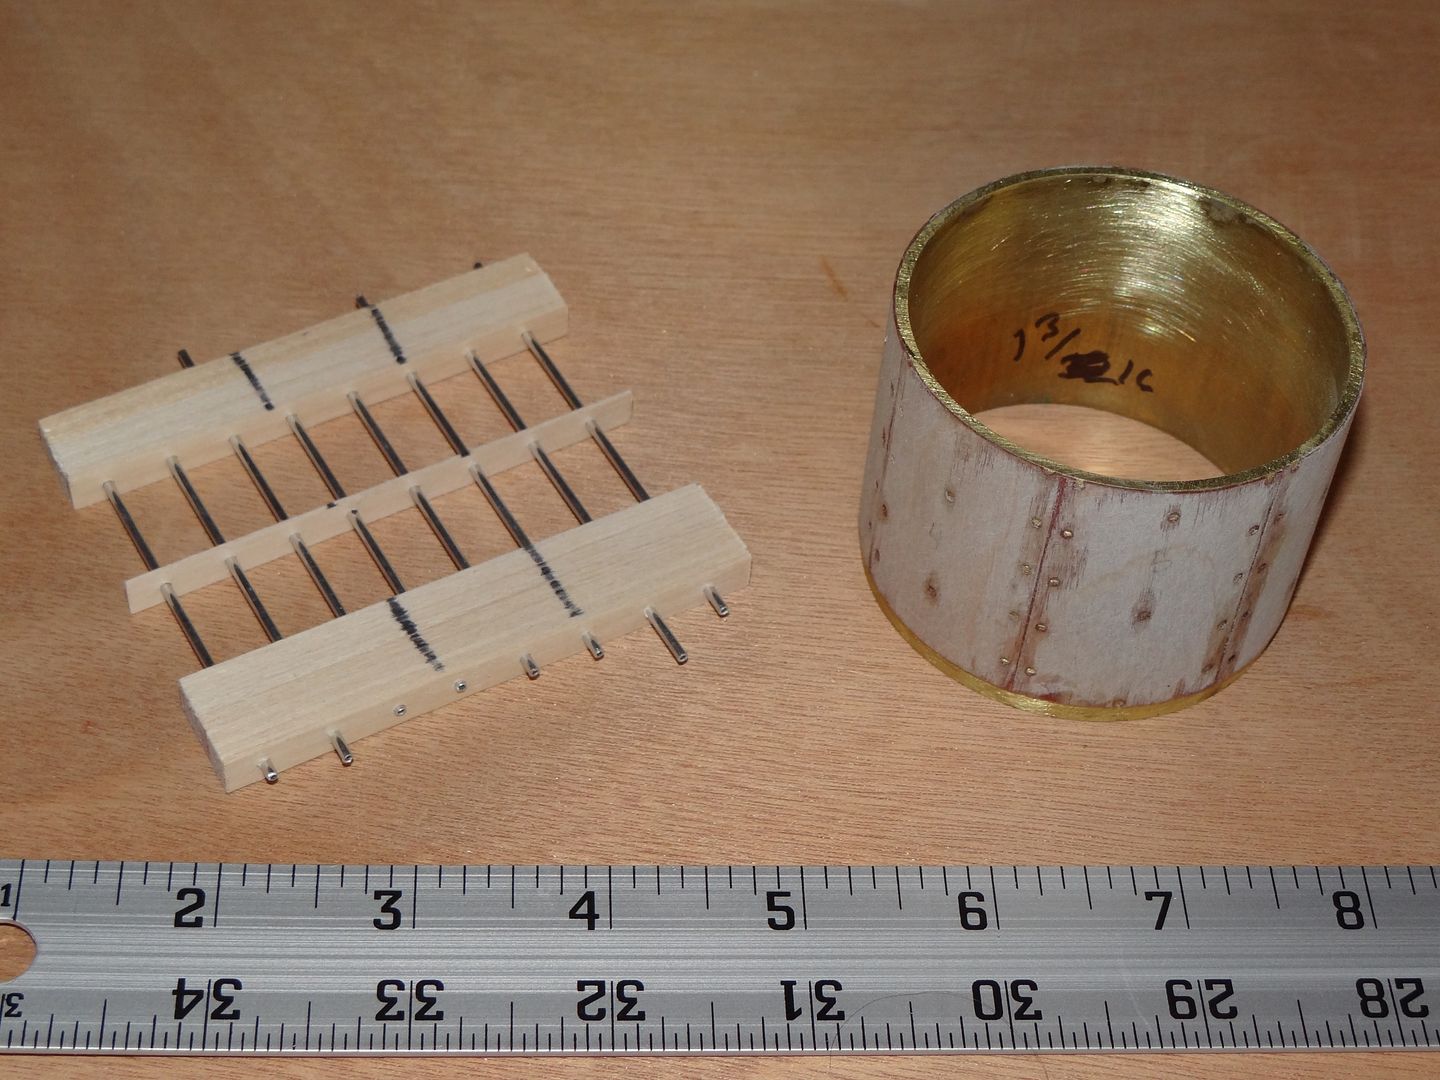
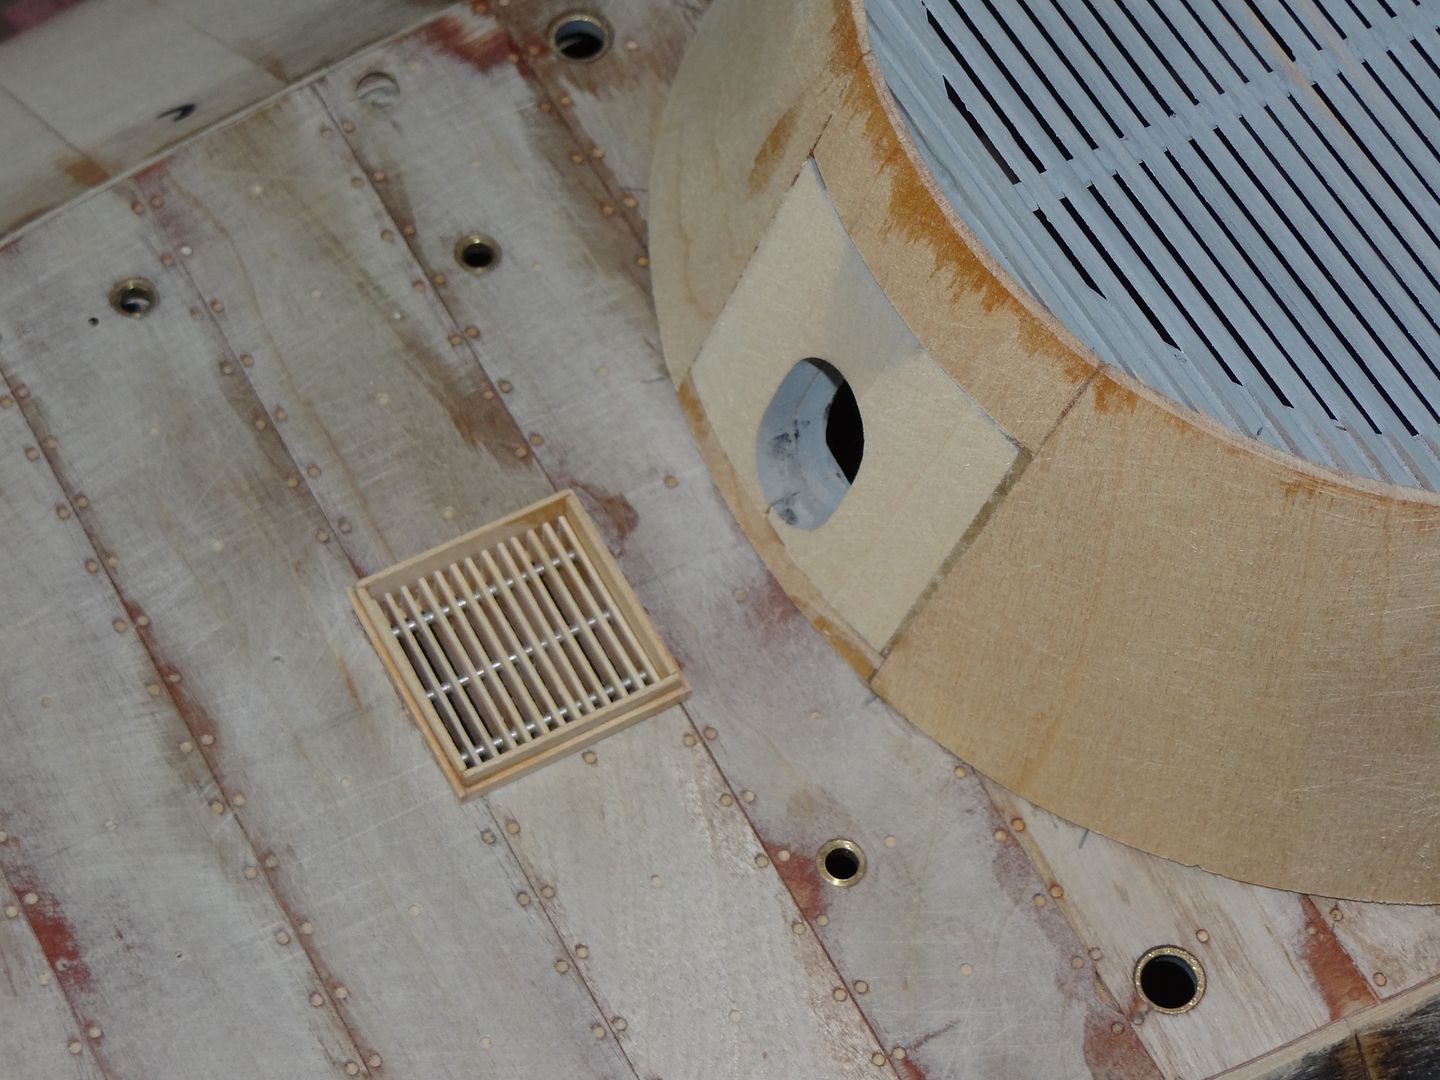
Here is one of the completed hatchway gratings with its coaming. The hatchways were 36 inches square.

Image

And the grating and coaming installed on the foredeck. The gratings are removable and I plan to follow the lead of the Galena photo (since I have nothing better) and paint the gratings and the interiors of the hatchway coamings white.

Image

I'm sure there was some kind of weather cover that could be installed over the hatchways, but Corbett doesn't include any in his drawing. If someone comes across photos of Civil War hatch covers, I would love to see them!


Last edited by Glen the Rotorhead on Tue Feb 18, 2014 9:39 am, edited 2 times in total.

Report this post
Top
 Profile  
Reply with quote  
PostPosted: Thu Feb 13, 2014 3:39 pm 
Offline
User avatar

Joined: Mon Jan 10, 2005 5:30 pm
Posts: 5385
Location: Nr Southampton England
really great, sharp, methodical work!


Love the thoughts that is going into all aspects of this build.

Fabulous!

Jim Baumann :thumbs_up_1: :thumbs_up_1:

_________________
....I buy them at three times the speed I build 'em.... will I live long enough to empty my stash...?
http://www.modelshipgallery.com/gallery ... index.html

IPMS UK SIG (special interest group) www.finewaterline.com


Report this post
Top
 Profile  
Reply with quote  
PostPosted: Thu Feb 13, 2014 5:14 pm 
Offline

Joined: Wed Nov 19, 2008 9:14 am
Posts: 107
JIM BAUMANN wrote:
really great, sharp, methodical work!


Love the thoughts that is going into all aspects of this build.

Fabulous!

Jim Baumann :thumbs_up_1: :thumbs_up_1:


Thanks Jim, that is quite a compliment coming from you! :smallsmile:


Report this post
Top
 Profile  
Reply with quote  
Display posts from previous:  Sort by  
Post new topic Reply to topic  [ 171 posts ]  Go to page Previous  1, 2, 3, 4, 5, 6, 7, 8, 9  Next

All times are UTC - 6 hours [ DST ]


Who is online

Users browsing this forum: jlusk and 25 guests


You can post new topics in this forum
You can reply to topics in this forum
You cannot edit your posts in this forum
You cannot delete your posts in this forum
You cannot post attachments in this forum

Jump to:  
Powered by phpBB® Forum Software © phpBB Group