The Ship Model Forum

The Ship Modelers Source
It is currently Wed Apr 24, 2024 1:19 pm

All times are UTC - 6 hours [ DST ]


Post new topic Reply to topic  [ 385 posts ]  Go to page Previous  1 ... 10, 11, 12, 13, 14, 15, 16 ... 20  Next
Author Message
PostPosted: Wed Apr 06, 2022 3:05 pm 
Offline
User avatar

Joined: Wed Sep 28, 2011 12:04 pm
Posts: 1820
Location: Paris
Beginning putting everything together

Over the years many parts have been produced and more recently painted. It slowly time to put everything together.

Image

The first step was to semi-permanently install the boat in the seascape. I do not expect to have to remove it again, but one never knows, so I am leaving filling the gaps around with acrylic gel to the very end. The model was screwed to the base from the bottom using a single wood-screw in the middle.

Image

At this point also the deckhouse could be permanently installed. Which in turn allowed to install the various ladders. These had been fitted with ‘brass’ anti-slip pads and shoes to keep them in place.

Image

The various skylights also have been installed and the steering-wheels together with the associated binnacles.

Image

The seams between the deckhouse, the skylights and the decks were touched with paint and some light ‘weathering’ with pastels applied with the idea to ‘pull together’ all parts visually. Thus, corners were touched up in dark grey pastel and typically more worn areas in front of ladders etc. were given a light rub with white pastel. This has to be with restraint, as the boat is meant to be depicted in a relatively new and well-maintained state, around 1878, so not much rust etc.

Image

Image

​​​​​​​BTW, the model is 286 mm long or 11 1/4 " ...

To be continued ....

_________________
Eberhard

Former chairman Arbeitskreis historischer Schiffbau e.V. (German Association for Shipbuilding History)

--------------------------------------------------------------------------------------------------------------------------------------------------------------------------------------------

Image Image Image Image


Report this post
Top
 Profile  
Reply with quote  
PostPosted: Thu Apr 07, 2022 11:27 pm 
Offline
User avatar

Joined: Sun Mar 07, 2010 12:01 am
Posts: 1645
Location: Corvallis, Oregon, USA
It is looking very nice!

Phil

_________________
A collision at sea will ruin your entire day. Aristotle


Report this post
Top
 Profile  
Reply with quote  
PostPosted: Fri Apr 08, 2022 12:36 am 
Offline

Joined: Wed Jan 02, 2013 1:15 am
Posts: 5012
Excellent in her small patch of sea!


Report this post
Top
 Profile  
Reply with quote  
PostPosted: Fri Apr 08, 2022 12:51 am 
Offline
User avatar

Joined: Tue Sep 29, 2020 4:35 pm
Posts: 1722
Location: Bretagne, France
Nice progress, it's very successful. The railing is going to be a big job. :thumbs_up_1:

_________________
Pascal

•Battleship Bretagne 3D: https://vu.fr/FvCY
•SS Delphine 3D: https://vu.fr/NeuO
•SS Nomadic 3D: https://vu.fr/tAyL
•USS Nokomis 3D: https://vu.fr/kntC
•USS Pamanset 3D: https://vu.fr/jXGQ


Report this post
Top
 Profile  
Reply with quote  
PostPosted: Fri Apr 08, 2022 1:16 am 
Offline
User avatar

Joined: Fri Dec 12, 2008 12:44 pm
Posts: 1779
Location: Herk-de-Stad, Belgium
It's really a gem, everything coming nicely together now!

_________________
"I've heard there's a wicked war a-blazing, and the taste of war I know so very well
Even now I see the foreign flag a-raising, their guns on fire as we sail into hell"
Roger Whittaker +9/13/2023


Report this post
Top
 Profile  
Reply with quote  
PostPosted: Fri Apr 08, 2022 12:06 pm 
Offline

Joined: Wed Jan 02, 2013 1:15 am
Posts: 5012
Though a small model, any ship will have a lot of pieces. One can gaze about and be reminded of the miniature construction of each small element!


Report this post
Top
 Profile  
Reply with quote  
PostPosted: Fri Apr 08, 2022 1:03 pm 
Offline
User avatar

Joined: Wed Sep 28, 2011 12:04 pm
Posts: 1820
Location: Paris
So true. And there are still many more tiny pieces to make and install. My most dreaded part are the chain-rails. I etched the stanchions already a long time ago, but unlike bar-rails, one cannot solder them together or the character of the chain will be lost.

_________________
Eberhard

Former chairman Arbeitskreis historischer Schiffbau e.V. (German Association for Shipbuilding History)

--------------------------------------------------------------------------------------------------------------------------------------------------------------------------------------------

Image Image Image Image


Report this post
Top
 Profile  
Reply with quote  
PostPosted: Fri Apr 08, 2022 1:39 pm 
Offline

Joined: Wed Jan 02, 2013 1:15 am
Posts: 5012
That sounds like a decent challenge. I remember EJ Foeth hand soldering anchor chain for his Hood and Song hand carving 1;200 anchor chain from wood, this seems a much greater challenge! Though I have been able to print some fairly small chain, certainly way beyond current 3D technology.

I am sure you will arrive at a clever solution!

Regards: Tom


Report this post
Top
 Profile  
Reply with quote  
PostPosted: Fri Apr 15, 2022 7:16 am 
Offline

Joined: Tue Feb 06, 2007 10:24 am
Posts: 2498
Location: Belgium
Wonderful to see it coming together! :thumbs_up_1: :thumbs_up_1: :thumbs_up_1:


Report this post
Top
 Profile  
Reply with quote  
PostPosted: Fri Apr 15, 2022 11:25 pm 
Offline
User avatar

Joined: Sun Mar 07, 2010 12:01 am
Posts: 1645
Location: Corvallis, Oregon, USA
Wefalc,

May I suggest a solution to the chain rails problem?

On a ship I was on we had chain lifelines around the main deck edges. These were chains strung between stanchions. But the chains were wrapped in canvas and the individual chain links were not visible (although the general outline was visible in the shape of the canvas).

From a distance they looked like white tubes and not like chains.

Phil

_________________
A collision at sea will ruin your entire day. Aristotle


Report this post
Top
 Profile  
Reply with quote  
PostPosted: Sat Apr 30, 2022 10:19 am 
Offline
User avatar

Joined: Wed Sep 28, 2011 12:04 pm
Posts: 1820
Location: Paris
Thanks, Phil, for this idea. Unfortunately, all pictorial evidence shows that this was not done on German Imperial Navy ships. But, as I say below, I think I have an idea for solving this problem. Preliminary experiments look promising ...

************************************

Further Assembly

Since the last post, turning handles made from 0.1 mm wire shaped in a die on the jeweller press that also flattened the end uniformly were glue onto the various ventilators. This operation was left to the last moment, as these handles are extremely flimsy and easily damaged or broken off. The ventilators now were ready to be spray-painted.

Image

There is some uncertainty around the interior colour of the ventilators. The interior appears very dark on the earliest photograph, suggesting that they have been either black or red. On later photographs with the black-white-yellow colour-scheme according the 1878 ordinance in some cases the interior seems to be the same colour as the exterior, namely white or yellow. There is no written evidence of a red interior, so I went for black to keep within the somewhat more sombre colour-scheme of the 1874 ordinance.

Image

Given the flimsy nature of all those parts that come on board now, I am working ‘inside-out’, so that I do not need to reach over already installed parts with the risk of breaking or bending something. This requires some strategic thinking.

Image

Now the lower carriage of the gun was finally assembled with the platform for the gun-captain, the shell-crane including its hand-cranks, and one training-shell in its wheeled loading-tray.

Image

The carriage was glued in place on its pivot. Unfortunately, once installed in the barbette many of the little details that took a lot of time to make are not visible anymore. However, I did make the effort, because there may be certain angles of view, where they may be in part visible at least.

Image

Next thing up will be the chain-rail around the deck-house. I think I found a way to simulate the chain, but I am waiting for some speciality wire (0.05 mm Konstantan wire, which is a copper-nickel alloy, which is somewhat tougher than pure copper).

Image


To be continued ....

_________________
Eberhard

Former chairman Arbeitskreis historischer Schiffbau e.V. (German Association for Shipbuilding History)

--------------------------------------------------------------------------------------------------------------------------------------------------------------------------------------------

Image Image Image Image


Report this post
Top
 Profile  
Reply with quote  
PostPosted: Mon May 02, 2022 11:59 am 
Offline

Joined: Wed Jan 02, 2013 1:15 am
Posts: 5012
This has been a long running project and you have gone to great lengths to produce accurately very small items. A tour de force in persistence and technique development.

One question, as I am not familiar with warship design of this period, what sort of "Armor" did this ship carry and where was it distributed? Later on a tenant of Battleship design was to have an immunity zone again her own battery capability. Was this the case or not?

Best regards: Tom


Report this post
Top
 Profile  
Reply with quote  
PostPosted: Mon May 02, 2022 1:36 pm 
Offline
User avatar

Joined: Wed Sep 28, 2011 12:04 pm
Posts: 1820
Location: Paris
Tom, that's a valid question. At that time, designers seem to have been pre-occupied to mainly protect some vital areas of the ships and also armour plate technology has not been very much advanced.

The WESPE-Class had an armour belt around the water-line and a 180° armoured breast-work around the barbette. One can see this from a lithographed plate that was produced in the very early 1880s and which tallies with other references:

Image

Image

This choice of armouring reflects the tactical concept for which these boats were designed: they were meant as a sort of detached 'fort' in front of the German coast-line, being able to keep at bay enemy warship by their heavy caliper gun. They were meant to operate in shallow waters, particularly also the Wadden Sea, where capital ships could not follow close enough to bring their own guns to bear. On this basis they really only needed frontal armour.

_________________
Eberhard

Former chairman Arbeitskreis historischer Schiffbau e.V. (German Association for Shipbuilding History)

--------------------------------------------------------------------------------------------------------------------------------------------------------------------------------------------

Image Image Image Image


Report this post
Top
 Profile  
Reply with quote  
PostPosted: Mon May 02, 2022 4:43 pm 
Offline

Joined: Thu Apr 28, 2022 9:45 pm
Posts: 4
Location: New Zealand
A very interesting subject, well executed and the fine detail is incredible, well done. :thumbs_up_1:
Garry


Report this post
Top
 Profile  
Reply with quote  
PostPosted: Mon May 02, 2022 8:42 pm 
Offline

Joined: Wed Jan 02, 2013 1:15 am
Posts: 5012
The armor scheme makes sense for the era, keep it afloat and protect the armament. The different "great Powers" even by WWII had somewhat differing philosophies for Battleship armor. Though large caliber AP shells had a certain destructive power, it was a ships own ammunition and powder train that could lead to it's destruction. Bismarck fairly early on lost her fire control and then her turrets. Once the magazines were flooded she was mostly being punched through with small holes and having her internal arrangements stirred about, but not much to cause a spectacular dramatic end.

Good work! Tom


Report this post
Top
 Profile  
Reply with quote  
PostPosted: Wed May 04, 2022 8:07 am 
Offline

Joined: Tue Feb 06, 2007 10:24 am
Posts: 2498
Location: Belgium
Great work as usual! :thumbs_up_1: :thumbs_up_1: :thumbs_up_1:

I'm looking forward to seeing what you come up with for the very fine chain.
If it doesn't work out, photo etched chain could do the job. For very fine chain, it doesn't look too bad if you twist it 90° at every link, and it can be made to hang exactly like you want it to. You can find it as part of many commercial PE sets.


Report this post
Top
 Profile  
Reply with quote  
PostPosted: Tue May 24, 2022 3:40 pm 
Offline
User avatar

Joined: Wed Sep 28, 2011 12:04 pm
Posts: 1820
Location: Paris
Thank you very much, gentlemen, for your kind words !
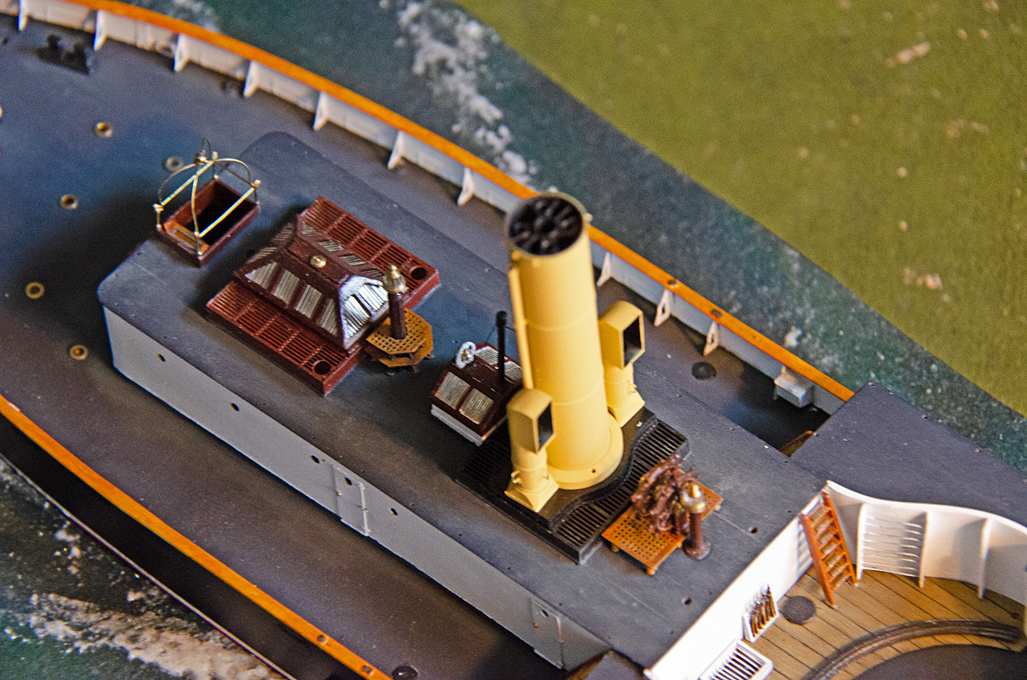
********************************************************

Ship’s Boats

While I was waiting for the wire for the chain-rails to arrive, I turned my attention to the ship’s boats. At that time there were four, two class IV cutters, a gig, and a joll-boat. In 1:160 they are all less than 50 mm long and 10 mm wide. Thanks to some research of various colleagues in Germany, we have reasonably good information on these boats, including lines and their constructional arrangement. In addition, there has been a text-book on boat construction, published since 1878 with updates every few years until 1929, which gives quite a few details on the naval boats.
I don’t quite feel like building four boats with all their internal constructional and fitting-out details, so I decided to show three of them covered, ready for the sea, while the small joll-boat will be shown ready for launching in an emergency, as it was custom. I don’t actually know, whether this boat or one of the cutters was used for the purpose, but assumed that the smaller boat would be easier to get into the water in a hurry, say in case of man-over-board.
An additional challenge is that these boats were clinker-built. I once built a clinker-dinghy in 1:60, which was only 50 mm long, but it was much wider and deeper and with wider strakes. These boats typically have ten strakes on each side.
I picked the long, but narrow and shallow gig first. I had a body plan available, drawn by a colleague some years ago. In addition, the text-book (BRIX, 1883) provides constructional details. The text indicates the dimension of the various parts.

Image
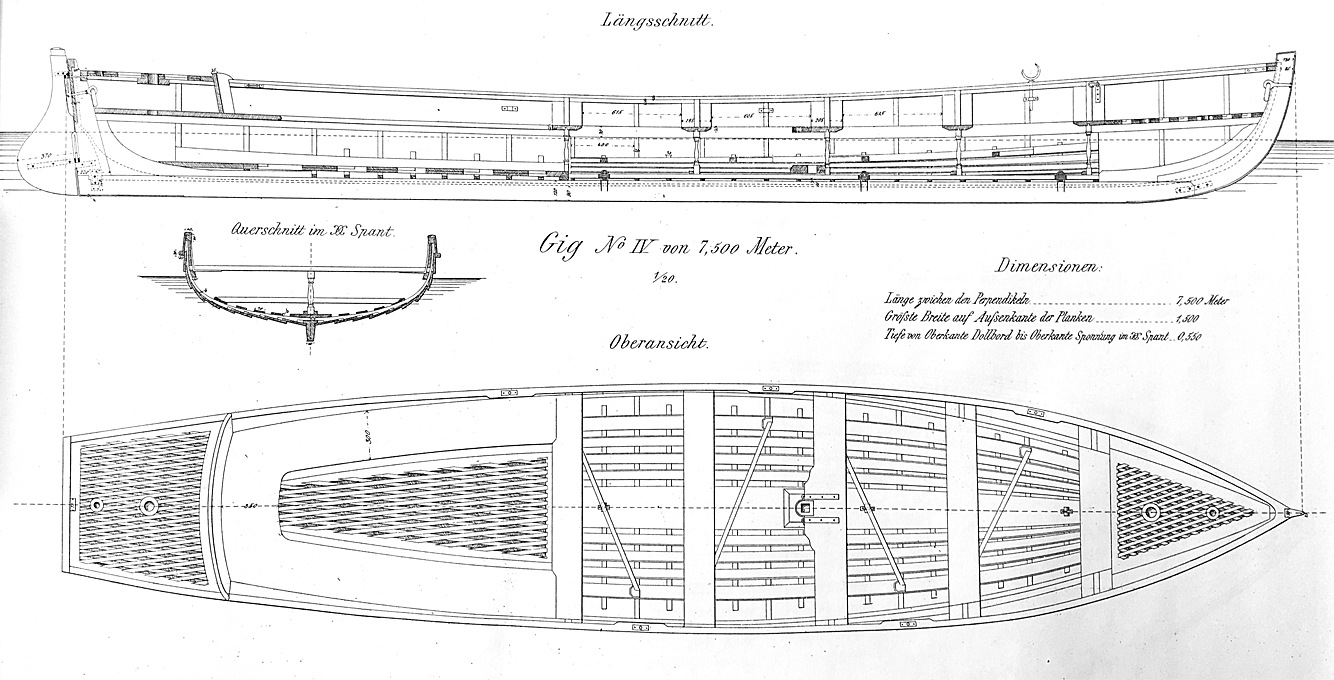
Drawing of gig from Brix (1883)

I decided on an overhead plank-on-bulkhead (POB) construction, which in a way seemed easier than trying to carve the hull with its hollow lines aft from a solid piece of wood using templates. The individual framing stations were taken from the body plan and drawn with additional material on the top in order to arrive at a common reference plane for overhead construction. The bulkhead were laid out for laser-cutting from Canson-paper.

Image
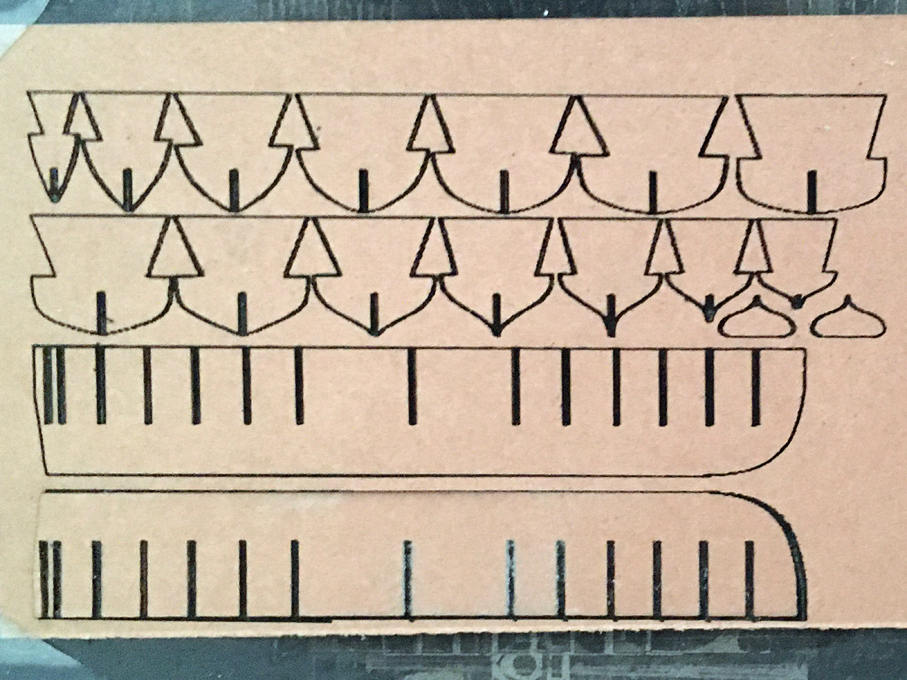
Laser-cut bulkheads and keel-pieces

A second drawing for laser-cutting contains another set of bulkhead and doubling pieces for the keel and stem, so that a rabbet for planking can be created. All pieces are doubled up after soaking in varnish to stiffen them.

Image
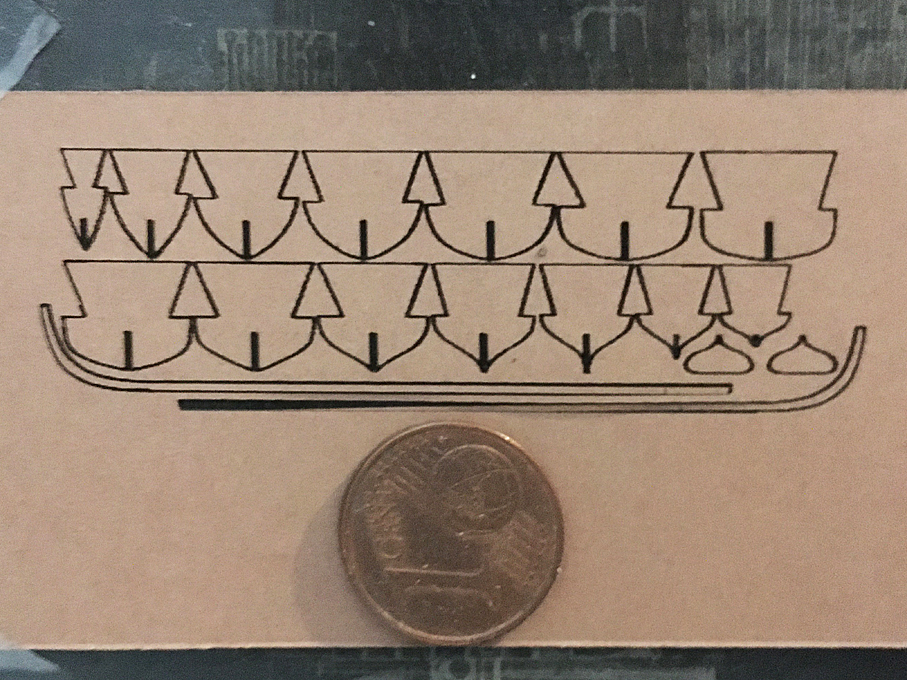
2nd set of laser-cut bulkheads and doubling pieces for the keel and stem

The pieces then were assembled as is tradition for POB-construction and mounted onto a piece of Canson-paper for extra stiffness. The whole assembly will then mounted in turn on a piece of wood to ease handling.

So far so good, but planking will be challenge, as the individual planks will be less than a millimetre wide overall. In theory, they should be only 0.06 mm thick in 1:160 scale, but I will give it a try with the 0.15 mm thick Canson-paper and see what it will look like. If the planking looks to coarse, I will have to start all-over again …

Image
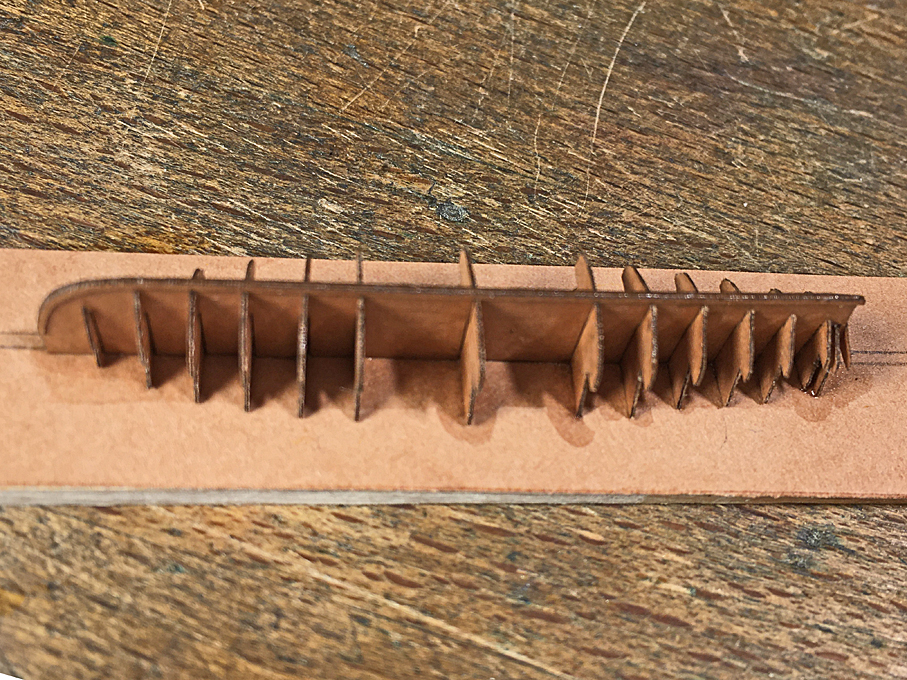
The assembled parts for the POB-construction

Tapering such planks by hand would be too much of a challenge an not quite feasible in paper I think. However, my 2D-CAD program gives the length of the Bezier-curves used to draw the outline of the frames. So, I simply took this length, divided it by 10, divided the result by 4 and then multiplied it by 5, which gives the plank width at each station line assuming that they overlap by about a quarter of their width (according to the drawing in BRIX, 1883). The contours of the planks were drawn for laser-cutting with this information. A first run, was not so successful – I will have to optimise the cutting parameters.

********
BRIX, A. (1883): Praktischer Schiffbau – Bootsbau.- 38 p. + 15 pl., Berlin (Hütte).

To be continued ....

_________________
Eberhard

Former chairman Arbeitskreis historischer Schiffbau e.V. (German Association for Shipbuilding History)

--------------------------------------------------------------------------------------------------------------------------------------------------------------------------------------------

Image Image Image Image


Report this post
Top
 Profile  
Reply with quote  
PostPosted: Thu Jun 02, 2022 4:32 am 
Offline

Joined: Tue Feb 06, 2007 10:24 am
Posts: 2498
Location: Belgium
Now that is a challenge in this scale! :thumbs_up_1: :thumbs_up_1: :thumbs_up_1:
I would guess that the most difficult aspect would be to achieve smooth curves on the hull; I would be affraid of the thin planking material buckling or getting stretched (and thus become too strait) in between the bulkheads. Very interested to see how this turns out!

But if not satisfactory, you can always default back to the method Philip Reed uses in 1/192 scale: a heat-formed plastic hull, clad with thin paper planks.


Report this post
Top
 Profile  
Reply with quote  
PostPosted: Thu Jun 02, 2022 6:26 am 
Offline
User avatar

Joined: Fri Dec 12, 2008 12:44 pm
Posts: 1779
Location: Herk-de-Stad, Belgium
marijn van gils wrote:
Now that is a challenge in this scale! :thumbs_up_1: :thumbs_up_1: :thumbs_up_1:
I would guess that the most difficult aspect would be to achieve smooth curves on the hull; I would be affraid of the thin planking material buckling or getting stretched (and thus become too strait) in between the bulkheads. Very interested to see how this turns out!

But if not satisfactory, you can always default back to the method Philip Reed uses in 1/192 scale: a heat-formed plastic hull, clad with thin paper planks.

I have built small boats in 1/200 scale, using PS plastic strips bevelled off one side, using a slightly under scale hull shape just like you suggest, Marijn.
Attachment:
zwartezee-05.jpg
zwartezee-05.jpg [ 64.41 KiB | Viewed 3745 times ]

_________________
"I've heard there's a wicked war a-blazing, and the taste of war I know so very well
Even now I see the foreign flag a-raising, their guns on fire as we sail into hell"
Roger Whittaker +9/13/2023


Report this post
Top
 Profile  
Reply with quote  
PostPosted: Thu Jun 02, 2022 7:58 am 
Offline
User avatar

Joined: Wed Sep 28, 2011 12:04 pm
Posts: 1820
Location: Paris
This would have been, indeed, one option, but then I would have needed to shape a plug using templates, which I wanted to avoid.

The spacing of the bulkheads may be too far apart. I considered filling in the spaces with a fine-grained hard foam-board that I have. On the other hand, the clinker-building is to a certain degree self-levelling. If I manage to install the garboard plank without sagging, the next plank will follow the edge of it and so on - let's keep fingers crossed.

_________________
Eberhard

Former chairman Arbeitskreis historischer Schiffbau e.V. (German Association for Shipbuilding History)

--------------------------------------------------------------------------------------------------------------------------------------------------------------------------------------------

Image Image Image Image


Report this post
Top
 Profile  
Reply with quote  
Display posts from previous:  Sort by  
Post new topic Reply to topic  [ 385 posts ]  Go to page Previous  1 ... 10, 11, 12, 13, 14, 15, 16 ... 20  Next

All times are UTC - 6 hours [ DST ]


Who is online

Users browsing this forum: No registered users and 24 guests


You can post new topics in this forum
You can reply to topics in this forum
You cannot edit your posts in this forum
You cannot delete your posts in this forum
You cannot post attachments in this forum

Jump to:  
Powered by phpBB® Forum Software © phpBB Group