The Ship Model Forum

The Ship Modelers Source
It is currently Tue Apr 16, 2024 2:12 pm

All times are UTC - 6 hours [ DST ]


Post new topic Reply to topic  [ 329 posts ]  Go to page 1, 2, 3, 4, 5 ... 17  Next
Author Message
 Post subject: 3D printing
PostPosted: Fri Dec 31, 2021 1:23 am 
Offline
User avatar

Joined: Sun Mar 07, 2010 12:01 am
Posts: 1645
Location: Corvallis, Oregon, USA
Is there a separate topic/thread on the Forum for 3D printing?

Santa brought me an Anycubic Photon Mono for Christmas and I am trying to learn how to use it.

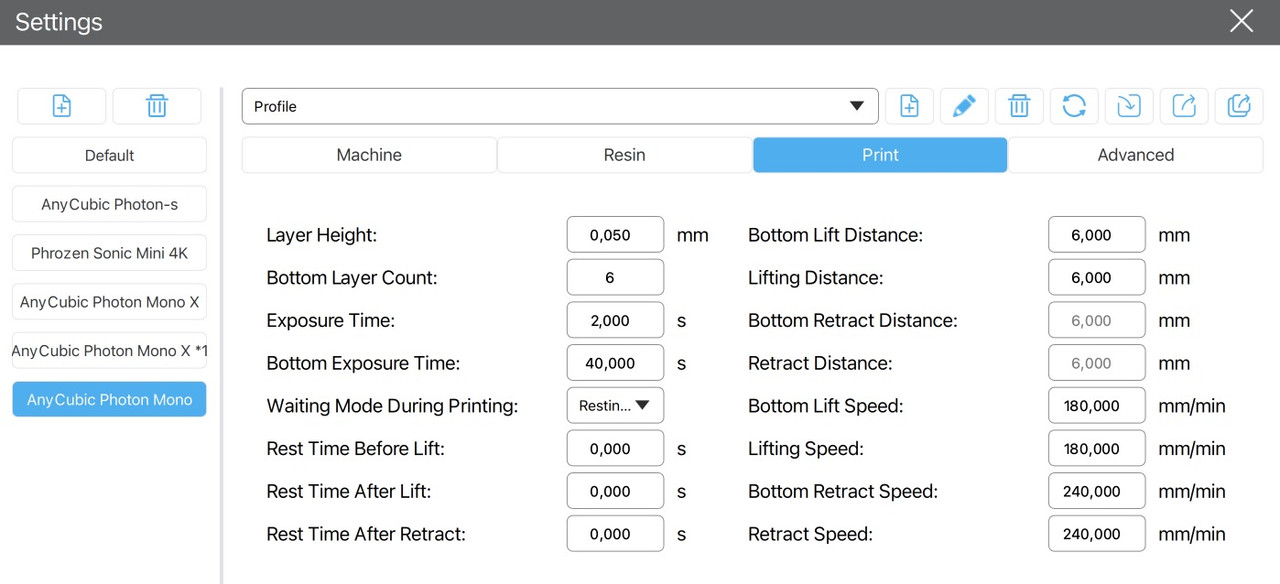
The Photon Workshop software that comes with it is crapware. I have tried three versions with no success. After I found one that seemed to work and printed a test run of some simple parts using the default settings and the print failed. Looking through the files I found that it exposed the base layers for 40 seconds each, as set up in the program, but then printed the rest of the job with zero second exposures! Only the bases printed!

However, I got Chitubox and it works pretty good.

The biggest surprise came when I found Microsoft 3D Builder will fix and bless the 3D files I created for my USS Oklahoma City CLG-5 CAD model. Some of them were started in 2004, before any reasonable quality home 3D printers existed, and before the software would generate STL or OBJ files. None of the model was drawn with 3D printing in mind - much of it is just 2D surfaces and not 3D solids. But I have tried a few, selecting all the parts and using "Solid Define" to make them a cobbled together solid. Most have more leaks than a sieve!

But 3D Builder opens them, says they have problems, and then patches them up. Chitubox takes them in, slices them, and produces a print file for the printer.

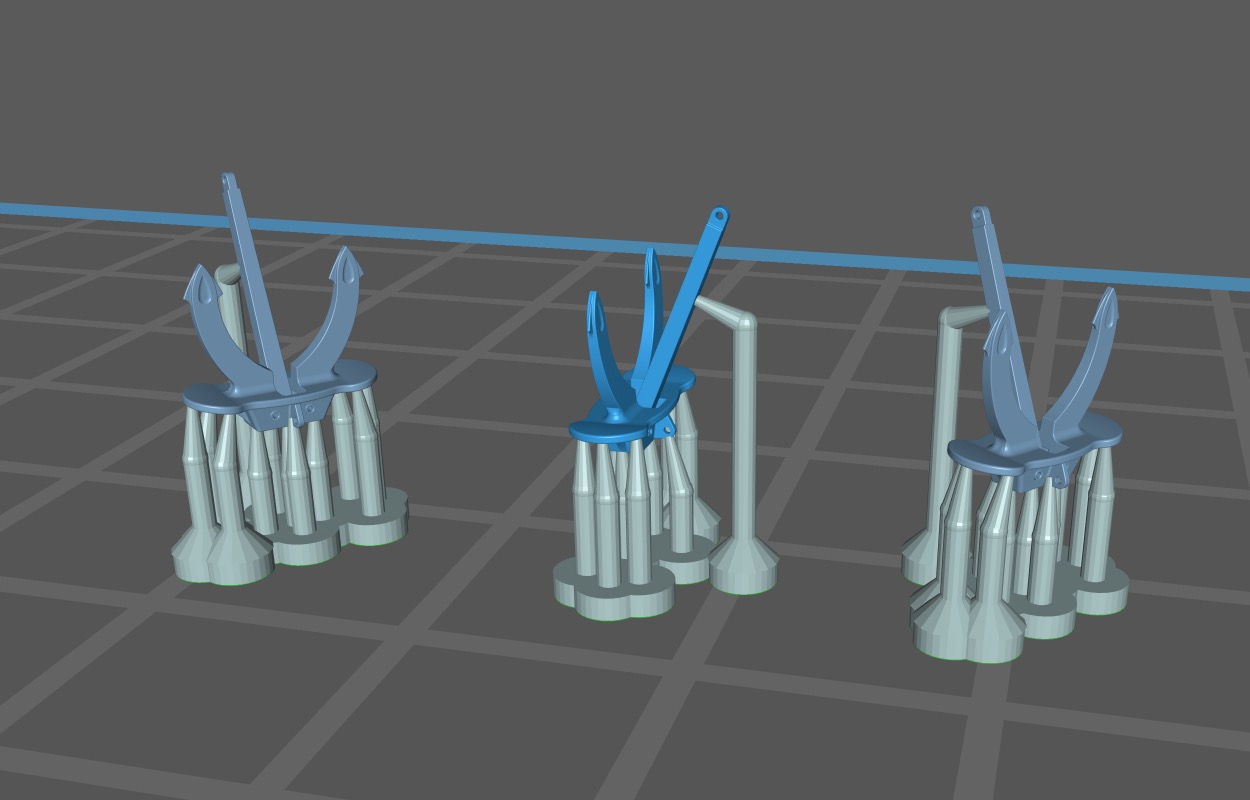
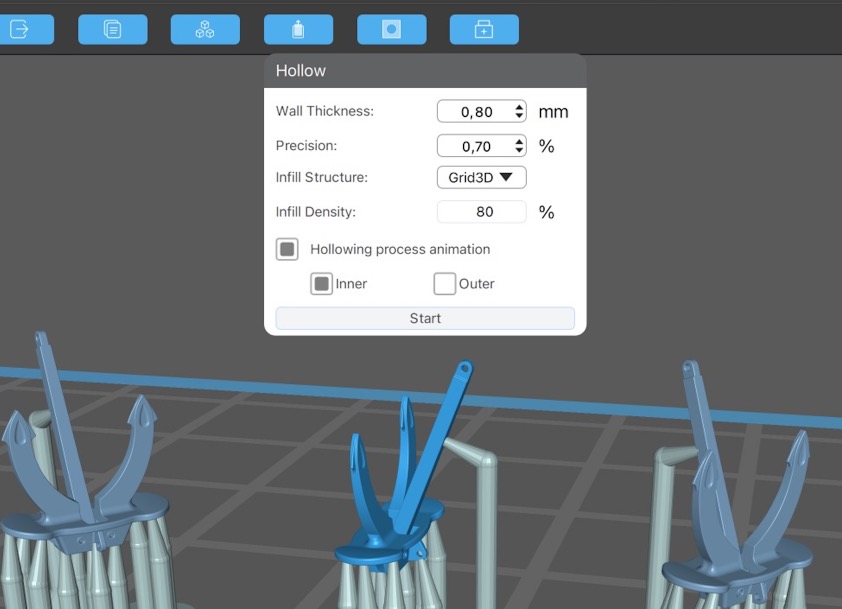
I have attached a photo of one of the most complicated single pieces - the anchor. The larger flukes piece has 60866 polygons, and is about an inch across. This was printed with the default settings for the printer (0.05 mm vertical steps and 4.5 second exposure). It came out pretty good!

Now I am printing a propeller. At 1:96 the blades are 0.0165 mm radius at the edges and only about 0.5 mm thick in the middle. There was no way I could cast something this thin in metal, especially with the compound curves. I am printing it at the maximum resolution of the printer - 0.01 mm - just to see if it works!

If this works it means I can use the files I generated over 14 years while making my CAD model of the USS Oklahoma City CLG-5 and I will resume the 1:96 model.

https://www.okieboat.com/CAD%20model.html
https://www.okieboat.com/Ship%20model%20page.html

Phil


Attachments:
anchor 3D print.jpg
anchor 3D print.jpg [ 278.27 KiB | Viewed 3444 times ]

_________________
A collision at sea will ruin your entire day. Aristotle
Report this post
Top
 Profile  
Reply with quote  
 Post subject: Re: 3D printing
PostPosted: Fri Dec 31, 2021 1:51 am 
Offline

Joined: Wed Jan 02, 2013 1:15 am
Posts: 5012
Phil! I trust the anchor isn't just a "fluke". Looks really good. I expect you will learn that the art comes in placing supports and orientation. Your anchor is better than my first simple efforts at printing. One can't always print to exact scale, sometimes something will have to be beefed up a little to print. The selection of resin also is important. For my printer the Phrozen Rapid Black makes for very fine detail but seems to shrink down a little. The Model Gray is smoother and goopier but seems to stay straight better for spars and booms as it drys. I does tend to fill in small holes like in a padeye whereas RB doesn't, a resin also much better for anchor chains.

With your great body of accumulated 3D files you should have great success!

Cheers: Tom


Report this post
Top
 Profile  
Reply with quote  
 Post subject: Re: 3D printing
PostPosted: Fri Dec 31, 2021 5:04 am 
Offline
User avatar

Joined: Wed Sep 28, 2011 12:04 pm
Posts: 1818
Location: Paris
For a 'first' this looks more than pretty good !

I had the same experience with laser-cutting, that one needs to modify the modelled dimensions somewhat to obtain the correctly cut dimension. It was somewhat unpredictable and depended on the orientation of the part and what was around it etc.

You 3D-printing guys are putting up a real challenge for us, who still work by hand. Both methods have their limitations, but I will have to look seriously into the 3D-printing option to stay 'competitive' (not that I actually have the intention to compete ...).

_________________
Eberhard

Former chairman Arbeitskreis historischer Schiffbau e.V. (German Association for Shipbuilding History)

--------------------------------------------------------------------------------------------------------------------------------------------------------------------------------------------

Image Image Image Image


Report this post
Top
 Profile  
Reply with quote  
 Post subject: Re: 3D printing
PostPosted: Fri Dec 31, 2021 7:19 am 
Offline
User avatar

Joined: Tue Sep 29, 2020 4:35 pm
Posts: 1720
Location: Bretagne, France
Welcome to the club, Phil! Good choice.

Chitubox has a function to fill objects or hollow them out, there are many that are not filled in on 3D object sites, free or not, you have to be careful. Because by printing in failure it can damage the trans parent film of the tray and worse the screen. Always have film sheets in advance.

https://www.britmodeller.com/forums/ind ... -fep-film/

To fill object I choose the 3D grid, but I haven't tested this function much yet..

4,5 seconds seems to me very long and will make lose precision at the level of the part, the details will be diffuse because too much exposed to UV, the 2 seconds of base seems reasonable.

As for the 0.01 mm, I don't think that it brings much with this printer with 47 micron pixels, 0.05 is quite enough, it is designed for that.

At 0.01 mm you are at least multiplying by 5 the printing time and the use of the film, the UV lamps and the screen. It's up to you.

Basic setting, Mono X.

Image

An exemple of supports for an anchor.

Image

Image

_________________
Pascal

•Battleship Bretagne 3D: https://vu.fr/FvCY
•SS Delphine 3D: https://vu.fr/NeuO
•SS Nomadic 3D: https://vu.fr/tAyL
•USS Nokomis 3D: https://vu.fr/kntC
•USS Pamanset 3D: https://vu.fr/jXGQ


Report this post
Top
 Profile  
Reply with quote  
 Post subject: Re: 3D printing
PostPosted: Fri Dec 31, 2021 8:53 am 
Offline
User avatar

Joined: Mon Nov 18, 2013 3:41 pm
Posts: 2948
Location: Mocksville, NC
Phil,

Welcome to the 3D modeling effort!!! Your anchors look very good - esp. for a 1st attempt. My first printing was a bust - nothing stuck to the plate, but I quickly remedied that problem. As both Tom & Pascal have mentioned, this is a learning process - nothing guaranteed at this point. However, I think we've all learned the basic tenets of this medium - type of resin, orientation of the part, and PROPER support of the part. I still find myself getting an occasional misprint due to the lack of proper supports.

What I DO find interesting about all this is that both Tom & I are using a basic, low-end printer, operating with a freeware slicing program, printing parts designed with a freeware version of a 3D design program - and achieving really remarkably detailed and crisp parts that simply at these small scales would be impossible to realize if created by hand. So....you've joined our ranks (more or less :big_grin: ) - be sure to have plenty of Kleenex and a fifth of Paul Jones handy as needed!!!! :doh_1:

Good to have another crew member come aboard!!!

Hank

_________________
HMS III
Mocksville, NC
BB62 vet 68-69

Builder's yard:
USS STODDARD (DD-566) 66-68 1:144, Various Lg Scale FC Directors
Finished:
USS NEW JERSEY (BB-62) 67-69 1:200
USN Sloop/Ship PEACOCK (1813) 1:48
ROYAL CAROLINE (1748) 1:47
AVS (1768) 1:48


Report this post
Top
 Profile  
Reply with quote  
 Post subject: Re: 3D printing
PostPosted: Fri Dec 31, 2021 10:51 am 
Offline
User avatar

Joined: Sun Jul 03, 2011 5:10 pm
Posts: 275
Location: Windsor Junction NS
Ahoy!

I am but a neophyte compared to the gents above, and their experience and results speak for themselves.

I've downloaded and am starting to use the 3D modeling software they've suggested to me, but so far, using the free online 'Tinkercad' program, I've managed to design and print the items below.

The great thing about 3D printing is that running a new prototype takes a few hours of work, and a few hours of waiting.

I don't know how long I've put into making the items below, but having the ship's cranes are on revision 4, and the crane truck is on revision 3 now - each time I add a bit more detail, add a bit more functionality, and improve the model.

I am not yet at the point where I can copy a blueprint and make it a physical object - the limitation there was Tinkercad - I think the Designspark program will let me do that a bit better as I learn it. (Online tutorials are helping!)

Note, I think you guys are all using resin type printers, as opposed to the filament style printer that I have, so you end up with much smoother finishes than I get. I'm considering getting another printer now. LOL.

NS


Attachments:
Bonnie Crane.JPG
Bonnie Crane.JPG [ 71.77 KiB | Viewed 3411 times ]
Bonnie Crane V4.JPG
Bonnie Crane V4.JPG [ 96.46 KiB | Viewed 3411 times ]
Cranes Boat etc.jpg
Cranes Boat etc.jpg [ 274.12 KiB | Viewed 3411 times ]

_________________
ICBM Address: 44:78N 063:63W

Ex RCN, HMC Ships Gatineau, Athabaskan, Charlottetown, St. John's, Montreal, Charlottetown, Summerside, Montreal.
Report this post
Top
 Profile  
Reply with quote  
 Post subject: Re: 3D printing
PostPosted: Fri Dec 31, 2021 12:53 pm 
Offline

Joined: Wed Jan 02, 2013 1:15 am
Posts: 5012
For anyone out there wanting to try printing a simple item, here is a link to a 1:144 fire hose, on bulkhead rack. As it is a .stl file it can be resized easily. This prints well with a SLA printer in a flat orientation.

https://www.dropbox.com/s/9hus2kle4xjnz ... 4.stl?dl=0

Tom


Report this post
Top
 Profile  
Reply with quote  
 Post subject: Re: 3D printing
PostPosted: Fri Dec 31, 2021 2:08 pm 
Offline
User avatar

Joined: Sun Mar 07, 2010 12:01 am
Posts: 1645
Location: Corvallis, Oregon, USA
I printed my propeller file, and this is like magic! It was drawn at 1:1 scale from the original blueprints, with all the complex curves and small radii. I had considered machining the props on a NC mill, or trying to cast them. But at 1:96 the blade thickness at the center is about 0.054 inch (1.5 mm), and only 0.013 inch (0.32mm) at the edges. There was no way to cast something that thin, and even trying to machine it out of brass/bronze would be quite a challenge. I would have to make the blades thicker for either option, and that would be a lot of work!

But it printed essentially perfectly without having to make the blades thicker! It is 1.47 inch (37.5 mm) diameter. Here are some photos straight off the sprue (after washing and curing). It was printed with the large diameter horizontal and the hub pointing up. The 0.01 mm step produced no visible "jaggies" in the curved blade surfaces.

The first picture (top view) shows the surfaces with no further treatment.

The second photo shows the bottom side. It came out pretty "poxy" with all the support attachment points. The blade on the left has been cleaned up and the other three blades show the attachment point "flash." It was easy to clean up the flash, but I was worried about working on the very thin blades. I used a small file to take down the highest parts, and an Xacto knife blade to scrape the rest smooth. Then I used some 600 grit sandpaper to remove any light scraping marks and finished with #0000 steel wool.

I think if I can print this thing I can surely print all the other small parts - and there are a LOT of them!

And this is on a cheap entry level printer!!

Phil


Attachments:
Propeller 1 small.jpg
Propeller 1 small.jpg [ 124.96 KiB | Viewed 3392 times ]
Propeller 3 small.jpg
Propeller 3 small.jpg [ 113.15 KiB | Viewed 3392 times ]

_________________
A collision at sea will ruin your entire day. Aristotle
Report this post
Top
 Profile  
Reply with quote  
 Post subject: Re: 3D printing
PostPosted: Fri Dec 31, 2021 3:36 pm 
Offline

Joined: Wed Jan 02, 2013 1:15 am
Posts: 5012
Phil! You printed it just perfect. Depending on the resin you may not get any steps. With the Rapid Black I prefer for crisp detail parts, this can occur. The bottom side is always the challenge for a clean print, but at least the curvature of the blades helps in this respect. The challenge is making them look like something else than painted plastic. There are metal 3D printing techniques, but I know nothing about this.

Nice work! Tom


Report this post
Top
 Profile  
Reply with quote  
 Post subject: Re: 3D printing
PostPosted: Fri Dec 31, 2021 10:07 pm 
Offline
User avatar

Joined: Mon Nov 18, 2013 3:41 pm
Posts: 2948
Location: Mocksville, NC
Phil,

You're in it now, buddy!!!!! :heh: With parts like your props, there's no telling what you'll come up with next!

A year from now we'll find you on the back alleys and shady lanes of Corvallis late on a rainy night, trying to make a deal with some not-so-reputable Wookie for a jug of "hot & juicy" resin - like the bar district of Tatooine - telling all the hotties "I'm not the laser printer you're looking for".. :big_grin: :big_grin:

Hank

_________________
HMS III
Mocksville, NC
BB62 vet 68-69

Builder's yard:
USS STODDARD (DD-566) 66-68 1:144, Various Lg Scale FC Directors
Finished:
USS NEW JERSEY (BB-62) 67-69 1:200
USN Sloop/Ship PEACOCK (1813) 1:48
ROYAL CAROLINE (1748) 1:47
AVS (1768) 1:48


Report this post
Top
 Profile  
Reply with quote  
 Post subject: Re: 3D printing
PostPosted: Fri Dec 31, 2021 10:40 pm 
Offline
User avatar

Joined: Sun Mar 07, 2010 12:01 am
Posts: 1645
Location: Corvallis, Oregon, USA
It seems I have given the wrong impression. The anchor wasn't my first attempt to print one of my files.

I started by redrawing the 14" bitts. The cruiser had about ten of these along the sides. I very carefully drew it so that there could be no leaks (the problem that I was worrying about the most). I figured it didn't need any supports (mistake 1) because the base was the widest part and the cylindrical parts were almost vertical. They did print OK, except for the "elephant's foot" (what someone called it on another web site). The first six layers were exposed 40 seconds to get a hard base on the print platform. The rest of the layers were exposed 4.5 seconds. Step size was the default 0.05 mm.

The long exposure for the base layers made them oversized. You can see this little flange around the base in the photos - this was not a part of my file, and wasn't on the real bitts.

I reprinted them with supports (lesson learned) and they came out fine. What is really surprising is that they are the precise dimensions the 1:96 parts should be - within the limits of precision of my calipers. There was no shrinkage or over size with the 4.5 second exposure recommended for the Anycubit gray resin.

There were some "jaggies" on the tops. The 14" diameter cylinders are not perfectly vertical, but angled at 1" in 18" (the way the blueprints call it out) or 3.1798 degrees. Consequently the 17" flat discs on top are at a slight angle. At 0.05 mm steps size the steps are quite visible, as are a few places on the anchor flukes.

But on the propeller, with 0.01 mm steps and 4.5 second exposure the compound curves of the mainly horizontal blades have no visible "jaggies" even under magnification!

Of course, printing at 0.01 mm steps takes five times as long as 0.05 mm steps, but for things with complex curved surfaces like the props the wait is worth it. Speaking of props, I just printed six more, three right hand and three left hand. The ship had two of each, and if they printed OK I have some spares. Now I need to go take them off the platform, wash them and cure them.

I have used 98% isopropyl alcohol and 95% denatured ethanol. The ethanol is what Anycubit recommends, and it does clean the parts better. And I found that ordinary Ajax liquid dish washing detergent gets the printing platform very clean - I also wash the parts in it after the alcohol wash.

I am curing for 15 minutes per side under a 300 Watt photoprinter lamp bulb that emits a strong blue part of the spectrum (also used for making photo etch). The resin cures at 405 nanometers and visible violet light is 400 nanometers, so a long wave length UV light isn't necessary, or even desirable. The UV "black lights" may produce less energy at 405 nm than many white light bulbs.

Phil


Attachments:
14 inch bitts 2 small.jpg
14 inch bitts 2 small.jpg [ 109.66 KiB | Viewed 3368 times ]
14 inch bitts 3 small.jpg
14 inch bitts 3 small.jpg [ 133.97 KiB | Viewed 3368 times ]

_________________
A collision at sea will ruin your entire day. Aristotle
Report this post
Top
 Profile  
Reply with quote  
 Post subject: Re: 3D printing
PostPosted: Sat Jan 01, 2022 12:24 am 
Offline

Joined: Wed Jan 02, 2013 1:15 am
Posts: 5012
Phil:

Good first steps with useable product. These items have the advantage of being relatively simple consisting of basic external surfaces. Not currently using a surface modeling program we don't have "leak" issues but I understand the concept. With more complex combinations of shapes, for instance a 40 mm Bofors, placement of supports and plane of orientation for printing start to assume importance and one has to consider if the item should be broken down into several assemblies. As with the bitts, if it doesn't work out, try again!

Looking forward to seeing your beautiful 3D drawings become tactile hardware! It's a considerable advantage to have a considerable 3D design history behind you. Thank you for sharing your progress!

Cheers: Tom


Report this post
Top
 Profile  
Reply with quote  
 Post subject: Re: 3D printing
PostPosted: Mon Jan 03, 2022 7:38 pm 
Offline

Joined: Wed Jan 02, 2013 1:15 am
Posts: 5012
Phil:

I have been working on props and have some decent one's, though not as beautifully ship specific as yours. Now that you have plastic props, what do you intend to do with them with regards to paints or whatnot for an accurate appearances. I am aware that "Brass" props as seen on many models are "blingie". I attempted to age the brass props on Missouri with various materials to evolve a patina. Not perfect results.

Do you have any suggestions as to an effective surface treatment?

Cheers: Tom


Report this post
Top
 Profile  
Reply with quote  
 Post subject: Re: 3D printing
PostPosted: Mon Jan 03, 2022 8:23 pm 
Offline

Joined: Wed Jan 02, 2013 1:15 am
Posts: 5012
Attachment:
3 blade props.jpg
3 blade props.jpg [ 339.4 KiB | Viewed 3293 times ]


My own less elegant props, about the same size as Phil's. Attempting a different method, making airfoil sections spaced 2 mm apart and then moving each section a pre determined set of degrees to get a span wise even pitch change then merging the planes to form a solid.

A little tedious.

Tom


Report this post
Top
 Profile  
Reply with quote  
 Post subject: Re: 3D printing
PostPosted: Tue Jan 04, 2022 12:03 am 
Offline
User avatar

Joined: Sun Mar 07, 2010 12:01 am
Posts: 1645
Location: Corvallis, Oregon, USA
Tom,

I was hoping you could tell me how to finish the props - and other parts. I am just at the printing stage, and haven't learned much about finishing/painting the parts.

The props were manganese bronze (49-B-3e) according to the blueprints. I have no idea what paint formulation would look correct. I'll probably just use bronze paint if I can find it. I suppose they could also be plated, but I have no idea how to do that.

However, I do know that the props were polished to a high shine at the factory. When we went into dry dock they had some crud on them, but a little cleaning shined them up again. So shiny props aren't out of place. I am thinking of mounting the model in a dry dock similar to what Pascal did with his SS Nomadic. So I want the props shiny!

I have cheated a bit. I made all four blades the same dimensions, with two right hand and two left hand. But on the real ships the outboard propeller blades were a bit wider by about 4/10 of an inch (all the same diameter). They operated in less compressed water than the inboard props that were close to the hull. The extra width gave the outboard prop blades a larger area for increased thrust to match the thrust of the inboard blades at the same RPM. On the 1:96 model that would be a diameter difference of 0.004176 inches or 0.1 mm. I think that small a difference will not be noticeable, especially after they are painted.

****

The notes in the blueprints are interesting. The propellers were cast 3/16" to 1/2" oversize and then were ground down to the desired size. The blades were to be ground to within 1% of the specification dimensions which were given in 32nd of an inch. Props were dynamically balanced, with material removed from the after face of the blades. Diameter was 11 feet 10 inches, and the net weight of one propeller was 14,930 pounds. Max RPM was 355 - that's almost 6 revolutions per second.

The blade cross section was like an airplane wing, almost flat on one side and curved on the other. The blueprints show nine cross sections from near the hub to the tip. These were rotated along the blade axis to give the proportional pitch necessary to generate the same thrust per unit area along the entire blade surface.

I drew all of the cross sections, placed them on the blade radius and rotated them appropriately. Then I stretched a surface grid over the cross sections. The leading and trailing edges were 1/16" radius and I created a 1/16" radius surface along the edge around the blade to complete the surface. It got tricky near the hub where the blade flared in a 2" radius curve to a surface tangent to the hub surface. This curvature connection to the hub wasn't perfect in my model, but the 3D print came out really nice!

I designed the prop in 1:1 scale and it was pretty accurate. I am still amazed that it printed at 1:96 with the correct blade proportions. Sometimes things work out much better than you expect!

Phil

_________________
A collision at sea will ruin your entire day. Aristotle


Report this post
Top
 Profile  
Reply with quote  
 Post subject: Re: 3D printing
PostPosted: Tue Jan 04, 2022 12:38 am 
Offline

Joined: Wed Jan 02, 2013 1:15 am
Posts: 5012
Phil:

I am surprised that the inboard and outboard propellers were that similar. In the fast battleships it was found necessary to use a combination of four and five blade propellers to achieve satisfactory vibration levels. However because of the hull depth aft required by the large barbettes in the battleships the situation for smooth water flow was perhaps more complex. Though they had about the same speed, the Iowa's achieved their 33 knots at 202 RPM.

Perhaps the ultimate propeller technology exists in submarines where lack of cavitation is essential for quiet running. We had a great advantage here due to sophisticated and very accurate finish machining capability. Unfortunately this capability escaped greatly reducing this advantage. Alaska with a more cruiser like hull form aft had same diameter props inboard and outboard, but the outboard ones had slightly greater pitch. Max speed was obtained on 270 RPM.

As to painting the props? Both Hank and Willie have some experience with this and might have better input. I painted the ARL props with some Golden acrylic Brassish paint. Not a perfect solution and I'll look for a better paint. It might work to mix some burnt siena in? Alaska presented an easier solution, waterline model. I do believe that they should be primed as these thin blades are quite flexible . As to scaling things, the Chitubox is quite good at this though I attempt to draw my items to the scale I will use. Some resins do have a shrinkage factor. The model airplane guys have som pretty good metalizers, so maybe there is something out there.

Cheers: Tom


Report this post
Top
 Profile  
Reply with quote  
 Post subject: Re: 3D printing
PostPosted: Tue Jan 04, 2022 1:15 am 
Offline

Joined: Wed Jan 02, 2013 1:15 am
Posts: 5012
Phil:

A Fine Scale thread one guy recommended Reaper Miniatures 9197 "Old Bronze" and another started with copper then used some various washes to tint it to the desired color. I found the paint on line but not currently in stock.

Tom


Report this post
Top
 Profile  
Reply with quote  
 Post subject: Re: 3D printing
PostPosted: Tue Jan 04, 2022 3:35 am 
Offline
User avatar

Joined: Wed Sep 28, 2011 12:04 pm
Posts: 1818
Location: Paris
It appears that Alclad paints are among the best metallic paints on the market and have many different colours. They are organic solvent based and have to be sprayed over a gloss black base-coat. The smells seems to be a bit obtrusive I have read. I did not use them myself.

AGAMA from the Czech Republic make excellent rub-on/painting metallic paints with very fine metallic pigments. I got a set in Prague some years ago, but not sure what their availability would be in other parts of the world.

_________________
Eberhard

Former chairman Arbeitskreis historischer Schiffbau e.V. (German Association for Shipbuilding History)

--------------------------------------------------------------------------------------------------------------------------------------------------------------------------------------------

Image Image Image Image


Report this post
Top
 Profile  
Reply with quote  
 Post subject: Re: 3D printing
PostPosted: Tue Jan 04, 2022 11:34 pm 
Offline
User avatar

Joined: Sun Mar 07, 2010 12:01 am
Posts: 1645
Location: Corvallis, Oregon, USA
In (many) years past I used Chromatone brand metallic paints on plastic models. It was made by the Alumatone Corporation in Los Angeles. It contains petroleum distillate so you needed good ventilation. I have never tried airbrushing it.

I used aluminum and copper versions of the paints, and maybe gold - not sure. The paint flowed on in very smooth thin coats and dried with a pretty good metallic finish.

I still have two ounce bottles of aluminum and copper. The pigments have settled but the paint hasn't dried up. Must be at least 30 years old!

I looked on line and couldn't find it so either it isn't made any more or the company has a different name and product name.

Phil

_________________
A collision at sea will ruin your entire day. Aristotle


Report this post
Top
 Profile  
Reply with quote  
 Post subject: Re: 3D printing
PostPosted: Wed Jan 05, 2022 1:40 am 
Offline

Joined: Wed Jan 02, 2013 1:15 am
Posts: 5012
I searched the AGMA and a Czech hobby shop popped up who took various currencies including Pound Sterling and Aussie Dollars. The other brand seemed domestically available but I didn't find a Bronze amongst the extensive selections.

Tom


Report this post
Top
 Profile  
Reply with quote  
Display posts from previous:  Sort by  
Post new topic Reply to topic  [ 329 posts ]  Go to page 1, 2, 3, 4, 5 ... 17  Next

All times are UTC - 6 hours [ DST ]


Who is online

Users browsing this forum: No registered users and 28 guests


You can post new topics in this forum
You can reply to topics in this forum
You cannot edit your posts in this forum
You cannot delete your posts in this forum
You cannot post attachments in this forum

Jump to:  
Powered by phpBB® Forum Software © phpBB Group