The Ship Model Forum

The Ship Modelers Source
It is currently Thu Apr 25, 2024 2:56 pm

All times are UTC - 6 hours [ DST ]


Post new topic Reply to topic  [ 46 posts ]  Go to page Previous  1, 2, 3  Next
Author Message
PostPosted: Fri Apr 01, 2011 4:12 pm 
Offline
User avatar

Joined: Sat Dec 09, 2006 6:12 pm
Posts: 1173
Location: campbell river.b.c canada
thanks for the quick replys darren and sean,no i do not have a pressure pot,i have no problem with my castings as the material as it is super thin,it is the moulding stuff that gets the bubbles, and it is fairly thick like liquid honey.they are called por-a-cast by hyperlast and por-a-mold by synair .fromcoast fiber-tek producks in burnaby b.c


Report this post
Top
 Profile  
Reply with quote  
PostPosted: Fri Apr 01, 2011 5:17 pm 
Offline
User avatar

Joined: Fri Jan 22, 2010 2:55 pm
Posts: 58
Location: Calgary, AB Canada
Russ,

Actually as a followup to that--I recently picked up a pair of 1/72 photo-etched RN flag lockers from Cammett (along with a 1/72 AN/SPS-49 which s absolutely beautiful) and while they are beautiful, they actually don't fit Summerside (which apparently has one less row and is 9x10 as opposed to 10x10) so instead of wrecking the whole thing with trying to cut it short, I cast a copy. I was surprised at the fidelity I could get--so long as I was diligent in poking and prodding those bubbles out of the RTV. I've been able to get a couple of pulls out if it before I started tearing parts off and I'm fairly happy with the results--I'll try to remember to take photos so I can post them.

Long story short, despite being warned away from the Alumilite, I have nothing but good words for their High-strength silicone. If you're having issues with viscosity you might want to try it, as I've found when mixed properly the RTV flows like a nice maple syrup--not too runny but not too sticky either, and it has lots of working time to poke and prod those bubbles out :thumbs_up_1:

Cheers,

Sean

on review: isn't it typically Canadian to make reference to Maple Syrup--eh? :big_grin:

_________________
Now Complete: 1/72 HMCS SUMMERSIDE (MM 711)
Now Complete: 1/72 HMCS ST. CROIX(I-81)

Current Project(s): 1/72 HMS WALNEY(Y 04)


Report this post
Top
 Profile  
Reply with quote  
PostPosted: Sat Apr 02, 2011 8:12 am 
Offline
User avatar

Joined: Sat Feb 03, 2007 1:00 pm
Posts: 898
Location: Bowmanville, ON, Canada
Since you don't have either a pressure pot or vacuum chamber, it boils down to technique. There is always more than one way to something, but these tips should help.

After the rubber is mixed, let it sit for 10-15 min. You should have hours before it sets and at least a good hour before it starts to gel, so take your time. Most bubbles should rise to the top and burst.

Next, use a stick/spoon or other tool to dip into the rubber and let it flow off until there is a thin dribble, then run it over the part you want molded. Cover it with a thin coating, leaving gaps over holes that need to be filled in. Let it sit for another 10 - 15 min. This should allow the rubber to flow by gravity, filling in most of the surface. You can repeat for areas that didn't get covered. This should prevent most air from getting trapped.

Then, pour at the edge, to allow the rubber to flow down to the bottom of the box and slowly come up over the part, don't fill all at once, do it in 2-4 stages, allowing the rubber to level out naturally each time. This also allows air to rise at each stage and not get trapped.

Once it is over the top of the part, finish filling and let sit. This won't get all the air, but it should take care of most of it. It will take 40-60 min to fill a mold. You will learn to see when the rubber has finished leveling when it is time to pour more.

Even with degassed rubber, I use this technique to get perfect molds every time.

_________________
Darren (Admiral Hawk)
In the not so tropical climate of the Great White North.


Report this post
Top
 Profile  
Reply with quote  
PostPosted: Sat Apr 02, 2011 12:33 pm 
Offline
User avatar

Joined: Mon Jan 10, 2005 10:52 am
Posts: 2557
Location: Land of the Cheshire cat
Sean, Watching with interest, :thumbs_up_1: :thumbs_up_1: :wave_1: :wave_1:

_________________
Simple but effective.


Report this post
Top
 Profile  
Reply with quote  
PostPosted: Mon Apr 04, 2011 6:07 pm 
Offline
User avatar

Joined: Fri Jan 22, 2010 2:55 pm
Posts: 58
Location: Calgary, AB Canada
I'm sure it sounds strange, but I'm honored just knowing that you're watching my build Admiral :woo_hoo:

I've must have read your Moffett build a hundred times prepping for my first stab at hull construction--and I'm still reviewing it as I prepare to build my flush-decker. I'm lurking on the Helena build, just absorbing the knowledge like a sponge. Thank you sir for looking in on my little build here :)

Darren, thanks for the advice on mold-making. I do the drizzle-and-coat in general, but I'm going to start leaving the RTV to sit for 15 minutes like you recommend; maybe that will reduce my need to sit and prod :)

And now, back to the grind! Or the zodiac, as the case may be....

Cheers,

Sean

_________________
Now Complete: 1/72 HMCS SUMMERSIDE (MM 711)
Now Complete: 1/72 HMCS ST. CROIX(I-81)

Current Project(s): 1/72 HMS WALNEY(Y 04)


Report this post
Top
 Profile  
Reply with quote  
PostPosted: Mon Jul 04, 2011 1:59 am 
Offline
User avatar

Joined: Sun Jul 03, 2011 5:10 pm
Posts: 275
Location: Windsor Junction NS
Hello!

Here's a link to an interesting little paper project for you if you're interested...there's a simple version, and a complex version.

http://www.navy.forces.gc.ca/cms/5/5-a_eng.asp?id=608

Quote:
The Canadian Navy is pleased to offer two challenging paper model warships that can be downloaded and printed at home using ordinary colour printers. These kinds of traditional paper models are a fun and challenging hobby!

The warship offered here is the Canadian Maritime Coastal Defence Vessel, or MCDV, which is the primary coastal patrol vessel of the Canadian Navy.

The model is offered in two versions: one is simplified with fewer parts, and the other is an advanced version with more detail and more 3-D parts. The finished models are approximately 30cm (12”) long and 15cm (6”) high.


Enjoy!

NS

_________________
ICBM Address: 44:78N 063:63W

Ex RCN, HMC Ships Gatineau, Athabaskan, Charlottetown, St. John's, Montreal, Charlottetown, Summerside, Montreal.


Report this post
Top
 Profile  
Reply with quote  
PostPosted: Wed Sep 14, 2011 5:46 pm 
Offline
User avatar

Joined: Fri Jan 22, 2010 2:55 pm
Posts: 58
Location: Calgary, AB Canada
Well, needless to say things have been busy since I last posted here. For those who are spoiler junkies, let me just say the end of this adventure has made all of the effort worthwhile. For those wanting the rest of the story, read on...

When last I posted, I was working on the zodiacs for SUMMERSIDE. Based on my references, she would be carrying two--one large and one small.

Image

Thanks to a head-sup by a local model club member, I was able to pick up a 1/72 scale zodiac fairly cheap--it cost only the high-bid on Ebay for the vintage Jaques Cousteau PBY-5 kit (which includes a zodiac and two divers). I built it up and made several resin copies, one of which was cut in half, lengenthened and provided a deeper keel to make the larger RHIB.

Image

While picking away at on these two boats, work continued on other small(ish) details like parts of the anchor assembly, the rails for the life raft canisters, radar, flag lockers, air contitioners etc.

Image

Image

Image

The rails for the life raft canisters (my first attempt at soldering):

Image

Earlier I had sprayed the main deck(s) with a textured paint product--the sort of thing used to provide a faux-rock effect to outdoor furniture or whatnot. It replicated the ship's anti-slip texture quite well in this scale, but was very "hot" in that it had a tendency to melt styrene unless sprayed very lightly. Now I had to spray the decks on the super-structure, and after all the work put into it (including the bridge interior of which I'm very proud) I suddenly had visions of it all melting into a pile of chemical goo.

Image

Screwing up my courage, and masking more thoroughly than I have ever done before, I lightly sprayed the deck surfaces and crossed my fingers.

Image

After a few anxious minutes, I gently peeled back the masking to reveal miraculously undamaged bulkheads....and a pretty nice texture effect on the deck :)

Image

The last really major fitting needing completion prior to painting was the Bofors Boffin mount. I rebuilt the ready-use ammo rack since I wasn't pleased with how the short-cut I'd used (a cut-down inclined ladder) had turned out. I added some wire and etch to complete the siren assembly and kitbashed a "scooter" and associated hydraulics from the landing gear of a F-18 kit. I also stole a front seat from the old Esci US Guntruck kit for the operator's seat. Finally, I had a gun mount I was happy with.

Image

Image

Time was now getting short--I'd set a goal for myself in that I would have the model ready for display (and competition) at the Western Canadian Regional model show in Nanton Alberta for June 4. My typical two-steps-forward-one-back approach to modelling had left me with only a few days before the show to get everything done--not to mention the additional complication of needing to ship the model across the country after the show necessitating the disassembly of the most fragile fittings so they could be re-assembled once I made it to PEI in July. Suddenly the final fitting out became a rolling process where bits and pieces were strategicly glued in place (or tacked in place with Elmer's white glue and a prayer) in almost random order to make sure I wasn't disturbing not-yet-dry fittings while adding other fittings.

Image

At this time I ran several copies of the custom decals I would need on the printer at work--I'm glad I printed multiples as the ship's call-sign decals (they go above the forward bridge hatches) were really fragile, and out of six copies only one full pair could be made that wasn't damaged in some way. That said, the ship's crest turned out wonderfully, and I still have five left! Using a babrber-pole stripe from Hawk Graphic's 1/72 Halifax Class small marking decal set along with the crest, I painted and completed the ship's mast, and painted the main superstructure at the same time--to save some time it was hoped.

Image

With most of the really fiddly bits done, and with the stacks glued in place, I pre-shaded the hull, and began to add the railing staunchions to the main decks (the complete railings on the superstructure had aready been done shortly after I finished painting it). The stanchions were Billing's Boats 3-bar (flat style as opposed to ball); I'd hoped to design some PE ones, but my broken ankle last winter set me far enough back on the project I dropped the idea and went with the Billing's staunchions since they were "Close enough for Jazz".

Image

Image

To be continued.....

Cheers,

Sean

ps -- Hey NavyShooter, thanks for the tip! I'd seen these a while back when first considering the project, but had forgotten about them. I've downloaded them so my daughter can give it a go though :)

_________________
Now Complete: 1/72 HMCS SUMMERSIDE (MM 711)
Now Complete: 1/72 HMCS ST. CROIX(I-81)

Current Project(s): 1/72 HMS WALNEY(Y 04)


Report this post
Top
 Profile  
Reply with quote  
PostPosted: Thu Sep 15, 2011 3:04 am 
Offline
User avatar

Joined: Sat Jan 22, 2005 10:18 am
Posts: 4131
Location: Liverpool
Hi Sean you have been very busy producing a lot of nice work .I like your Zodiac conversion , good thinking.
Dave Wooley :thumbs_up_1: :thumbs_up_1: :thumbs_up_1:


Report this post
Top
 Profile  
Reply with quote  
PostPosted: Thu Sep 15, 2011 8:11 am 
Offline
User avatar

Joined: Tue Apr 17, 2007 9:18 am
Posts: 1979
Location: Brasil
Sean
superb :wave_1:


Report this post
Top
 Profile  
Reply with quote  
PostPosted: Thu Sep 15, 2011 5:39 pm 
Offline
User avatar

Joined: Fri Jan 22, 2010 2:55 pm
Posts: 58
Location: Calgary, AB Canada
Thanks guys! I'm especially enjoying your hangar build Dave; I'm planning on using some Fleetscale fittings for a future build (of HMCS CHARLOTTETOWN in fact!) so I'm keen to see what a master modeler does with them :)

Cheers,

Sean

_________________
Now Complete: 1/72 HMCS SUMMERSIDE (MM 711)
Now Complete: 1/72 HMCS ST. CROIX(I-81)

Current Project(s): 1/72 HMS WALNEY(Y 04)


Report this post
Top
 Profile  
Reply with quote  
PostPosted: Thu Sep 15, 2011 9:32 pm 
Offline
User avatar

Joined: Mon Jan 10, 2005 6:00 pm
Posts: 12145
Location: Ottawa, Canada
Lovely work, Sean! Will you be at the Alberta Military Modellers Show this weekend?

_________________
De quoi s'agit-il?


Report this post
Top
 Profile  
Reply with quote  
PostPosted: Thu Sep 15, 2011 10:28 pm 
Offline
User avatar

Joined: Fri Jan 22, 2010 2:55 pm
Posts: 58
Location: Calgary, AB Canada
Timmy,

I am, although it's looking more and more doubtful if my zebra-striped PT boat will be joining me.... :dead:

If you're there too and you see me wandering about (I'm the guy with the bushy beard and the HMCS SUMMERSIDE baseball cap) give me a shout :wave_1:

Cheers,

Sean

_________________
Now Complete: 1/72 HMCS SUMMERSIDE (MM 711)
Now Complete: 1/72 HMCS ST. CROIX(I-81)

Current Project(s): 1/72 HMS WALNEY(Y 04)


Report this post
Top
 Profile  
Reply with quote  
PostPosted: Fri Sep 16, 2011 4:08 pm 
Offline
User avatar

Joined: Mon Jan 10, 2005 6:00 pm
Posts: 12145
Location: Ottawa, Canada
Will do! See you there - I'll be the Asian kid bringing the 1/700 Japanese cargo-liner.

_________________
De quoi s'agit-il?


Report this post
Top
 Profile  
Reply with quote  
PostPosted: Tue Mar 13, 2012 5:07 pm 
Offline
User avatar

Joined: Fri Jan 22, 2010 2:55 pm
Posts: 58
Location: Calgary, AB Canada
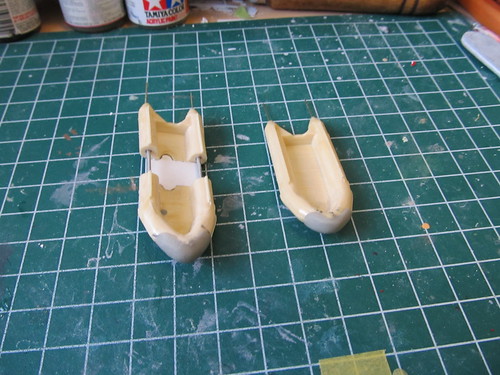
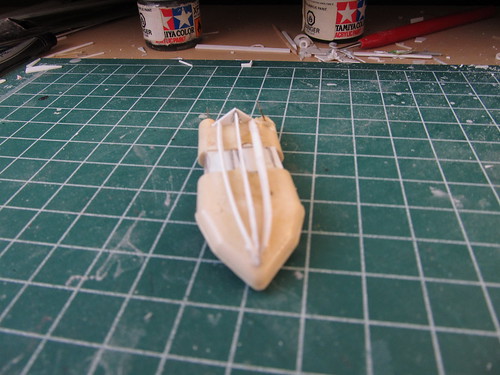
Previously on "Scratch-building by a Dummy...." :)

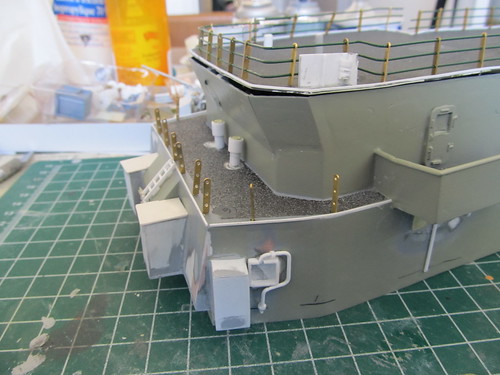
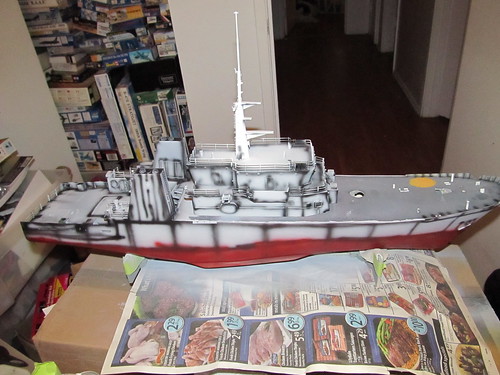
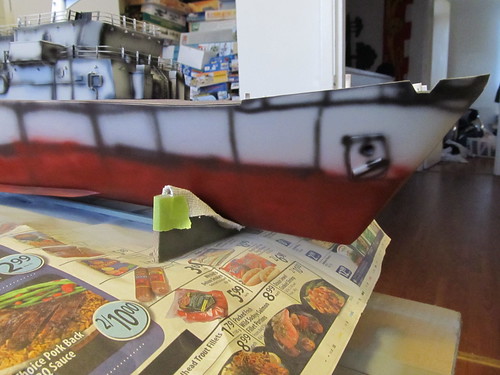
I had preshaded the 1/72 scale hull...

So now we get down to June 3, the (Friday) night before the show. After a full day at the office (having successfully delivered a project and thus feeling pretty enthusiastic) I immediately came home for a marathon 12-hour session of painting, masking, re-painting, cursing over-spray, masking, painting, threatening to throw the model out a second-floor window, re-masking, re-painting, and finally, decaling. After a 2-hour nap, I promptly packed the whole kit and caboodle into it's Rubbermaid container for the 1-hour drive south to Nanton.

Image

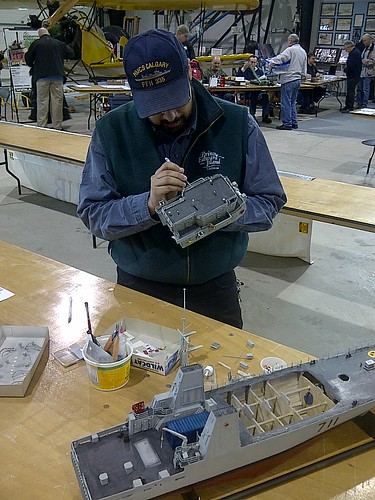
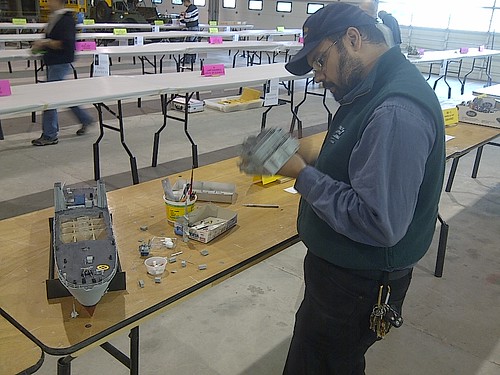
And here we are in Nanton, where Sean realizes that he'd not thought to remove the masks from the bridge windows, and is frantically peeling off tape in the vain hope that one can be both gentle, and fast. :)

Image

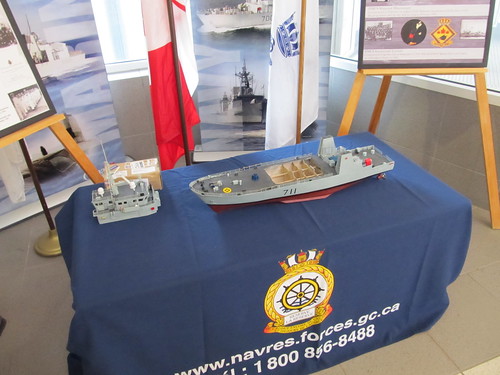
Nonetheless, masking removed, and final loose fittings secured to the hull, SUMMERSIDE looked the part of a 1/72 warship--and perhaps while not the best model in her category (the top two were flawless) she certainly was the largest! Regardless, SUMMERSIDE did bring home Bronze in her category, and was awarded Best Canadian Naval Vessel (sponsored by the Resin Shipyard) and IPMS Canada Member's choice--both awards being very pleasant surprises to her now nearly comatose builder.....

After Nanton, it was back home for SUMMERSIDE to be packed in preparation for her cross-Canada journey. Safely stowed in her Rubbermaid container, and wrapped in multiple layers of twine, tape and this-side-up warnings, she--thanks to the graciousness of the Greyhound Gods--made it safe and sound to PEI. My daughter and I were to follow six weeks later.

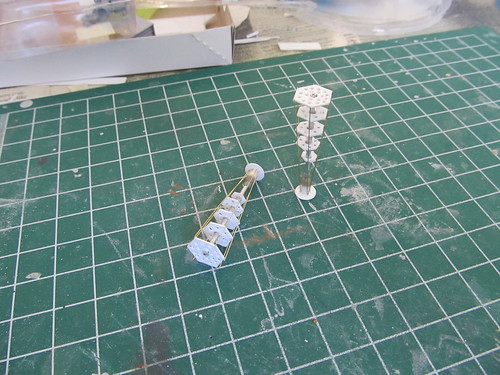
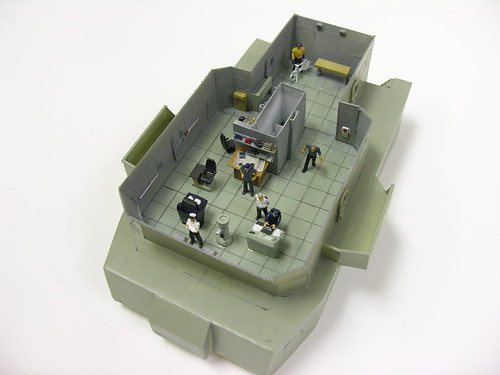
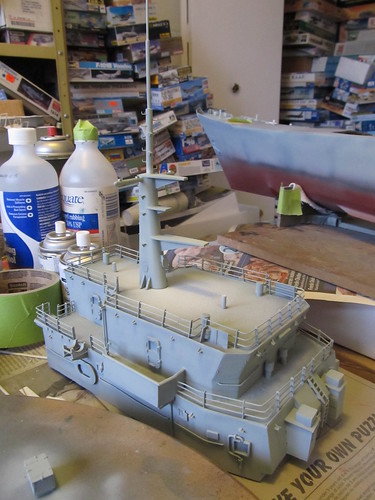
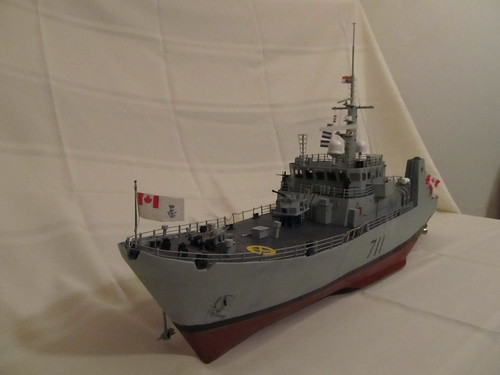
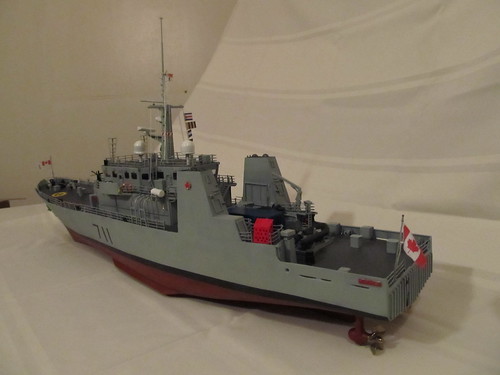
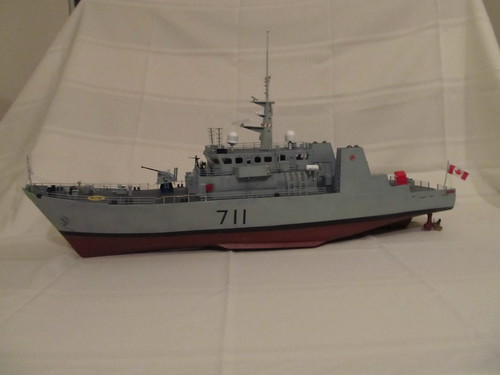
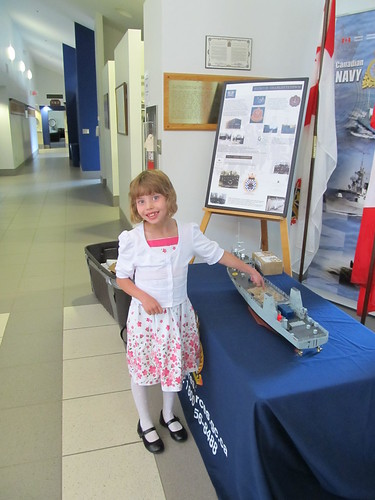
Once on PEI I took the final assembly steps, including rigging the mast and flying the ship's call sign--and gluing down all the fiddly bits in a much more permanent manner. Here are a couple of "beauty shots" taken the night before her presentation.

Image

Image

Image

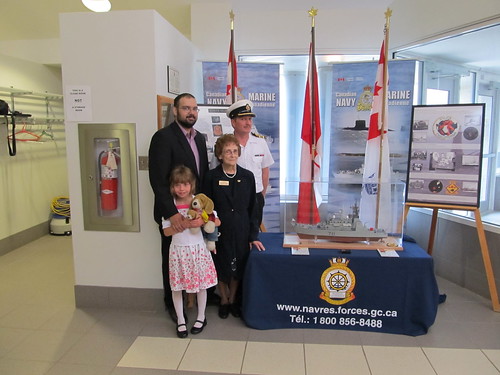
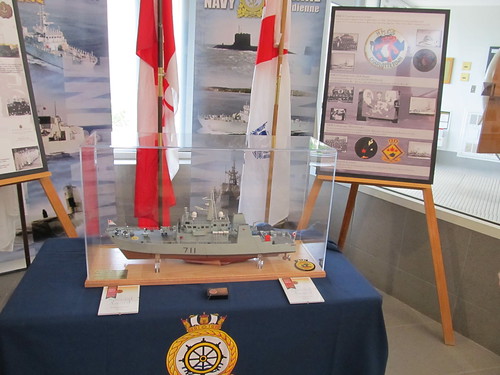
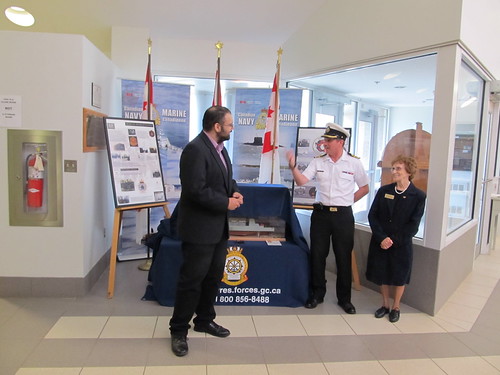
I was very pleasantly surprised at how enthusiastic the CO of HMCS QUEEN CHARLOTTE (the naval reserve unit in Charlottetown PEI) was to receive the model. Cdr. Gallant had an entire unveiling arranged, including, as a representative of the ship herself (at the time off the coast of Boston) the dear lady who had christened her 12 years before. I've included below some photos of the ship in her case--awards arranged with her, as well as some photos of myself and my daughter at the ceremony.

Image

Image

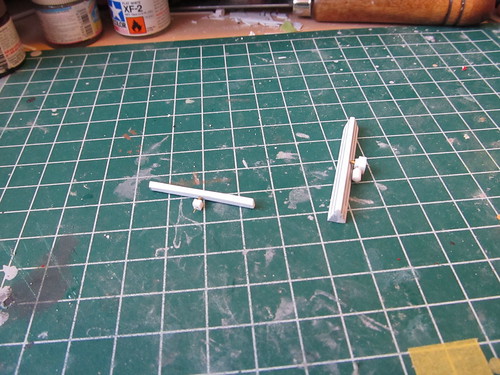
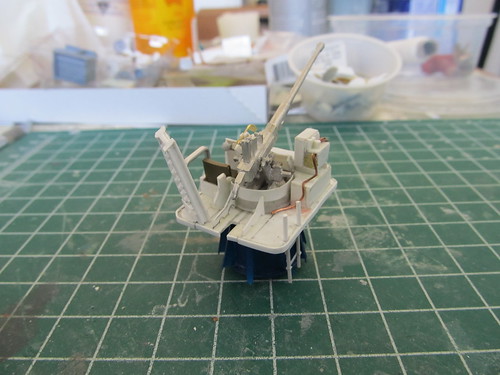
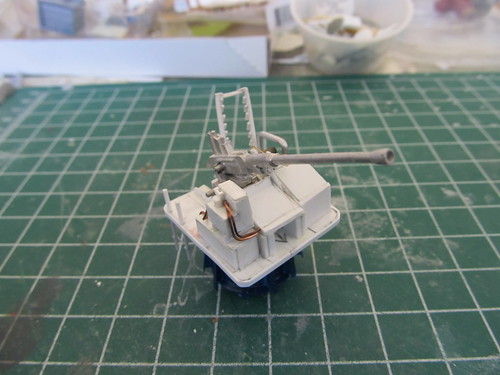
The final assembly awaits!

Image

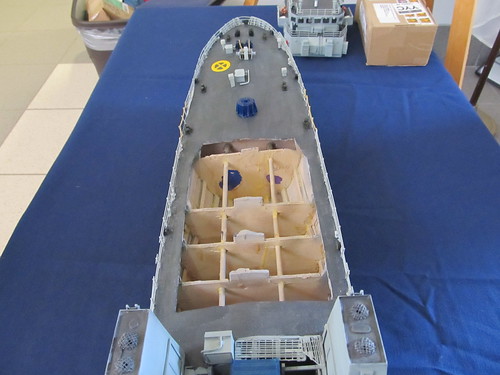
In this one Rhane is pointing to the fingerprints she and I had left on an interior bulkhead 18 months before.

Image

And here are those self-same fingerprints.

Image

SUMMERSIDE in her new permanent residence.
Image

They asked me to say a few words.
Image

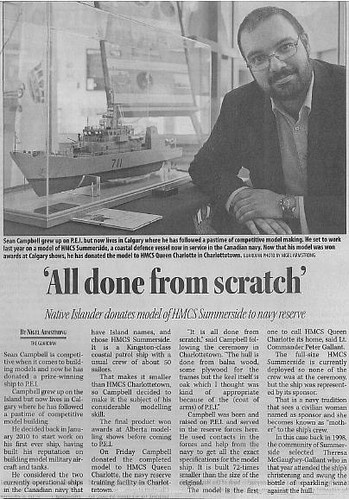
I even got a nice write up on the local newspaper!

Image

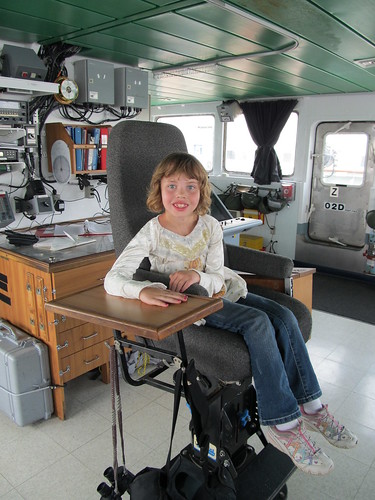
As an epilogue, when we were on our way back to Calgary--and as we were flying out of Halifax anyway--we had the distinct pleasure of touring the real HMCS SUMMERSIDE, just returned to HMC Dockyard in Halifax from Boston. It was a very strange feeling walking the decks of a ship I knew so intimately, but that I'd never set foot on before. Better yet, there were no glaring omissions on the model when compared to the real ship--save for the damage control panel on the port side of the bridge--I know of no photos or descriptions (I suspect for security reasons) and so had no detail on that part of the model's bridge.

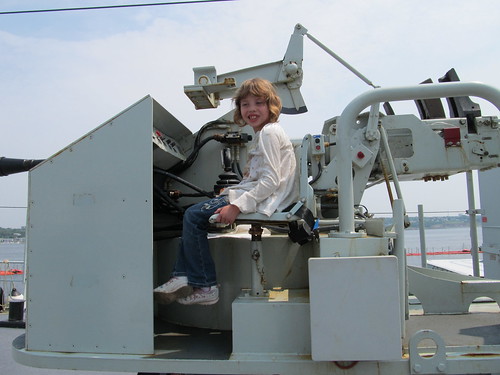
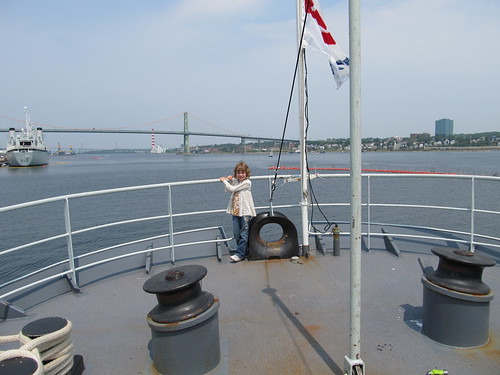
Here you can see a couple of shots of my daughter aboard the real SUMMERSIDE

Sitting in the captain's chair....

Image

Sitting in the Bofors mount...

Image

Being generally pretty cute at the bow....

Image

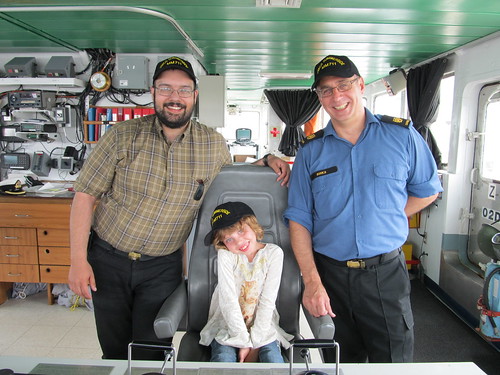
The cox'n of SUMMERSIDE--Chief John Birks--invited us to stay aboard for lunch, and I have to say, compared to the rations we army boys received when I was serving...well, the navy makes one mean steak.

I presented her CO with a framed copy of this beauty shot shown below--which I am told will be hanging in the wardroom! I also got a larger copy signed by the CO and Chief Birks to hang on my wall here in Calgary.

It turns out that Chief Birks wife serves aboard HMCS CHARLOTTETOWN--the only other serving Canadian warship named for a PEI community--which at the time was serving off the coast of Libya in Operation MOBILE. CHARLOTTETOWN in fact has been the first Canadian warship to take and return hostile fire since the Korean war--so it's the Op MOBILE version I've decided I'll build of this now historic vessel--but I don't expect to be starting that project for a while yet. In 1/72 she'd be 6 feet long!

All in all, I really can't say how much I appreciate the dedication, effort and sacrifice of the men and women of the Canadian Navy. It was an honor to be aboard SUMMERSIDE and shake hands with her CO and cox'n.

Here are Rhane and I with Chief Birks on the bridge of SUMMERSIDE. Rhane's sitting at the helm--she get's all the good seats :)

Image

And so that wraps up my story. SUMMERSIDE was my first ship model, and my first really big scratch-building attempt. She turned out better than I could have hoped--even though at times during the build I was really close to consigning her to the dumpster. Maybe that's why I'm happier that she's on display 3000 miles away--I don't need to be looking at her flaws all the time. Beyond a lot of fun, and a huge sense of accomplishment in building her, this project has given me the opportunity to meet and interact with some amazing people--many of whom were essential in assisting me see this project through to completion. So, many thanks to Dennis Kaye for his words of experience, Scott McTavish for his photography, Darren Scannel for his research materials, Tim Cotey for his insight into the world of the MCDV, my Dad for being boots on the ground in PEI, Cdr Gallant for his belief and enthusiasm, my daughter Rhane for her patience--and not a few 'out of the mouths of babes' moments, and last but not least, Chief Birks and the crew of SUMMERSIDE--heck, the entire Canadian Navy for that matter--for being an inspiration for this old army guy.

But I have to say, I think I have the ship-building bug now but good. I'm already planning the next projects I'm going to undertake--including a turtle-back destroyer, HMCS ANNAPOLIS, a PEI car ferry.....all in 1/72 scale.

In any case, thanks for listening to my ramblings.

Cheers,

Sean

PS - So its been several MONTHS since I actually wrote the bit above, and despite my best intentions, I'm apparently pretty crappy at staying on top of actually having my writing published....

Since then I've started working on my next project--HMCS ANNAPOLIS (I-04)--and plan on adding a build log for her too. Meantime I've also been doing some work with a neat CAD app called Delftship. I'm by no means an expert; Lord knows the last time I worked with a CAD program, AutoCAD has release numbers and not dates...but I'm also including a screen shot at my initial attempts at doing a MCDV like SUMMERSIDE:

Image

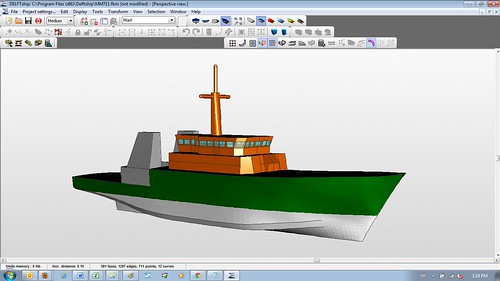
What I like best about using Delftship is that I can sketch up a hull fairly rapidly, and then print out my drawings with any number of station or buttock lines etc. that I need for the project. I'm also exploring using the STL that Delftship can export to try some rapid prototyping of parts. Time and finances permitting of course.

So, once again, thanks to those of you who've taken the time to read this. I look forward to documenting ANNAPOLIS here as well--just hopefully faster than I did before :)

Cheers (again),

Sean

_________________
Now Complete: 1/72 HMCS SUMMERSIDE (MM 711)
Now Complete: 1/72 HMCS ST. CROIX(I-81)

Current Project(s): 1/72 HMS WALNEY(Y 04)


Report this post
Top
 Profile  
Reply with quote  
PostPosted: Tue Mar 13, 2012 6:01 pm 
Offline
User avatar

Joined: Mon Jun 12, 2006 1:46 pm
Posts: 1012
Sean
You must be very proud of your Summerside .It looks perfect .Only it's creater can see it's flaws.Look forward to your next build . :thumbs_up_1: :thumbs_up_1: :thumbs_up_1:

_________________
If you are not living on the edge then you are taking up to much space


Report this post
Top
 Profile  
Reply with quote  
PostPosted: Tue Mar 13, 2012 6:06 pm 
Offline
User avatar

Joined: Mon Sep 11, 2006 9:33 pm
Posts: 189
Location: St. Catharines, Ontario Canada
Great build and you and your daughter seemed to have so much fun at the end.

I look forward to watching the Annapolis build. I am planning a future build in 1/72 of HMCS Niagara I-57.

_________________
James W.

Dry docked:
1/72 HMCS Assiniboine DDE 234-1960
1/72 HMCS Ottawa DDE 229-1960
1/72 HMCS St. Catharines-River Class Frigate-1944
On the slipway:
1/72 HMCS Camrose-Flower Class Corvette-1943
1/72 HMCS Trillium-Flower Class Corvette-1942


Report this post
Top
 Profile  
Reply with quote  
PostPosted: Tue Mar 13, 2012 6:16 pm 
Offline
User avatar

Joined: Mon Jan 10, 2005 10:52 am
Posts: 2557
Location: Land of the Cheshire cat
Sean, A very nice write up, very interesting, :woo_hoo: :woo_hoo: :woo_hoo: :woo_hoo: :wave_1:

_________________
Simple but effective.


Report this post
Top
 Profile  
Reply with quote  
PostPosted: Tue Mar 13, 2012 7:19 pm 
Offline
User avatar

Joined: Mon Jan 10, 2005 6:00 pm
Posts: 12145
Location: Ottawa, Canada
I was in Halifax just this past week/end! Saw Summerside by the pier and thought of this, haha! She looks great and you are right to be damn proud, Sean!

_________________
De quoi s'agit-il?


Report this post
Top
 Profile  
Reply with quote  
PostPosted: Tue Mar 13, 2012 9:51 pm 
Offline
User avatar

Joined: Fri Jan 22, 2010 2:55 pm
Posts: 58
Location: Calgary, AB Canada
Thanks Timmy! It was funny, when I was there in the summer, one of SUMMERSIDE's sailors was telling me how lucky I was to see her, as a couple of years before she had been in reserve, and he figured she's be laid up within the next couple of years. I picked the perfect window of opportunity I guess :)

Cheers,

Sean

_________________
Now Complete: 1/72 HMCS SUMMERSIDE (MM 711)
Now Complete: 1/72 HMCS ST. CROIX(I-81)

Current Project(s): 1/72 HMS WALNEY(Y 04)


Report this post
Top
 Profile  
Reply with quote  
PostPosted: Tue Mar 13, 2012 11:53 pm 
Offline
User avatar

Joined: Mon Jan 10, 2005 6:00 pm
Posts: 12145
Location: Ottawa, Canada
And here she is, taken from the bridge of Preserver:


Attachments:
2012-03-10-201.jpg
2012-03-10-201.jpg [ 2.11 MiB | Viewed 3106 times ]

_________________
De quoi s'agit-il?
Report this post
Top
 Profile  
Reply with quote  
Display posts from previous:  Sort by  
Post new topic Reply to topic  [ 46 posts ]  Go to page Previous  1, 2, 3  Next

All times are UTC - 6 hours [ DST ]


Who is online

Users browsing this forum: No registered users and 74 guests


You can post new topics in this forum
You can reply to topics in this forum
You cannot edit your posts in this forum
You cannot delete your posts in this forum
You cannot post attachments in this forum

Jump to:  
cron
Powered by phpBB® Forum Software © phpBB Group