The Time has come to start my thread about my build of U-69.
A little background:
U-69
The keel was laid down on the 11th of November at Friedrich Krupp Germaniawerft in Kiel. F. Krupp Germaniawerft produced 131 u-boats, which were commissioned into the Kriegsmarine in World War II along with a list of other war vassals consisting of u-boats starting with U-7 in 1935 and finishing with U-4710 in 1945.
Technical information for type VIIC
Displacement:
(tons) 769 (sf)
871 (sm)
1070 (total)
Length: (m) 67,10 oa
50,50 ph
Beam: (m) 6,20 oa
4,70 ph
Draught: (draft) 4,74 m
Height: 9,60 m
Power: (hp) 3200 (sf)
750 (sm)
Speed:
(knots) 17,7 (sf)
7,6 (sm)
Range:
(miles / knots) 8500/10 (sf)
80/4 (sm)
Torpedoes: 14
4/1 (bow / stern tubes)
Mines: 26 TMA
Deck gun: 88/45
220 rounds
Crew: 44-52 men
Max depth: ca. 220 m
(722 feet)
sm = submerged, sf = surfaced, ph = pressure hull,
oa = overall, hp = horsepower.
(from u-boat.net )
U-69 was launched on September 19th, 1940 and commissioned on November 2nd, 1940. She participated in 11 war patrols in her career and belonged to 7 wolf packs. He was a member of the 7th Flotolla (Unterseebootsflottille "Wegener") From November of 1940 to February of 1943. Throughout her career she amassed 16 ships sunk for a total of 67,500 GRT, 1 ship damaged for a total of 4,887 GRT,1 ship a total loss for a total of 5,445 GRT before her fate on 17 Feb, 1943 in the North Atlantic east of Newfoundland. She was sunk from depth charges taking with her 46 souls. Until this point no crewmembers aboard U-69 had perished while in her commission.
The time period I hope to depict will be from the end of her 3rd patrol (thank you Dougie). All the criteria I am looking to depict are present. She is returning to St. Nazaire and has added 33,868 tons to her war chest for a total of 61,205 tons at this point. U-69 was commanded by Kptlt. Jost Metzler (Knights Cross). Metzler would leave on the 4th patrol with u-69 only to be stricken ill within days from leaving St. Nazaire.
I am still learning as I go here. The subtle differences between the boats are becoming more apparent. I will be ordering some of the critical add-on kits to help me along the way. Starting with the PhotoEtch: Flood & Vent set (U-Brass/WEM #PE 7232). Below are a couple of shots from the beginning stages of my build. I started opening the flood vents along the hull in preparation of a delivery of my add-on.
Please feel free to make suggestions and/or critique along the way. I am not an expert by all means and if I am missing something or overlook something along the way�.speak up, PLEASE.
With all that said, I hope you enjoy the build.
My U-69
Moderators: BB62vet, MartinJQuinn, JIM BAUMANN, Jon, Dan K
-
TRM

- Posts: 63
- Joined: Tue Nov 10, 2009 12:33 pm
My U-69
- Attachments
-
- I used my Dremel to mill out the back. I need to thin out a little more for scale.
-
- A round needle file worked great in taking the excess down.
-
-
Regards,
T
"The humblest craft that floats makes its appeal to a seaman by the faithfulness of her life."
Joseph Conrad
USS Arizona
USS Laffey
U-69
T
"The humblest craft that floats makes its appeal to a seaman by the faithfulness of her life."
Joseph Conrad
USS Arizona
USS Laffey
U-69
-
TRM
- Posts: 63
- Joined: Tue Nov 10, 2009 12:33 pm
Re: My U-69
Moving along slow and steady (more cause the weather has been warm and outside work permits it). I have begun to drill out the GHG Plates, adding more were there should be from photographs. I have also begun to plot and cut out the missing aft flood vents.
Added are a few shots of my homemade keel clamp. Made from an architectural draft clamp, I cut it down and added stems, covering them with styrene. Just need to add 1/8" (3mm) foam tape to protect all future paint.
Thanks for stopping by!
Added are a few shots of my homemade keel clamp. Made from an architectural draft clamp, I cut it down and added stems, covering them with styrene. Just need to add 1/8" (3mm) foam tape to protect all future paint.
Thanks for stopping by!
- Attachments
-
-
-
-
-
Regards,
T
"The humblest craft that floats makes its appeal to a seaman by the faithfulness of her life."
Joseph Conrad
USS Arizona
USS Laffey
U-69
T
"The humblest craft that floats makes its appeal to a seaman by the faithfulness of her life."
Joseph Conrad
USS Arizona
USS Laffey
U-69
-
taskforce48

- Posts: 1612
- Joined: Mon May 21, 2007 5:49 pm
- Location: The beautiful PNW
Re: My U-69
Looking good so far! 
Matt
Matt
In the yards right now:
USS Utah AG-16
On Hold
1/350 USS Portland CA-33 1942
1/350 Trumpeter Texas with a twist
USS Utah AG-16
On Hold
1/350 USS Portland CA-33 1942
1/350 Trumpeter Texas with a twist
-
TRM
- Posts: 63
- Joined: Tue Nov 10, 2009 12:33 pm
Re: My U-69
Thanks Matt. Looking at your signature, I see you're doing the Nevada. Sweet! I may have to check out some pics....I have the 1/350 Missouri on the bench.
Have a great Holiday Weekend!
Cheers!
Have a great Holiday Weekend!
Cheers!
Regards,
T
"The humblest craft that floats makes its appeal to a seaman by the faithfulness of her life."
Joseph Conrad
USS Arizona
USS Laffey
U-69
T
"The humblest craft that floats makes its appeal to a seaman by the faithfulness of her life."
Joseph Conrad
USS Arizona
USS Laffey
U-69
-
TRM
- Posts: 63
- Joined: Tue Nov 10, 2009 12:33 pm
Re: My U-69
RAIN! This allows me to finally sit down and get some work done on the 69.
Did a little work on the tanks this morning, grinding, filling and such. Trying to round them out. Also made up some UT plates to cover over the kits' version.
Did a little work on the tanks this morning, grinding, filling and such. Trying to round them out. Also made up some UT plates to cover over the kits' version.
- Attachments
-
-
-
Regards,
T
"The humblest craft that floats makes its appeal to a seaman by the faithfulness of her life."
Joseph Conrad
USS Arizona
USS Laffey
U-69
T
"The humblest craft that floats makes its appeal to a seaman by the faithfulness of her life."
Joseph Conrad
USS Arizona
USS Laffey
U-69
-
TRM
- Posts: 63
- Joined: Tue Nov 10, 2009 12:33 pm
Re: My U-69
Just got back from Vacation (Holiday) on Cape Cod, MA. Great week, temps in the 90's F and humid. Even better, when the kids ask to go home early, because they are tired!!!! Parents - 1 , Kids - 0...We win!
Before I left, I began some oil canning effect to one side of the hull. Hastily I removed all but the aft rivet...."live and learn". Now that I am back, the dauntless task of replacement of the rivets is inevitable. Before I shell out more cash, I figured I would attempt some on my own. Below are some pics, not bad from what I can see for now. I will push my way through and lightly prime the side to see how they come out under painting. As you can see, I removed the anchor well in preparation for movement forward...no rush, as I do not have the torpedo door add-on kit as of yet.
Before I left, I began some oil canning effect to one side of the hull. Hastily I removed all but the aft rivet...."live and learn". Now that I am back, the dauntless task of replacement of the rivets is inevitable. Before I shell out more cash, I figured I would attempt some on my own. Below are some pics, not bad from what I can see for now. I will push my way through and lightly prime the side to see how they come out under painting. As you can see, I removed the anchor well in preparation for movement forward...no rush, as I do not have the torpedo door add-on kit as of yet.
- Attachments
-
-
-
-
-
Regards,
T
"The humblest craft that floats makes its appeal to a seaman by the faithfulness of her life."
Joseph Conrad
USS Arizona
USS Laffey
U-69
T
"The humblest craft that floats makes its appeal to a seaman by the faithfulness of her life."
Joseph Conrad
USS Arizona
USS Laffey
U-69
-
Neptune

- Posts: 2455
- Joined: Sun Mar 13, 2005 11:51 am
- Location: Belgium
Re: My U-69
Great job in general, love that oil canning a lot! So what did you do to achieve that oil canning effect? Looks very convincing and it's not "over it" (which happens on some builds too) at all!
Keep us updated!
Keep us updated!
The merchant shipyard
-
TRM
- Posts: 63
- Joined: Tue Nov 10, 2009 12:33 pm
Re: My U-69
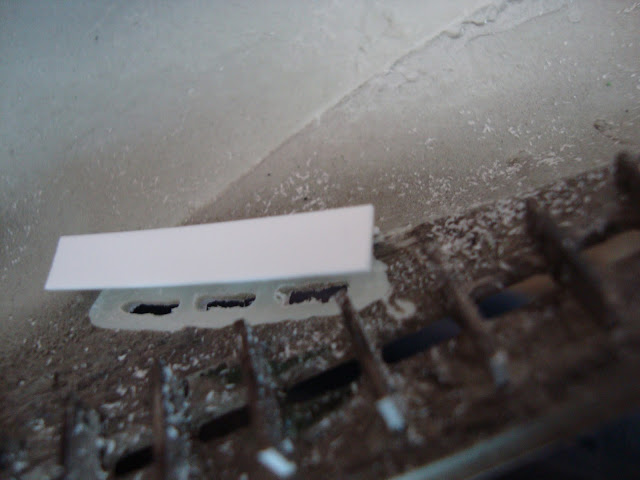
Thanks Neptune. I used a #10 scalpel blade(s). You need to change them about 4 or 5 time a side. They chatter after too much, but they are still good for cutting. I found drawing the blade towards you for most of the cut. I did start off using a Dremel and a tiny diamond tip cutter. I ended up switching to a battery operated Dremel, going slower and not trying to go too deep....then after reading I tried the blade. It's just as effective.
I added pics of the soon to be internal ribs at the vents and my 1st forward drip cap.
I added pics of the soon to be internal ribs at the vents and my 1st forward drip cap.
- Attachments
-
- #10 Blade
-
- Slowly drawing the blade, taking a little at a time
-
- Almost done...
-
- A light sand with a sanding stick or 600 and done.
-
- Mass production of ribs.
-
- Drip Cap.
Regards,
T
"The humblest craft that floats makes its appeal to a seaman by the faithfulness of her life."
Joseph Conrad
USS Arizona
USS Laffey
U-69
T
"The humblest craft that floats makes its appeal to a seaman by the faithfulness of her life."
Joseph Conrad
USS Arizona
USS Laffey
U-69
-
TRM
- Posts: 63
- Joined: Tue Nov 10, 2009 12:33 pm
Re: My U-69
I began making and applying the doublers and welds. With no clear indication to the exact placement of the welds, I placed some where I though they should go. I managed to work on the anchor well. I have not received the Model brass PE or the flood and vent PE. I have stayed away from these areas till I get them.
- Attachments
-
- Tools
-
- Making the rivets
-
-
-
-
-
-
-
-
Regards,
T
"The humblest craft that floats makes its appeal to a seaman by the faithfulness of her life."
Joseph Conrad
USS Arizona
USS Laffey
U-69
T
"The humblest craft that floats makes its appeal to a seaman by the faithfulness of her life."
Joseph Conrad
USS Arizona
USS Laffey
U-69
-
TRM
- Posts: 63
- Joined: Tue Nov 10, 2009 12:33 pm
Re: My U-69
Hello All,
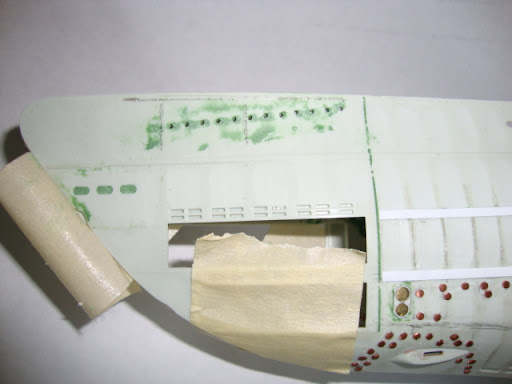
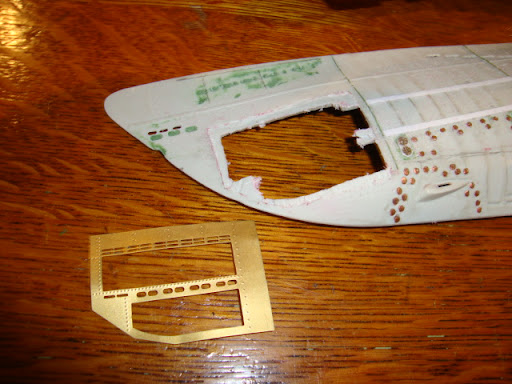
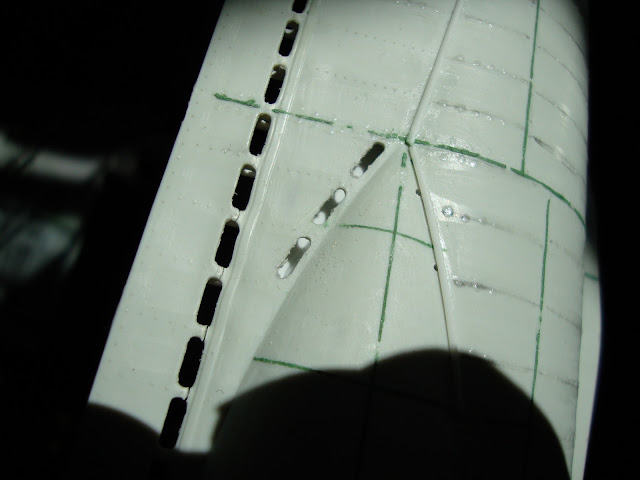
Update....since getting the AMP PE I have been sliding in some time to move forward on the build. Worked on the Bow round vents, Saddle trios, bow slots and finally the torp doors....these seems to be the most problematic to date. It certainly is not the PE itself. It has to do with preparation of the area intended. Carving out the space for the vent section to sit for support is laborious. Time should definitely be set aside to slowly mill down the area and then chisel and sand remaining material to insure a tight fit. The seem to fit nicely and smooth BEFORE I added the CA???? Some of the edges after gluing were raised and would most certainly show. I have also learned that it is good to show mistakes along the way also. This will hopefully make someone more aware to the issues before the pop out at them and they throw out a perfectly good model.
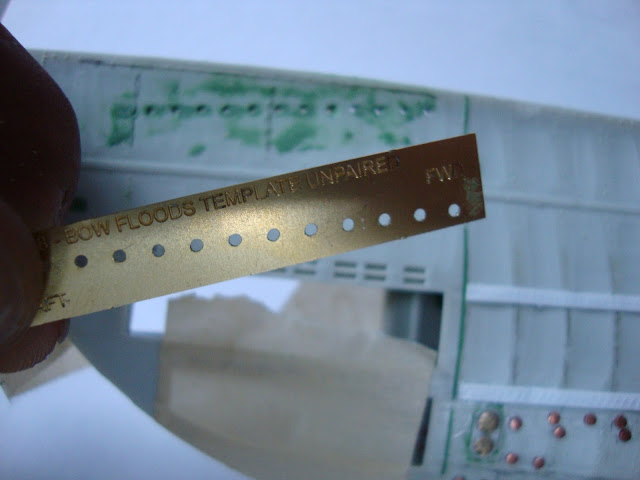
Impressive little template!
Below: the layout process for seating the torp vent/doors. Color coded so I would not forget what I was taking out.
Initial grinding for a nice tight fit....or so I thought
Placement...
Mudding....term used by plasterers when smoothing out the walls on a job (fixing screw-ups)
Sanding, sanding, oh yeah, more sanding and then....
Fregattenkapit�n.....Lori, doesn't like sniper photos!

GRINDING!!! Sorry Wink and Dougie, those beautiful rivets ???
Not to worry, they will find their way back again...

Still putting the final sanding on the fore-mentioned, here are the saddle vents...
Well, I will be spending my evening sanding and polishing up the torp vents. ( and trying to sneak more pictures of the wife, until she starts throwing things at me).
Cheers!
Update....since getting the AMP PE I have been sliding in some time to move forward on the build. Worked on the Bow round vents, Saddle trios, bow slots and finally the torp doors....these seems to be the most problematic to date. It certainly is not the PE itself. It has to do with preparation of the area intended. Carving out the space for the vent section to sit for support is laborious. Time should definitely be set aside to slowly mill down the area and then chisel and sand remaining material to insure a tight fit. The seem to fit nicely and smooth BEFORE I added the CA???? Some of the edges after gluing were raised and would most certainly show. I have also learned that it is good to show mistakes along the way also. This will hopefully make someone more aware to the issues before the pop out at them and they throw out a perfectly good model.
Impressive little template!
Below: the layout process for seating the torp vent/doors. Color coded so I would not forget what I was taking out.
Initial grinding for a nice tight fit....or so I thought
Placement...
Mudding....term used by plasterers when smoothing out the walls on a job (fixing screw-ups)
Sanding, sanding, oh yeah, more sanding and then....
Fregattenkapit�n.....Lori, doesn't like sniper photos!
GRINDING!!! Sorry Wink and Dougie, those beautiful rivets ???
Not to worry, they will find their way back again...
Still putting the final sanding on the fore-mentioned, here are the saddle vents...
Well, I will be spending my evening sanding and polishing up the torp vents. ( and trying to sneak more pictures of the wife, until she starts throwing things at me).
Cheers!
Regards,
T
"The humblest craft that floats makes its appeal to a seaman by the faithfulness of her life."
Joseph Conrad
USS Arizona
USS Laffey
U-69
T
"The humblest craft that floats makes its appeal to a seaman by the faithfulness of her life."
Joseph Conrad
USS Arizona
USS Laffey
U-69
-
JIM BAUMANN

- Posts: 5680
- Joined: Mon Jan 10, 2005 5:30 pm
- Location: Nr Southampton England
Re: My U-69
Good work-- I like the blade idea --
Good luck with taking a photo of an unwilling lady.....
JIM B
Good luck with taking a photo of an unwilling lady.....
JIM B
....I buy them at three times the speed I build 'em.... will I live long enough to empty my stash...?
http://www.modelshipgallery.com/gallery ... index.html
IPMS UK SIG (special interest group) www.finewaterline.com
http://www.modelshipgallery.com/gallery ... index.html
IPMS UK SIG (special interest group) www.finewaterline.com
-
tomcat Fanatic
- Posts: 54
- Joined: Wed Jan 28, 2009 2:05 pm
Re: My U-69
In what scale is this Sub?
-
ingura
-
TRM
- Posts: 63
- Joined: Tue Nov 10, 2009 12:33 pm
Re: My U-69
Thank you Jim!
Tomcat,
This is the Revell 05015 U-Boat Type VII C, the scale is 1/72.
(WOW, Hit reply when you posted Peter, didn't want to go through!...LOL)
Regards,
T
Tomcat,
This is the Revell 05015 U-Boat Type VII C, the scale is 1/72.
(WOW, Hit reply when you posted Peter, didn't want to go through!...LOL)
Regards,
T
Regards,
T
"The humblest craft that floats makes its appeal to a seaman by the faithfulness of her life."
Joseph Conrad
USS Arizona
USS Laffey
U-69
T
"The humblest craft that floats makes its appeal to a seaman by the faithfulness of her life."
Joseph Conrad
USS Arizona
USS Laffey
U-69
-
tomcat Fanatic
- Posts: 54
- Joined: Wed Jan 28, 2009 2:05 pm
Re: My U-69
Big sub. yesterday I had bougt Revell Type VII C in 1/144 scale.. it looks great..
-
TRM
- Posts: 63
- Joined: Tue Nov 10, 2009 12:33 pm
Re: My U-69
Tomcat,
That is a nice kit. might sneak one in at some point. Size makes it easy to fit in my cabinet (code for: hide from wife). Also I love the Griffin "all in one" PE set: Click Here. Did you start a thread yet. I would like to follow the build.
That is a nice kit. might sneak one in at some point. Size makes it easy to fit in my cabinet (code for: hide from wife). Also I love the Griffin "all in one" PE set: Click Here. Did you start a thread yet. I would like to follow the build.
Regards,
T
"The humblest craft that floats makes its appeal to a seaman by the faithfulness of her life."
Joseph Conrad
USS Arizona
USS Laffey
U-69
T
"The humblest craft that floats makes its appeal to a seaman by the faithfulness of her life."
Joseph Conrad
USS Arizona
USS Laffey
U-69
-
tomcat Fanatic
- Posts: 54
- Joined: Wed Jan 28, 2009 2:05 pm
Re: My U-69
No I have not started my sub yet, 3 weeks ago I finnished firts one in 1/350 scale, now I have some mig, kfir and tomcat on the bench..
-
TRM
- Posts: 63
- Joined: Tue Nov 10, 2009 12:33 pm
Re: My U-69
Ahh, the makings of a nice Air Force there! Love to see some of those builds as well. I have a Fw190 on the bench, calling to me. Going to be a diorama. Still making drawings of the layout so I can start the base.
I tell my wife...."one woman, 10 models, better for you it's not 10 women and one model"
Cheers!
I tell my wife...."one woman, 10 models, better for you it's not 10 women and one model"
Cheers!
Regards,
T
"The humblest craft that floats makes its appeal to a seaman by the faithfulness of her life."
Joseph Conrad
USS Arizona
USS Laffey
U-69
T
"The humblest craft that floats makes its appeal to a seaman by the faithfulness of her life."
Joseph Conrad
USS Arizona
USS Laffey
U-69
-
TRM
- Posts: 63
- Joined: Tue Nov 10, 2009 12:33 pm
Re: My U-69
Hello,
Today I decided to keep busy on the 69 with the pressure hull. I have been patiently waiting for the Modelbrass upgrade....to my dismay, nothing! Not a shipping notice, not an e-mail confirmation, (not even a post card! Just the lonely Pay Pal statement mentioning "transaction complete".
Anyway, after Glenn had posted the bit about Archer, I was lurking around his 673 build site.
Modeling U-673 "Flak-trap" by Glenn Cauley
I found myself prior, attempting different methods of getting the non-hollow effect and was starting then scrapping, over and over again. The I saw Glenn's pressure hull layout. THANK YOU! After checking the supplies, I was only lacking the .080 sheet stock for the main ribs. Found some .25" Poplar instead. Off to work I went....
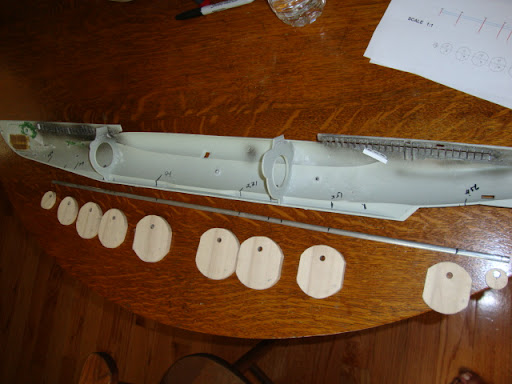
Scaled up the print, drilling, band saw and sanding
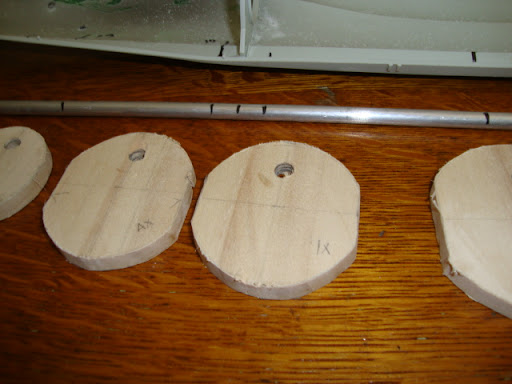
Carefull labeling as per Mr. Cauley's exquisite layout
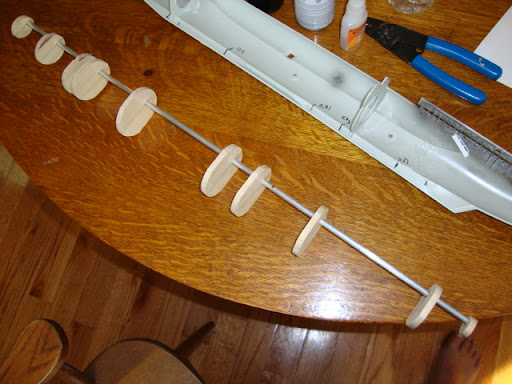
Using a .25" Aluminum rod I had for the spine...
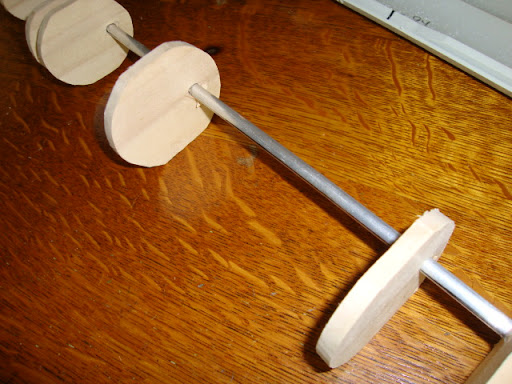
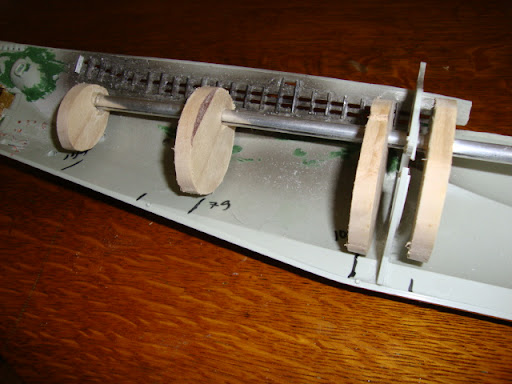
Dry-fitting....
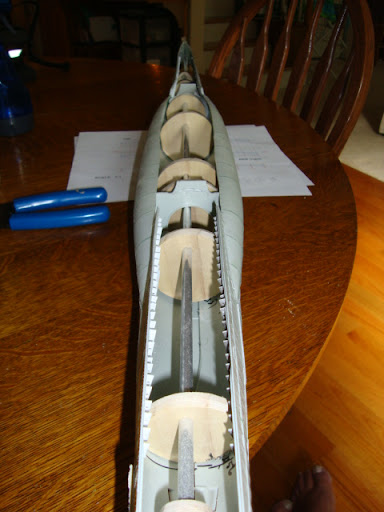
Some fairing took place, and a bit more I presume. Not I need to remove the kit supplied ribs, so to make room for the continuous pressure hull skin. Now while I am WAITING FOR MY ORDER FROM MODELBRASS , for my BOTTOM VENTS, I will finish the skin and work on the saddle tanks and torpedo door framing.
Cheers!
Today I decided to keep busy on the 69 with the pressure hull. I have been patiently waiting for the Modelbrass upgrade....to my dismay, nothing! Not a shipping notice, not an e-mail confirmation, (not even a post card! Just the lonely Pay Pal statement mentioning "transaction complete".
Anyway, after Glenn had posted the bit about Archer, I was lurking around his 673 build site.
Modeling U-673 "Flak-trap" by Glenn Cauley
I found myself prior, attempting different methods of getting the non-hollow effect and was starting then scrapping, over and over again. The I saw Glenn's pressure hull layout. THANK YOU! After checking the supplies, I was only lacking the .080 sheet stock for the main ribs. Found some .25" Poplar instead. Off to work I went....
Scaled up the print, drilling, band saw and sanding
Carefull labeling as per Mr. Cauley's exquisite layout
Using a .25" Aluminum rod I had for the spine...
Dry-fitting....
Some fairing took place, and a bit more I presume. Not I need to remove the kit supplied ribs, so to make room for the continuous pressure hull skin. Now while I am WAITING FOR MY ORDER FROM MODELBRASS
Cheers!
Regards,
T
"The humblest craft that floats makes its appeal to a seaman by the faithfulness of her life."
Joseph Conrad
USS Arizona
USS Laffey
U-69
T
"The humblest craft that floats makes its appeal to a seaman by the faithfulness of her life."
Joseph Conrad
USS Arizona
USS Laffey
U-69