Hello
I am building the Academy Graf Spee premium edition.
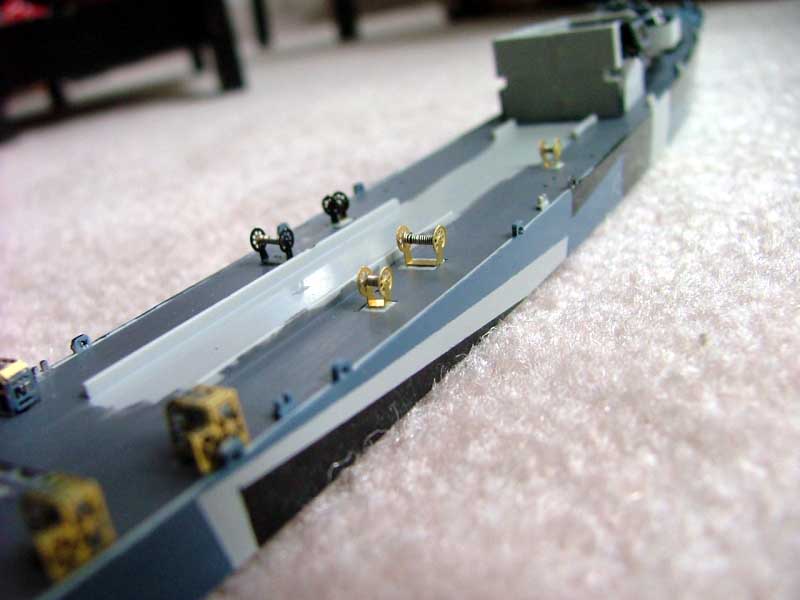
This is my first use of Photo Etch, regarding the cable reels supplied in the boxed Photo Etch it appears only to consist of 2 detailed ends for the outer drum casing joined by to strips. Now I understand that the ends get bent to right angles with the joining strip, but it would appear that there is no solid centre of the drum to wrap cable around.
Could someone please explain this to me or tell me the correct way to assemble a cable drum.
Thanks
Bill
Photo Etch Cable Reels
Moderator: JIM BAUMANN
-
Timmy C

- Posts: 12447
- Joined: Mon Jan 10, 2005 6:00 pm
- Location: Ottawa, Canada
Re: Photo Etch Cable Reels
You are expected to make the center section on your own, with short length of rod (either metal or plastic). One way to make them would be to have a length of rod and wrapping thin wire around it to simulate the cable, then cutting the rod (with the wire still wrapped around it) to the appropriate size and fitting it between the photoetched ends.
De quoi s'agit-il?
-
Bill Dickson
Re: Photo Etch Cable Reels
Thanks
What type or gauge of wire would you suggest
Bill
What type or gauge of wire would you suggest
Bill
-
Timmy C
- Posts: 12447
- Joined: Mon Jan 10, 2005 6:00 pm
- Location: Ottawa, Canada
Re: Photo Etch Cable Reels
Here's an example of what I did in 1/350 scale - you can probably do a better job than I did:
http://www.modelshipgallery.com/gallery ... 635-13.jpg
Difficult to suggest a particular wire size, as I just scrounged up what I had around my house. Old electronics are good. For the "core", look for something that would fill up most of the required thickness. You may want to look at pictures of the real thing to see the relative size between the middle part and the outer rims/wheels and then find something in your house that would meet that same ratio in your scale.
De quoi s'agit-il?
-
BillDickson

- Posts: 58
- Joined: Tue Dec 27, 2011 10:19 am
- Location: Alloa, Scotland
Re: Photo Etch Cable Reels
Thanks Tommy
-
Rdutnell

- Posts: 822
- Joined: Mon Dec 19, 2011 9:11 pm
- Location: Norman, Oklahoma
Re: Photo Etch Cable Reels
For 1/350 scale I found that the wire in the twist ties that come with lettuce are the perfect size after you get rid of the covering. I've only done 2 ships and each took a different method to put on the "cable". For the Missouri, I was able to completely build the reel and slide the wire through the holes. I could then use a small spot of glue to tack the end of thread to the wire and then simply twist the wire until there is enough thread on the spool. I then snipped the ends of the wire and glue them in place. For the USS England, I had to do it differently, because the holes are too small to get the wire through. Instead, I carefully wrapped the thread around a piece of wire making sure to keep the wrappings in a narrow band as wide as the completed reel. Some of the thread will get out of this zone but don't worry about it because after I get the amount of thread I want in the zone, I coat it with superglue. When it dries I simply cut the wire, with the wrapped thread, the width it needs to be to fit in the spool. This piece is then glued into the reel.
I think they look pretty good.
I think they look pretty good.
- Attachments
-
Completed:
1/350 USS Missouri (BB-63) * 1/350 USS England (DE-635) * "Underway Personnel Transfer" Diorama
In Progress:
1/350 USS Bennington (CV-20)
1/144 USS Greenling (SSN-614) - ACAD/3D Printing
1/144 USS Batfish (SS-310) - ACAD/3D Printing
1/350 USS Missouri (BB-63) * 1/350 USS England (DE-635) * "Underway Personnel Transfer" Diorama
In Progress:
1/350 USS Bennington (CV-20)
1/144 USS Greenling (SSN-614) - ACAD/3D Printing
1/144 USS Batfish (SS-310) - ACAD/3D Printing