Making Sea-water -using watercolor paper in 1/700-- PART ONE

Post here for tips on modeling.

Moderators: richter111, JIM BAUMANN

Making Sea-water -using watercolor paper in 1/700-- PART ONE

Postby JIM BAUMANN » Sun Sep 07, 2008 2:03 pm

Hello Gentlemen!

I get numerous e-mails each week inquiring how I make water using the water-colour paper method.
As a result I thought it worthwhile to photo-document the procedure on my current build of HMS Scylla.
That way I can then also simply send a link to this thread! :cool_2:

HMS Scylla is being built in 1/700 scale using the WSW kit as a starting point.
For most 1/700 models I use textured watercolour paper- Bockingford Rough 140 lbs
in a block measuring 14" x 22"- available from http://www.artsupplies.co.uk/index.php
Any textured watercolour paper from any reputable manufacturer will work.

It is especially effective at depicting a calm sea with only a gentle ripple caused by a light winds, an example of which can be seen in the overhead views of my 1/700 Kolchida

Img_3021.jpg


Img_3024.jpg


For my model of HMS Scylla I chose to set this weathered and war-weary AA cruiser at speed in a rolling lop of a sea.
But first a bit of preparation....

To prevent warpage in the resin hull years down the line, I mount all my models on a stainless steel plate, in which are are
drilled an array of countersunk holes for later screwing down.
At the beginning of the build I drill a selection of holes drilled (3mm drill bit) into the underside of the hull that correspond with the pe-drilled holes in the mounting plate.

These then have a thread cut using a No 6 pozi drive countersunk selftapping screw.

I placed the hull of the model on a well oversize piece of watercolour paper -prior to commencing construction-and drew a pencil line around at waterline
7 september 2008 004.jpg


This is then cut out using scissors( or a craftknife - to choice)- remember to mark the direction of travel/bow..!

7 september 2008 007.jpg

7 september 2008 008.jpg


To simulate a long swell I then covered the entire steel plate with very high tack doublesided adhesive tape( Venture Tape) and placed cocktail sticks in the positions where I wanted the high point of the swells and hull's wave formation to be; the cocktail sticks being snipped off with a Xuron cutter.
The paper was thereafter pushed down so as to make contact with the doublesided tape.

7 september 2008 009.jpg


The paper was then placed carefully so that the pre-drilled holes in the plate lined up with the hull again as in step 1.
and the paper pushed down in between the cocktail sticks to form the desired swell

7 september 2008 012.jpg


The surplus paper is then trimmed off using a sharp blade the plate as the guide.
Because the ship is at speed the displacement waveform created would reveal parts of her red 'underbelly'..!
To achieve this I placed some styrene strips in position to raise the hull slightly within the paper cutout, these also formed the lower hull where it would be revealed-hence their positions midships had to be accurate.

7 september 2008 013.jpg


Had the decision to show the vessel in a swell been taken at the commencement of the build, I would have simply added a hull footprint sized waterline shim underneath!!!!

A testfit of the model showed all to well with levels and size.

7 september 2008 015.jpg


The entire water-seascape was the soaked in Cyanocrylite glue( superglue) to make it strong,structurally stabel and totally impervious to moisture.

7 september 2008 017.jpg


At the edges of the paper ( the sea!) there are unsightly gaps ....

7 september 2008 018.jpg


These are then filled flush with autobodyfiller, a two part polyester filler consisting of paste and hardener.

This sets firm within about 5 minutes so that the coarse trimming of any surplus can take place with ease-again using the stainless mounting plate as the knife guide.
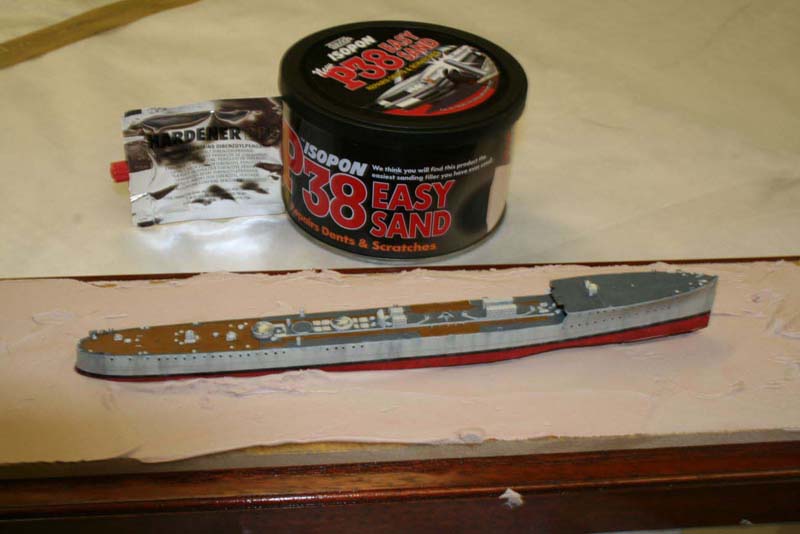
Within 10 minutes the reaction is complete and final trimming and a light sand can take place.
there are a number of Body-filler makes available, in the UK I use Isopon P 38 or Plastic Padding. In the USA understand a popular make to be 'Bondo'

7 september 2008 022.jpg


The model is then glued and screwed; having first ensured there are no areas that require work that may need access to undercuts or overhangs..!( the waterline plate restricts this type of access severely!)

7 september 2008 024.jpg


Any gaps that may appear between the hull and the paper water are filled using white glue to spanseptember 2008 the gap.

The technique that seems works best is to make a number of small' bridges' with a small dollop of white glue; once these are partially set, infill the spaces between using thinned white glue allowing the 'glue bridges' to make the frame required for the surface tension to span any gaps.

7 september 2008 026.jpg


The bow wave and wake patterns are then added using Acrylic texture paste, I prefer the Daler-Rowney variant-it is easy to use, fast-drying and dries matt, so unlike glossy variants of acrylic gels it can maintain very fine curls and undercut bow-waves, as well as having a 'sharper' appearance when used for the crests of breaking water on the wake.


7 september 2008 028.jpg
7 september 2008 029.jpg


The water is now essentially complete. I shall now finish the model to the flatcoated-but-not-rigged stage

Colouring the water and finishing the wakes will be the subject of PART TWO
right here: viewtopic.php?f=4&t=37406

Jim Baumann :wave_1:
....I buy them at three times the speed I build 'em.... will I live long enough to empty my stash...?
http://www.modelshipgallery.com/gallery ... index.html
User avatar
JIM BAUMANN
 
Posts: 1343
Joined: Mon Jan 10, 2005 5:30 pm
Location: Nr Southampton England

Re: Making Sea-water -using watercolor paper in 1/700-- PART ONE

Postby bismarck builder11 » Mon Sep 08, 2008 3:15 am

Hi Jim
so that's how you do it very informative
gary
bismarck builder11
 

Re: Making Sea-water -using watercolor paper in 1/700-- PART ONE

Postby Yevgeniy » Mon Sep 08, 2008 6:08 am

Thank you, Jim, great technique and fantastic pictures of your HMS Scylla dio.

I already put this text into my "treasury" of tips&ticks on my PC. Waiting to see Part II.

Just a question for Part I. From reading the text I understand that this technique works great for relatively calm sea. Did you useit for making stormy sea? Or watercolor paper is not the best medium for stormy sea? (Sorry for stupid question if you have already placed pictures of watercolor-paper-stormy-sea on MW).

Thank you again.

Yevgeniy
Yevgeniy
 
Posts: 387
Joined: Thu May 10, 2007 9:46 am
Location: Kyiv, Ukraine

Re: Making Sea-water -using watercolor paper in 1/700-- PART ONE

Postby MartinJQuinn » Mon Sep 08, 2008 10:34 am

Great stuff Jim, thanks for sharing. Looking forward to Pt II!
Martin

“Now this is not the end. It is not even the beginning of the end. But it is, perhaps, the end of the beginning." Winston Churchill
User avatar
MartinJQuinn
 
Posts: 1735
Joined: Tue Jan 11, 2005 1:40 pm
Location: In the hills of North Jersey

Re: Making Sea-water -using watercolor paper in 1/700-- PART ONE

Postby Miguel » Mon Sep 08, 2008 10:58 am

Thank You very much Jim. :woo_hoo: :woo_hoo:
I was looking for this technique,my Achilles ankle is water,I'm afraid to destroy my so so ships with a trully horrible water diorama ,hope to see more Jim :thumbs_up_1: :thumbs_up_1: :thumbs_up_1: :thumbs_up_1:
User avatar
Miguel
 
Posts: 86
Joined: Wed Feb 09, 2005 5:45 pm
Location: Mexico City

Re: Making Sea-water -using watercolor paper in 1/700-- PART ONE

Postby JIM BAUMANN » Mon Sep 08, 2008 12:50 pm

@ Yevgeniy

There are a number of ways of simulating rougher water.

I personally like using autobodyfiller- sets fast and sculpts quite well

In my build article of HMS Mary Rose I detailed what I did with it!
http://www.modelwarships.com/reviews/sh ... eview.html

Image

Modelwarship colleague Rainer Michalek is an exponent of the 'German' Silicone clear sealer method.
He presented an article here at MW.com on how he does it!

http://www.modelwarships.com/features/h ... index.html

Cheers

Jim Baumann
....I buy them at three times the speed I build 'em.... will I live long enough to empty my stash...?
http://www.modelshipgallery.com/gallery ... index.html
User avatar
JIM BAUMANN
 
Posts: 1343
Joined: Mon Jan 10, 2005 5:30 pm
Location: Nr Southampton England

Re: Making Sea-water -using watercolor paper in 1/700-- PART ONE

Postby Yevgeniy » Tue Sep 09, 2008 3:16 am

Thank you, Jim.

I like both methods: yours and Rainer's. You achieve incredible realism. :thumbs_up_1:

Yevgeniy
Yevgeniy
 
Posts: 387
Joined: Thu May 10, 2007 9:46 am
Location: Kyiv, Ukraine

Re: Making Sea-water -using watercolor paper in 1/700-- PART ONE

Postby Rainer » Tue Sep 09, 2008 11:32 am

Hi Jim,

what a wonderful job. Your water design is very realistic. You're just a true champion.

Many greetings

Rainer :wave_1: :thumbs_up_1:
Rainer
 

Re: Making Sea-water -using watercolor paper in 1/700-- PART ONE

Postby silent one » Thu Sep 18, 2008 4:34 am

This is a verry useful thread. just a beginner so would very much like to see more about making sea bases. When will we get part two, Im eager to get into this. Verry grateful for this tutorial.
"The vast majority of Iraqis want to live in a peaceful, free world. And we will find these people and we will bring them to justice."
Washington DC, 27 October, 2003. President George W Bush
User avatar
silent one
 
Posts: 78
Joined: Wed Sep 03, 2008 9:14 pm
Location: A Scot in New Zealand

Re: Making Sea-water -using watercolor paper in 1/700-- PART ONE

Postby JIM BAUMANN » Thu Sep 18, 2008 7:08 am

@ Silent one...

:welcome: :welcome: to Modelwarships.com

HMS Scylla is now essentially finished.just a few last tiny issued to clear up

I shall flat-coat it at the weekend-and then the water surface gets further work to completion.
Thereafter I shall document it here early next week.

Thank for your interest

JIM B :smallsmile:
....I buy them at three times the speed I build 'em.... will I live long enough to empty my stash...?
http://www.modelshipgallery.com/gallery ... index.html
User avatar
JIM BAUMANN
 
Posts: 1343
Joined: Mon Jan 10, 2005 5:30 pm
Location: Nr Southampton England

Re: Making Sea-water -using watercolor paper in 1/700-- PART ONE

Postby reuben » Fri Sep 19, 2008 5:52 am

Simply incredible--surfed your other models on your website and am amazed at your skill and dedication.

Will take my hopelessly crude pond boat query down to the local hardware store and leave you all to you amazing craftsmanship!

cheers, :smallsmile:
Reuben
reuben
 
Posts: 3
Joined: Wed Sep 17, 2008 3:44 pm

Re: Making Sea-water -using watercolor paper in 1/700-- PART ONE

Postby Rui Matos » Sun Sep 21, 2008 11:21 am

Looking forward to the "final" update Jim
Keep up
:wave_1:
Rui
Ship Modelers of the World UNITE
User avatar
Rui Matos
 
Posts: 126
Joined: Wed Nov 22, 2006 4:42 pm
Location: Lisbon, Portugal

Re: Making Sea-water -using watercolor paper in 1/700-- PART ONE

Postby JIM BAUMANN » Tue Sep 23, 2008 7:00 am

Hi all

the model is now finished except for the rigging--and the finishing of the water can ow be seen here:

viewtopic.php?f=4&t=37406

:wave_1: JIM B
....I buy them at three times the speed I build 'em.... will I live long enough to empty my stash...?
http://www.modelshipgallery.com/gallery ... index.html
User avatar
JIM BAUMANN
 
Posts: 1343
Joined: Mon Jan 10, 2005 5:30 pm
Location: Nr Southampton England

Re: Making Sea-water -using watercolor paper in 1/700-- PART ONE

Postby FrancisMcN » Tue Sep 23, 2008 12:45 pm

Jim,

Thanks indeed for an excellent article.

One small point - I think the paper is Bockingford Rough rather than Rockingford. Might save some time for anyone trying to find some!

Francis Macnaughton
FrancisMcN
 
Posts: 70
Joined: Mon Jan 15, 2007 12:03 pm
Location: Plymouth UK

Re: Making Sea-water -using watercolor paper in 1/700-- PART ONE

Postby JIM BAUMANN » Tue Sep 23, 2008 5:50 pm

Francis wrote:

<< the paper is Bockingford Rough rather than Rockingford.>>

you are of course absolutely correct- my typo... duh!

>> Might save some time for anyone trying to find some!<<

and then some!

thanks for the observation!

JIM B :wave_1:
....I buy them at three times the speed I build 'em.... will I live long enough to empty my stash...?
http://www.modelshipgallery.com/gallery ... index.html
User avatar
JIM BAUMANN
 
Posts: 1343
Joined: Mon Jan 10, 2005 5:30 pm
Location: Nr Southampton England

Re: Making Sea-water -using watercolor paper in 1/700-- PART ONE

Postby Timothyo » Tue Oct 28, 2008 5:03 pm

Hi Jim-

Thanks for the great ideas, I think I shall try it- I have a question though, before I try your method-

What type of superglue do you use, and how do you apply it to the paper? I am assuming you use a non-viscous type, but was curious on your technique, as I have never saturated anything other than my floor with the stuff! Does the paper just absorb it on its own?

Thanks, and regards,

Timothy
User avatar
Timothyo
 
Posts: 26
Joined: Tue Jan 11, 2005 11:54 pm
Location: Wisconsin, USA

Re: Making Sea-water -using watercolor paper in 1/700-- PART ONE

Postby JIM BAUMANN » Tue Oct 28, 2008 8:03 pm

I use some industrial stuff as used by double glazing installers...

A near equivalent would be the ZAP runny(made by Pacer) in a pink bottle.

The paper sucks the CA up like sponge--making it impervious to moisture and really quite strong too!.

JIM B :wave_1:
....I buy them at three times the speed I build 'em.... will I live long enough to empty my stash...?
http://www.modelshipgallery.com/gallery ... index.html
User avatar
JIM BAUMANN
 
Posts: 1343
Joined: Mon Jan 10, 2005 5:30 pm
Location: Nr Southampton England


Return to Tips and Tricks

Who is online

Users browsing this forum: BillG and 1 guest