The Ship Model Forum

The Ship Modelers Source
It is currently Fri May 09, 2025 1:43 am

All times are UTC - 6 hours [ DST ]


Post new topic Reply to topic  [ 8 posts ] 
Author Message
PostPosted: Mon Feb 20, 2023 11:52 am 
Offline
User avatar

Joined: Wed May 30, 2007 12:26 am
Posts: 502
Howdy, All, I have a bit of a unique problem, an island of an A/C.

Image

I have this 'DreamModel' island whose upper island portion is a bit warped (the lower portion is fine), but how do I "level" that portion WithOut destroying and Finer detail! (domes, radio anteannae platforms, other finer details) I have seen posts about using hot water, oven, hair dryer.....Microwave :big_eyes:

But, what would be the best way for this "Thinner" work.........just afraid that IF I place in oven, I'll get up to check and it'll be a molten slag..... :faint:

NOTE: There is a short lip on the forward bridge area, that would line up with the platform of the lower portion of the island.

Thanks for your help.

Mairo


Top
 Profile  
Reply with quote  
PostPosted: Mon Feb 20, 2023 5:13 pm 
Offline
User avatar

Joined: Sat Feb 03, 2007 1:00 pm
Posts: 930
Location: Bowmanville, ON, Canada
There are a couple of ways you could fix this.

One that might work is put a screw into it from the bottom to see if you can pull it flat. You'd need to add a small metal plate to keep the bottom from being pulled up.

Another would be to clamp the piece between to metal plates or wood blocks and warm in oven. Removing the 3 domes would make this easier.

I know a lot of people say hot water, but I find it messy because I use clamps and it becomes awkward putting clamps in water, especially if you are using wood.
A hair dryer will localize heat, giving an uneven result. Sometimes this is desired, sometimes it isn't.

When you decide which way to go, I can give more detailed instructions to help avoid problems, but be warned, there are no guarantees and it takes a bit of creative work to set things up for success!!

Keeping the oven at or below 200F will not melt the resin.

_________________
Darren (Admiral Hawk)
In the not so tropical climate of the Great White North.


Top
 Profile  
Reply with quote  
PostPosted: Mon Feb 20, 2023 8:16 pm 
Offline
User avatar

Joined: Fri Oct 19, 2007 2:25 pm
Posts: 778
Location: Phoenix, AZ
Hi Mairo --

Depending on the detail on the other side, you may have success by carefully cutting off the fore and aft bridge areas with a razor saw (cut at the red lines below) and the sanding the bottom flat (orange), and then reassembling. This may cause less damage and be less risky than heating and bending, with only a very negligible impact to scale height.

Pardon my rudimentary MS Paint skills, for a Before and After here:

Image

Attachment:
Island 2.jpg
Island 2.jpg [ 202.54 KiB | Viewed 876 times ]

_________________
-- Scott


Top
 Profile  
Reply with quote  
PostPosted: Thu Feb 23, 2023 1:34 pm 
Offline
User avatar

Joined: Wed May 30, 2007 12:26 am
Posts: 502
'Admhawk', thanks for the few suggestions.....

The use of metal plates with screws, was looked at, by me, but I don't think that it will work....being the two pieces are too narrow as to drill out an area for a screw to fit thru both bottom and lower part of upper part of the island. As far as the oven, I can set the temp to a lower temp on the oven, but since I have never 'fixed a resin piece' before....I just a Little bit hesitant to use that for, again, a narrow, small piece.
I might use the screws part for a Larger piece, like a hull of a ship, or a solid piece of resin that looks 'more durable', but I think I might go with the oven in this case.

'reigels', as far as cutting with a razor saw would be VERY tricky for me....... I see where you are asking me in cutting and that the tops of both bridge/FD control are Flat with no detail on them. I just feel that the sanding of the bottom, After, I cut off the bridges would probably ruin a bit of the detail...mostly grill work on either side of the island and several doors (eight [8] altogether). Then after the sanding and reconnecting the bridges there will be a bit of "missing" material that was sawed off....though it can be replaced with sheet styrene.

Gentlemen.......I DO Appreciate your suggestions, a couple of them I wouldn't have come up with. I have heard of people putting warped resin pieces in the oven with gentle heat, I even heard of using a Mircrowave Oven......Is THAT a Good idea?? :scratch: I have decided to use the Hot Water Bath method, I will try to secure the island on a strong backing and clamp with wood and rubber bands. Just afraid that IF I used an actual clamp, it could break off pieces where it is attach or deform the piece. This part is just SO Delicate :shock: that if Worse comes to worse....I could just use the island that came with the kit.

Again, Thanks.....I'll update you later this week on what happens. :smallsmile:

Mario


Top
 Profile  
Reply with quote  
PostPosted: Thu Feb 23, 2023 3:24 pm 
Offline
User avatar

Joined: Sat Feb 03, 2007 1:00 pm
Posts: 930
Location: Bowmanville, ON, Canada
DO NOT USE MICROWAVE!!!

Try water, if it doesn't work, use the oven.
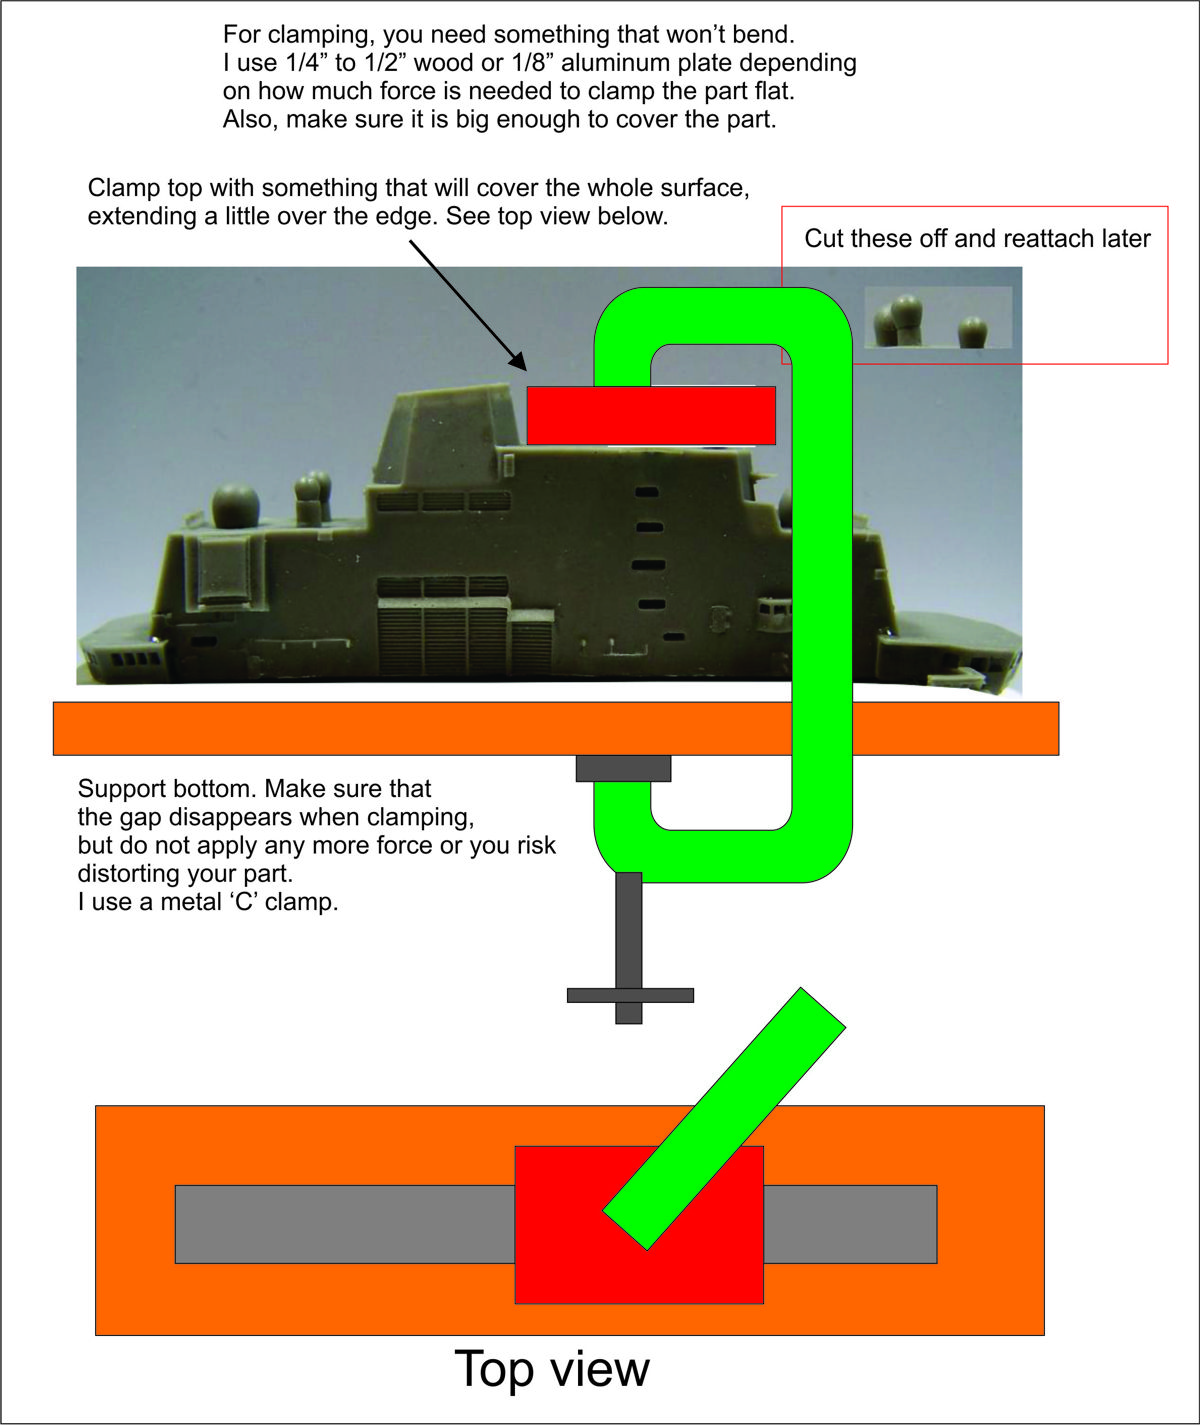
Here are some tips.

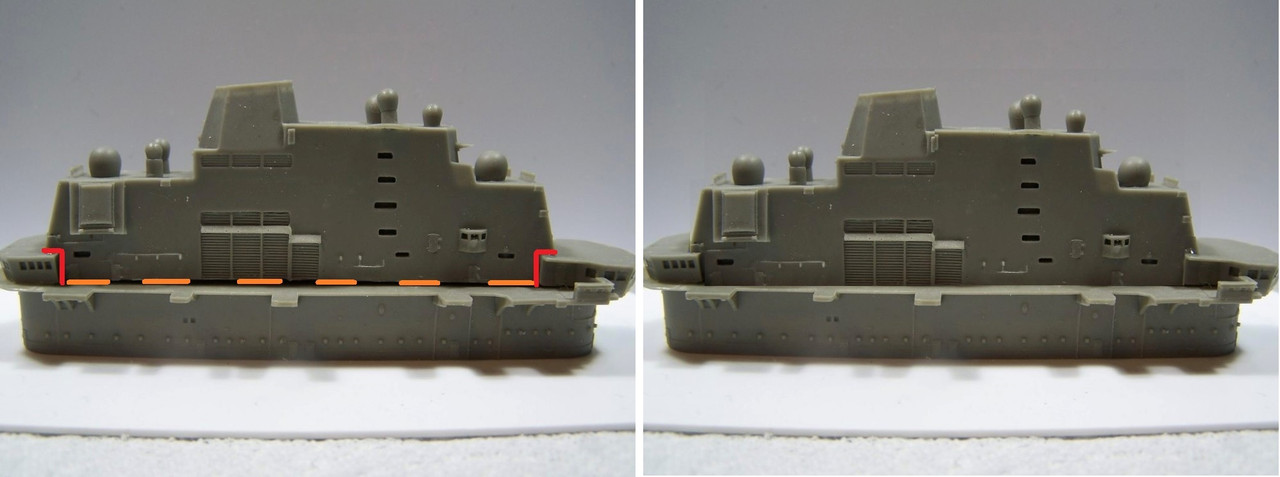
You want an even application of heat so that the whole part becomes flexible at the same time.
You want to give enough time for the part to stabilize at temperature, both heating and cooling. I would say 30min for heating, a couple of hours for cooling to room temp. Do not rush!! (no freezers, no flames)
Put whole assembly (clamp, plates, part) into heat.
Do not unclamp until fully cooled.
Do not clamp with any more pressure than required, ie: just enough to flatten part.
If clamping does not flatten part, go to plan B, you're knackered.
If part springs back fully after treatment, try again, with hotter temp for longer. (20-40F hotter, 15-30min longer.)
If part springs back partially after treatment, repeat procedure until part stays put.
If using oven, place on cooking tray for easy movement in and out. Start with 150F. Set timer!!
Localized pressure spots on clamps along with too much heat for too long WILL deform most resins.
Most resins SHOULD respond to this treatment, however, there are no guarantees.

Good luck!!

Image

_________________
Darren (Admiral Hawk)
In the not so tropical climate of the Great White North.


Top
 Profile  
Reply with quote  
PostPosted: Fri Feb 24, 2023 10:41 pm 
Offline
User avatar

Joined: Wed May 30, 2007 12:26 am
Posts: 502
'ADM Hawk'..... :thanks:

...That is some graphic!!!

I get it, Unfort.....I have begun the process of doing the Hot Water Bath....and although I have Almost followed everything that you mentioned, I have proceeded on the Bath, before I saw this, so my clamping Might be a bit different....

Image
The paint thinner bottle is just a stand for me taking a pic...while the paint bottle was used as a counter-weight only.

I used dissemble cloths pins w/o springs. Using the flat surfaces of the pins and having ~a little knowledge of resin, and if "heated too much" might deform the resin...........A N D ........

Image
Starboard side...

Image
...Port / FD side.

Image
The Only damage, as I was pulling off the rubber bands :doh_1:

But it Looks Good....whatcha think??? My other question is ..... would the rubber interfere/melt onto resin?? ( I had a strange feeling that it would, so I tried placing the bands as far away from the resin = funny wrapping ) And, would the wood do something, I understand that if you Tighten Too MUCH....it would deform, would there be anything else that could/would happen??

Again, thanks to you 'admhawk' and to you 'reigels'!!! :headphones_2: :worship_1:

M


Top
 Profile  
Reply with quote  
PostPosted: Sat Feb 25, 2023 8:58 am 
Offline
User avatar

Joined: Fri Oct 19, 2007 2:25 pm
Posts: 778
Location: Phoenix, AZ
Looks great. Glad to see it turned out well!

_________________
-- Scott


Top
 Profile  
Reply with quote  
PostPosted: Sat Feb 25, 2023 9:30 am 
Offline
User avatar

Joined: Sat Feb 03, 2007 1:00 pm
Posts: 930
Location: Bowmanville, ON, Canada
Looks good!

You probably didn't need to clamp the forward and aft ends, but it didn't hurt.

The rubber 'might' have stuck to the resin, but if you had used rubber bands without the clothespins, or other plating, I would expect the rubber to deform the edges, as well as stick.

The reason I didn't suggest rubber bands is because a c-clamp provides a more perpendicular directional pressure towards the part. The bands apply more force to the outer edges, increasing the risk of deformation. However, as you can see, the risk was low enough for a successful outcome!

Cheers!

_________________
Darren (Admiral Hawk)
In the not so tropical climate of the Great White North.


Top
 Profile  
Reply with quote  
Display posts from previous:  Sort by  
Post new topic Reply to topic  [ 8 posts ] 

All times are UTC - 6 hours [ DST ]


Who is online

Users browsing this forum: No registered users and 20 guests


You can post new topics in this forum
You can reply to topics in this forum
You cannot edit your posts in this forum
You cannot delete your posts in this forum
You cannot post attachments in this forum

Jump to:  
Powered by phpBB® Forum Software © phpBB Group