Calling all Yamato (大和) and Musashi (武蔵) fans
Moderators: BB62vet, MartinJQuinn, Timmy C, Gernot, Olaf Held, Dan K, HMAS, ModelMonkey
-
baseballbrat

- Posts: 317
- Joined: Thu Nov 29, 2012 11:38 pm
Re: Calling all IJN Yamato & Musashi fans
That would make a great diorama project to attempt to recreate. Modeler just used inline kits and plastic board to build what he thought the deck would look like. If you are a master modeler, you probably could reconstruct the 1/350 Tamiya new tools Plane Hanger to show some of the detail looking in from the top. Something to consider building.
-
baseballbrat
- Posts: 317
- Joined: Thu Nov 29, 2012 11:38 pm
Re: Calling all IJN Yamato & Musashi fans
Sorry if I had already asked this question.............
I am still looking for a diagram on rigging Yamato's antenna wires. Wire attachment points, Ball & Bar Insulator placements along with any fine details on where all these wires are hung.
No diagrams from any Yamato publication I have are detailed enough or complete. Even Skulski's book or Super Illustrated have anything complete, but just closeups on some of the masts.
The 1:10 Model from the museum is of little use, due to the photos are of the main parts and not up close attachment points.
I am looking for more of a map on just rigging.
Any ideas, please leave a post.
Thanks Guys!!!
Jim
PS: Their's nothing like building a accurate model and then rig it wrong.
I am still looking for a diagram on rigging Yamato's antenna wires. Wire attachment points, Ball & Bar Insulator placements along with any fine details on where all these wires are hung.
No diagrams from any Yamato publication I have are detailed enough or complete. Even Skulski's book or Super Illustrated have anything complete, but just closeups on some of the masts.
The 1:10 Model from the museum is of little use, due to the photos are of the main parts and not up close attachment points.
I am looking for more of a map on just rigging.
Any ideas, please leave a post.
Thanks Guys!!!
Jim
PS: Their's nothing like building a accurate model and then rig it wrong.
-
Dan K
- Posts: 9069
- Joined: Tue Jan 11, 2005 10:56 am
- Location: New York City
Re: Calling all IJN Yamato & Musashi fans
To be clear, it is attachment points illustrations and examples that you need?
-
baseballbrat
- Posts: 317
- Joined: Thu Nov 29, 2012 11:38 pm
Re: Calling all IJN Yamato & Musashi fans
Yes, A realistic visual schematic of the steel wire antenna system that could be used to rig to the masts, poles and any other points used as a connection point. It's the point A to point B for each of the individual wires. I don't need to know why, but where. There seems to be two main wires from the sterns mast (one on each side) that runs the length of the hull, connected to the Halyard Arm bracket and then connecting to the bow pole. Then others spliced into these main wires around the superstructure downward to attachment points on the ship. Also where where they attach, what do the plates look like and where the ball & bar insulators are placed along the wire would be helpful too.Dan K wrote:To be clear, it is attachment points illustrations and examples that you need?
In all the modelers examples I have seen, this was just being guessed at by looking at photographs and not using some kind of planned out reference from plans.
The Halyards are the only known detail I am familiar with and know how to rig.
Any help will be appreciated.
Thanks!
Jim
Last edited by baseballbrat on Wed May 13, 2015 10:55 am, edited 1 time in total.
-
Dan K
- Posts: 9069
- Joined: Tue Jan 11, 2005 10:56 am
- Location: New York City
Re: Calling all IJN Yamato & Musashi fans
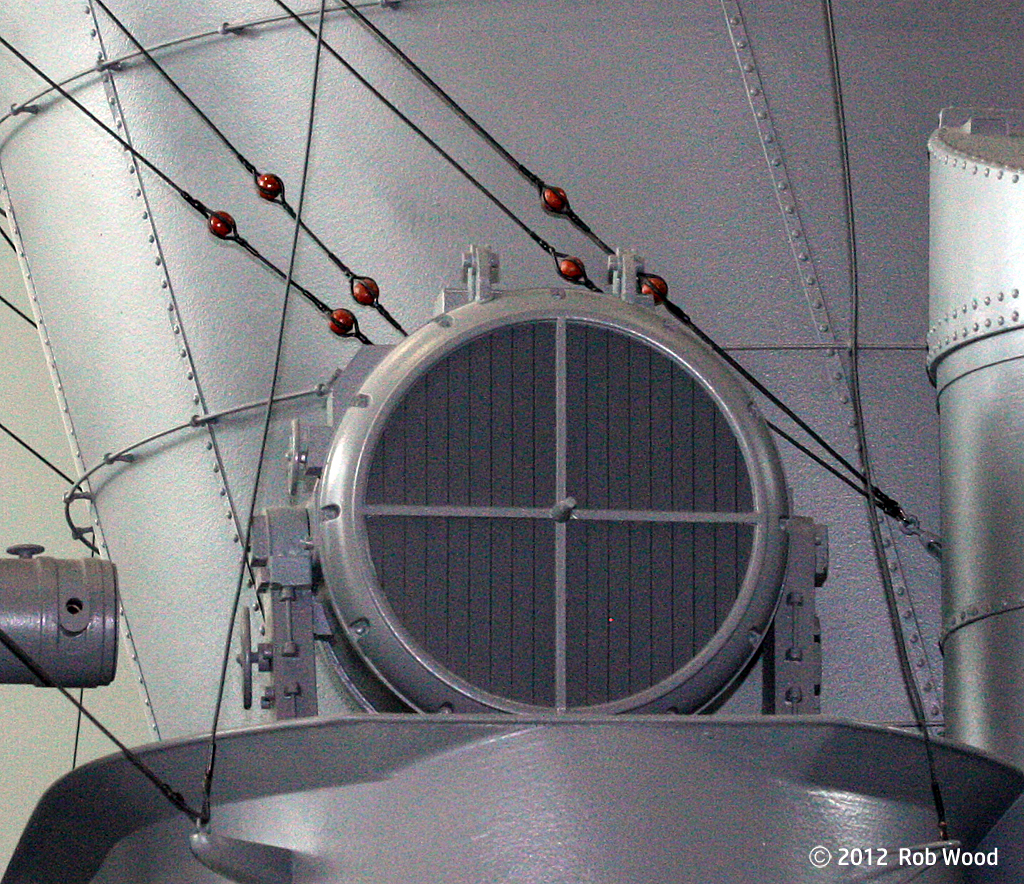
There aren't a lot of illustrations out there. Stay wires and the like are attached by turnbuckles. Rob Wood posted some closeups of the 1-10 Yamato some years ago. Have you seen those? Two examples and cropped close-up, below. I hope you can make out the details.
- Attachments
-
-
-
-
-
-
baseballbrat
- Posts: 317
- Joined: Thu Nov 29, 2012 11:38 pm
Re: Calling all IJN Yamato & Musashi fans
Thanks Dan. I had re-wrote my post above, but you seem to have figured it out.
Yes, I have seen Rob Woods photos and use them as reference. He seems to be the only one to photograph these examples.
I have been searching the internet on every possible Yamato photo site looking for these type of photos. So far, no other photos exists of this.
I had contacted Tamiya USA's Customer Service some time ago, but they are no help. My question was only that they include a rigging diagram with their new tool kit to aid the modeler during construction. Questions like this do get address at that level. Tamiya should have this reference.
I would contact Tamiya directly in Japan, but I need to have a go to guy that would listen to my request. If anyone has information to how to contact individuals there, please let me know.
Much discussion here has been about accuracy, but no one but myself has brought up the rigging as an issue.
Thanks for all your help!!!
Jim
Yes, I have seen Rob Woods photos and use them as reference. He seems to be the only one to photograph these examples.
I have been searching the internet on every possible Yamato photo site looking for these type of photos. So far, no other photos exists of this.
I had contacted Tamiya USA's Customer Service some time ago, but they are no help. My question was only that they include a rigging diagram with their new tool kit to aid the modeler during construction. Questions like this do get address at that level. Tamiya should have this reference.
I would contact Tamiya directly in Japan, but I need to have a go to guy that would listen to my request. If anyone has information to how to contact individuals there, please let me know.
Much discussion here has been about accuracy, but no one but myself has brought up the rigging as an issue.
Thanks for all your help!!!
Jim
-
Dan K
- Posts: 9069
- Joined: Tue Jan 11, 2005 10:56 am
- Location: New York City
Re: Calling all IJN Yamato & Musashi fans
Well, how much more do you need? I may have some more material on the 1/10 model at home. I recll a special booklet, maybe also a DVD put out by the museum when it opened.
-
baseballbrat
- Posts: 317
- Joined: Thu Nov 29, 2012 11:38 pm
Re: Calling all IJN Yamato & Musashi fans
It's the starting and ending point of each of the wires that's of main interest to me.Dan K wrote:Well, how much more do you need? I may have some more material on the 1/10 model at home. I recll a special booklet, maybe also a DVD put out by the museum when it opened.
I do have two of those 1/10 Yamato books in my massive collection.
Thanks again!
Jim
-
Rob Wood
- Posts: 78
- Joined: Tue Jul 10, 2012 2:56 pm
Re: Calling all IJN Yamato & Musashi fans
I've gone through some of my Yamato photos from the museum, looking for rigging details. I have a few that might be helpful, but I'm currently jammed with too much on my plate to dig for more.
One thing I think is important to point out is that my photos are photos of a model. I'm guessing the rigging hardware and connect points are accurate, but I have no way of knowing for sure. I know one thing for certain, though, and that is that none of the rope knots are shipshape. I also didn't focus on rigging, so my photos aren't really as crisp as they ought to be.
But, here's a sample. Would this level of detail and clarity work for you? If so, I'll try to get more uploaded tomorrow.
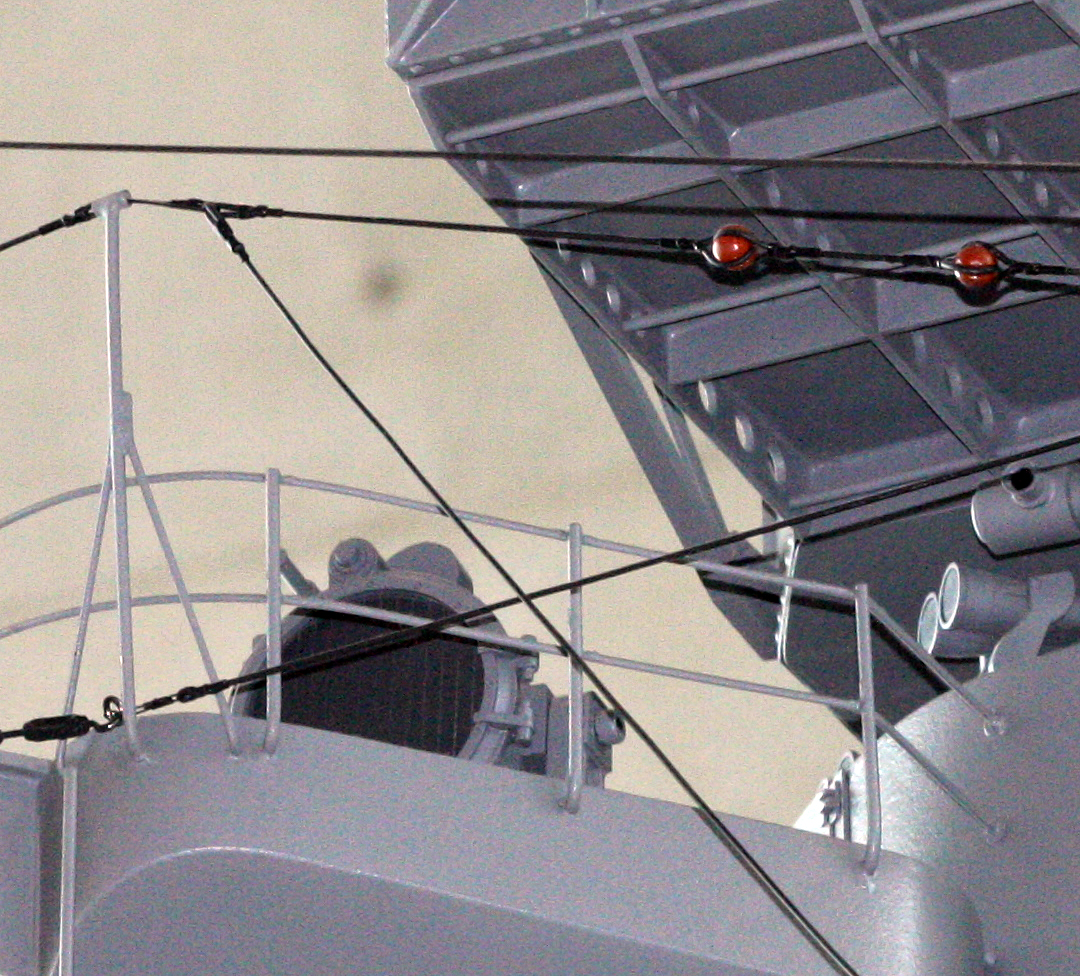
One thing I think is important to point out is that my photos are photos of a model. I'm guessing the rigging hardware and connect points are accurate, but I have no way of knowing for sure. I know one thing for certain, though, and that is that none of the rope knots are shipshape. I also didn't focus on rigging, so my photos aren't really as crisp as they ought to be.
But, here's a sample. Would this level of detail and clarity work for you? If so, I'll try to get more uploaded tomorrow.
-
baseballbrat
- Posts: 317
- Joined: Thu Nov 29, 2012 11:38 pm
Re: Calling all IJN Yamato & Musashi fans
Thanks again Rob for all your excellent photos of the 1/10 scale model at the museum. I am sure that what you can provide will be a great help in understanding the rigging better.
The detail is fine! What you have, no one else can provide.
Thanks for all your help and please take your time!
Jim
The detail is fine! What you have, no one else can provide.
Thanks for all your help and please take your time!
Jim
-
Rob Wood
- Posts: 78
- Joined: Tue Jul 10, 2012 2:56 pm
1:10 Yamato Rigging Photographs (Kure Yamato Museum)
Disclaimer: My knowledge of Japanese warship construction, fittings and rigging is very thin. I can answer questions based on my study of this particular model, but others here are better able to answer historical questions pertaining to IJN naval construction and engineering practices. My specialty is Kriegsmarine, and in particular, the Bismarck class of battleships. I am, however, a fairly competent photographer, and my technical skills have greatly improved since I shot this model in June of 2012.
I've been studying my photos over the past couple of days, specifically looking for rigging connections. For the photographers out there who might want to try photographing this gargantuan model (86-feet long): I had only one day to get whatever I could get, and that included a trip on the bullet train from Osaka to Hiroshima and back, plus a round trip on a local train from Hiroshima to Kure, then a fairly long walk to the museum. If you get a chance to visit this museum, plan your shots before you get there, spend at least two days in Kure, and try to get permission to use a tripod.
Once I got to the museum, I discovered a low-light situation, compounded by a huge wall of glass directly behind the stern that made any shot from forward toward the stern a back-lit, blown-out, near-impossibility at main deck level. The fact that tripods weren't allowed meant shooting low light, hand held - not a great combo for details. Having only 4 hours to shoot this subject, I was forced to hurry, and while I did not have time to systematically shoot particular subjects (such as rigging connecting points), I did shoot over 1,000 photos from a total of four levels, all the way around the ship. I've only been through a hundred or so shots so far in my quest for rigging connections, but I think I have enough to enable a builder to see how the rigging is organized, and how the various kinds of rigging are handled.
One other caveat: Because I did not systematically shoot rigging, I have to pull the connectors from wider shots, and that means that the end points are not likely to be crisply focused. Not only that, but because there is a 1,200 pixel maximum dimension for images here, I have to crop each shot to show what detail there is. It's labor-intensive and time-consuming, and it's going to take a while - maybe a couple of months - to pull them all and upload them to our server. So, be patient, please.
While not every end point is going to be presented here (there are hundreds), a good modeler, familiar with IJN practices, should be able to guess, along with help from other knowledgeable members of this great forum, how each type of line, guy wire and electrical/radio/phone cable is connected.
Three rigging end points are common elements that I've observed so far, most of which terminate at a fixed steel eye. (I assume they are eye bolts or permanently welded.) One end of each steel cable is connected to the eye with a loop and cable clamps or crimps, while the other end typically terminates with an adjustable turnbuckle and hook. The other two connectors are electrical and radio or audio connectors, each with some sort of insulator at the connecting point.
I plan to present enough visual information here that you ought to feel fairly confident that the way is generally mapped for an accurate portrayal of the 1:10 Yamato model in Kure. How accurate that model is...well, I'm guessing it's more accurate than any other you're likely to find, but what do I know? I'm a Bismarck guy.
Finally, I'm going to attempt to present photos of sections of the superstructure, starting with wide angles, then tighter shots related to that section. The convention is: wide shot>medium shot>detail shot, where possible. I'm not going to write captions, but the organization of the photos should be self-explanatory.
Rob
I've been studying my photos over the past couple of days, specifically looking for rigging connections. For the photographers out there who might want to try photographing this gargantuan model (86-feet long): I had only one day to get whatever I could get, and that included a trip on the bullet train from Osaka to Hiroshima and back, plus a round trip on a local train from Hiroshima to Kure, then a fairly long walk to the museum. If you get a chance to visit this museum, plan your shots before you get there, spend at least two days in Kure, and try to get permission to use a tripod.
Once I got to the museum, I discovered a low-light situation, compounded by a huge wall of glass directly behind the stern that made any shot from forward toward the stern a back-lit, blown-out, near-impossibility at main deck level. The fact that tripods weren't allowed meant shooting low light, hand held - not a great combo for details. Having only 4 hours to shoot this subject, I was forced to hurry, and while I did not have time to systematically shoot particular subjects (such as rigging connecting points), I did shoot over 1,000 photos from a total of four levels, all the way around the ship. I've only been through a hundred or so shots so far in my quest for rigging connections, but I think I have enough to enable a builder to see how the rigging is organized, and how the various kinds of rigging are handled.
One other caveat: Because I did not systematically shoot rigging, I have to pull the connectors from wider shots, and that means that the end points are not likely to be crisply focused. Not only that, but because there is a 1,200 pixel maximum dimension for images here, I have to crop each shot to show what detail there is. It's labor-intensive and time-consuming, and it's going to take a while - maybe a couple of months - to pull them all and upload them to our server. So, be patient, please.
While not every end point is going to be presented here (there are hundreds), a good modeler, familiar with IJN practices, should be able to guess, along with help from other knowledgeable members of this great forum, how each type of line, guy wire and electrical/radio/phone cable is connected.
Three rigging end points are common elements that I've observed so far, most of which terminate at a fixed steel eye. (I assume they are eye bolts or permanently welded.) One end of each steel cable is connected to the eye with a loop and cable clamps or crimps, while the other end typically terminates with an adjustable turnbuckle and hook. The other two connectors are electrical and radio or audio connectors, each with some sort of insulator at the connecting point.
I plan to present enough visual information here that you ought to feel fairly confident that the way is generally mapped for an accurate portrayal of the 1:10 Yamato model in Kure. How accurate that model is...well, I'm guessing it's more accurate than any other you're likely to find, but what do I know? I'm a Bismarck guy.
Finally, I'm going to attempt to present photos of sections of the superstructure, starting with wide angles, then tighter shots related to that section. The convention is: wide shot>medium shot>detail shot, where possible. I'm not going to write captions, but the organization of the photos should be self-explanatory.
Rob
Last edited by Rob Wood on Wed May 20, 2015 3:11 pm, edited 1 time in total.
-
Rob Wood
- Posts: 78
- Joined: Tue Jul 10, 2012 2:56 pm
Re: 1:10 Yamato Rigging Photographs (Kure Yamato Museum)
This is my proposed convention. Comments welcomed.
Wide shot: Aft Rigging
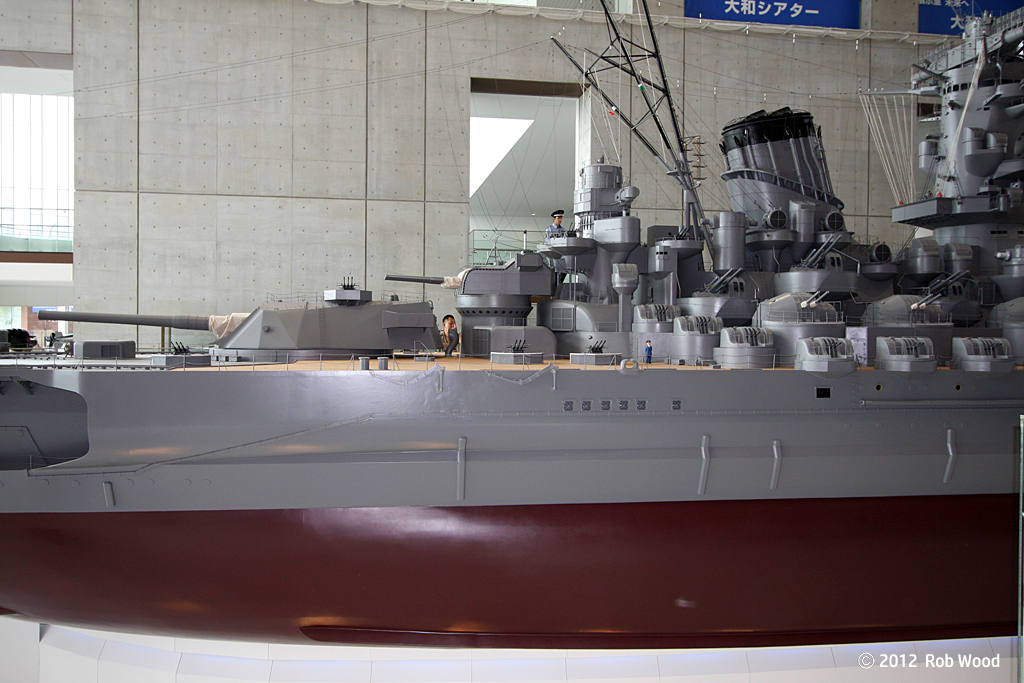
Medium shot: Aft Rigging
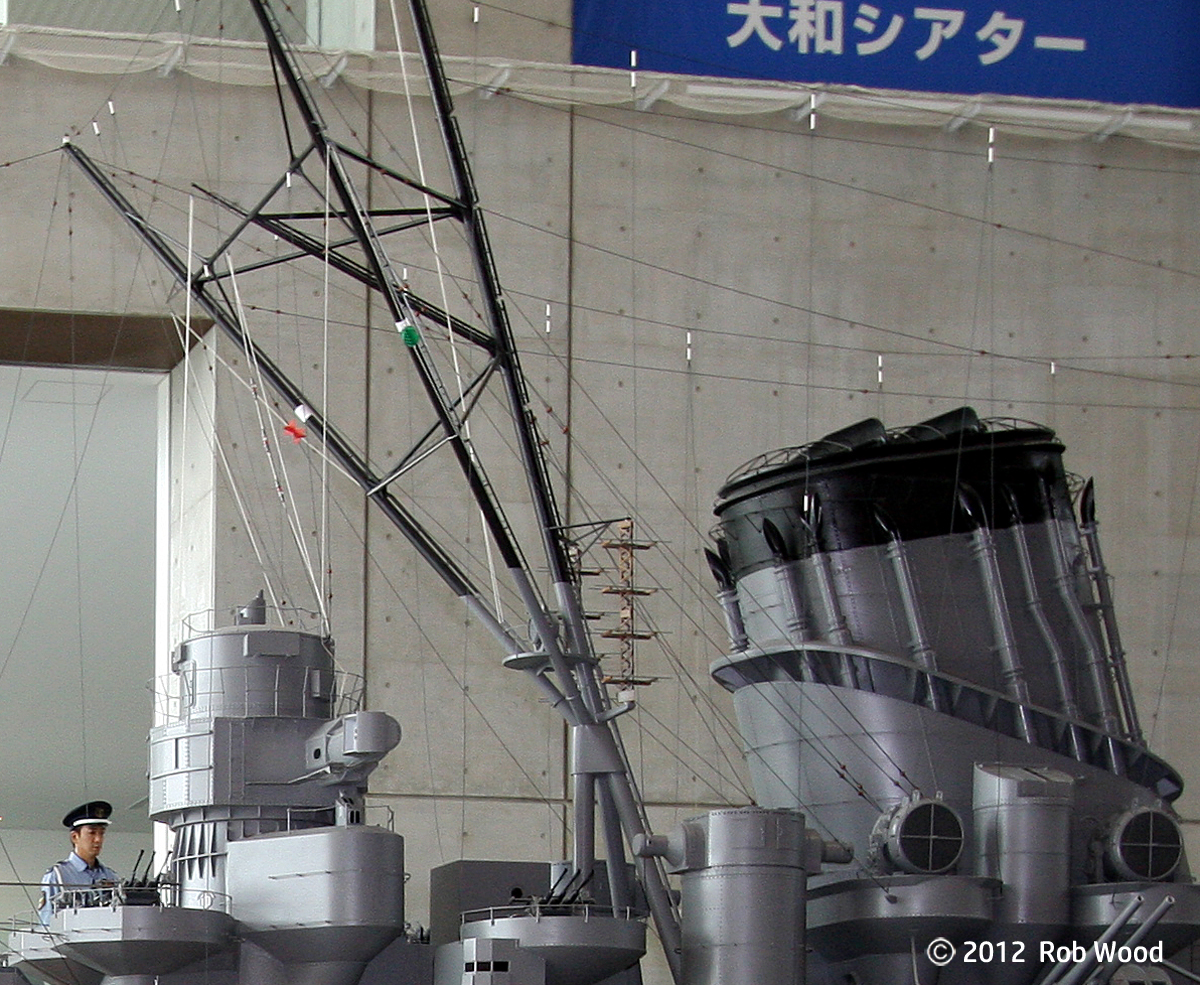
Medium shot2: Aft Rigging
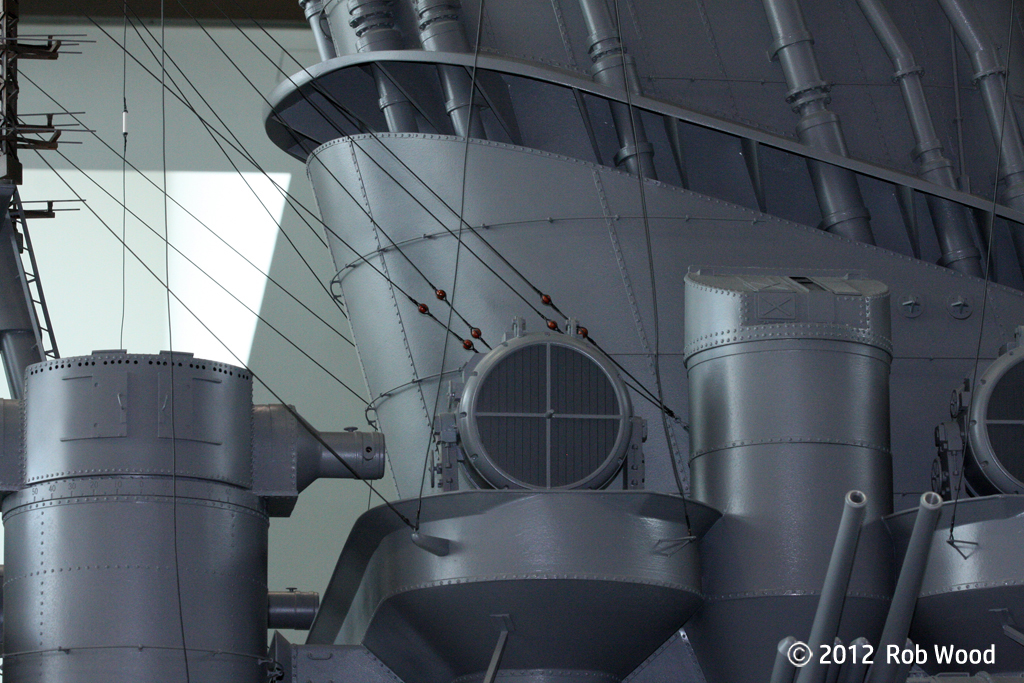
Sample detail shot: Aft Rigging
Comments on this presentation convention?
Note: In some cases, I may be able to zoom in on a particular detail in a medium shot, or at least show you a clearer shot of that type of fitting from elsewhere on the ship. Just ask, and I'll do my best.
Rob
Wide shot: Aft Rigging
Medium shot: Aft Rigging
Medium shot2: Aft Rigging
Sample detail shot: Aft Rigging
Comments on this presentation convention?
Note: In some cases, I may be able to zoom in on a particular detail in a medium shot, or at least show you a clearer shot of that type of fitting from elsewhere on the ship. Just ask, and I'll do my best.
Rob
Last edited by Rob Wood on Wed May 20, 2015 5:39 pm, edited 2 times in total.
-
Dan K
- Posts: 9069
- Joined: Tue Jan 11, 2005 10:56 am
- Location: New York City
Re: 1:10 Yamato Rigging Photographs (Kure Yamato Museum)
I think the convention is fine and many, many thanks to you for going the extra mile on providing reference photos. That's a much appreciated effort.
-
Rob Wood
- Posts: 78
- Joined: Tue Jul 10, 2012 2:56 pm
Re: 1:10 Yamato Rigging Photographs (Kure Yamato Museum)
My pleasure, Dan. Aside from the obvious benefits modelers glean from working cooperatively in this way, there's a deeper value that goes beyond the craft. I believe we are increasingly the keepers of the flame of the Greatest Generation. My father, for example, was Old Navy when the Japanese bombed Pearl Harbor. He served on the Murmansk convoys, fighting the Germans before the U.S. was officially in the war. After that, he served in the Pacific, all the way up the chains to Japan, then served in the occupation forces until 1946. He's gone now, like so many of his generation. My POV is that the least we modelers can do is honor them by doing what we can to build accurate scale models of their ships, aircraft and vehicles, and to preserve their stories that way.
Rob
Rob
-
Mike C

- Posts: 583
- Joined: Wed Jan 12, 2005 1:32 am
- Location: Peach State
Re: 1:10 Yamato Rigging Photographs (Kure Yamato Museum)
Excellent pictures, Rob. They should be a great help in clarifying the pictures on the Kure Museum site: http://mokehana.web.fc2.com/e-photo-yamatomuseum.htm
-
Doug Hallet

- Posts: 214
- Joined: Sat Mar 15, 2008 8:43 pm
Re: Calling all IJN Yamato & Musashi fans
Great work Anthony Polychroniadis! Finally, someone's done the black deck/white markings configuration. A great inspiration to get my own back under construction. Cheers!
Last edited by Timmy C on Thu May 28, 2015 11:02 pm, edited 1 time in total.
Reason: Added link to Anthony's gallery
Reason: Added link to Anthony's gallery
-
baseballbrat
- Posts: 317
- Joined: Thu Nov 29, 2012 11:38 pm
Re: Calling all IJN Yamato & Musashi fans
YES! I agree. A fine example. I hope mine comes out that good when I get underway.Doug Hallet wrote:Great work Anthony Polychroniadis! Finally, someone's done the black deck/white markings configuration. A great inspiration to get my own back under construction. Cheers!

-
Anthony P

- Posts: 259
- Joined: Tue Jan 11, 2005 4:15 am
- Location: Athens, Greece
Re: Calling all IJN Yamato & Musashi fans
Thank you guys! Glad you like it. I should also thank you, as I found myself unable to build it in any other way after the convincing arguments on this thread.
On a practical basis the build gave me fits, as I went for a black deck halfway through it and repainted the Pontos wood deck with black oils... ..not to mention the epoxy seascape that wouldn't dry!
I also blame you guys for my increasing addiction, as to relax after this strenuous build, I built a chibi maru Yamato, 8 1/2000 Yamato class miniatures (and a water base...) and have the 1/500 Fujimi Yamato looking at me from the stash...
Anthony
On a practical basis the build gave me fits, as I went for a black deck halfway through it and repainted the Pontos wood deck with black oils...
..not to mention the epoxy seascape that wouldn't dry!I also blame you guys for my increasing addiction, as to relax after this strenuous build, I built a chibi maru Yamato, 8 1/2000 Yamato class miniatures (and a water base...) and have the 1/500 Fujimi Yamato looking at me from the stash...
Anthony
Fast is fine, but accuracy is everything.
Wyatt Earp
Wyatt Earp
-
bucketfoot-al
- Posts: 495
- Joined: Mon Mar 26, 2007 11:34 pm
- Location: The Lone Star State
- Contact:
Re: Calling all IJN Yamato & Musashi fans
Anthony, I must say that looking at your Ten-ichi-go diorama gave me chills - not only is it 100% accurate down to every last gun emplacement and deck color, and super-detailed (fantastic work with the tiny sailor figures!!!), but the water and the background clouds give it an "eerie feeling" of a chilly April morning. Having been on ships in the Adriatic in similar weather conditions and time of day, I could almost smell the cool salty air and feel the chilly breeze! (Not to mention smell the diesel fumes).
Fantastic work my friend! Fabulous!!!
Fantastic work my friend! Fabulous!!!
bucketfoot-al
Creator of the Yamato/Musashi Archive Photo Gallery
https://battleshipyamato.com
dulce et decorum est pro patria mori
Creator of the Yamato/Musashi Archive Photo Gallery
https://battleshipyamato.com
dulce et decorum est pro patria mori
-
bucketfoot-al
- Posts: 495
- Joined: Mon Mar 26, 2007 11:34 pm
- Location: The Lone Star State
- Contact:
Re: Calling all IJN Yamato & Musashi fans
On another unrelated note, you will see that my website now has NO POPUP ADS ANYMORE as I have decided to actually pay the monthly subscription fee so I can get more space.
I cannot promise when, because I am so busy right now with work and life, but I intend to upload a lot more material to the site since I have gone from 20MB to 2GB in allotment. I will let y'all know when there is more stuff to be seen. In the meantime, enjoy the friendlier browsing experience!
I cannot promise when, because I am so busy right now with work and life, but I intend to upload a lot more material to the site since I have gone from 20MB to 2GB in allotment. I will let y'all know when there is more stuff to be seen. In the meantime, enjoy the friendlier browsing experience!
bucketfoot-al
Creator of the Yamato/Musashi Archive Photo Gallery
https://battleshipyamato.com
dulce et decorum est pro patria mori
Creator of the Yamato/Musashi Archive Photo Gallery
https://battleshipyamato.com
dulce et decorum est pro patria mori