The Ship Model Forum

The Ship Modelers Source
It is currently Tue Apr 16, 2024 9:10 am

All times are UTC - 6 hours [ DST ]


Post new topic Reply to topic  [ 166 posts ]  Go to page Previous  1, 2, 3, 4, 5 ... 9  Next
Author Message
 Post subject: more progress...
PostPosted: Sun Apr 29, 2012 6:54 pm 
Offline

Joined: Sat Dec 15, 2007 10:40 pm
Posts: 337
Location: San Diego
I managed to build a stand, paint the hull, install the wood maindeck and start on the foc'sl and foredecks.

Note that I had a HORRIBLE time trying to get Vallejo Air to stick to Mr. Surfacer. I primed the (*VERY* clean) resin with Mr. Surfacer, let it dry till it no longer smelled (three days), and painted below the waterline with Vallejo. After a week's drying time I masked for the haze grey and applied that color in ModelMaster. Upon removing the (Tamiya) masking tape, the red VAllejo came off in sheets. I stripped all the paint (and had to scrub to get the Mr. Surfacer off), then tried everything again, thinking I had somehow done something wrong. Exact same results the second time around. After stripping the entire hull for the second time I went back to my tried-and-true formula (Tamiya and ModelMaster). I used Tamiya below the waterline and everything else is Model Master. No real reason for this combination other than I am comfortable mixing the correct vertical/horizontal colors in MM (NB: in this context I use the word "correct" with respect to my tastes - if something doesn't look right to you, I always welcome useful critique), and I happened to have the correct combination of colors in Tamiya for the anti-foul red.

If anyone can tell from my description what I'm doing wrong with Vallejo, PLEASE let me know: I actually like the paint quite a bit, but if it won't stick reliably it is of little use to me.

After everything was nice and dry I made a template of the planked area and transferred it to a piece of "tinted wood" deck from ScaleDecks.com. I cut that out with scissors then carefully sanded its edges to precise shape. Then after summoning the appropriate courage I glued it to the hull using Zap-a-Gap. I am personally impressed with how great it looks.

The second image shows the current state of the foredeck. Prior to painting and with the exception of a few pieces on the stern, I sanded all of the cast-in detail off the hull (the kit's foc'sl was particularly "interesting" and had to go), and sanded down the planked area to approximate the thickness of the wood deck. So, everything you see in the photos - aside from the hull itself and the turret bodies, is scratch-built - except for the exceptional L'Aresnal twin bits. I know the extreme edge of the decking looks "a bit rough" but the good news is that the maindeck railing with hide it.

Still having fun with this kit...
- Randy

Image


Image


Top
 Profile  
Reply with quote  
PostPosted: Mon Apr 30, 2012 8:57 pm 
Offline

Joined: Thu Mar 18, 2010 6:42 pm
Posts: 177
Thanks for the update Randy, she's gonna be a beaut.

Cheers,

Keith


Top
 Profile  
Reply with quote  
PostPosted: Tue May 01, 2012 11:52 am 
Offline
User avatar

Joined: Wed Jan 13, 2010 9:10 am
Posts: 2695
Location: san francisco
very nice looking model. :thumbs_up_1: :thumbs_up_1: wonder it can be bought as a waterline?


Top
 Profile  
Reply with quote  
PostPosted: Tue May 01, 2012 12:00 pm 
Offline

Joined: Sat Dec 15, 2007 10:40 pm
Posts: 337
Location: San Diego
Absolutely. The hull comes in the standard top/bottom halves: building a waterline version would actually be quite a bit less work :)


Top
 Profile  
Reply with quote  
PostPosted: Tue May 01, 2012 12:03 pm 
Offline
User avatar

Joined: Wed Jan 13, 2010 9:10 am
Posts: 2695
Location: san francisco
cool, building a waterline Tonkin Gulf fleet. she will look good next to my Chicago CG-11. :thumbs_up_1:


Top
 Profile  
Reply with quote  
 Post subject: incremental progress
PostPosted: Sat May 12, 2012 12:34 am 
Offline

Joined: Sat Dec 15, 2007 10:40 pm
Posts: 337
Location: San Diego
Built up the main tower this evening. I must say that in my experience, YMW's photoetch is very, very nice.

Image

Image

Image

Image


Top
 Profile  
Reply with quote  
PostPosted: Sat May 12, 2012 6:31 pm 
Offline

Joined: Sat Dec 15, 2007 10:40 pm
Posts: 337
Location: San Diego
Image

Image


Top
 Profile  
Reply with quote  
 Post subject: some more progress
PostPosted: Sun May 13, 2012 8:46 pm 
Offline

Joined: Sat Dec 15, 2007 10:40 pm
Posts: 337
Location: San Diego
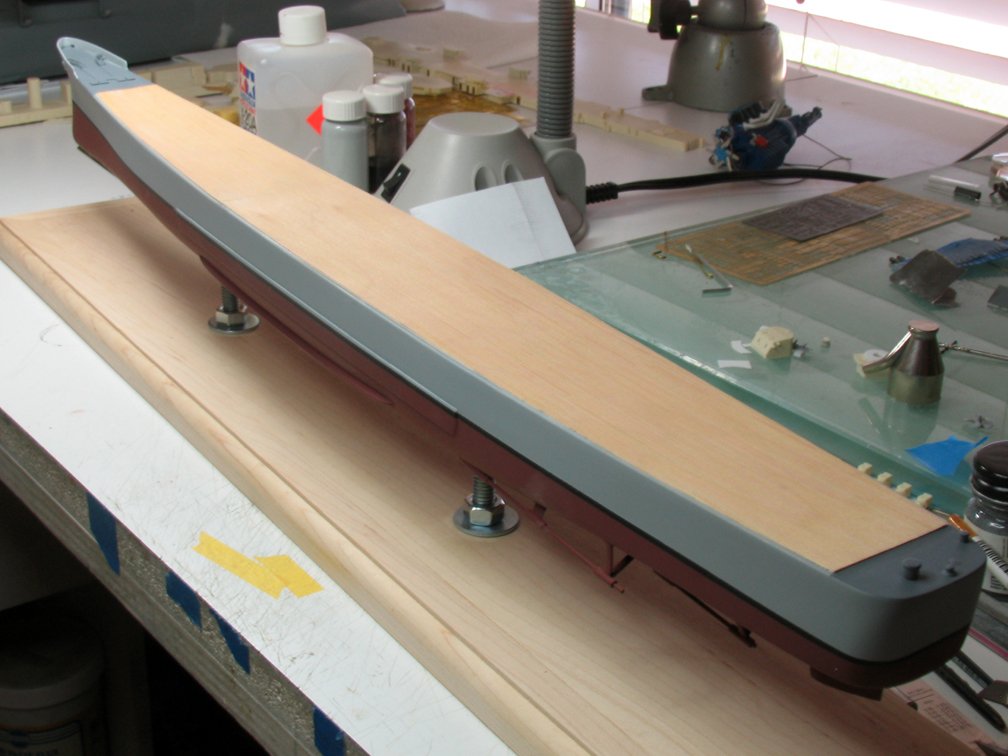
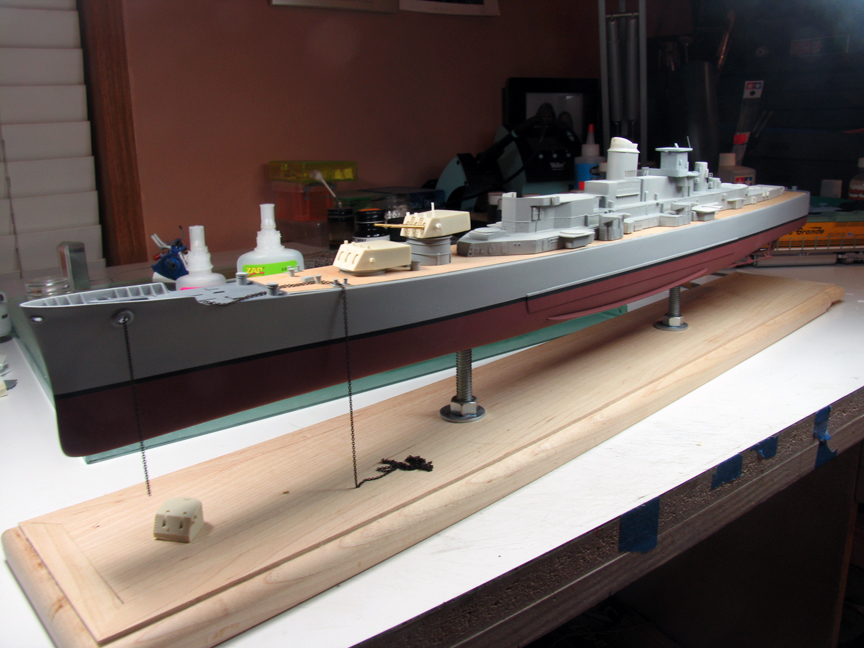
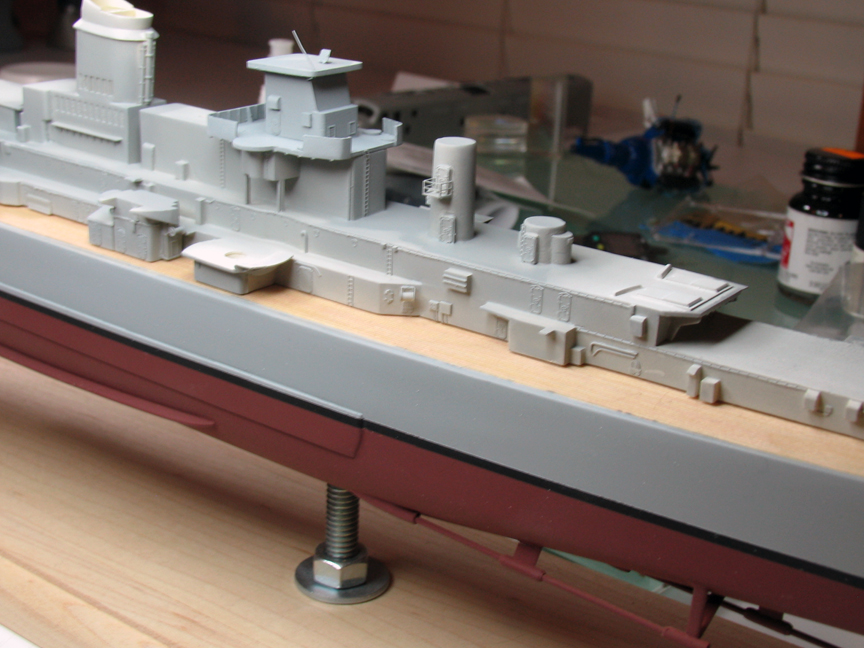
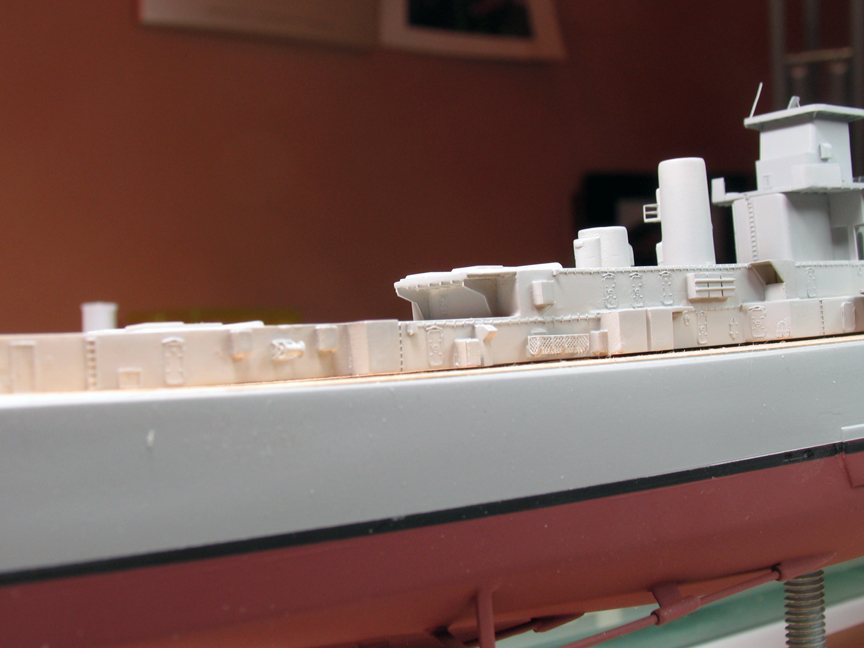
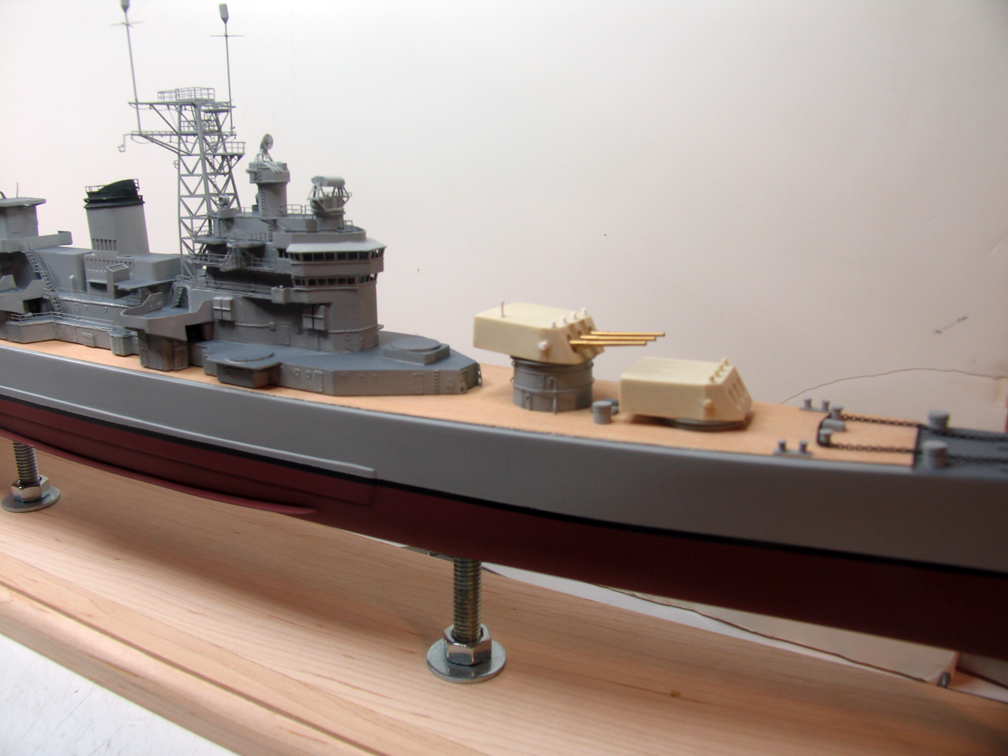
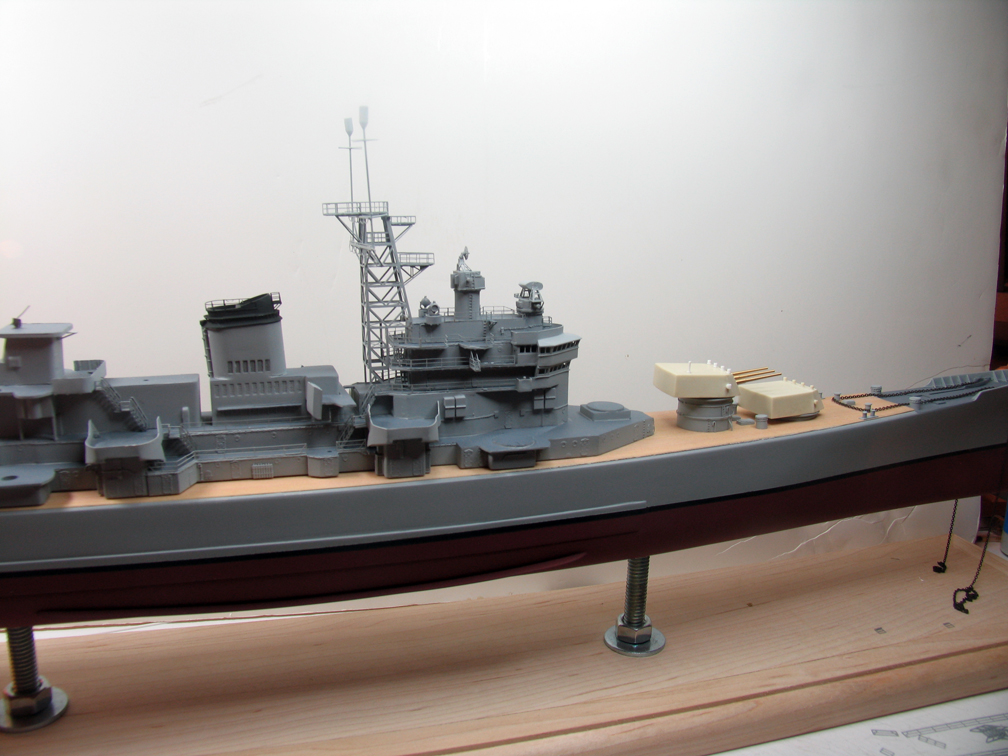
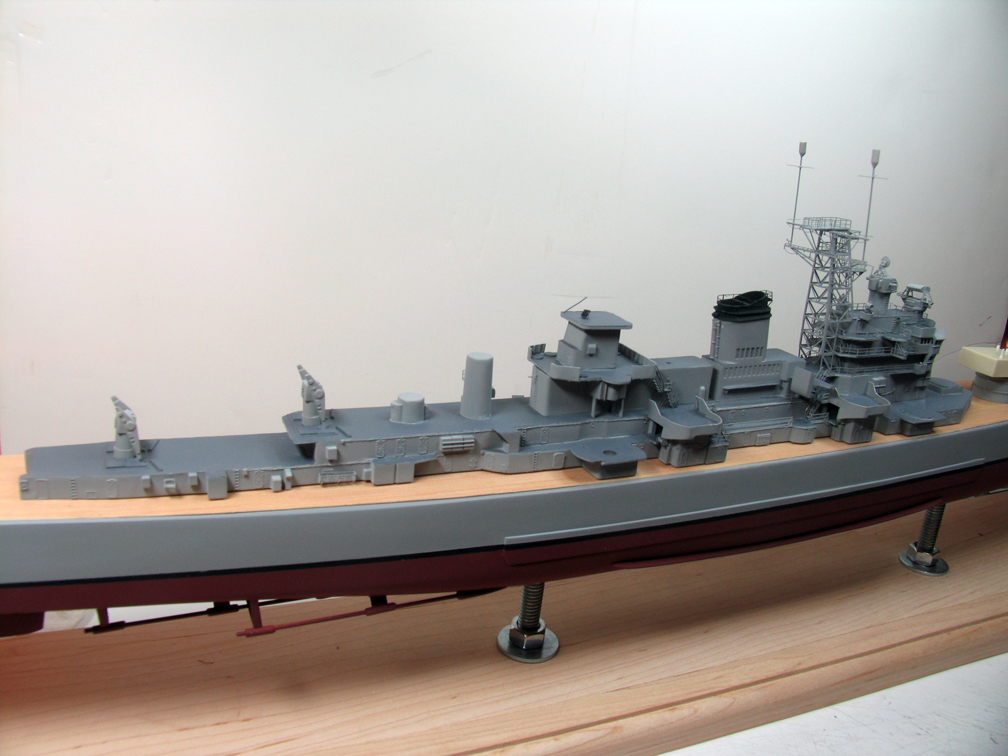
Spent some more time on Boston this weekend, and figured I'd place all the subassemblies just to see how everything is shaping up. First up is an overall shot of current progress. In this view the main/01 deckhouses are attached to each other but not to the hull, and everything else is just "sitting there."

Image

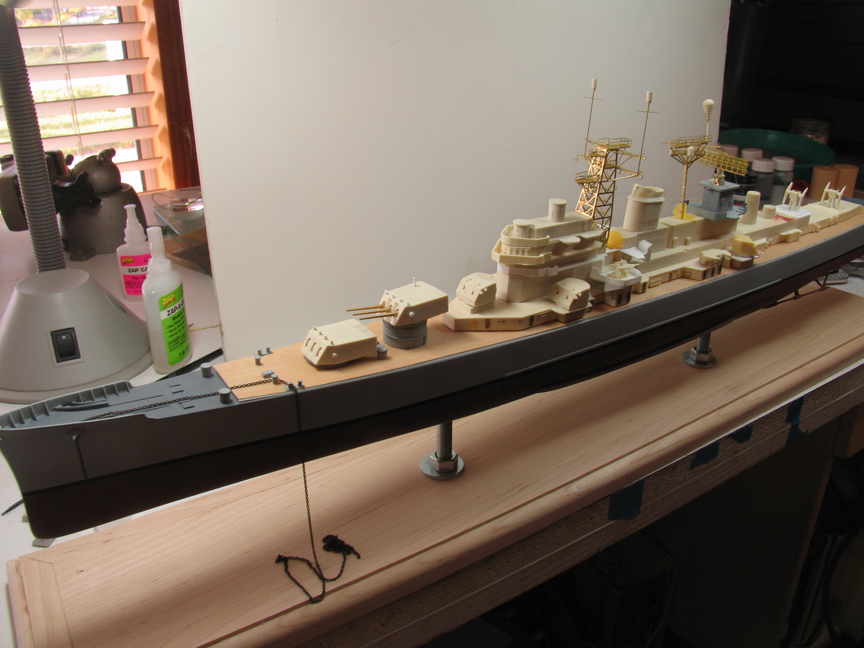
I came to a bit of a nasty realization... I'd been planning on assembling/painting on a deck-by-deck basis, but due to the general design (ie., multi-deck height of the amidships superstructure, 3" guntubs - which share a seamless deck with the 02 level, etc.) that I would have to at least work on the maindeck / 01-deck assemblies as a unit. So I assembled those decks and took care of remaining seams, then realized that the 03 bridge deck would also have to be assembled to this unit - the splinter shields form a seamless assembly with the deckhouses immediately below. So much for plans.

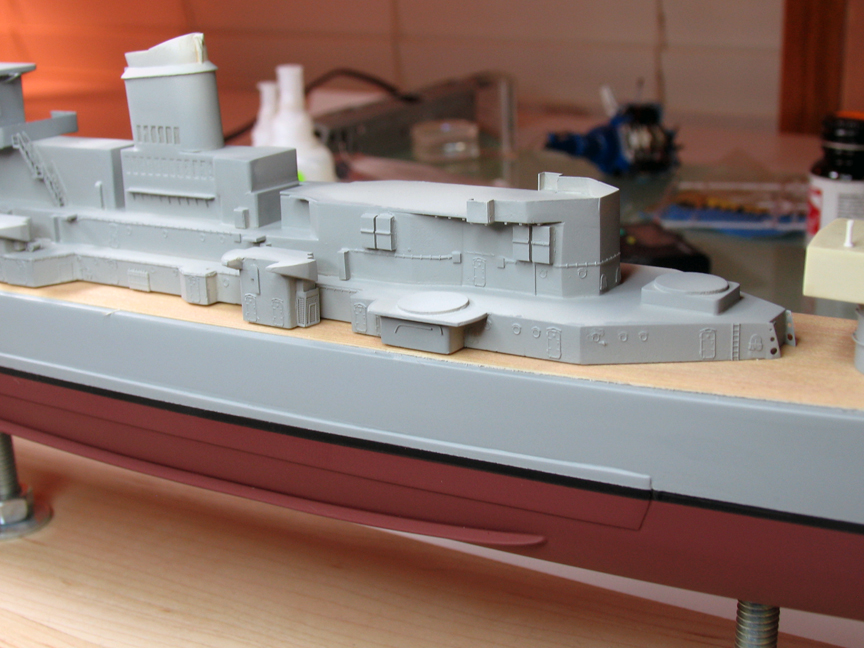
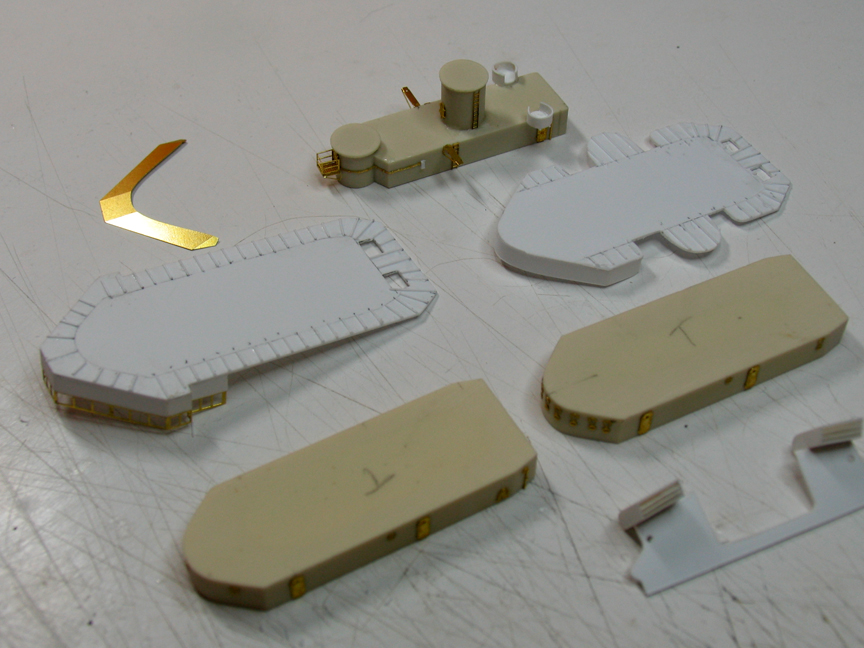
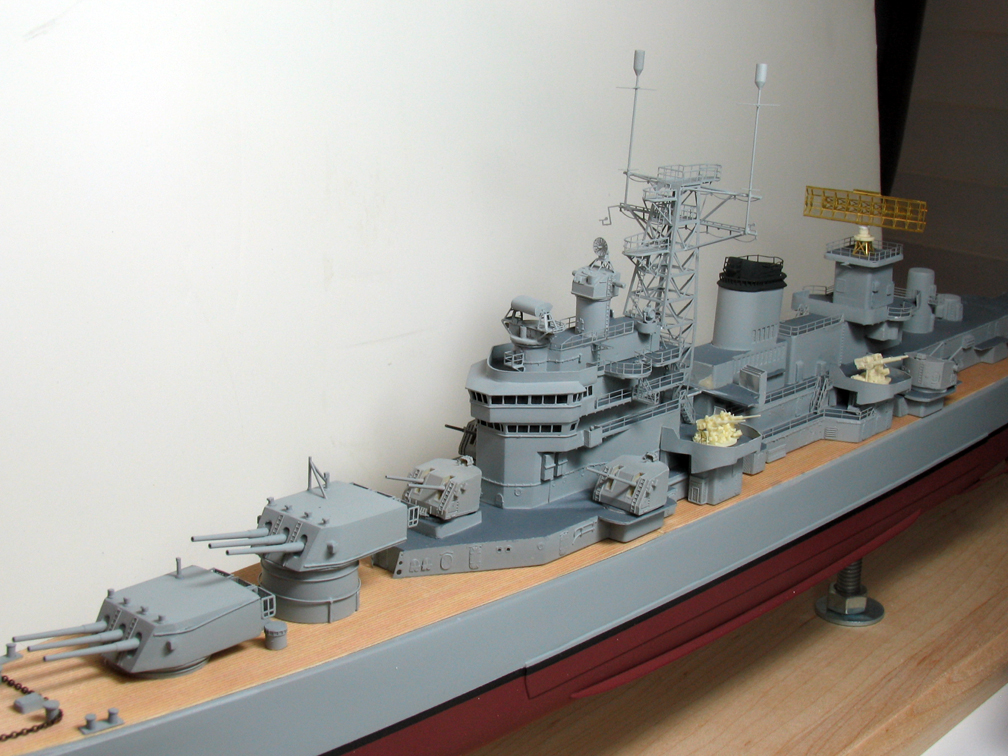
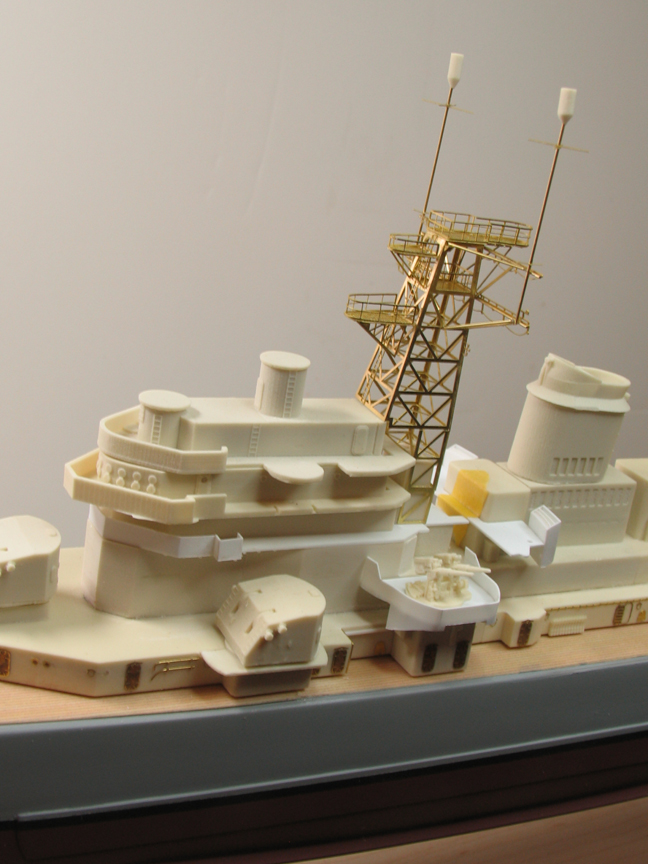
This next shot shows the bridge area with the main tower in place (just sitting there). Visible are several items which required replacement with scratchbuilt parts: the 03 deck and railings (the kit-supplied parts for which scaled out to around 12-inches thick...), the port-forward 3" gun tub (which was oddly shaped and again way out of scale), and the flag-bag deck and flag bags (once again, waaay too large).

Image

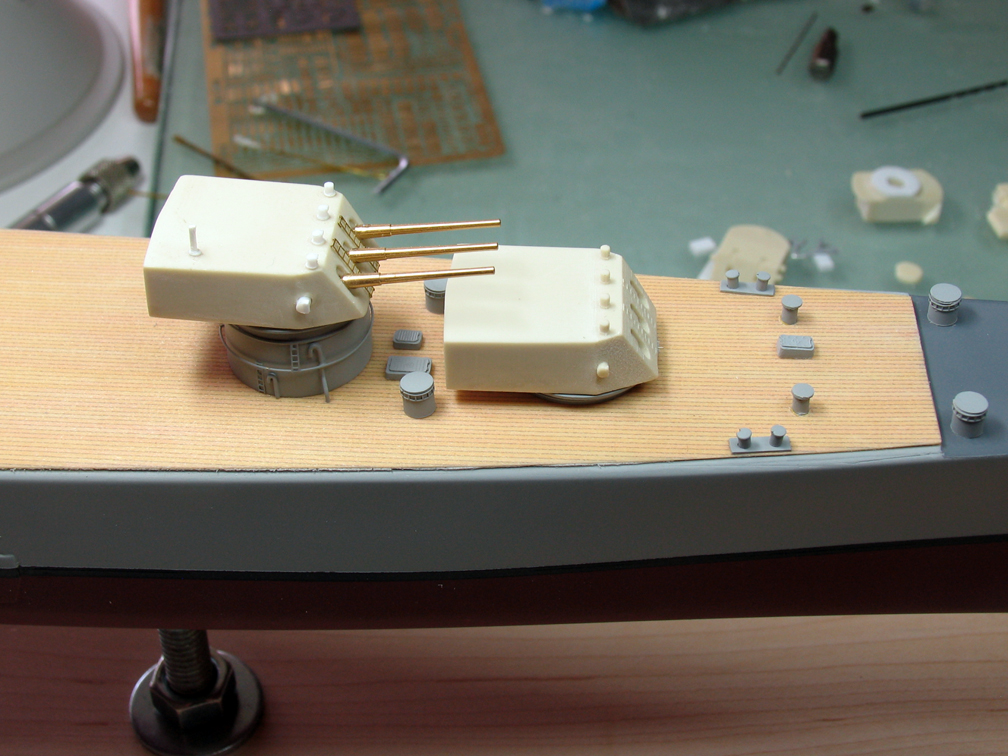
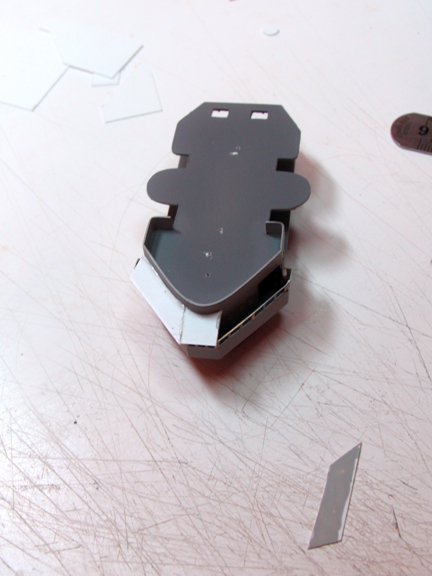
This is the area I mentioned earlier - where the maindeck and 01-deck houses form a seamless vertical wall. The only way I know how to achieve an acceptable finish is to build/finish them as one piece. The forward missile launcher mount had to be replaced (too thick, details too soft). I also replaced the kit-supplied pedestals for the launchers.

Image

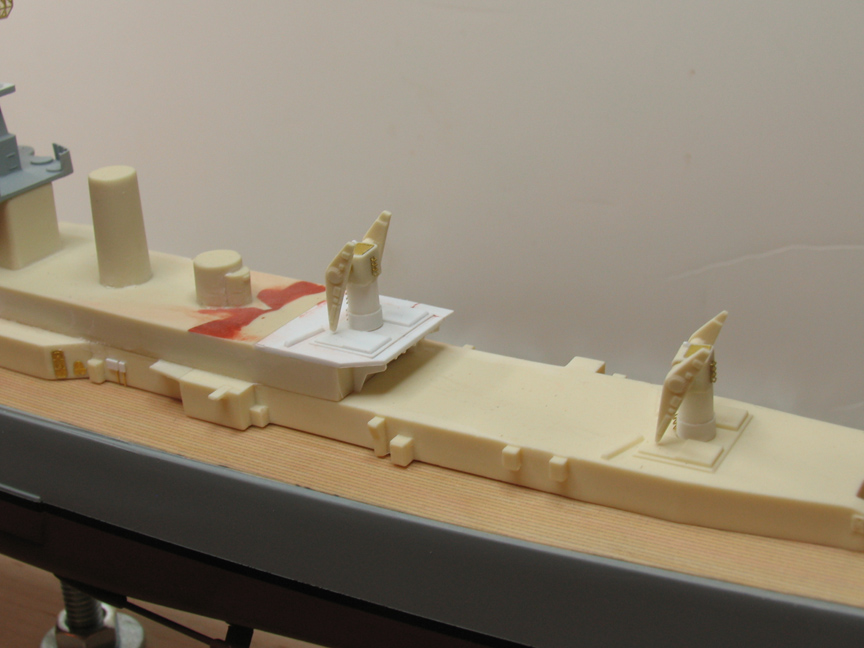
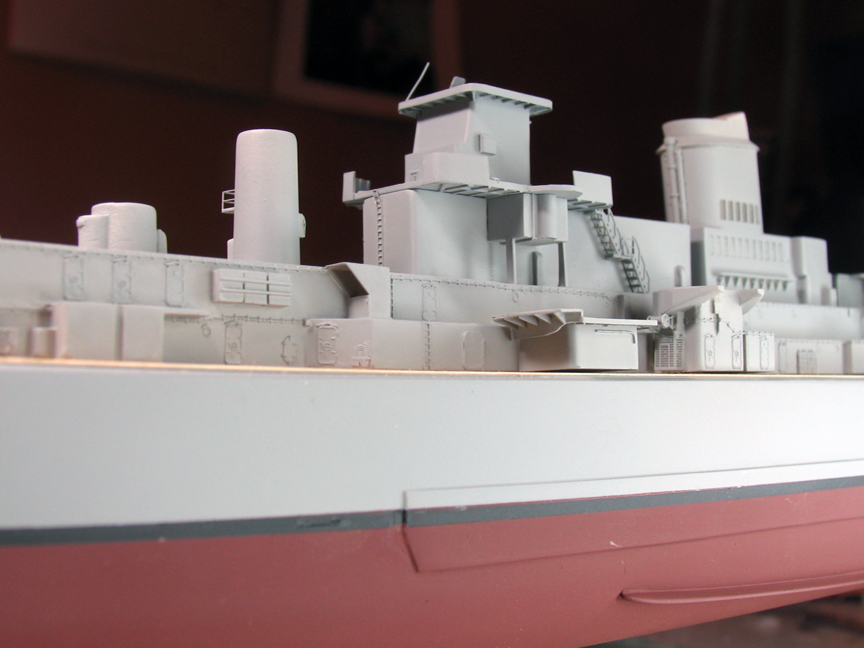
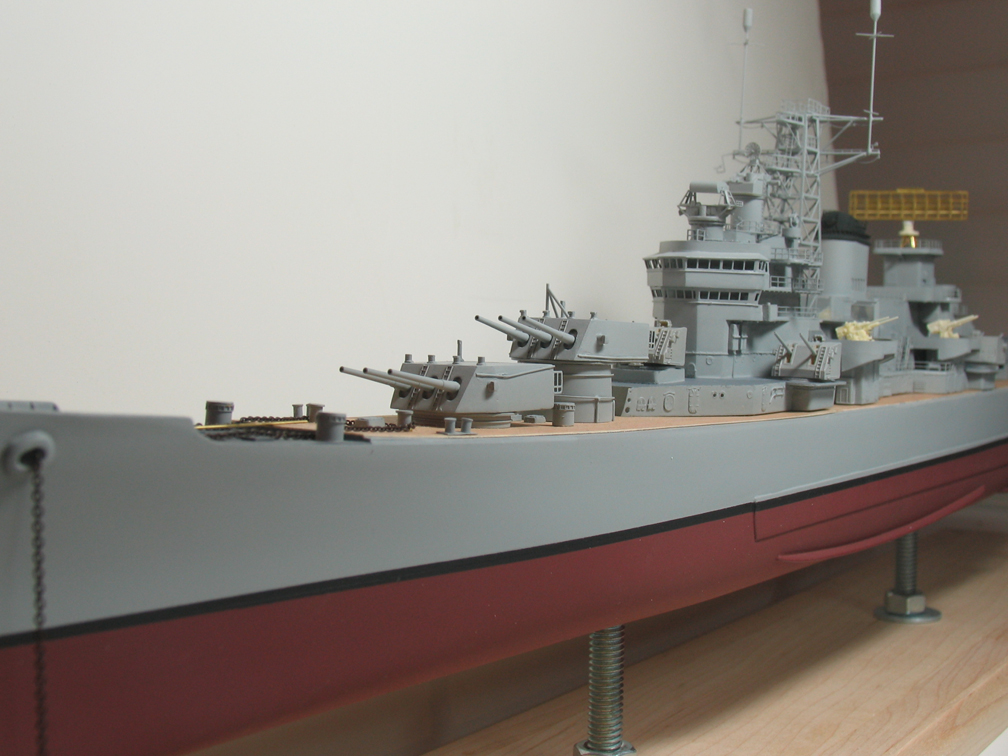
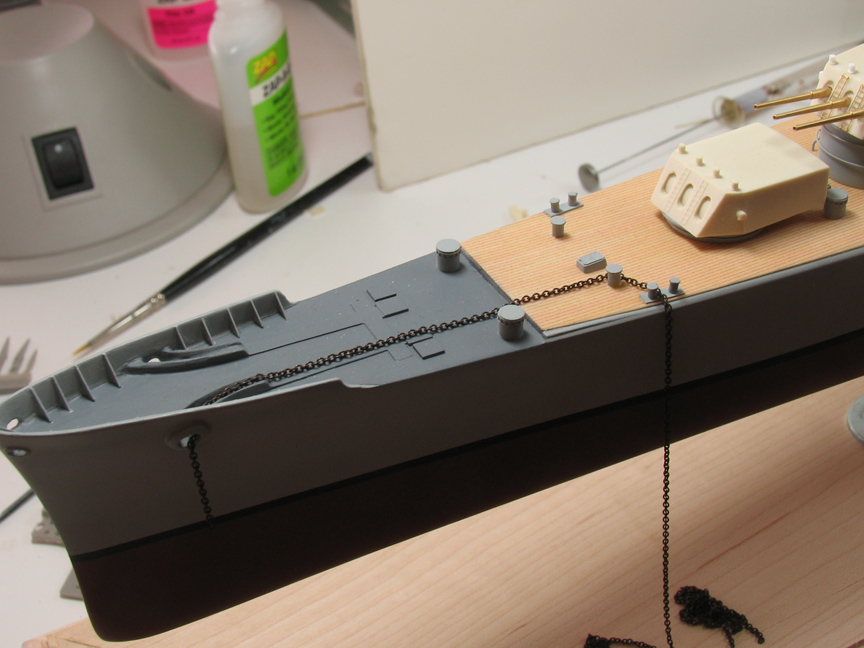
View of the foc'sle in current form. The hull in this area was scraped clean - out of scale, wrong shape, etc. - and replaced. The very nice chain comes from L'Arsenal courtesy of Tony Bunch.

Image

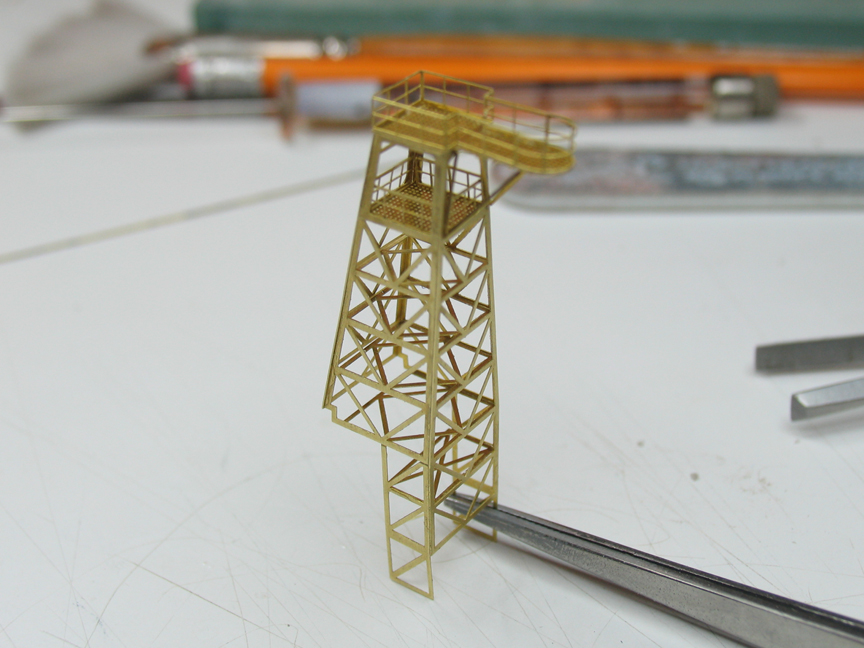
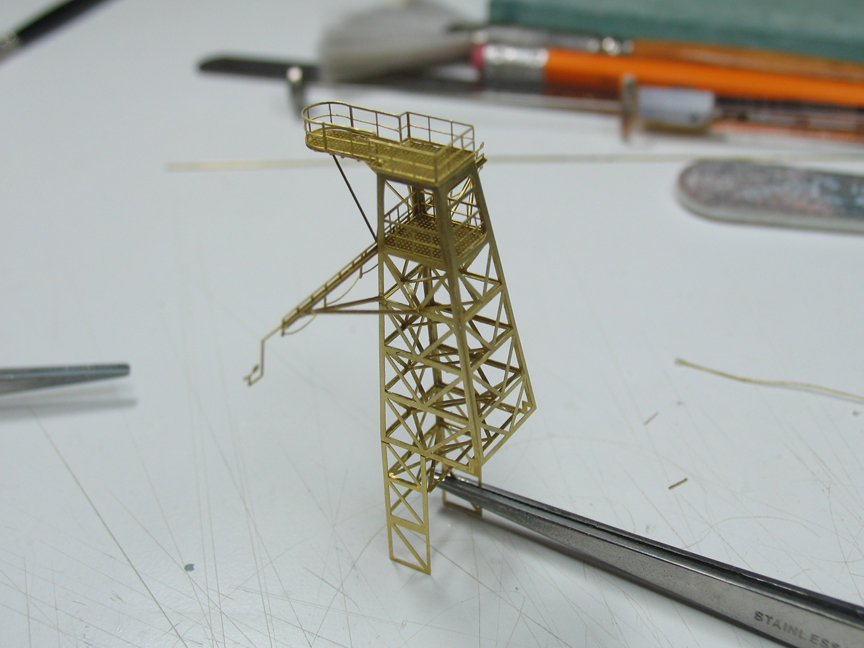
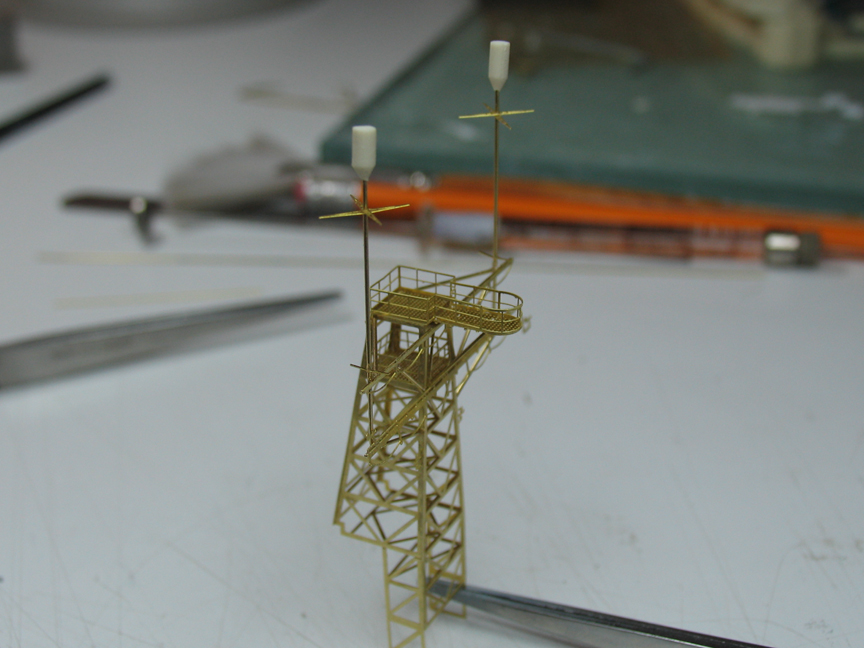
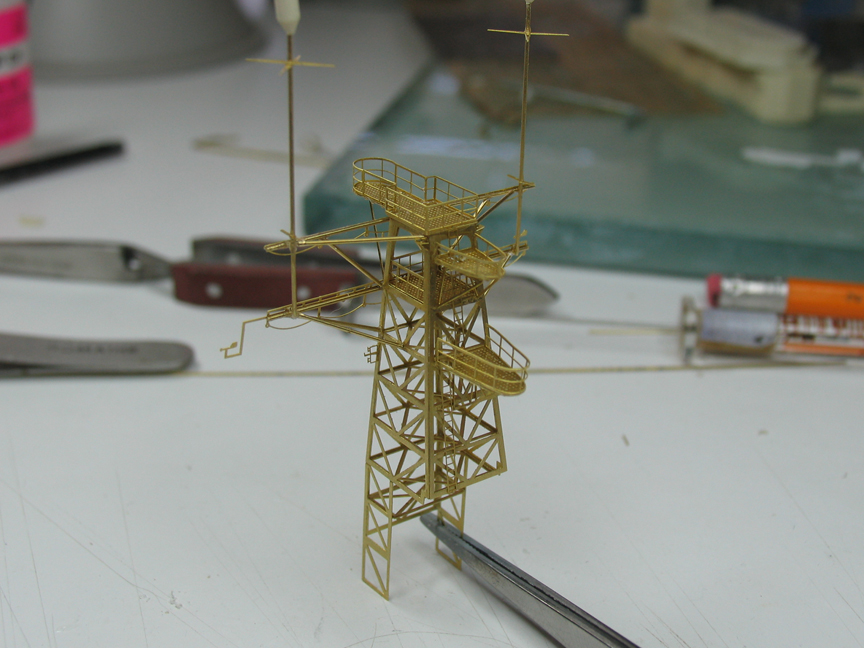
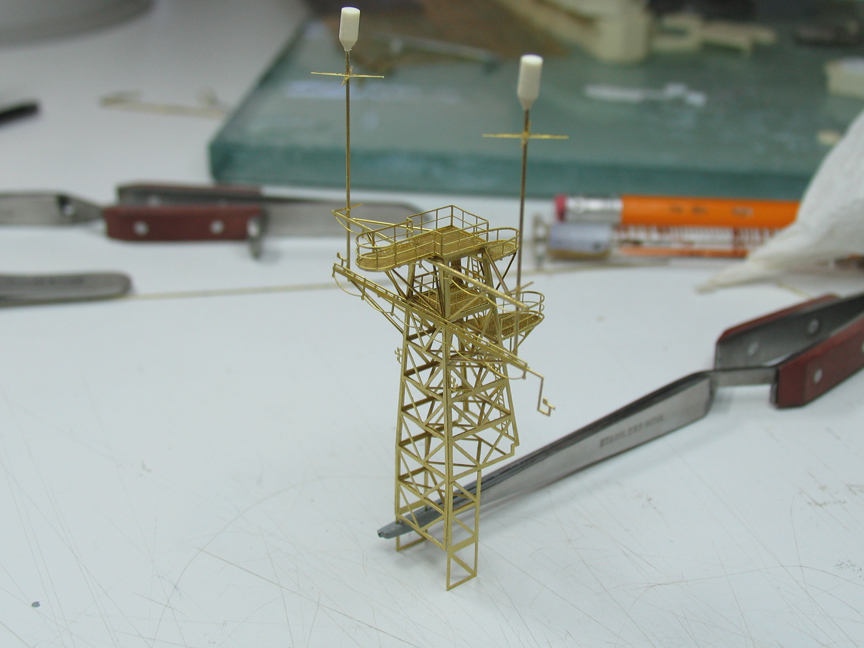
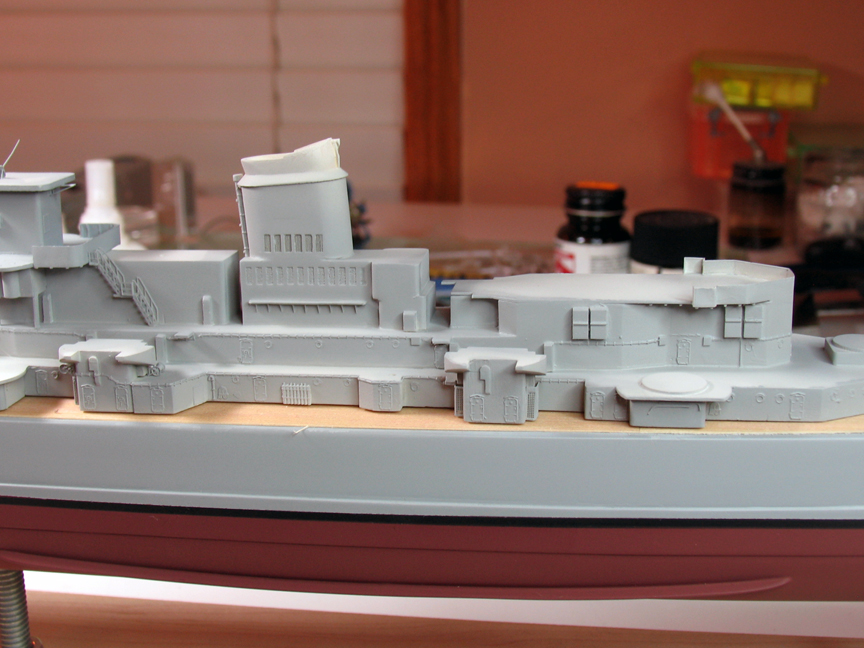
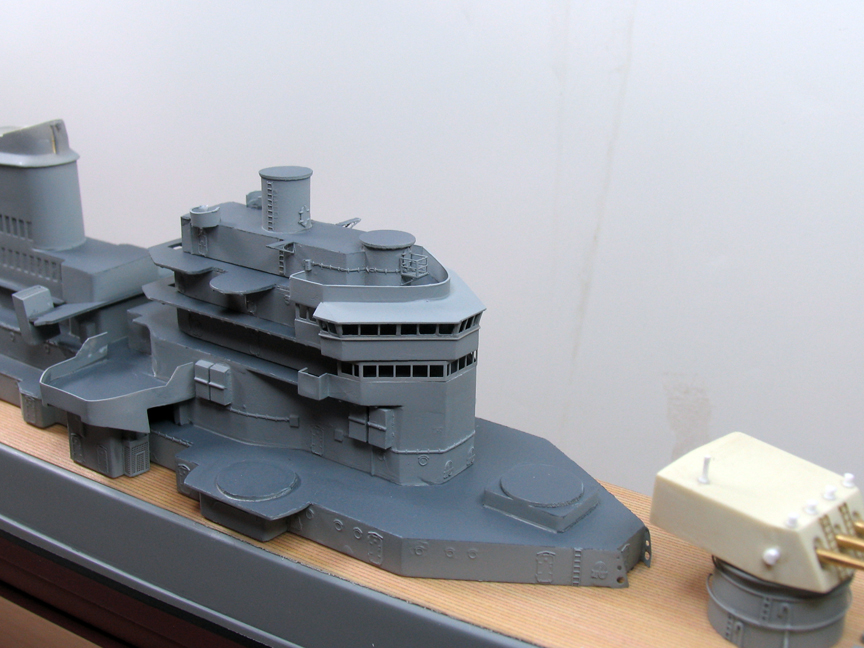
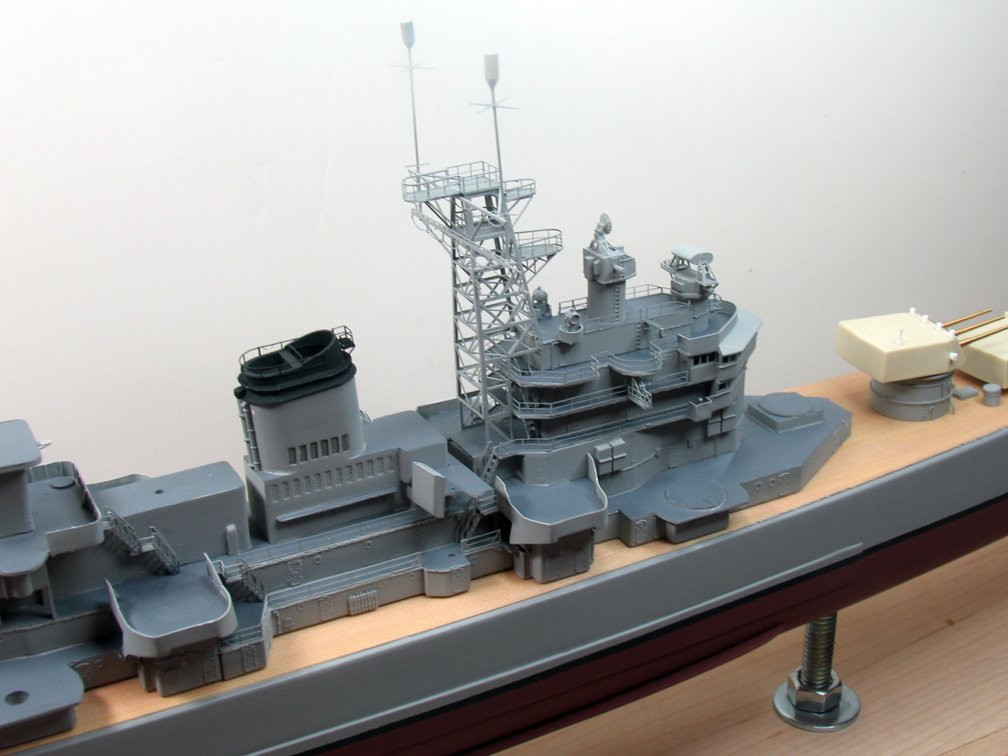
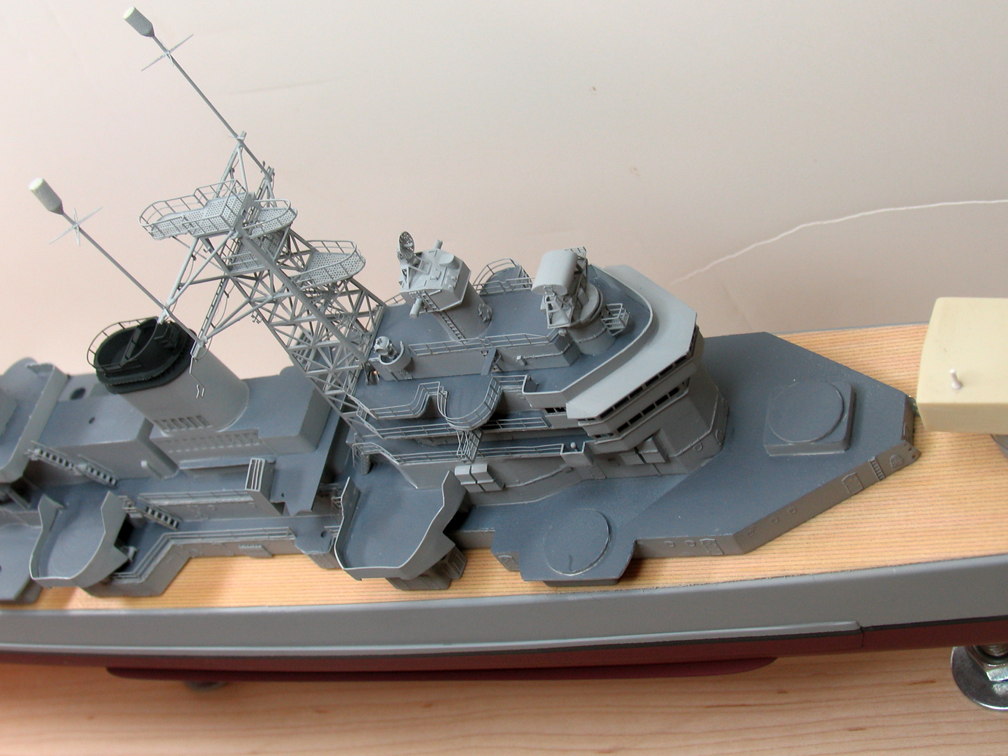
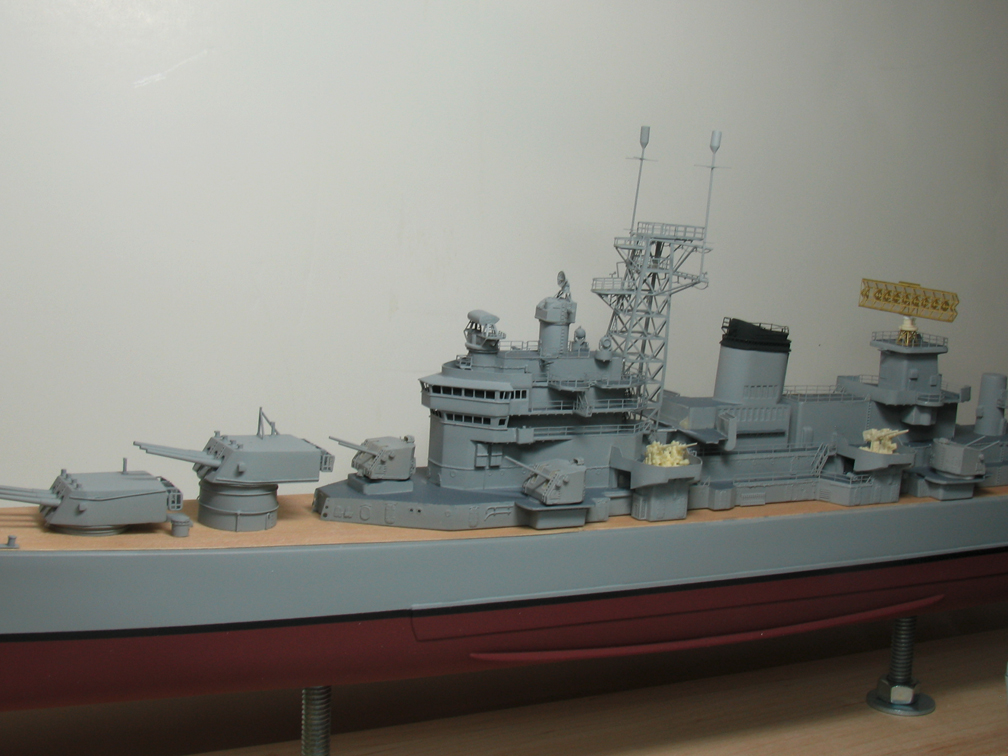
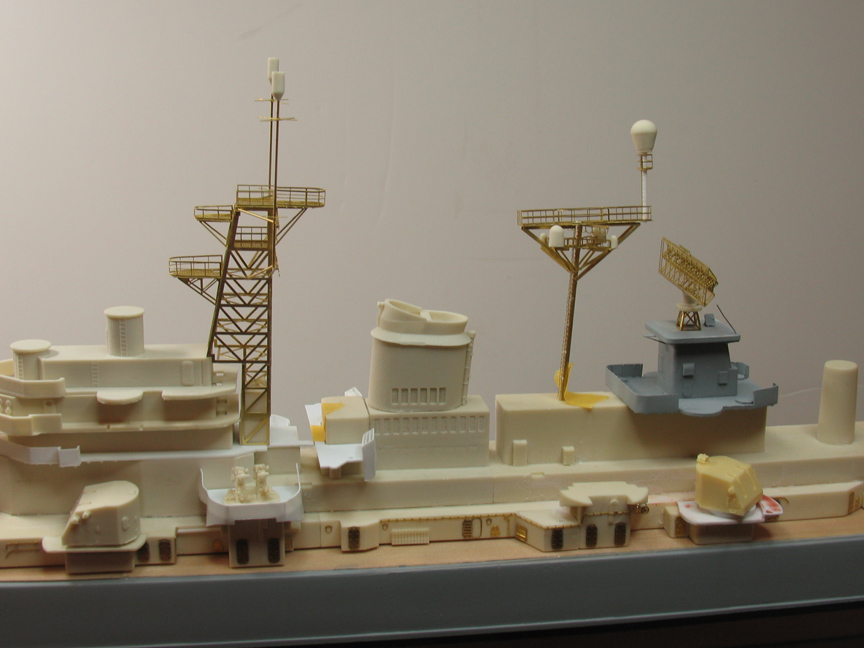
This shot shows the amidships works including the mainmast and main tower. The deckhouse supporting the SPS43 radar antenna was replaced with scratchbuilt items (out of scale, mis-shapen, really bad texturing). Once again the photoetch in this kit is very nice. Keep in mind the tower/mast are "just sitting there" and are not yet correctly aligned to the hull.

Image

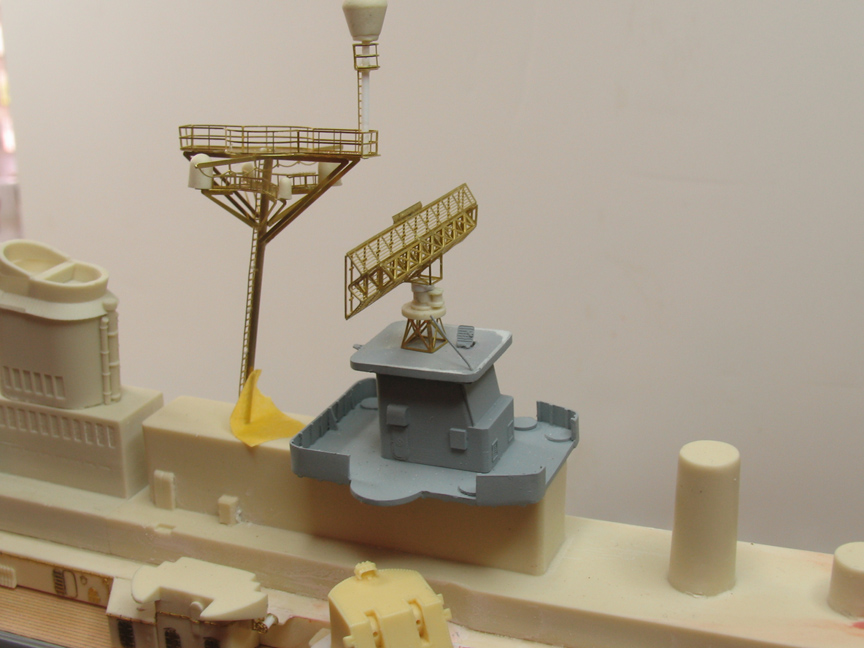
Closeup of the SPS43 radar and house.

Image

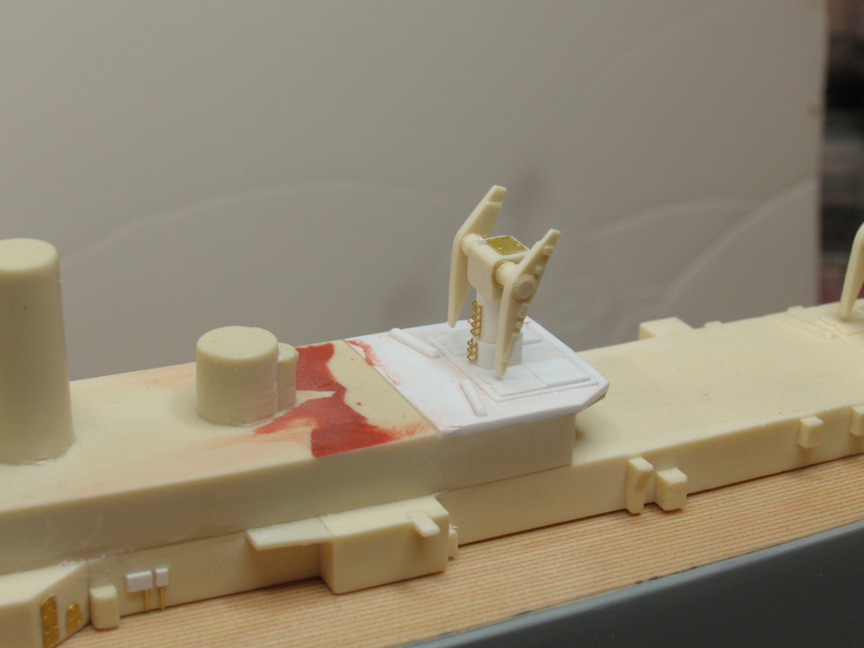
And finally, a closeup of the forward launcher.

Image

That's it for now.


Top
 Profile  
Reply with quote  
PostPosted: Fri Jun 08, 2012 10:08 am 
Offline
User avatar

Joined: Mon Dec 05, 2011 5:47 pm
Posts: 210
Location: Washington, DC
Any updates?

Boston is on my short list to do, and I'm following your build with interest.


Top
 Profile  
Reply with quote  
PostPosted: Fri Jun 08, 2012 5:14 pm 
Offline

Joined: Thu Mar 18, 2010 6:42 pm
Posts: 177
Thanks for posting Randy, your BOSTON is looking very nice.

Cheers,

Keith


Top
 Profile  
Reply with quote  
PostPosted: Sat Jun 09, 2012 2:02 pm 
Offline

Joined: Sat Dec 15, 2007 10:40 pm
Posts: 337
Location: San Diego
Thansk for the encouragement, guys... this is a challenging build from the standpoint of a [time invested]:[progress made] ratio. I'm fighting the usual battle: balancing the honey-do list, modeling, documenting the modeling... oh, and work too :) Living in southern california means that I can rarely use the weather as an excuse to keep my butt indoors.

I've made some progress since the last photos - still concentrating mostly on the 01/02 decks, getting them ready for paint/installation. Most of the new work is focused on cleanup, continuing to add PE to make up for all the detail I had to, errr, remove. I realized the stack had to be added to this assembly - again due to seamless vertical surfaces - but I think I have finally arrived at the first "module configuration" to be added to the hull. I'll try to take photos this weekend, but again, most of the work is on detailed cleanup of seams, corners, PE, yada yada, so nothing new from an appearance standpoint. The good news is that I've informed the family I intend to put some hours in on her this weekend.

Randy


Top
 Profile  
Reply with quote  
 Post subject: Milestone progress
PostPosted: Sun Jul 01, 2012 12:54 am 
Offline

Joined: Sat Dec 15, 2007 10:40 pm
Posts: 337
Location: San Diego
I'm up to about 125 hours into this build, and tonight - against my better judgement - I put the first several haze grey color coats on the maindeck assembly. I consider this a milestone because a very large percentage of those hours were spent on this assembly, and frankly I'm getting very tired of looking at it.

Here she is - the hull is just as it has been for several months, but now the main, 01, and 02 deckhouses are grey! Which means I've finished with the main detailing of this area of the model - a task which turned out to be quite tedious. I've been staring at photos so long I feel like I could make my way around Boston unattended.

Image

The 04-deck radar structure is just "sitting there" - as is the maindeck assembly on the hull.

Image

Starboard forward...

Image

This shot shows the reworked rear 5" turret mounts (the kit's mount is a flat surface while the ship in this era had an elevated lip on the after side). Also the (giant) maindeck ventilation intake. And if you look below the stack you'll see a small platform with numerous triangular supports - this was fun (and I got to do one for the other side too!). Everything you see on vertical surfaces is either PE or scratchbuilt.

Image

Another view of the forward section - the splintershield on the bridge deck was also replaced (are you beginning to see a trend here?).

Image

This view shows some of the details added to the underside of the forward missile launcher area (and that GIANT intake duct again...).

Image


Still a loooooong way to go, but I'm excited to be at this stage. It feels like I just poured the foundation for a new house. Tomorrow I hope to spend some time on cleanup and some additional haze grey coats, then move on to the decks...


Top
 Profile  
Reply with quote  
PostPosted: Sun Jul 01, 2012 12:56 pm 
Offline
User avatar

Joined: Mon Dec 05, 2011 5:47 pm
Posts: 210
Location: Washington, DC
Awesome thanks!

Boston was the first ship I remember going aboard when my father was aboard her, (it was his fist ship after finishing what was then destroyer school in Newport) so I'm looking forward to getting to my kit, but the amount of work you have to do is, while not intimidating, substantial, so I'll have to wait until I have time for it...

Thank you again for posting!


Top
 Profile  
Reply with quote  
PostPosted: Sun Jul 01, 2012 1:01 pm 
Offline
User avatar

Joined: Wed Jan 13, 2010 9:10 am
Posts: 2695
Location: san francisco
Thanks for posting. You made me get back to work on my Chicago CG-11. :thumbs_up_1: :thumbs_up_1:


Top
 Profile  
Reply with quote  
PostPosted: Sun Jul 01, 2012 2:06 pm 
Offline

Joined: Sat Dec 15, 2007 10:40 pm
Posts: 337
Location: San Diego
FWIW, I got to work on this project early this AM, cleaning up. I usually take a series of hi-res close-ups and analyze them separately (I have a 14MPxl camera with macro, from which NOTHING can escape), then fix areas identified as needing attention. Then I wash/rinse/repeat, dry, and paint. I usually have to iterate 2-3 times: we'll see how it goes on this model.

The next looming challenge: painting the decks. This ship will certainly test the limits of my patience with masking tape.


Top
 Profile  
Reply with quote  
 Post subject: some more progress
PostPosted: Thu Jul 05, 2012 10:58 pm 
Offline

Joined: Sat Dec 15, 2007 10:40 pm
Posts: 337
Location: San Diego
Got the main superstucture masked and painted (phew!), plus the bridge decks built and primed.

The first image below shows the 03-05 deck structures prior to painting, while the second shows:

- main superstructure in place but not attached
- scratchbuilt 3" gun tubs in place but not attached
- 03-05 deck structures primed but not painted (ditto the flagbag deck)

The bridge structures need to be cleaned up and "fitted" - if you notice in the first photo the PE part which forms the "crown" of the 04 deck - this fit of this part is critical to the stackup of the pretty much all the other pieces. I used it as a template when creating the 04 and 05 decks (the kit-supplied parts were hopelessly out of shape/undersized/overscale). The other major fit issue I need to work out are the window frames on the 03 and 04 decks - they are supposed to be angled outward but the kit parts are designed to be vertically mounted as shown. I have a plan for doing this, so we'll see...

The mast/tower are the same as before, just posing for photos (and the mast is angled waaaay too far astern).

Image

Image


Top
 Profile  
Reply with quote  
PostPosted: Fri Jul 06, 2012 11:46 pm 
Offline

Joined: Sat Dec 15, 2007 10:40 pm
Posts: 337
Location: San Diego
So much for best-laid plans...

I took the plunge and hacked up the bridge windows so they could be canted outward as on the prototype. I obviously hadn't thought this thru, as making this change resulted in the PE crown piece now being undersized. I made a new one out of 0.005" sheet plastic - seven total pieces.

Here's the modified bridge in process...

Image

And here it is posing with its first color coat. The change is subtle but effective, IMHO.

Image


Top
 Profile  
Reply with quote  
 Post subject: Weekend progress
PostPosted: Sun Jul 08, 2012 10:21 pm 
Offline

Joined: Sat Dec 15, 2007 10:40 pm
Posts: 337
Location: San Diego
I spent waaaaaay too much time at the bench this weekend, but results are starting to show. The 3" gun tubs are installed, as are the bridge decks up to 05. The two directors are posing, as is the main tower. As you can see, I've begun installing railing and deck details on the bridge superstructure. Staring at these photos I notice some haze grey overspray up between the three 5" mounts - oh well, something else to deal with.

Image

Image

Image

Image

Image


Top
 Profile  
Reply with quote  
PostPosted: Tue Jul 17, 2012 7:45 pm 
Offline
User avatar

Joined: Wed Jan 13, 2010 9:10 am
Posts: 2695
Location: san francisco
Image


Top
 Profile  
Reply with quote  
 Post subject: more progress
PostPosted: Wed Jul 18, 2012 12:02 am 
Offline

Joined: Sat Dec 15, 2007 10:40 pm
Posts: 337
Location: San Diego
I finished the main and secondary gun armament (8" and 5" turrets), plus some directors and some additional inner railing/ladders. I'm also comparing the 3"/50 gun mounts from both Yankee Modelworks (kit-supplied - on the after mount) and Veteran (on the fore mount). No detail paint yet... just gallons and gallons of haze grey.

Image

Image

Image

One (of many) thing I've not been able to figure out yet - the forward 5" mount on Boston had what I believe are shell ejection chutes on the back of the turret (you can just see one of them in the last image above, and clearly see them on the prototype in the image below), while the other four mounts did not. Why?

Image


Top
 Profile  
Reply with quote  
Display posts from previous:  Sort by  
Post new topic Reply to topic  [ 166 posts ]  Go to page Previous  1, 2, 3, 4, 5 ... 9  Next

All times are UTC - 6 hours [ DST ]


Who is online

Users browsing this forum: No registered users and 34 guests


You can post new topics in this forum
You can reply to topics in this forum
You cannot edit your posts in this forum
You cannot delete your posts in this forum
You cannot post attachments in this forum

Jump to:  
Powered by phpBB® Forum Software © phpBB Group