The Ship Model Forum

The Ship Modelers Source
It is currently Sat Apr 20, 2024 3:30 am

All times are UTC - 6 hours [ DST ]


Post new topic Reply to topic  [ 528 posts ]  Go to page Previous  1 ... 23, 24, 25, 26, 27  Next
Author Message
PostPosted: Tue Jul 05, 2016 12:10 am 
Offline
User avatar

Joined: Tue Jan 11, 2005 5:41 am
Posts: 337
Location: Laurieton , Australia
Here`s another shot Tom, starboard partition with a bit more detail, cheers.


Attachments:
Syd 2010.jpg
Syd 2010.jpg [ 199.83 KiB | Viewed 7014 times ]
Top
 Profile  
Reply with quote  
PostPosted: Tue Jul 05, 2016 4:03 pm 
Offline

Joined: Thu Mar 18, 2010 6:42 pm
Posts: 177
On US ships, back in the day these platforms were where we stored mooring fenders. Of note to builders of the Academy kit are the WTD on the port side maindeck, the strbd side bridge windows and pyro locker, and the single porthole at the O2 level just aft the strbd platform (this to the CO's stateroom). Academy missed these details.

Cheers,

Keith


Top
 Profile  
Reply with quote  
PostPosted: Tue Jul 05, 2016 9:55 pm 
Offline
User avatar

Joined: Sun Jun 12, 2016 6:56 am
Posts: 46
el Cid wrote:
On US ships, back in the day these platforms were where we stored mooring fenders. Of note to builders of the Academy kit are the WTD on the port side maindeck, the strbd side bridge windows and pyro locker, and the single porthole at the O2 level just aft the strbd platform (this to the CO's stateroom). Academy missed these details.

Cheers,

Keith


Thanks for that heads up. I had noticed the wtd and the ladders to get up but didn't see the porthole. Will look for that.

Thanks
Tom


Top
 Profile  
Reply with quote  
PostPosted: Thu Jul 07, 2016 3:30 am 
Offline
User avatar

Joined: Tue Jan 11, 2005 5:41 am
Posts: 337
Location: Laurieton , Australia
As the Academy kit has been mentioned a number of times, of note the omissions and inaccuracies, there is one other point which has not been brought up, important for those planning to embark on this project if you wish to get it right.
The keel sonar dome is incorrect, it is ridiculously narrow, no one seems to be able to get this right, in drawings or models.
The AN-SQS 56 sonar fitted to a FFG is mounted within a rubber composite blister which is filled with water to maintain shape, on Australian FFG`s there is also a much smaller extension protruding from the keel, forward of the dome, which I suspect is to do with the sonar arrangement, and probably fitted to other FFG`s in other navies, also omitted.

After many years of resin I am having a go in plastic with the Academy FFG, so far have only got as far as the hull which seems to be correct/or close to in dimensions and lines.
The dome is in the correct location, as are the masker emitters and prop shaft, they also got it right with 2 strengthening ribs ( particular for my planned build) but not the sonar dome shape, or the emitters going right round the keel, the bilge keel is totally incorrect, as mentioned earlier, and the stabilizer fins are missing.
Haven`t had a good look yet, but someone mentioned earlier that the duck tail has also been omitted.

Here is a sequence of what the dome should look like, and also a small shot of HMAS Newcastle in dry dock, showing the extra extension forward of the dome.


Attachments:
Newcastle dome.jpg
Newcastle dome.jpg [ 56.47 KiB | Viewed 6926 times ]
AN-SQS 56 Dome..jpg
AN-SQS 56 Dome..jpg [ 112.49 KiB | Viewed 6926 times ]
Top
 Profile  
Reply with quote  
PostPosted: Thu Jul 07, 2016 9:55 pm 
Offline

Joined: Thu Dec 30, 2010 7:53 pm
Posts: 446
Brett Morrow wrote:
There is a storage platform behind, RAN and USN units, not sure on Spanish units as the partition has been modified.


That is not a storage unit. It is "Nulka" which is a decoy for incoming missiles. - https://en.wikipedia.org/wiki/Nulka


Top
 Profile  
Reply with quote  
PostPosted: Fri Jul 08, 2016 12:14 am 
Offline
User avatar

Joined: Mon Jan 10, 2005 6:00 pm
Posts: 12144
Location: Ottawa, Canada
He's referring to the platform in the alcove behind the front facade of the deckhouse, not the items under the kangaroo.

_________________
De quoi s'agit-il?


Top
 Profile  
Reply with quote  
PostPosted: Sun Jul 10, 2016 3:30 pm 
Offline
User avatar

Joined: Tue Jan 11, 2005 5:41 am
Posts: 337
Location: Laurieton , Australia
Does anybody have any photos of the inside of the helo hanger that they could post?
I`ve been searching, but can`t find any shots, Thanks.


Top
 Profile  
Reply with quote  
PostPosted: Sun Jul 10, 2016 10:22 pm 
Offline
User avatar

Joined: Sun Jun 12, 2016 6:56 am
Posts: 46
Brett Morrow wrote:
Does anybody have any photos of the inside of the helo hanger that they could post?
I`ve been searching, but can`t find any shots, Thanks.


Yes please. I have found a few partials but no real great shots. I would think that with this being the 21st century there would be all kinds of photos of this kinda stuff on the net.

Tom


Top
 Profile  
Reply with quote  
PostPosted: Tue Jul 12, 2016 5:23 am 
Offline
User avatar

Joined: Sat Apr 29, 2006 7:36 am
Posts: 658
Location: Vigo, Spain
Hi to all of you, folks:
I have realized that after finishing my FFG Santa María, I simply forgot to post some views of the final product. :bash_2: 
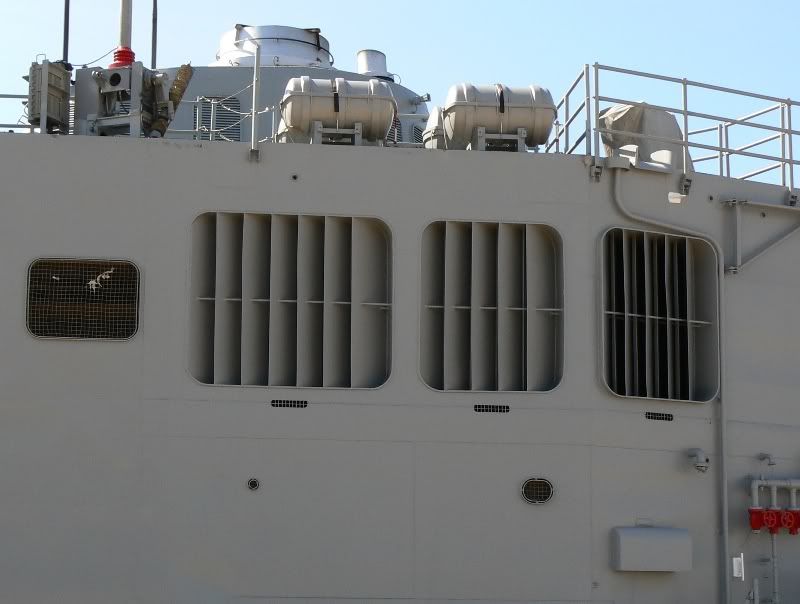
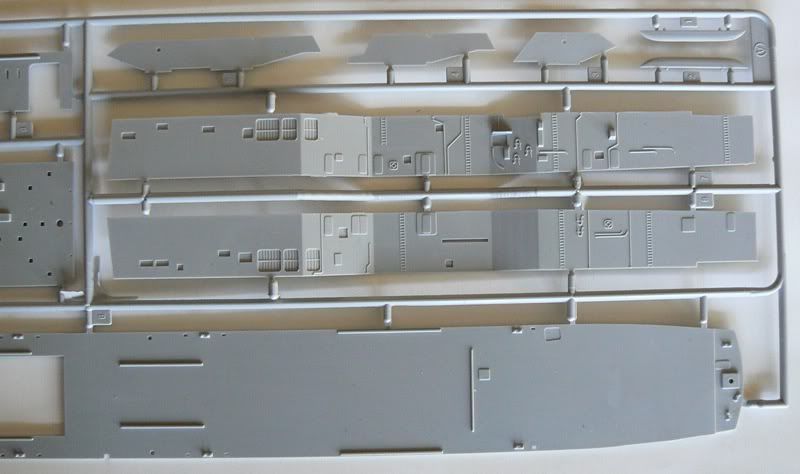
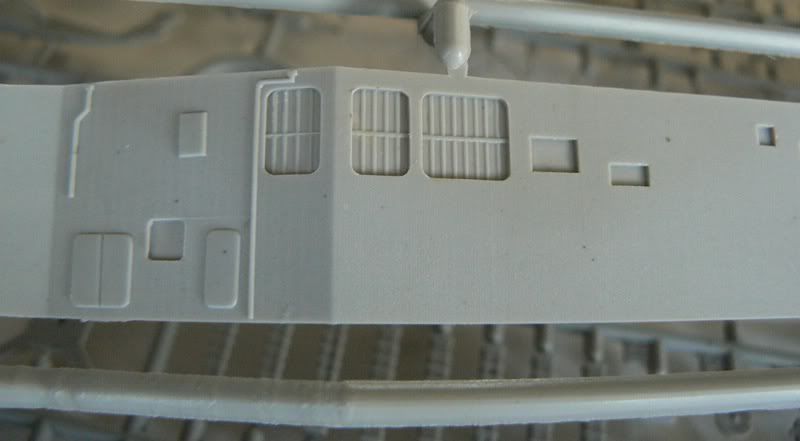
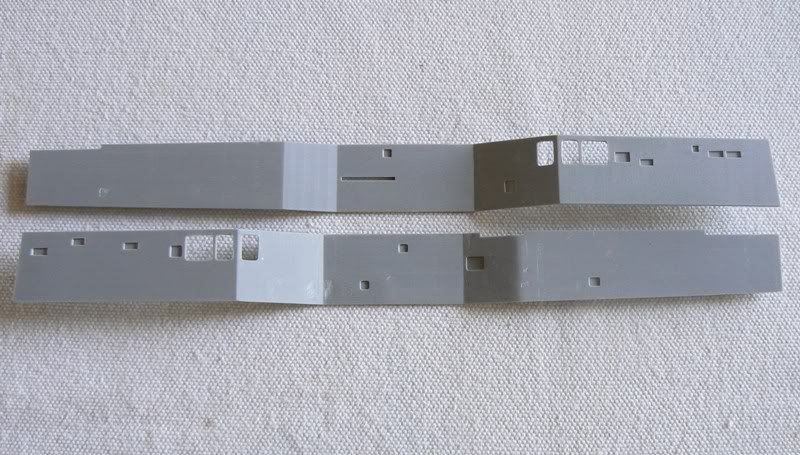
Maybe I am getting old.

So here you are some pics.
Port side :
Attachment:
(441).jpg
(441).jpg [ 205 KiB | Viewed 4940 times ]

Attachment:
(442).jpg
(442).jpg [ 249.04 KiB | Viewed 4940 times ]

Attachment:
(443).jpg
(443).jpg [ 159.82 KiB | Viewed 4940 times ]

Attachment:
(444).jpg
(444).jpg [ 164.19 KiB | Viewed 4940 times ]

Attachment:
(445).jpg
(445).jpg [ 162.98 KiB | Viewed 4940 times ]

And some closer details. Bridge and flying bridge :
Attachment:
(446).jpg
(446).jpg [ 172.76 KiB | Viewed 4940 times ]

Attachment:
(447).jpg
(447).jpg [ 250.16 KiB | Viewed 4940 times ]

And midships :
Attachment:
(448).jpg
(448).jpg [ 170.2 KiB | Viewed 4940 times ]

I will post some more in the next message. I hope you like them.

Willie.

_________________
Amen dico tibi, hodie mecum eris in paradiso (Lk 23,43).


Last edited by Willie on Sat Oct 19, 2019 5:39 pm, edited 1 time in total.

Top
 Profile  
Reply with quote  
PostPosted: Tue Jul 12, 2016 5:33 am 
Offline
User avatar

Joined: Sat Apr 29, 2006 7:36 am
Posts: 658
Location: Vigo, Spain
And hi again.

As I said, some more views. Starboard side :
Attachment:
(449).jpg
(449).jpg [ 128.89 KiB | Viewed 4940 times ]

Attachment:
(450).jpg
(450).jpg [ 186.17 KiB | Viewed 4940 times ]

Attachment:
(451).jpg
(451).jpg [ 250.33 KiB | Viewed 4940 times ]

Attachment:
(452).jpg
(452).jpg [ 177.56 KiB | Viewed 4940 times ]

Masts and aerials :
Attachment:
(453).jpg
(453).jpg [ 165.66 KiB | Viewed 4940 times ]

Attachment:
(454).jpg
(454).jpg [ 135.12 KiB | Viewed 4940 times ]

Stbd. structure details :
Attachment:
(455).jpg
(455).jpg [ 172.61 KiB | Viewed 4940 times ]

And flight deck :
Attachment:
(456).jpg
(456).jpg [ 153.87 KiB | Viewed 4940 times ]

And well, I think that´s all.
I hope you have liked it, and very best regards from this side of the Atlantic,

Willie.

_________________
Amen dico tibi, hodie mecum eris in paradiso (Lk 23,43).


Last edited by Willie on Sat Oct 19, 2019 5:46 pm, edited 2 times in total.

Top
 Profile  
Reply with quote  
PostPosted: Tue Jul 12, 2016 6:05 am 
Offline

Joined: Sun Feb 19, 2006 6:21 pm
Posts: 255
Your craftsmanship is superb! Thank you for sharing the final pictures.

I served on the staff of NATO's STANAVFORLANT (old name) and have a tie clasp from the Frigata Santa Maria which I wear often.

_________________
Charles Landrum
USNA 1983
Norfolk, Virginia


Top
 Profile  
Reply with quote  
PostPosted: Sun Jul 31, 2016 10:30 am 
Offline
User avatar

Joined: Sun Jun 12, 2016 6:56 am
Posts: 46
Just found this. May be old news to some of you but about 8:20 in they are doing drills in one of the hangar bays. I have only watched 10 min or so so far but a wealth of useful info so far.
It's called: The Last Frigate (US Navy Documentary)

https://www.youtube.com/watch?v=8SckMQ-yl_4

Tom


Top
 Profile  
Reply with quote  
PostPosted: Wed Aug 24, 2016 4:00 pm 
Offline

Joined: Tue Mar 27, 2012 10:08 pm
Posts: 6
Willie wrote:
Hi all,

Thanks a lot for your kind remarks. It is my pleasure to share this with colleagues.

The work of today was quite tedious, the exterior vent exhausts -- i think from the hangar, but i am not very sure.

Image

The offering from Lee was a very odd looking grid :

Image

Image

I had to cut off all the holes after stripping both bulkheads off all the details, until I got this :

Image

I had to place two supports inside, and then to cut all the pieces one but one, setting everyone in place before cutting the next. Quite monotunous and exasperating, but obviously this is a hobby -- nobody was compelling me to do anything... :sleepy:
It was then like this :

Image

As I was fed up with strips I thought I could do something a bit more pleasant, so I started the aft hangar bulkhead too :

Image

The process was the same, to strip the piece off all details, to open the holes and to complete it.

Image

Image

The articulated doors are made with Evergreen "V-Groove" # 2025 which most suitable for it.
The white lines in yogourt plastic are necessary for the painting.
And it is now like this, almost complete minus the two ladders and some minor details
Quedó finalmente así, a falta de las escalas y algunos detalles menores :

Image

And that´s all for today.
I hope you like it, and best regards,

Willie.


How did you cut out those holes so precise? What tool or tools did you use. I tried to do this on a spare and it was a disaster.


Top
 Profile  
Reply with quote  
PostPosted: Thu Sep 01, 2016 4:14 am 
Offline
User avatar

Joined: Sat Apr 29, 2006 7:36 am
Posts: 658
Location: Vigo, Spain
DarcyD wrote:
How did you cut out those holes so precise? What tool or tools did you use. I tried to do this on a spare and it was a disaster.


Hi there Darcy and all,

This is the easiest thing ever.
For the bigger holes I simply make a number of holes with a drill, cut them away with an X-acto, refine them with the X-acto again, and finish them with files and sandpaper.

For the tiny ones, it´s easier: I scratch the inside of the surfaces with a half round blade until the plastic gets away by itself, and then refine with a file and sandpaper again. Done.

I hope this helps, and best regards,

Willie.

_________________
Amen dico tibi, hodie mecum eris in paradiso (Lk 23,43).


Last edited by Willie on Sat Oct 19, 2019 5:21 pm, edited 1 time in total.

Top
 Profile  
Reply with quote  
PostPosted: Fri Sep 02, 2016 1:31 pm 
Offline

Joined: Tue Mar 27, 2012 10:08 pm
Posts: 6
Willie wrote:
DarcyD wrote:
How did you cut out those holes so precise? What tool or tools did you use. I tried to do this on a spare and it was a disaster.


Hi there Darcy and all,

This is the easiest thing ever.
For the bigger holes I simply make a number of holes with a drill, cut them away with an X-acto, refine them with the X-acto again, and finish them with files and sandpaper.

For the tiny ones, it´s easier: I scratch the inside of the surfaces with a half round blade until the plastic gets away by itself, and then refine with a file and sandpaper again. Done.

I hope this helps, and best regards,

Willie.


Thank you,
This really does help. The model I have is Academy and the vent markings are only on the outside, looks like this project is going through the winter months. HA!!
thanks again,
Darcy


Top
 Profile  
Reply with quote  
PostPosted: Mon Sep 05, 2016 8:26 am 
Offline
User avatar

Joined: Sun Jun 12, 2016 6:56 am
Posts: 46
Anyone have and tips for building the AN/SPS-49 radar from the Pontos set? I am to the point where I need to tackle it. It looks like a daunting task. I have the main mast nearly done and most of the towers but this is so delicate I am looking for tips. I have looked at many pictures and now the parts fit is figured out, the directions not to much help here sometimes.

Thanks


Top
 Profile  
Reply with quote  
PostPosted: Wed Sep 07, 2016 9:38 am 
Offline
User avatar

Joined: Sun Jun 12, 2016 6:56 am
Posts: 46
Since nobody offered up any suggestions. I just did it.

Image

Image

Image

Image

I think it turned out pretty good.


Top
 Profile  
Reply with quote  
PostPosted: Wed Sep 07, 2016 9:43 am 
Offline
User avatar

Joined: Tue Jan 25, 2005 5:48 am
Posts: 380
Location: Lisbon, Portugal
Hi,

what's the scale of this model?


Thanks.
Regards,
Ayala Botto

_________________
"Ayala Botto Model Ships"
Image
Facebook: https://www.facebook.com/AyalaBottoModelShips


Top
 Profile  
Reply with quote  
PostPosted: Wed Sep 07, 2016 3:55 pm 
Offline
User avatar

Joined: Sun Jun 12, 2016 6:56 am
Posts: 46
If you're referring to mine 1/350.


Top
 Profile  
Reply with quote  
PostPosted: Fri Sep 09, 2016 7:35 am 
Offline
User avatar

Joined: Wed Jul 10, 2013 5:33 pm
Posts: 120
Location: British Columbia
steel_tiger1 wrote:
Since nobody offered up any suggestions. I just did it.

Image

Image

Image

Image

I think it turned out pretty good.


Hello, I'm curious as to what you used to solder it together. Just a regular soldering iron tip or did you use a modified tip?

Thanks in advance

_________________
Gerry


Top
 Profile  
Reply with quote  
Display posts from previous:  Sort by  
Post new topic Reply to topic  [ 528 posts ]  Go to page Previous  1 ... 23, 24, 25, 26, 27  Next

All times are UTC - 6 hours [ DST ]


Who is online

Users browsing this forum: No registered users and 6 guests


You can post new topics in this forum
You can reply to topics in this forum
You cannot edit your posts in this forum
You cannot delete your posts in this forum
You cannot post attachments in this forum

Jump to:  
Powered by phpBB® Forum Software © phpBB Group