The Ship Model Forum

The Ship Modelers Source
It is currently Thu Apr 25, 2024 9:50 am

All times are UTC - 6 hours [ DST ]


Post new topic Reply to topic  [ 234 posts ]  Go to page Previous  1, 2, 3, 4, 5, 6, 7 ... 12  Next
Author Message
PostPosted: Sun Aug 01, 2010 1:46 pm 
Offline
User avatar

Joined: Mon Jan 10, 2005 1:21 pm
Posts: 3374
Location: equidistant to everywhere
The I-19 has a small, apparently fixed antenna mast behind the gun, next to the tall retractable antenna mast. Do the antenna that stretch between the small fixed mast and the bridge stay in place when the boat dives?, or are they first removed and struct below?

_________________
Assessing the impact of new area rug under modeling table.


Top
 Profile  
Reply with quote  
PostPosted: Wed Aug 11, 2010 12:27 pm 
Offline
User avatar

Joined: Mon Jan 10, 2005 1:21 pm
Posts: 3374
Location: equidistant to everywhere
Can anyone point me to a antenna rigging diagrame for I-19?

Thanx

_________________
Assessing the impact of new area rug under modeling table.


Top
 Profile  
Reply with quote  
PostPosted: Thu Aug 12, 2010 10:00 am 
Offline
User avatar

Joined: Fri Aug 03, 2007 2:55 am
Posts: 98
Location: Wroclaw, Poland
There is a nice and detailed model of I-19 in the Gakken volume about I-boats (no.17). This model is equipped with kind of "tubular" antenna instalation, similar to those found in British WWI battleships.

_________________
Best regards,
Marek

http://www.modelshipgallery.com/gallery/users/Marek-Targowicz/user-index.html


Top
 Profile  
Reply with quote  
PostPosted: Sun Sep 19, 2010 4:59 am 
Offline

Joined: Mon Sep 07, 2009 9:48 pm
Posts: 50
G'day, is anybody in here?

I have made a little more progress on the I-36. Construction proceeded quickly and the hull was assembled as per instructions without any problems and minimal clean up and filler

Image

I have used the kit guards for the rear dive planes

Image

I also substituted some aluminum rod for the prop shaft as I find cleaning up mold seams or round parts tedious and avoid it when I can.

Image

I thought the front dive plane guards were a little thick so I replaced these with some fine copper wire, using the kit items as a template.

Image

Image

The sub is now ready for paint, I just have to clean up the 6 smaller Kaiten first

Image

cheers,

Pappy


Top
 Profile  
Reply with quote  
PostPosted: Mon Sep 20, 2010 9:30 am 
Offline

Joined: Tue Jan 11, 2005 10:56 am
Posts: 8577
Location: New York City
It's looking very good, Pappy.


Top
 Profile  
Reply with quote  
PostPosted: Mon Sep 20, 2010 9:44 am 
Offline
User avatar

Joined: Mon Jan 10, 2005 1:21 pm
Posts: 3374
Location: equidistant to everywhere
One minor detail, the cross section of the semi-circular ring of the upper guard of the forward diving plane is actually flat, round.

_________________
Assessing the impact of new area rug under modeling table.


Top
 Profile  
Reply with quote  
PostPosted: Mon Sep 20, 2010 3:10 pm 
Offline

Joined: Mon Sep 07, 2009 9:48 pm
Posts: 50
G'day Dan, thanks a lot.

chuck wrote:
One minor detail, the cross section of the semi-circular ring of the upper guard of the forward diving plane is actually flat, round.


G'day Chuck!

As always, a font of knowledge, thanks for the tip

Unfortunately, It is too late for me to fix as I have already applied the hull red and black :( . I will take note and correct it for next time though as I still have two I-19's and an I-58 to do. I figure that I will still use the copper wire but after shaping the parts, I will squeeze them in a pair of pliers to flatten out the cross-section. I think that I will thin down the rear guard as well, it looks a little overscale.

cheers,

Pappy


Top
 Profile  
Reply with quote  
PostPosted: Sun Sep 26, 2010 7:30 am 
Offline

Joined: Mon Sep 07, 2009 9:48 pm
Posts: 50
I have added the main colours,

Image

Image

I apologise for the low quality pics, I usually take pics in the day, the indoor lighting is poor.

I sprayed the lower hull in Tamiya Hull Red (XF-9) followed by a *warm coat of Tamiya Semi-gloss Black. Once all was dry, the masking tape was removed and I was pleased to find only two small spots of bleed. I gave the hull a very light dry brushing of aluminium. This helps pop out the details in preparation of adding the rust and watermarks that will follow. It is hard to see all the bits when the hull is painted black!

* I added some drops flat red to the semi-gloss black. It gives the black a slightly reddish hue but it is only noticeable in broad daylight. It makes the black less stark, and you cannot apply a black wash to straight black, so this will allow slight contrast between the wash and the hull colour.


Image

Image

Image

Image

thanks for looking

Pappy


Top
 Profile  
Reply with quote  
PostPosted: Wed Oct 13, 2010 11:51 pm 
Offline

Joined: Wed Nov 02, 2005 10:28 pm
Posts: 748
Location: Downey, California
A question regarding the tall radio mast on the I-58: Was it still present in her final fit, or had it been deleted when she was converted for kaiten carrying?
- Sean F.


Top
 Profile  
Reply with quote  
PostPosted: Sat Feb 26, 2011 9:40 am 
Offline
User avatar

Joined: Tue Jun 20, 2006 6:50 am
Posts: 352
Location: roma, italia
a question regarding the system to open the hangar in japanese sub of type A (I-9_12) and B (I-15_54)

a) like in figure 1 open the door like in I-400 but no evidence of handle or hinge or rail (like in I-13 or I-400) nor in foto (with may be a exception in a foto of i-15 in bagnasco book on ww2 sub and other sources) nor in drawing or models (model art special 34, various gakken book, koinishi book, model art 684, polmar & carpenter ww2 sub of ijn, a russian book of apalkov on jap sub, model art book on carrier and submarines drawing)

b) like in figure 2 open two porthole on the top of hangar and a crane for the raising of the plane (not possible in A & B 3 types because of radar or double 25 mm on the top of hangar, but in B1 & B2 types?)
ciao peppe


Attachments:
File comment: fig 1
i29-07.jpg
i29-07.jpg [ 39.86 KiB | Viewed 7013 times ]
File comment: fig 2 (on the model art ws 34)
0001.jpg
0001.jpg [ 134.92 KiB | Viewed 7013 times ]
Top
 Profile  
Reply with quote  
PostPosted: Wed Mar 09, 2011 6:47 pm 
Offline
User avatar

Joined: Wed Feb 02, 2011 12:01 pm
Posts: 454
Hello
I was look as building a Japanese submarine when i noticed that there are different deck colors being shown from one picture to another. I have seen light colored wood, dark stained wood all most like a dark brown, to a a dark grey color. i was wondering which color is the most proper representation of a late war Japanese submarine? I'm building the I-58 if that helps any.


Top
 Profile  
Reply with quote  
PostPosted: Wed Mar 09, 2011 7:24 pm 
Offline
User avatar

Joined: Fri Apr 08, 2005 9:41 am
Posts: 2207
Location: Monson, MA.
The I-58 class/( I-54-56-58) were all painted black when entering service in 1944. The decks were more than likely painted/stained black as well. The 1-58 in most pictures show it in a very faded war weary grayish black. I am betting that she did not receive any new paint jobs since her entering service. For her decks they would be a very worn wood color with very little black paint/stain showing.


Bob Pink. :wave_1:


Top
 Profile  
Reply with quote  
PostPosted: Wed Mar 09, 2011 8:21 pm 
ok thanks very much !


Top
  
Reply with quote  
PostPosted: Wed Mar 09, 2011 9:56 pm 
Offline
User avatar

Joined: Fri Apr 08, 2005 9:41 am
Posts: 2207
Location: Monson, MA.
You are very welcome. Forgot to mention to you to check out the Calling all IJN Subs fans section. Lots of good stuff there.


Bob Pink. :wave_1:


Last edited by MartinJQuinn on Thu Mar 10, 2011 12:02 pm, edited 1 time in total.
Merged into Calling all WW2 IJN Sub fans thread


Top
 Profile  
Reply with quote  
PostPosted: Tue Apr 12, 2011 7:56 pm 
Offline
User avatar

Joined: Thu Jul 08, 2010 8:28 pm
Posts: 38
Location: Kinglake Victoria
Hello,

I was wondering if anybody out there knows of the identity of the Japanese sub credited with the torpedo-ing of HMAS Hobart:

"On 20 July 1943, while at sea with the ships of Task Force 74, HOBART was struck by a torpedo fired by a Japanese submarine and suffered severe damage and some casualties. She managed to proceed to Esperitu Santo where after de-ammunitioning, she was escorted to Sydney by HMAS WARRAMUNGA and HMAS ARUNTA, arriving on 26 August for extensive repairs which kept her out of service until 1945"
http://www.navy.gov.au/HMAS_Hobart_(I)

Any suggestions would be appreciated.

Ben. :wave_1:

_________________
Fitting Out:
1/350 Admril Graff Spee

Planned
37+ Purchased in 1/350 (Help me I have a serious problem!)


Top
 Profile  
Reply with quote  
PostPosted: Wed Apr 13, 2011 3:19 am 
Offline
L'Arsenal
L'Arsenal
User avatar

Joined: Mon Aug 18, 2008 1:55 pm
Posts: 914
Location: 64700 Hendaye, FRANCE
Answer has been given here : viewtopic.php?f=48&p=407857#p407857


Top
 Profile  
Reply with quote  
PostPosted: Wed Apr 13, 2011 10:47 am 
Hi Peppe,
"a) like in figure 1 open the door like in I-400 but no evidence of handle or hinge or rail (like in I-13 or I-400) nor in foto (with may be a exception in a foto of i-15 in bagnasco book on ww2 sub and other sources) nor in drawing or models (model art special 34, various gakken book, koinishi book, model art 684, polmar & carpenter ww2 sub of ijn, a russian book of apalkov on jap sub, model art book on carrier and submarines drawing)"

My scanner is down but I can give some book references to help you. Basing on real photographs for the B's The plane slides out on rails from the cylinder via dolly, the forward dome is slide away from the cylinder, Refer to Ghakken 38-17220 on top page 180 you could could see the dome open to the side during flight recovery operations. I believe there should be a hatch there (like the I 400's) to keep the hanger cylinder water tight. Also for the hinge if you observe some of the real boat photos showing the profiles. There is a small bulge similar to the I-400's incaseing the "hinge" on B's usually found on the starboard side of the hanger in the middle of the crease line were the dome meets the cylinder.This can seen in History Of Japanese Submarines 1993#469 Profile photo I/26 Page 65 as an example. As for the grab railing around the cylinder, Refer to the I/19 Nichimo box art.


Top
  
Reply with quote  
PostPosted: Wed Apr 13, 2011 12:23 pm 
Offline
User avatar

Joined: Tue Jan 11, 2005 1:40 pm
Posts: 8179
Location: New Jersey
Aoshima has announced a 1/350 IJN Cruiser Submarine I-16

_________________
Martin

"Tomorrow is the most important thing in life. Comes into us at midnight very clean. It's perfect when it arrives and it puts itself in our hands. It hopes we've learned something from yesterday." John Wayne

Ship Model Gallery


Top
 Profile  
Reply with quote  
PostPosted: Wed Apr 13, 2011 5:44 pm 
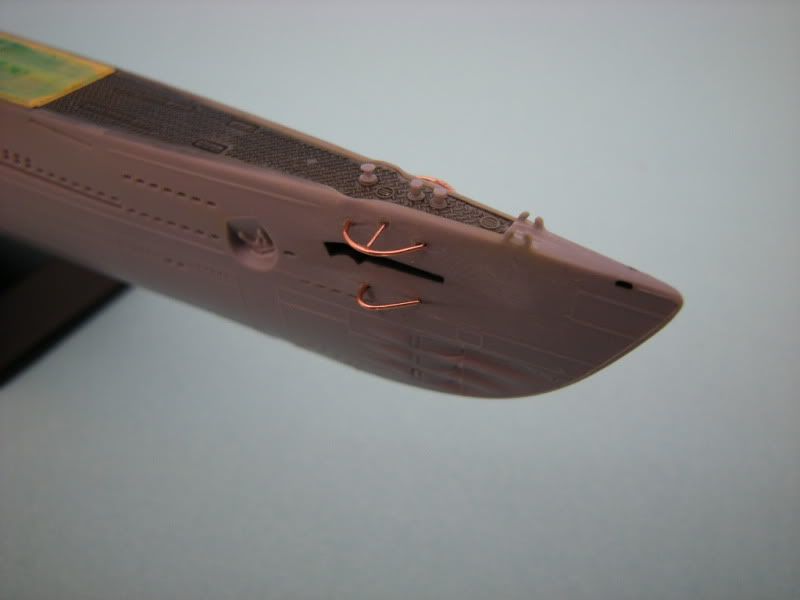
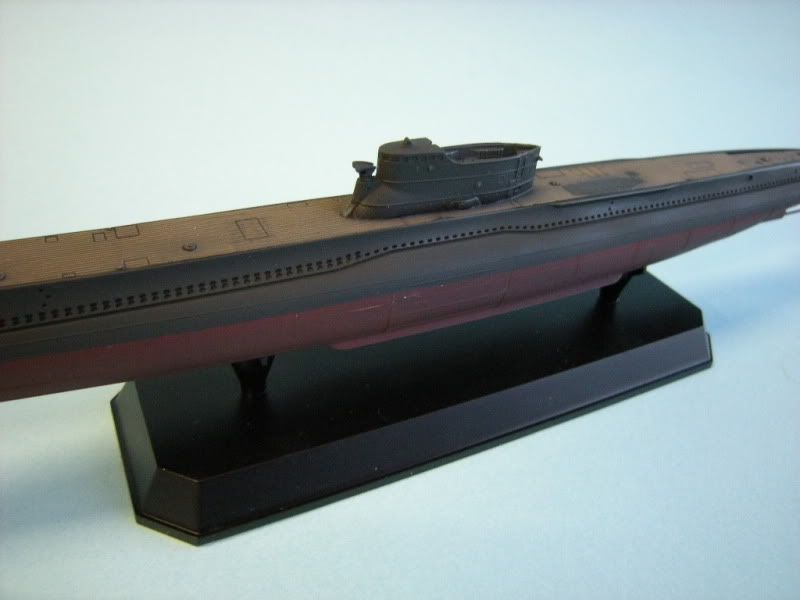
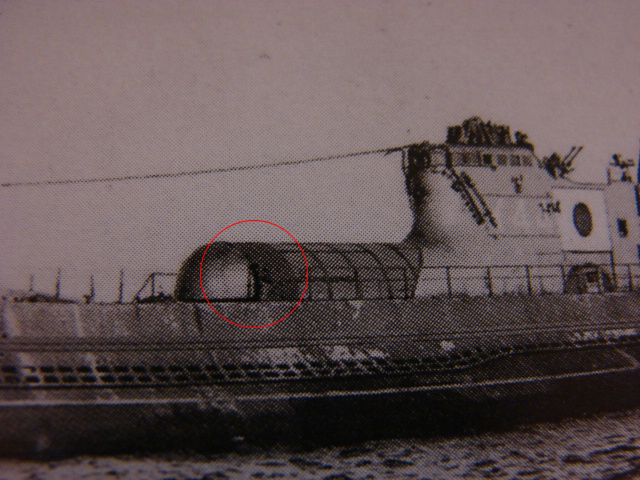
Peppe, In lieu of scanning , I took some pictures from my references showing the hanger opening operation and what to look for detailing wise when modeling. These small but crucial hanger details are usually omitted in drawings, illustrations and models. Unlock latches should be in the recessed openings like the one appearing on the two black tower images. I am not sure if the front hangar dome opens to the port or the starboard, or if differed between the boats. It would be very hard to maintain water tight and structural integrity if the doors open bomb bay style from the top as in the computer illustration that you posted above. It just doesn't make much sense to open that way because that would be too impractical and time consuming to use the crane to lift the plane in and out of the hanger when they had track rails below for the plane's dolly in order to launch from the ramp. IMHO, The crane was for retrieval only, and would be used to lift the plane out of the water and on to the dolly which would then be slid back into the hanger so the boat can get underway. Time was very limited and crucial during those tasks of launching and retrieval. At this stage the boat is at it's most vulnerable so the least amount of time needed to perform the plane launch/recovery the better.

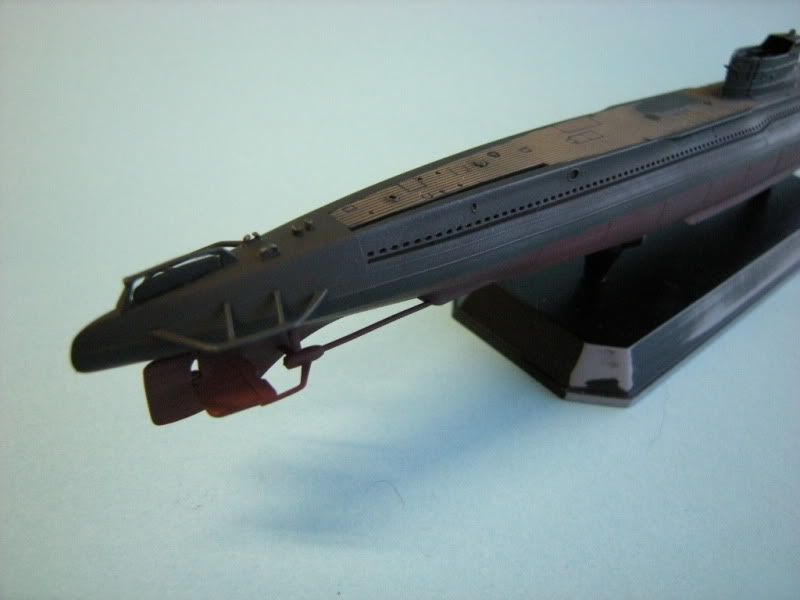
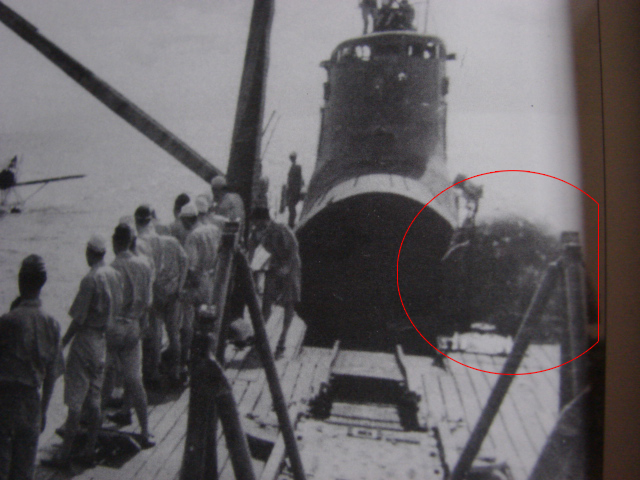
Here is an image of the hangar Open for retrieval.

Image

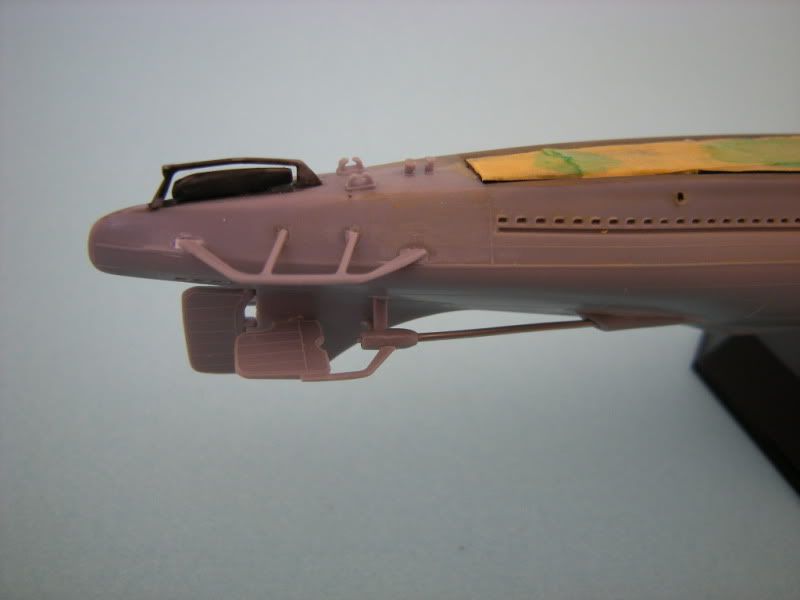
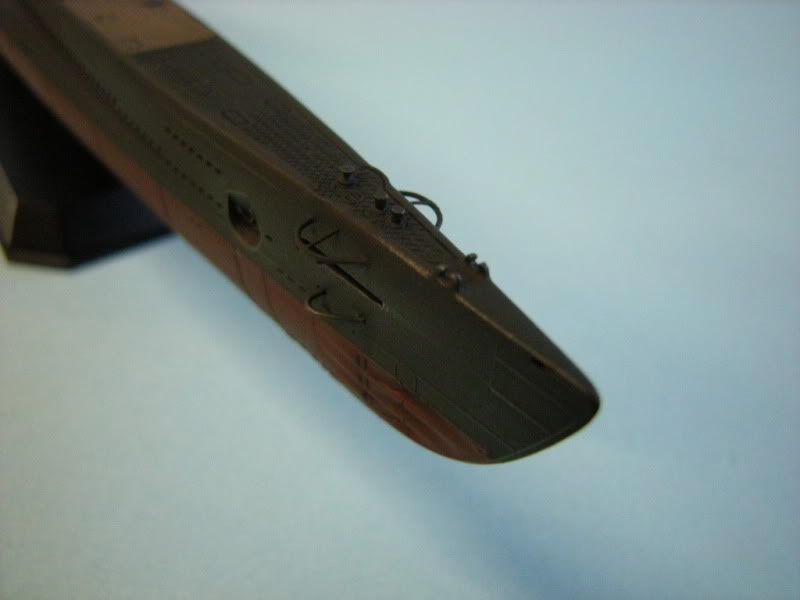
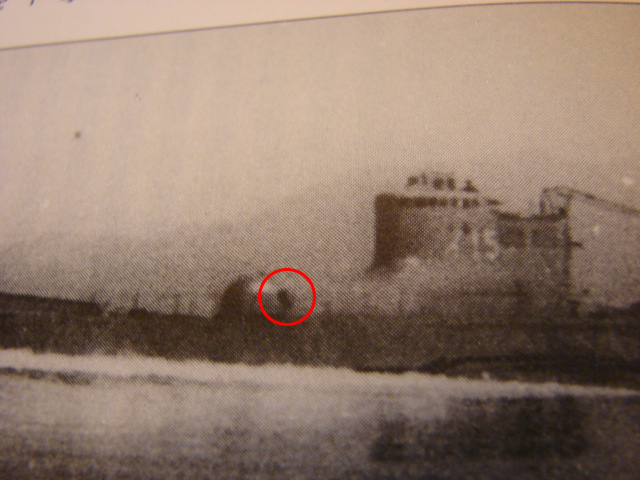
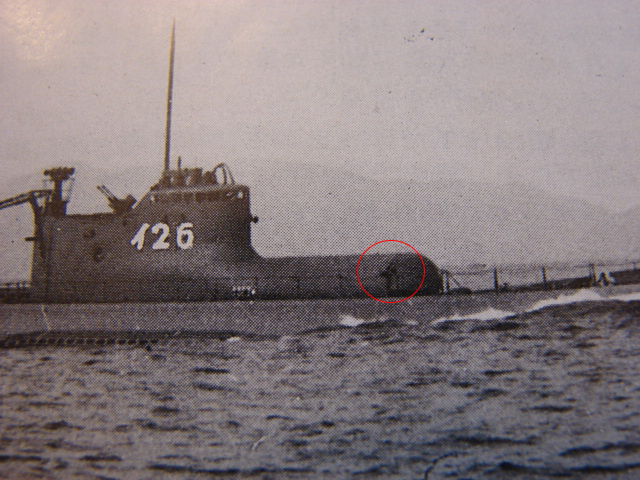
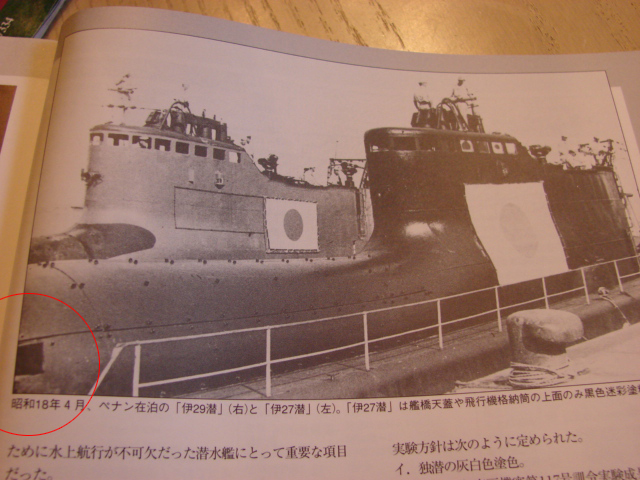
These images show the recess, hangar lock latch and hing bulge.

Image

Image

Image

Image

This image shows how the rails would pivot connecting the ramp to the hangar rails. This illustration is off of a I-400, but this system was perfected by the earlier classes and was scaled up for the I-400 class.

Image

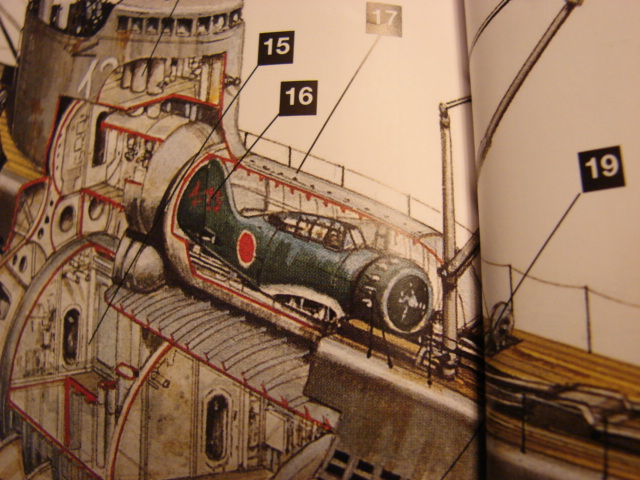
This image shows a cut away of the hangar. It also shows the bulkheads that wrap around the water tight hangar for maximum strength and structural integrity.

Image


Top
  
Reply with quote  
PostPosted: Wed May 04, 2011 1:27 am 
Offline
User avatar

Joined: Thu Jul 08, 2010 8:28 pm
Posts: 38
Location: Kinglake Victoria
Do any of you educated chaps happen to know what the IJN I-19 looked like at the time of the sinking of the Hornet? I know that jap subs around that time were being painted black, however i cannot find any images of the sub in question or any info on when or where she was serviced, to confirm that this was done to the I-19.
I am at paint stage on a kit that is to be entered in the local statewide modelling comp in a couple of months so any assistance would be greatly appreciated.

Ben.


Top
 Profile  
Reply with quote  
Display posts from previous:  Sort by  
Post new topic Reply to topic  [ 234 posts ]  Go to page Previous  1, 2, 3, 4, 5, 6, 7 ... 12  Next

All times are UTC - 6 hours [ DST ]


Who is online

Users browsing this forum: No registered users and 25 guests


You can post new topics in this forum
You can reply to topics in this forum
You cannot edit your posts in this forum
You cannot delete your posts in this forum
You cannot post attachments in this forum

Jump to:  
Powered by phpBB® Forum Software © phpBB Group