The Ship Model Forum

The Ship Modelers Source
It is currently Tue Apr 23, 2024 10:24 am

All times are UTC - 6 hours [ DST ]


Post new topic Reply to topic  [ 197 posts ]  Go to page Previous  1, 2, 3, 4, 5 ... 10  Next
Author Message
PostPosted: Sat Nov 06, 2021 9:41 pm 
Offline
User avatar

Joined: Tue Jan 11, 2005 1:40 pm
Posts: 8177
Location: New Jersey
Finished installing all the main battery gun barrels into the trunnions, then installed the trunnions into the turrets. Took a little work to get the barrels to fit, but it worked out in the end.
Attachment:
IMG_1594.JPG
IMG_1594.JPG [ 281.87 KiB | Viewed 1511 times ]

Attachment:
IMG_E1595.JPG
IMG_E1595.JPG [ 270.44 KiB | Viewed 1511 times ]

Once those were done, I fired the airbrush back up, and continued painting, using Colourcoats 5D.
Attachment:
IMG_E1600.JPG
IMG_E1600.JPG [ 243.73 KiB | Viewed 1511 times ]

Attachment:
IMG_1598.JPG
IMG_1598.JPG [ 202.07 KiB | Viewed 1511 times ]

Attachment:
IMG_1599.JPG
IMG_1599.JPG [ 133.96 KiB | Viewed 1511 times ]

Both the Kraken superstructure and ModelMonkey turrets look good with some paint on them, though you can see some print lines in the superstructure parts with high magnification.

_________________
Martin

"Tomorrow is the most important thing in life. Comes into us at midnight very clean. It's perfect when it arrives and it puts itself in our hands. It hopes we've learned something from yesterday." John Wayne

Ship Model Gallery


Report this post
Top
 Profile  
Reply with quote  
PostPosted: Sat Nov 06, 2021 9:51 pm 
Offline

Joined: Tue Jan 11, 2005 10:56 am
Posts: 8577
Location: New York City
Lookin' really nice.


Report this post
Top
 Profile  
Reply with quote  
PostPosted: Thu Nov 11, 2021 10:18 pm 
Offline
User avatar

Joined: Tue Jan 11, 2005 1:40 pm
Posts: 8177
Location: New Jersey
Spent time removing 3D printed parts from their print rafts, cleaning said parts and getting them ready for painting (tedious!!).
Attachment:
IMG_1613.JPG
IMG_1613.JPG [ 5.23 MiB | Viewed 1460 times ]

Attachment:
IMG_1608.JPG
IMG_1608.JPG [ 1.68 MiB | Viewed 1460 times ]

Attachment:
IMG_1614.JPG
IMG_1614.JPG [ 4.8 MiB | Viewed 1460 times ]

Also did more work on the superstructure, gluing the director platform to the pilot house. There were some fit issues, so I had to use some super glue gel for the joint between the top of the pilot house and platform above. The seam was then puttied and sanded.
Attachment:
IMG_1615.JPG
IMG_1615.JPG [ 2.69 MiB | Viewed 1460 times ]

Attachment:
IMG_1616.JPG
IMG_1616.JPG [ 2.41 MiB | Viewed 1460 times ]

Attachment:
IMG_1617.JPG
IMG_1617.JPG [ 1.66 MiB | Viewed 1460 times ]

Attachment:
IMG_1618.JPG
IMG_1618.JPG [ 1.61 MiB | Viewed 1460 times ]

Attachment:
IMG_1624.JPG
IMG_1624.JPG [ 2.31 MiB | Viewed 1460 times ]

Attachment:
IMG_1625.JPG
IMG_1625.JPG [ 2.44 MiB | Viewed 1460 times ]

After those parts were glued together, I noticed the support legs for the Mk 19 directors are warping a little. Fortunately Kraken Hobbies printed those legs hollow, so I’ll insert some brass rod in them and pin them to the deck when that whole assembly is ready to be permanently mounted.

I also finished drilling out all the locating holes in the casements for the 5”/51cal gun barrels. With all that done, I was hoping to do a little more painting tonight, but :sleepy: :sleepy:

_________________
Martin

"Tomorrow is the most important thing in life. Comes into us at midnight very clean. It's perfect when it arrives and it puts itself in our hands. It hopes we've learned something from yesterday." John Wayne

Ship Model Gallery


Report this post
Top
 Profile  
Reply with quote  
PostPosted: Fri Nov 12, 2021 2:31 am 
Offline

Joined: Tue Feb 06, 2007 10:24 am
Posts: 2498
Location: Belgium
Very nice work! And excellent progress! :thumbs_up_1: :thumbs_up_1: :thumbs_up_1:


Report this post
Top
 Profile  
Reply with quote  
PostPosted: Mon Nov 22, 2021 9:23 am 
Offline
User avatar

Joined: Tue Jan 11, 2005 1:40 pm
Posts: 8177
Location: New Jersey
Some of this weekends work on the Oklahoma. More paint work done: the last coat of 5D went down on some parts and the first coat of insignia red went down on the forward turret tops. Also got some black down on the top of the funnel and bottom of the ships boats.
Attachment:
IMG_1689.JPG
IMG_1689.JPG [ 232.3 KiB | Viewed 1340 times ]

Attachment:
IMG_1698.JPG
IMG_1698.JPG [ 754.59 KiB | Viewed 1340 times ]

Attachment:
IMG_1693.JPG
IMG_1693.JPG [ 150.77 KiB | Viewed 1340 times ]

Attachment:
IMG_1692.JPG
IMG_1692.JPG [ 152.9 KiB | Viewed 1340 times ]

Attachment:
IMG_1690.JPG
IMG_1690.JPG [ 153.88 KiB | Viewed 1340 times ]

Attachment:
IMG_1691.JPG
IMG_1691.JPG [ 157.18 KiB | Viewed 1340 times ]

Attachment:
IMG_1688.JPG
IMG_1688.JPG [ 150.83 KiB | Viewed 1340 times ]

Started work on the platform aft of the break in the deck (the kit part was missing).
Attachment:
A5427715-DB91-4674-9795-B1A58A9F02C6.jpeg
A5427715-DB91-4674-9795-B1A58A9F02C6.jpeg [ 241.87 KiB | Viewed 1383 times ]

Attachment:
IMG_1695.JPG
IMG_1695.JPG [ 236.89 KiB | Viewed 1340 times ]

The boats will have to have their lower hills masked so I can move on to the next step in painting. I also have to mask and paint the false bow wave soon. Doing lots of work but I don’t feel like I’m making much progress.…

_________________
Martin

"Tomorrow is the most important thing in life. Comes into us at midnight very clean. It's perfect when it arrives and it puts itself in our hands. It hopes we've learned something from yesterday." John Wayne

Ship Model Gallery


Report this post
Top
 Profile  
Reply with quote  
PostPosted: Tue Nov 23, 2021 3:19 pm 
Offline

Joined: Tue Oct 23, 2018 2:00 pm
Posts: 575
Looking very well Martin.

Will be watching this thread with interest, great to see all the 3D printed aftermarket parts being used 'in anger' on a model!

Keep up the good work & I look forward to future updates.


Report this post
Top
 Profile  
Reply with quote  
PostPosted: Tue Nov 23, 2021 8:26 pm 
Offline
User avatar

Joined: Tue Jan 11, 2005 1:40 pm
Posts: 8177
Location: New Jersey
Thanks Mr Church!

Used some AK Interactive Masking Putty to mark off the bottom of the false bow wave. Then I brush painted it, using photos and a rendering of Oklahoma by Paul Bender.

Masked:
Attachment:
IMG_1700.JPG
IMG_1700.JPG [ 3.98 MiB | Viewed 1301 times ]

Attachment:
IMG_1701.JPG
IMG_1701.JPG [ 4.04 MiB | Viewed 1301 times ]

Unmasked:
Attachment:
IMG_E1707.JPG
IMG_E1707.JPG [ 788.9 KiB | Viewed 1301 times ]

Attachment:
IMG_E1708.JPG
IMG_E1708.JPG [ 747.89 KiB | Viewed 1301 times ]

Attachment:
IMG_1705.JPG
IMG_1705.JPG [ 546.62 KiB | Viewed 1301 times ]

I painted and added the missing platform...
Attachment:
IMG_1706.JPG
IMG_1706.JPG [ 162.21 KiB | Viewed 1301 times ]

And started cutting and sanding to shape replacement platforms for the mainmast
Attachment:
FJEC1990.JPG
FJEC1990.JPG [ 274 KiB | Viewed 1301 times ]

_________________
Martin

"Tomorrow is the most important thing in life. Comes into us at midnight very clean. It's perfect when it arrives and it puts itself in our hands. It hopes we've learned something from yesterday." John Wayne

Ship Model Gallery


Report this post
Top
 Profile  
Reply with quote  
PostPosted: Tue Nov 23, 2021 8:41 pm 
Offline
User avatar

Joined: Mon Jan 24, 2005 8:53 am
Posts: 154
Location: Southern New Jersey
:thumbs_up_1:


Report this post
Top
 Profile  
Reply with quote  
PostPosted: Wed Nov 24, 2021 9:13 am 
Offline
User avatar

Joined: Mon Jan 10, 2005 10:46 am
Posts: 2411
Location: Hoboken, NJ
Nice work!

How do you like the masking putty, compared to Blue Tak or Silly Putty?

_________________
We like our history sanitized and theme-parked and self-congratulatory, not bloody and angry and unflattering. - Jonathan Yardley


Report this post
Top
 Profile  
Reply with quote  
PostPosted: Wed Nov 24, 2021 9:18 am 
Offline
User avatar

Joined: Tue Jan 11, 2005 1:40 pm
Posts: 8177
Location: New Jersey
Devin wrote:
Nice work!

How do you like the masking putty, compared to Blue Tak or Silly Putty?

Thanks! It worked fine. Fairly easy to work with, and it didn't leave any residue. I actually never used silly putty or blue tak to mask, so I can't comment on which is better.

_________________
Martin

"Tomorrow is the most important thing in life. Comes into us at midnight very clean. It's perfect when it arrives and it puts itself in our hands. It hopes we've learned something from yesterday." John Wayne

Ship Model Gallery


Report this post
Top
 Profile  
Reply with quote  
PostPosted: Fri Nov 26, 2021 8:53 pm 
Offline

Joined: Mon Jan 07, 2008 10:15 pm
Posts: 953
Hi Martin,
Oklahoma's superstructure looks amazing! Some incredible detail on that thing! As far as the degaussing lines go, Okie was first installed with the temporary degaussing lines which ran along the outside of the hull. Then, sometime later those lines were replaced with the permanent lines which laid on her deck edge. I am not sure at this point when that transition took place for her so I guess its possible she still had the temporary lines after she was painted into MS-1.
Image


Report this post
Top
 Profile  
Reply with quote  
PostPosted: Sat Nov 27, 2021 1:59 pm 
Offline
User avatar

Joined: Tue Jan 11, 2005 1:40 pm
Posts: 8177
Location: New Jersey
Thanks Jeff. Kudos to Matt at Kraken for designing and printing it. It's certainly an upgrade over the original resin parts.

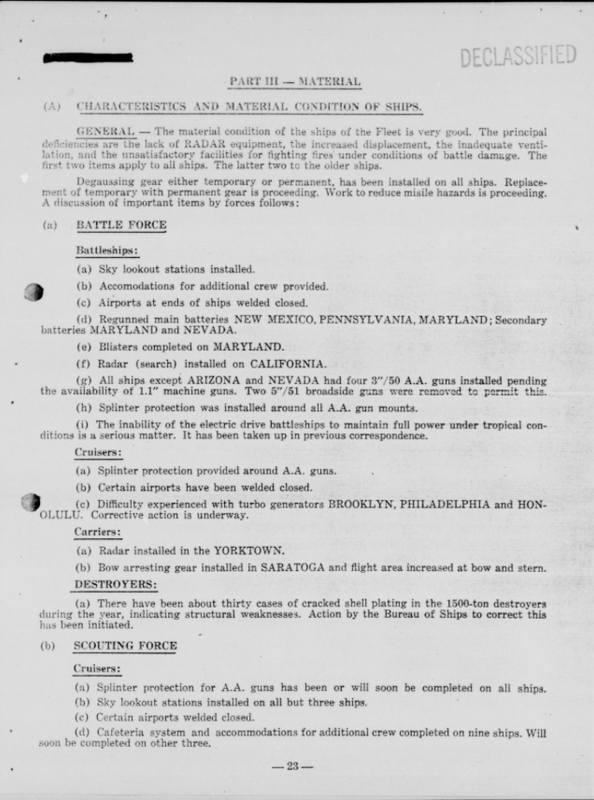
That's a cool document - thanks for sharing! Once the degaussing cable went on, it wasn't coming off, so hopefully no one will find proof that it was removed before Okie was painted Ms1!! :roll:

Been doing a little bit of everything lately: touch up painting, prepping other parts for paint, working on the 3D printed parts, etc. The Black Cat boats have their lower hulls masked off and are ready for 5D.
Attachment:
IMG_E1718.JPG
IMG_E1718.JPG [ 351.58 KiB | Viewed 1167 times ]

I also "made" an extra boat, using a left over boat hull from the Merit Enterprise kit and adding some styrene decks, "engine" and thwarts. Hmmm....I should add a PE rudder to that, now that I look at it.
Attachment:
IMG_1719.JPG
IMG_1719.JPG [ 158.53 KiB | Viewed 1167 times ]

I've been fiddling with the Kraken 3D printed bridge as well. Made the struts for the foremast spotting top, then decided to permanently attach the bottom of the superstructure to the deck. Good thing I did it this way, as it would have been almost impossible to secure it to the deck with additional levels glued to the base.
Attachment:
IMG_1725.JPG
IMG_1725.JPG [ 191.29 KiB | Viewed 1167 times ]

Attachment:
IMG_1727.JPG
IMG_1727.JPG [ 216.71 KiB | Viewed 1167 times ]

Attachment:
IMG_1726.JPG
IMG_1726.JPG [ 200.02 KiB | Viewed 1167 times ]

I had to clamp it down, because, just like some of the other parts, there’s a slight warp in it (something I'm starting to find is apparently endemic to larger 3D printed parts in general, not specific to Kraken). I used some gel CA I bought, which allowed me time to position the part in place and then clamp it down.
Attachment:
IMG_1729.JPG
IMG_1729.JPG [ 338.46 KiB | Viewed 1167 times ]

I set it aside to dry, then took a break to watch the first part of The Beatles "Get Back" on Disney+. Highly recommended! After watching that, and giving everything time to dry, I removed the clamps. You'll probably notice some divots in the deck - that's where I removed the cast ready ammo lockers from the model before masking and spraying the 5D. Those are put aside and will be added back to the model shortly.
Attachment:
IMG_1730.JPG
IMG_1730.JPG [ 252.72 KiB | Viewed 1167 times ]

Attachment:
IMG_1731.JPG
IMG_1731.JPG [ 268.27 KiB | Viewed 1167 times ]

As you can see by some of the pictures above, the support columns for the Mk19 directors are warped. The plan is to saw them off and replace them with brass tube. That's probably the next step. I have to figure out the size of the motion picture projection booth, and make that as well.

_________________
Martin

"Tomorrow is the most important thing in life. Comes into us at midnight very clean. It's perfect when it arrives and it puts itself in our hands. It hopes we've learned something from yesterday." John Wayne

Ship Model Gallery


Report this post
Top
 Profile  
Reply with quote  
PostPosted: Sat Nov 27, 2021 2:55 pm 
Offline

Joined: Mon Jan 07, 2008 10:15 pm
Posts: 953
MartinJQuinn wrote:
I have to figure out the size of the motion picture projection booth, and make that as well.


Here is a good look at her projector booth.
Image


Report this post
Top
 Profile  
Reply with quote  
PostPosted: Sat Nov 27, 2021 7:05 pm 
Offline

Joined: Tue Jan 11, 2005 10:56 am
Posts: 8577
Location: New York City
I had a good look at Okie yesterday, in the flesh. Martin's made excellent progress, as well as finetuning the Kraken parts. She really looks great in person.

Btw, that "extra" boat he made is truly fine.


Report this post
Top
 Profile  
Reply with quote  
PostPosted: Sun Nov 28, 2021 1:35 pm 
Offline
User avatar

Joined: Tue Jan 11, 2005 1:40 pm
Posts: 8177
Location: New Jersey
DavidP wrote:
looks like the forward mast has a bit of a forward tilt to it.

Yes, it does. I'm hoping when I glue it to the struts it will straighten out.

Jeff: another great photo! Thank you!

Dan: you are too kind.

Started fiddling around with turret 3 and the catapult. The kit supplied PE doesn't even come CLOSE to fitting the Model Monkey turret. Oddly, it doesn't seem to really fit the kit supplied resin turret either. :doh_1:
Attachment:
IMG_1739.JPG
IMG_1739.JPG [ 174.49 KiB | Viewed 1097 times ]


Looked at the PE catapult for the Trumpeter USS New York. The NY turret looks close in shape and size to the Okie's #3 turret, but the latter has the large rangefinder on Turret 3, which the former doesn't have, so I'm not sure how to proceed here. For now, I'll put this aside and deal with it later.

_________________
Martin

"Tomorrow is the most important thing in life. Comes into us at midnight very clean. It's perfect when it arrives and it puts itself in our hands. It hopes we've learned something from yesterday." John Wayne

Ship Model Gallery


Report this post
Top
 Profile  
Reply with quote  
PostPosted: Sun Nov 28, 2021 3:20 pm 
Offline
User avatar

Joined: Tue Jan 11, 2005 1:40 pm
Posts: 8177
Location: New Jersey
DavidP wrote:
are you running the catapult parallel to the centerline of the ship or a slight angle according to the Booklet of General Plans? turrets 2 & 3 are identical to the New York class except for the range finders & front glacis plate as I helped Steve(Model Monkey) on the Nevada class turrets.

At an angle. I have the BoGP and a set of plans from Floating Drydock.

_________________
Martin

"Tomorrow is the most important thing in life. Comes into us at midnight very clean. It's perfect when it arrives and it puts itself in our hands. It hopes we've learned something from yesterday." John Wayne

Ship Model Gallery


Report this post
Top
 Profile  
Reply with quote  
PostPosted: Wed Dec 01, 2021 7:04 pm 
Offline
User avatar

Joined: Tue Jan 11, 2005 1:40 pm
Posts: 8177
Location: New Jersey
The NY class catapult is close, but still not right:
Attachment:
IMG_1741.JPG
IMG_1741.JPG [ 188.35 KiB | Viewed 1027 times ]

Attachment:
IMG_1742.JPG
IMG_1742.JPG [ 233.72 KiB | Viewed 1027 times ]

With that set aside for now, I removed the 3D printed supports for the Mk19 directors
Attachment:
IMG_1743.JPG
IMG_1743.JPG [ 295.87 KiB | Viewed 1027 times ]

And replaced them with brass tube I had on had. Which happened to be a perfect match
Attachment:
IMG_1745.JPG
IMG_1745.JPG [ 207.9 KiB | Viewed 1027 times ]

When both sides were on, and dry, I repainted this sub-assembly
Attachment:
IMG_1757.JPG
IMG_1757.JPG [ 290.82 KiB | Viewed 1027 times ]

I noticed afterwards that the aft part of the pilot house deck, on the port side, has lifted up in the corner, so I'll have to play with that, to see if I can get it down without breaking it. Again.

I also painted the top of turret 4 true blue. Here's how it all looks as of now
Attachment:
IMG_E1755.JPG
IMG_E1755.JPG [ 142.1 KiB | Viewed 1027 times ]

Attachment:
IMG_E1754.JPG
IMG_E1754.JPG [ 136.54 KiB | Viewed 1027 times ]

More to come...

_________________
Martin

"Tomorrow is the most important thing in life. Comes into us at midnight very clean. It's perfect when it arrives and it puts itself in our hands. It hopes we've learned something from yesterday." John Wayne

Ship Model Gallery


Report this post
Top
 Profile  
Reply with quote  
PostPosted: Fri Dec 03, 2021 9:11 pm 
Offline
User avatar

Joined: Tue Jan 11, 2005 1:40 pm
Posts: 8177
Location: New Jersey
Starting painting the spotting tops and other assorted parts 1941 5-L
Attachment:
IMG_1768.JPG
IMG_1768.JPG [ 171.52 KiB | Viewed 1280 times ]

Attachment:
IMG_1769.JPG
IMG_1769.JPG [ 183.84 KiB | Viewed 1280 times ]

Attachment:
IMG_1770.JPG
IMG_1770.JPG [ 112.78 KiB | Viewed 1280 times ]

While that was drying, I started adding white glue in the opening around the barrels on the faces of the turrets. I'll have to do this a few times, to build these up to represent blast bags
Attachment:
IMG_1763.JPG
IMG_1763.JPG [ 146.55 KiB | Viewed 1280 times ]

Attachment:
IMG_1764.JPG
IMG_1764.JPG [ 140.51 KiB | Viewed 1280 times ]

Attachment:
IMG_1762.JPG
IMG_1762.JPG [ 394.61 KiB | Viewed 1280 times ]

And while THAT was drying, I did some more work on the 1/700 Arizona superstructure.
Attachment:
IMG_1771.JPG
IMG_1771.JPG [ 55.45 KiB | Viewed 1280 times ]

Attachment:
IMG_1773.JPG
IMG_1773.JPG [ 64.94 KiB | Viewed 1280 times ]

Attachment:
File comment: Top level dry fit only
IMG_1774.JPG
IMG_1774.JPG [ 119.85 KiB | Viewed 1280 times ]

Previously, I run into a little trouble getting the top of the conning tower to fit onto the deck below, as it didn't lay flush over the structures on either side of the bridge. I had to carefully trim that down as well as the bottom of the conning tower, to get it to fit. When I was done, there was still a little bit of a seam.

I also found a seam in the legs of the supports for the Mk19 directors, where the levels of the platforms split. I think it might be better to make these supports one piece, from the signal bridge to the director platform. I have to clean up the filler I put down, and then tuck inclined ladders into the openings at the back of the bridge. If I had pre-planned properly, I would have done that before I glued the conning down down to the base. For the present, however, Oklahoma is my focus, and these Arizona parts can wait.

_________________
Martin

"Tomorrow is the most important thing in life. Comes into us at midnight very clean. It's perfect when it arrives and it puts itself in our hands. It hopes we've learned something from yesterday." John Wayne

Ship Model Gallery


Report this post
Top
 Profile  
Reply with quote  
PostPosted: Sat Dec 04, 2021 2:21 am 
Offline

Joined: Wed Jan 02, 2013 1:15 am
Posts: 5012
Nice work in such a dinky az scale! I had good luck using clay materials for blast bags which I glazed with CA.

Cheers. Tom


Report this post
Top
 Profile  
Reply with quote  
PostPosted: Sat Dec 04, 2021 5:06 am 
Offline
User avatar

Joined: Sun Oct 12, 2008 3:55 am
Posts: 593
Location: Budapest, Hungary
To build these battleships simultaneously seems an enormous task to me.
You are making great progress, though.
Keep up the good work!


Report this post
Top
 Profile  
Reply with quote  
Display posts from previous:  Sort by  
Post new topic Reply to topic  [ 197 posts ]  Go to page Previous  1, 2, 3, 4, 5 ... 10  Next

All times are UTC - 6 hours [ DST ]


Who is online

Users browsing this forum: varifleman and 94 guests


You can post new topics in this forum
You can reply to topics in this forum
You cannot edit your posts in this forum
You cannot delete your posts in this forum
You cannot post attachments in this forum

Jump to:  
Powered by phpBB® Forum Software © phpBB Group