1/350 CVL-23 USS Princeton
Moderators: BB62vet, MartinJQuinn, JIM BAUMANN, Jon, Dan K
-
StevenVD
- Posts: 620
- Joined: Fri Dec 27, 2013 6:32 pm
Re: 1/350 CVL-23 USS Princeton
That would be cool, Richard! Your model would be about 2 meters long? That's spectacular! But are there any planes on this scale, or will you produce these too?
-
Richard OMalley
- Posts: 146
- Joined: Fri Mar 13, 2015 11:59 am
Re: 1/350 CVL-23 USS Princeton
Steven
The plans of Belleau Wood were 1/96 . They also are available in 1/192 . They also have plans of Princeton .
The plans of Belleau Wood were 1/96 . They also are available in 1/192 . They also have plans of Princeton .
-
StevenVD
- Posts: 620
- Joined: Fri Dec 27, 2013 6:32 pm
Re: 1/350 CVL-23 USS Princeton
I meant the (air)planes, Richard, are there any on that scale? The Hellcats I see on Scalemates have all a respectable age.
To have some movement in the water, I sprayed it in a mix of white and blue, you can see a sample in the hull. This serves as a base for the AK Foam. The larger blots are positioned above the ship's propulsion units.


While I was planning to glue the hull together on the base, I declined from that idea when I saw the deformation there was on the extremities. The fit was good when pressure was put on one side, but the other side would then rise up. Glue wouldn't be able to keep the parts together.
The construction with an extra bottom in the upper hull allowed me to use another option, to screw the upper part to the lower. This could stand stronger tension and pressure could be divided over the length of the waterline, making any seam disappear. I started out with two screws at 10 cm from the bow and the stern.


Something slightly hampered the fit of the hull, it must have been the locator ridge inside the lower hull. I removed part of that and later even half.

When pressing the bow to the waterline it tilted heavily and the PE starboard barbette was smashed. The parts could be reshaped without permanent damage and this can probably be repaired to the original state. Fingers crossed that this is the last of damage done to the model, I already have about 20 PE parts to fix.

Using only two Parker screws, one side of the ship kept on creeping up a millimeter.


This was not acceptable for such a model, I can't cover the entire waterline with waves to obscure the seam. If I fixed the bow first and moved the seam to the aft, I could then pull it tight with a third screw about 5cm from the aft.

This fixed the entire waterline to the bottom, leaving only a tiny seam that will disappear if I add some liquid glue.


Before I add the foam, I will do some urgent little repairs.
To have some movement in the water, I sprayed it in a mix of white and blue, you can see a sample in the hull. This serves as a base for the AK Foam. The larger blots are positioned above the ship's propulsion units.
While I was planning to glue the hull together on the base, I declined from that idea when I saw the deformation there was on the extremities. The fit was good when pressure was put on one side, but the other side would then rise up. Glue wouldn't be able to keep the parts together.
The construction with an extra bottom in the upper hull allowed me to use another option, to screw the upper part to the lower. This could stand stronger tension and pressure could be divided over the length of the waterline, making any seam disappear. I started out with two screws at 10 cm from the bow and the stern.
Something slightly hampered the fit of the hull, it must have been the locator ridge inside the lower hull. I removed part of that and later even half.
When pressing the bow to the waterline it tilted heavily and the PE starboard barbette was smashed. The parts could be reshaped without permanent damage and this can probably be repaired to the original state. Fingers crossed that this is the last of damage done to the model, I already have about 20 PE parts to fix.
Using only two Parker screws, one side of the ship kept on creeping up a millimeter.
This was not acceptable for such a model, I can't cover the entire waterline with waves to obscure the seam. If I fixed the bow first and moved the seam to the aft, I could then pull it tight with a third screw about 5cm from the aft.
This fixed the entire waterline to the bottom, leaving only a tiny seam that will disappear if I add some liquid glue.
Before I add the foam, I will do some urgent little repairs.
-
Joe Simon
- Posts: 825
- Joined: Sat Jan 24, 2009 5:16 pm
- Location: Wisconsin
Re: 1/350 CVL-23 USS Princeton
That is looking very impressive!
-
StevenVD
- Posts: 620
- Joined: Fri Dec 27, 2013 6:32 pm
Re: 1/350 CVL-23 USS Princeton
Thanks, Joe! I've been busy fixing the floater nets like they are on Independence pictures and then adding some silicon waves.


Then I pencilled on the AK Water Foam. This is a thick acrylic paint that can be pasted or drybrushed on for wave tops or thinned and painted as spray. But it smells a bit sour.


Here is a detail of the floater net baskets. These are mostly filled up with rope ladders and the kit parts had the outline of these ladders molded on, but the PE off course doesn't have this.


A glass showcase, 65 on 20 centimeter will probably arrive by next week.
Then I pencilled on the AK Water Foam. This is a thick acrylic paint that can be pasted or drybrushed on for wave tops or thinned and painted as spray. But it smells a bit sour.
Here is a detail of the floater net baskets. These are mostly filled up with rope ladders and the kit parts had the outline of these ladders molded on, but the PE off course doesn't have this.
A glass showcase, 65 on 20 centimeter will probably arrive by next week.
-
StevenVD
- Posts: 620
- Joined: Fri Dec 27, 2013 6:32 pm
Re: 1/350 CVL-23 USS Princeton
It's already here and fitting well to the model.


Nevertheless I have to adjust the base with a spacer to make the fit perfect. This liner must measure from 642 to 606mm and from 192 tot 160mm.
The other package is a set of Masterbox replacement tracks for my Kondensator atomic gun, that will enter production soon...
Nevertheless I have to adjust the base with a spacer to make the fit perfect. This liner must measure from 642 to 606mm and from 192 tot 160mm.
The other package is a set of Masterbox replacement tracks for my Kondensator atomic gun, that will enter production soon...
-
StevenVD
- Posts: 620
- Joined: Fri Dec 27, 2013 6:32 pm
Re: 1/350 CVL-23 USS Princeton
This was the hottest day in Belgium's meteo record. An outside job could be arranged. You see a wooden ornamental profile, 2,5 meters long, two PVC L-profiles 1 meter long and a bookshelf 80 to 20 centimeters.


The shelf was fit to the showcase and the wood lining was joined in V-shape.

Next a dry-fit inside, because it was criminal to continue with 40+ degrees Celsius.


The PVC L-profiles will serve as shown:


The shelf was fit to the showcase and the wood lining was joined in V-shape.
Next a dry-fit inside, because it was criminal to continue with 40+ degrees Celsius.
The PVC L-profiles will serve as shown:
-
StevenVD
- Posts: 620
- Joined: Fri Dec 27, 2013 6:32 pm
Re: 1/350 CVL-23 USS Princeton
The plastic lining around the dio still had to be made.

The plastic is not measured from the dio, but dry-fitted around it and then cut up. Some irregularities in the plaster wall are calculated away. PVC-glue is used to connect the parts.

To line up with the plastic, the dio base is trimmed. 10 millimeters are removed from the styropor wall covered with a thin plaster layer. This is done with an old cutter lifted by a piece of cardboard.

When the plaster is cut up, it's easy to remove a slice.

This presents a tight waterline edge on three sides.

The front side is deformed in a way that can't be corrected, this will be painted blue.
The plastic is not measured from the dio, but dry-fitted around it and then cut up. Some irregularities in the plaster wall are calculated away. PVC-glue is used to connect the parts.
To line up with the plastic, the dio base is trimmed. 10 millimeters are removed from the styropor wall covered with a thin plaster layer. This is done with an old cutter lifted by a piece of cardboard.
When the plaster is cut up, it's easy to remove a slice.
This presents a tight waterline edge on three sides.
The front side is deformed in a way that can't be corrected, this will be painted blue.
-
StevenVD
- Posts: 620
- Joined: Fri Dec 27, 2013 6:32 pm
Re: 1/350 CVL-23 USS Princeton
To fix the entire plastic frame to the base plate, I needed only two bolts with nuts. There was no glue involved to keep the frame and the cardboard plate in place. This way, I can get to the water diorama from the underside, so I don't have to wrestle it out of the plastic lining. I also ordered a name tag on a 3mm thick brass medallion. I hope this arrives in a week.


These transverse profiles keep the plastic lining perpendicular. The extra plastic appendages keep the nuts fixed.

The showcase has got some edges painted white and it should be ready to receive the model. Now that needs to be finished before I can insert it again!

To defeat the problem of unthrustworthy self-adhesive sides on the Pontos deck, I provided this glue.

All deck edges are treated with glue, which is brushed flat after applying.

To spare the joint between the two deck sections, some care is taken.

I'll color the deck holes individually, after all covers are removed. Maybe I should first weather the deck with my airbrush.

A last look on the Dragon deck. I reasoned that the extra detail doesn't outweigh the correct proportions. It's probably impossible to get the transverse girders as good as they were on the plastic deck. This could probably only be done with a dedicated PE-set that would be slightly over-scale to still see the details, while removing planks on the wooden deck and replacing them with the PE.

Then the deck was fixed and ready to apply markings. Two resin Hellcats had loosened in the hangar and now figure on the deck. They will be replaced with the styrene ones.


I now have the wet transfer "23" and the dry-transfer "22", but it seems to me there are no aerial shots that clearly show the deck number. Was it actually applied during battle operations? It would be easier to leave it off than to make a masking for a marking that was possibly not used, though it would undoubtedly embellish the model.
These transverse profiles keep the plastic lining perpendicular. The extra plastic appendages keep the nuts fixed.
The showcase has got some edges painted white and it should be ready to receive the model. Now that needs to be finished before I can insert it again!
To defeat the problem of unthrustworthy self-adhesive sides on the Pontos deck, I provided this glue.
All deck edges are treated with glue, which is brushed flat after applying.
To spare the joint between the two deck sections, some care is taken.
I'll color the deck holes individually, after all covers are removed. Maybe I should first weather the deck with my airbrush.
A last look on the Dragon deck. I reasoned that the extra detail doesn't outweigh the correct proportions. It's probably impossible to get the transverse girders as good as they were on the plastic deck. This could probably only be done with a dedicated PE-set that would be slightly over-scale to still see the details, while removing planks on the wooden deck and replacing them with the PE.
Then the deck was fixed and ready to apply markings. Two resin Hellcats had loosened in the hangar and now figure on the deck. They will be replaced with the styrene ones.
I now have the wet transfer "23" and the dry-transfer "22", but it seems to me there are no aerial shots that clearly show the deck number. Was it actually applied during battle operations? It would be easier to leave it off than to make a masking for a marking that was possibly not used, though it would undoubtedly embellish the model.
-
StevenVD
- Posts: 620
- Joined: Fri Dec 27, 2013 6:32 pm
Re: 1/350 CVL-23 USS Princeton
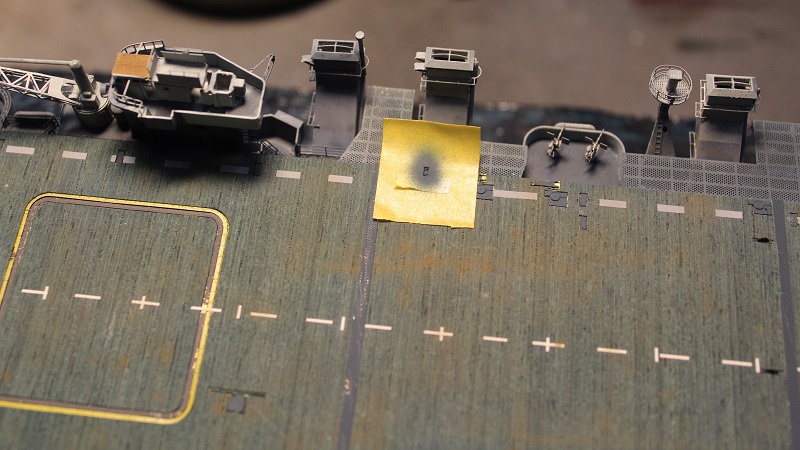
Kudos to Pontos for providing such a perfect set of dry-decals. It took me only half an hour to finish the deck striping.

Long ago cowboys, dinosaurs and black letters used to populate my dry-decal sets. But I never imagined that white stripes could be even more fun.

You only have to pay attention how far aside the film has to be moved, this you can only check on the plan with the cable tensioning arm locator holes..


Now still the horizontal centerlines. From the "Calling all Princeton fans" topic I deduced that also for Princeton there is no clue for placing the deck number, so I better leave it off.
Long ago cowboys, dinosaurs and black letters used to populate my dry-decal sets. But I never imagined that white stripes could be even more fun.
You only have to pay attention how far aside the film has to be moved, this you can only check on the plan with the cable tensioning arm locator holes..
Now still the horizontal centerlines. From the "Calling all Princeton fans" topic I deduced that also for Princeton there is no clue for placing the deck number, so I better leave it off.
-
Richard OMalley
- Posts: 146
- Joined: Fri Mar 13, 2015 11:59 am
Re: 1/350 CVL-23 USS Princeton
Hi Steven
John Haynes has Avengers and Hellcats in 1/96 . 1/96 is popular here in US for RC models and there are some more aircraft for that scale coming out . I think the 3D printer is helping . I like the weathering you are doing .All the RC ships I see are clean as a whistle . Someday I hope to find time to make a 1/350 scale model of Takao . I have the flyhawk photo-etch and resin kit for it but I don't have the kit of it . I should have purchased it years ago when it was cheaper . If I ever do make it , it will be weathered .
John Haynes has Avengers and Hellcats in 1/96 . 1/96 is popular here in US for RC models and there are some more aircraft for that scale coming out . I think the 3D printer is helping . I like the weathering you are doing .All the RC ships I see are clean as a whistle . Someday I hope to find time to make a 1/350 scale model of Takao . I have the flyhawk photo-etch and resin kit for it but I don't have the kit of it . I should have purchased it years ago when it was cheaper . If I ever do make it , it will be weathered .
-
StevenVD
- Posts: 620
- Joined: Fri Dec 27, 2013 6:32 pm
Re: 1/350 CVL-23 USS Princeton
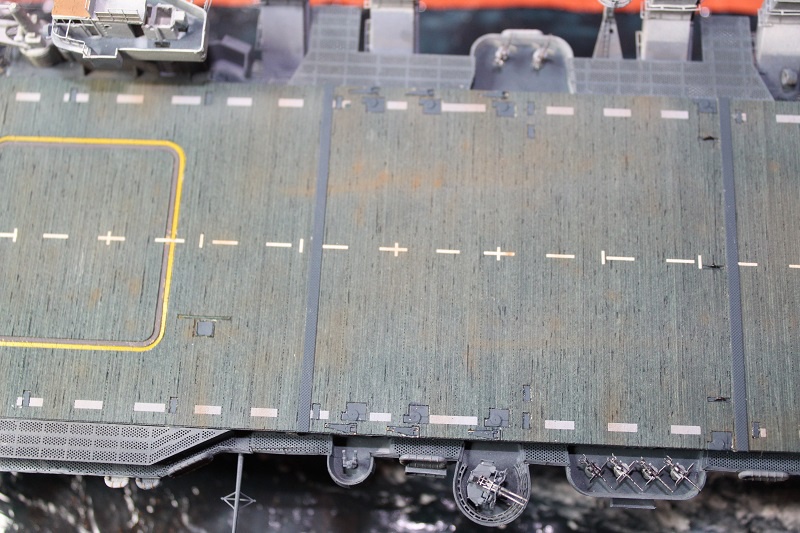
Hi Richard, I think that you will like this next posting better, I just weathered the deck like a carrier in use should have.

All these small bits were awaiting eagerly to be painted.

All is ready for priming. I used Tamiya Grey under the Lifecolor Deck Blue for more strength. This was not always enough.

Tamiya Middle Grey and Mud Brown are used to weather the deck. Later on, some marks can still be added.


The PE is added here. It's hard not to spill glue, once I had a fingertip. The superglue does not attack the wood, but a slight sheen remains after scratching. I will make an oil spill there.


The crash barrier supports still miss some paint.

I suppose I can't use the WEM arrestor wire supports, because no plane will be landing. That's a shame.

All these small bits were awaiting eagerly to be painted.
All is ready for priming. I used Tamiya Grey under the Lifecolor Deck Blue for more strength. This was not always enough.
Tamiya Middle Grey and Mud Brown are used to weather the deck. Later on, some marks can still be added.
The PE is added here. It's hard not to spill glue, once I had a fingertip. The superglue does not attack the wood, but a slight sheen remains after scratching. I will make an oil spill there.
The crash barrier supports still miss some paint.
I suppose I can't use the WEM arrestor wire supports, because no plane will be landing. That's a shame.
-
Crossy77
- Posts: 9
- Joined: Mon Aug 05, 2019 5:36 am
Re: 1/350 CVL-23 USS Princeton
Great looking build so far mate.
-
IModel_215
- Posts: 22
- Joined: Wed Jul 31, 2019 1:27 am
Re: 1/350 CVL-23 USS Princeton
StevenVD wrote:Hi Richard, I think that you will like this next posting better, I just weathered the deck like a carrier in use should have.
All these small bits were awaiting eagerly to be painted.
All is ready for priming. I used Tamiya Grey under the Lifecolor Deck Blue for more strength. This was not always enough.
Tamiya Middle Grey and Mud Brown are used to weather the deck. Later on, some marks can still be added.
The PE is added here. It's hard not to spill glue, once I had a fingertip. The superglue does not attack the wood, but a slight sheen remains after scratching. I will make an oil spill there.
The crash barrier supports still miss some paint.
I suppose I can't use the WEM arrestor wire supports, because no plane will be landing. That's a shame.
What technique did you use to weather the deck? It looks great.
-
StevenVD
- Posts: 620
- Joined: Fri Dec 27, 2013 6:32 pm
Re: 1/350 CVL-23 USS Princeton
Thanks, Charlie! These decks were originally stained deck blue, which would fade within a week under the circumstances. The weathering is only done in two colors, first medium grey and then mud brown. Some parts are airbrushed from a great distance to get a uniform wear, some are pinpointed a few millimeters from the deck to have some random operating damage. I'm still planning some oil marks and tyre burns.
I have placed the arrestor supports anyway, because I found an article stressing that they were not retracted during military operations.
I have placed the arrestor supports anyway, because I found an article stressing that they were not retracted during military operations.
-
IModel_215
- Posts: 22
- Joined: Wed Jul 31, 2019 1:27 am
Re: 1/350 CVL-23 USS Princeton
StevenVD wrote:Thanks, Charlie! These decks were originally stained deck blue, which would fade within a week under the circumstances. The weathering is only done in two colors, first medium grey and then mud brown. Some parts are airbrushed from a great distance to get a uniform wear, some are pinpointed a few millimeters from the deck to have some random operating damage. I'm still planning some oil marks and tyre burns.
I have placed the arrestor supports anyway, because I found an article stressing that they were not retracted during military operations.
I�m contemplating weathering the Mo I�m working on. But due to lack of experience, I�m concerned i will ruin the model by attempting. I think it would add an awesome element having the main walking paths weathered down and all the areas around the bofors weathered.
The flight deck looks really good, I�m looking forward to seeing it further detailed with the oil marks and tire wear
-
StevenVD
- Posts: 620
- Joined: Fri Dec 27, 2013 6:32 pm
Re: 1/350 CVL-23 USS Princeton
Thanks again, Charlie, here is the next update. I decided to place the arresting cable guides, having read this article: https://www.quora.com/During-carrier-op ... ing-hazard.

I had to strip them once, apparently Armypainter gunmetal was too thick to spray, then I went for black.

Placing them in the Pontos holders was easy, but I miss the one on the elevator deck.

Using Uschi Van Der Rosten 0,001 thread, laying the cables is a joy.

I could not imagine the cable that is tended over the shaft dangling on the railing while the elevator operated. However, it is not mentioned how this was done, so at first I assumed that it was detached. Looking at pictures to find proof of this, I found the solution to this question, but only because one picture was sharp enough to see the tiny retracted cable ends on it. So if you're trying to build this out of the box with the aft elevator open, you should relay at least this cable.

This is the WEM railing for the elevator. I went on to paint it grey.

Here it is installed on the deck, with two of the Hellcats placed in the hangar again and with the arresting gear in situ.


Now I'll take a look on the crash barrier.
So, all positions are now taken by the WEM guides.They are always deployed, regardless of any tripping hazard unless pulled for some repair.
Just to note, when the USS Midway became a carrier museum in San Diego, they left the arresting cables in place briefly. Soon thereafter, they were removed because of all the many visitors who tripped over them.
I had to strip them once, apparently Armypainter gunmetal was too thick to spray, then I went for black.
Placing them in the Pontos holders was easy, but I miss the one on the elevator deck.
Using Uschi Van Der Rosten 0,001 thread, laying the cables is a joy.
I could not imagine the cable that is tended over the shaft dangling on the railing while the elevator operated. However, it is not mentioned how this was done, so at first I assumed that it was detached. Looking at pictures to find proof of this, I found the solution to this question, but only because one picture was sharp enough to see the tiny retracted cable ends on it. So if you're trying to build this out of the box with the aft elevator open, you should relay at least this cable.
This is the WEM railing for the elevator. I went on to paint it grey.
Here it is installed on the deck, with two of the Hellcats placed in the hangar again and with the arresting gear in situ.
Now I'll take a look on the crash barrier.
-
StevenVD
- Posts: 620
- Joined: Fri Dec 27, 2013 6:32 pm
Re: 1/350 CVL-23 USS Princeton
Today I had a call from the DIY-store, the Princeton name tag was ready. I immediately collected it after work.

I had it made out of a brass plaque, with one line of text because more would have cost 7 euro extra. I chose the oblique font.


The location inside the case seems safest to me. This will work at the modelling shows...
I had it made out of a brass plaque, with one line of text because more would have cost 7 euro extra. I chose the oblique font.
The location inside the case seems safest to me. This will work at the modelling shows...
-
Ian Roberts
- Posts: 314
- Joined: Sun Jan 08, 2012 4:59 pm
- Location: Austin
- Contact:
Re: 1/350 CVL-23 USS Princeton
Loving this thread. Great work!
-
StevenVD
- Posts: 620
- Joined: Fri Dec 27, 2013 6:32 pm
Re: 1/350 CVL-23 USS Princeton
Thanks for the appraisal, Ian! I added some fine detail now.
I corrected the painting errors on the deck. It needed a tape mask with a tiny hole in it, but all of the brass has now been covered. That took away a bit of the dry-decal striping, so that also needed repair.
Now the crash barrier could be rigged with fine Van der Rosten thread.

The mission checklist decoration was added to the island.

It appeared that the ship also sported the venturis provided by WEM, so I had to add these after the catwalks were already finished:
A speck of blue on them is all that's needed now, but the supports for it were ridiculously small, 1 millimeter and they still had four appendage points to be removed.

The deck parafernalia got a little more paint, such as the cardboard parts on the torpedoes and the weathering on the whaleboats.


Now these North Star buddies are calling...
I corrected the painting errors on the deck. It needed a tape mask with a tiny hole in it, but all of the brass has now been covered. That took away a bit of the dry-decal striping, so that also needed repair.
Now the crash barrier could be rigged with fine Van der Rosten thread.
The mission checklist decoration was added to the island.
It appeared that the ship also sported the venturis provided by WEM, so I had to add these after the catwalks were already finished:
A speck of blue on them is all that's needed now, but the supports for it were ridiculously small, 1 millimeter and they still had four appendage points to be removed.
The deck parafernalia got a little more paint, such as the cardboard parts on the torpedoes and the weathering on the whaleboats.
Now these North Star buddies are calling...