Hello Captn P.,
I will give you the sizes of my small rings later on. How many do you need?
XXXDAn
To HMS Victory and beyond
Moderators: BB62vet, MartinJQuinn, JIM BAUMANN, Jon, Dan K
-
dafi

- Posts: 1003
- Joined: Mon Mar 12, 2012 11:13 am
- Location: Ludwigsburg/Germany
- Contact:
Re: To HMS Victory and beyond
To Victory and beyond ...
viewtopic.php?f=59&t=99050&start=60
See also our german forum for the age of Sail and History:
http://www.segelschiffsmodellbau.com
viewtopic.php?f=59&t=99050&start=60
See also our german forum for the age of Sail and History:
http://www.segelschiffsmodellbau.com
-
Captain pugwash

- Posts: 422
- Joined: Sun Jan 08, 2012 5:36 am
- Location: LA/Cornwall-UK
Re: To HMS Victory and beyond
Hi Daniel.
I imagine that if they are small enuff I would need about 150 at a rough estimate.
I could change the ones I have on at the moment so as to make all the same, that would make at least 200.
I would also like some brass bars that fit above gun hatchs, but will scratch these if ness.
As you know its 1/180 i am working in.
Would PM- ing you be better.
Cheers Capt-P
Cornwall UK
-
dafi
- Posts: 1003
- Joined: Mon Mar 12, 2012 11:13 am
- Location: Ludwigsburg/Germany
- Contact:
Re: To HMS Victory and beyond
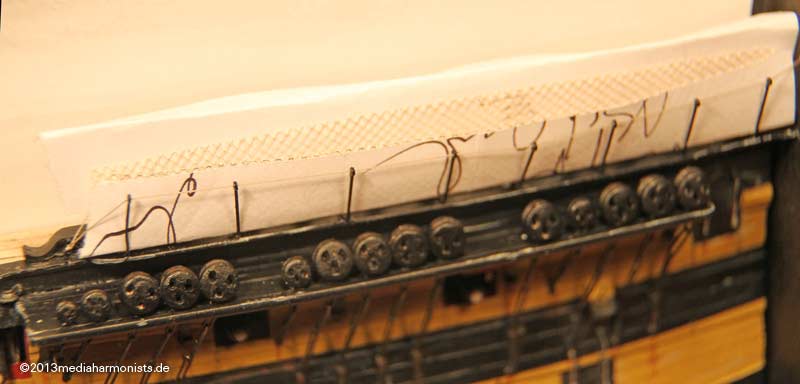
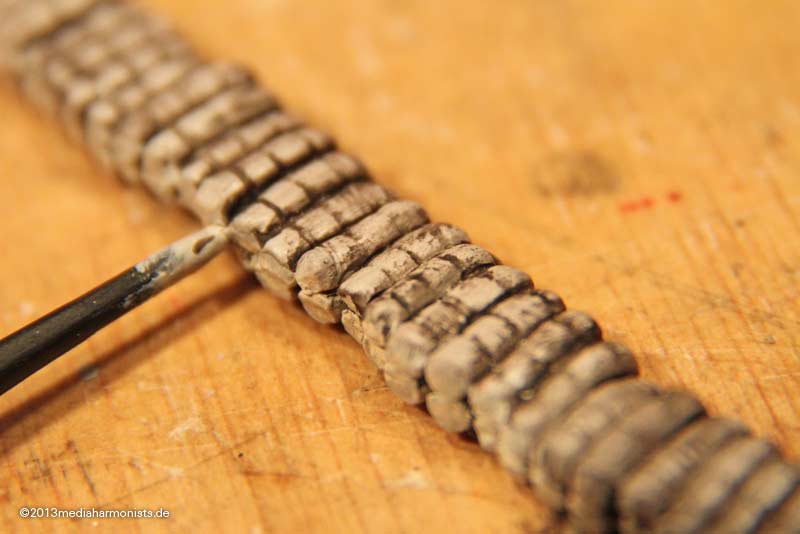
So far so good, but the next part was a bit scary ...
... you remember, on the heads and in the fighting tops I already tried some netting. But it was quite ridgit and I knew not what would come out now.
So put the gaze into a cardboard frame ...
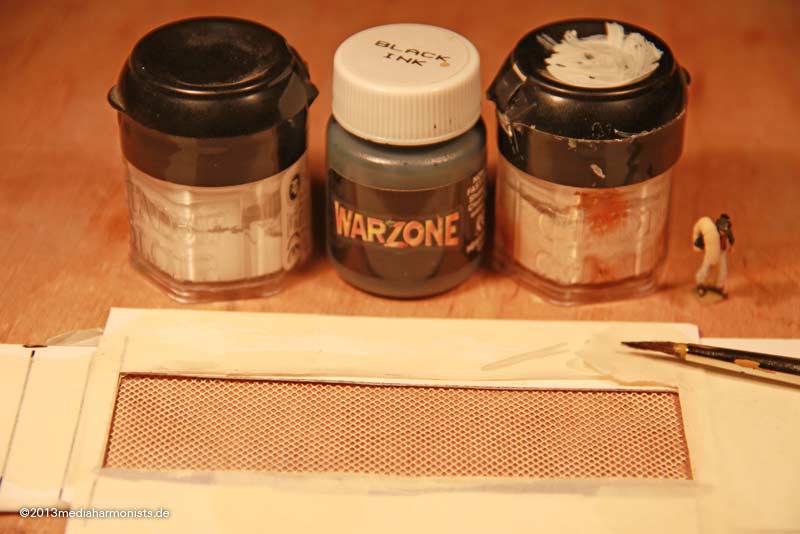
... and painted nicely with beige, added some plain white and dirtied it with very diluted black ink.
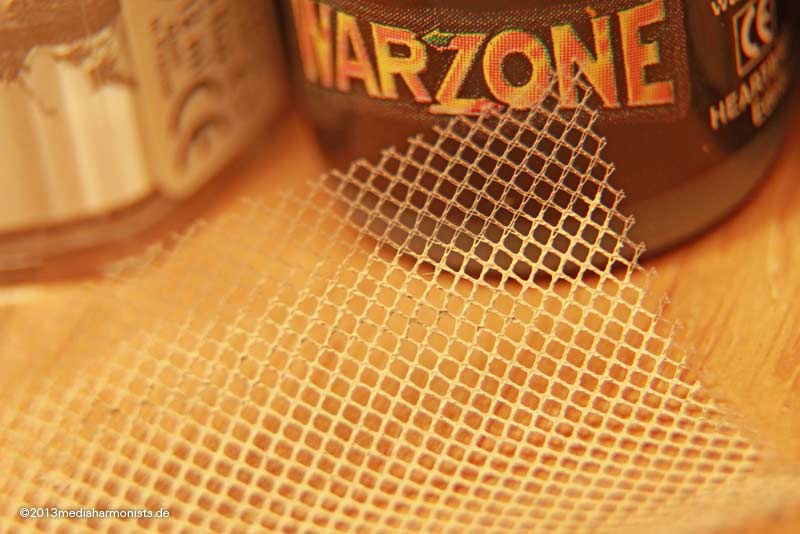
Easy to see how the appearance became more homogenous.
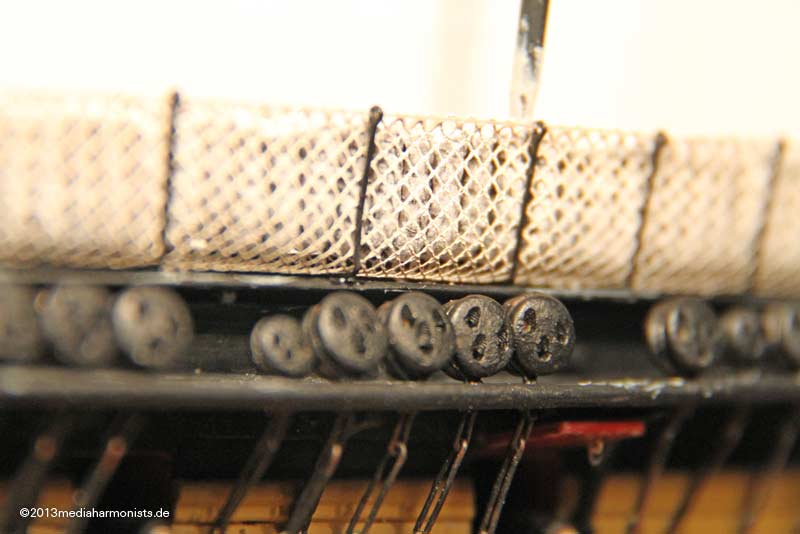
Then did a test fit and realised how the holes got stuck on the hammock cranes ...
... but it looked ok so far.
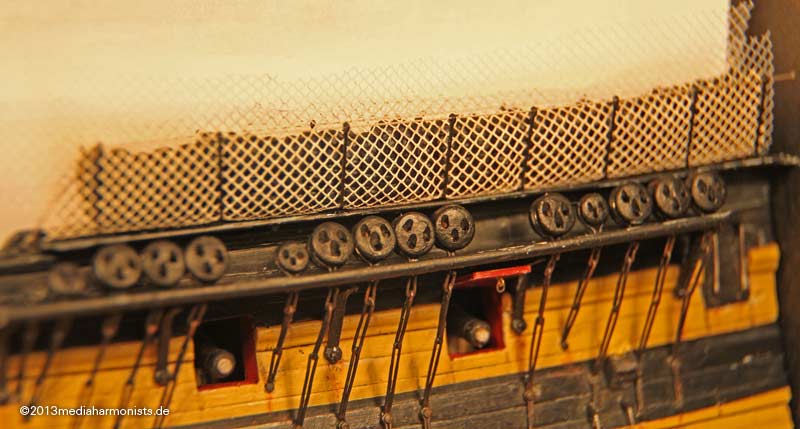
Some test handling on the outside ...

... proved that the netting should curl outside instead of inside.
Then introduced some papers as introduction help and introducing the netting was no subject of getting stuck any more
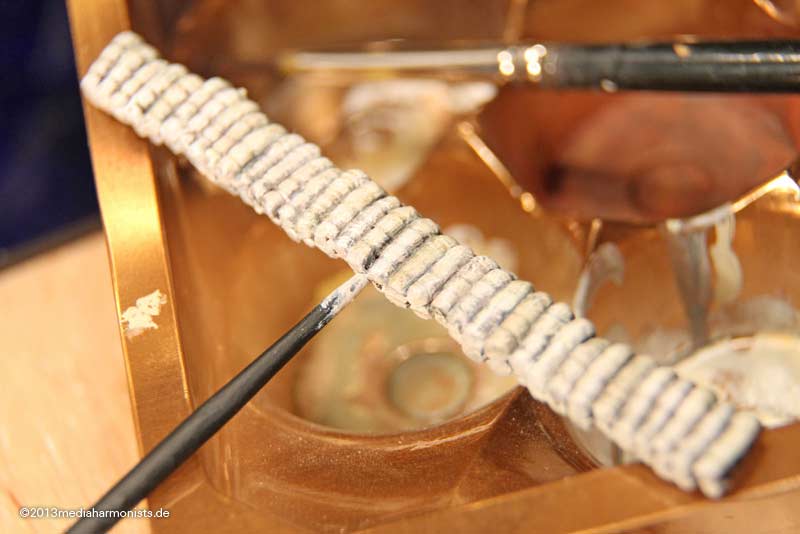
Got the front paper out, adjusted the height towards the rope ...
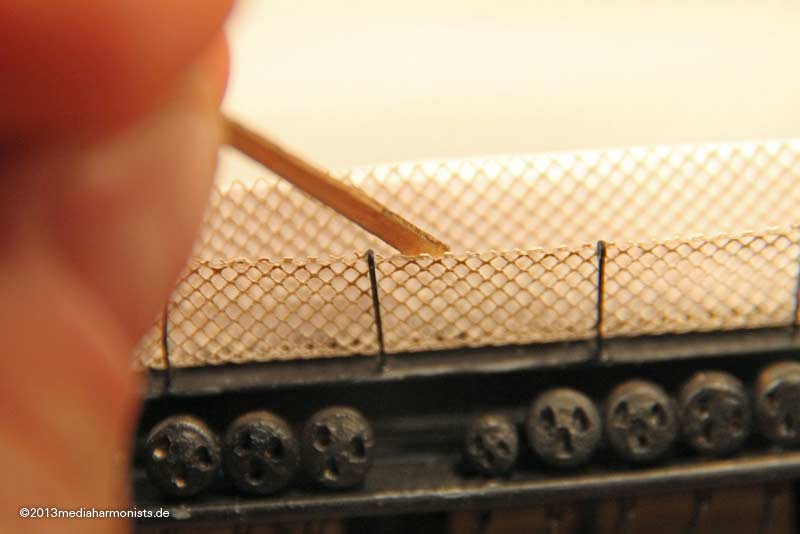
... and glued with CA the netting onto the rope .
Then used the hammocks to press down the netting ...
... pulled out the back paper and also the hammocks, used pincers to hold rope and netting together and used CA to fix.
Then cut the side length ...
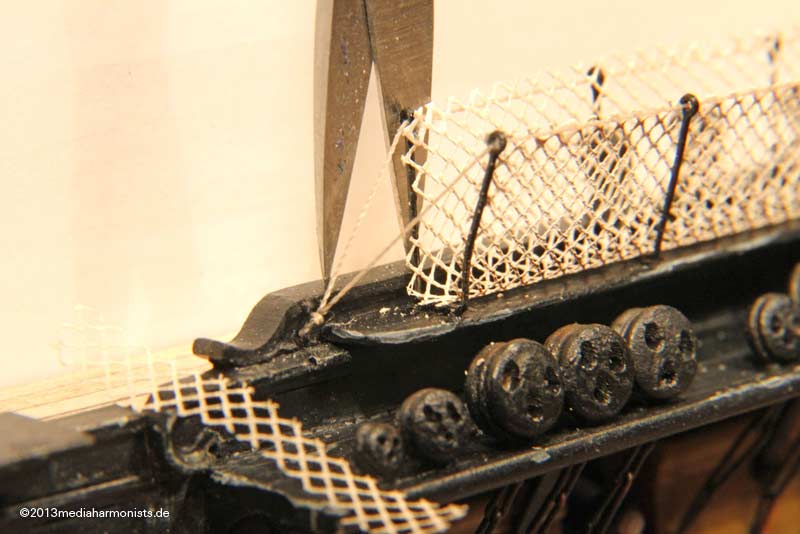
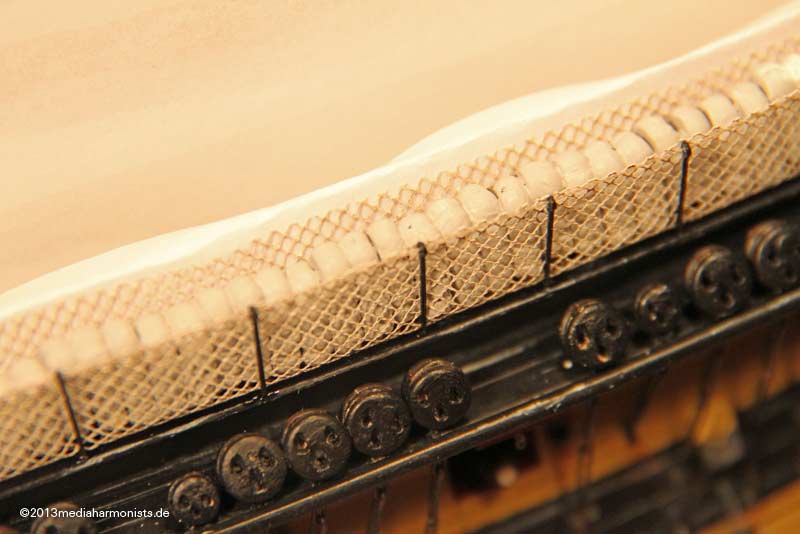
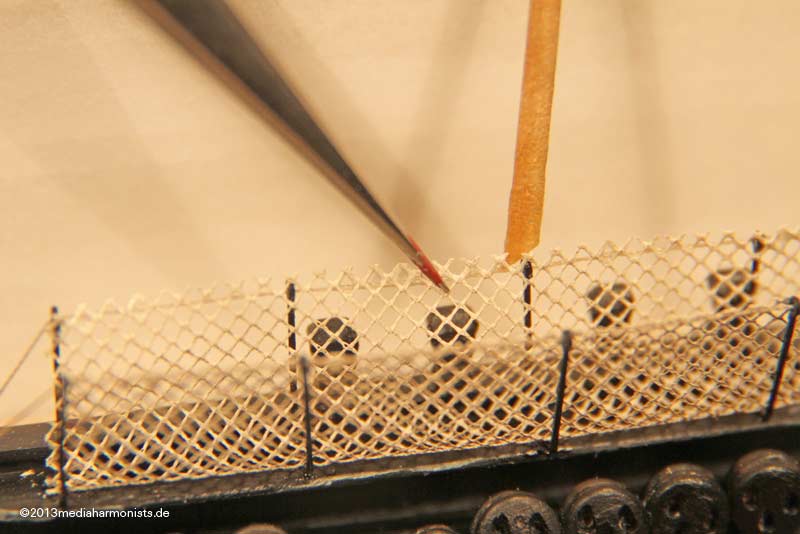
... and the most tricky, cleaning up the top edge with some fine and sharp nail scissors - without cutting the top rope!
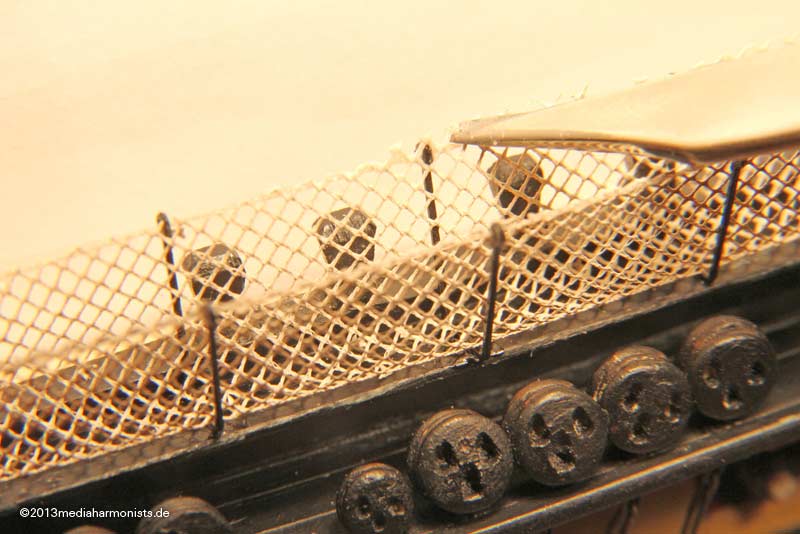
Looks intriguing enough
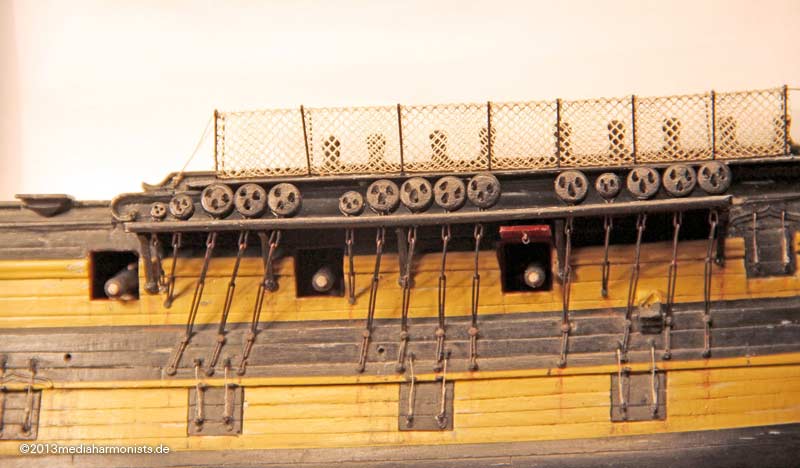
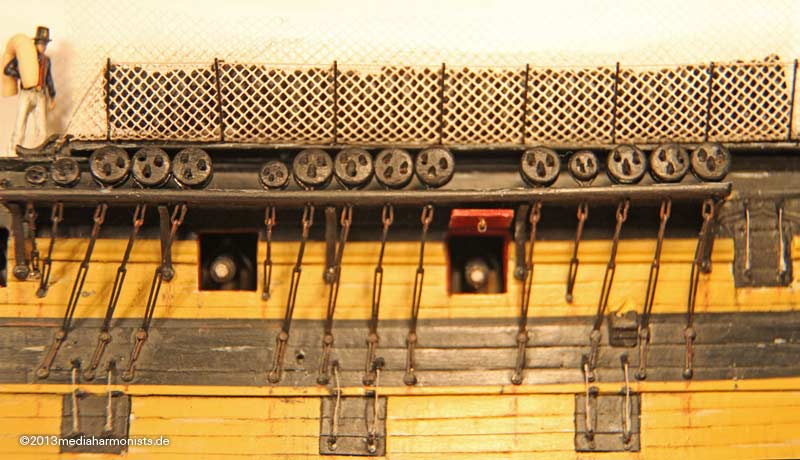
And another fascinating task, painting the hammocks using my beloved casein paints with all kind of whiter shades of pale ...
... looking if the colors work if hidden behind the netting ...
... some differentiation with some more different shades of ochre ...
... put in place ...
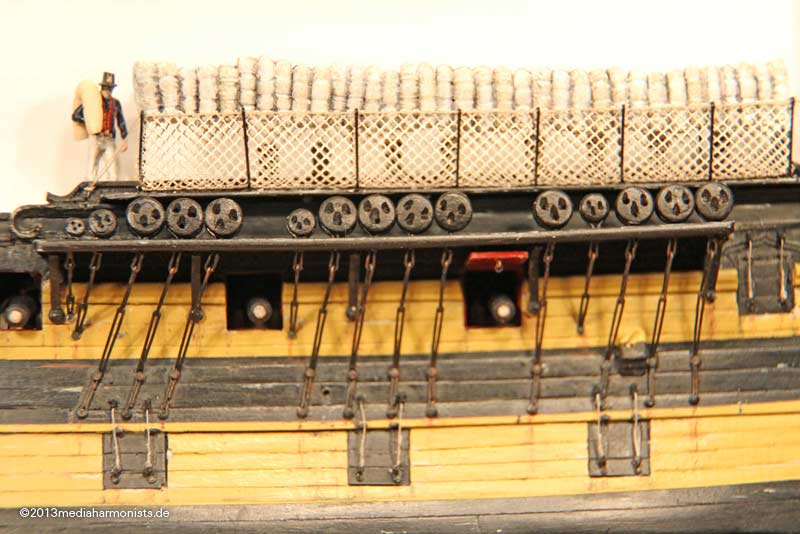
... gently and pushed in
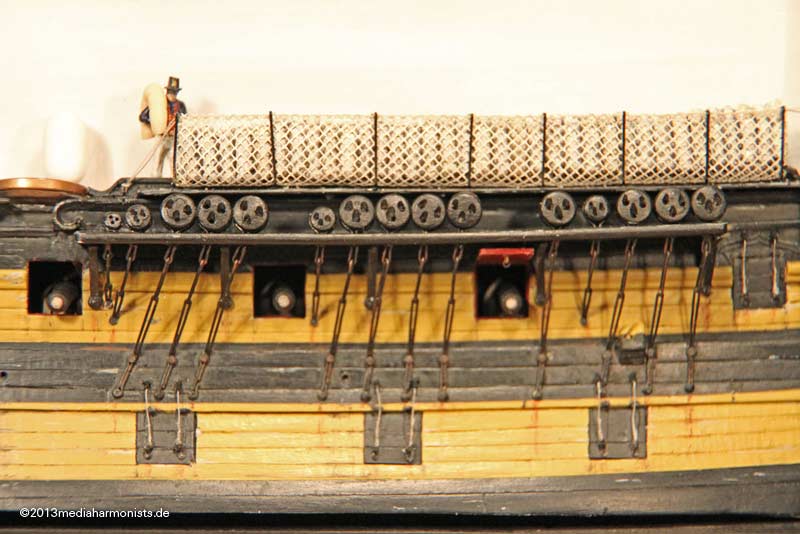
Fascinating!
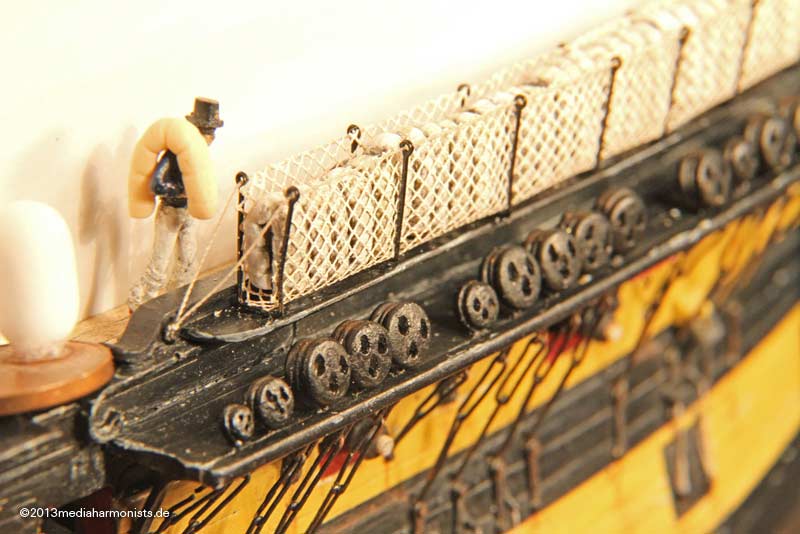
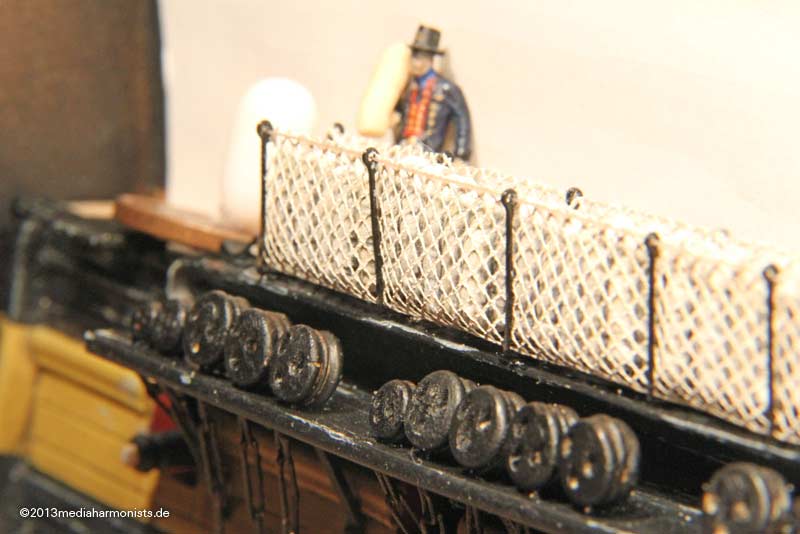
And as you see on the left - the Tic-Tac would not fit in
Good night and sleep well,
Daniel
... you remember, on the heads and in the fighting tops I already tried some netting. But it was quite ridgit and I knew not what would come out now.
So put the gaze into a cardboard frame ...
... and painted nicely with beige, added some plain white and dirtied it with very diluted black ink.
Easy to see how the appearance became more homogenous.
Then did a test fit and realised how the holes got stuck on the hammock cranes ...
... but it looked ok so far.
Some test handling on the outside ...
... proved that the netting should curl outside instead of inside.
Then introduced some papers as introduction help and introducing the netting was no subject of getting stuck any more
Got the front paper out, adjusted the height towards the rope ...
... and glued with CA the netting onto the rope .
Then used the hammocks to press down the netting ...
... pulled out the back paper and also the hammocks, used pincers to hold rope and netting together and used CA to fix.
Then cut the side length ...
... and the most tricky, cleaning up the top edge with some fine and sharp nail scissors - without cutting the top rope!
Looks intriguing enough
And another fascinating task, painting the hammocks using my beloved casein paints with all kind of whiter shades of pale ...
... looking if the colors work if hidden behind the netting ...
... some differentiation with some more different shades of ochre ...
... put in place ...
... gently and pushed in
Fascinating!
And as you see on the left - the Tic-Tac would not fit in
Good night and sleep well,
Daniel
To Victory and beyond ...
viewtopic.php?f=59&t=99050&start=60
See also our german forum for the age of Sail and History:
http://www.segelschiffsmodellbau.com
viewtopic.php?f=59&t=99050&start=60
See also our german forum for the age of Sail and History:
http://www.segelschiffsmodellbau.com
-
dafi
- Posts: 1003
- Joined: Mon Mar 12, 2012 11:13 am
- Location: Ludwigsburg/Germany
- Contact:
Re: To HMS Victory and beyond
So far so good, but the next part was a bit scary ...
... you remember, on the heads and in the fighting tops I already tried some netting. But it was quite ridgit and I knew not what would come out now.
So put the gaze into a cardboard frame ...
... and painted nicely with beige, added some plain white and dirtied it with very diluted black ink.
Easy to see how the appearance became more homogenous.
Then did a test fit and realised how the holes got stuck on the hammock cranes ...
... but it looked ok so far.
Some test handling on the outside ...
... proved that the netting should curl outside instead of inside.
Then introduced some papers as introduction help and introducing the netting was no subject of getting stuck any more
Got the front paper out, adjusted the height towards the rope ...
... and glued with CA the netting onto the rope .
Then used the hammocks to press down the netting ...
... pulled out the back paper and also the hammocks, used pincers to hold rope and netting together and used CA to fix.
Then cut the side length ...
... and the most tricky, cleaning up the top edge with some fine and sharp nail scissors - without cutting the top rope!
Looks intriguing enough
And another fascinating task, painting the hammocks using my beloved casein paints with all kind of whiter shades of pale ...
... looking if the colors work if hidden behind the netting ...
... some differentiation with some more different shades of ochre ...
... put in place ...
... gently and pushed in
Fascinating!
And as you see on the left - the Tic-Tac would not fit in
Good night and sleep well,
Daniel
To Victory and beyond ...
viewtopic.php?f=59&t=99050&start=60
See also our german forum for the age of Sail and History:
http://www.segelschiffsmodellbau.com
viewtopic.php?f=59&t=99050&start=60
See also our german forum for the age of Sail and History:
http://www.segelschiffsmodellbau.com
-
sgtryan13

- Posts: 2650
- Joined: Thu Apr 03, 2008 10:48 pm
- Location: Connecticut, USA
Re: To HMS Victory and beyond
Absolutely wonderful work! This thing looks so alive already, and the craftsmanship is a true work of art. Keep it up!
Enlisted men are stupid, but very cunning and deceitful and bear considerable watching." - Marine Corps Officers Manual, 1894
http://www.modelshipgallery.com/gallery ... index.html
http://www.modelshipgallery.com/gallery ... index.html
-
Captain pugwash
- Posts: 422
- Joined: Sun Jan 08, 2012 5:36 am
- Location: LA/Cornwall-UK
Re: To HMS Victory and beyond
Great bit o work there Daniel  .
.
Most Interesting your build from the start, and most helpfull in where everything goes.
I imagine you will be putting lights in later too.
Lanterns of course .
Cheers Capt-P
Most Interesting your build from the start, and most helpfull in where everything goes.
I imagine you will be putting lights in later too.
Lanterns of course
Cheers Capt-P
Cornwall UK
-
LE BOSCO

- Posts: 2261
- Joined: Thu Aug 27, 2009 11:05 am
- Location: Paris France
Re: To HMS Victory and beyond
HI Daniel
as usual... a great demonstration of knowledge to make , everything looks so simple with you Daniel
chapeau bas l'artiste
cheers
Nicolas
as usual... a great demonstration of knowledge to make , everything looks so simple with you Daniel
chapeau bas l'artiste
cheers
Nicolas
-
JIM BAUMANN

- Posts: 5686
- Joined: Mon Jan 10, 2005 5:30 pm
- Location: Nr Southampton England
Re: To HMS Victory and beyond
Exceptionally well modelled, photographed and explained..
.
"Hut ab!! "
( eng. translation roughly .. I raise my hat! )
Jim Baumann
.
"Hut ab!! "
( eng. translation roughly .. I raise my hat! )
Jim Baumann
....I buy them at three times the speed I build 'em.... will I live long enough to empty my stash...?
http://www.modelshipgallery.com/gallery ... index.html
IPMS UK SIG (special interest group) www.finewaterline.com
http://www.modelshipgallery.com/gallery ... index.html
IPMS UK SIG (special interest group) www.finewaterline.com
-
Bill Code

- Posts: 679
- Joined: Mon May 02, 2005 10:00 am
- Location: Michigan
Re: To HMS Victory and beyond
gaze works very well for the hammocks.. Awesome work!
-
dafi
- Posts: 1003
- Joined: Mon Mar 12, 2012 11:13 am
- Location: Ludwigsburg/Germany
- Contact:
Re: To HMS Victory and beyond
Thank you Sirs
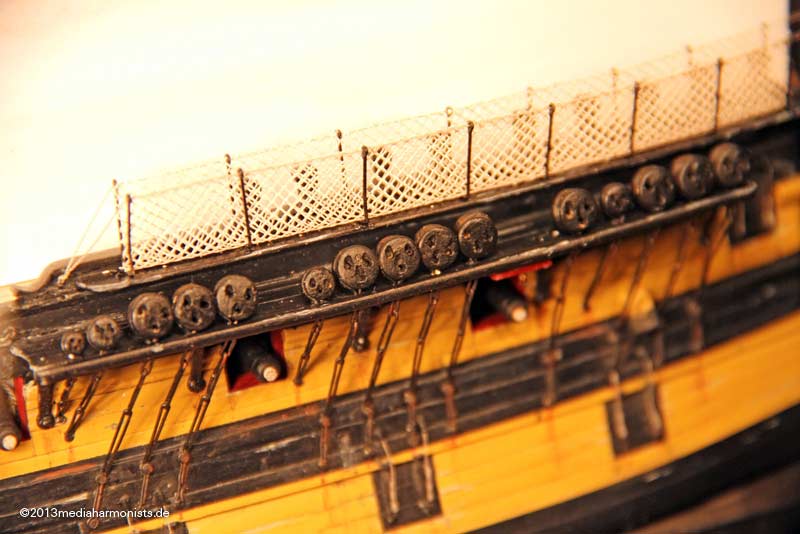
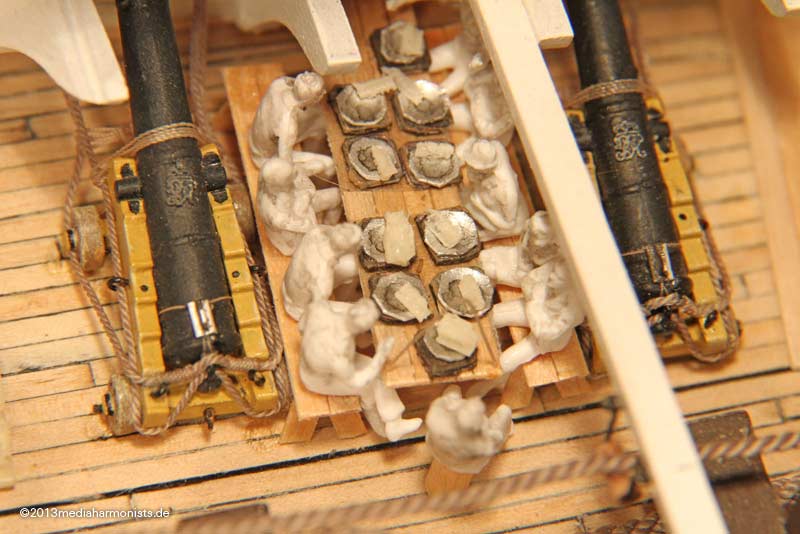
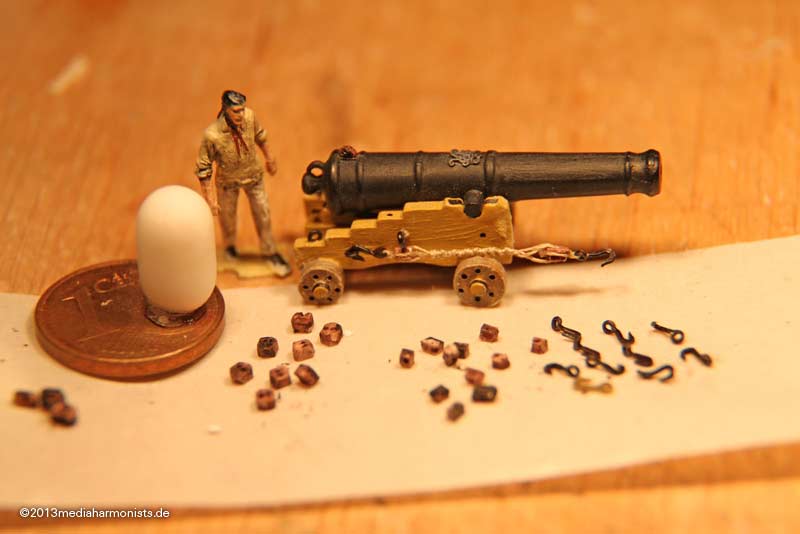
Finally some more easy tinkering was done.
Anchors and hammock crane interaction.
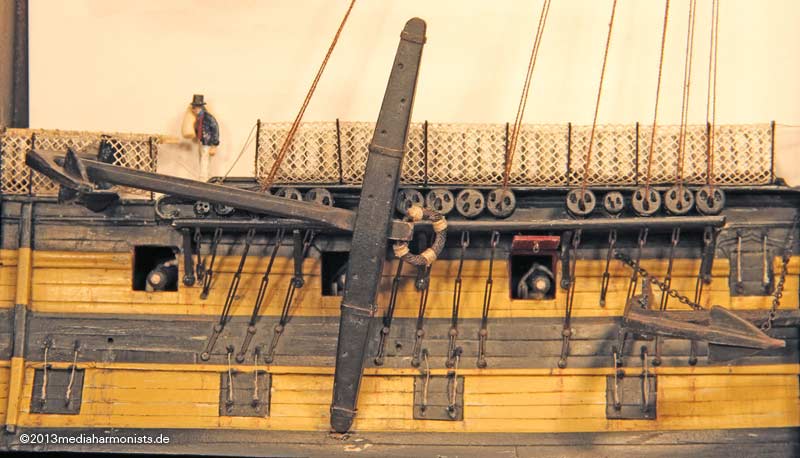
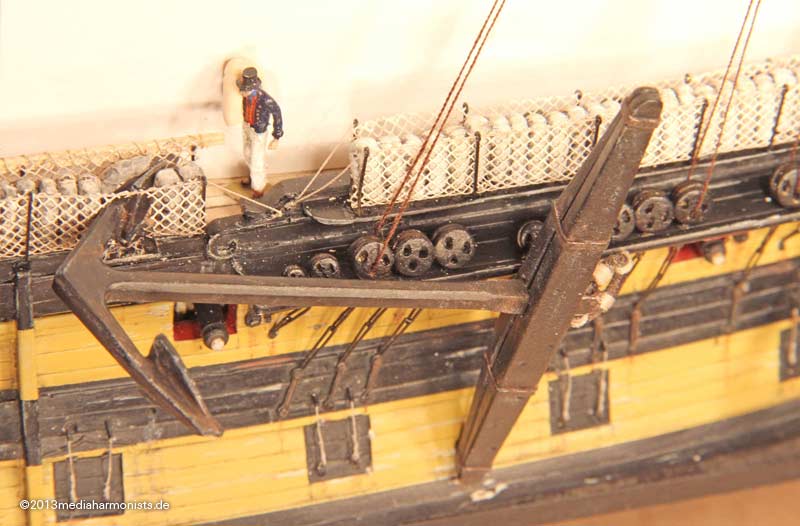
XXXDAn
Finally some more easy tinkering was done.
Anchors and hammock crane interaction
XXXDAn
To Victory and beyond ...
viewtopic.php?f=59&t=99050&start=60
See also our german forum for the age of Sail and History:
http://www.segelschiffsmodellbau.com
viewtopic.php?f=59&t=99050&start=60
See also our german forum for the age of Sail and History:
http://www.segelschiffsmodellbau.com
-
Captain pugwash
- Posts: 422
- Joined: Sun Jan 08, 2012 5:36 am
- Location: LA/Cornwall-UK
Re: To HMS Victory and beyond
Well you made a mess of that netting with a gurt hole in it .
Nice pictures Daniel, she is comeing together very well.
Like the way its working and look forward to more pictures.
Cheers Capt-P.
Nice pictures Daniel, she is comeing together very well.
Like the way its working and look forward to more pictures.
Cheers Capt-P.
Cornwall UK
-
dafi
- Posts: 1003
- Joined: Mon Mar 12, 2012 11:13 am
- Location: Ludwigsburg/Germany
- Contact:
Re: To HMS Victory and beyond
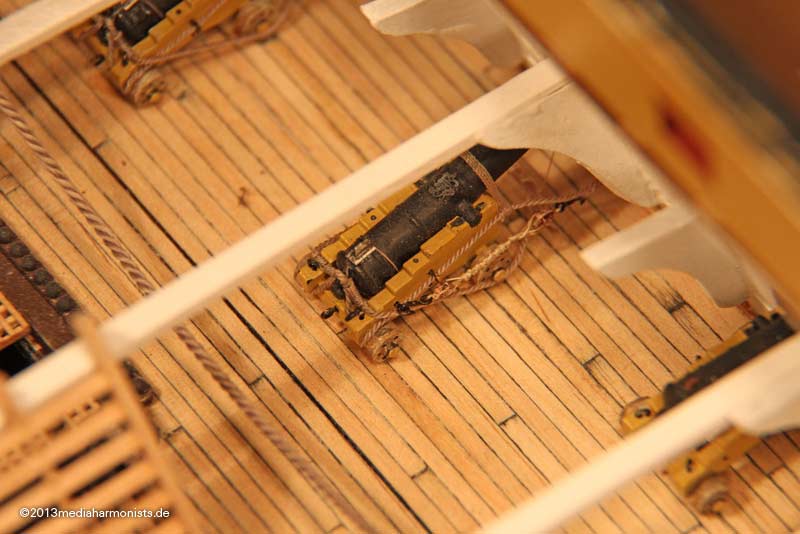
-fail-fail-fail-
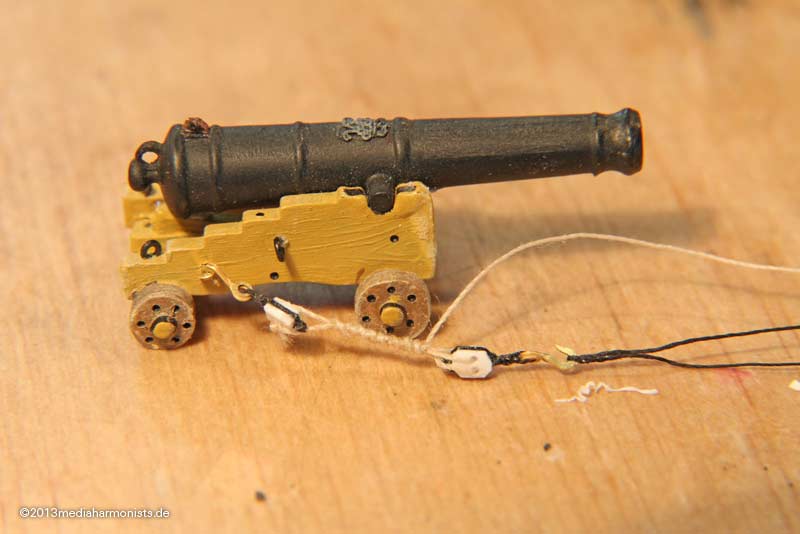
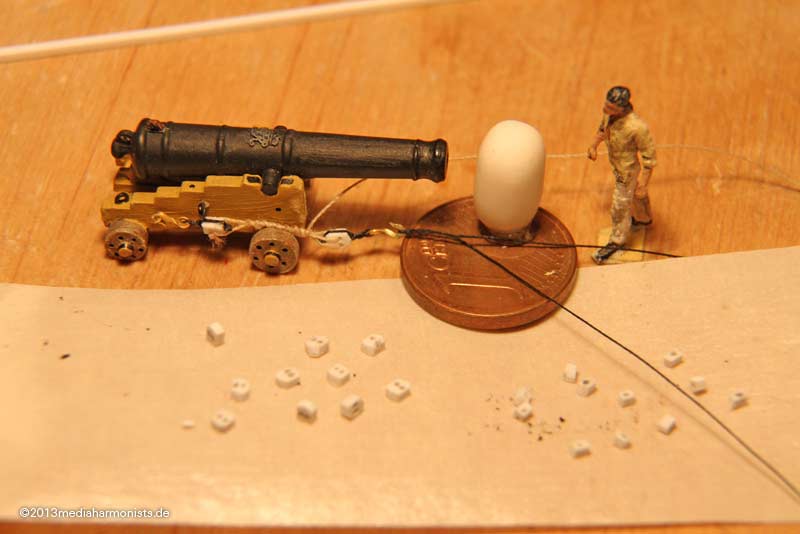
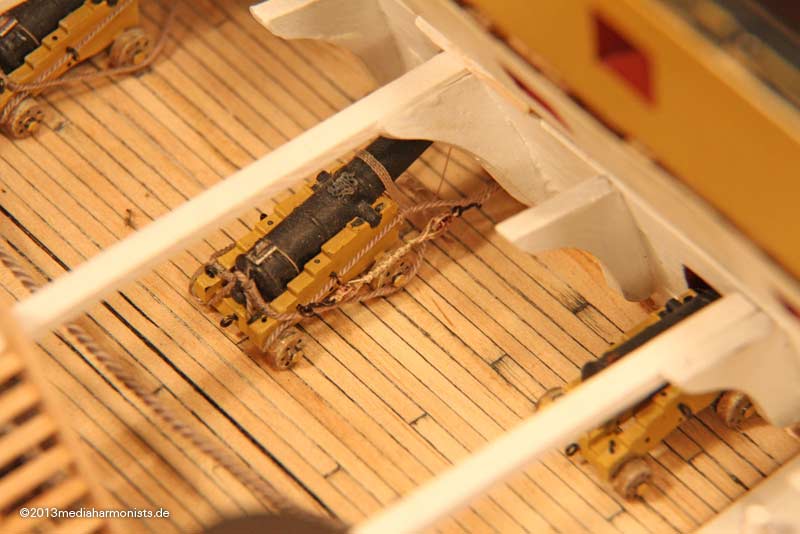
Was waiting already but nobody mentioned so far the missing side tackles on the guns
But lazy dafi was trying to avoid work and was looking for easy-easy-easy way of cheating: casting he believed would be the easy option, making two halves and glueing them together in the required length ...
... 30 times lashed and 6 times in position ...
... lazy bastard ...
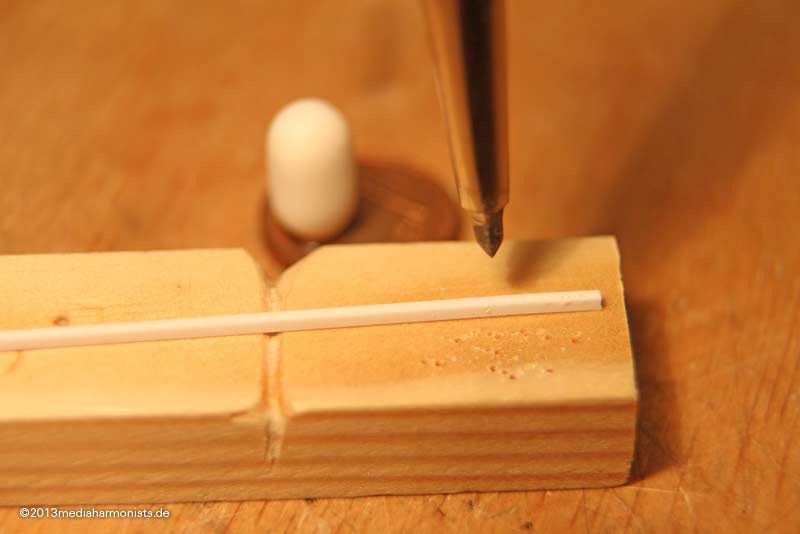
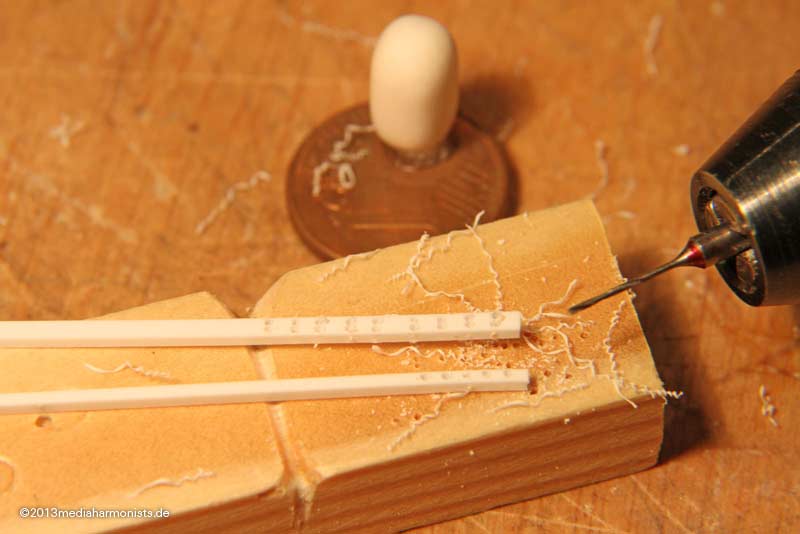
So made very fastily blocks out of Evergreen rods ...

... went fast, drilled with 0,5 mm after setting a centre punch, fastily drilled ...

... and cut to length on a double sided tape.
Small tail in the end ...

... some wire rope into the blocks ...

... and we got some cute sado-maso-killer-sperms
Happily made some wire lashings around ...

... did the castings ...
... and cried my eyes out as the resin needed for those tiny bits was pure waste ...
... and the parts too small and flimsy for mass production ...
... and on top of it the cleaning of the parts ...
... then realised that I need to paint them ...
... and the looks were not what i had in mind ...
... so got out the big chopper and reduced some parts ...

... to fit a nice fresh meal for the poor little sailors, sittings for weeks already in front of their empty plates ...
... and the rest ...

... went into Tar Jack�s box of dead hallows, where all discarded parts end up.
And so much for the wasted brainwaves, material and time to make it easy and fast ?!?
And then I realised, how easy it could have been ...
... more soon.
XXXDAn
Was waiting already but nobody mentioned so far the missing side tackles on the guns
But lazy dafi was trying to avoid work and was looking for easy-easy-easy way of cheating: casting he believed would be the easy option, making two halves and glueing them together in the required length ...
... 30 times lashed and 6 times in position ...
... lazy bastard ...
So made very fastily blocks out of Evergreen rods ...
... went fast, drilled with 0,5 mm after setting a centre punch, fastily drilled ...
... and cut to length on a double sided tape.
Small tail in the end ...
... some wire rope into the blocks ...
... and we got some cute sado-maso-killer-sperms
Happily made some wire lashings around ...
... did the castings ...
... and cried my eyes out as the resin needed for those tiny bits was pure waste ...
... and the parts too small and flimsy for mass production ...
... and on top of it the cleaning of the parts ...
... then realised that I need to paint them ...
... and the looks were not what i had in mind ...
... so got out the big chopper and reduced some parts ...
... to fit a nice fresh meal for the poor little sailors, sittings for weeks already in front of their empty plates ...
... and the rest ...
... went into Tar Jack�s box of dead hallows, where all discarded parts end up.
And so much for the wasted brainwaves, material and time to make it easy and fast ?!?
And then I realised, how easy it could have been ...
... more soon.
XXXDAn
Last edited by dafi on Wed Aug 14, 2013 10:58 am, edited 1 time in total.
To Victory and beyond ...
viewtopic.php?f=59&t=99050&start=60
See also our german forum for the age of Sail and History:
http://www.segelschiffsmodellbau.com
viewtopic.php?f=59&t=99050&start=60
See also our german forum for the age of Sail and History:
http://www.segelschiffsmodellbau.com
-
dafi
- Posts: 1003
- Joined: Mon Mar 12, 2012 11:13 am
- Location: Ludwigsburg/Germany
- Contact:
Re: To HMS Victory and beyond
Somewhere, somehow, sometimes I was wondering what I was doing ...
... and tried to remember, how things should look like, took some Evergreen, drilled some blocks, took 2 of my etch parts hooks (ATTENTION: Product placement), some line, and after some hooks and turns ...
... that easy, so easy, so lessens learned: No more cheating attempts!!! (Message to myself: Write this down a 100 tiomes to never forget again)
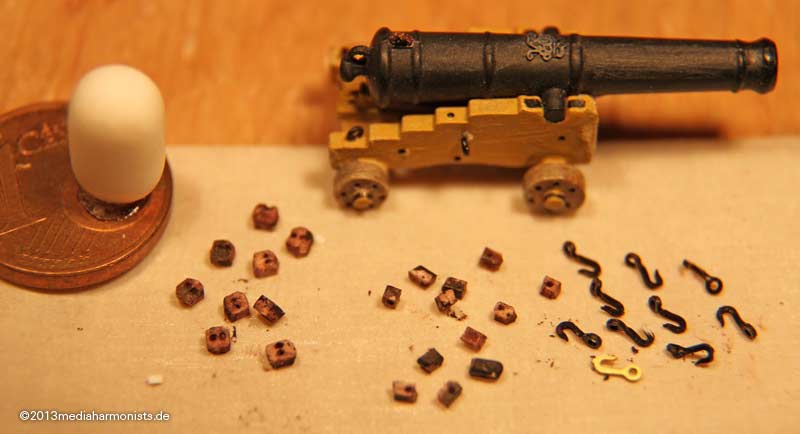
So produced new blocks, punched some holes with the scriber on the 1 x 2 mm rod for the double blocks ...
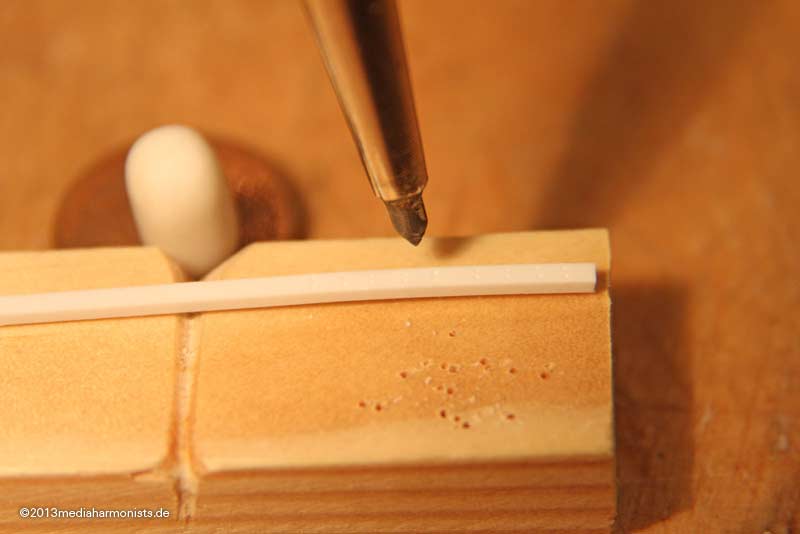
... and on the 1 x 1 mm rod for the single blocks ...
... drilled with 0,5 mm ...
... and roughened the surface with a abrasive fleece.
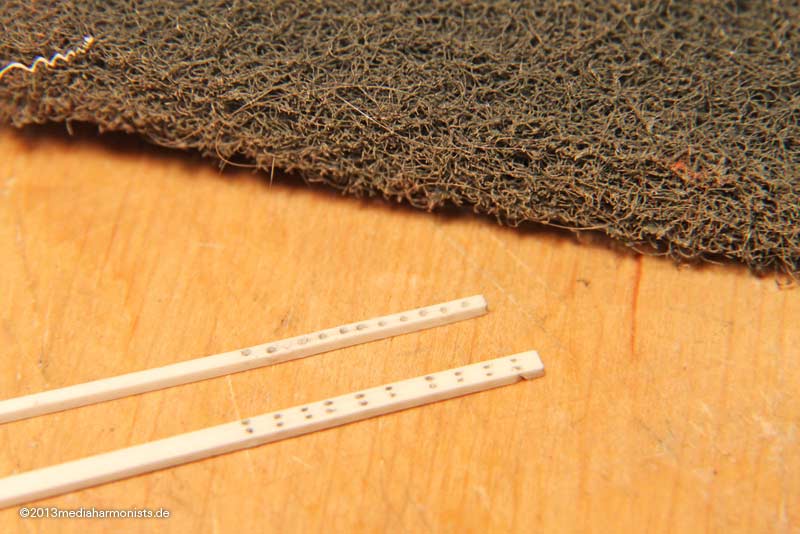
While cutting to length I used the scalpel to round the surface and out came an amount of itzy-bitzy-teeny-wheeny extra small blocks.
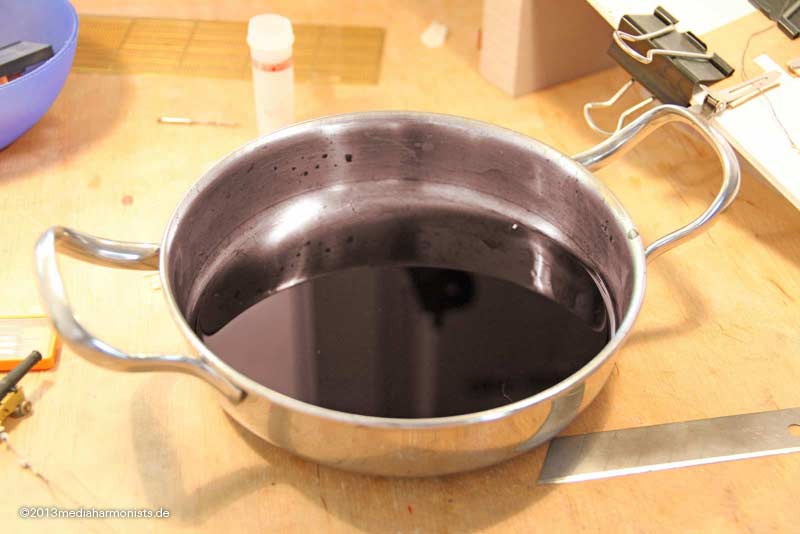
Instead of painting I remembered tinting, a trick I once used successful while my studies on polyamide spheres: Tinting powder for synthetic fiber. But does this work for polystyrene?
So the powder with vinegar and the parts into the pot and boil well and long
The toughest was to find the itzy-bitzy-teeny-wheeny extra small blocks in this mess in between the remains of undissolved color powder ...
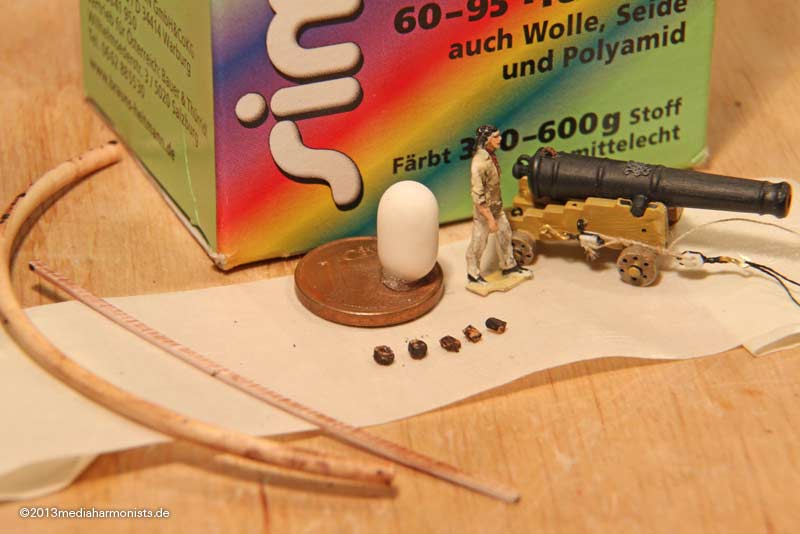
... and it really worked! Not as well as I thought it would, but well enough for my needs.
On the bigger parts one can see how much the color was absorbed and on the smaller ones particles of the powder even gave darker spots.
Fixed the drill upside down ...
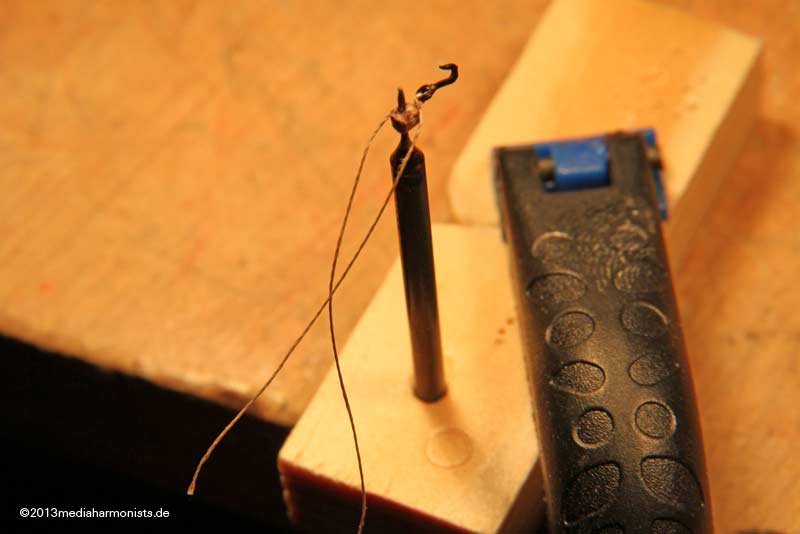
... used it to hold the block, knotted a thread onto one of my blackened hooks and attached it with some CA onto the block.
Then knotted the backside and fixed all well with CA. The single block was done accordingly, just one side of the thread was left long ...
... to serve as lanyard, the ensemble put to length and secured with CA. Then the lanyard was wound round on the serving machine, checked ...
... and fits
A tad too short for this place, but this one will fit aft, where there is difference in lengths because of the curve of the hull.
Cheers, dafi
... and tried to remember, how things should look like, took some Evergreen, drilled some blocks, took 2 of my etch parts hooks (ATTENTION: Product placement), some line, and after some hooks and turns ...
... that easy, so easy, so lessens learned: No more cheating attempts!!! (Message to myself: Write this down a 100 tiomes to never forget again)
So produced new blocks, punched some holes with the scriber on the 1 x 2 mm rod for the double blocks ...
... and on the 1 x 1 mm rod for the single blocks ...
... drilled with 0,5 mm ...
... and roughened the surface with a abrasive fleece.
While cutting to length I used the scalpel to round the surface and out came an amount of itzy-bitzy-teeny-wheeny extra small blocks.
Instead of painting I remembered tinting, a trick I once used successful while my studies on polyamide spheres: Tinting powder for synthetic fiber. But does this work for polystyrene?
So the powder with vinegar and the parts into the pot and boil well and long
The toughest was to find the itzy-bitzy-teeny-wheeny extra small blocks in this mess in between the remains of undissolved color powder ...
... and it really worked! Not as well as I thought it would, but well enough for my needs.
On the bigger parts one can see how much the color was absorbed and on the smaller ones particles of the powder even gave darker spots.
Fixed the drill upside down ...
... used it to hold the block, knotted a thread onto one of my blackened hooks and attached it with some CA onto the block.
Then knotted the backside and fixed all well with CA. The single block was done accordingly, just one side of the thread was left long ...
... to serve as lanyard, the ensemble put to length and secured with CA. Then the lanyard was wound round on the serving machine, checked ...
... and fits
A tad too short for this place, but this one will fit aft, where there is difference in lengths because of the curve of the hull.
Cheers, dafi
To Victory and beyond ...
viewtopic.php?f=59&t=99050&start=60
See also our german forum for the age of Sail and History:
http://www.segelschiffsmodellbau.com
viewtopic.php?f=59&t=99050&start=60
See also our german forum for the age of Sail and History:
http://www.segelschiffsmodellbau.com
-
Uzun Elendil

- Posts: 58
- Joined: Sat Mar 12, 2011 7:17 am
Re: To HMS Victory and beyond
I guess the only possible way making such a incredible work is, investing a high-tech company billion of dollars, in order to invent a Shrink Ray, which can decrease the my size and so that I might do the same detail?!
No, I lied, I still can't do it
No, I lied, I still can't do it
-
Captain pugwash
- Posts: 422
- Joined: Sun Jan 08, 2012 5:36 am
- Location: LA/Cornwall-UK
Re: To HMS Victory and beyond
I see what you mean on the tention of ropes, but you can have a bit of slack you know.
Nice going Dafi.
Cheers Capt-P.
Nice going Dafi.
Cheers Capt-P.
Cornwall UK
-
Captain pugwash
- Posts: 422
- Joined: Sun Jan 08, 2012 5:36 am
- Location: LA/Cornwall-UK
Re: To HMS Victory and beyond
Hi Daniel.
Any news on that E mail I sent you regarding your PE frets.
I am starting to get things together for this project.
Cheers Capt-P
Any news on that E mail I sent you regarding your PE frets.
I am starting to get things together for this project.
Cheers Capt-P
Cornwall UK
-
dafi
- Posts: 1003
- Joined: Mon Mar 12, 2012 11:13 am
- Location: Ludwigsburg/Germany
- Contact:
Re: To HMS Victory and beyond
No more cheating attempts! No more cheating attempts! No more cheating attempts ...
And one more reason why ...
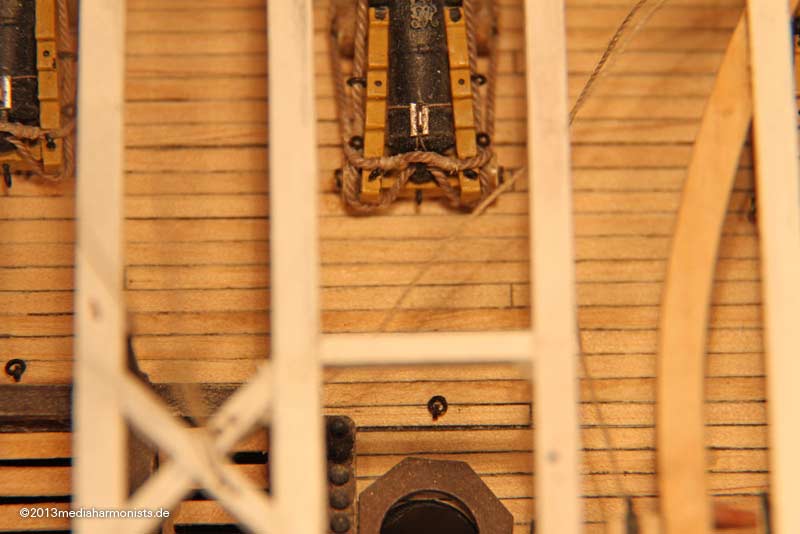
... as the cheat was already planned for a long time, when I assembled the carriages, I omitted the eyebolt for the side tackle ...
... and fixed the guns ...
... yes the ring was meant to be faked ...
... meant ...
... yep ...
...and now ???
So learn it the hard way dafi.
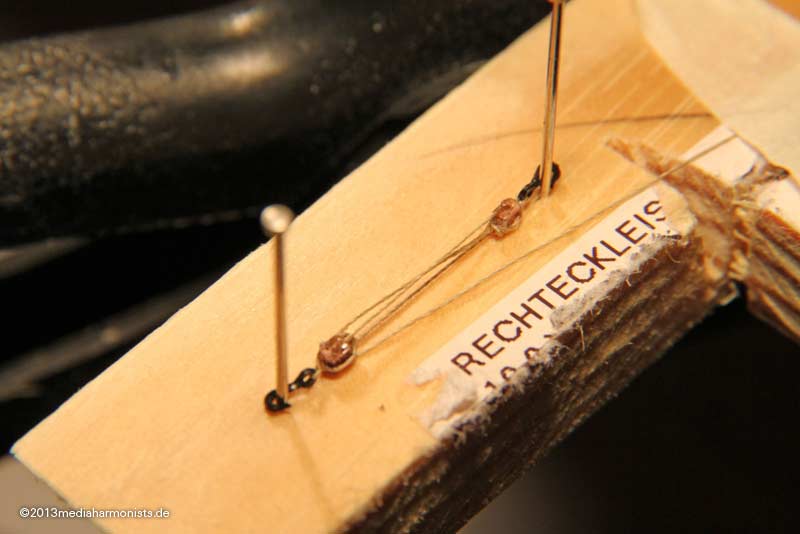
Luckily the Flying Spaghetti Monster made me do the holes for the eyebolts at the times that the carriages were assembled, so with pointed pliers ...

... the CA-hardened breeching ropes were slid beside and the ring pushed in. Unfortunately just makable in the wrong vertical orientation ...

... so it still had to be turned with a pointed scaler
Luckily I did some ships in the bottle when I was young ...
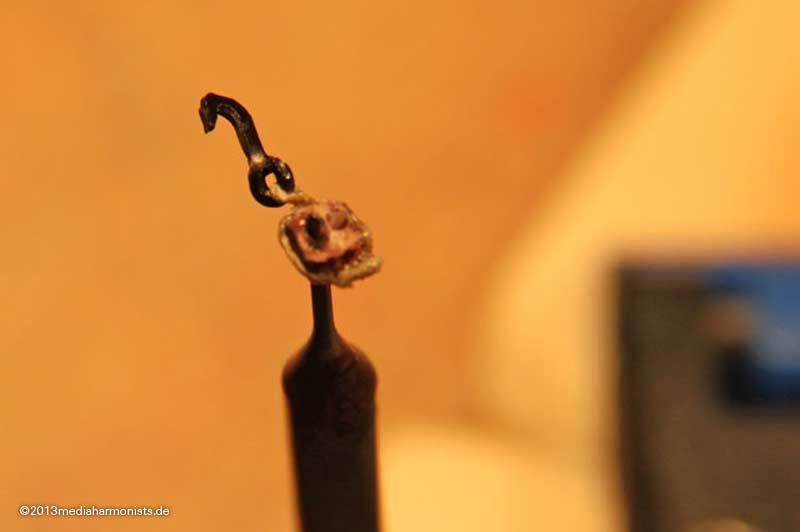
And after being in a teeny-weeny-mode, I decided to want to have the rings for the back tackles done the right way, so I took some of my smallest etch eyebolts (attention product placement for dafis smaller than life etch parts), combined with the next size ...
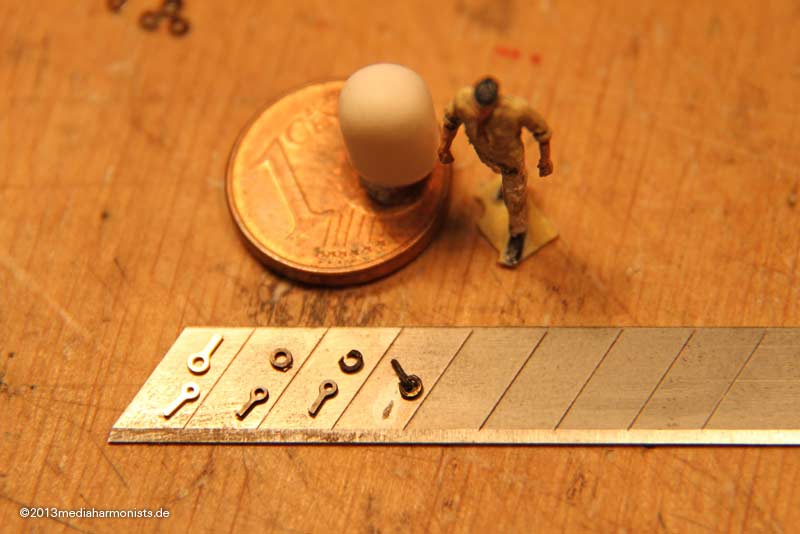
... and got something that just fitted the purpose
Cheers, Daniel
And one more reason why ...
... as the cheat was already planned for a long time, when I assembled the carriages, I omitted the eyebolt for the side tackle ...
... and fixed the guns ...
... yes the ring was meant to be faked ...
... meant ...
... yep ...
...and now ???
So learn it the hard way dafi.
Luckily the Flying Spaghetti Monster made me do the holes for the eyebolts at the times that the carriages were assembled, so with pointed pliers ...
... the CA-hardened breeching ropes were slid beside and the ring pushed in. Unfortunately just makable in the wrong vertical orientation ...
... so it still had to be turned with a pointed scaler
Luckily I did some ships in the bottle when I was young ...
And after being in a teeny-weeny-mode, I decided to want to have the rings for the back tackles done the right way, so I took some of my smallest etch eyebolts (attention product placement for dafis smaller than life etch parts), combined with the next size ...
... and got something that just fitted the purpose
Cheers, Daniel
To Victory and beyond ...
viewtopic.php?f=59&t=99050&start=60
See also our german forum for the age of Sail and History:
http://www.segelschiffsmodellbau.com
viewtopic.php?f=59&t=99050&start=60
See also our german forum for the age of Sail and History:
http://www.segelschiffsmodellbau.com
-
Stefano Salesi

- Posts: 410
- Joined: Fri Aug 29, 2008 6:17 am
- Location: Lerici
Re: To HMS Victory and beyond
man, i stopped by a lot of time on your build.
you are really insane. the amount of detail and work on your victory is stunning.i bet that building your is taking more time than building the real one....
May the FSM bless your work!
you are really insane. the amount of detail and work on your victory is stunning.i bet that building your is taking more time than building the real one....
May the FSM bless your work!
On the bench: evolution of Royal Italian Navy Ironclads-1/700
-Regia Nave Roma...no, not that one!
-Regia Nave Roma...no, not that one!
-
KevinYoung
- Posts: 285
- Joined: Sun Jun 02, 2013 6:54 am
Re: To HMS Victory and beyond
Amazing detail your a true artist looking at this model just gives me more reasons to visit the UK and see this ship in my lifetime.. Thanks for posting....
-
JIM BAUMANN
- Posts: 5686
- Joined: Mon Jan 10, 2005 5:30 pm
- Location: Nr Southampton England
Re: To HMS Victory and beyond
I see that you too are not immune from sequential planning errors....
it is after all not so easy to install eye-bolts into gun trucks THROUGH the deck beams hahahahh!!
[i>>>]... so it still had to be turned with a pointed scaler<<<[/i]
innovative!!!!!
>>>Luckily I did some ships in the bottle when I was young ...<<<
Photos please !!!!
Regard
Jim Baumann ( impressed! )
it is after all not so easy to install eye-bolts into gun trucks THROUGH the deck beams hahahahh!!
[i>>>]... so it still had to be turned with a pointed scaler
innovative!!!!!
>>>Luckily I did some ships in the bottle when I was young ...<<<
Photos please !!!!
Regard
Jim Baumann ( impressed! )
....I buy them at three times the speed I build 'em.... will I live long enough to empty my stash...?
http://www.modelshipgallery.com/gallery ... index.html
IPMS UK SIG (special interest group) www.finewaterline.com
http://www.modelshipgallery.com/gallery ... index.html
IPMS UK SIG (special interest group) www.finewaterline.com