The Ship Model Forum

The Ship Modelers Source
It is currently Sun Sep 21, 2025 6:00 am

All times are UTC - 6 hours [ DST ]


Post new topic Reply to topic  [ 172 posts ]  Go to page Previous  1, 2, 3, 4, 5 ... 9  Next
Author Message
PostPosted: Sun Feb 09, 2014 6:14 pm 
Offline
User avatar

Joined: Mon Nov 11, 2013 11:01 pm
Posts: 1257
Location: Detroit area
Fascinating...

Good luck as you progress mate, I really want to see her done up proper!

_________________
Sean Nash, ACG (aircraft camo gestapo)

On the ways:
1/200 Trumpeter HMS Nelson
1/700 Tamiya USS Yorktown CV-5

In the stash:
1/35 Italiari PT-109
1/35 Tamiya "Pibber" Patrol Boat
1/350 Trumpeter USS Yorktown CV-10


Report this post
Top
 Profile  
Reply with quote  
PostPosted: Sun Feb 09, 2014 6:35 pm 
Offline
User avatar

Joined: Mon Jan 10, 2005 5:30 pm
Posts: 5588
Location: Nr Southampton England
First of all...

I congratulate you on your tenacity, fortitude , determination and endurance in the face of a set-back... :thumbs_up_1: :thumbs_up_1:

But... you are fortunately not alone.... differing screw sizes... no 6 and no 8... (?) easily done...


arghhh!!!!


Image


I did get away with it....-- but had the advantage of having a steel deck
Image

excellent detailing and attention to the minutia--as of course you will!

_________________
....I buy them at three times the speed I build 'em.... will I live long enough to empty my stash...?
http://www.modelshipgallery.com/gallery ... index.html

IPMS UK SIG (special interest group) www.finewaterline.com


Report this post
Top
 Profile  
Reply with quote  
PostPosted: Sun Feb 09, 2014 9:16 pm 
Offline
User avatar

Joined: Tue Jan 11, 2005 1:40 pm
Posts: 8374
Location: New Jersey
Incredible work. I admire your skill and your fortitude after the mishap. Glad you sourced another kit to keep at it. In the end, I know it will be well worth it. And you go ahead and post just as often as you like! We can all use the inspiration!

_________________
Martin

"Tomorrow is the most important thing in life. Comes into us at midnight very clean. It's perfect when it arrives and it puts itself in our hands. It hopes we've learned something from yesterday." John Wayne

Ship Model Gallery


Report this post
Top
 Profile  
Reply with quote  
PostPosted: Sun Feb 09, 2014 9:49 pm 
Offline
User avatar

Joined: Fri Jun 22, 2012 12:02 pm
Posts: 2350
Location: Herndon, VA
George,

I spent the weekend doing other things than models so I'm feeling a bit refreshed.

Would you mind if I steal the hand rails from your build for my own? Where did you find this picture?

Thanks!

_________________
- Chris

1/700 Saratoga w/Pontos (Needs paint)
1/700 Potato w/Kurama (On hold)
1/700 Murdertorpedoboat Ooi


Report this post
Top
 Profile  
Reply with quote  
PostPosted: Mon Feb 10, 2014 3:39 pm 
Offline
User avatar

Joined: Sun Oct 12, 2008 3:55 am
Posts: 625
Location: Budapest, Hungary
Gents, thank you for the encouraging comments.

Jim, I would have never guessed that you have once faced the same problem!
Thanks for posting.

Chris, but of course you can use any idea/solution from my work, that's why I show it!
The picture in question was found in the book "Clydebank Battlecruisers" which is the most useful source of information in this project.

George Pék


Report this post
Top
 Profile  
Reply with quote  
PostPosted: Tue Feb 11, 2014 5:08 am 
Offline
User avatar

Joined: Tue Sep 28, 2010 8:30 pm
Posts: 78
Location: Hong Kong
Sorry for your mishaps but what you have achieved in your new hull is really impressive! I like your way to read details from photo and apply them in the model! I can't wait to see your Tiger complete soon! :thumbs_up_1:


Report this post
Top
 Profile  
Reply with quote  
PostPosted: Tue Feb 11, 2014 9:52 am 
Offline
User avatar

Joined: Fri Jun 22, 2012 12:02 pm
Posts: 2350
Location: Herndon, VA
Thank you, George. I've ordered the book seeing as I have quite a number of RN battlecruisers in my stash.

Just so you know, I am working on my Tiger, just slowly. I'll post an update in the future. Please feel free to critique. It won't be NEARLY as impressive as your miniature art, but I'm learning. :smallsmile:

_________________
- Chris

1/700 Saratoga w/Pontos (Needs paint)
1/700 Potato w/Kurama (On hold)
1/700 Murdertorpedoboat Ooi


Report this post
Top
 Profile  
Reply with quote  
PostPosted: Thu Feb 13, 2014 7:26 pm 
Offline
User avatar

Joined: Sun Oct 12, 2008 3:55 am
Posts: 625
Location: Budapest, Hungary
Thank you Vincent!
Looking forward to updates on your build Chris.
I made only a small progress: started detail work on the fo'c'sle deck, first turning my attention towards the ground tackle
Attachment:
mws_1590.jpg
mws_1590.jpg [ 199.1 KiB | Viewed 1810 times ]


Report this post
Top
 Profile  
Reply with quote  
PostPosted: Tue Feb 18, 2014 8:08 am 
Offline
User avatar

Joined: Fri Jun 22, 2012 12:02 pm
Posts: 2350
Location: Herndon, VA
How is she coming, George? Do you plan on doing a sea base?

I've had to slow down work on my Tiger as my wife and I are moving very soon.

_________________
- Chris

1/700 Saratoga w/Pontos (Needs paint)
1/700 Potato w/Kurama (On hold)
1/700 Murdertorpedoboat Ooi


Report this post
Top
 Profile  
Reply with quote  
PostPosted: Tue Feb 18, 2014 12:09 pm 
Offline
User avatar

Joined: Wed Mar 12, 2008 11:24 am
Posts: 72
Location: La Rioja SPAIN
:thumbs_up_1: :thumbs_up_1: :thumbs_up_1:
I'm really impressed, you've got a special art for small scales.
I'm going to have so much fun following this step by step.


Fran


Report this post
Top
 Profile  
Reply with quote  
PostPosted: Tue Mar 04, 2014 10:54 am 
Offline
User avatar

Joined: Sun Oct 12, 2008 3:55 am
Posts: 625
Location: Budapest, Hungary
Hi all, here's an update showing slow but steady progress due to lack of time - business as usual.
The small fittings on the forecastle deck have been detailed - not one original structure to be found here has been left alone: each and every one of them has been fiddled with.
The hatches covering the skylights are treated separately to facilitate painting -they have been glued temporarily to a piece of cardboard along with 40 small and two medium sized circular plus 16 rectangular mushroom vents.
I recognised that the fo'c'sle deck did not have wooden planking some way in front of the singular upper 6" mount so I filled the deck grooves up with putty and sanded the area smooth.
Some guesswork was necessary to ascertain the arrangement of fittings at the after end of the fo'c'sle deck as I was unable to find pictures showing this section in detail.
Now I move on to work on the quarterdeck.

George


Attachments:
mws001.jpg
mws001.jpg [ 196.15 KiB | Viewed 1654 times ]
mws002.jpg
mws002.jpg [ 118.2 KiB | Viewed 1654 times ]
mws003.jpg
mws003.jpg [ 126.01 KiB | Viewed 1654 times ]
mws004.jpg
mws004.jpg [ 121.85 KiB | Viewed 1654 times ]
mws005.jpg
mws005.jpg [ 136.12 KiB | Viewed 1654 times ]
Report this post
Top
 Profile  
Reply with quote  
PostPosted: Tue Mar 04, 2014 12:40 pm 
Offline
User avatar

Joined: Fri Jun 22, 2012 12:02 pm
Posts: 2350
Location: Herndon, VA
George,

Love it. I move fast because I don't go through NEAR the detail you do, though I wish I did. This is going to look amazing. I hope you don't mind me consulting some of your methodology when I start an SMS Seydlitz from WSW that will need the extra love.

_________________
- Chris

1/700 Saratoga w/Pontos (Needs paint)
1/700 Potato w/Kurama (On hold)
1/700 Murdertorpedoboat Ooi


Report this post
Top
 Profile  
Reply with quote  
PostPosted: Tue Mar 18, 2014 6:46 pm 
Offline
User avatar

Joined: Sun Oct 12, 2008 3:55 am
Posts: 625
Location: Budapest, Hungary
Chris, I am happy to be of any help.
Here's an update. The build is progressing at snail's pace (lack of time, see Jim Baumann's thread in the main forum - the same applies to me).
The detailing of the forecastle and quarterdeck is complete - not one tiny structure has been left alone.
Attachment:
mws001.jpg
mws001.jpg [ 161.14 KiB | Viewed 1562 times ]

Attachment:
mws002.jpg
mws002.jpg [ 196.24 KiB | Viewed 1562 times ]

It's starting to look busy even in this early stage.
Attachment:
mws003.jpg
mws003.jpg [ 89.09 KiB | Viewed 1562 times ]

The minute parts temporarily attached to this piece of cardboard will all be part of the deck equipment: mushroom vents (IJN, but who was their master?), scratchbuilt rectangular vents, PE hatches, skylight covers, lockers and night lifebuoys.
Attachment:
mws004.jpg
mws004.jpg [ 179.44 KiB | Viewed 1562 times ]

Attachment:
mws005.jpg
mws005.jpg [ 154.07 KiB | Viewed 1562 times ]

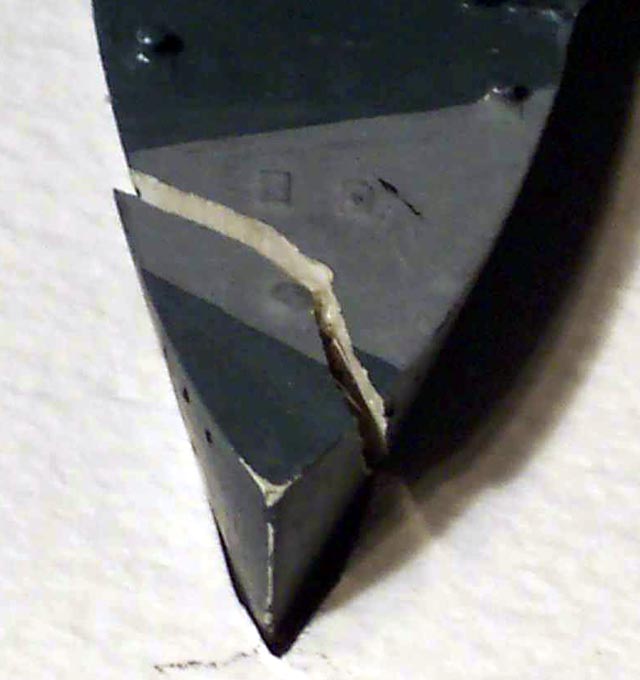
Next I started working on the lower tier of the superstructure. Almost all details have been removed and the grooves on the shelter deck have been filled with putty as I believe this deck was covered by corticene rather than wood planking. The two casemates at this level had their shapes altered to conform with pictures and to prevent them from overhanging the forecastle deck below them - a curious feature found in this otherwise excellent kit. The funnel bases had some hatches clearly based on the drawing in the book of R. A. Burt - nice, but alas incorrect.
I drilled a "trench" at the perimeter of the bases then divided it two sections by tiny pieces of aluminium plate.
In the picture changes made so far are readily apparent when compared to an unmodified kit part.
Attachment:
mws011.jpg
mws011.jpg [ 177.25 KiB | Viewed 1562 times ]

Now adding details to this part is next on my agenda.
George Pék


Report this post
Top
 Profile  
Reply with quote  
PostPosted: Sat Apr 19, 2014 11:06 am 
Offline
User avatar

Joined: Sun Oct 12, 2008 3:55 am
Posts: 625
Location: Budapest, Hungary
Some progress to report:
the lower tier of superstructure is ready to be painted - the difference from the original shown next to it is readily apparent. There are locating pins for the conning tower and the funnels.
Attachment:
mws003.jpg
mws003.jpg [ 114.73 KiB | Viewed 1480 times ]

Next I moved to the conning tower - this is where some major surgery was necessary as Combrig got the shape wrong but thanks to the excellent Artist Hobby PE set something credible was achieved.
You can see the evolution of this part here:
Attachment:
mws001.jpg
mws001.jpg [ 152.78 KiB | Viewed 1480 times ]

Attachment:
mws002.jpg
mws002.jpg [ 155.49 KiB | Viewed 1480 times ]

Attachment:
005.JPG
005.JPG [ 185.52 KiB | Viewed 1480 times ]

Attachment:
007.JPG
007.JPG [ 184.17 KiB | Viewed 1480 times ]

And the superstructure completed so far as a whole:
Attachment:
mws008.jpg
mws008.jpg [ 171.84 KiB | Viewed 1480 times ]

Attachment:
mws009.jpg
mws009.jpg [ 126.66 KiB | Viewed 1480 times ]


Report this post
Top
 Profile  
Reply with quote  
PostPosted: Sat Apr 19, 2014 11:15 am 
Offline
User avatar

Joined: Sun Oct 12, 2008 3:55 am
Posts: 625
Location: Budapest, Hungary
In the meantime 223 little parts have been glued temporarily to the piece of cardboard (in preparation to the painting) so I had to start using another one:
Attachment:
mws010.jpg
mws010.jpg [ 176.49 KiB | Viewed 1481 times ]

Attachment:
mws011.jpg
mws011.jpg [ 149.67 KiB | Viewed 1481 times ]

Attachment:
013.JPG
013.JPG [ 114.88 KiB | Viewed 1481 times ]

So that's how she looks today with some work already done to the funnels: I got their height even (the base of the funnel No3 had to be raised), drilled their opening deeper and added PE rings. Next I will do the steam pipes and the cap grilles.
Attachment:
mws014.jpg
mws014.jpg [ 87.96 KiB | Viewed 1481 times ]


George Pék


Report this post
Top
 Profile  
Reply with quote  
PostPosted: Sat Apr 19, 2014 1:52 pm 
Offline
User avatar

Joined: Tue Aug 18, 2009 11:02 am
Posts: 552
Location: Poland, Wroclaw
Hello George,

Fantastic job. :thumbs_up_1: :thumbs_up_1: :thumbs_up_1:
Watching with interest.
Question: When do you plan to paint the deck?

Good luck!
Greg

_________________
...in my shipyard...
Image


Report this post
Top
 Profile  
Reply with quote  
PostPosted: Sat Apr 19, 2014 4:06 pm 
Offline
User avatar

Joined: Wed Apr 23, 2008 7:40 pm
Posts: 1158
Location: New Jersey
This is great. I feel like throwing my 1/350 scale version into the garbage now.

_________________
Image


Report this post
Top
 Profile  
Reply with quote  
PostPosted: Sat Apr 19, 2014 4:25 pm 
Offline
User avatar

Joined: Sun Jun 17, 2007 6:38 pm
Posts: 275
George
Nicely detailed work! I have Combrig HMS Canada which may be my next project as a1914-2014 project. What colours will you be using for the hull, deck, and superstructure?
George


Report this post
Top
 Profile  
Reply with quote  
PostPosted: Sat Apr 19, 2014 5:22 pm 
Offline
User avatar

Joined: Sun Oct 12, 2008 3:55 am
Posts: 625
Location: Budapest, Hungary
Thank you for the kind words, gents!
blacman, I am flattered that you like my work. I am a great admirer of your models. I think your Kako and Kirishima are just awesome and your ability to design and manufacture your own PE is exceptional.
I usually prepare every part then start painting with the decks. This time I will have to change my habit because some decks on the superstructure need to be painted before assembly - that's why I did not proceed with the bridge but went on to detail the funnels.
drdoom 1337, yours is one really splendid cat! I understand you chose to build her in her 1914 guise so there are some differences compared to mine.
George W, I plan to paint all vertical surfaces Humbrol 28 as Jim Baumann did with his Courageous, I will use WEM teak on the wooden and WEM Corticene on the other decks. Turrets B and Y will be painted black with white deflection scales on them.
George Pék


Report this post
Top
 Profile  
Reply with quote  
PostPosted: Sun Apr 20, 2014 9:30 am 
Offline
User avatar

Joined: Sun Jun 17, 2007 6:38 pm
Posts: 275
George
Thank you for your paint references, particularly the H28. I'm mainly WWII and post war doing RCN topics in 1/350 so I appreciate any guidance in areas where I have not done work, ie WWI. My Combrig Canada will be out of the box mostly (the PE included are immensely small) but I will be watching your build and will check the other builds mentioned here.
Thanks again
George


Report this post
Top
 Profile  
Reply with quote  
Display posts from previous:  Sort by  
Post new topic Reply to topic  [ 172 posts ]  Go to page Previous  1, 2, 3, 4, 5 ... 9  Next

All times are UTC - 6 hours [ DST ]


Who is online

Users browsing this forum: Yuth and 59 guests


You can post new topics in this forum
You can reply to topics in this forum
You cannot edit your posts in this forum
You cannot delete your posts in this forum
You cannot post attachments in this forum

Jump to:  
Powered by phpBB® Forum Software © phpBB Group