The Ship Model Forum

The Ship Modelers Source
It is currently Mon Jun 30, 2025 8:06 am

All times are UTC - 6 hours [ DST ]


Post new topic Reply to topic  [ 400 posts ]  Go to page Previous  1 ... 9, 10, 11, 12, 13, 14, 15 ... 20  Next
Author Message
PostPosted: Wed Feb 13, 2013 10:10 am 
Offline
User avatar

Joined: Thu Apr 03, 2008 10:48 pm
Posts: 2646
Location: Connecticut, USA
Great job and attention to detail so far! And man, you are much braver than I, doing that beast with rattlecan paints??? I shudder at the thought of lack of spray control on someting this big and expensive. Hat's off to ya!

_________________
Enlisted men are stupid, but very cunning and deceitful and bear considerable watching." - Marine Corps Officers Manual, 1894

http://www.modelshipgallery.com/gallery ... index.html


Report this post
Top
 Profile  
Reply with quote  
PostPosted: Sat Feb 16, 2013 5:13 pm 
Offline
User avatar

Joined: Mon May 14, 2012 12:18 pm
Posts: 2068
Location: Salt Lake City, USA
Update: Bismark gets her main deck!

Remember that initially I had planned to hand-lay individual planks like a madman. Today I put a main deck on in 15 minutes... I figured I earned it after wandering my way through porthole hell. Here it is on a rare sunny clear Salt Lake winter day with the guns for effect:

Image

Image

Image

Image

Image

Image

Image

Image

The KA deck is really something! It fits perfectly...almost freakishly so and is so easy to install that even retarded chimpanzees could probably manage it.

Before laying the deck I put "glass" in my portholes using clear styrene, then puttied and painted the edges of the deck and hull + the bases of the deck fittings. Along with the styrene strips I added along the edges of the hull a couple months back they do a fairly decent job of giving me a "gutter" along the edge like the real ship. I do wish I had planned the gutter around the KA deck though; I could have got a far more precise job in the the end. Se La vi

I'm still trying to decide on my deck's final color; I sort of like it natural but I don't know... maybe I'll sleep on it. I suppose I'll at least have to seal it.

Until next time!

_________________
-Jason Channell

Current Project: 1/200 Bismarck


Report this post
Top
 Profile  
Reply with quote  
PostPosted: Sat Feb 16, 2013 5:49 pm 
Offline
User avatar

Joined: Mon Jan 10, 2005 6:00 pm
Posts: 12326
Location: Ottawa, Canada
Looks great!

But one minor quibble: it's C'est la vie ;)

_________________
De quoi s'agit-il?


Report this post
Top
 Profile  
Reply with quote  
PostPosted: Sat Feb 16, 2013 7:16 pm 
Offline
User avatar

Joined: Mon May 14, 2012 12:18 pm
Posts: 2068
Location: Salt Lake City, USA
Timmy C wrote:

But one minor quibble: it's C'est la vie ;)


Cut me a break... I am an Americun after all and we are notoriously hard to civilize. :big_grin:

_________________
-Jason Channell

Current Project: 1/200 Bismarck


Report this post
Top
 Profile  
Reply with quote  
PostPosted: Sun Feb 17, 2013 12:12 am 
Offline
User avatar

Joined: Sat Jan 26, 2013 2:02 am
Posts: 72
Location: Albuquerque, New Mexico, USA
Jason:

Your Bismarck is looking great!

Bismarck had a teak deck (an expensive wood, very resistant to maritime weather) about the same color as your KA Models Mk 1 deck. It's amazing to still see the durable teak planking on the wreck after 72 years of submergence in seawater!

I thought the manufacturer sealed these Mk 1 decks already. Do check, and be careful of any sealer you apply as it might 1.) change the deck color and/or 2.) create an unrealistic, non-scale, shiny deck finish on the model.

Kindest regards, Jason (see...I'm a civilized American!!!)

_________________
Bill

SI VIS PACEM, PARA BELLUM.


Report this post
Top
 Profile  
Reply with quote  
PostPosted: Sun Feb 17, 2013 10:45 am 
Offline
User avatar

Joined: Tue Jan 11, 2005 1:40 pm
Posts: 8345
Location: New Jersey
Channell wrote:
Remember that initially I had planned to hand-lay individual planks like a madman. Today I put a main deck on in 15 minutes...


Speaking from experience: smart move!!

Nice work. Impressive looking build.

_________________
Martin

"Tomorrow is the most important thing in life. Comes into us at midnight very clean. It's perfect when it arrives and it puts itself in our hands. It hopes we've learned something from yesterday." John Wayne

Ship Model Gallery


Report this post
Top
 Profile  
Reply with quote  
PostPosted: Wed Feb 20, 2013 6:25 am 
Great work on the Bismarck. I really liked what you have done with the portholes. I would like to ask what height is the hull red and boot topping on your model? I look forward to seeing more of your build. You do know there is a Missouri coming from Trumpeter in 1/200 scale?


Report this post
Top
  
Reply with quote  
PostPosted: Wed Feb 20, 2013 1:04 pm 
Offline
User avatar

Joined: Mon May 14, 2012 12:18 pm
Posts: 2068
Location: Salt Lake City, USA
Guest wrote:
Great work on the Bismarck. I really liked what you have done with the portholes. I would like to ask what height is the hull red and boot topping on your model? I look forward to seeing more of your build. You do know there is a Missouri coming from Trumpeter in 1/200 scale?


Thanks! To be honest, my paint scheme is an "artisic impression" which is more about making the model itself look pretty than being technically accurate. Image

I "eyeballed" the whole thing with copies of a handfull of historic photos to guide me and didn't measure a lot. Here's what I did:

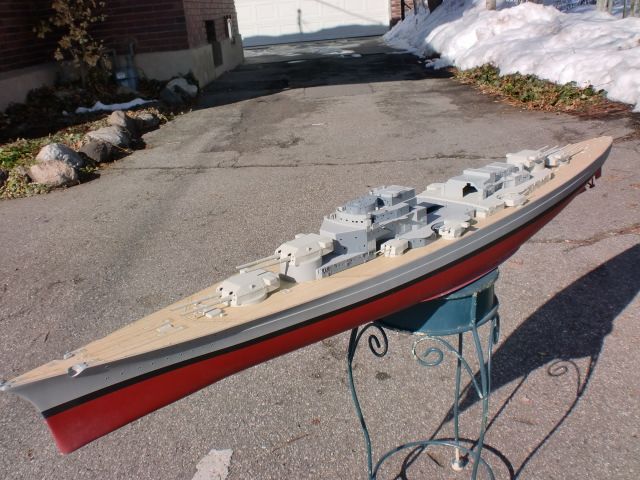
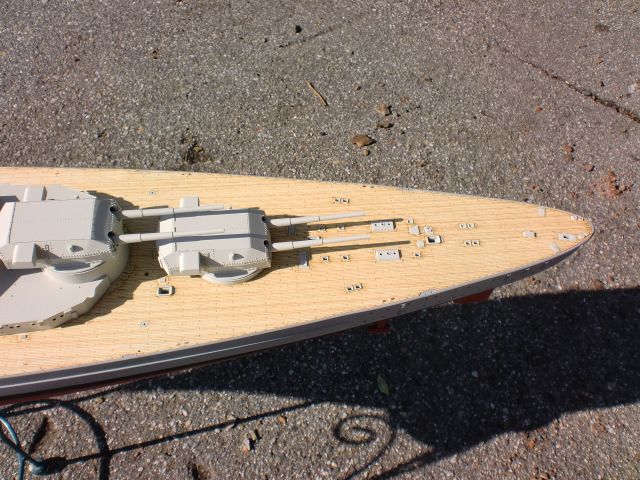
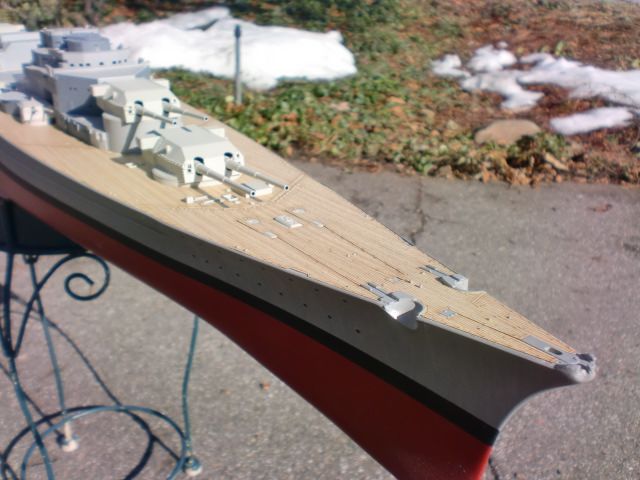
First (after painting the upper hull grey) I marked off a waterline by taping a pen to an upside-down cup (also shimmed up to the right height) and marking off a dotted line around the entire hull as is sat weighted down on a large, smooth surface.

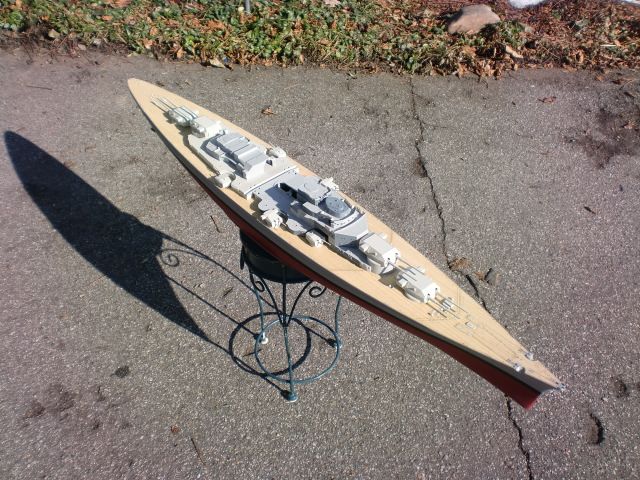
After marking off the waterline it became obvious my Trumpeter hull was a bit off; the waterline was too high amidships and too low on the stern. After painting the lower hull red I compensated for it by carefully "warping" the boot topping as I went to make everything look "right" along the contours of the hull. I kept the width of the boot top constant by putting little pieces of Tamiya tape cut the same width every 8" or so inbetween the top and bottom tape lines (and removing them before painting the boot).

I also made the boot top thinner than it would have been on the real ship; a good portion the real Bismarck's boot was underwater and it didn't matter how thick it was for appearances but my boat won't be displayed in the water so I went with aesthetics instead.

I know plenty of people are looking for hard measurements to lay out their Bismarcks but unfortunately it's not gonna be that simple on this kit. This is a project that requires a bit of artistry to fix Trumpy's many "oopsies".

_________________
-Jason Channell

Current Project: 1/200 Bismarck


Report this post
Top
 Profile  
Reply with quote  
PostPosted: Fri Feb 22, 2013 11:12 pm 
Offline
User avatar

Joined: Mon May 14, 2012 12:18 pm
Posts: 2068
Location: Salt Lake City, USA
When Bismarck Burnout strikes:

Image

This week I did some work on turret Dora. I think it's very accurate personally. :tongue:

I've gotta say, I am starting to get sick of this ship. This project must have crossed the 100 hour mark by now and everything is going well so far...but there is still such a long way to go. :faint:

_________________
-Jason Channell

Current Project: 1/200 Bismarck


Report this post
Top
 Profile  
Reply with quote  
PostPosted: Sat Feb 23, 2013 12:16 am 
Channell wrote:
When Bismarck Burnout strikes:

Image

This week I did some work on turret Dora. I think it's very accurate personally. :tongue:

I've gotta say, I am starting to get sick of this ship. This project must have crossed the 100 hour mark by now and everything is going well so far...but there is still such a long way to go. :faint:


Excellent work on Dora but I think the color is slightly off ! What do you think of the MK1 Design set for the Bismarck? I just ordered the DX pack for mine.


Report this post
Top
  
Reply with quote  
PostPosted: Sat Feb 23, 2013 10:59 am 
Offline
User avatar

Joined: Mon May 14, 2012 12:18 pm
Posts: 2068
Location: Salt Lake City, USA
Guest wrote:
Excellent work on Dora but I think the color is slightly off ! What do you think of the MK1 Design set for the Bismarck? I just ordered the DX pack for mine.


HOLA GUEST! Dora is muy vistoso I know, but I can only spend so much time on an effigy of my least favorite kids cartoon character. :big_grin:

As for the MK1 set, it's really not bad at all. The deck is superb and the PE is well done. I plan to use the resin blast bags too, but I do wish it included more... like new PE doors/ closed vent hatches and grating for the intakes/sea chests below the waterline.

_________________
-Jason Channell

Current Project: 1/200 Bismarck


Report this post
Top
 Profile  
Reply with quote  
PostPosted: Tue Feb 26, 2013 2:13 am 
Offline
User avatar

Joined: Sat Jan 26, 2013 2:02 am
Posts: 72
Location: Albuquerque, New Mexico, USA
Guest wrote:
Great work on the Bismarck. I really liked what you have done with the portholes. I would like to ask what height is the hull red and boot topping on your model? I look forward to seeing more of your build. You do know there is a Missouri coming from Trumpeter in 1/200 scale?


Jason suggests a good tehnique for marking the CWL (construction water line) on the model by running the tip of a fine marker around the hull at the level of the 1/200 scale CWL.

On the real Bismarck the CWL was 9.3 meters above the keel. So, 9.3 meter X 1000 mm/meter X 1/200 = 46.5 mm = 4.65 cm above the model keel = the model CWL.

The black boot top extended above and below the CWL. Here, it's a matter of "eyeballing" it. On my model the boot top will rise 4 mm abpve the CWL and extend 10-12 mm below it. The MES (degaussing cable) ran toward the bottom of the lower boot top (also painted black).

_________________
Bill

SI VIS PACEM, PARA BELLUM.


Report this post
Top
 Profile  
Reply with quote  
PostPosted: Tue Feb 26, 2013 10:13 pm 
Offline
User avatar

Joined: Sat Jan 26, 2013 2:02 am
Posts: 72
Location: Albuquerque, New Mexico, USA
Wilhelm wrote:
Guest wrote:
Great work on the Bismarck. I really liked what you have done with the portholes. I would like to ask what height is the hull red and boot topping on your model? I look forward to seeing more of your build. You do know there is a Missouri coming from Trumpeter in 1/200 scale?


Jason suggests a good tehnique for marking the CWL (construction water line) on the model by running the tip of a fine marker around the hull at the level of the 1/200 scale CWL.

On the real Bismarck the CWL was 9.3 meters above the keel. So, 9.3 meter X 1000 mm/meter X 1/200 = 46.5 mm = 4.65 cm above the model keel = the model CWL.

The black boot top extended above and below the CWL. Here, it's a matter of "eyeballing" it. On my model the boot top will rise 4 mm abpve the CWL and extend 10-12 mm below it. The MES (degaussing cable) ran toward the bottom of the lower boot top (also painted black).


CORRECTION: The above method WOULD work IF Trumpeter Bismarck had correct hull lines. Problem: Trumpeter has moulded the hull with an upward sweep at the stern. A 4.65 cm LEVEL CWL at midships appears to DROOP away (below) the stern deck line as station 0 is approached! If you paint the boot top at the same midships level (4.65 cm above keel) on the stern, the stern portholes will look way too high above the waterline! In fact at station 0, the level drawn CWL on the model is nearly 2 cm below where it should be!

SOLUTION: The 4.65 cm model CWL above keel works well from midships FORWARD. But, somewhere from midships, going AFT, the "CWL" water line needs to be drawn about 3.0 cm below the top of the hull (main deck). This is an artistic solution to to a hull design flaw by Trumpeter. Profile drawings as in Anatomy of the Ship or photos give a good idea of where the stern CWL should appear.

_________________
Bill

SI VIS PACEM, PARA BELLUM.


Report this post
Top
 Profile  
Reply with quote  
PostPosted: Tue Feb 26, 2013 10:19 pm 
Offline
User avatar

Joined: Mon May 14, 2012 12:18 pm
Posts: 2068
Location: Salt Lake City, USA
Wilhelm wrote:
This is an artistic solution to to a hull design flaw by Trumpeter. Profile drawings as in Anatomy of the Ship or photos give a good idea of where the stern CWL should appear.


...which is why "eyeballing" isn't such a bad strategy after all. :heh: There's a lot wrong with the kit... it's gonna be hard to get me to put good money on a Trumpeter product after this one.

I guess I should announce that I'm taking a break on this one...It's time to add detail the superstructure and I want to see what else the aftermarket puts out before going any further.

Plus I've got "Reich fatigue"... I'm so emotionally scarred by all the Bismarck Madness on the forum that I might never bring my finished Bismarck out in public out of fear that someone will whip out a pair of calipers and demand to know why my Bismarck is tarnishing the glory of the fatherland because my boot topping is 2mm too thin or is the wrong shade of Hellgrau. :eyes_spinning:

The Bismarck is a pretty ship, but lets face the facts... the WW2 Kriegsmarine is mostly on the bottom of the ocean but the USN still rules the waves. :jest: German ships just aren't my passion.

_________________
-Jason Channell

Current Project: 1/200 Bismarck


Report this post
Top
 Profile  
Reply with quote  
PostPosted: Tue Feb 26, 2013 11:20 pm 
Offline

Joined: Sat Jan 12, 2013 1:44 am
Posts: 272
Location: San Diego, CA
I'm kind of there with you Channell. Not going to take a break, but slow down the progress that I make. There are only so many portholes I can do in a day and not work on designing PE so much for just one ship. I, like you, am also not looking for full accuracy in my build, but to add to it what would be seen as my own representation. So, I've started a new model for when the BIsmarck starts feeling a little taxing. Its Dragon's 1/350 Gearing Class Destroyer USS Frank Knox DD-742. Looks like Bismarck will not be the first ship I complete.


Report this post
Top
 Profile  
Reply with quote  
PostPosted: Wed Feb 27, 2013 7:34 am 
Offline
User avatar

Joined: Sun Oct 30, 2005 12:27 pm
Posts: 305
Channell wrote:
Wilhelm wrote:
This is an artistic solution to to a hull design flaw by Trumpeter. Profile drawings as in Anatomy of the Ship or photos give a good idea of where the stern CWL should appear.


...which is why "eyeballing" isn't such a bad strategy after all. :heh: There's a lot wrong with the kit... it's gonna be hard to get me to put good money on a Trumpeter product after this one.

I guess I should announce that I'm taking a break on this one...It's time to add detail the superstructure and I want to see what else the aftermarket puts out before going any further.

Plus I've got "Reich fatigue"... I'm so emotionally scarred by all the Bismarck Madness on the forum that I might never bring my finished Bismarck out in public out of fear that someone will whip out a pair of calipers and demand to know why my Bismarck is tarnishing the glory of the fatherland because my boot topping is 2mm too thin or is the wrong shade of Hellgrau. :eyes_spinning:

Hey Jason,

Why dont you go and get another Arizone, and follow my lead on the hull mods. You'll love it, all the cutting, sanding and shaping!!

The Bismarck is a pretty ship, but lets face the facts... the WW2 Kriegsmarine is mostly on the bottom of the ocean but the USN still rules the waves. :jest: German ships just aren't my passion.

_________________
Regards

Nigel


Report this post
Top
 Profile  
Reply with quote  
PostPosted: Wed Feb 27, 2013 3:04 pm 
Offline
User avatar

Joined: Wed Apr 02, 2008 6:23 am
Posts: 1216
Location: South Carolina USA
Grab an old kit and build OOB for fun; you’ll be rejuvenated and ready to rejoin the fight...
I picked up the Revell Viking ship for 10 bucks and had a blast building it. Felt so good to jump in with glue and paint without digging deep in the scratch build mode for a change.

_________________
"Only two sailors, in my experience, never ran aground. One never left
port and the other was an atrocious liar."
-Don Bamford


Report this post
Top
 Profile  
Reply with quote  
PostPosted: Wed Feb 27, 2013 4:36 pm 
Offline
User avatar

Joined: Fri Jan 05, 2007 8:31 pm
Posts: 892
Location: Flensburg, Germany
Wilhelm wrote:
If you paint the boot top at the same midships level (4.65 cm above keel) on the stern, the stern portholes will look way too high above the waterline! In fact at station 0, the level drawn CWL on the model is nearly 2 cm below where it should be!
I'm not sure if I understood everything correctly. The 4.65cm is the model CWL (I believe it should be at 4,75cm, but that's just me). The upper edge of the model boot-topping should be at 5.25cm. It could be that there was a sag towards midships on the actual vessel, when compared to bow and the stern. The lower edge of the boot-topping is still open to debate. I personally believe it was at the same level as the lower edge of the side armour belt. On the model, the width of the boot-topping would be 1.35cm (if I correctly remember the figures provided in one of the Bismarck threads here). If you say the model CWL at the stern is 2cm below where it should be, then your hull seems to be bent like a banana. Do you have a photo showing the CWL on your model?

Happy modelling ~ Olaf!


Report this post
Top
 Profile  
Reply with quote  
PostPosted: Wed Feb 27, 2013 6:54 pm 
Offline
User avatar

Joined: Mon May 14, 2012 12:18 pm
Posts: 2068
Location: Salt Lake City, USA
Olaf Held wrote:
Wilhelm wrote:
If you paint the boot top at the same midships level (4.65 cm above keel) on the stern, the stern portholes will look way too high above the waterline! In fact at station 0, the level drawn CWL on the model is nearly 2 cm below where it should be!
I'm not sure if I understood everything correctly. The 4.65cm is the model CWL (I believe it should be at 4,75cm, but that's just me). The upper edge of the model boot-topping should be at 5.25cm. It could be that there was a sag towards midships on the actual vessel, when compared to bow and the stern. The lower edge of the boot-topping is still open to debate. I personally believe it was at the same level as the lower edge of the side armour belt. On the model, the width of the boot-topping would be 1.35cm (if I correctly remember the figures provided in one of the Bismarck threads here). If you say the model CWL at the stern is 2cm below where it should be, then your hull seems to be bent like a banana. Do you have a photo showing the CWL on your model?

Happy modelling ~ Olaf!


The problem is Trumpeter's hull. I didn't break out the calipers but by eye alone you can tell the bow and especially stern have too much rise in them compared to the real thing. Some Trumpy hulls have "banana warp" along the keel; my keel is as straight as an arrow but I still had the same problem Wilhelm is describing. Luckily it's fairly easy to mask by carefully warping the boot top along the length of the hull. The hull is big enough (and the error small enough) that the issue is easily resolved that way.

_________________
-Jason Channell

Current Project: 1/200 Bismarck


Report this post
Top
 Profile  
Reply with quote  
PostPosted: Wed Feb 27, 2013 7:00 pm 
Offline
User avatar

Joined: Sat Jan 26, 2013 2:02 am
Posts: 72
Location: Albuquerque, New Mexico, USA
Olaf Held wrote:
Wilhelm wrote:
If you paint the boot top at the same midships level (4.65 cm above keel) on the stern, the stern portholes will look way too high above the waterline! In fact at station 0, the level drawn CWL on the model is nearly 2 cm below where it should be!
I'm not sure if I understood everything correctly. The 4.65cm is the model CWL (I believe it should be at 4,75cm, but that's just me). The upper edge of the model boot-topping should be at 5.25cm. It could be that there was a sag towards midships on the actual vessel, when compared to bow and the stern. The lower edge of the boot-topping is still open to debate. I personally believe it was at the same level as the lower edge of the side armour belt. On the model, the width of the boot-topping would be 1.35cm (if I correctly remember the figures provided in one of the Bismarck threads here). If you say the model CWL at the stern is 2cm below where it should be, then your hull seems to be bent like a banana. Do you have a photo showing the CWL on your model?

Happy modelling ~ Olaf!


Will try to post a photo of the LEVEL drawn STERN CWL on my model later tonight. This is where the problem lies. The plastic hull is not obviously "bent like a banana." But as you drag a LEVEL marker along the hull it APPEARS that the LEVEL CWL droops away from the aft deck line. The true source of the problem has possibly been discovered by Nigel, who is effectively rebuilding the misshapen stern. Most likely, an engineering type (not me...I'm a physician) will discover that the stern bulkhead lines are not correct. The aft bulkhead lines may taper too quickly. And, in that case, a LEVEL marker will execute a curved approach line toward the keel and stern too quickly. If you paint your waterline on THAT line, I suggest that the line will APPEAR too far below the quarterdeck and portholes on your completed model.

I'm no Nigel! I'm not rebuilding the stern, so the artistic compromise solution to appearance is given above. In effect lay down a boot top line that LOOKS right (even if it's not a level CWL line from midships to stern on the plastic Trumpeter hull).

_________________
Bill

SI VIS PACEM, PARA BELLUM.


Report this post
Top
 Profile  
Reply with quote  
Display posts from previous:  Sort by  
Post new topic Reply to topic  [ 400 posts ]  Go to page Previous  1 ... 9, 10, 11, 12, 13, 14, 15 ... 20  Next

All times are UTC - 6 hours [ DST ]


Who is online

Users browsing this forum: No registered users and 12 guests


You can post new topics in this forum
You can reply to topics in this forum
You cannot edit your posts in this forum
You cannot delete your posts in this forum
You cannot post attachments in this forum

Jump to:  
Powered by phpBB® Forum Software © phpBB Group