The Ship Model Forum

The Ship Modelers Source
It is currently Mon Jul 07, 2025 1:26 am

All times are UTC - 6 hours [ DST ]


Post new topic Reply to topic  [ 60 posts ]  Go to page Previous  1, 2, 3
Author Message
PostPosted: Fri Nov 12, 2010 1:49 pm 
Offline

Joined: Mon Jan 10, 2005 11:02 am
Posts: 10569
Location: EG48
Apologies for the delay.... There have been projects that delayed my return to Scharnhorst and stretched out the work.

Today's post:
Fear Not the Coarse!

When I started modeling I used fine grits of steel wool (0000 grit) as I did not want to erase detail or leave big gouges in the material. Sanding took a long time. I later went to school for an A&P and one of our projects was window repair. The instructor took an old DC-8 cabin window, put a HUGE scrape in the clear plastic with his keys, and said, "remove that." This was the event that taught me "proper" sanding.

I use the term "proper" as there are actually a few variations and tools one can use, so there is no one "true" way, but there are some theories that I think are crucial.

* start coarse and move fine
* succeeding grits sand perpendicular to the previous ones

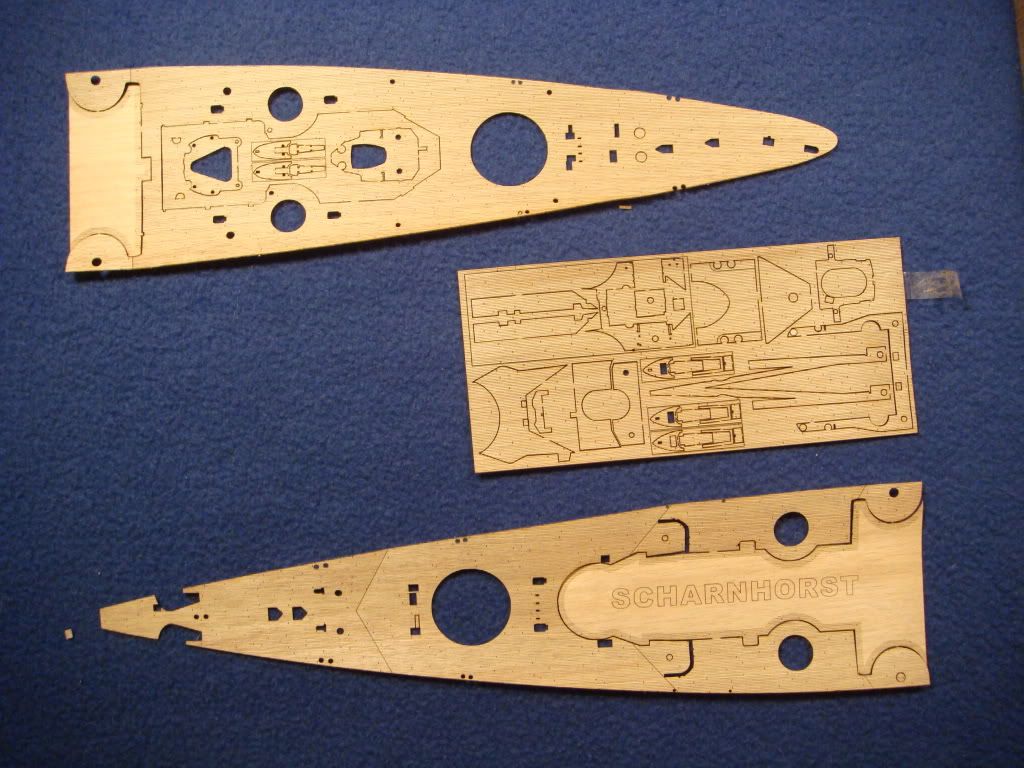
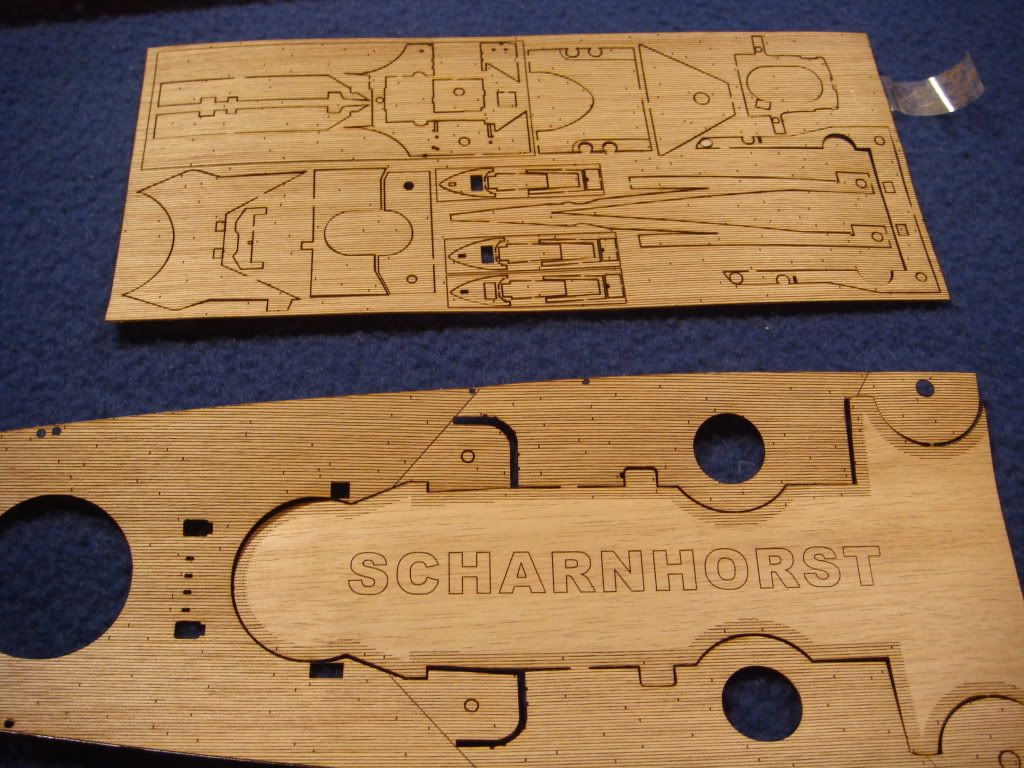
So in the case of Scharnhorst, what lead me me to immediately jump to a coarse grit was a small step in the forward bow area as well as a problem I caused... the fit is great otherwise. I'm just less patient now and want to get the sanding over with as quickly as possible. So, I started by sanding down the length of the hull with the roughest sanding stick I could find; below is a shot of the Apoxie-sculpt high-points coming off:

Image

As you can see, it's pretty rough, with some heavier scratches left in the plastic once I'm done:

Image

After this, I switch to a medium grit stick or paper, and sand going perpendicular to the first pass, that is, from the deck down to the keel, instead of bow to stern. The reason for this is that it allows you to see when you have removed all of the deeper scores of the heavier grit better; if you go the same direction all of the time you'll never be quite sure if you're seeing fine sanding action of coarse hidden by fine. Once the sanding marks you see all travel in the flow of the second pass (top down in this case), then you've sanded away the rougher sanding work.

Now, some lessons from that old DC-8 window. Fear not the coarse, but don't get too liberal with it. If you sand, say, a one inch square patch, you'll need to sand a bigger patch with the next grit to get to the edge of the first grit, and then blend it out. Guys who were sloppy with their first work wound up having to sand much more area in each successive round.

And... don't be afraid to polish with a fine filler. I will typically do one pass with the coarse, another 90 degrees off with medium, then rub some thin CA glue into what's left, and then hit it again with a little more medium to take the streaks from that back down, before using some 2400 or 3200 micromesh to give it a decent and quick polish to see what I might have missed.

I have the hull sides now primered and will post pictures this weekend; I thought I had them with me but I do not. :Oops_1:

_________________
Tracy White -Researcher@Large

"Let the evidence guide the research. Do not have a preconceived agenda which will only distort the result."
-Barbara Tuchman


Report this post
Top
 Profile  
Reply with quote  
PostPosted: Fri Nov 12, 2010 5:02 pm 
Offline

Joined: Fri Sep 17, 2010 5:49 pm
Posts: 447
Nice update and a good sanding lesson. I've been looking forward to every update on this project. I was worried it would get shelved for Arizona. I'm not starting mine til January, but I have been looking over the pieces a lot. There's no indication to go by, so have you figured out where the boot top should be positioned?


Report this post
Top
 Profile  
Reply with quote  
PostPosted: Sat Nov 13, 2010 10:23 am 
Offline
User avatar

Joined: Thu Aug 19, 2010 7:17 pm
Posts: 582
Tracy White wrote:
I got about ten minutes to sand the port side down last night... first time in about two weeks I've had a chance. I had a review to do and some test shots that needed looking over and critiquing that ate all of my time. Hope to have some more updates soon.


Test shots of what?

_________________
Current Builds:
1-350 DKM Z-39
1-350 USS Philippine Sea


Report this post
Top
 Profile  
Reply with quote  
PostPosted: Sat Nov 13, 2010 11:24 am 
Offline

Joined: Mon Jan 10, 2005 11:02 am
Posts: 10569
Location: EG48
The Dragon CVL; I've been on the team helping them produce it for over two years so I received test pieces to build up quickly and comment on.

_________________
Tracy White -Researcher@Large

"Let the evidence guide the research. Do not have a preconceived agenda which will only distort the result."
-Barbara Tuchman


Report this post
Top
 Profile  
Reply with quote  
PostPosted: Fri Dec 10, 2010 1:32 am 
Offline

Joined: Mon Jan 10, 2005 11:02 am
Posts: 10569
Location: EG48
My time on Scharnhorst has slowed quite a bit due to poor weather (I work in the garage and the sub-freezing temperatures were just more than I wanted to deal with) and over-extending myself (I'm already two days late on a 1/200th Arizona review). However, I did get some time in a couple of weeks ago and shot some photos in anticipation of an update that I haven't had time to make until now. One of the reasons I haven't is that I haven't scanned in the instructions that reference what I'm about to write about, but I think we can all figure this out, and I'll try and add them later.

The piece for the armored conning tower has a small platform mounted on it's side around the aft port side. There is a small PE ladder provided for the platform as well as a slot in its side to locate the platform, but no part number is listed on the instructions, and I can't find one on the tree. I just decided to make my own. The below photo shows the area in question and some of the tools I used to do this:

Image

The locating slot I mentioned is close to the upper right corner of the metal ruler I have. Everything is resting on a piece of .010" or .020" plastic, which fit into the slot well (It's been long enough that I can't remember the thickness, apologies!) The ladder with just one railing in the upper left corner of the PE fret is for said missing platform, and I used it to make a rough guess as to how to size the platform.


Image

Since the conning tower has purely vertical sides, I could use it to create a piece with the exact same curvature; I drew two lines close to each other so that I could make the locating tab, as you see here. It was fairly easy to make this rough cut as you see and then cut it to the desired shape after this. Below is the state of my superstructure, with conning tower in place:

Image

The superstructure is just resting on the deck and not glued in place.

One more comment, as I've said before, the instructions are not designed with the modeler in mind, really. The order of assembly is poorly thought out and will lead to broken parts and other problems if followed religiously. Here's a case in point:

Image

I've discussed this step before. I wanted to ensure I had the platforms L20 & L21 and director figured out and lined up correctly before they got too complex to sand, so I followed the Dragon assembly order and glued them in before trying to glue this deckhouse down. I'm pretty sure that I had this deckhouse pressed as firmly down and forward as possible to align properly when gluing the director foundations to this deckhouse, but as you can see in the superstructure photo above, there's a gap between it's forward face and the rest of the structure. The small gap between the deck and this piece I can fix easily enough, but the small flat pieces that form the splinter shields that but up to this have a gap.... I'm going to cut them off and make slightly wider ones that will close the gap.

I have an idea for the boat cranes in this area I'll try and cover in my next post.

_________________
Tracy White -Researcher@Large

"Let the evidence guide the research. Do not have a preconceived agenda which will only distort the result."
-Barbara Tuchman


Report this post
Top
 Profile  
Reply with quote  
PostPosted: Sat Dec 11, 2010 4:17 am 
Offline
User avatar

Joined: Sun Mar 16, 2008 3:46 am
Posts: 79
Location: Germany;Bavaria; Waldkraiburg
Hi Tracy,

the gaps between superstructure and the decks are no bigger problems, you could use the wooden deck. .not the one from Nautilus, there is one from Voyager, available at hobbyeasy. Think this will solve a lot.

Best regards

Marc


Report this post
Top
 Profile  
Reply with quote  
PostPosted: Sat Dec 11, 2010 2:16 pm 
Offline
User avatar

Joined: Thu Dec 29, 2005 5:51 pm
Posts: 65
Location: Vancouver B.C
I'll second what marc said. i got my voyageur deck last week from hobbyeasy.. its really nice
here's what you get
Image
Image


Report this post
Top
 Profile  
Reply with quote  
PostPosted: Mon Dec 13, 2010 4:50 pm 
Offline

Joined: Mon Jan 10, 2005 11:02 am
Posts: 10569
Location: EG48
No thanks. The gaps are simply because it's not pressed into place, once it's on deck it'll be tighter than any wood I've seen, and it won't look like a fake wood deck!

_________________
Tracy White -Researcher@Large

"Let the evidence guide the research. Do not have a preconceived agenda which will only distort the result."
-Barbara Tuchman


Report this post
Top
 Profile  
Reply with quote  
PostPosted: Thu Dec 23, 2010 7:59 pm 
Tracy White wrote:
No thanks. The gaps are simply because it's not pressed into place, once it's on deck it'll be tighter than any wood I've seen, and it won't look like a fake wood deck!


I think I can second you on that Tracy.To me the wood decks look out of scale to the protuding plastic that must be left.I think it was you that wrote an article about painting a simulated wood deck(?) using the 3 colors and taping.While it is time comsuming it does work quite well even for my first time on the the Academy's Graf Spee.Watching and booked;Trumps Prinz Eugen up next for me though.Cheers


Report this post
Top
  
Reply with quote  
PostPosted: Thu Dec 23, 2010 9:16 pm 
Offline

Joined: Mon Jan 10, 2005 11:02 am
Posts: 10569
Location: EG48
I'm just off three weeks of serious overtime at work and have the next week on holiday... Hoping to get back to Scharnhorst after Saturday....

_________________
Tracy White -Researcher@Large

"Let the evidence guide the research. Do not have a preconceived agenda which will only distort the result."
-Barbara Tuchman


Report this post
Top
 Profile  
Reply with quote  
PostPosted: Sun Dec 26, 2010 11:40 pm 
Offline
User avatar

Joined: Sun Oct 09, 2005 4:22 pm
Posts: 225
Location: Melbourne Australia
Something for you to watch out for Tracy. I'm building mine now and have discovered that the single 37mm guns designated 'A' in the instructions are way oversized. Either that or I've built them incorrectly, which is possible considering the instructions are incorrect on it's assembly. (worst instructions I have ever had to deal with) As you can see from the two pics I've posted, work in progress, the single barrelled 37 mm which sits next to B turret is too high. There are two more on the upper platform under the main director. If someone out there knows better than me please let me know


Attachments:
2010-12-27 - Version 2.jpg
2010-12-27 - Version 2.jpg [ 58.19 KiB | Viewed 5616 times ]
2010-12-27 (1).jpg
2010-12-27 (1).jpg [ 131.57 KiB | Viewed 5616 times ]
File comment: Side view comparing 37mm to turret B
2010-12-27.jpg
2010-12-27.jpg [ 30.51 KiB | Viewed 5616 times ]
Report this post
Top
 Profile  
Reply with quote  
PostPosted: Mon Dec 27, 2010 1:57 am 
Offline

Joined: Mon Jan 10, 2005 11:02 am
Posts: 10569
Location: EG48
Yeah that's a "little" off.. you can see where it should be in Rob's CAD here.

_________________
Tracy White -Researcher@Large

"Let the evidence guide the research. Do not have a preconceived agenda which will only distort the result."
-Barbara Tuchman


Report this post
Top
 Profile  
Reply with quote  
PostPosted: Thu Dec 30, 2010 12:08 pm 
Offline

Joined: Thu Dec 30, 2010 11:58 am
Posts: 51
Location: Biloxi,MS
I think the the ones on the Prinz Eugen from Trump look to be more to scale than Dragon's but mine are still sitting on trees :dontknow:Cheers

_________________
Twain:Ethical man - a Christian holding four aces

Twain:Life would be infinitely happier if we could only be born at the age of eighty and gradually approach eighteen.


Report this post
Top
 Profile  
Reply with quote  
PostPosted: Sun Feb 06, 2011 1:09 pm 
hi Tracy and all:

I too am just starting on the Dragon Scharnhorst. Just like you I have been filling inn the step between the upper and lower hulls, and I did not make any mode like cutting the ribs in the upper hull. The gap in the deck has also appeared, but not as bad as some kits I have built. The stern area has the biggest one and will require some filling with plastic strips.

I will be adding to the PE by purchasing the WEM PE set, along with brass barrels. I am also planning on purchasing a wood deck by the new company Scale decks. I really love how thin they are. They are expected to issue them this month.

Hope to see more of your inprogress pics.

Dick Wood


Report this post
Top
  
Reply with quote  
PostPosted: Sun Feb 06, 2011 3:58 pm 
Offline

Joined: Mon Jan 10, 2005 11:02 am
Posts: 10569
Location: EG48
Hi Dick... I'm about to leave on a research trip, but the Gambier Bay I am doing a build review on is stalled out due to WEM paint supply problems... Scharnhorst is back on when I get home!

_________________
Tracy White -Researcher@Large

"Let the evidence guide the research. Do not have a preconceived agenda which will only distort the result."
-Barbara Tuchman


Report this post
Top
 Profile  
Reply with quote  
PostPosted: Sat Jun 20, 2015 5:42 pm 
Tracy,
Did you ever finish this kit? - It is now over 4 years ago.

I wondered if you ever managed to complete it?


Report this post
Top
  
Reply with quote  
PostPosted: Sun Jun 21, 2015 12:09 am 
Offline

Joined: Mon Jan 10, 2005 11:02 am
Posts: 10569
Location: EG48
Hi guest - not finished, but I did pick it up again a couple of weeks ago. I'm still at the paint problem stage... i.e. I never got around to buying the paint when it was available! My Graf Spee is in the same boat, so to speak, but I did at least compile the list of paints I need for both and hope to order on my next "fun money" pay check.

_________________
Tracy White -Researcher@Large

"Let the evidence guide the research. Do not have a preconceived agenda which will only distort the result."
-Barbara Tuchman


Report this post
Top
 Profile  
Reply with quote  
PostPosted: Tue Jun 23, 2015 3:47 pm 
Thanks for the update.
I have just bought a copy of this kit from a German seller at a very good knock-down price, and just hope that I can do something with it.

Having read a build thread on here by a guy called California-bound, I fear that the instructions contain many pitfalls for the unwary.

I hope, with the help of the build thread, not to fall into too many of them myself.

I have heard people say that you can include as much or as little detail as you like with this kit, but just how much can you leave in the box before the end result begins to disappoint?

How many of you out there who have built this kit, have ended up with a stack of unused parts-laden runners in the box when you have finished?


Report this post
Top
  
Reply with quote  
PostPosted: Wed Jun 24, 2015 12:30 am 
Offline

Joined: Mon Jan 10, 2005 11:02 am
Posts: 10569
Location: EG48
They're far from perfect, but if you pay attention to them and compare them to the kit they're not dangerous and are better than some others I've seen. I don't really like their order of build (to be honest, I feel this way about most manufacturer's instructions) and they have so much crammed in there that they made mistakes. However, I think that with examination and test fitting, it's far from treacherous.

How much you include of leave depends on the your desires. Some people find the parts too small and fiddly, others love the detail and are fine with the work.

_________________
Tracy White -Researcher@Large

"Let the evidence guide the research. Do not have a preconceived agenda which will only distort the result."
-Barbara Tuchman


Report this post
Top
 Profile  
Reply with quote  
PostPosted: Sun Jun 28, 2015 7:25 am 
Well, the kit arrived on Thursday but I had to wait until yesterday to actually examine the box contents etc.

First up, the upper and lower hull halves won't go together. The halves click/snap together amidships but this leaves a 5mm gap at the two stem halves. Push these together, and the whole lot just opens up again.
Looks like some serious warpage has occurred here during manufacture.

The start page of the instructions is, well, what can I say?
Putting it politely, the first page is highly busy, with no bold clarity as to where/how one should start, and how one should follow on.

I haven't bothered doing anything else yet, but have noticed that there are some serious plastic pour marks on the outer surface of the lower hull where the inner bracings have been molded in.

The other thing is that the included figures look out of scale for 1/350.

Everything is back in the box for now. I'm not staring this one for some time but my initial impressions are not those of being greatly impressed.


Report this post
Top
  
Reply with quote  
Display posts from previous:  Sort by  
Post new topic Reply to topic  [ 60 posts ]  Go to page Previous  1, 2, 3

All times are UTC - 6 hours [ DST ]


Who is online

Users browsing this forum: Bing [Bot] and 18 guests


You can post new topics in this forum
You can reply to topics in this forum
You cannot edit your posts in this forum
You cannot delete your posts in this forum
You cannot post attachments in this forum

Jump to:  
Powered by phpBB® Forum Software © phpBB Group