good lord. I quit!!! This is jewel maker quality! It raises the level of model making to an artform. It's amazing to be able to look through this thread and see the skill and patience demonstrated.
I shall go back to assembling my kits...
HMS Victory and Le Redoutable at Trafalgar (1/300)
Moderators: BB62vet, MartinJQuinn, JIM BAUMANN, Jon, Dan K
-
Not_so_COB

- Posts: 197
- Joined: Tue Jul 20, 2010 8:18 am
-
marijn van gils
- Posts: 2691
- Joined: Tue Feb 06, 2007 10:24 am
- Location: Belgium
Re: HMS Victory and Le Redoutable at Trafalgar (1/300)
Thank you! 


Well, we all have different ways to enjoy this wonderful hobby... And there is nothing wrong at all with sticking to building kits!
Now, something I built already months ago: the plugs for vacforming the hulls of the ship�s boats.
There will be 8 boats on the diorama: 3 towed by the two ships (one will be badly damaged and foundering), 1 picking up men from the water, 1 on the way to do the same, and the last 3 on board of their ships (more or less damaged).
I made plugs for 7 different types of boats: 3 French and 4 British.
The technique was basically the same as for the hull of Redoutable, but much smaller, and in one piece because the boats have no tumblehome.
Ribs cut and glued according to the plans of the real thing (but much �higher� to allow for �spider webbing� when vacforming):

Before gluing, I drilled holes in the ribs, so the putty can �connect� through them for extra strength:


Seven different types:

Now, the gaps were filled with Magic Sculp:


And sanded until the ribs were reached. Note I cut the �base-plate� to the contours of the boat before the sanding.


To give you an idea of the scale (I forgot my match�): the �base-plate� is 1mm thick.

Sanding like this is never perfect right away. Therefore, I sprayed the plugs with a good coat of Motib spray filler, and sanded again.
This plug has been coated with the spray filler, but not yet sanded. Note the ribs are visible in the surface, even though I used sanding boards and files (as opposed to �soft� sanding materials).


After sanding again, I sprayed them with Tamiya primer. Much better now!


All ready for vacforming!

Well, we all have different ways to enjoy this wonderful hobby... And there is nothing wrong at all with sticking to building kits!
Now, something I built already months ago: the plugs for vacforming the hulls of the ship�s boats.
There will be 8 boats on the diorama: 3 towed by the two ships (one will be badly damaged and foundering), 1 picking up men from the water, 1 on the way to do the same, and the last 3 on board of their ships (more or less damaged).
I made plugs for 7 different types of boats: 3 French and 4 British.
The technique was basically the same as for the hull of Redoutable, but much smaller, and in one piece because the boats have no tumblehome.
Ribs cut and glued according to the plans of the real thing (but much �higher� to allow for �spider webbing� when vacforming):
Before gluing, I drilled holes in the ribs, so the putty can �connect� through them for extra strength:
Seven different types:
Now, the gaps were filled with Magic Sculp:
And sanded until the ribs were reached. Note I cut the �base-plate� to the contours of the boat before the sanding.
To give you an idea of the scale (I forgot my match�): the �base-plate� is 1mm thick.
Sanding like this is never perfect right away. Therefore, I sprayed the plugs with a good coat of Motib spray filler, and sanded again.
This plug has been coated with the spray filler, but not yet sanded. Note the ribs are visible in the surface, even though I used sanding boards and files (as opposed to �soft� sanding materials).
After sanding again, I sprayed them with Tamiya primer. Much better now!
All ready for vacforming!
-
wefalck

- Posts: 2109
- Joined: Wed Sep 28, 2011 12:04 pm
- Location: Paris
- Contact:
Re: HMS Victory and Le Redoutable at Trafalgar (1/300)
Interested to see how it goes. This is on my agenda too, plus a couple of clinker-built ones.
Do you have vacuum-forming equipment, or are you doing it the artisanal way ?
Do you have vacuum-forming equipment, or are you doing it the artisanal way ?
Last edited by wefalck on Fri May 21, 2021 11:48 am, edited 1 time in total.
Eberhard
Former chairman Arbeitskreis historischer Schiffbau e.V. (German Association for Shipbuilding History)
--------------------------------------------------------------------------------------------------------------------------------------------------------------------------------------------


Former chairman Arbeitskreis historischer Schiffbau e.V. (German Association for Shipbuilding History)
--------------------------------------------------------------------------------------------------------------------------------------------------------------------------------------------
-
marijn van gils
- Posts: 2691
- Joined: Tue Feb 06, 2007 10:24 am
- Location: Belgium
Re: HMS Victory and Le Redoutable at Trafalgar (1/300)
Thanks!
I made myself some vacform equipment in the (very!) artisanal way.
I'll be using and hopefully photographing it this weekend.
I made myself some vacform equipment in the (very!) artisanal way.
I'll be using and hopefully photographing it this weekend.
-
EJFoeth
- Posts: 2919
- Joined: Wed Jan 21, 2009 1:51 pm
Re: HMS Victory and Le Redoutable at Trafalgar (1/300)
Outrageously expensive Evergreen or another source? Before you know if you spend a package of failed hulls...  I used some cheaper stuff that came per square meter or so...
-
wefalck
- Posts: 2109
- Joined: Wed Sep 28, 2011 12:04 pm
- Location: Paris
- Contact:
Re: HMS Victory and Le Redoutable at Trafalgar (1/300)
It seems to be not so easy (anymore ?) to find the really thin stuff (0.1 mm thick), but otherwise I rather get the styrene from architectural modelling supply houses.
Eberhard
Former chairman Arbeitskreis historischer Schiffbau e.V. (German Association for Shipbuilding History)
--------------------------------------------------------------------------------------------------------------------------------------------------------------------------------------------
Former chairman Arbeitskreis historischer Schiffbau e.V. (German Association for Shipbuilding History)
--------------------------------------------------------------------------------------------------------------------------------------------------------------------------------------------
-
EJFoeth
- Posts: 2919
- Joined: Wed Jan 21, 2009 1:51 pm
Re: HMS Victory and Le Redoutable at Trafalgar (1/300)
Evergreen has some 0.13mm but it is finicky to work with, especially for vacuum forming I suppose. From Japanese sources you can get 0.10mm but the difference with the Evergreen 0.13 is too small. After vacuum the styrene is pulled a bit thinner even, so 0.25 plus sanding might be sufficiently thin (used it for a similar exercise as Marijn's).
-
wefalck
- Posts: 2109
- Joined: Wed Sep 28, 2011 12:04 pm
- Location: Paris
- Contact:
Re: HMS Victory and Le Redoutable at Trafalgar (1/300)
I think I wouldn't even dare to use the 0.1 mm or 0.13 mm for vacuum forming (but then I don't have any significant experience with it (yet).
Way back in the mid-1970s it seems to have been easy to find that thin stuff in most model-shops in the UK. I still have a few 'treasured' sheets from that time that are still good (which also gives me some confidence in the stability of the material).
Way back in the mid-1970s it seems to have been easy to find that thin stuff in most model-shops in the UK. I still have a few 'treasured' sheets from that time that are still good (which also gives me some confidence in the stability of the material).
Eberhard
Former chairman Arbeitskreis historischer Schiffbau e.V. (German Association for Shipbuilding History)
--------------------------------------------------------------------------------------------------------------------------------------------------------------------------------------------
Former chairman Arbeitskreis historischer Schiffbau e.V. (German Association for Shipbuilding History)
--------------------------------------------------------------------------------------------------------------------------------------------------------------------------------------------
-
marijn van gils
- Posts: 2691
- Joined: Tue Feb 06, 2007 10:24 am
- Location: Belgium
Re: HMS Victory and Le Redoutable at Trafalgar (1/300)
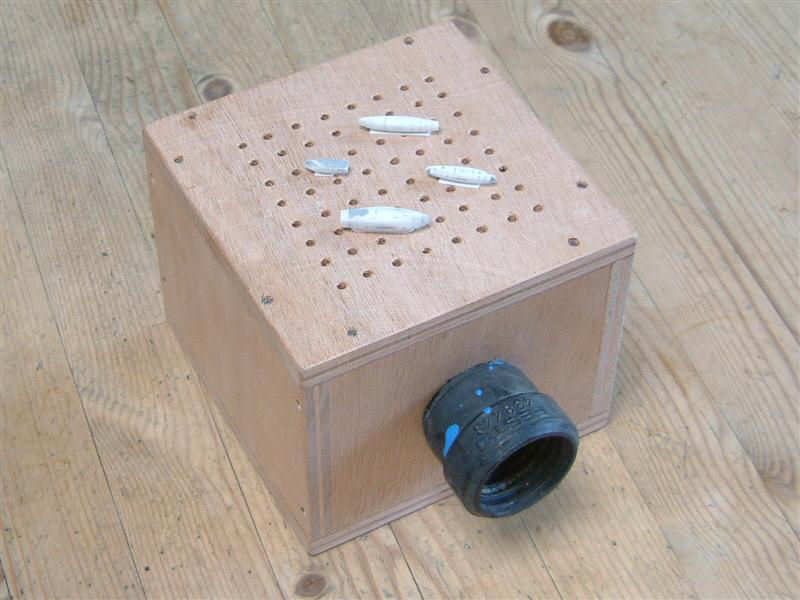
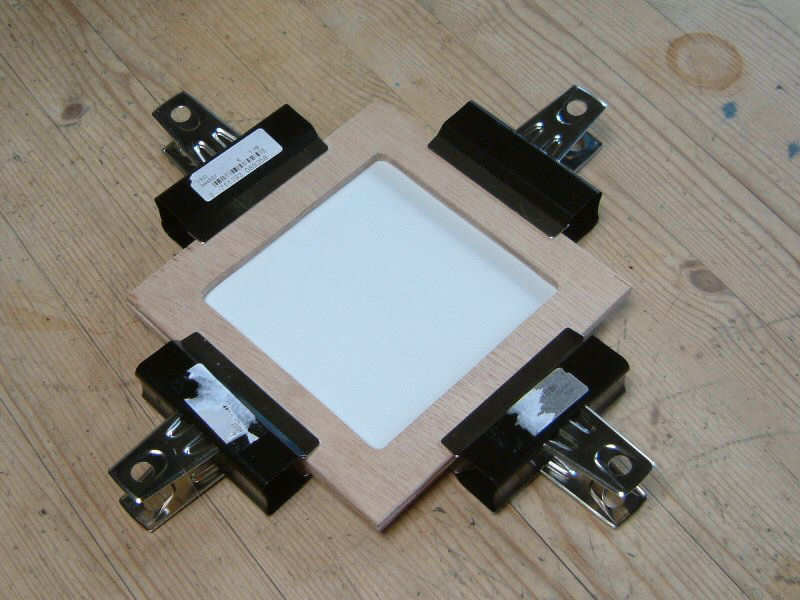
My little vacform �machine�:

It is as �artisanal� as it gets: it is nothing more than a simple box made from some scrap 6mm MDF, assembled with epoxy glue, with a hole in the front for the vacuum cleaner hose, and a series of small holes in the top.
And the frame for holding the plastic sheet is very simple too: two pieces of 6mm MDF. I made openings at the �handles� too, so I can attach clamps at the sides too. But that proved not to be necessary.

Both the �box� and frame took much less time to make than only one of the plugs took. It is crude, but it works!
This is my setup: The �box� is clamped to the kitchen worktable, and the vacuum cleaner is connected. A plug is attached to the box with a bit of Blu Tack. I heat the plastic sheet over the cooking fire, make a half turn left to the �box� (with vacuum on), press down the frame over the box and that�s it!

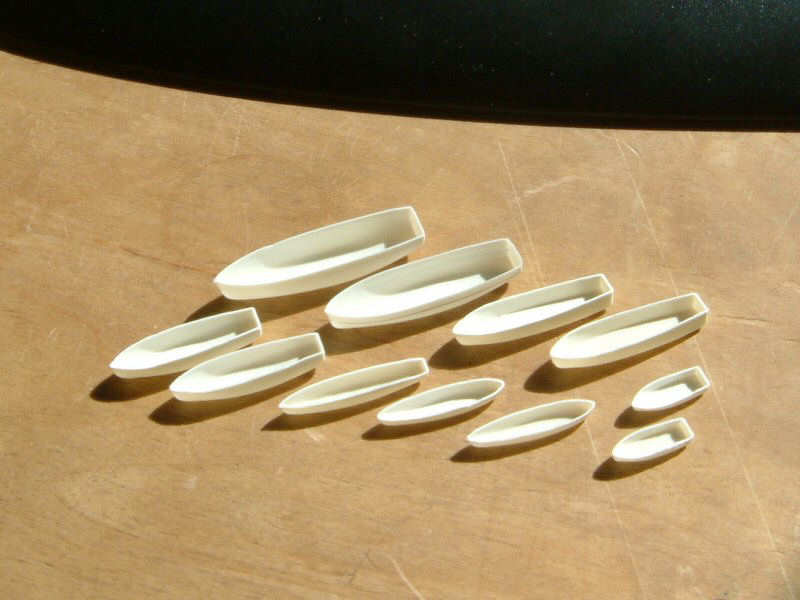
Some of the first tries:

The webbing at the stern of the boat that is still attached to the sheet is pretty normal. That is the exact reason why plugs should always be made much higher than the part you want.
And cut down to the needed height:

And all 7 types (I made some spares): British on the left, French on the right:

Sorry for the bad cellphone pics. I�ll try something better next time�
I used 0,5mm sheet. I like to keep the hull sides a bit thicker (0,4 -0,5 mm). That gives better strength, and will be safer when gluing details to it (don�t want to melt through the hull!). And I can easily scrape or sand the top edge for a finer appearance.
The biggest challenge was not to melt the plastic too much, because that causes it to stretch more and become too thin.
Vacforming with thinner styrene would be possible, but 0,13mm would be a challenge I think�
In my opinion, cost is relative� There is a lot of wastage indeed with this technique, however the absolute cost is not very high.
I can get 2 �forms� out of an A4 sized sheet. I didn�t use Evergreen (even though I like it a lot), but sheets from a Dutch brand named �Maquett� (simply because that�s what my local art supply shop had in stock). For the results in the last photo (plus some failed attempts!), I used 9 sheets.
One Evergreen sheet would cost about 2 euro (6 euro for a pack with 3 sheets, according to a quick google). So 18 euro total expense for ending up with 8 boats, so 2,25 euro per boat (plus some spare hulls!). For detailing them, I�ll have to use more sheet plastic and some square rod, but there will be little wastage for that, and the quantities are so tiny that the cost is negligible. So all in all, I would say this is much cheaper than buying another kit that I will never find the time to build�
It is as �artisanal� as it gets: it is nothing more than a simple box made from some scrap 6mm MDF, assembled with epoxy glue, with a hole in the front for the vacuum cleaner hose, and a series of small holes in the top.
And the frame for holding the plastic sheet is very simple too: two pieces of 6mm MDF. I made openings at the �handles� too, so I can attach clamps at the sides too. But that proved not to be necessary.
Both the �box� and frame took much less time to make than only one of the plugs took. It is crude, but it works!
This is my setup: The �box� is clamped to the kitchen worktable, and the vacuum cleaner is connected. A plug is attached to the box with a bit of Blu Tack. I heat the plastic sheet over the cooking fire, make a half turn left to the �box� (with vacuum on), press down the frame over the box and that�s it!
Some of the first tries:
The webbing at the stern of the boat that is still attached to the sheet is pretty normal. That is the exact reason why plugs should always be made much higher than the part you want.
And cut down to the needed height:
And all 7 types (I made some spares): British on the left, French on the right:
Sorry for the bad cellphone pics. I�ll try something better next time�
I used 0,5mm sheet. I like to keep the hull sides a bit thicker (0,4 -0,5 mm). That gives better strength, and will be safer when gluing details to it (don�t want to melt through the hull!). And I can easily scrape or sand the top edge for a finer appearance.
The biggest challenge was not to melt the plastic too much, because that causes it to stretch more and become too thin.
Vacforming with thinner styrene would be possible, but 0,13mm would be a challenge I think�
In my opinion, cost is relative� There is a lot of wastage indeed with this technique, however the absolute cost is not very high.
I can get 2 �forms� out of an A4 sized sheet. I didn�t use Evergreen (even though I like it a lot), but sheets from a Dutch brand named �Maquett� (simply because that�s what my local art supply shop had in stock). For the results in the last photo (plus some failed attempts!), I used 9 sheets.
One Evergreen sheet would cost about 2 euro (6 euro for a pack with 3 sheets, according to a quick google). So 18 euro total expense for ending up with 8 boats, so 2,25 euro per boat (plus some spare hulls!). For detailing them, I�ll have to use more sheet plastic and some square rod, but there will be little wastage for that, and the quantities are so tiny that the cost is negligible. So all in all, I would say this is much cheaper than buying another kit that I will never find the time to build�
-
wefalck
- Posts: 2109
- Joined: Wed Sep 28, 2011 12:04 pm
- Location: Paris
- Contact:
Re: HMS Victory and Le Redoutable at Trafalgar (1/300)
Well done 'Mr. Artisan' !
How are you going to deal with the transom ? Normally, there would be a sharp corner between the planking and the transom. Of course the rounded corners are unavoidable with the vacuumforming technique. One could make the plug longer than neede, glue in the transom at the right place and then trim the hull back to it.
How are you going to deal with the transom ? Normally, there would be a sharp corner between the planking and the transom. Of course the rounded corners are unavoidable with the vacuumforming technique. One could make the plug longer than neede, glue in the transom at the right place and then trim the hull back to it.
Eberhard
Former chairman Arbeitskreis historischer Schiffbau e.V. (German Association for Shipbuilding History)
--------------------------------------------------------------------------------------------------------------------------------------------------------------------------------------------
Former chairman Arbeitskreis historischer Schiffbau e.V. (German Association for Shipbuilding History)
--------------------------------------------------------------------------------------------------------------------------------------------------------------------------------------------
-
EJFoeth
- Posts: 2919
- Joined: Wed Jan 21, 2009 1:51 pm
Re: HMS Victory and Le Redoutable at Trafalgar (1/300)
looks familiar
-
dafi

- Posts: 1005
- Joined: Mon Mar 12, 2012 11:13 am
- Location: Ludwigsburg/Germany
- Contact:
Re: HMS Victory and Le Redoutable at Trafalgar (1/300)
Thank you all for the input 
XXXDAn
XXXDAn
To Victory and beyond ...
viewtopic.php?f=59&t=99050&start=60
See also our german forum for the age of Sail and History:
http://www.segelschiffsmodellbau.com
viewtopic.php?f=59&t=99050&start=60
See also our german forum for the age of Sail and History:
http://www.segelschiffsmodellbau.com
-
marijn van gils
- Posts: 2691
- Joined: Tue Feb 06, 2007 10:24 am
- Location: Belgium
Re: HMS Victory and Le Redoutable at Trafalgar (1/300)
Thanks!

It is not as bad as the one photo of the cut-out boat suggests though: the transom has a pronounced camber that exaggerates it. But still, the edges are a bit rounded indeed.
At the moment, I'm a bit reluctant to cut and replace them as that may weaken the structure. Maybe I can glue an extra 0,5mm piece to the inside of the transom, then sand from behind? Or maybe I can play around with it when installing the top strakes: add a bit of putty, sand a bit, carve the top of the inner corners a little...
Anyway, not sure yet what I'll do. But anyway I'm aware now, so thanks again for pointing it out!
Yes! To be honest, seeing yours (quite some time ago now) gave me the inspiration to give a go at it myself.EJFoeth wrote:looks familiar
Aye, honestly I hadn't thought of this before... So thank you very much!wefalck wrote:How are you going to deal with the transom ? Normally, there would be a sharp corner between the planking and the transom. Of course the rounded corners are unavoidable with the vacuumforming technique. One could make the plug longer than needed, glue in the transom at the right place and then trim the hull back to it.
It is not as bad as the one photo of the cut-out boat suggests though: the transom has a pronounced camber that exaggerates it. But still, the edges are a bit rounded indeed.
At the moment, I'm a bit reluctant to cut and replace them as that may weaken the structure. Maybe I can glue an extra 0,5mm piece to the inside of the transom, then sand from behind? Or maybe I can play around with it when installing the top strakes: add a bit of putty, sand a bit, carve the top of the inner corners a little...
Anyway, not sure yet what I'll do. But anyway I'm aware now, so thanks again for pointing it out!
-
Nanond
- Posts: 95
- Joined: Sun Jan 15, 2012 6:09 am
Re: HMS Victory and Le Redoutable at Trafalgar (1/300)
Wow! I've been away for a few months and your amazing work has progressed so much. The setting of the battle scene looks very promising. And vacuuming small boats is just equally awesome.
Great, great work!
Nanond
Great, great work!
Nanond
-
marijn van gils
- Posts: 2691
- Joined: Tue Feb 06, 2007 10:24 am
- Location: Belgium
Re: HMS Victory and Le Redoutable at Trafalgar (1/300)
Thank you Nanond!
-
Devin

- Posts: 2503
- Joined: Mon Jan 10, 2005 10:46 am
- Location: Hoboken, NJ
- Contact:
Re: HMS Victory and Le Redoutable at Trafalgar (1/300)
Amazing work as always, Marijn. I'm looking forward to seeing how you detail out the interiors of those small boats. I've done a few such boats in CAD for printing, but they're of a much larger scale. Your approach here will result in a much more in-scale hull thickness.
We like our history sanitized and theme-parked and self-congratulatory, not bloody and angry and unflattering. - Jonathan Yardley
-
marijn van gils
- Posts: 2691
- Joined: Tue Feb 06, 2007 10:24 am
- Location: Belgium
Re: HMS Victory and Le Redoutable at Trafalgar (1/300)
Many thanks Devin!
I'll do the detailing only in July, as it's a perfect holiday project. Whether it will be better than 3D designing and printing I do not know, but I do know that I will enjoy the 'old-fashioned' way more than spending more time behind a computer!
I'll do the detailing only in July, as it's a perfect holiday project. Whether it will be better than 3D designing and printing I do not know, but I do know that I will enjoy the 'old-fashioned' way more than spending more time behind a computer!
-
wefalck
- Posts: 2109
- Joined: Wed Sep 28, 2011 12:04 pm
- Location: Paris
- Contact:
Re: HMS Victory and Le Redoutable at Trafalgar (1/300)
Marijn, you hit the nail on the head: as much as I appreciate these modern technologies and their capabilities, I hesitate to practically embrace them fully, as it would indeed mean that I would not only spend most of my money-earning time in front of the computer, but also my spare time ...
Eberhard
Former chairman Arbeitskreis historischer Schiffbau e.V. (German Association for Shipbuilding History)
--------------------------------------------------------------------------------------------------------------------------------------------------------------------------------------------
Former chairman Arbeitskreis historischer Schiffbau e.V. (German Association for Shipbuilding History)
--------------------------------------------------------------------------------------------------------------------------------------------------------------------------------------------
-
Maarten Sch�nfeld

- Posts: 1842
- Joined: Fri Dec 12, 2008 12:44 pm
- Location: Herk-de-Stad, Belgium
Re: HMS Victory and Le Redoutable at Trafalgar (1/300)
Marijn, you keep amazing me! Vacuforming all the boats... indeed EJ preceeded you on this...
Maarten
Maarten
"I've heard there's a wicked war a-blazing, and the taste of war I know so very well
Even now I see the foreign flag a-raising, their guns on fire as we sail into hell"
Roger Whittaker +9/13/2023
Even now I see the foreign flag a-raising, their guns on fire as we sail into hell"
Roger Whittaker +9/13/2023
-
marijn van gils
- Posts: 2691
- Joined: Tue Feb 06, 2007 10:24 am
- Location: Belgium
Re: HMS Victory and Le Redoutable at Trafalgar (1/300)
Thanks Maarten!
I would love to pay for parts designed/printed by someone else if that can save me some time (1/300 - 1/350 scale Napoleonic age sailors, marines and officers in action anyone? ), but I also prefer to avoid the computer a little myself...
Meanwhile, I finished the lower masts of the Redoutable:

The techniques I used are the same as for the masts of Victory.
The mizzen was a lot simpler than Victory�s, as it is a one-piece mast without iron hoops, and it has a short rubbing paunch with no rope wooldings.
The bibbs of all masts were also much easier to make than Victory�s, but the rope wooldings on the fore and main mast were a minor challenge here.
They proved too small for me to also include the wooden battens to their top and bottom, but at least I managed to give them a �rope� appearance while keeping their diameter to scale, and sink them into the rubbing paunch.
I made them from tinned copper wire, twisting three 0,05mm strands together for a diameter of 0,1mm. One section of wooldings is less than 1mm wide. The mast itself at this height is about 2,5mm wide.

The thicker �rope� wrapped around the mast above the top simulates the top ends of the shrouds. This is made from three stands of 0,1mm wire wound together, for a diameter of about 0,2mm.
Exactly!wefalck wrote:Marijn, you hit the nail on the head: as much as I appreciate these modern technologies and their capabilities, I hesitate to practically embrace them fully, as it would indeed mean that I would not only spend most of my money-earning time in front of the computer, but also my spare time ...
I would love to pay for parts designed/printed by someone else if that can save me some time (1/300 - 1/350 scale Napoleonic age sailors, marines and officers in action anyone?
Meanwhile, I finished the lower masts of the Redoutable:
The techniques I used are the same as for the masts of Victory.
The mizzen was a lot simpler than Victory�s, as it is a one-piece mast without iron hoops, and it has a short rubbing paunch with no rope wooldings.
The bibbs of all masts were also much easier to make than Victory�s, but the rope wooldings on the fore and main mast were a minor challenge here.
They proved too small for me to also include the wooden battens to their top and bottom, but at least I managed to give them a �rope� appearance while keeping their diameter to scale, and sink them into the rubbing paunch.
I made them from tinned copper wire, twisting three 0,05mm strands together for a diameter of 0,1mm. One section of wooldings is less than 1mm wide. The mast itself at this height is about 2,5mm wide.
The thicker �rope� wrapped around the mast above the top simulates the top ends of the shrouds. This is made from three stands of 0,1mm wire wound together, for a diameter of about 0,2mm.