The Ship Model Forum

The Ship Modelers Source
It is currently Sun Jun 29, 2025 11:26 pm

All times are UTC - 6 hours [ DST ]


Post new topic Reply to topic  [ 107 posts ]  Go to page Previous  1, 2, 3, 4, 5, 6  Next
Author Message
PostPosted: Fri Dec 10, 2010 8:16 pm 
Offline
Scale Decks
Scale Decks

Joined: Sun Nov 28, 2010 1:33 am
Posts: 163
Location: Southern California
redsoldiergreen wrote:
Hi John . I wasnt aware that hasegawa did a deluxe Mikasa . Thats next on my radar. Ive been doing a bit of research myself for wood decks . There are a few manufacturers about ,all have website but i cant find anything on Blue Star or A1. Do you know of these ? There is also a chap who does one for the Revell Emden and the Varyag . Hes called Vectorcut .com . That also has some very good insperational modelling on in various scales . Check him out . Martin :thumbs_up_1:

Martin -

I know of Vectorcut - that's a TOTALLY different approach. He is making a very THICK deck that is designed to totally replace the kit plastic. The problem with that is that you then have to scracth build the various fittings and such, or find some other way to construct all the detail on the plastic parts you throw away. Thus I think it would be really tough to do other ships with molded in gun tubs, shields, bulkheads, etc. For a kit like the Varyag it's a good approach.

I hadn't come across Blue Star or A1. I will be sure to check them out, though. Thanks for the heads-up!

-- John D. --

_________________
scaledecks.com - Proud Sponsor of the ModelWarships.com community!


Report this post
Top
 Profile  
Reply with quote  
 Post subject: I HATE MOSQUITO GUNS!
PostPosted: Mon Dec 13, 2010 7:52 pm 
Offline
Scale Decks
Scale Decks

Joined: Sun Nov 28, 2010 1:33 am
Posts: 163
Location: Southern California
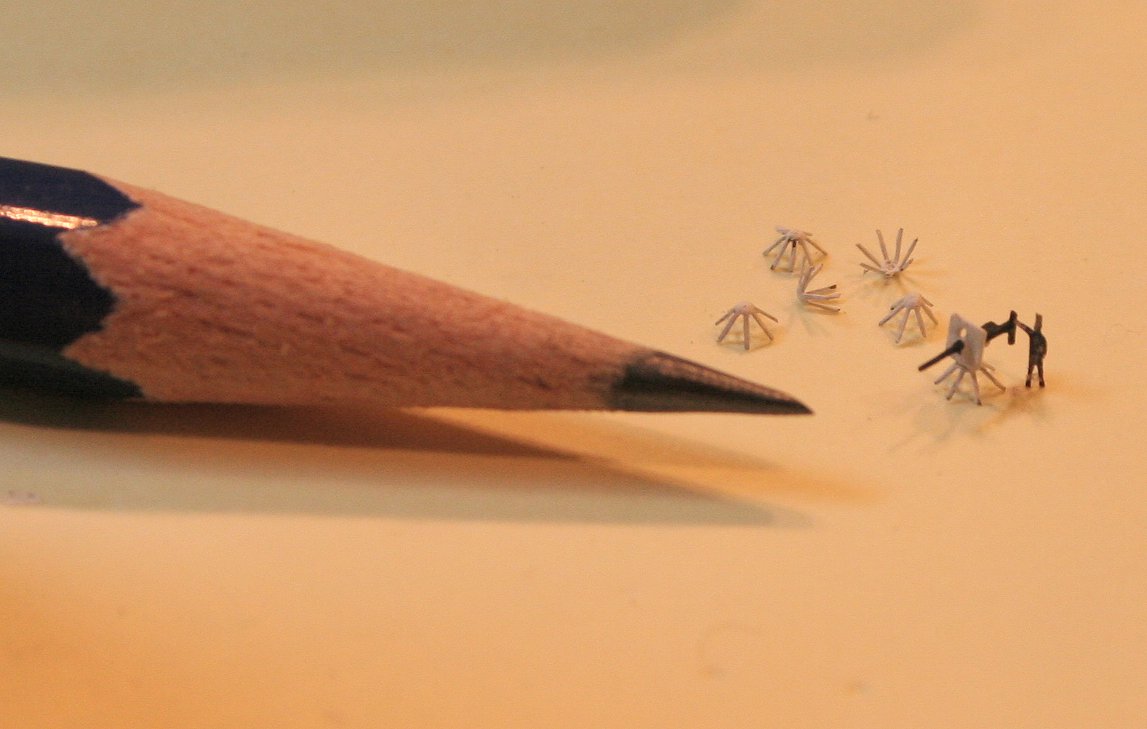
Can I vent? Boy, do I HATE MOSQUITO GUNS! This is what I meant when I referred to as "deck guns that look like a squashed mosquito - only smaller":
Attachment:
File comment: Mosquito Gun
Mosquito_Gun.jpg
Mosquito_Gun.jpg [ 77.41 KiB | Viewed 3888 times ]

The Borodino kit has these guns mounted on a cone pedestal. White Ensign, perhaps to reflect accurate detail (but I suspect more likely just to be unnecessarily cruel) provides fold-up stands to replace these cones (along with gun shields and shoulder rests.) I scrapped all the Zvezda parts which had the clunky gun shields unfortunately molded on, opting instead to go with the small 1.1s from the Missouri, as I will be replacing THOSE with LionRoar Brass anyway when I eventually get to my Iowas. These were much easer to clip from the cone and to remove the shoulder rest - and the Tamiya molding was a bit finer than the Zvezda casting.

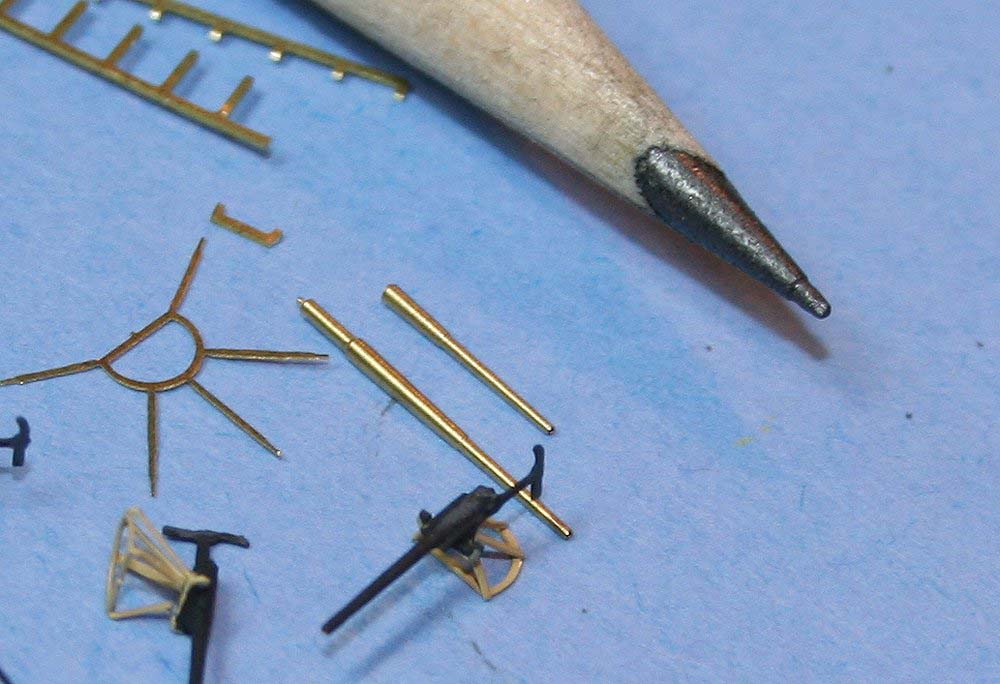
White Ensign provides enough brass to make 20 guns, and the plans of the Borodino call for 18. So we had two spares, which we immediately trashed trying to make the first two guns. So we're out of spares...

The problem is that the bases are shaped like the letter "D" with five spokes on them. They are very small.
Attachment:
File comment: White Ensign Brass for the Borodino
Brass.jpg
Brass.jpg [ 85.64 KiB | Viewed 3888 times ]

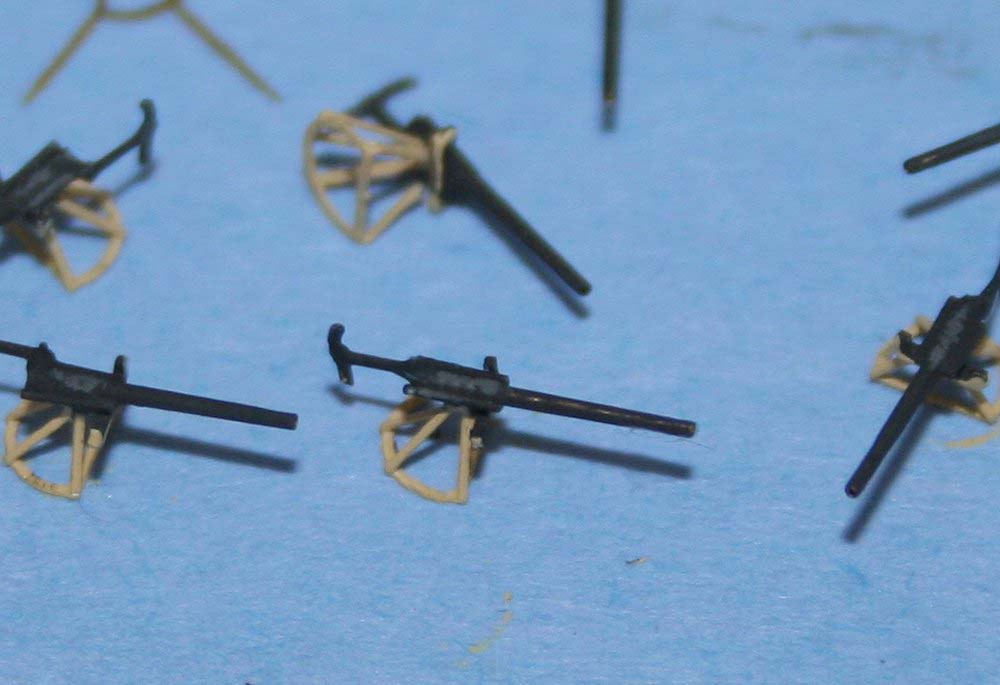
Cutting out the spiders is easy enough... Although I broke a leg or two when I was attempting to cut them from the sheet. The legs are EXTREMELY FRAGILE - so I planned to replace the broken ones with .006 brass wire...
Attachment:
File comment: Notice the sad, four-legged pedestal in the foreground, and the replacement brass wire.
Spiders.jpg
Spiders.jpg [ 70.79 KiB | Viewed 3888 times ]

Two problems happen when attempting to use the pedestals... First, there is really just no good way to get a grip on the buggers to make sure that the legs bend at the appropriate places. And second (and more problematic) is that if you attempt to do any adjustments, straightening, or rebending, the legs just snap off. As in, "we're outta here - sucks to be you!" And, sometimes the legs just snap off for fun anyway, like when you are cutting them from the sheet, or when you just think about doing the most careful of initial bends. GRRRR...

So I devised a plan to make things a little more manageable by forming a solid base that could be used as grip and foundation for gluing broken legs. I started by punching out some styrene disks, then cutting away one side to make appropriately sized "D's"...
Attachment:
File comment: Making the letter "D" to lock down my mosquito guns...
Disks.jpg
Disks.jpg [ 89.88 KiB | Viewed 3888 times ]

Next step, glue the spiders down. Note that I am working on a strip of Scotch Tape sticky-side up, and that is stuck to a scrap of my deck material just to provide som stiffness...
Attachment:
File comment: Brass glued to disks
Unbent_Pedestals.jpg
Unbent_Pedestals.jpg [ 125.45 KiB | Viewed 3888 times ]

Next step, simply (Hah!) bend the legs up. And watch out for the legs that had some glue runoff and stuck themselves to the tape... Then place a trop of glue at the top to lock all the legs together.
Attachment:
File comment: Pedestals with bent legs and glue blobs
Pedestals.jpg
Pedestals.jpg [ 110.75 KiB | Viewed 3888 times ]

When you are done, assuming that you have not been sent to an asylum or commited some unspeakable act on your pet out of frustration, you have a piece of tape with some pedestals stuck to it. The disk bases provide SOMETHING that you can grip without mangling with fine tweezers or a very fine hemostat. I was able to make all the pedestals I needed, and replaced broken legs, to match the two guns that we had previously completed after mangling four sets of legs.
Attachment:
File comment: I HATE MOSQUITO GUNS
I_Hate_Mosquito_Guns.jpg
I_Hate_Mosquito_Guns.jpg [ 102.3 KiB | Viewed 3888 times ]

The bad news is that one of those two guns separated from the pedestal, so I had to attempt to reglue it several times to get it to stick. And, in so doing, I had an accumulation of glue from the failed attempts forming a solid blob within the legs. In other words, a cone. Like the ones I had cut off. Except bigger, and more blobby. So I just reglued the cast cone to the base.

So, ONE of my 18 guns has a cone pedestal. Too bad. I'll bury it in an obscure location, and use the disk-based guns everywhere else, unless I mangle more of those. (And if anybody says, "Yeah -but the stands didn't have a solid base" I can only threaten to throw a mosquito gun at you with all my strength...)

If I had it to do all over again, I would just leave them all on their wonderfully cast cone bases and leave it at that. Sometimes you just have to admit defeat.

Have I mentioned that I HATE Mosquito Guns?
Attachment:
File comment: ???
What Was I Thinking.jpg
What Was I Thinking.jpg [ 67.44 KiB | Viewed 3888 times ]

_________________
scaledecks.com - Proud Sponsor of the ModelWarships.com community!


Last edited by johnd13 on Tue Dec 14, 2010 5:31 am, edited 1 time in total.

Report this post
Top
 Profile  
Reply with quote  
PostPosted: Mon Dec 13, 2010 8:16 pm 
Offline

Joined: Tue Jun 20, 2006 5:06 pm
Posts: 730
Location: Cambridgeshire
1/350?

Luxury....!

You should try doing it in 700 scale... :big_grin:

Image

This is a 'cone' version (with the cone made from tip of a toothpick and the base made with a punched styrene disc), I'll try and dig up a open stand version... Jim B probably has one around on one of his WIP's... :cool_2:

_________________
Bill Livingston
Cambridge


Report this post
Top
 Profile  
Reply with quote  
PostPosted: Tue Dec 14, 2010 3:12 am 
Offline
User avatar

Joined: Mon Jan 10, 2005 5:30 pm
Posts: 5568
Location: Nr Southampton England
Luxury indeed....

this is the same gun in 1/700...! :big_grin:

Image
and installed:

Image


BUT....


good natured joking and ribbing aside.... :wave_1: :big_grin:

The technique is to hold each leg in the tweezers and bend up the rest of the assembly to the centres, repeat around the entire 'star'--that way the legs bend evenly around the crease line

see here:

Image

Using a bit of easy maths....

I used 1/700 RN 6 in brass gun barrels ( NNT) --these gave a fair impression of a 1/350 3" QF guns


Image

_________________
....I buy them at three times the speed I build 'em.... will I live long enough to empty my stash...?
http://www.modelshipgallery.com/gallery ... index.html

IPMS UK SIG (special interest group) www.finewaterline.com


Report this post
Top
 Profile  
Reply with quote  
PostPosted: Tue Dec 14, 2010 5:24 am 
Offline
Scale Decks
Scale Decks

Joined: Sun Nov 28, 2010 1:33 am
Posts: 163
Location: Southern California
You guys are scary. Or sick. Or both!

I sure am learning a lot by going throgh this process and sharing my trials and tribulations. Thank you so very much... I think!

What have I learned?

1. I have a long way to go in this hobby (but that's a good thing, isn't it?)
2. That I think I am better off sticking to decks and not the guns that go on them!

As such, I have learned some of the limits of what I should attempt to do at this point in my model-building level of development. We spent the night taking those Missouri guns and putting the shields and shoulder rests on them complete with the cone bases. The more I looked at those incosistentently bent spindly legs the less I liked them. For now, I'll be satisfied with cones and take what I have learned and apply it to the next detail that I attempt to do...

Meanwhile, I will attempt to contribute where I can and commit to learn just about everywhere else. Speaking of which, after some inspired deep thought and conversation, we've come up with a new, alternate approach to decking that I think might appeal to "the crazies" like you guys... Ultra realistic, and hopefully workable even for fat-fingered relative novices like me. I should be able to pick up a sample tomorrow, then I will experiment with it and should be able to post some pictures by the weekend... The only question is what kit I will try it on... I am thinking that my 1896 Texas in resin might be a good candidate... I don' t think I am ready to do a whole Texas stem to stern yet, but I could lay down a deck and take some pictures I bet... Stay tuned!

_________________
scaledecks.com - Proud Sponsor of the ModelWarships.com community!


Report this post
Top
 Profile  
Reply with quote  
PostPosted: Tue Dec 14, 2010 9:44 am 
Offline

Joined: Tue Jun 20, 2006 5:06 pm
Posts: 730
Location: Cambridgeshire
johnd13 wrote:
You guys are scary. Or sick. Or both!


LOL!!! I'm glad you took that all in the way it was intended... :big_grin:

We ALL have a long way to go... Jim is the scary one though... and Kostas, and Dave Griffiths and a few others working in 700 scale. The rest of us just try to emulate the masters and learn as much as we can in order to progress and feel that with each model we are getting better, learning as we go and getting more and more enjoyment from it as we see our skills and our knowledge improve.

I am not sure what a 700 scale wooden deck would look like. In 700 scale we pretty much always mount the model in a seascape and the whole ship is weathered in such a way it approaches what it would like like if we were to see the ship in that setting in real life. We are all obviously miles away from that, but some people get close enough... or at least get to the point where the finished model looks like a very accurate painting of the same scene. Jim Baumann manages to achieve that...

A lot of 350 scale models are mounted on pedestals and are pretty much pristine... I can see a wooden deck would suit that sort of modelling very well... if the grain was fine enough and the thing looked 'natural'. The only issue I have ever found in wooden deck on the rare occasions I have seen one, would be on the fitting around deck fixtures... I ALWAYS see gaps... and the fact that the surrounding border planking is never there... either around fixtures or fittings, casemates, or even the boundary around the deck edge. The gaps would be more pronounced in 700 scale and the thickness of the deck would be correspondingly thicker and therefore mean all the fittings would be lower than would be the case in reality.

What you would really want is NO holes for fittings... just the pattern itself, replacing the whole deck, including the pattern around where fittings would mount. That way each individual fitting could be fixed on top of the deck so that it would appear in the same way as it would be in reality. But then, THAT would be really obsessive! :big_grin:

Anyway, here is a picture of one of Jim's 700 scale ships, painted and weathered and illustrates what I meant earlier... :thumbs_up_1:

Image

See what I mean...? Now THAT is scary... and just in case you dont believe it is a model, or cant believe it is in 700 scale... here you go... :-)

Image

If I could get a tenth as good as that I would be happy...

We ALL have a way to go, that's what makes it both challenging and enjoyable... :thumbs_up_1:

_________________
Bill Livingston
Cambridge


Report this post
Top
 Profile  
Reply with quote  
PostPosted: Tue Dec 14, 2010 9:50 am 
Offline

Joined: Mon Oct 04, 2010 2:29 pm
Posts: 20
Ill have to get some super detailed pencil :thumbs_up_1: shots to upload now ! Great work guys , now I know to avoid open pedestals .


Report this post
Top
 Profile  
Reply with quote  
PostPosted: Tue Dec 14, 2010 6:21 pm 
Offline
Scale Decks
Scale Decks

Joined: Sun Nov 28, 2010 1:33 am
Posts: 163
Location: Southern California
It took a bit of searching on line, but I found the PERFECT tool to use to achieve the level of detail that I want in my photograps... Check it out - only $4.95 from seefred.com!
Attachment:
File comment: Problem Solved!
giantpencil.jpg
giantpencil.jpg [ 9.98 KiB | Viewed 3805 times ]

_________________
scaledecks.com - Proud Sponsor of the ModelWarships.com community!


Report this post
Top
 Profile  
Reply with quote  
PostPosted: Tue Dec 14, 2010 6:48 pm 
Offline

Joined: Tue Jun 20, 2006 5:06 pm
Posts: 730
Location: Cambridgeshire
Lol!

Wonderful.... :big_grin: :thumbs_up_1:

_________________
Bill Livingston
Cambridge


Report this post
Top
 Profile  
Reply with quote  
PostPosted: Tue Dec 14, 2010 7:15 pm 
Offline

Joined: Mon Oct 04, 2010 2:29 pm
Posts: 20
Ha Ha .!excellent :thumbs_up_1:


Report this post
Top
 Profile  
Reply with quote  
PostPosted: Wed Dec 15, 2010 5:55 am 
Offline
User avatar

Joined: Mon Jan 10, 2005 5:30 pm
Posts: 5568
Location: Nr Southampton England
My secrets out then... :big_grin:

JB

_________________
....I buy them at three times the speed I build 'em.... will I live long enough to empty my stash...?
http://www.modelshipgallery.com/gallery ... index.html

IPMS UK SIG (special interest group) www.finewaterline.com


Report this post
Top
 Profile  
Reply with quote  
PostPosted: Wed Dec 15, 2010 9:53 am 
I'm not sure if this is good news or bad news, but the WEM replacement bases for the 47mm guns are wrong. They were in fact angled (eccentric?) cones. so the kit bases are actually more accurate. :smallsmile:
Here are 47mm guns on Orel, they were the same on all the Borodinos.


Report this post
Top
  
Reply with quote  
PostPosted: Wed Dec 15, 2010 12:27 pm 
Offline
User avatar

Joined: Mon Jan 10, 2005 5:30 pm
Posts: 5568
Location: Nr Southampton England
Thats interesting....

The WEM angles look OK-- but they were actually a steel cone eh...!

Ha! ( lucky for me that the French QF's were on Octapods-( substituted with the WEM heptapods,....!!)

Always check your refs-- or ask Cerberus JF !! :heh: :big_grin: :wave_1:

JIM B

_________________
....I buy them at three times the speed I build 'em.... will I live long enough to empty my stash...?
http://www.modelshipgallery.com/gallery ... index.html

IPMS UK SIG (special interest group) www.finewaterline.com


Report this post
Top
 Profile  
Reply with quote  
PostPosted: Wed Dec 15, 2010 2:23 pm 
Offline
User avatar

Joined: Sun Jul 25, 2010 5:13 am
Posts: 403
Location: Tucson, Arizona
Is that battle damage just below the 47mm gun? It looks like a shell penetration of the side just below the first gun.


Report this post
Top
 Profile  
Reply with quote  
PostPosted: Wed Dec 15, 2010 2:26 pm 
JIM BAUMANN wrote:
Always check your refs-- or ask Cerberus JF !! :heh: :big_grin: :wave_1:

LOL :wave_1: The expert on Borodino is Kronma, no question :smallsmile:
BFR4570 wrote:
Is that battle damage just below the 47mm gun? It looks like a shell penetration of the side just below the first gun.


Yes it is, it was taken after the battle of Tsushima. :smallsmile:
Here is one of Borodino being build with identical 47mm bases. Please ignore the red square, I was outlining a hammock store


Report this post
Top
  
Reply with quote  
PostPosted: Sat Dec 18, 2010 5:47 am 
Offline

Joined: Sat Jan 23, 2010 6:24 am
Posts: 23
Hello John,

I'm really impressed by your wooden decks, and I'll for sure buy one for my Borodino (respectively Kniaz Suwarow).

But your great work runs myself into another BIG PROBLEM.

I'm a so far proud owner of a 1/350 ARIZONA kit (the former Banner kit, re-released by MHM), bought brass barrels, the GMM photo-etch set, and additionally the Eduard BIG-ED photo-etch set.

How can I build this kit without your fantastic wooden decks ???

Please consider in your further developments a wooden deck for this famous ship.

Merry Christmas and a Happy New Year from Germany

smoke


Report this post
Top
 Profile  
Reply with quote  
PostPosted: Sat Dec 18, 2010 6:10 am 
Offline
User avatar

Joined: Thu Mar 05, 2009 10:38 pm
Posts: 3127
Bill Livingston wrote:
Image

If I could get a tenth as good as that I would be happy...

We ALL have a way to go, that's what makes it both challenging and enjoyable... :thumbs_up_1:
Hey, Bill, what's that thing to the left of the model?

_________________
Proper Preparation Prevents Poor Performance


Report this post
Top
 Profile  
Reply with quote  
PostPosted: Sat Dec 18, 2010 7:28 am 
I forgot to say that although the plans call for 18 47mm guns, the ship actually carried 20 :smallsmile:


Report this post
Top
  
Reply with quote  
PostPosted: Sat Dec 18, 2010 8:20 am 
Offline

Joined: Tue Jun 20, 2006 5:06 pm
Posts: 730
Location: Cambridgeshire
navydavesof wrote:
Hey, Bill, what's that thing to the left of the model?


no idea :big_grin:

_________________
Bill Livingston
Cambridge


Report this post
Top
 Profile  
Reply with quote  
PostPosted: Sat Dec 18, 2010 8:49 am 
Offline

Joined: Mon Oct 04, 2010 2:29 pm
Posts: 20
Wow! were cameras really so large in the early days of photography? :thumbs_up_1:


Report this post
Top
 Profile  
Reply with quote  
Display posts from previous:  Sort by  
Post new topic Reply to topic  [ 107 posts ]  Go to page Previous  1, 2, 3, 4, 5, 6  Next

All times are UTC - 6 hours [ DST ]


Who is online

Users browsing this forum: No registered users and 10 guests


You can post new topics in this forum
You can reply to topics in this forum
You cannot edit your posts in this forum
You cannot delete your posts in this forum
You cannot post attachments in this forum

Jump to:  
Powered by phpBB® Forum Software © phpBB Group