The Ship Model Forum

The Ship Modelers Source
It is currently Fri Apr 19, 2024 6:55 pm

All times are UTC - 6 hours [ DST ]


Post new topic Reply to topic  [ 39 posts ]  Go to page Previous  1, 2
Author Message
PostPosted: Fri Mar 16, 2018 9:52 pm 
Offline
User avatar

Joined: Tue Jan 22, 2008 5:55 pm
Posts: 320
Location: Hoover, Alabama
Fantastic work, Terence!!!

I have been, and am still following this build and your details with great interest!
Kelley

_________________
Image


Report this post
Top
 Profile  
Reply with quote  
PostPosted: Sat Mar 17, 2018 1:36 pm 
Offline

Joined: Sat Jan 24, 2009 5:16 pm
Posts: 815
Location: Wisconsin
Very impressive work! Looking forward to this one!


Report this post
Top
 Profile  
Reply with quote  
PostPosted: Sat Mar 17, 2018 3:26 pm 
Offline
User avatar

Joined: Tue Jan 11, 2005 1:40 pm
Posts: 8175
Location: New Jersey
Your attention to detail is outstanding.

_________________
Martin

"Tomorrow is the most important thing in life. Comes into us at midnight very clean. It's perfect when it arrives and it puts itself in our hands. It hopes we've learned something from yesterday." John Wayne

Ship Model Gallery


Report this post
Top
 Profile  
Reply with quote  
PostPosted: Sun Mar 18, 2018 9:24 pm 
Offline
User avatar

Joined: Fri Oct 28, 2016 10:13 pm
Posts: 16
Location: Vancouver, WAshington, USA
Thanks guys. I'll try to be better about posting every couple of weeks.

_________________
Terence Werdel


Report this post
Top
 Profile  
Reply with quote  
PostPosted: Sun Mar 18, 2018 10:12 pm 
Offline
User avatar

Joined: Mon May 21, 2007 5:49 pm
Posts: 1589
Location: The beautiful PNW
Terry,

Fantastic work so far!!! Can’t wait to see her in person, should bring to the auction Tuesday, I’d bid handsomely for it :big_grin:

Matt

_________________
In the yards right now:
USS Utah AG-16
On Hold
1/350 USS Portland CA-33 1942
1/350 Trumpeter Texas with a twist


Report this post
Top
 Profile  
Reply with quote  
PostPosted: Mon Apr 02, 2018 2:58 pm 
Offline
User avatar

Joined: Fri Oct 28, 2016 10:13 pm
Posts: 16
Location: Vancouver, WAshington, USA
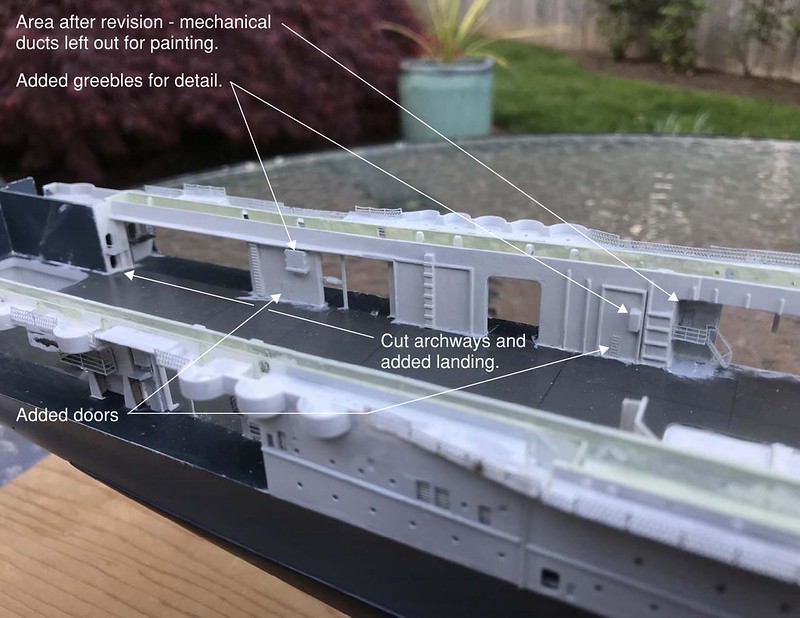
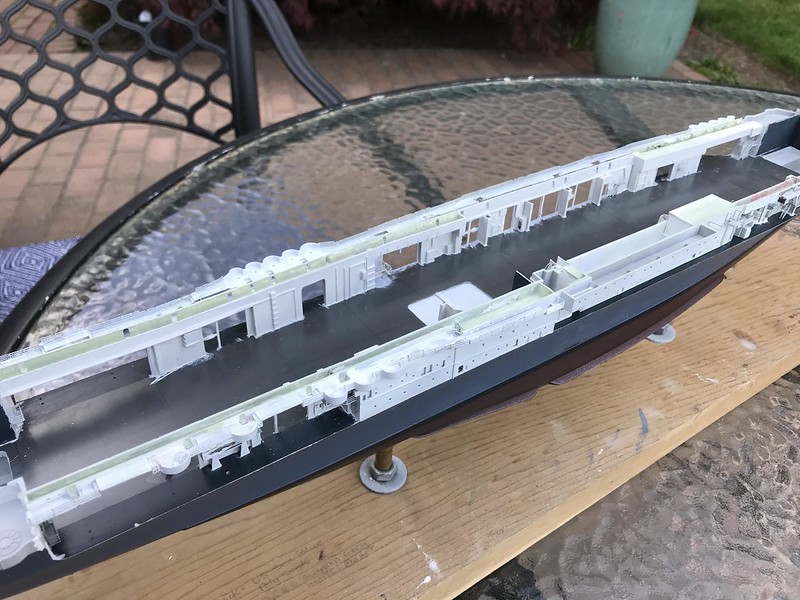
I've glued down the starboard hanger sections. Added a few fun items along the way. It's not perfect and I'm missing some stuff but at least I can see the similarity in pictures.

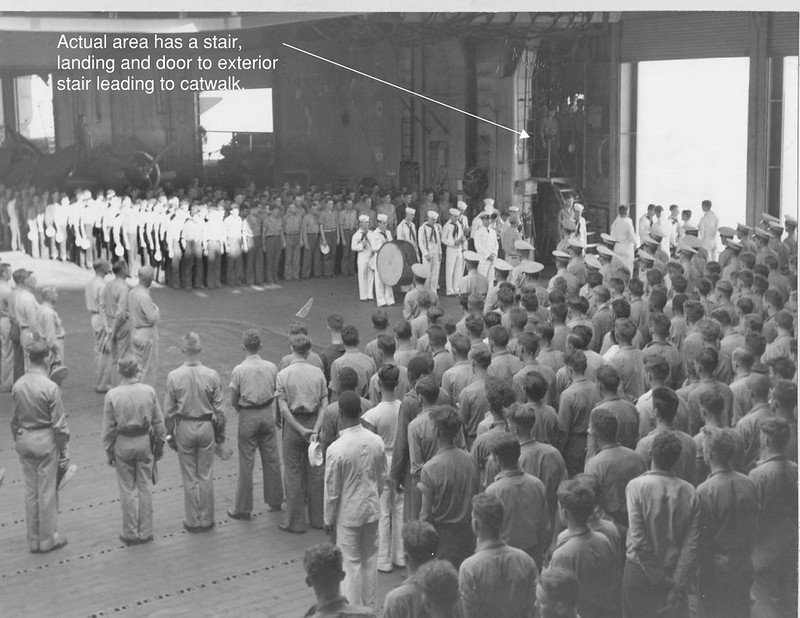
Task Force 48 provided me with a picture that I was intrigued by and wanted to run with. The picture below shows a Sunday service being held at the center elevator area.
Attachment:
Service 01 69.jpg
Service 01 69.jpg [ 68.31 KiB | Viewed 2663 times ]
You'll notice that the bulkheads around the elevator are very dark. I don't know what year of the war this was taken but given the number of times the Enterprise was painted, it seems it was dark at one time or another. We thought there was a very good chance these were painted deck blue to prevent the elevator opening from being a giant white target square for dive bombers to aim for if it was down in an attack. Going with this assumption, I've decided to paint the bulkheads around the elevators deck blue. I can't prove this but it adds interest to the hanger area and I like the idea. Don't fret modelers, I also have pictures of this same area painted the same color as the rest of the hanger...so go with your creative spirit.

Here's a photo of the rear hanger section.
Attachment:
Aft Elevator 01 56.jpg
Aft Elevator 01 56.jpg [ 55.61 KiB | Viewed 2663 times ]
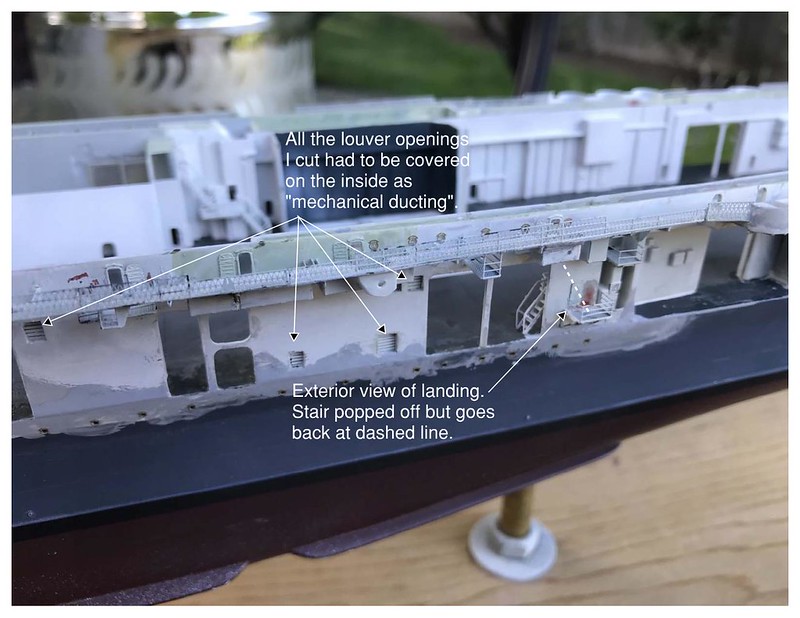
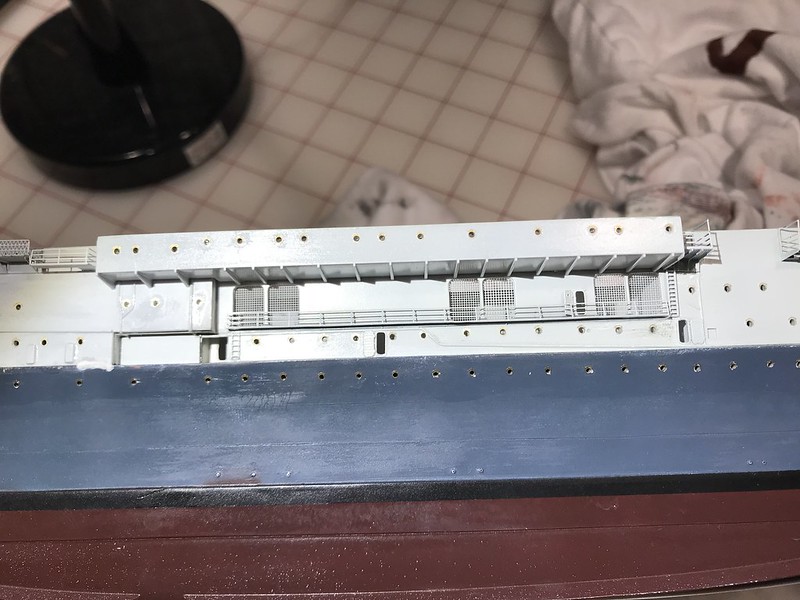
I've created elevator wells because I've never seen this done before.
Attachment:
Aft Post 01 59.jpg
Aft Post 01 59.jpg [ 58.9 KiB | Viewed 2663 times ]
Looks pretty cool...guess the elevators will be up now.

The bow elevator well is interesting in that it's stepped because the hull is too narrow at this point. I saw this in the general plans and verified it with a repair photo taken after the kamikaze blew the elevator out of the ship in May '45 off of Okinawa.
Attachment:
Bow Elevator 01 46.jpg
Bow Elevator 01 46.jpg [ 45.38 KiB | Viewed 2663 times ]
See the lower right of the picture where you see the step begin.

I've also added the raised hanger catapult in the forward section.
Attachment:
Bow Post 01 68.jpg
Bow Post 01 68.jpg [ 67.72 KiB | Viewed 2663 times ]
I can't imagine using this thing. The ship would have to be dead still unless you wanted to launch into a 90 degree crosswind and then you're what...30 feet above the water. Crazy! Attached is a picture of a Hellcat being launched off one of the Essex carriers.
Attachment:
Deck Launch Post 01 53.jpg
Deck Launch Post 01 53.jpg [ 52.99 KiB | Viewed 2663 times ]


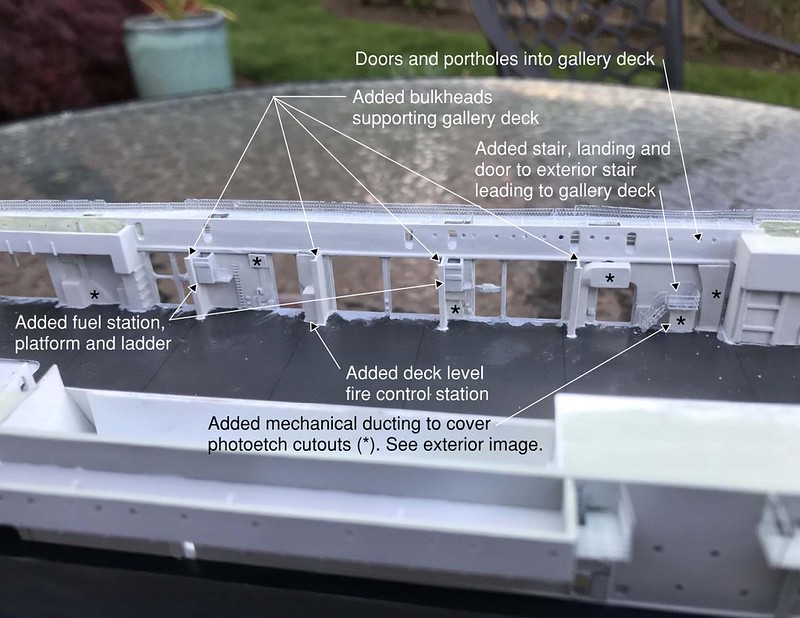
I've always been fascinated by a picture of the Enterprise hanger when it was being salvaged. It shows the battle record of the ship on a bulkhead but I've never been able to figure out where is was located. I think I found it when I put in the stair to the Gallery deck. It looks like it's on the bulkhead between the two starboard forward roller doors. The stair appears in the background.
Attachment:
Salvage Post 03 48.jpg
Salvage Post 03 48.jpg [ 47.69 KiB | Viewed 2663 times ]


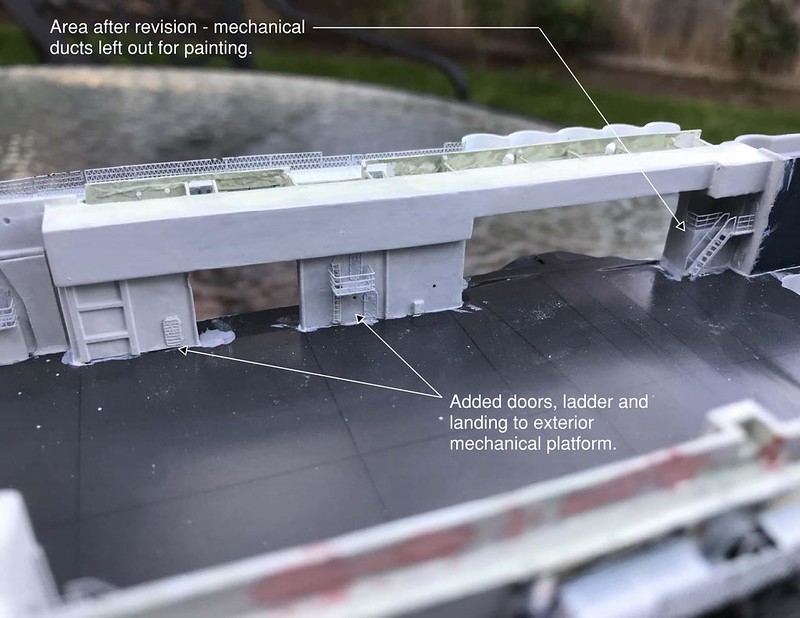
Then finally a picture of the mid-section of the hanger.
Attachment:
Mid Post 03 78.jpg
Mid Post 03 78.jpg [ 77.8 KiB | Viewed 2663 times ]

_________________
Terence Werdel


Report this post
Top
 Profile  
Reply with quote  
PostPosted: Mon Apr 02, 2018 9:36 pm 
Offline
User avatar

Joined: Tue Jan 22, 2008 5:55 pm
Posts: 320
Location: Hoover, Alabama
Speechless!!!!
Absolutely fantastic detail!!!
I plan on modeling the aft auxiliary elevator and AFT bulkhead hangar door on my build, but haven't figured out how I want to tackle the hanger catapult. You have captured it extremely well! The hangar deck gray color and sheen is very nice as well.


Um - 'how-too's' or 'dids' are welcome! :thumbs_up_1:
Kelley

_________________
Image


Report this post
Top
 Profile  
Reply with quote  
PostPosted: Tue Apr 03, 2018 10:10 pm 
Thank you for the kind words Tom. I'm glad this thread is helpful to you. The hanger deck appears very glossy in all the pictures I've seen. I'll probably have to flat it to weather but will re-gloss it to finish.
Everything inside will eventually all be glossy for the simple reason that it reflects the most light. Anything will help in the dark interior. No special techniques to report although "gluing" PE with future works really well when you can float something onto a flat surface. you can work it around before it dries, it dries super thin and it's waterproof.


Report this post
Top
  
Reply with quote  
PostPosted: Wed Apr 04, 2018 2:02 am 
Offline
User avatar

Joined: Mon May 21, 2007 5:49 pm
Posts: 1589
Location: The beautiful PNW
Terry,

Really really wish you would bring in the shrink ray you have invented to one of the club meetings :heh:

Don’t know a word strong enough, but simply fantastic work my friend!

Matt

_________________
In the yards right now:
USS Utah AG-16
On Hold
1/350 USS Portland CA-33 1942
1/350 Trumpeter Texas with a twist


Report this post
Top
 Profile  
Reply with quote  
PostPosted: Fri Apr 06, 2018 5:40 am 
Offline
SovereignHobbies
SovereignHobbies

Joined: Sat Feb 28, 2015 9:09 am
Posts: 1176
Location: Aberdeenshire, Scotland, UK
I agree with the general comments. I've nothing to add really, other than to say I am looking in on your build thread here and am very impressed with your work :thumbs_up_1:

_________________
James Duff
Sovereign Hobbies Ltd
http://www.sovereignhobbies.co.uk

Current build:
HMS Imperial D09 1/350
http://www.shipmodels.info/mws_forum/viewtopic.php?f=59&t=167151


Report this post
Top
 Profile  
Reply with quote  
PostPosted: Fri Apr 06, 2018 5:20 pm 
Offline
User avatar

Joined: Fri Oct 28, 2016 10:13 pm
Posts: 16
Location: Vancouver, WAshington, USA
Thanks guys, I appreciate the compliments. It’s all in the shrink-ray. They’re tough to come by and cost a fortune but worth every penny :)

_________________
Terence Werdel


Report this post
Top
 Profile  
Reply with quote  
PostPosted: Tue May 29, 2018 2:53 pm 
Offline
User avatar

Joined: Fri Oct 28, 2016 10:13 pm
Posts: 16
Location: Vancouver, WAshington, USA
I don’t think I’m a rivet counter but if I see an opportunity to make something take longer than it should…I will. I think I have a fear of finishing things. At any rate, I spotted some other problems in the hanger that bothered me enough to fix them - a stair and landing that connects to an exterior stair amidships and a stair at the bow that leads up to the forecastle deck.

Image

A photo of a burial at sea, not sure of the battle, shows the missing stair area which should connect to a stair on the outside.

I feel a little awkward using an image like this to illustrate a trivial build so I apologize if I offend anyone. It's a powerful photo.

Image

At any rate, just as I was making progress, I received this photo and I had to take a few steps back.

Image

Image

And...a few more.

Image

But I’m making progress. This is port stern. The corrected stair area should have some mechanical ducts in front but I had to leave them out for painting. The stair extends a little too far out into the roller door opening...but it'll have to be good enough.

Image

Image

Here’s port amidships

Image

And port bow.

Image

Overall

Image

Cheers

_________________
Terence Werdel


Report this post
Top
 Profile  
Reply with quote  
PostPosted: Tue May 29, 2018 3:24 pm 
Offline
SovereignHobbies
SovereignHobbies

Joined: Sat Feb 28, 2015 9:09 am
Posts: 1176
Location: Aberdeenshire, Scotland, UK
That's excellent attention to detail, and very neatly executed also. :big_grin:

_________________
James Duff
Sovereign Hobbies Ltd
http://www.sovereignhobbies.co.uk

Current build:
HMS Imperial D09 1/350
http://www.shipmodels.info/mws_forum/viewtopic.php?f=59&t=167151


Report this post
Top
 Profile  
Reply with quote  
PostPosted: Mon Jun 11, 2018 12:51 am 
Offline
User avatar

Joined: Mon May 21, 2007 5:49 pm
Posts: 1589
Location: The beautiful PNW
Terry,

Your pursuit of perfection never ceases to astound me. Knowing first hand what you are working with and the level of detail that you are adding is truly awe inspiring.


Can't wait to see the latest updates in person.

Matt

_________________
In the yards right now:
USS Utah AG-16
On Hold
1/350 USS Portland CA-33 1942
1/350 Trumpeter Texas with a twist


Report this post
Top
 Profile  
Reply with quote  
PostPosted: Mon Jun 11, 2018 7:15 am 
Offline
Model Monkey
Model Monkey

Joined: Sat Aug 20, 2005 9:27 pm
Posts: 3954
Location: USA
Love it!

_________________
Have fun, Monkey around.™

-Steve L.

Complete catalog: - https://www.model-monkey.com/
Follow Model Monkey® on Facebook: - https://www.facebook.com/modelmonkeybookandhobby


Report this post
Top
 Profile  
Reply with quote  
PostPosted: Tue Jun 12, 2018 3:28 pm 
Offline
User avatar

Joined: Fri Oct 28, 2016 10:13 pm
Posts: 16
Location: Vancouver, WAshington, USA
Thank you all for the kind words.

Back when I started, I filled a bunch of portholes to reflect the Midway timeline and drilled out the rest. I've needed to put PE portholes over the holes ever since but not had any idea how to do it.

Image

Yeah...these buggers are tiny!

I settled on just Futuring (AKA - Johnson Klear / Pledge Floor Gloss, whatever - it'll always be Future to me) them down and it worked great. The Future gave me time to place them and there was no glue build-up! I put a few more coats of Future over them to seal them down.

Image

Without doing this, they easily flaked off. A couple more coats seems to have sealed them down pretty good and painting will really stick'm down.

Image

_________________
Terence Werdel


Report this post
Top
 Profile  
Reply with quote  
PostPosted: Sun Aug 19, 2018 1:56 pm 
Offline
User avatar

Joined: Tue Jan 22, 2008 5:55 pm
Posts: 320
Location: Hoover, Alabama
Great work Terry!!!

Looking forward to the next update!!!

Kelley

_________________
Image


Report this post
Top
 Profile  
Reply with quote  
PostPosted: Wed Oct 03, 2018 9:25 pm 
Offline

Joined: Wed Jan 11, 2012 12:24 pm
Posts: 72
Amazing amount of detail work! Has me tweaking! :thumbs_up_1:


Report this post
Top
 Profile  
Reply with quote  
PostPosted: Mon Mar 01, 2021 10:22 pm 
Offline
User avatar

Joined: Tue Jan 11, 2005 11:54 pm
Posts: 205
Location: Wisconsin, USA
Any more progress to show?! This is such a great build so far that I hope it hasn't died!


Report this post
Top
 Profile  
Reply with quote  
Display posts from previous:  Sort by  
Post new topic Reply to topic  [ 39 posts ]  Go to page Previous  1, 2

All times are UTC - 6 hours [ DST ]


Who is online

Users browsing this forum: No registered users and 118 guests


You can post new topics in this forum
You can reply to topics in this forum
You cannot edit your posts in this forum
You cannot delete your posts in this forum
You cannot post attachments in this forum

Jump to:  
cron
Powered by phpBB® Forum Software © phpBB Group