The Ship Model Forum

The Ship Modelers Source
It is currently Wed Apr 24, 2024 7:52 pm

All times are UTC - 6 hours [ DST ]


Post new topic Reply to topic  [ 15 posts ] 
Author Message
PostPosted: Sun May 07, 2017 12:26 pm 
Offline
SovereignHobbies
SovereignHobbies

Joined: Sat Feb 28, 2015 9:09 am
Posts: 1176
Location: Aberdeenshire, Scotland, UK
I felt the need to open another box. At the Scottish Nationals at Perth last weekend my wife, Gill, somehow bartered and is now building the gorgeous Hasegawa 1/350 Akagi c/w all the add-on PE packages (that should rightfully be mine) I find it's nice spending quality time together at the dining table ignoring one another and concentrating on photo etched brass.

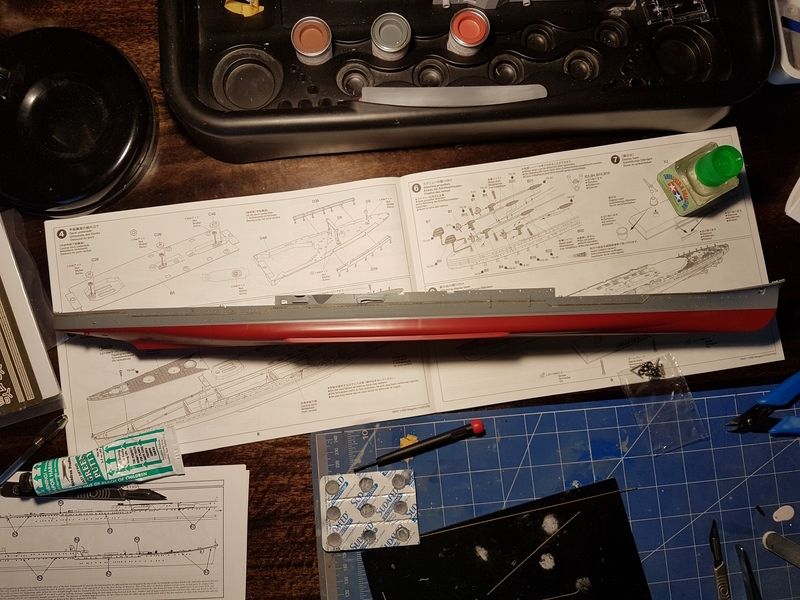
I bought the Tamiya 1/350 Mogami Aircraft Cruiser for full RRP a few years back in an attempt to support a local model shop. This was before I decided I should just have my own model shop. It was (and still is!) the largest sum of cash I've ever handed over for a model kit and it is typical of recent Tamiya kits; exquisitely engineered and manufactured.

Since all the Japanese packs of AAA guns, cable reels and ladders etc are opened for Gill's Akagi (that should rightfully be mine) I thought "what the heck" and retrieved the lovely Mogami from the stash. I spent the first night drilling out the portholes in the hull.

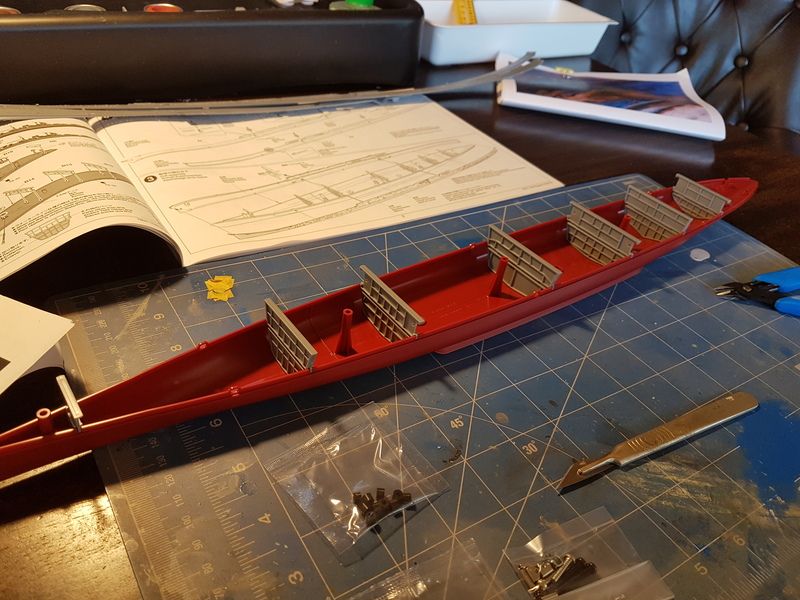
Several manufacturers are producing framed hulls. We will soon find out how good Hasegawa's is (and I expect Gill shall find it excellent too) but the Tamiya effort is worthy of commendation for clicking together like Lego.
Image

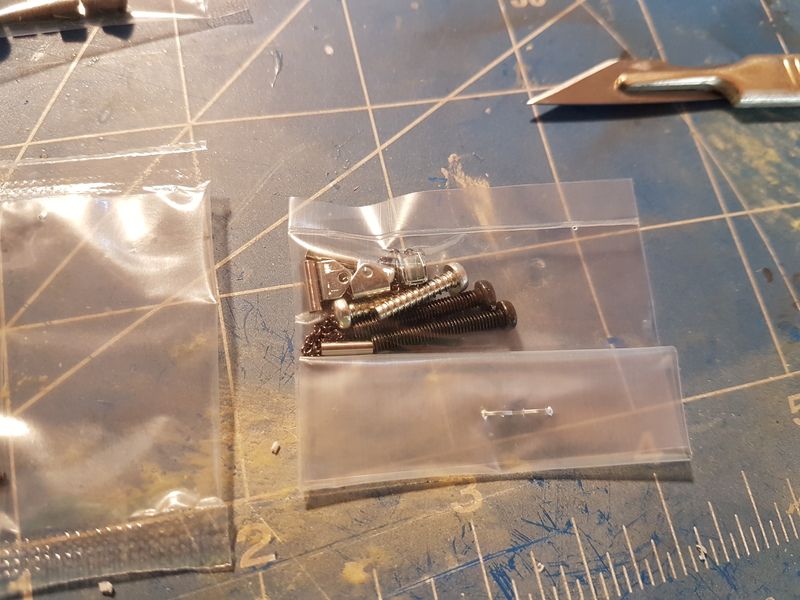
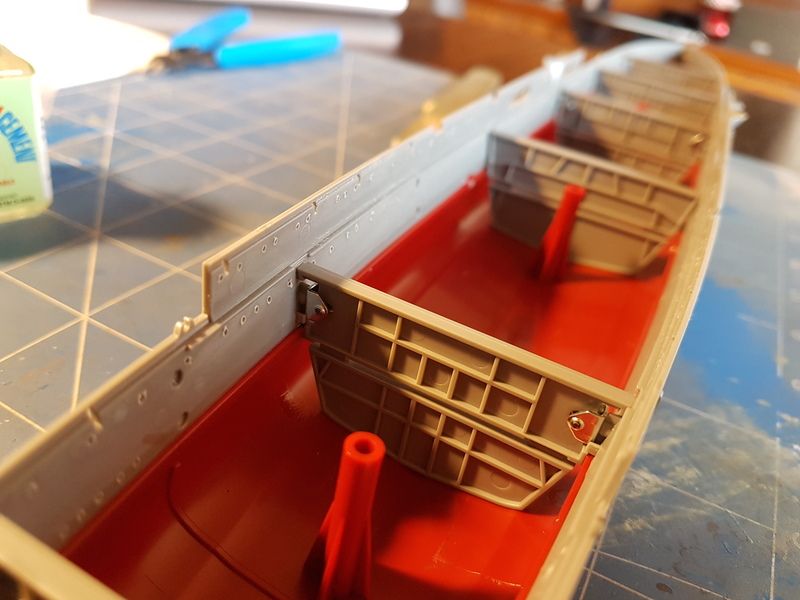
I'm not rightly sure why, but Tamiya included a fair bit of ironmongery in this kit. The little steel brackets screw on to the upper hull sides and in turn screw on to the hull framing. You even get a nice little screwdriver in the kit.
Image

Image


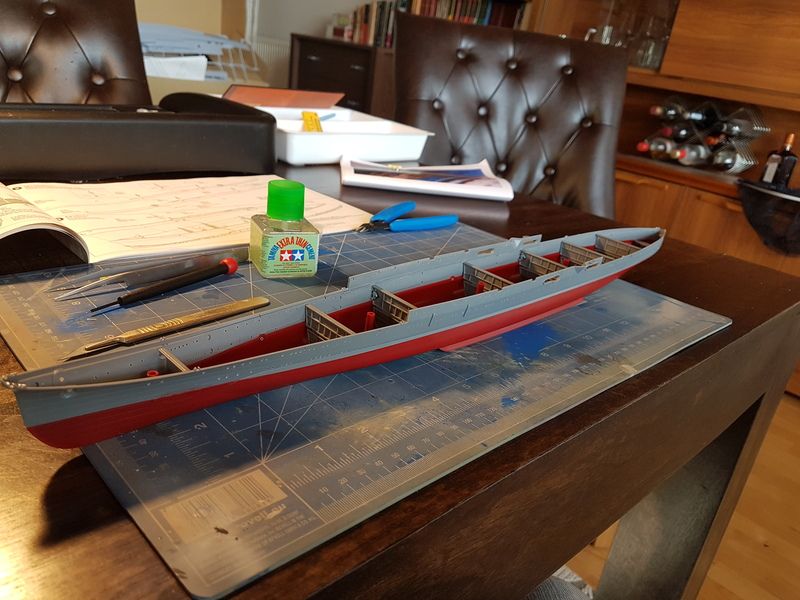
Unsurprisingly, it pretty much falls together. I assembled it dry then painted the joins with Tamiya's extra thin cement. Whilst I like the stuff, I do find it prone to causing gluey finger prints when it weeps out the other side of a join whilst pressing it together. I've already had to rectify one such boo boo on this. I shall try to be more careful in future 
Image


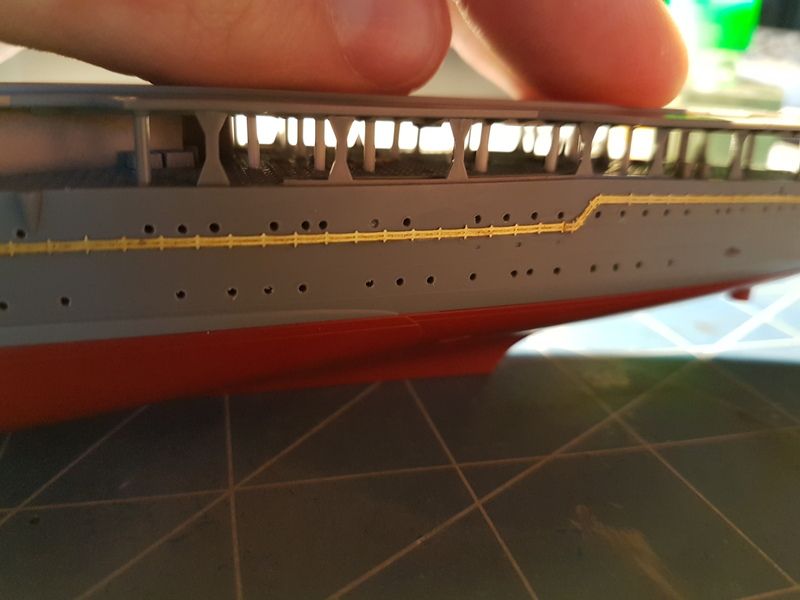
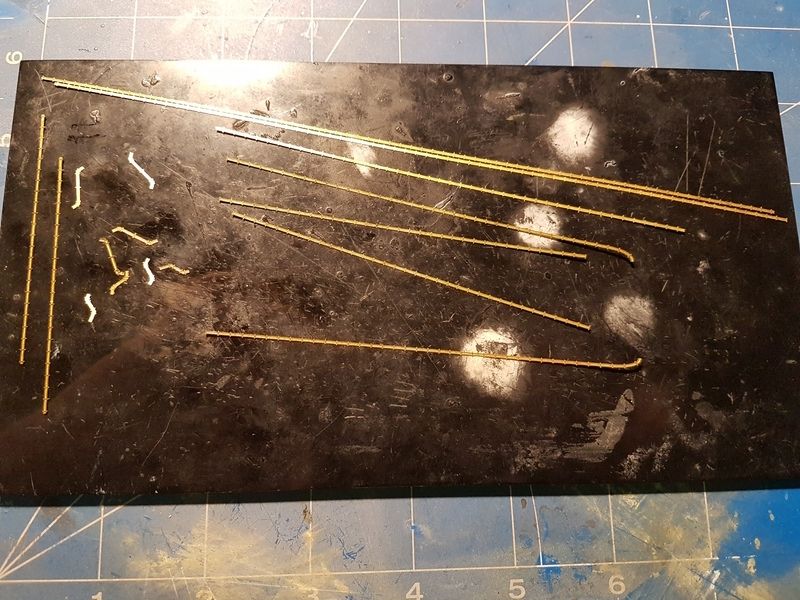
With the hull together, I felt now was the time to break out the White Ensign Models PE set for Mogami, and I cut out the degaussing cables
Image

And fitted them

Image

It is a nice kit so far. I find myself wondering why I left it so long!


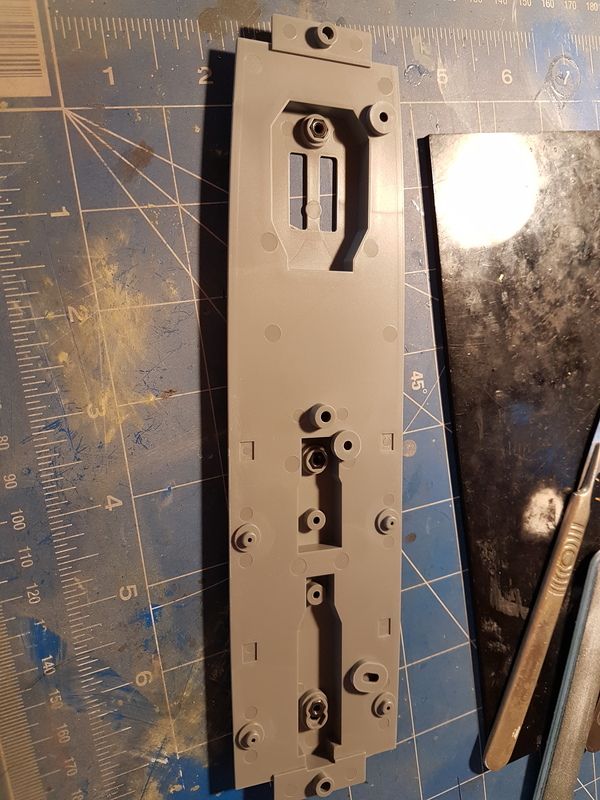
More nuts to be installed before assembly
Image


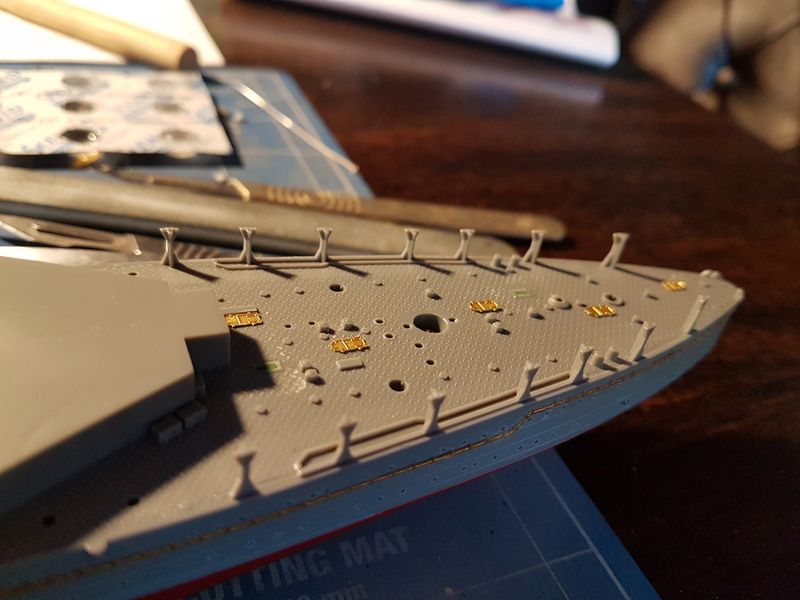
I removed the moulded on stairs and replaced the moulded deck hatches with WEM items. The plastic was fine and this isn't strictly necessary, but I figure I should do the best I can otherwise what's the point?
Image


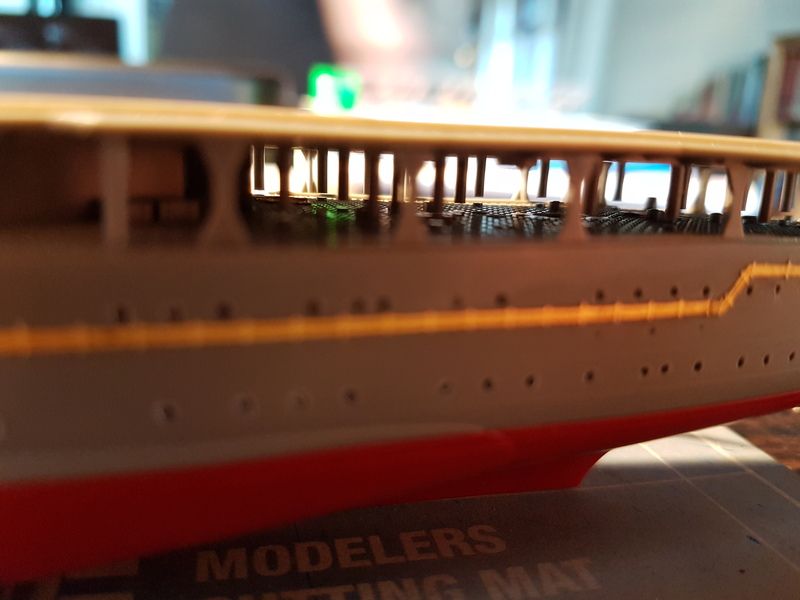
Whilst nice, the kit has revealed a shortcoming. The posts under the extended flight deck don't meet the deck below. As the gaps are at the bottom and fairly visible, this was unacceptable
Image


...so I cut them off and drilled out the stumps on the quarter deck.
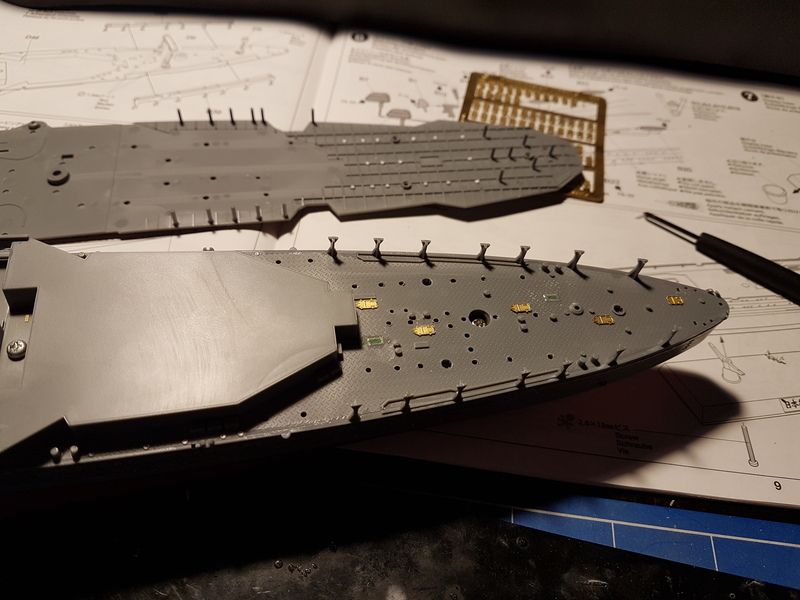
Image

Plastic rod was inserted into the holes in the quarterdeck and touched with cement. One at a time, I fitted a rod and placed the flight deck on top to pushe the rod down to the correct height.
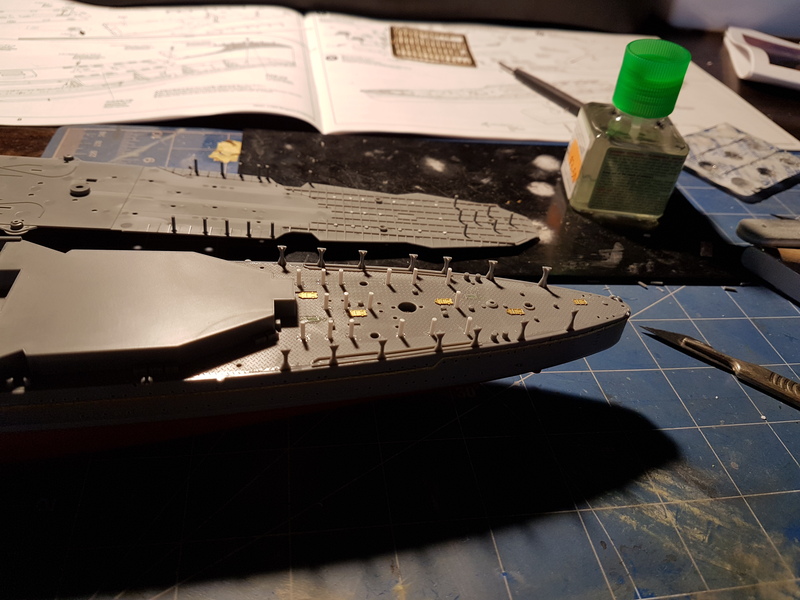
Image


Much better

Image

I remembered to fit PE ladders to replace the two I chopped off
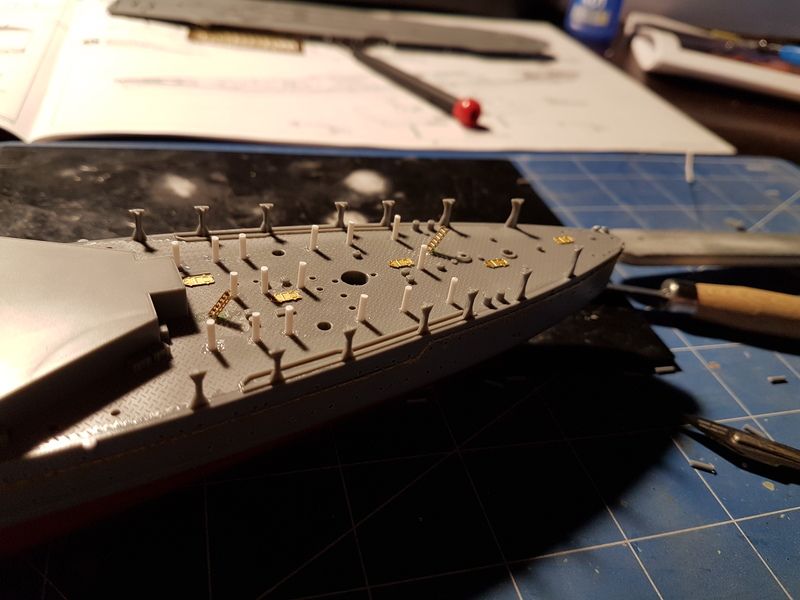
Image


Can't quite photograph it but you get the idea
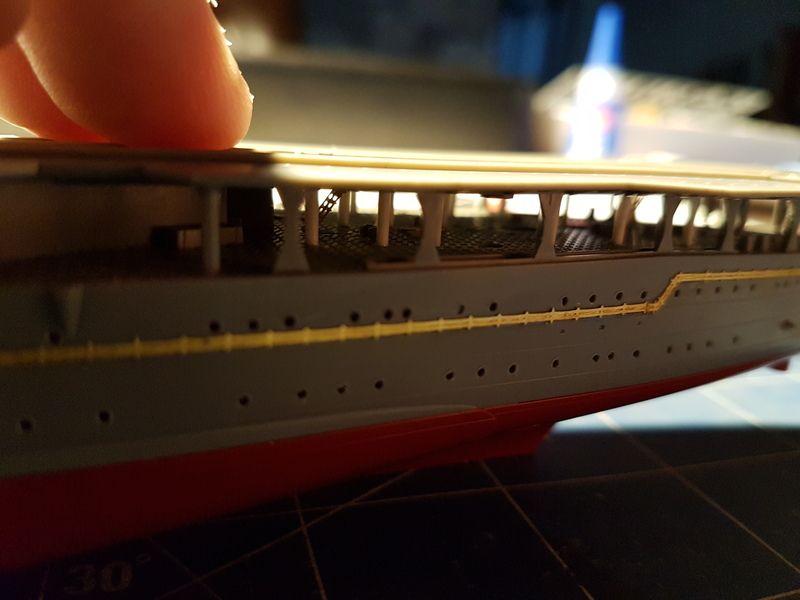
Image

I've never really done dioramas but though I might have a go with this one. I like the idea of a model ship in water but am less enthusiastic about waterlining the model. I like a full hull. The talented Won-Hui Lee makes incredible dioramas using tinted epoxy for water. I would like to try that. Likewise, a long-term customer of mine by the name of Alan Bird makes rather nice warship models too and his recent 1/200 HMS Rodney was a full hull model on pedestals featuring ratings sat on boards hanging down painting the hull. I liked that idea too so have thought I'd try to combine the two.
Image

Image

So to summarise - I'm well out of my comfort zone here. Still, if I want to get better I have to push myself a little!

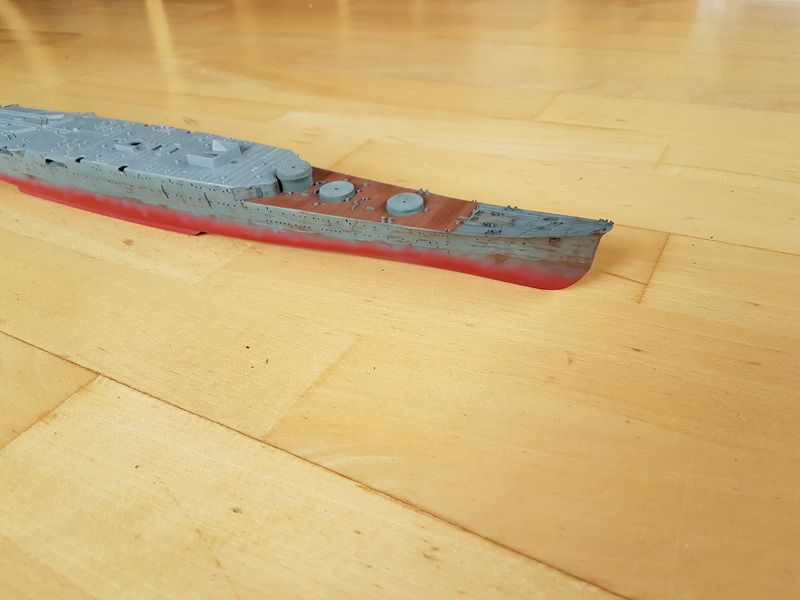
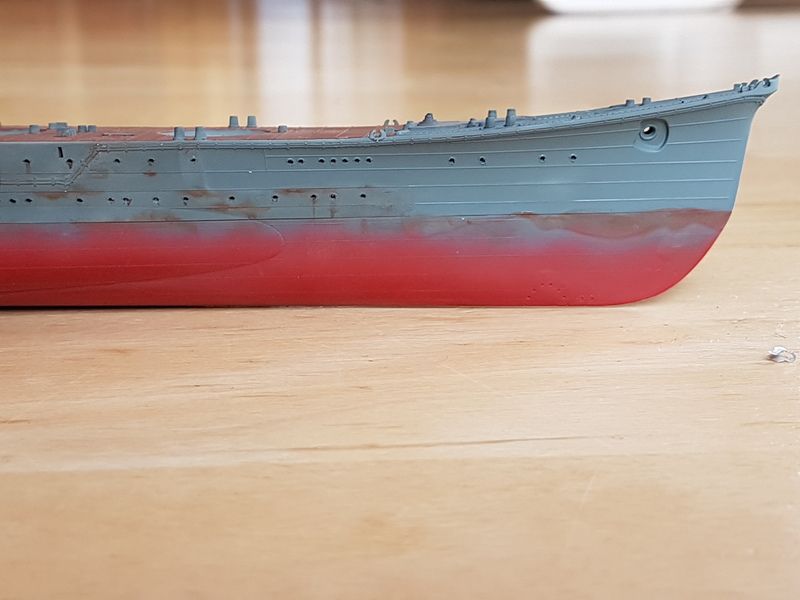
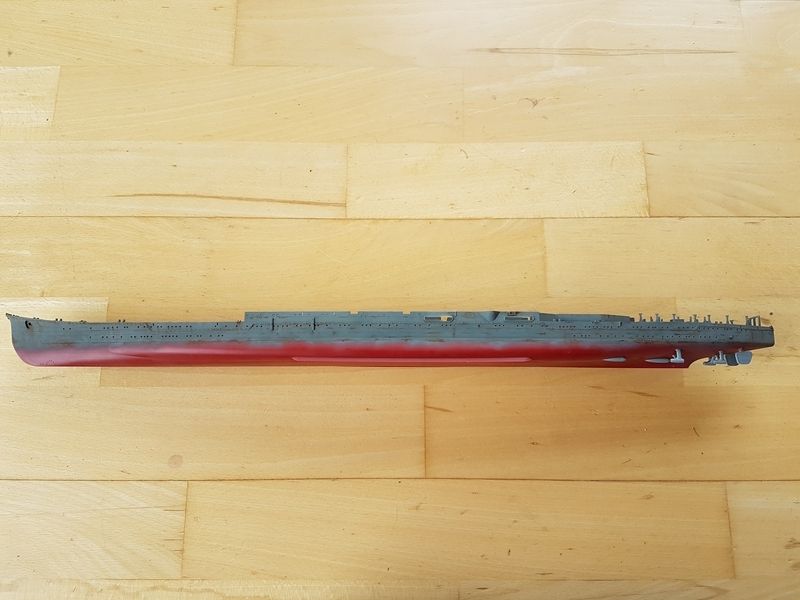
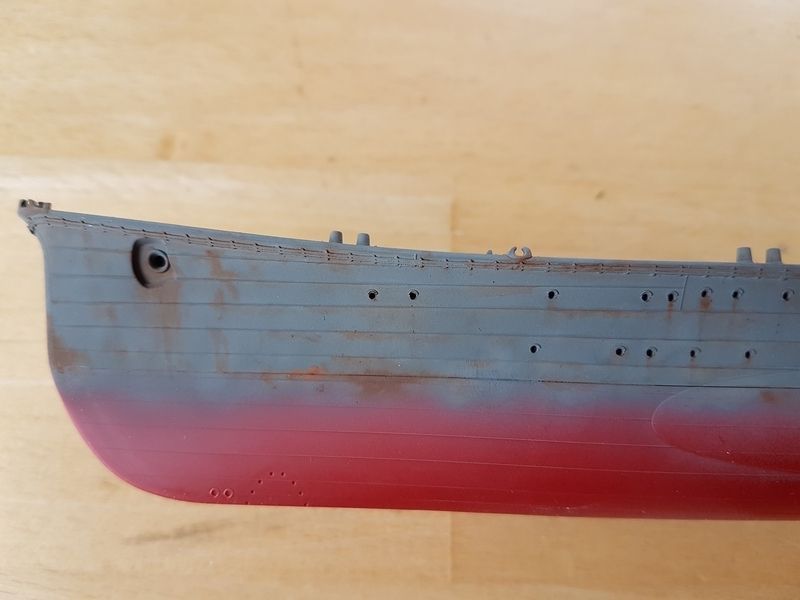
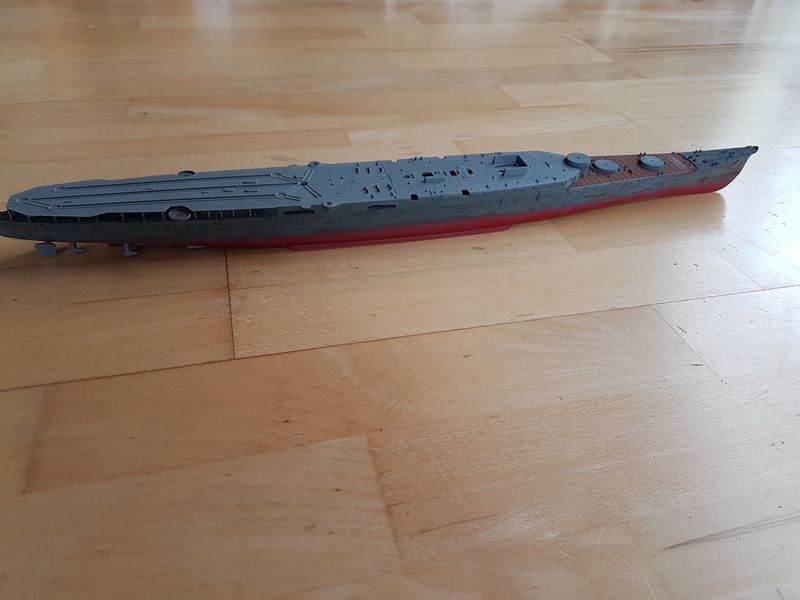
Now then, time for some paint. According to my reference - the WEM published book on IJN Greys, Mogami was painted in the Kure Naval Arsenal's shade of grey from 1935 until sunk at Leyte Gulf in 1944. IJN02 Kure Grey is the lightest of the 4 Colourcoats IJN greys. Granting myself a little artistic license though, I used some IJN04 Yokosuka Grey left over in the airbrush jar after teaching Gill how to build up a shaded, patchy coat with the airbrush in close for her Akagi build, and I painted the whole hull badly and very unevenly in the slightly different shade. I then tried the rusting technique I'd seen by wetting the model with the relevant thinners and touching on a rusty colour, letting it disperse into the thinner. I used Tamiya X-9 Brown with Xtracrylics thinners for this. Although a strong brown, the Tamiya paint gives a nice reddish rusty tone when used this way and doesn't hassle the enamel underneath.
Image

And cruel closeup

Image

To be honest I planned to go quite heavy on this for effect and may have overdone it, but I'm telling myself it'll work out fine in the end...


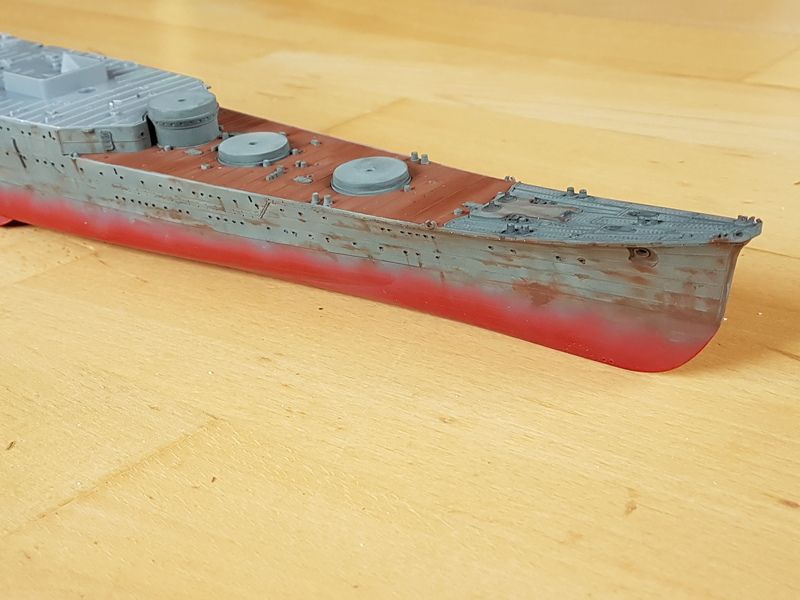
IJN10 Linoleum was brush painted. I didn't feel like masking today.
Image

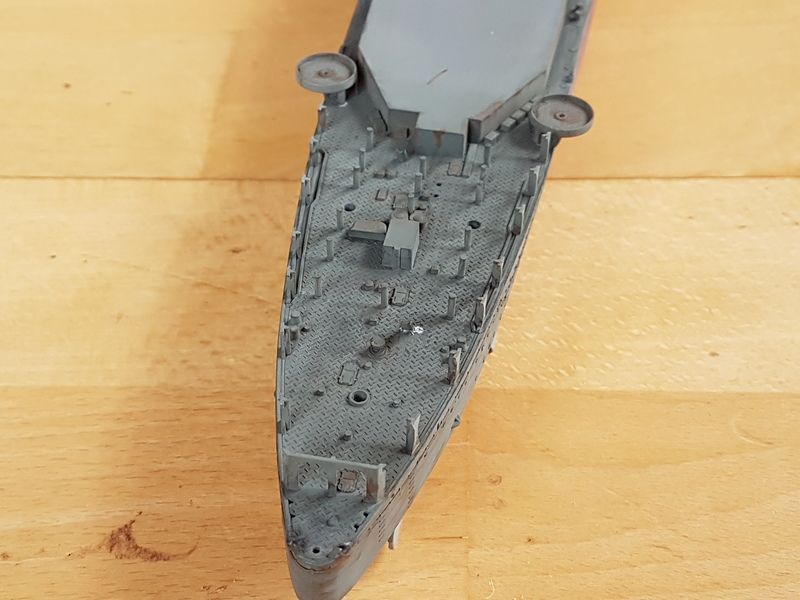
And the quarter deck received some dirty wash using whichever Tamiya paint is the tyre black colour. This is heavily shadowed so I deliberately went OTT here in the hope that something would be apparent in the shadows.
Image

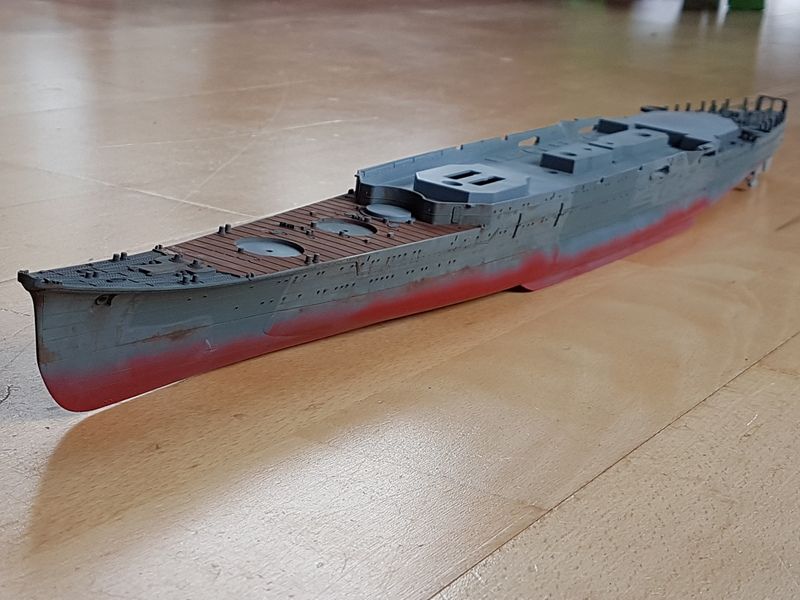
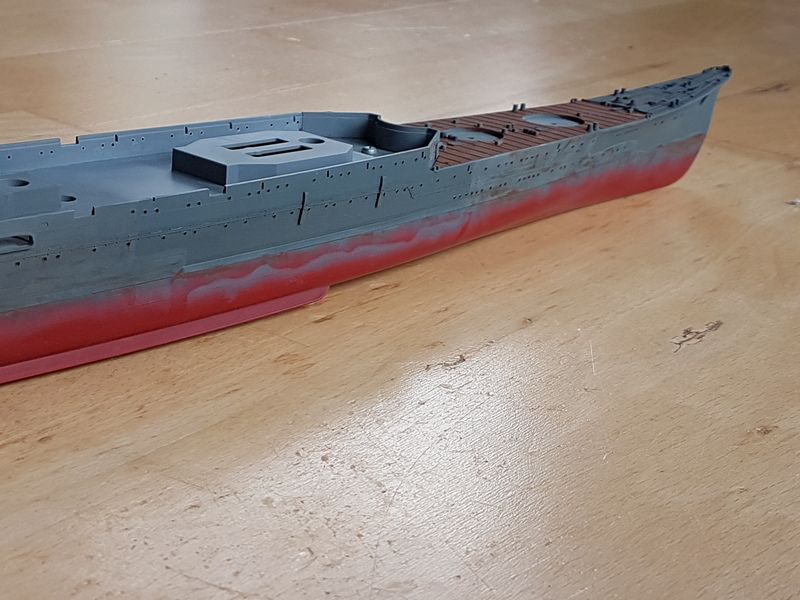
That dried, and it was on to stage 3 of the master plan. This is why I didn't use IJN02 Kure Grey to paint the hull first time around - I masked with blutac squarish areas and sprayed in them with the Kure Grey without much patchy shading to represent freshly applied paint. To try to enhance the effect slightly, I sprayed a light satin clearcoat over the fresh Kure Grey. My cunning plan is that the painters will be positioned on boards hanging down looking like they're part way through repainting the ship.
Image

Image

Image

_________________
James Duff
Sovereign Hobbies Ltd
http://www.sovereignhobbies.co.uk

Current build:
HMS Imperial D09 1/350
http://www.shipmodels.info/mws_forum/viewtopic.php?f=59&t=167151


Report this post
Top
 Profile  
Reply with quote  
PostPosted: Sun May 07, 2017 2:48 pm 
Offline
User avatar

Joined: Mon Jan 10, 2005 5:30 pm
Posts: 5386
Location: Nr Southampton England
Looks pretty good...

put your full hull ship in water...

have a look at this....

( do read/ look at the the links (in German ) ( or translate voa google translator)
http://www.modelshipgallery.com/gallery ... index.html

this is the bit that will interest you... :smallsmile:


Image

Image

Image

_________________
....I buy them at three times the speed I build 'em.... will I live long enough to empty my stash...?
http://www.modelshipgallery.com/gallery ... index.html

IPMS UK SIG (special interest group) www.finewaterline.com


Report this post
Top
 Profile  
Reply with quote  
PostPosted: Mon May 08, 2017 7:31 am 
Offline
Model Monkey
Model Monkey

Joined: Sat Aug 20, 2005 9:27 pm
Posts: 3954
Location: USA
Terrific! :big_grin:

_________________
Have fun, Monkey around.™

-Steve L.

Complete catalog: - https://www.model-monkey.com/
Follow Model Monkey® on Facebook: - https://www.facebook.com/modelmonkeybookandhobby


Report this post
Top
 Profile  
Reply with quote  
PostPosted: Tue May 09, 2017 6:41 am 
Offline

Joined: Tue Jan 11, 2005 10:56 am
Posts: 8577
Location: New York City
Nicely done.


Report this post
Top
 Profile  
Reply with quote  
PostPosted: Tue May 09, 2017 8:41 pm 
Offline

Joined: Thu Aug 25, 2016 12:03 pm
Posts: 23
I look forward to your wonderful work.

The Mogami you're working on are really nice.

:thumbs_up_1:


Report this post
Top
 Profile  
Reply with quote  
PostPosted: Mon May 15, 2017 2:57 am 
Offline
SovereignHobbies
SovereignHobbies

Joined: Sat Feb 28, 2015 9:09 am
Posts: 1176
Location: Aberdeenshire, Scotland, UK
I haven't been able to work on this much, but did manage to get an hour to start the underwater hull painting over the weekend

Image

Image

_________________
James Duff
Sovereign Hobbies Ltd
http://www.sovereignhobbies.co.uk

Current build:
HMS Imperial D09 1/350
http://www.shipmodels.info/mws_forum/viewtopic.php?f=59&t=167151


Report this post
Top
 Profile  
Reply with quote  
PostPosted: Mon May 15, 2017 3:08 pm 
Offline
SovereignHobbies
SovereignHobbies

Joined: Sat Feb 28, 2015 9:09 am
Posts: 1176
Location: Aberdeenshire, Scotland, UK
I think I will call the hull painting complete and move on. It is going in a sea base afterall!

Image

_________________
James Duff
Sovereign Hobbies Ltd
http://www.sovereignhobbies.co.uk

Current build:
HMS Imperial D09 1/350
http://www.shipmodels.info/mws_forum/viewtopic.php?f=59&t=167151


Report this post
Top
 Profile  
Reply with quote  
PostPosted: Mon May 15, 2017 9:43 pm 
Offline
User avatar

Joined: Thu Jul 02, 2015 1:06 am
Posts: 972
Location: Bangkok, Thailand
Very nice weathering and colouring! :thumbs_up_1: :thumbs_up_1:

Aop

_________________
On the way:
--1/350 Tamiya DKM Tirpitz Nov 1944

--1/350 scratch-build HMS Lion never built battleship (1938)

And our artworks!


Report this post
Top
 Profile  
Reply with quote  
PostPosted: Tue May 16, 2017 2:30 pm 
Offline
SovereignHobbies
SovereignHobbies

Joined: Sat Feb 28, 2015 9:09 am
Posts: 1176
Location: Aberdeenshire, Scotland, UK
The screws are now fitted. I think I need to stop procrastinating with paint and get on with the topsides.

Image

Image

Image

_________________
James Duff
Sovereign Hobbies Ltd
http://www.sovereignhobbies.co.uk

Current build:
HMS Imperial D09 1/350
http://www.shipmodels.info/mws_forum/viewtopic.php?f=59&t=167151


Report this post
Top
 Profile  
Reply with quote  
PostPosted: Thu May 18, 2017 2:46 pm 
Offline
User avatar

Joined: Tue Sep 25, 2012 8:11 am
Posts: 647
Location: Elyria, Ohio USA
WOW! Looking very nice :thumbs_up_1:

_________________
Just finished:
1/350 USS Santee 1944

Current projects:
1/700 USS Catamount 1960
1/350 USS Columbia 1945
1/350 USS San Francisco 1944


Report this post
Top
 Profile  
Reply with quote  
PostPosted: Fri Jun 09, 2017 1:31 pm 
Offline
User avatar

Joined: Sun Mar 18, 2012 7:31 pm
Posts: 1287
Location: Macclesfield NC
Really jaw dropping work going on here, keep up the fantastic work!! :thumbs_up_1: :thumbs_up_1: :thumbs_up_1:

_________________
Jim Varnell
ABH2 USN/RET.
89-00

Eastern NC Modelworks

Up coming projects:
1/700 scale rebuild of diorama project 960 square feet.
(Table 1 underway)Feb.2017
1/350 USS ALASKA CB-1(started Aug. 2017) 70% completed


Report this post
Top
 Profile  
Reply with quote  
PostPosted: Tue Oct 17, 2017 4:02 am 
Offline
SovereignHobbies
SovereignHobbies

Joined: Sat Feb 28, 2015 9:09 am
Posts: 1176
Location: Aberdeenshire, Scotland, UK
I hadn't touched this (or any ship really) since the last post by me up there ^.


Photobucket since committed commercial suicide and this thread is one of many of mine that would require retrieval of old photos, rehosting and rebuilding of threads and frankly I just haven't got the time to do that.


I had decided not to go to work yesterday late last week so spent the weekend doing the usual sort of stuff that consumes all the time I'm not at my day job and yesterday felt sufficiently recovered from the soul-sucking monotony of being a self-sufficient adult to do some ship modelling. I had taken this out of the box many times since May, shuddered at the thought and put it away again. Yesterday, I enjoyed it.


I think I have lost my touch a bit due to lack of practise, but I have surprisingly little to show for several hours stolen here and there over the course of yesterday:


Attachments:
tn_3ea8f49f-c3a8-441c-b4d7-0b0f9343c379.jpg
tn_3ea8f49f-c3a8-441c-b4d7-0b0f9343c379.jpg [ 30.25 KiB | Viewed 1856 times ]
tn_1949118b-c18d-4390-a45d-1033dc6ecf57.jpg
tn_1949118b-c18d-4390-a45d-1033dc6ecf57.jpg [ 38.18 KiB | Viewed 1856 times ]
tn_b2a9b101-d185-4a69-836b-0a5cc0731bae.jpg
tn_b2a9b101-d185-4a69-836b-0a5cc0731bae.jpg [ 35.24 KiB | Viewed 1856 times ]
tn_bc93c5a0-50a7-4678-ba7f-fe2484eef0ef.jpg
tn_bc93c5a0-50a7-4678-ba7f-fe2484eef0ef.jpg [ 32.18 KiB | Viewed 1856 times ]
tn_c48b0486-0173-4c8c-a1e3-349d66b8c97b.jpg
tn_c48b0486-0173-4c8c-a1e3-349d66b8c97b.jpg [ 41.51 KiB | Viewed 1856 times ]

_________________
James Duff
Sovereign Hobbies Ltd
http://www.sovereignhobbies.co.uk

Current build:
HMS Imperial D09 1/350
http://www.shipmodels.info/mws_forum/viewtopic.php?f=59&t=167151
Report this post
Top
 Profile  
Reply with quote  
PostPosted: Tue Oct 17, 2017 7:17 pm 
Offline

Joined: Tue Jan 11, 2005 10:56 am
Posts: 8577
Location: New York City
1) the work looks good; 2) I don't know that I would have accomplished more than you in the same time frame.


Report this post
Top
 Profile  
Reply with quote  
PostPosted: Tue Nov 28, 2017 5:10 am 
Offline
SovereignHobbies
SovereignHobbies

Joined: Sat Feb 28, 2015 9:09 am
Posts: 1176
Location: Aberdeenshire, Scotland, UK
First modelling since Telford:

Attachment:
resized_81214da1-a80a-43bb-b1b3-cb9923c8515e.jpg
resized_81214da1-a80a-43bb-b1b3-cb9923c8515e.jpg [ 317.1 KiB | Viewed 1590 times ]


Ok, it's all in a silly scale and definitely pursuing quantity rather than quality but there's a reason for it. I also had help from Gill with these, but then I had to scratch build two replacement propeller shaft pipes and struts (the bits on A frames that support the propeller end of the shafts) for her 1/350 Akagi as they had somehow gone walkies. That took me a wee while. Unfortunately in was both of the inboards which vanished so I had neither to copy, therefore the geometry for replacements took me some trial and error to get looking acceptable.


I did manage to do a little on Mogami this weekend though. it really is a little although admittedly that's better than nothing!

Attachment:
resized_091be47a-9c64-4512-9ccf-2f3edacb03c1.jpg
resized_091be47a-9c64-4512-9ccf-2f3edacb03c1.jpg [ 237.54 KiB | Viewed 1590 times ]


I wimped out on the WEM funnel caps. I did cut out the parts, but then decided I simply couldn't be bothered with them and that the kit parts were ok. I am fairly adept at stretching single-piece PE funnel parts into 3D shapes, but I absolutely hate the ones with separate base rings and grille parts to be bent into shape and glued together. It's like trying to pose a feral cat.

_________________
James Duff
Sovereign Hobbies Ltd
http://www.sovereignhobbies.co.uk

Current build:
HMS Imperial D09 1/350
http://www.shipmodels.info/mws_forum/viewtopic.php?f=59&t=167151


Report this post
Top
 Profile  
Reply with quote  
PostPosted: Tue Nov 28, 2017 1:28 pm 
Offline

Joined: Tue Jan 11, 2005 10:56 am
Posts: 8577
Location: New York City
Progress is progress, regardless of speed. Nice crane work.


Report this post
Top
 Profile  
Reply with quote  
Display posts from previous:  Sort by  
Post new topic Reply to topic  [ 15 posts ] 

All times are UTC - 6 hours [ DST ]


Who is online

Users browsing this forum: No registered users and 138 guests


You can post new topics in this forum
You can reply to topics in this forum
You cannot edit your posts in this forum
You cannot delete your posts in this forum
You cannot post attachments in this forum

Jump to:  
Powered by phpBB® Forum Software © phpBB Group