The Ship Model Forum

The Ship Modelers Source
It is currently Tue Apr 16, 2024 4:56 pm

All times are UTC - 6 hours [ DST ]


Post new topic Reply to topic  [ 1216 posts ]  Go to page Previous  1 ... 29, 30, 31, 32, 33, 34, 35 ... 61  Next
Author Message
PostPosted: Tue Aug 03, 2021 12:01 pm 
Offline
User avatar

Joined: Fri Dec 12, 2008 12:44 pm
Posts: 1774
Location: Herk-de-Stad, Belgium
Willie wrote:
Only backdraw of it all: considering the role of Villeneuve in this action, this sniper should have better been shooting from Gravina´s Principe de Asturias, Alava´s Santa Ana or or Churruca´s San Juan Nepomuceno.

I have visited the Waterloo battlefield a number of times too, all the way from Le Caillou to Hougoumont and la Haye Sainte. What a moving experience, specially if you have done your homework, and know all the details and consequences of the action that too place there.
Willie.[/size]


Hi Willie,

Yes, Villeneuve didn't fare well after Trafalgar. But I'm not sure whether he was assassinated by British or by French agents, it could have been very well 'closing the bill' by Napoleon himself. As he was in British emprisonment, a murder by British wouldn't be likely after his release.

And I fully agree: Waterloo is a beautiful but very sad countryside today, even gloomy.

_________________
"I've heard there's a wicked war a-blazing, and the taste of war I know so very well
Even now I see the foreign flag a-raising, their guns on fire as we sail into hell"
Roger Whittaker +9/13/2023


Report this post
Top
 Profile  
Reply with quote  
PostPosted: Mon Sep 06, 2021 2:36 am 
Offline

Joined: Tue Feb 06, 2007 10:24 am
Posts: 2493
Location: Belgium
Villeneuve didn't fare too well indeed, but he was not on board of the Redoutable (but on the French flagship Bucentaure).
The 3 Spanish ships mentioned and their commanders conducted themselves very well in the battle indeed, but so did the Redoutable.
Captain Lucas of the Redoutable did receive the honours his conduct in the battle deserved (received in England with great courtesy, and personally awarded the rank of Commandeur of the Legion of Honour by Napoleon himself after his release). Who knows, if Téméraire hadn't come alongside, he might have succeeded in boarding Victory and taking her...
During the battle of the Basque Roads, he showed himself again to be an exceptional commander: https://en.wikipedia.org/wiki/Jean_Jacq ... enne_Lucas

It can be doubted however how much the shot that killed Nelson was aimed accurately, or rather was a lucky shot. On one hand, the mizzen platform of the Redoutable was pretty close to the quarterdeck of the Victory, and Nelson was easily recognizable. But on the other hand, those muskets were terribly inaccurate, and the ships were pitching and rolling. I guess we will never know, especially since the man who shot Nelson was killed himself shortly afterwards (according to the book 'Voices from the battle of Trafalgar').


Meanwhile, I finally finished detailing the boats.
They took a little longer than I expected. I have to admit I underestimated a little how much detail goes into them, and there are 8 of them (7 different types), but they were a real pleasure to do.

I did most work during my holidays, so I don’t have a lot of in-progress photo’s this time.


First, I cut the vacformed hulls to their correct sheerline:
Image

Then, I detailed the outsides: detailing the sheerline when necessary, adding keel and keelson, sternpost, rubbing strakes and mouldings.
Image

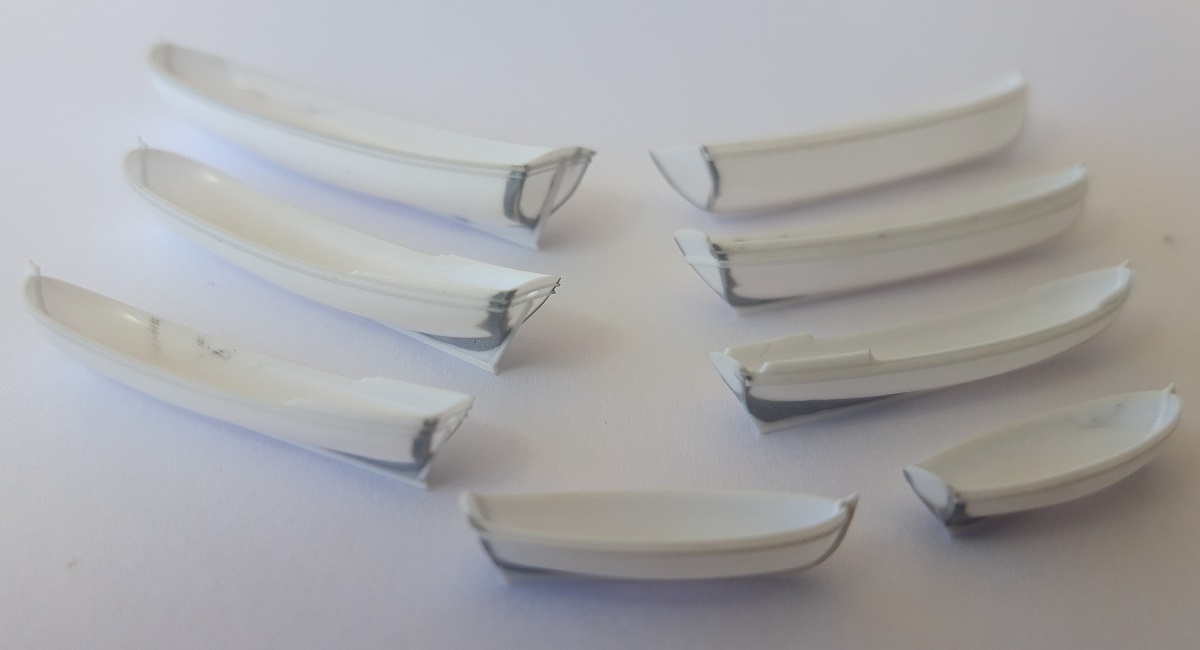
But before that, I ‘sharpened’ the edges of the stern. The vacform technique caused these to be rounded. I used the most classic technique: putty and sanding. I did fill and strengthen the corners at their outside with some stretched sprue before applying the putty. The inside corners were carved square with a sharp scalpel.
Thanks again for pointing this out Welfalk; I think it makes a big difference to the appearance and ‘feel’ of the boats! :thumbs_up_1: :thumbs_up_1: :thumbs_up_1:
Image

Next, I added battle damage to some of the hulls, and then started the detailing the interiors.
The French boats before the thwarts and their knees were added:
Image

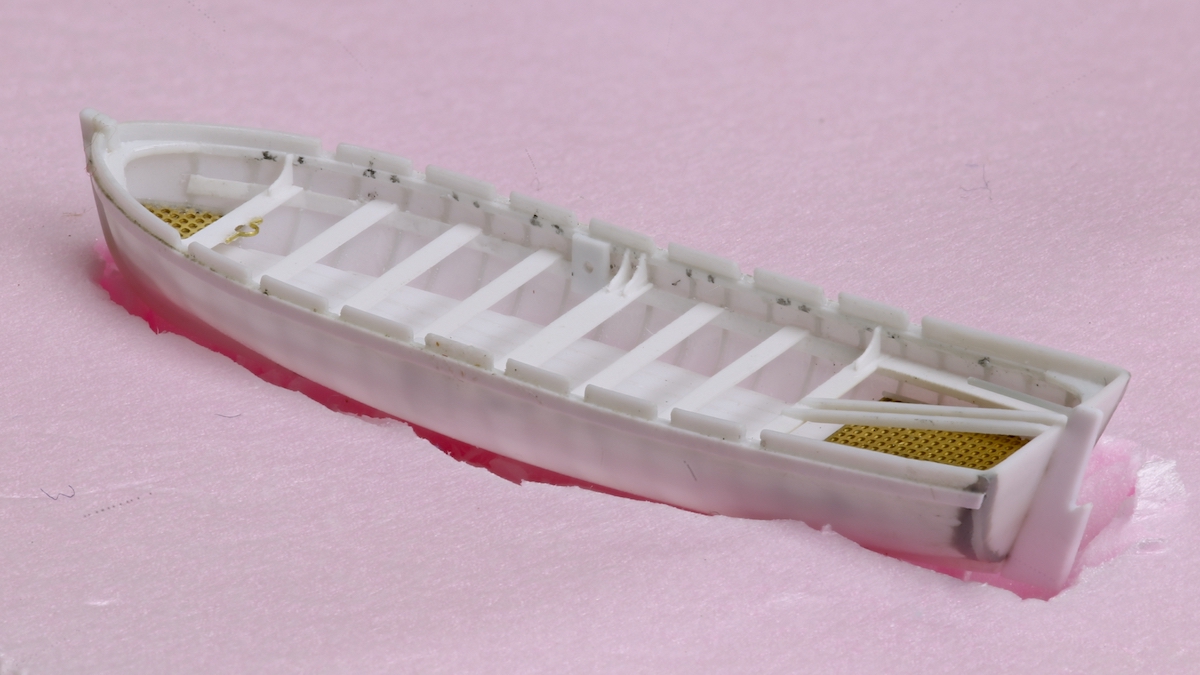
The British boats before thwarts and their knees were added. The gratings were cut from generic PE grating. All the rest is made from styrene sheet and stretched sprue.
Image

And finished!
The biggest British boat, the 34ft launch, will be set in the seascape, rowing towards sailors in the water:
Image

I left the windlass out, so the rowers on the adjoining thwart would have room for their legs. I guess this is how they must have done it?
Image

I will have Victory tow the 28ft pinnace behind her:
Image

Image

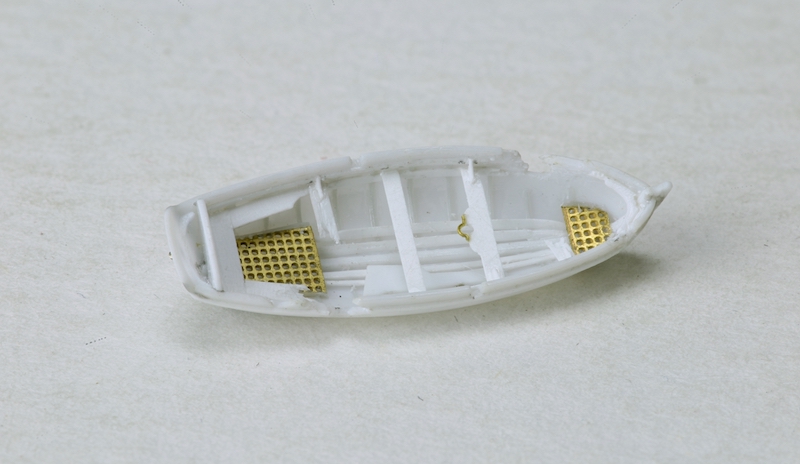
This British 18ft cutter ('jollyboat') will be rescuing sailors clinging to this wreckage:
Image

Image

The other jollyboat (this is the only type of which I made two boats) and the 32ft barge will be on the beams in the waist of Victory. They are both damaged by the gunfire. I also added the chocks for two other boats. In between those, I added a spare topmast, and other spare spars.
Image

Note how the rudders are not attached to the sterns, but lying loose in the boats.
Image

Image

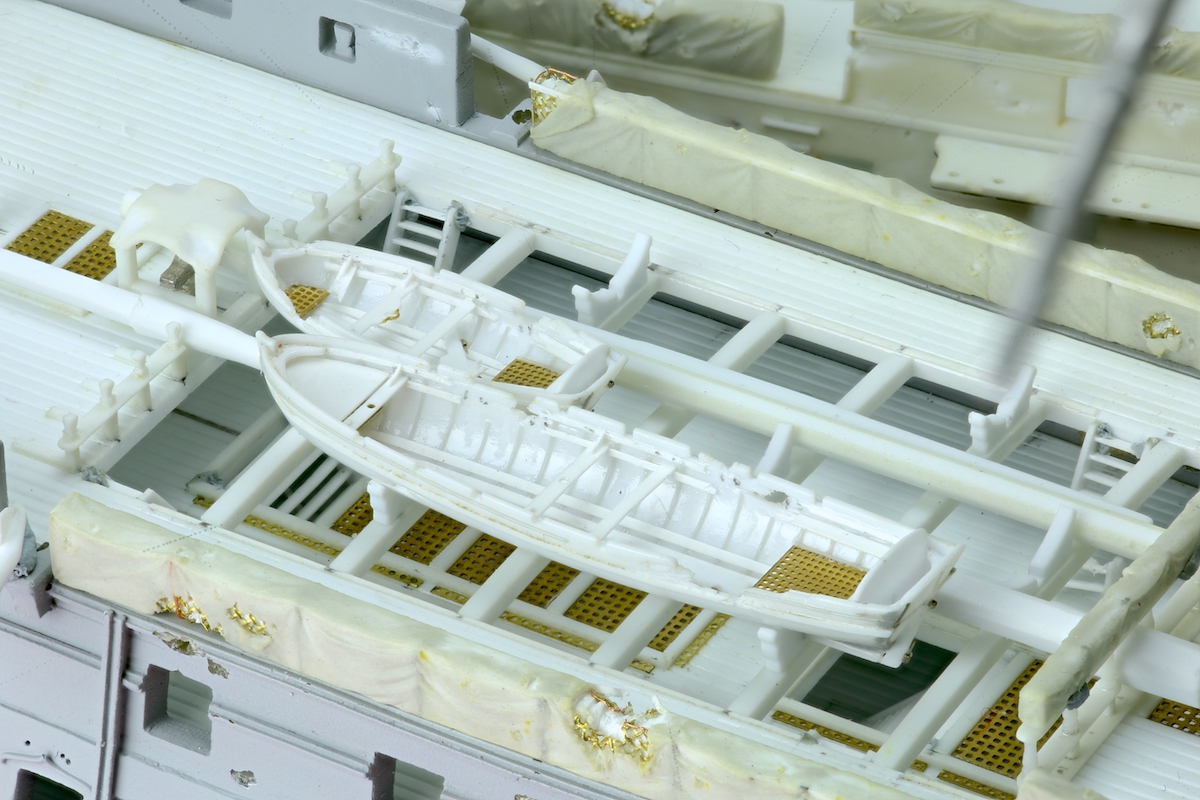
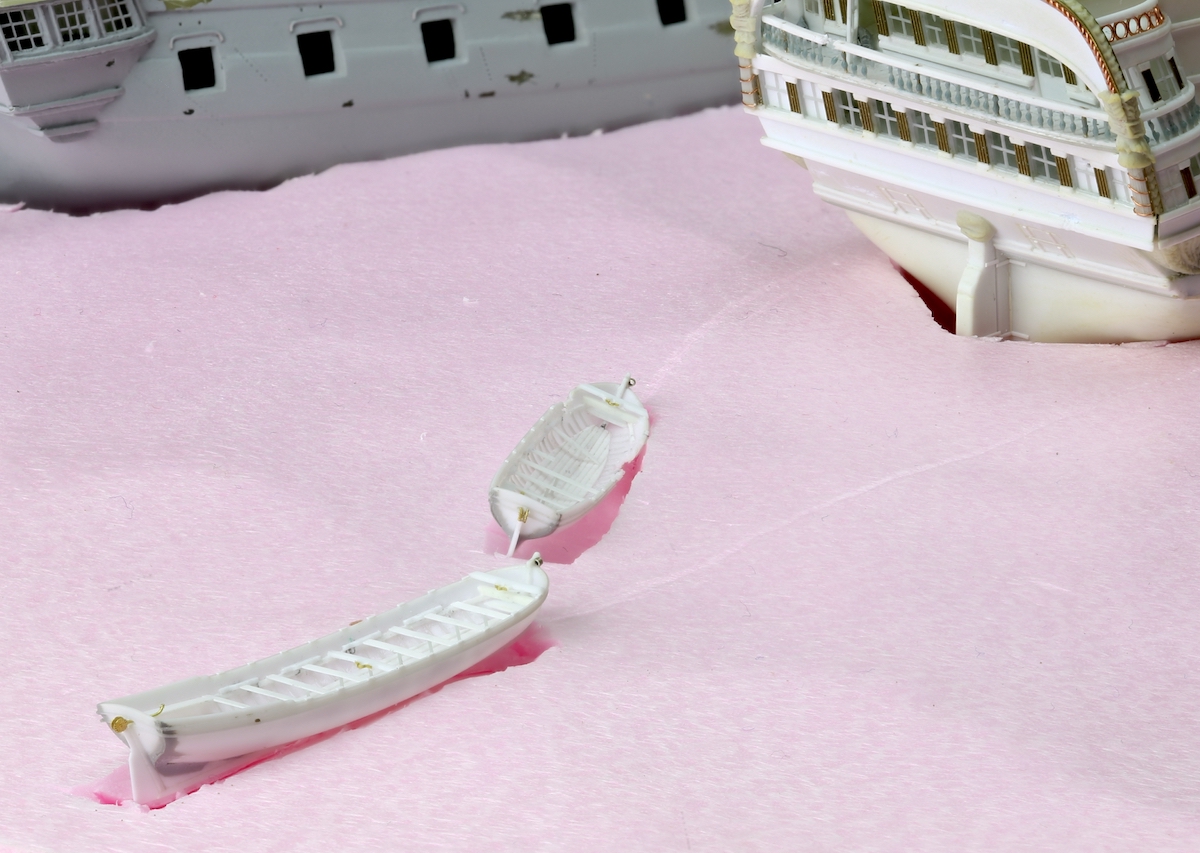
The biggest French boat, the longboat, sits in the waist of the Redoutable and is damaged too. I also added two spare topmasts and associated chocks to sit alongside it, but these are near invisible from this angle.
Image

Image

The two remaining French boats (barge and cutter) are towed behind the Redoutable. The forward one has been hit and is slowly sinking.
Image

French barge:
Image

Image

French cutter:
Image

Image

And the obligatory shot with a match for scale: :big_grin:
Image

Usually, I don’t count parts, but this time I did get curious. ;) The biggest boat has well over 150 individual parts in it, the smallest almost 60.
So in that last photo, I’m holding close to 1000 pieces in my hand… :-o


Report this post
Top
 Profile  
Reply with quote  
PostPosted: Mon Sep 06, 2021 3:57 am 
Offline
User avatar

Joined: Wed Sep 28, 2011 12:04 pm
Posts: 1818
Location: Paris
Excellent progress ! And you are right, such boats can be projects of their own, considering the amount of detail that could be on and in them. There would be also a lot of clutter in them, such as a boat-compass, water barrels, a bread casket, the sailing gear, etc. etc. - boats were fitted out to be seaworthy in case they got separated from their ship.

I am still contemplating how to make the boats for my own project. If I am going down the route of vacuum-forming, I would probably make halfs and glue them to a stempost - keel - sternpost/transom assembly to ensure sharp edges on these timbers. However, I will only show one boat ready for emergencies, while the others will be shown covered as at sea - so the work of kitting them out remains manageable.

_________________
Eberhard

Former chairman Arbeitskreis historischer Schiffbau e.V. (German Association for Shipbuilding History)

--------------------------------------------------------------------------------------------------------------------------------------------------------------------------------------------

Image Image Image Image


Report this post
Top
 Profile  
Reply with quote  
PostPosted: Mon Sep 06, 2021 3:59 am 
Offline

Joined: Tue Jun 14, 2005 6:23 am
Posts: 3697
Location: Bonn
The boats are really excellent! :thumbs_up_1:

_________________
Image


Report this post
Top
 Profile  
Reply with quote  
PostPosted: Mon Sep 06, 2021 5:36 am 
Offline
User avatar

Joined: Fri Dec 12, 2008 12:44 pm
Posts: 1774
Location: Herk-de-Stad, Belgium
Marijn,

How fortunate that the weather this summer was ho-di-hum! :cool_1: At least in Belgium. You managed to spend a lot of time on modelling, apparently.

And realizing - again! - these boats are only 2-3 centimeter long in most cases! What a miniature work, and so exquisite! I can only compare these with Evert-Jan Foeth's boats he made for his HMS Hood in 1:350. Stunning! :worship_1: Naturally early 19th century boats were even more abundant in details then those WW2 boats. :woo_hoo:

_________________
"I've heard there's a wicked war a-blazing, and the taste of war I know so very well
Even now I see the foreign flag a-raising, their guns on fire as we sail into hell"
Roger Whittaker +9/13/2023


Report this post
Top
 Profile  
Reply with quote  
PostPosted: Mon Sep 06, 2021 6:11 am 
Offline
User avatar

Joined: Tue Sep 29, 2020 4:35 pm
Posts: 1720
Location: Bretagne, France
Superb! :cool_1:

I will be able to change my retinas. :cool_2:

_________________
Pascal

•Battleship Bretagne 3D: https://vu.fr/FvCY
•SS Delphine 3D: https://vu.fr/NeuO
•SS Nomadic 3D: https://vu.fr/tAyL
•USS Nokomis 3D: https://vu.fr/kntC
•USS Pamanset 3D: https://vu.fr/jXGQ


Report this post
Top
 Profile  
Reply with quote  
PostPosted: Mon Sep 06, 2021 7:09 am 
Offline

Joined: Wed Jan 21, 2009 1:51 pm
Posts: 2858
Nice work! I like the presence and consistency of the styrene frames! Probably the largest time vampire?


Report this post
Top
 Profile  
Reply with quote  
PostPosted: Mon Sep 06, 2021 9:44 am 
Offline

Joined: Tue Feb 06, 2007 10:24 am
Posts: 2493
Location: Belgium
Many thanks everyone! :smallsmile: :wave_1: :smallsmile:

wefalck wrote:
There would be also a lot of clutter in them, such as a boat-compass, water barrels, a bread casket, the sailing gear, etc. etc. - boats were fitted out to be seaworthy in case they got separated from their ship.

Yes! I already have barrels (turned and cast in resin), but I will still add some stuff (also oars of course!). I will vary the amount a bit though. In the two fully manned boats, there is no sense in adding a lot of equipment under the figures that will be invisible. And the boats on the ships often had (part of) their equipment stored out of the boats (the boats often had water in them, which was good to prevent the wood from drying out and the plank seams from opening). But the towed boats should have plenty of clutter!

wefalck wrote:
I am still contemplating how to make the boats for my own project. If I am going down the route of vacuum-forming, I would probably make halfs and glue them to a stempost - keel - sternpost/transom assembly to ensure sharp edges on these timbers. However, I will only show one boat ready for emergencies, while the others will be shown covered as at sea - so the work of kitting them out remains manageable.

In 1/300, I was happy to have the extra structural strength of one-piece hulls, but in 1/150 that may be the best way to go indeed. The covered ones would be easier to make solid (you have to make a solid plug anyway for vacforming...), unless:
- if weight is important. If they're for example sitting on a really flimsy structure, lightweight vacformed boats would be better.
- If they are all the same, simply vacforming some extra hulls may be easier than creating extra solid pieces.

Maarten Schönfeld wrote:
How fortunate that the weather this summer was ho-di-hum! :cool_1: At least in Belgium. You managed to spend a lot of time on modelling, apparently.

In fact, I did most of it on holiday in Turkey, at 30+°C. :big_grin: But it was a holiday, so I had some extra time in between family activities, and I could do modelling with a beautiful view of the Mediterranean Sea. :smallsmile:
After that, I also did have less time, because my other hobby (playing bass guitar in a band) started up again when covid measure were eased. After almost 1 year without shows or rehearsals, I had to get some practice time in... :big_grin:
And yes, everything about Evert-Jan's Hood is inspirational indeed! ;)

EJFoeth wrote:
I like the presence and consistency of the styrene frames! Probably the largest time vampire?

Before starting, I thought they would be indeed. But they turned out pretty straightforward, while many of the pieces with curved edges that need to be cut and fitted precisely to the hull took more time than than I expected. But in fact, all of it is pretty manageable, just the large amount of detail adds up in the end. But as long as I don't get bored with it, that is not a problem! ;)


Report this post
Top
 Profile  
Reply with quote  
PostPosted: Mon Sep 06, 2021 5:08 pm 
Offline
User avatar

Joined: Tue Jan 26, 2016 7:59 am
Posts: 228
Fantastic work! Must be very difficult with such gargantuan hands though...

_________________
King George V class Battleships in 3D


Report this post
Top
 Profile  
Reply with quote  
PostPosted: Tue Sep 07, 2021 3:10 am 
Offline
User avatar

Joined: Sun Jul 11, 2010 6:52 am
Posts: 348
Location: Galicia (Spain)
It's a fantastic job. I do not know that manufacturing technique, perhaps it is valid for a large number of boats.
There is another method that may also be easier. (viewtopic.php?f=13&t=55147)
Anyway, you have done a great job.
:wave_1:

_________________
On workbench:
LCS-4 Coronado 1/350
IJN Yamato 1/700 Tamiya
Plan Type 039 Yuan Class 1/350

Shipyard:
LCS-4 Coronado


My Galery:
http://www.modelshipgallery.com/gallery ... index.html
Instagram: Tamboshipsmodels


Report this post
Top
 Profile  
Reply with quote  
PostPosted: Tue Sep 07, 2021 4:10 am 
Offline

Joined: Tue Feb 06, 2007 10:24 am
Posts: 2493
Location: Belgium
Thanks guys! :smallsmile: :smallsmile: :smallsmile:

Martocticvs wrote:
Must be very difficult with such gargantuan hands though...

Haha! :big_grin:
Thank god for tweezers... :big_grin: ;)

Kometa wrote:
I do not know that manufacturing technique, perhaps it is valid for a large number of boats.
There is another method that may also be easier. (viewtopic.php?f=13&t=55147)

Thanks Kometa! That is a great build I didn't know; very interesting! :thumbs_up_1: :thumbs_up_1: :thumbs_up_1:
The technique for making boats is very interesting too. I think it looks great for 1/700 scale, but if you want to have the thwarts ('seats' or 'benches') separate from the floor in larger scales it won't work so good, or if the lines of the boats become a bit more pronounced (you need a lot of thickness of the 'floor' sheet for sanding the curves).

Vacuum forming small items is in fact pretty easy, and so is making your own vacuum forming 'machine'. This video explains it quite well:
https://www.youtube.com/watch?v=Gx66mS7U2vY

I simplified my version even further, using simpler materials for the frame and only handheld equipment, and I used the cooking fire instead of the oven:
viewtopic.php?f=59&t=167367&start=560#p942794

Of course, you have to make a plug for each type of boat: viewtopic.php?f=59&t=167367&start=560#p942655
Making even one plug actually took me longer than making the vacforming equipment (but that mostly shows how simple the vacforming equipment is). But you can be very precise when making the plug, because it is solid. And once you have the plug, you can make as many copies as you want! ;)


Report this post
Top
 Profile  
Reply with quote  
PostPosted: Tue Sep 07, 2021 5:10 am 
Offline
User avatar

Joined: Wed Sep 28, 2011 12:04 pm
Posts: 1818
Location: Paris
On the heat-source for vacuum-forming: some time ago I obtained an electrical hot-air soldering kit. The temperature can be regulated in the range between 100°C and 450°C, as well as the airflow. Hadn't to do any vacuum-forming since I bought the set, but this is what I am going to try out next time. As it is a well-controlled source of heat, it can used for all sorts of other bending etc. work, besides the actual soldering. For me this were 80€ well spent.

_________________
Eberhard

Former chairman Arbeitskreis historischer Schiffbau e.V. (German Association for Shipbuilding History)

--------------------------------------------------------------------------------------------------------------------------------------------------------------------------------------------

Image Image Image Image


Report this post
Top
 Profile  
Reply with quote  
PostPosted: Tue Sep 07, 2021 6:18 am 
Online

Joined: Sat Jul 30, 2016 5:33 pm
Posts: 1772
Location: Stockholm, Sweden
Looks like you are just one -upping yourself with every post. This is amazing workmanship on the boats. Had no idea rudders were taken off for the battle. Makes sense too.

_________________
- @Shipific on IG
my gallery


Report this post
Top
 Profile  
Reply with quote  
PostPosted: Tue Sep 07, 2021 7:10 am 
Offline

Joined: Tue Feb 06, 2007 10:24 am
Posts: 2493
Location: Belgium
That sounds very interesting indeed Wefalk! :thumbs_up_1:
I have to take a look at those...

Many thanks Pavel! :wave_1:
The rudders were always removed when the boats were stowed. They are movable parts that can get damaged or accidentally hurt someone when a boat was being hoisted in or out of the water (a complicated procedure aboard a sailing man 'o war), so they were only attached after a boat was placed in the water, and removed again before a boat was hoisted aboard.


Report this post
Top
 Profile  
Reply with quote  
PostPosted: Tue Sep 07, 2021 12:55 pm 
Offline
User avatar

Joined: Sun Mar 13, 2005 11:51 am
Posts: 2407
Location: Belgium
I guess you have people who build stuff and build who BUILD STUFF. Awesome work, very consistent sharpness throughout all the boats. Great job!

And you're saying I use complex subjects to model?! :crazy:

_________________
The merchant shipyard


Report this post
Top
 Profile  
Reply with quote  
PostPosted: Wed Sep 08, 2021 3:35 am 
Offline
User avatar

Joined: Mon Feb 21, 2011 6:38 am
Posts: 708
Location: Czech Republic
marijn van gils wrote:
And the obligatory shot with a match for scale: :big_grin:
Image

Usually, I don’t count parts, but this time I did get curious. ;) The biggest boat has well over 150 individual parts in it, the smallest almost 60.
So in that last photo, I’m holding close to 1000 pieces in my hand… :-o

Marijn, this is just absolutely awesomelly crazy!!! Fingers crossed! :thumbs_up_1: :thumbs_up_1: :thumbs_up_1:

_________________
Battle of Savo Island Collection (all 1/700)
Recently completed: USS Wilson DD-408
At works: USS Astoria CA-34 | USS Patterson DD-392 & USS Bagley DD-386
Prep stage: USS Vincennes CA-44 | HMAS Australia | Yubari | Kako


Report this post
Top
 Profile  
Reply with quote  
PostPosted: Wed Sep 08, 2021 9:01 am 
Offline

Joined: Tue Feb 06, 2007 10:24 am
Posts: 2493
Location: Belgium
Many thanks Neptune and Vladi! :wave_1:


Report this post
Top
 Profile  
Reply with quote  
PostPosted: Wed Sep 08, 2021 3:17 pm 
Offline
User avatar

Joined: Mon Jan 10, 2005 5:30 pm
Posts: 5385
Location: Nr Southampton England
:wave_1: :wave_1:

Sharp, clean and very consistent works, the inner wood fittings ,
the fine parallel rubbing strakes outboard,
along with thole pins, oar slots and rowlocks are all masterfully crisp!
Most excellent!

JIM B :thumbs_up_1:

_________________
....I buy them at three times the speed I build 'em.... will I live long enough to empty my stash...?
http://www.modelshipgallery.com/gallery ... index.html

IPMS UK SIG (special interest group) www.finewaterline.com


Report this post
Top
 Profile  
Reply with quote  
PostPosted: Thu Sep 09, 2021 4:39 am 
Offline

Joined: Tue Feb 06, 2007 10:24 am
Posts: 2493
Location: Belgium
Many thanks Jim! :thumbs_up_1:

Yes, those features were a lot of fun! Especially cutting the oar slots... :big_grin:

In fact, the French barge and cutter should still have thole pins added on the little rectangular 'squares'. But these should be maximum 0,1mm thick and 0.3mm high, and I'm not sure I can position these consistent enough, so it may look better to leave them of...
Anyway, still some time to think that one over, because I would do it only after painting because they would be too fragile on those exposed hull edges. ;)

And I noticed on the photo's that before painting, I will really need to clean some finger grease from the top edge of the rubbing strakes! :big_grin:


Report this post
Top
 Profile  
Reply with quote  
PostPosted: Thu Sep 09, 2021 5:35 am 
Offline
User avatar

Joined: Sun Oct 12, 2008 3:55 am
Posts: 593
Location: Budapest, Hungary
Each boat you made is a beautiful little gem! So much work but it really pays off.
Brilliant!


Report this post
Top
 Profile  
Reply with quote  
Display posts from previous:  Sort by  
Post new topic Reply to topic  [ 1216 posts ]  Go to page Previous  1 ... 29, 30, 31, 32, 33, 34, 35 ... 61  Next

All times are UTC - 6 hours [ DST ]


Who is online

Users browsing this forum: No registered users and 62 guests


You can post new topics in this forum
You can reply to topics in this forum
You cannot edit your posts in this forum
You cannot delete your posts in this forum
You cannot post attachments in this forum

Jump to:  
Powered by phpBB® Forum Software © phpBB Group