LE BOSCO wrote:
what i find amazing Marijn is that your work on plastic is just as beautiful as working on wood and makes it just as "noble"

can't wait to see more
cheers
nicolas
Thanks Nicolas! That a very nice compliment!
For this scale, I prefer to avoid the texture/grain of wood, and simulate the feel by painting. I think I can get the final result to feel more in scale that way.
It is also easier and faster to me, as my wooden modelling experience is very limited!

Although I really love wood (my grandfather was a professional carpenter carved big sculptures in wood as a passionate hobby), I don't feel any material is more 'noble' than another. To me, it is the final result that counts...
But much respect to people like Donald McNarry and Philip Reed, who manage(d) to create an illusion of reality in small scale with wooden models!
And here is a little more:
One element of the hull remained: the figurehead.
The decoration of the Redoutable is not known, but a classic Greco-roman style warrior seems a reasonable guess.
I based it l’Hannibal the Spartiate, two of the few French 75’s of the period of which the decoration is known.
Decoration for 17th and 18th century ships can be daunting, especially when sculptures of humans are involved. Maybe this is a reason why we don’t see these ships being scratchbuilt in small scales more often?
Years ago, I sculpted a fair number of 1/35 scale figures, so I was well prepared.
But I know sculpting is very daunting for most modellers. I know I was afraid of it before I ever tried it!
However, I found it to be easier than I had imagined, and also less time-consuming than I thought it would be.
But since most ship-modellers are probably not familiar with the techniques involved, I made a little step by step.
Each step is one sculpting session, with the putty being cured in between sessions. I used Magic Sculp (MS), which cures in about 1 to 1,5 hours. Most sessions only took 0,5 to 1 hour, which gives you an idea of the total time spent (I think about 10 hours in total).
I started with two blobs of MS, one for the head and one for the body.
After hardening, I connected them with 0,2mm copper wire. I added skeleton legs in the same material.
In larger scales, I would normally use separate pieces for the upper torso and pelvis. But because of the scale and the rather static pose, I kept it simpler here.
The figure received a 0,2mm brass wire in an uncomfortable position

, allowing me to place it on the bow for test-fitting and remove it again for sculpting.
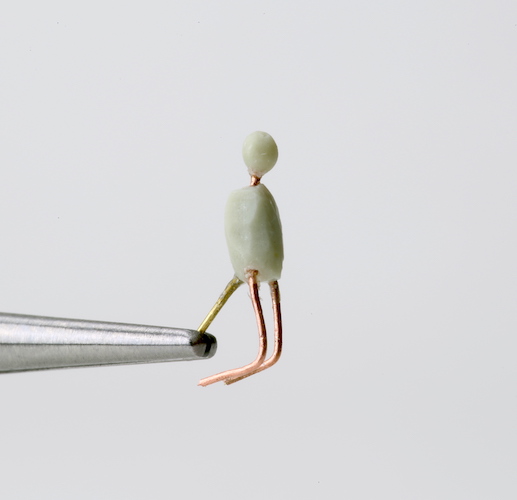

The legs were fleshed out with MS, and the neck was filled in. With a sharp scalpel, I carved a groove in the head. This allows place for the putty when sculpting the face later, especially for the eye-sockets.

Next, I added his skirt.
In this session, the belt was treated as part of the folds, delineating it’s lower edge and the buckle before adding the actual folds.


The process goes like this:
- I add a shapeless blob of putty, and push it around the area I want the skirt to be. I remove any excess.
- I push and move the putty around to get the volume of the skirt to my liking.
- I cut the upper and lower limits with a scalpel and remove the excess putty.
- I press the (lower edge of the) belt and the folds in the putty. I first start with rough shapes, like a sketch. Next, I go over them again repeatedly, refining their shape and smoothing the transitions between them. Any excess putty gets pushed to the edge, and is again cut and removed.
- At the end, I smooth the surface a tiny bit with a small brush and (very little) water.
These are the tools I use: toothpicks with their ends sanded smooth to more or less pointy or blunt tips. They are covered in superglue, and then sanded again.
The upper toothpick only has one working end (on the right), the lower one has 2.
A fine needle is used for the deepest creases and thin lines.
Talcum powder and water are used to keep the putty from sticking to the tools too much.

So far, I held the figure in a pin-vice with its brass wire. But this wasn’t too comfortable, so I made a simple handle on which the figure is positioned just like on the stem of the ship.

Next was his scale armour shirt. I cut a slit in the end of a fine aluminium tubing and opened the ends to a U-shape. This was used to press the scales in the soft putty.


Now the face was added. I added a tiny blob of putty to the front of the head, smoothed this over the face, and pressed the facial features in it. Rather than adding a nose on top of it, the areas around the nose were pressed down.

Next, the helmet was added.
When this was hard, I added the skeleton arms. For strength, the sword was made integral to the arm by flattening the end of the wire with pliers and filing the end.

Now, the arms were sculpted.
For smooth and regular items like this (or the legs and the helmet), I usually need to do some carving and shaping with a sharp scalpel after the putty cures.
MS needs to cure overnight. But I usually speed this up by putting it in an oven for 20-30 minutes at 50-60°C, so I can do more sessions in one day. Another advantage of keeping the figurehead separate from the ship as long as possible, as I wouldn’t want the styrene ship exposed to that temperature…

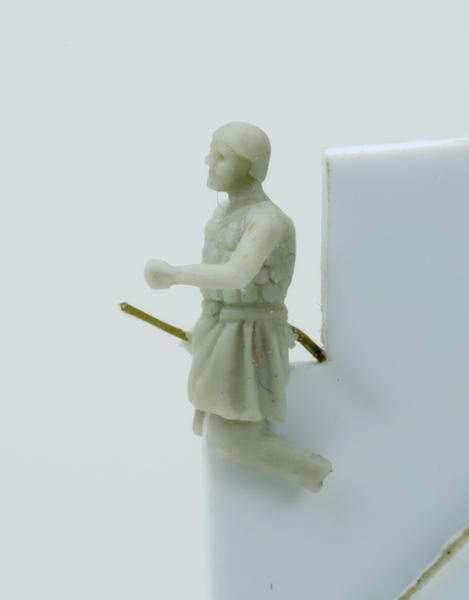
Sleeves were added. At the end of the session, sword details were made too.


A punch and die was used to punch a shield from 0,13mm plastic sheet. 0,2mm copper wire was wrapped around the punch used, providing a rim with the perfect diameter. A smaller plastic disc was glued in the centre.
After gluing the shield to the figure, straps were added in MS. They are sculpted in situ: apply blob of putty, spread around the arm, and remove excess.


Now, the figure was permanently glued on the stem. Gaps between the ship and legs were filled, and feet sculpted directly to the stem.


A mantle or cape was added next, integrating the figurehead further with the bow.


Finally, feathers were added to the helmet.


Finished!
It’s not the most dynamic pose, but hey, he’s supposed to be a statue!

And a reminder of the scale.
I placed a 1/350 scale figure on the beakhead deck to show how large such a figurehead must have been in reality.
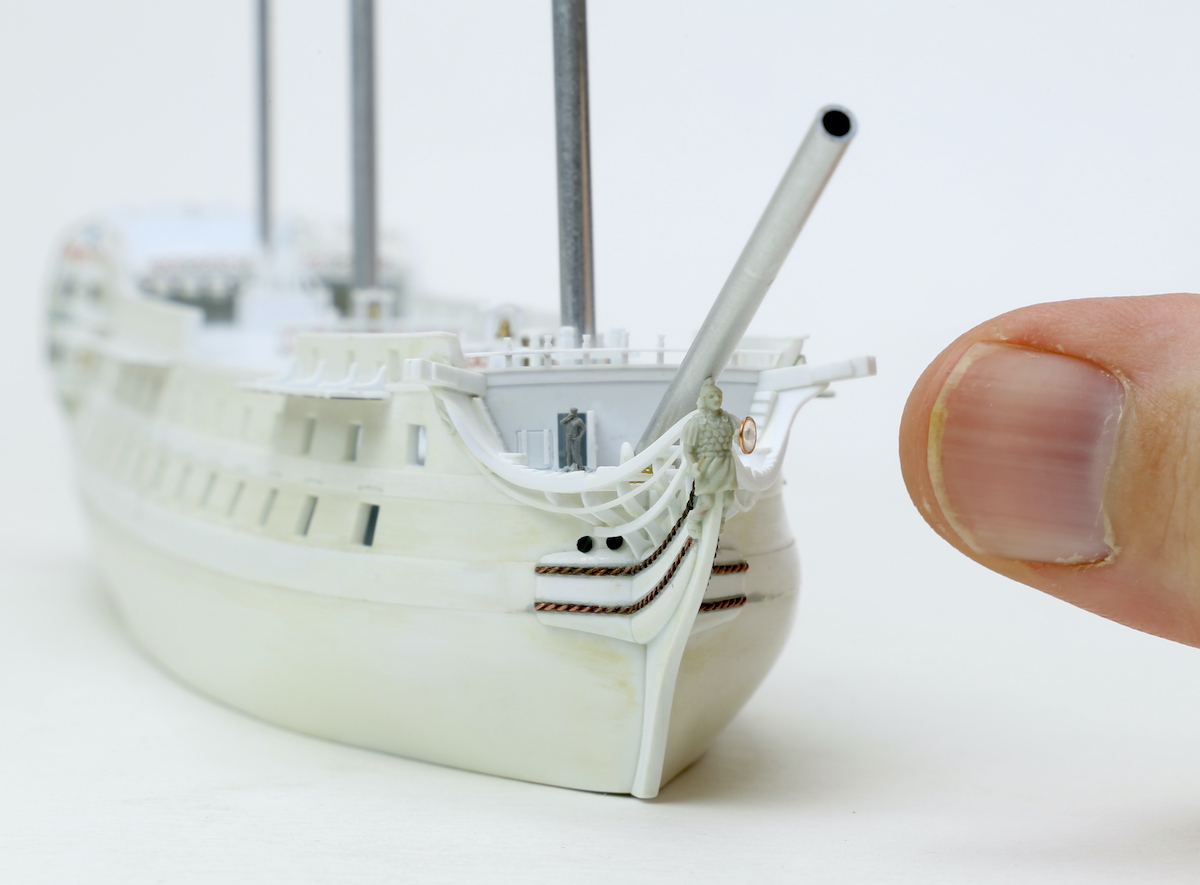
And an overview of the hull. It is now finished, besides elements which can only be added after painting (gunport lids, anchors, etc.), and of course battle damage.

BTW, , I used photo stacking for the last photo to get perfect field of depth. Compare that to the photo before!
All the best,
Marijn