The Ship Model Forum

The Ship Modelers Source
It is currently Thu Apr 25, 2024 3:16 pm

All times are UTC - 6 hours [ DST ]


Post new topic Reply to topic  [ 1221 posts ]  Go to page Previous  1 ... 3, 4, 5, 6, 7, 8, 9 ... 62  Next
Author Message
PostPosted: Fri Mar 22, 2019 9:23 am 
Offline

Joined: Wed Jan 21, 2009 1:51 pm
Posts: 2858
Nice to see some progress on these small weapons. I tried casting a few times and was never really happy with the result, so naturally I'm looking forward to the casting progress report :smallsmile:


Report this post
Top
 Profile  
Reply with quote  
PostPosted: Fri Mar 22, 2019 9:36 am 
Offline
PetrOs Modellbau
PetrOs Modellbau
User avatar

Joined: Wed Nov 15, 2006 11:58 am
Posts: 1822
Location: Munich, Germany
Looks fantastic!

_________________
Model kit manufacturer and distributor: https://b2b.modellbaudienst.de
Distributor of Very Fire, Snowman, Milania Master Korabel, Falkonet, Microdisign in EU
1:350 HMS Diana 1794 - nearly released
Further kits in preparation.


Report this post
Top
 Profile  
Reply with quote  
PostPosted: Fri Mar 22, 2019 11:50 am 
Offline
User avatar

Joined: Sat Mar 26, 2016 2:58 am
Posts: 225
Location: Belgium
Good to see you back at the bench, Marijn-sama! Not something your average modeller would dare to do though, impressive stuff :thumbs_up_1:


Report this post
Top
 Profile  
Reply with quote  
PostPosted: Fri Mar 22, 2019 12:31 pm 
Offline
User avatar

Joined: Fri Apr 08, 2005 9:41 am
Posts: 2207
Location: Monson, MA.
Insane job so far! :thumbs_up_1: :thumbs_up_1: :thumbs_up_1: :thumbs_up_1: :cool_2:


Bob Pink. :wave_1:


Report this post
Top
 Profile  
Reply with quote  
PostPosted: Fri Mar 22, 2019 1:18 pm 
Offline
User avatar

Joined: Tue Jan 26, 2016 7:59 am
Posts: 228
Great work! And yes - there's a reason those 64pdrs were nicknamed the Smashers :cool_2:

_________________
King George V class Battleships in 3D


Report this post
Top
 Profile  
Reply with quote  
PostPosted: Fri Mar 22, 2019 4:12 pm 
Offline
User avatar

Joined: Mon Mar 12, 2012 11:13 am
Posts: 904
Location: Ludwigsburg/Germany
Luvit!!!

XXXDAn

_________________
To Victory and beyond ...
viewtopic.php?f=59&t=99050&start=60

See also our german forum for the age of Sail and History:
http://www.segelschiffsmodellbau.com


Report this post
Top
 Profile  
Reply with quote  
PostPosted: Sat Mar 23, 2019 3:10 am 
Offline

Joined: Tue Feb 06, 2007 10:24 am
Posts: 2498
Location: Belgium
Many thanks guys! :big_grin:

A friend will do the casting. You really need a vacuum pump for proper resin casting, especially such small items. And some experience!

I'm really happy he is willing to cast these guns for me, as it will save me an enormous amount of time. Each barrel took me about 45 minutes to turn, and each (non-slide) carriage about 90 minutes to build (they are not complicated, but so tiny...). You can do the math for both a 104-gun and 74 gun ship if I would have to do them all by hand individually...
Now they will of course still take some time: cutting from the pouting plug, cleaning up, and drilling the muzzle end of the barrels. But it will be much less!


Report this post
Top
 Profile  
Reply with quote  
PostPosted: Sun Mar 24, 2019 7:06 am 
Online
User avatar

Joined: Mon Jan 10, 2005 5:30 pm
Posts: 5386
Location: Nr Southampton England
very good and sharp progress!

in your huge 1/300 scale the differences twixt RN and French pattern guns will be discernible to the knowledgeable eye


==> in 1/700 I think less so... :cool_2:

hence ,

I am considering/ planning 3-d printing for the gun carriages and barrels for the deck guns for my
1/700 Bretagne project

Back Cat manage completely step-less 3 D printing... :thumbs_up_1:

:wave_1: :wave_1:

JB

_________________
....I buy them at three times the speed I build 'em.... will I live long enough to empty my stash...?
http://www.modelshipgallery.com/gallery ... index.html

IPMS UK SIG (special interest group) www.finewaterline.com


Report this post
Top
 Profile  
Reply with quote  
PostPosted: Wed Mar 27, 2019 3:27 pm 
Offline

Joined: Tue Feb 06, 2007 10:24 am
Posts: 2498
Location: Belgium
Many thanks Jim!

3D printing the guns is an excellent idea!
In these small scales, I found the hardest part with the 'traditional' way is to get both sides of the carriages (brackets) identical. Because they are so small, the most minute difference becomes instantly visible. A challenge in 1/300, but even harder in 1/700 I'm sure. No problem at all though when CAD-designing them... I

Also for the barrels, 3D-printing would have some good advantages:
- it would be easy to have the trunnions as part of the barrel instead of the carriage.
- the muzzle could be hollow, and the barrel attached to the wafer with the pommelion. For resin casting, that would be too fragile and too thin for good flow of resin into the part, so I had to attach them to the pouring plug with the muzzle end, which means I will have to drill out each and every barrel by hand.

But completely stepless printing would be a prerequisite indeed.

Funny how we often choose our methods on the possibilities offered by our modelling friends! :big_grin: I chose lathe turning and resin casting because I have friends to help me with it. If I had a 3D-designing friend, maybe I would have rather thought of that too?


Report this post
Top
 Profile  
Reply with quote  
PostPosted: Thu Mar 28, 2019 6:33 am 
Offline
Model Monkey
Model Monkey

Joined: Sat Aug 20, 2005 9:27 pm
Posts: 3954
Location: USA
Wonderful model, Marijn! Just stunning work.

Big fan of 3D-printed cannons. Here are examples of what is possible in larger scales. Ben's printer is likely to achieve similar detail in 1/300.


Attachments:
Model Monkey 1-100 Cannons 24-pounder Blomefield long-pattern (7) b.jpg
Model Monkey 1-100 Cannons 24-pounder Blomefield long-pattern (7) b.jpg [ 136.04 KiB | Viewed 1247 times ]
Model Monkey 1-76 Carriages for 24-pounder Cannons d.jpg
Model Monkey 1-76 Carriages for 24-pounder Cannons d.jpg [ 137.07 KiB | Viewed 1247 times ]
Model Monkey 1-96 32-pounder Carronades US Navy (8) c.jpg
Model Monkey 1-96 32-pounder Carronades US Navy (8) c.jpg [ 127.46 KiB | Viewed 1247 times ]

_________________
Have fun, Monkey around.™

-Steve L.

Complete catalog: - https://www.model-monkey.com/
Follow Model Monkey® on Facebook: - https://www.facebook.com/modelmonkeybookandhobby
Report this post
Top
 Profile  
Reply with quote  
PostPosted: Thu Mar 28, 2019 6:43 am 
Offline

Joined: Wed Jan 21, 2009 1:51 pm
Posts: 2858
marijn van gils wrote:
In these small scales, I found the hardest part with the 'traditional' way is to get both sides of the carriages (brackets) identical. Because they are so small, the most minute difference becomes instantly visible.


Glue two strips together at one end, model the end of the other end of the strip (file, cut, drill, anything you like), then separate the strips using a chopper. Voila, identical parts. When you need to use them for casting they only need to be identical once!


Report this post
Top
 Profile  
Reply with quote  
PostPosted: Fri Mar 29, 2019 4:18 am 
Offline

Joined: Tue Feb 06, 2007 10:24 am
Posts: 2498
Location: Belgium
Thanks guys!

Those look great Steve!
That's actually a very good idea Evert-Jan!
These things are pretty small in 1/300: the brackets (carriage sides) are only 0,3mm (8 pounder) to 0,5mm (36 pounder) thick. The detailing really depends on tenths of a millimeter, so still challenging for either method... :big_grin: But mine are made now and ready for casting! :big_grin:

Meanwhile, I also made some small stuff to dress up the decks in a combat scene:
Top: different sizes of barrels (powder and other), two sizes of (swab) buckets, and a larger tub for holding water.
Bottom: ‘salt box’ (ready use cartridge box), 3 different wedges for the guns, match tub (for holding linstocks), and French and British pattern ‘cases of wood’ (for transporting cartridges from the magazines safely).

Image
Image

Cheers,

Marijn


Report this post
Top
 Profile  
Reply with quote  
PostPosted: Fri Mar 29, 2019 4:27 am 
Offline
PetrOs Modellbau
PetrOs Modellbau
User avatar

Joined: Wed Nov 15, 2006 11:58 am
Posts: 1822
Location: Munich, Germany
Great work!

_________________
Model kit manufacturer and distributor: https://b2b.modellbaudienst.de
Distributor of Very Fire, Snowman, Milania Master Korabel, Falkonet, Microdisign in EU
1:350 HMS Diana 1794 - nearly released
Further kits in preparation.


Report this post
Top
 Profile  
Reply with quote  
PostPosted: Fri Mar 29, 2019 5:05 am 
Offline
User avatar

Joined: Thu Aug 27, 2009 11:05 am
Posts: 2261
Location: Paris France
HI Marijn

as usual, a precision work and especially personal work more gratifying that the systematic use of 3D :smallsmile: :thumbs_up_1: :thumbs_up_1:
completely "fan" of your work
cheers
Nicolas

_________________
https://ladiagonaledubosco.blogspot.fr/


Report this post
Top
 Profile  
Reply with quote  
PostPosted: Fri Mar 29, 2019 5:39 am 
Offline
User avatar

Joined: Wed Sep 28, 2011 12:04 pm
Posts: 1820
Location: Paris
Hope they come out as nicely as castings :thumbs_up_1:

_________________
Eberhard

Former chairman Arbeitskreis historischer Schiffbau e.V. (German Association for Shipbuilding History)

--------------------------------------------------------------------------------------------------------------------------------------------------------------------------------------------

Image Image Image Image


Report this post
Top
 Profile  
Reply with quote  
PostPosted: Fri Mar 29, 2019 9:07 am 
Offline

Joined: Tue Feb 06, 2007 10:24 am
Posts: 2498
Location: Belgium
Many thanks guys!

I hope so too Wefalk... :)
My friend has plenty of resin casting experience, and a powerful vacuum pump, so I have good confidence.


Report this post
Top
 Profile  
Reply with quote  
PostPosted: Fri Mar 29, 2019 11:18 am 
Offline
User avatar

Joined: Sat Mar 26, 2016 2:58 am
Posts: 225
Location: Belgium
My my my, I would wet my pants only thinking about doing such fine and small work :big_grin: . Great work. The effort sure will pay of. Looking forward to next installment.


Last edited by GewoonWouter on Sat Mar 30, 2019 5:53 am, edited 1 time in total.

Report this post
Top
 Profile  
Reply with quote  
PostPosted: Sat Mar 30, 2019 5:06 am 
Offline

Joined: Tue Feb 06, 2007 10:24 am
Posts: 2498
Location: Belgium
Thanks Wouter!

Here is the next installment! :big_grin:

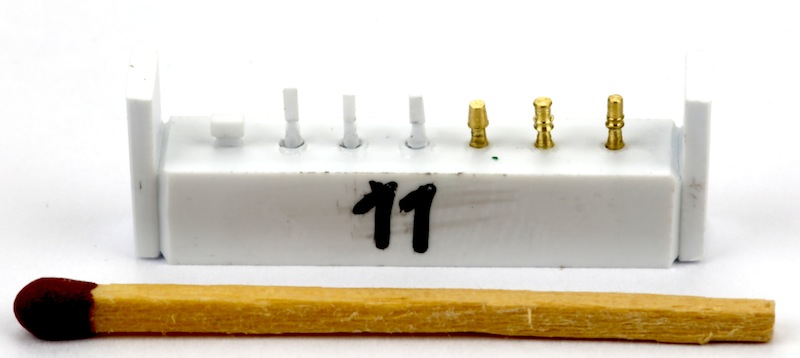
Besides the guns, I have been working to get the Redoutable started for some time already. Since there is no kit in this scale, it will be fully scratchbuilt.

Since the gun ports will be open, I need a hollow hull. I opted for vacuum forming two hull halves, in between which I can fit decks etc. For this, a mould needs to be made.

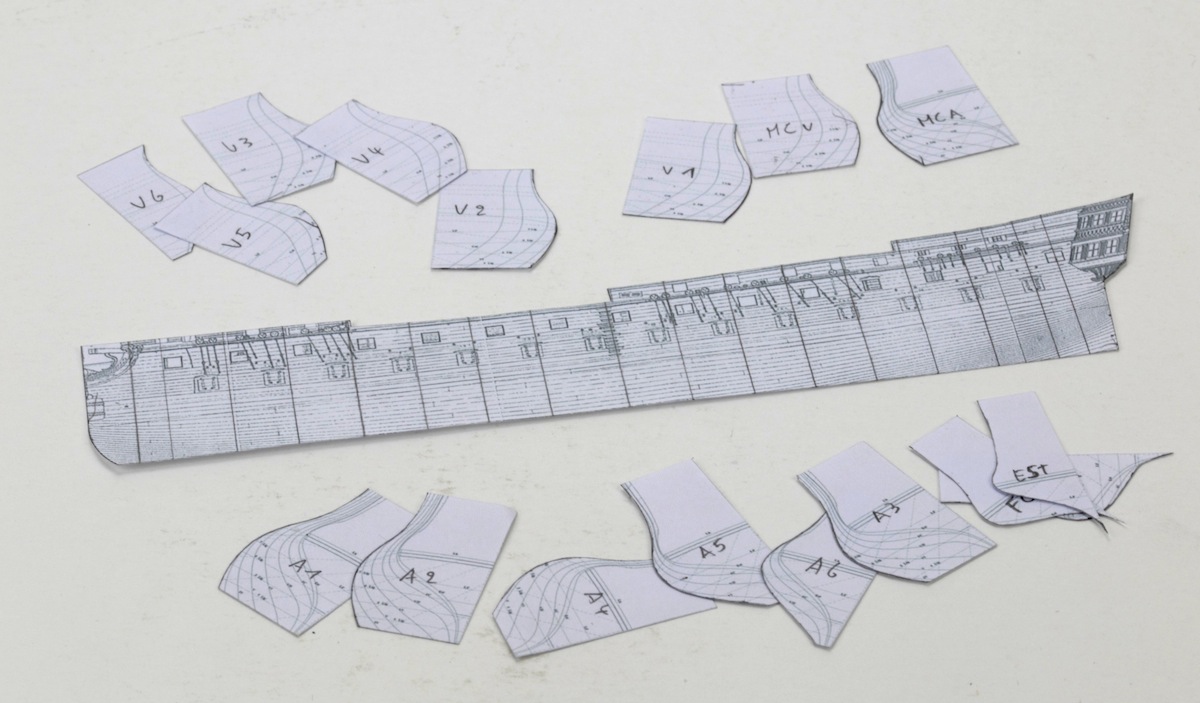
This started with plans, which I took from Boudriot’s magnificent ‘the 74 gun ship’.
These were scaled to 1/300, and printed multiple times. Ribs were cut out according to all the station lines.

But since the mould will be on the inside of the vacuum formed plastic, the thickness of the plastic needs to be subtracted from them. The thickest part of the hull, at the lower gun ports, is 1,5mm in 1/300, so I cut the ribs 1,5mm smaller than each station line.
But of course, the hull is not of equal thickness from top to bottom: the hull sides are thinner near the weather decks. So I make the mould for the outside of the vacform parts to be correct, and I will later sand the inside thinner towards the top.

Image

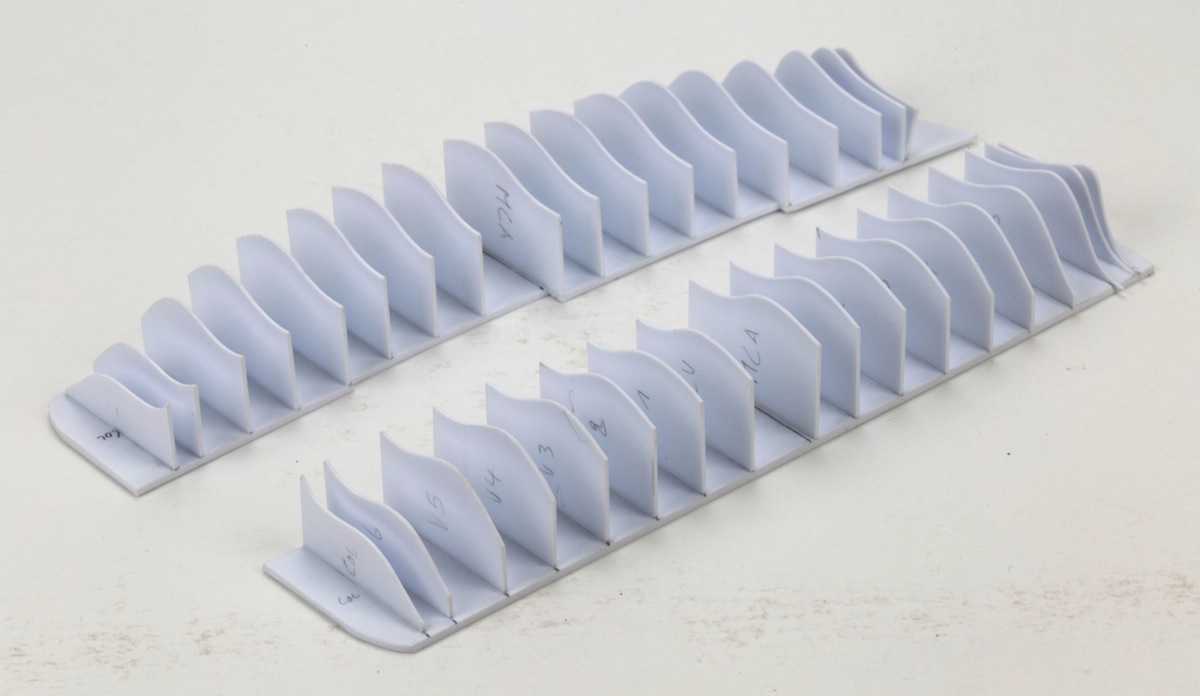
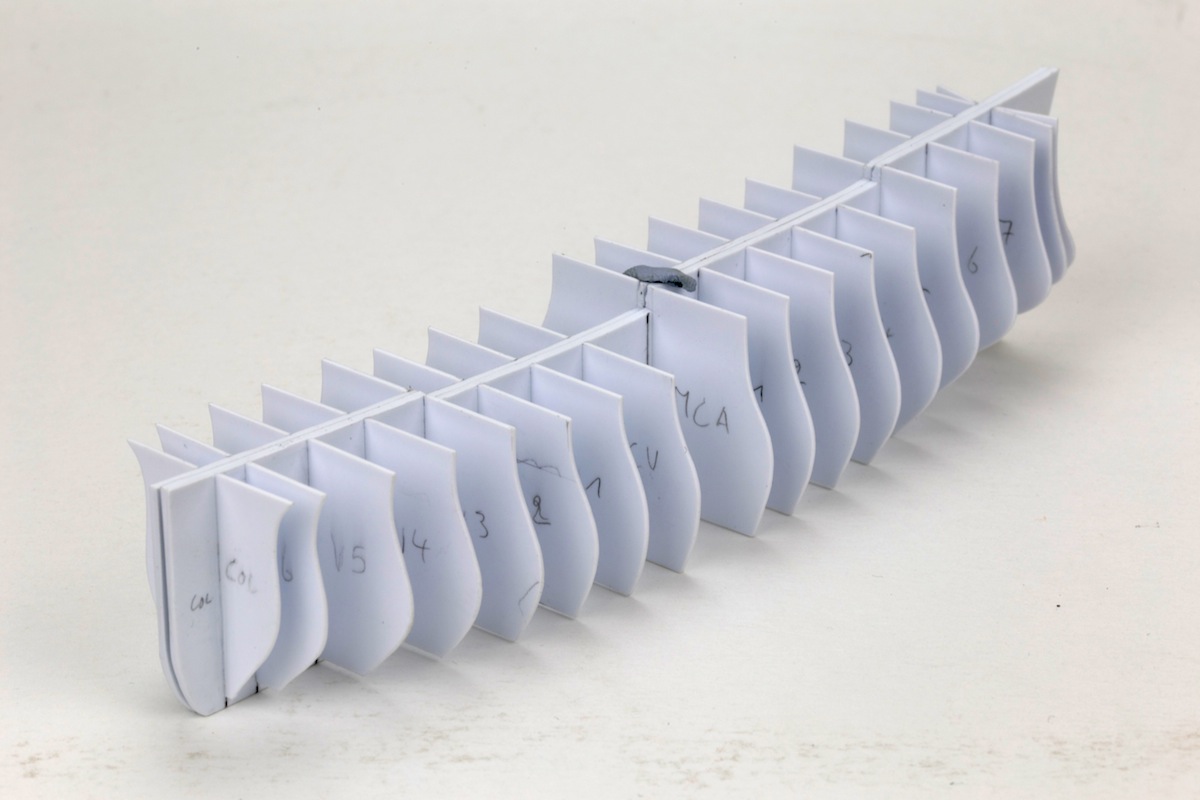
These paper templates were transferred to plastic sheet, cut out and glued together. I kept both hull halves separate.
Image
Image

Next, the space in between the ribs was mostly filled with scrap plastic sheet.
Image
Image

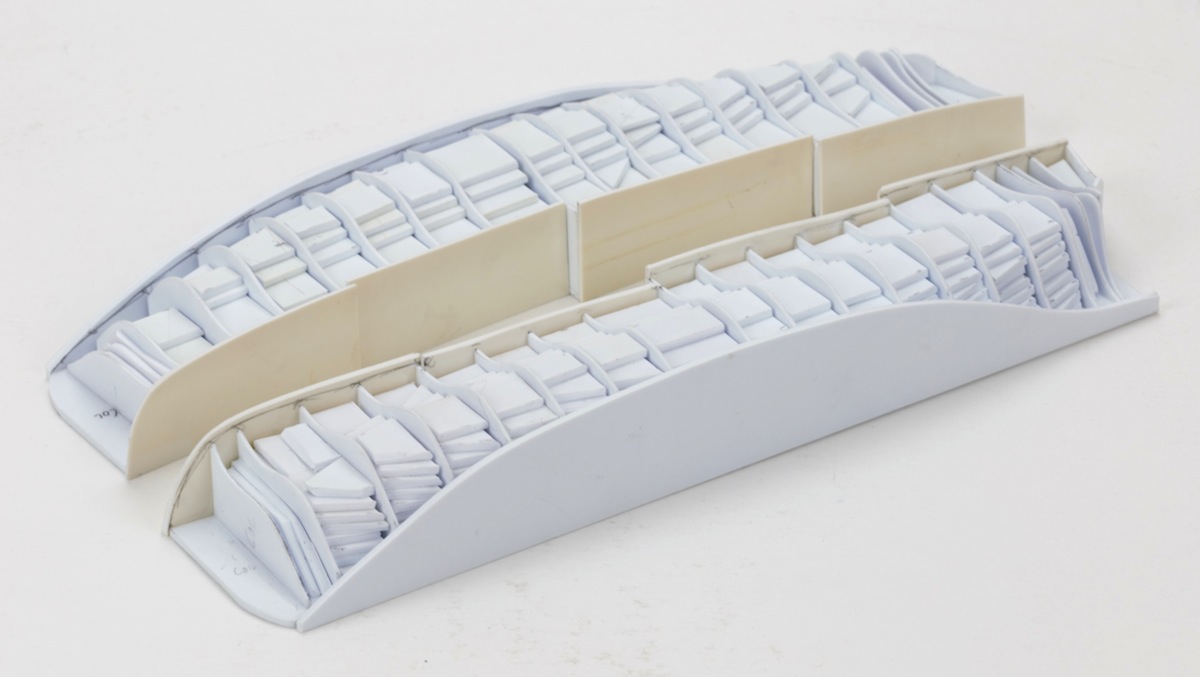
And the final voids were filled with Magic Sculp epoxy putty.
Image
Image

This was carefully sanded, using the ribs as a guide.
Image
Image

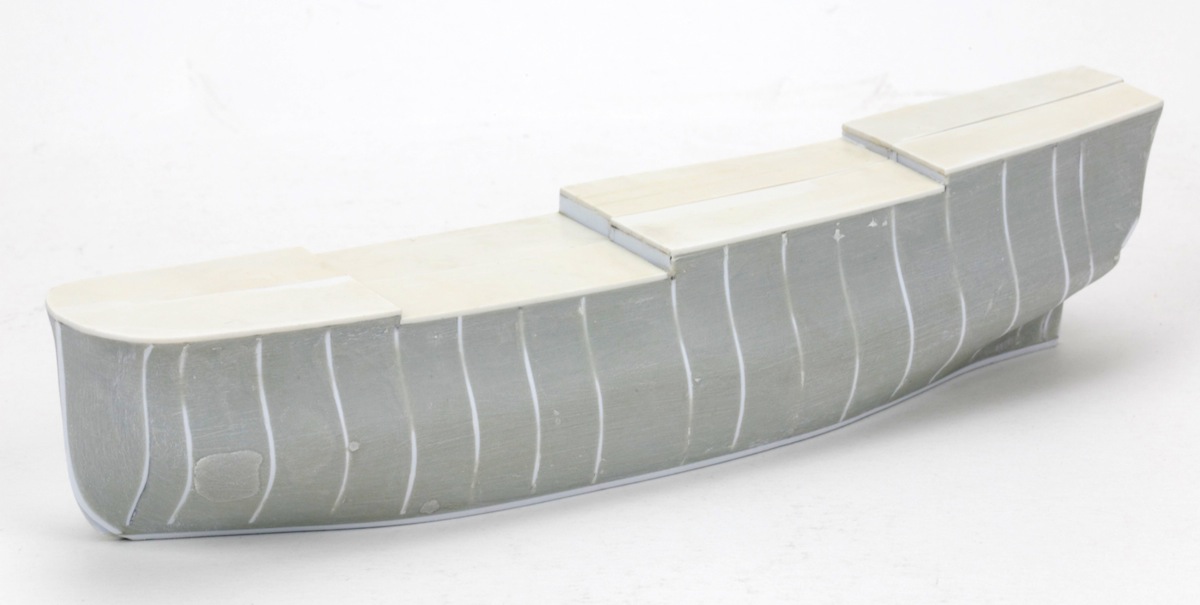
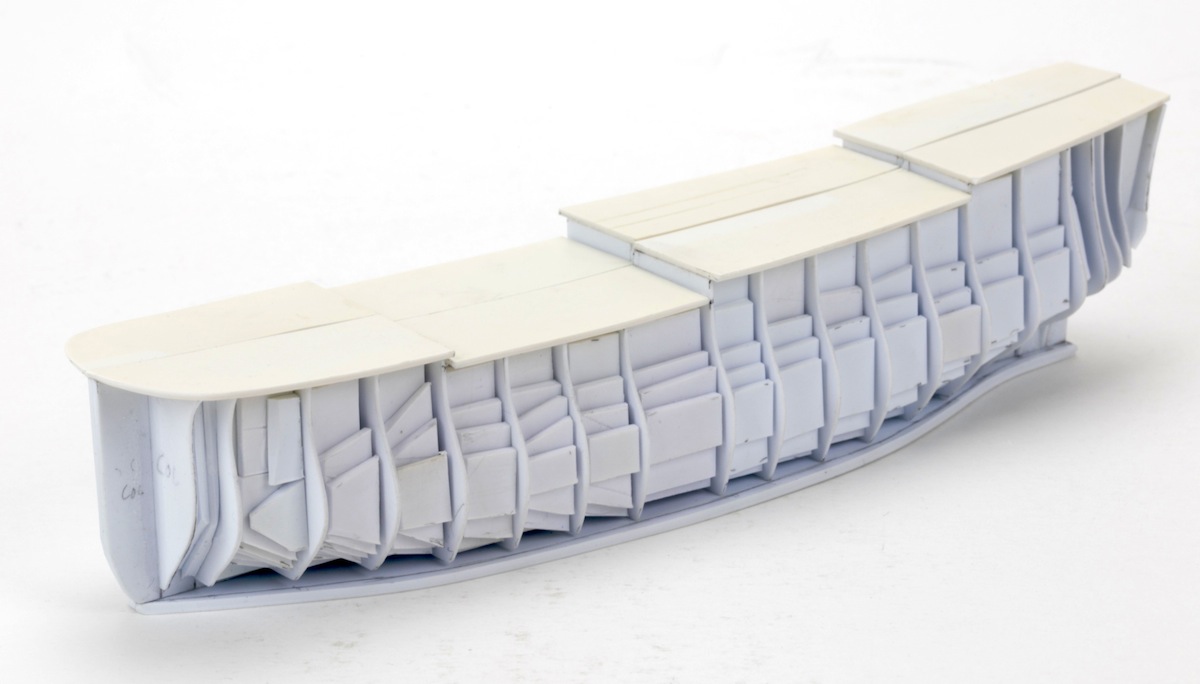
Now, both hull halves were attached to a thick baseplate. This leaves some space near the bottom, in case webbing is created by the vacforming.
The space in between the hull halves is filled so the vacformed parts will smoothly continue over the top of the hull instead of sharply bending downwards. Again, first plastic sheet was used for most of the volume…
Image

… followed by Magic Sculp and sanding.
Image

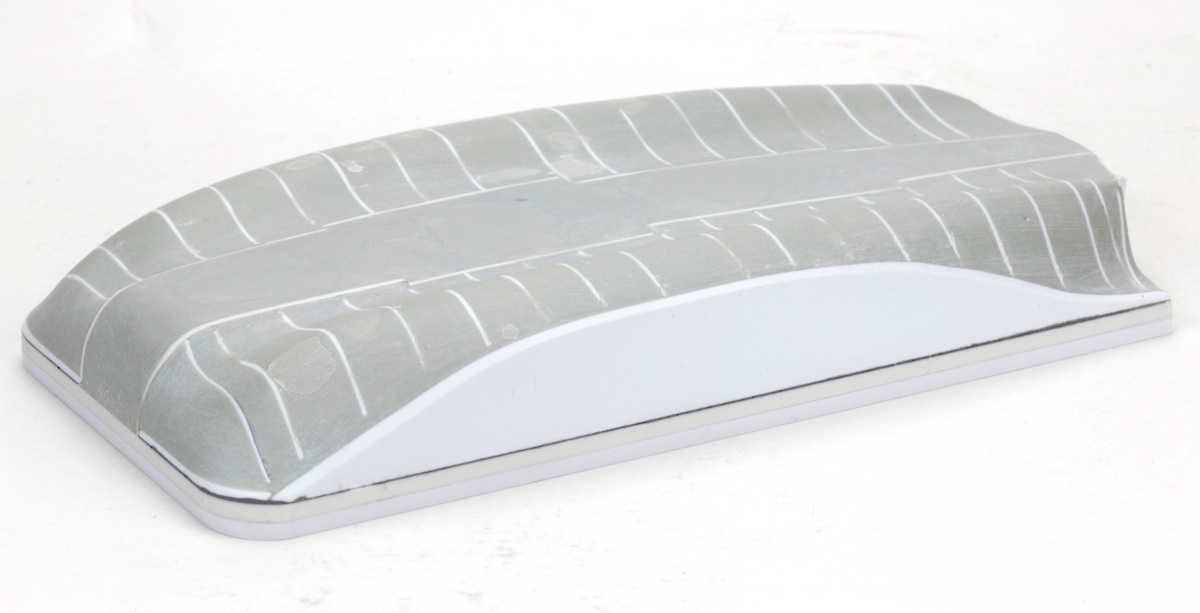
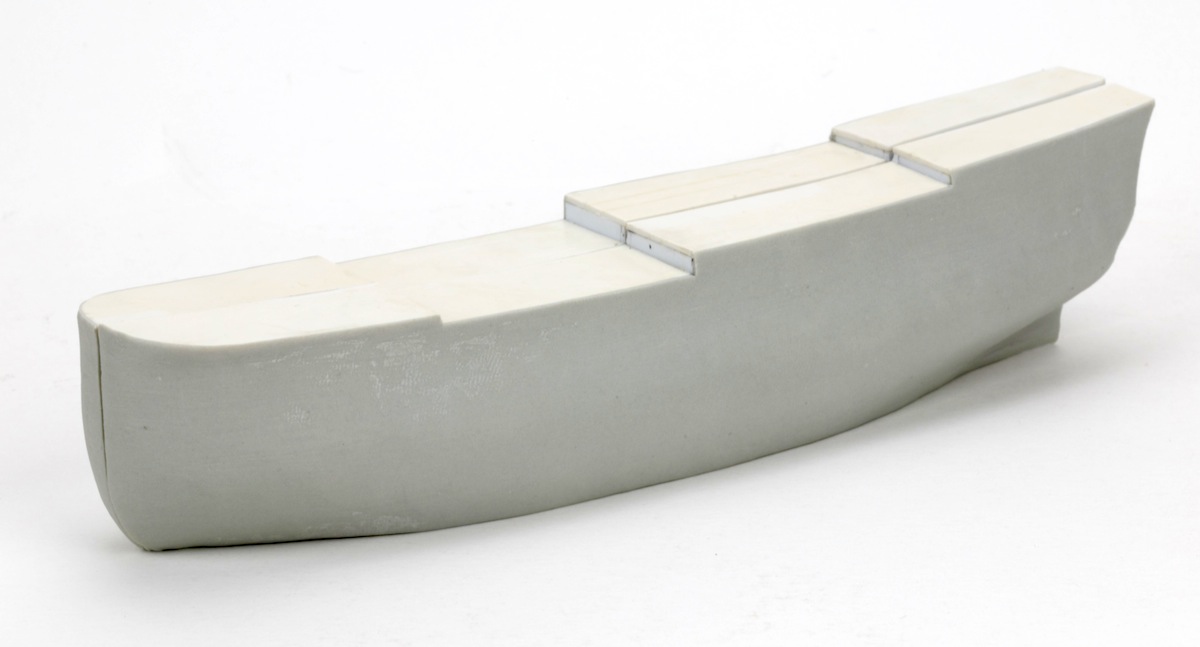
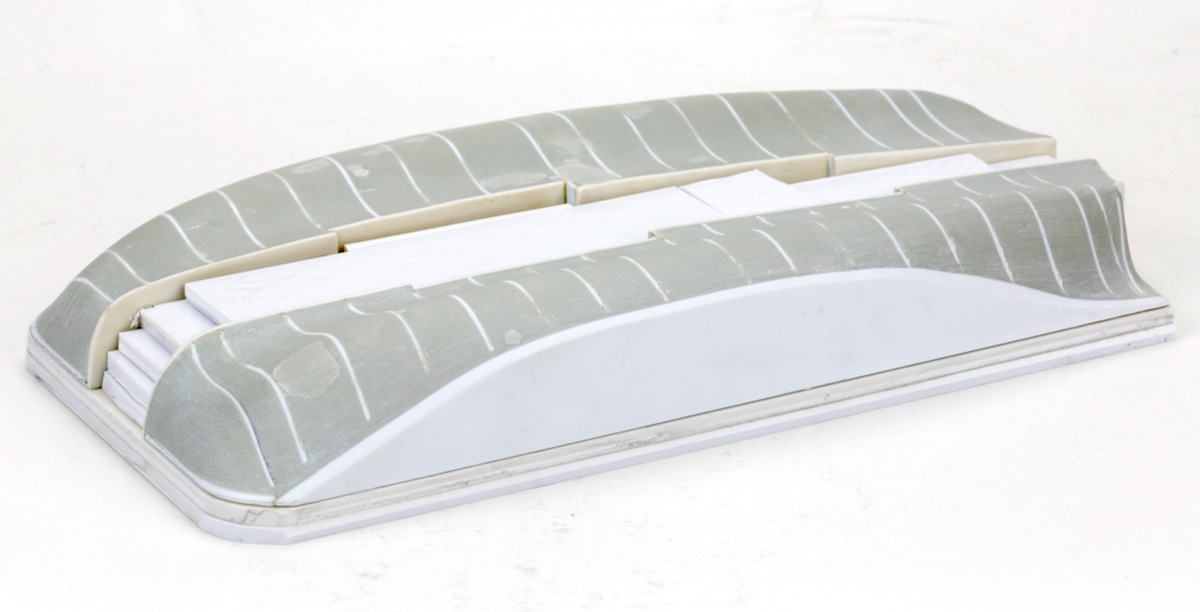
Next, the surface was smoothed further by spraying it with Motib spray filler, sanding, spraying more filler, sanding, etc.
Image

And finally, a coat of primer was applied to reveal any imperfections, and the mould was ready. Making this mould was not really difficult, but I have to admit it was more time-consuming than I anticipated.
Image

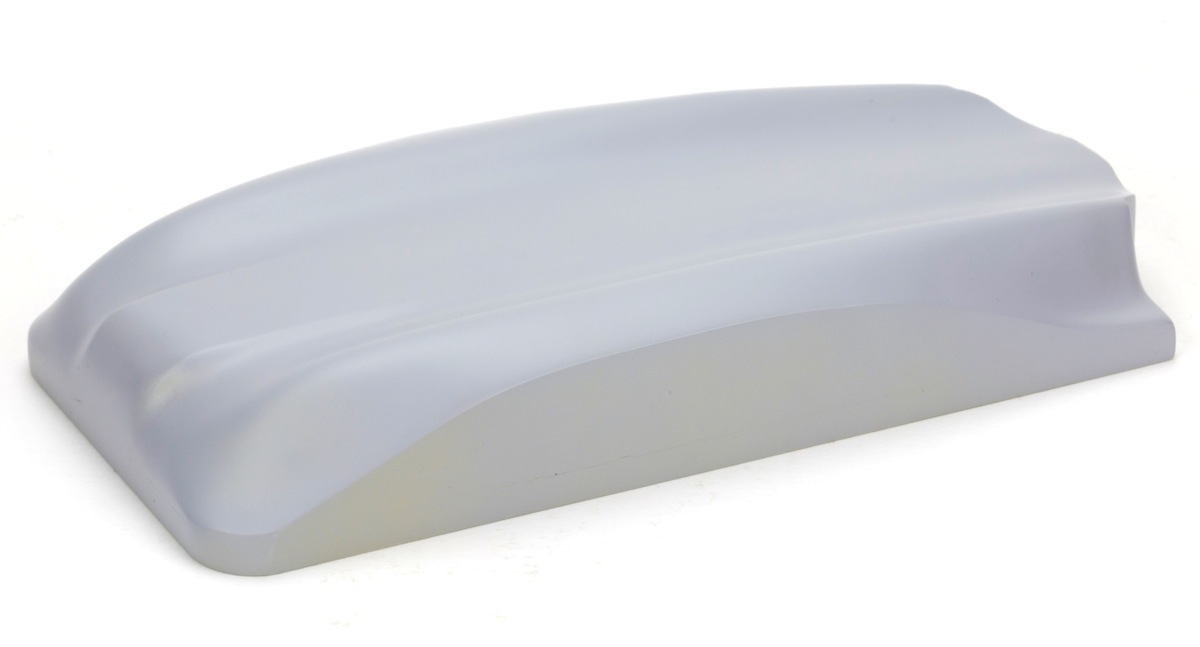
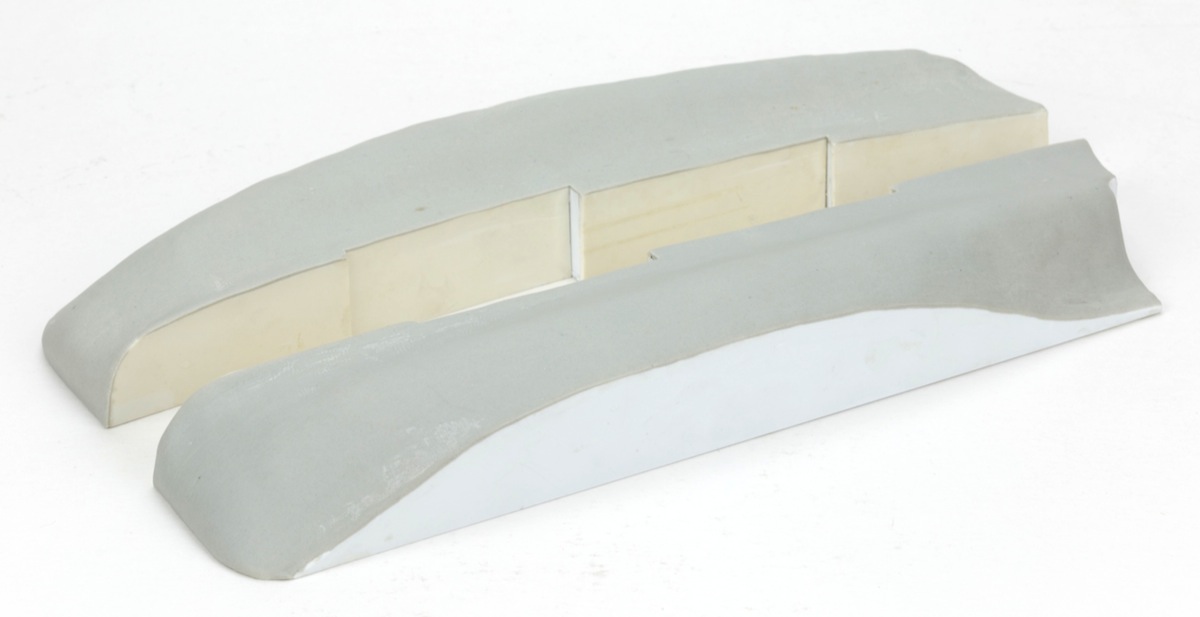
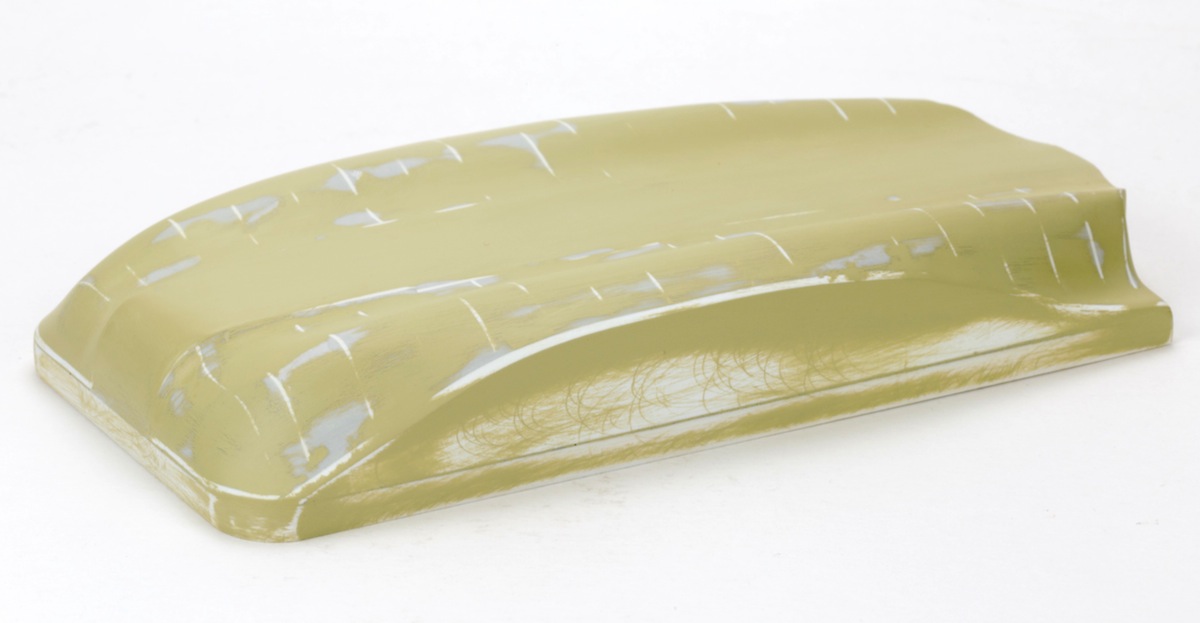
Now, the same friend who will cast the guns, took the mould and vacformed the basic hull parts for me. He did a fantastic job! Perfectly formed, and no webbing at all. :thumbs_up_1: :thumbs_up_1: :thumbs_up_1:
Image

Now I can start the laborious task of cutting out correctly both hull halves and opening up all the gun ports… :big_grin:

Cheers,

Marijn


Report this post
Top
 Profile  
Reply with quote  
PostPosted: Sat Mar 30, 2019 5:56 am 
Offline
User avatar

Joined: Sat Mar 26, 2016 2:58 am
Posts: 225
Location: Belgium
Did you hear that? That was my yaw hitting the floor :big_grin: . This is a new technique to me, looking very interesting. Great part about it is that you will have a subject no one else has so far. Really looking forward to see laborous work to transform this into something which resembles a ship. Keep up the good work sailor!


Report this post
Top
 Profile  
Reply with quote  
PostPosted: Sat Mar 30, 2019 6:10 am 
Offline
User avatar

Joined: Wed Sep 28, 2011 12:04 pm
Posts: 1820
Location: Paris
I can imagine that the next steps are actually more difficult, marking out all the cutting lines. I suppose you will add the planking as strips of polystyrene sheet ? The whole process seems to be very similar to how Artitek makes their masters (they sell a nice video on this, btw).

_________________
Eberhard

Former chairman Arbeitskreis historischer Schiffbau e.V. (German Association for Shipbuilding History)

--------------------------------------------------------------------------------------------------------------------------------------------------------------------------------------------

Image Image Image Image


Report this post
Top
 Profile  
Reply with quote  
Display posts from previous:  Sort by  
Post new topic Reply to topic  [ 1221 posts ]  Go to page Previous  1 ... 3, 4, 5, 6, 7, 8, 9 ... 62  Next

All times are UTC - 6 hours [ DST ]


Who is online

Users browsing this forum: Bing [Bot], JIM BAUMANN and 154 guests


You can post new topics in this forum
You can reply to topics in this forum
You cannot edit your posts in this forum
You cannot delete your posts in this forum
You cannot post attachments in this forum

Jump to:  
Powered by phpBB® Forum Software © phpBB Group