The Ship Model Forum

The Ship Modelers Source
It is currently Thu Apr 18, 2024 7:11 am

All times are UTC - 6 hours [ DST ]


Post new topic Reply to topic  [ 1219 posts ]  Go to page Previous  1 ... 6, 7, 8, 9, 10, 11, 12 ... 61  Next
Author Message
PostPosted: Fri Apr 19, 2019 10:34 am 
Offline
User avatar

Joined: Tue Jan 26, 2016 7:59 am
Posts: 228
That makes more sense; they look far too fiddly to have to assemble each one!

I thought the Royal Navy had eliminated the stool bed by this time, and just used the bed bolt instead?

_________________
King George V class Battleships in 3D


Report this post
Top
 Profile  
Reply with quote  
PostPosted: Wed Apr 24, 2019 5:36 am 
Offline
User avatar

Joined: Sat Apr 26, 2014 10:15 am
Posts: 65
Location: Stupava, Slovakia
Marijn excellent work. :thumbs_up_1:
A really good example of how to do it without the original construction kit.


Report this post
Top
 Profile  
Reply with quote  
PostPosted: Thu Apr 25, 2019 3:40 am 
Offline

Joined: Thu Jan 26, 2017 8:30 am
Posts: 202
Nice work and beautiful castings... enjoy cleaning and assembling.


Report this post
Top
 Profile  
Reply with quote  
PostPosted: Thu Apr 25, 2019 4:33 am 
Offline

Joined: Tue Feb 06, 2007 10:24 am
Posts: 2495
Location: Belgium
Many thanks guys! :smallsmile:

Milan, maybe we meet again this weekend? :wave_1:

Martocticvs wrote:
That makes more sense; they look far too fiddly to have to assemble each one!

Yep, but now they are quite fiddly to clean up... :big_grin: The sides are 0,3 to 0,5mm, and I have to take it slow to prevent crushing them. But at least this way, they are all exactly identical. If I would have to assemble them, there could be some minor misalignement issues.

Martocticvs wrote:
I thought the Royal Navy had eliminated the stool bed by this time, and just used the bed bolt instead?

No idea to be honest! I'm just copying the plans in Anatomy of the ship, and photo's of the reconstructions on the real Vic. :big_grin:
What does a bed bolt look like? It is a hard term to google... :big_grin:


Report this post
Top
 Profile  
Reply with quote  
PostPosted: Thu Apr 25, 2019 2:04 pm 
Offline
User avatar

Joined: Tue Jan 26, 2016 7:59 am
Posts: 228
Sorry, I was mis-remembering. I blame them for not using sufficiently distinct terminology!

Older carriages had a bed, which was basically a base plate that the sides (called brackets) where mounted on. This was done away with by about 1725. The carriage then retained the same basic form and features until sometime in the naval artillery dark ages of the 1820s-1840s, when they became much more complex (but there are no decent reference books covering that period).

The bed bolt is the iron bar that runs across the carriage, a little behind the middle. And then you are quite right to be using the stool bed, which is a board that was notched under the front to sit over the bed bolt, and at the rear rest on the rear axle tree. And then on top of that were placed the quoins for elevation.

_________________
King George V class Battleships in 3D


Report this post
Top
 Profile  
Reply with quote  
PostPosted: Fri Apr 26, 2019 1:28 am 
Offline
User avatar

Joined: Sat Apr 26, 2014 10:15 am
Posts: 65
Location: Stupava, Slovakia
marijn van gils wrote:
Milan, maybe we meet again this weekend?


Marijn, we see. :cool_2:
We'll be there with Jan on Sunday morning. Will you show the unfinished HMS Victory?


Report this post
Top
 Profile  
Reply with quote  
PostPosted: Sun Apr 28, 2019 1:00 pm 
Offline
User avatar

Joined: Sat Dec 01, 2018 10:14 am
Posts: 84
Location: Hungary
It was an honor seeng your ship dioramas personally at Moson, Marijn! Victory and Le Redoutable were also fantastic, I'm lookng forward the progress on those little beauties! :thumbs_up_1:

Áron


Report this post
Top
 Profile  
Reply with quote  
PostPosted: Tue Apr 30, 2019 4:56 am 
Offline

Joined: Tue Feb 06, 2007 10:24 am
Posts: 2495
Location: Belgium
Thanks Martocticvs! :thumbs_up_1:

Many thanks Milan and Aaron! That was a great weekend... :big_grin:

And now Le Redoutable as she looked last weekend, with the basic structure of the bow and stern added:

The bow is starting simple:
Image

The stern is a bit more complex than Victory, as it had an open stern gallery. I first made the deck for that stern gallery. Then I added the bulkhead with openings for windows and doors. Following this, I also added decks/supports for the quarter galleries.
Image

The parts above are firmly glued in place. The large decks inside the ship remain removable though. The poop deck rests on top of the bulkhead of the stern gallery, doubling as the roof of the stern gallery.
Image

The face of the stern was cut in one piece. This will remain detachable to ease painting of the stern gallery and the inside of the quarter galleries.
Image

A lot of details still have to follow, but the main structure is there!
The outer two windows on each side of the upper gun deck will be closed again later, as they were mock windows on the real ship.
Image

I also added the whales:
Image

Cheers,

Marijn


Report this post
Top
 Profile  
Reply with quote  
PostPosted: Sun May 19, 2019 7:25 am 
Offline

Joined: Tue Feb 06, 2007 10:24 am
Posts: 2495
Location: Belgium
Time has come to add details to the hull.

I have always found the beakhead bows of man ‘o war extremely aesthetically pleasing, so that is where I started. It is also one of the most complex parts of the ship…

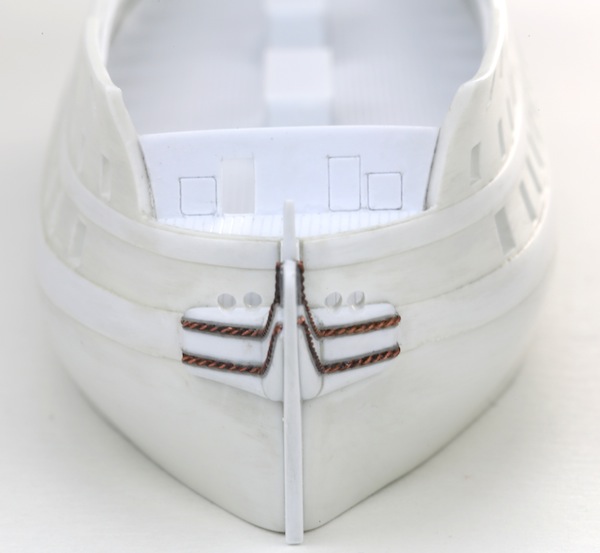
I started by adding the cheeks. The two main pieces on each side were cut, carved and sanded from plastic sheet. When glued in place, two grooves were cut. In these, twisted copper was glued. These were flanked by two lengths of stretched sprue. Finally, hawse holes were drilled in the hull, and slots for the head timbers were cut in the top of the cheeks.

ImageImage
Image

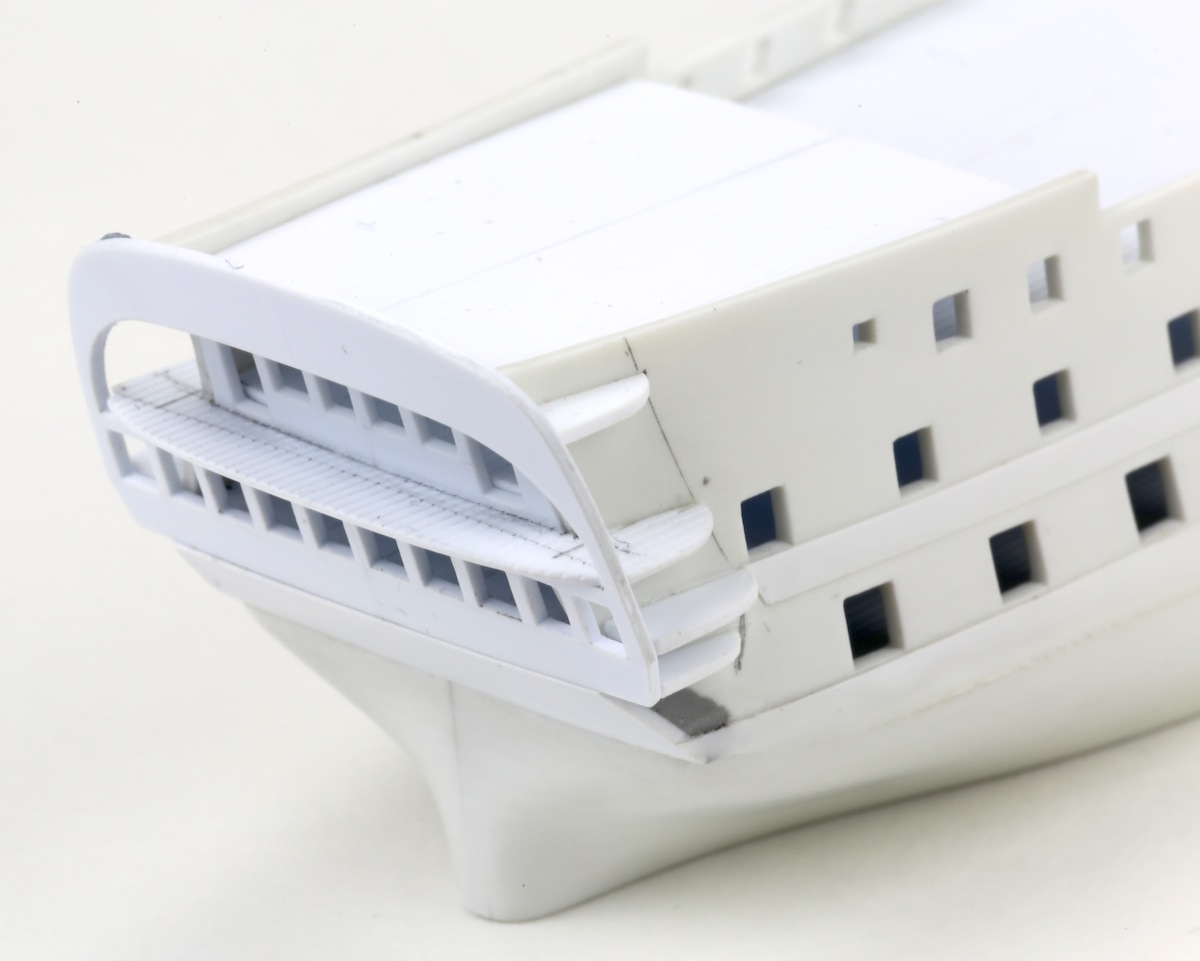
Next, the head timbers and main rail were cut and carved from plastic sheet and installed. This was probably the most critical phase for getting all proportions and shapes to end up correct and symmetrical. The cross pieces were added in between the two main rails from stock square plastic rod.

ImageImage
ImageImage

Now the lower and middle rails could be added, completing the lower part of the beakhead. At the top, carlings were added in between the cross pieces.

ImageImage
ImageImage

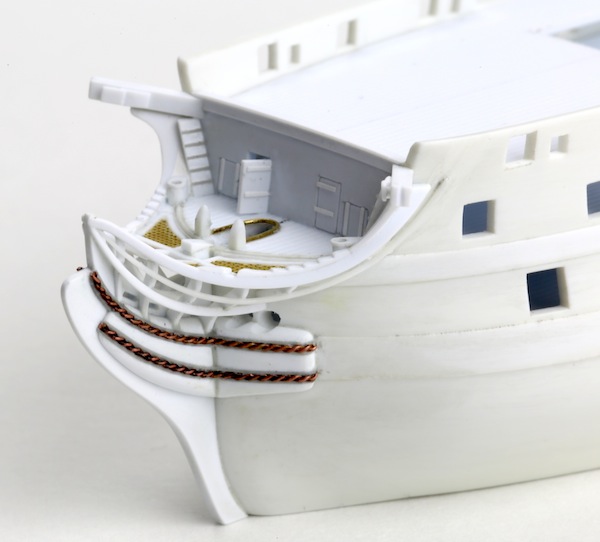
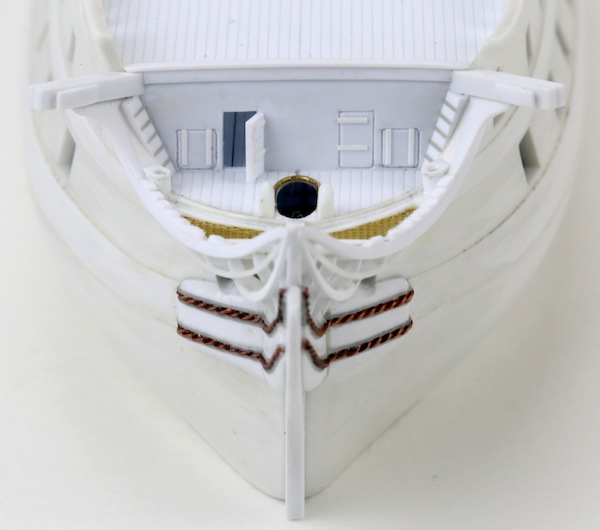
Gratings were now added, cut from a generic PE sheet. Also the cathead and their supports were installed.

ImageImage
ImageImage

Finally, the last details were added: ladders, seats of ease, false rails (ridged pieces on top of main rails), knightheads, hinges on the doors and bowchase ports, …

ImageImage
ImageImage

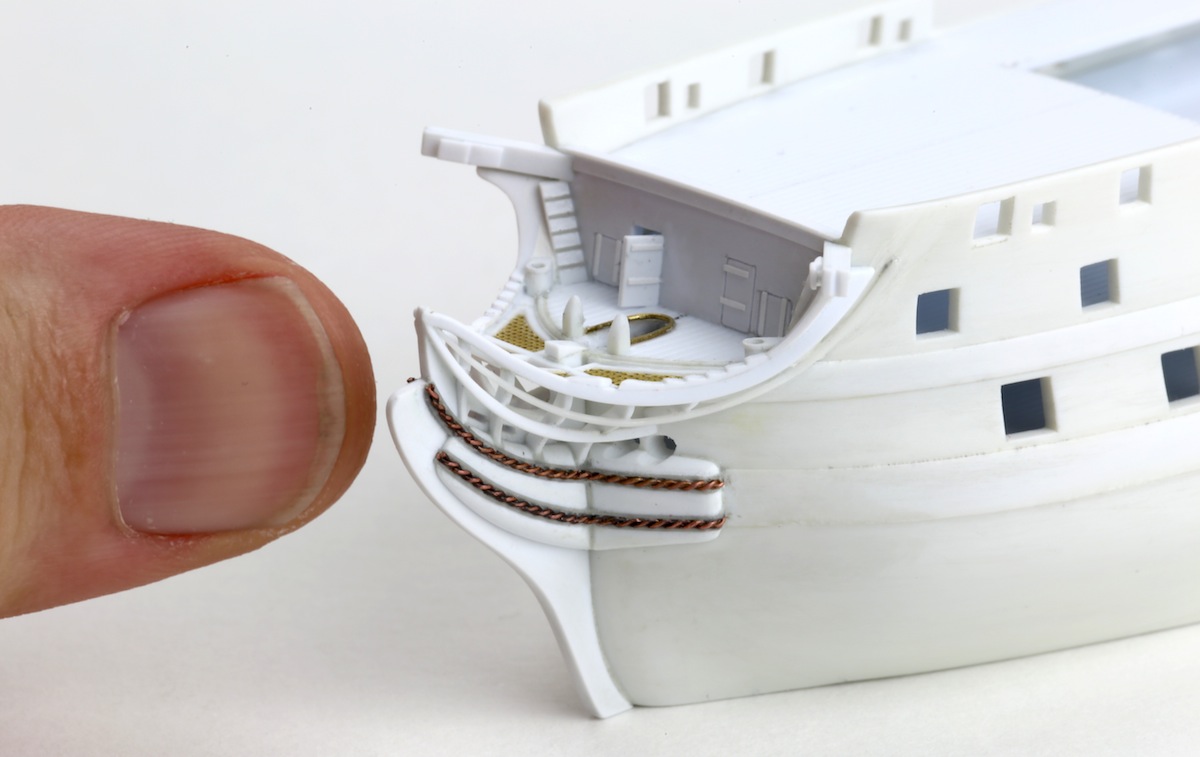
And as a reminder of the scale of this model:

Image

Of course, the figurehead still needs to be added, but I'll first detail the stern and get 'back into' sculpting on that area first.

Cheers,

Marijn


Report this post
Top
 Profile  
Reply with quote  
PostPosted: Sun May 19, 2019 9:59 am 
Offline
User avatar

Joined: Sat Mar 26, 2016 2:58 am
Posts: 225
Location: Belgium
That's just superimpressive mate! Well done!


Report this post
Top
 Profile  
Reply with quote  
PostPosted: Mon May 20, 2019 1:47 am 
Offline

Joined: Wed Jan 21, 2009 1:51 pm
Posts: 2858
Great progress! Didn't notice the putty at the flanks of the twisted wire at first (phone screen not very good). I think I like the cut-to-size PE most :big_grin:


Report this post
Top
 Profile  
Reply with quote  
PostPosted: Mon May 20, 2019 7:03 am 
Offline

Joined: Tue Jan 11, 2005 10:56 am
Posts: 8571
Location: New York City
Outstanding work, Marijn!


Report this post
Top
 Profile  
Reply with quote  
PostPosted: Mon May 20, 2019 7:33 am 
Offline

Joined: Thu Jan 19, 2017 4:33 am
Posts: 71
Remarkable work. :thumbs_up_1:


Report this post
Top
 Profile  
Reply with quote  
PostPosted: Mon May 20, 2019 8:53 am 
Offline

Joined: Thu Jan 26, 2017 8:30 am
Posts: 202
stunning work on that bow... I think you've heard it a million times yet, but incredible craftmanship... I know, carefull preparation and basic skills like cutting and sanding, but masterly done...


Report this post
Top
 Profile  
Reply with quote  
PostPosted: Tue May 21, 2019 8:40 am 
Offline

Joined: Tue Feb 06, 2007 10:24 am
Posts: 2495
Location: Belgium
Many thanks everyone! :smallsmile: :cool_1: :smallsmile:


EJFoeth wrote:
Didn't notice the putty at the flanks of the twisted wire at first (phone screen not very good).

That isn't putty, but (gray) stretched sprue. :big_grin:
But to be fair, there is Magic Sculp visible nearby, filling the gaps around the cheeks and the head timbers, and it looks exactly the same... :big_grin:

And this little addition (decorative carving) is Magic Sculpt too: :big_grin:
Image Image

Cheers,

Marijn


Report this post
Top
 Profile  
Reply with quote  
PostPosted: Tue May 21, 2019 8:51 am 
Offline

Joined: Wed Jan 21, 2009 1:51 pm
Posts: 2858
That is very cute :thumbs_up_1: (I looked at some pics of the "real thing" (other models) but they don't show this floral woodwork?)


Report this post
Top
 Profile  
Reply with quote  
PostPosted: Tue May 21, 2019 9:09 am 
Offline

Joined: Tue Feb 06, 2007 10:24 am
Posts: 2495
Location: Belgium
This is not Victory, but Le Redoutable, the French 74-gun ship. The exact decoration of it is not known, so I mostly follow the plans of Boudriot in 'the 74 gun ship'. But the few existing period plans of French 74's of that period do show some kind of floral decoration in that location.

This is a beautiful 1/72 scale model according to the same plans by Jacques Fichant. You can just make out the carving.
Image

Cheers,

Marijn


Report this post
Top
 Profile  
Reply with quote  
PostPosted: Tue May 21, 2019 9:12 am 
Offline

Joined: Wed Jan 21, 2009 1:51 pm
Posts: 2858
Thanks for that image; makes the streched sprue more clear as well.


Report this post
Top
 Profile  
Reply with quote  
PostPosted: Tue May 21, 2019 10:35 am 
Offline

Joined: Tue Feb 06, 2007 10:24 am
Posts: 2495
Location: Belgium
;) :wave_1:


Report this post
Top
 Profile  
Reply with quote  
PostPosted: Fri May 24, 2019 3:17 am 
Offline
User avatar

Joined: Wed Sep 28, 2011 12:04 pm
Posts: 1818
Location: Paris
What is actually your preferred method to smooth down styrene - diamond files, sandpaper, steel-wool, ... ?

_________________
Eberhard

Former chairman Arbeitskreis historischer Schiffbau e.V. (German Association for Shipbuilding History)

--------------------------------------------------------------------------------------------------------------------------------------------------------------------------------------------

Image Image Image Image


Report this post
Top
 Profile  
Reply with quote  
Display posts from previous:  Sort by  
Post new topic Reply to topic  [ 1219 posts ]  Go to page Previous  1 ... 6, 7, 8, 9, 10, 11, 12 ... 61  Next

All times are UTC - 6 hours [ DST ]


Who is online

Users browsing this forum: No registered users and 74 guests


You can post new topics in this forum
You can reply to topics in this forum
You cannot edit your posts in this forum
You cannot delete your posts in this forum
You cannot post attachments in this forum

Jump to:  
Powered by phpBB® Forum Software © phpBB Group