The Ship Model Forum

The Ship Modelers Source
It is currently Fri Apr 19, 2024 12:50 am

All times are UTC - 6 hours [ DST ]


Post new topic Reply to topic  [ 150 posts ]  Go to page 1, 2, 3, 4, 5 ... 8  Next
Author Message
PostPosted: Thu Jan 21, 2021 5:22 am 
Offline
User avatar

Joined: Sun Oct 12, 2008 3:55 am
Posts: 593
Location: Budapest, Hungary
Here is an account on building Trumpeter’s 1:700 HMS Valiant, another element of my diorama featuring HMS Barham and possibly HMS Griffin.
It’s been a long time since I built a plastic model my last five completed ships being resin kits. I have come to prefer the construction of resin kits over plastic models for several reasons but now it’s time to resort to old techniques of assembling plastic models.
Trumpeter’s kit is a reasonably fair representation of the original with some flaws which need to be corrected.
Attachment:
mws5.jpg
mws5.jpg [ 385.69 KiB | Viewed 4015 times ]

I also have a resin kit of Valiant from HP Model
Attachment:
mws6.jpg
mws6.jpg [ 394.86 KiB | Viewed 4015 times ]

but it has numerous inaccuracies, wrong and irregular shapes besides it shows an 1944 fit, therefore once the Trumpeter kit was available it became the preferred option for me.
Here you can see my workbench during the planning phase.
Attachment:
mws1.jpg
mws1.jpg [ 389.35 KiB | Viewed 4015 times ]

This is my hand-drawn plan of construction. There is another page of drawings and text in English.
Attachment:
mws2.jpg
mws2.jpg [ 374.77 KiB | Viewed 4015 times ]

For some reason there is much more coverage of Valiant’s similarly modernised sister, HMS Queen Elizabeth, while I was unable to find a decent plan of Valiant. There is a good quality drawing in R.A. Burt’s work about British battleships of WW II, some more in the Shipcraft and Ensign publications dealing with the Queen Elizabeth class, but no deck plan. Therefore I used the deck plan of Queen Elizabeth found in the Raven-Roberts tome on British battleships of WW II and a complete set of plans of QE from the Profile Morskie series.
Attachment:
mws3.jpg
mws3.jpg [ 370.83 KiB | Viewed 4015 times ]

I put much emphasis on comparing every detail possible with the period photographs available to me. I tried to establish the differences between the two near-identical sisters but I am afraid that I could not identify all of them.
During construction I will mainly use upgrade sets of FlyHawk and Tetra Models for QE and to a lesser degree WEM’s QE/Valiant set.
Attachment:
mws4.jpg
mws4.jpg [ 384.96 KiB | Viewed 4015 times ]

I will utilize many more PE sets for just a few details and some of Micro Master’s superb 3D printed accessories. Panting will be done with Colourcoats and photographs taken by my Canon EOS 450 D camera. I sincerely hope to finish this model in considerably less time than Barham’s outrageous four-and-a -half years!


Report this post
Top
 Profile  
Reply with quote  
PostPosted: Thu Jan 21, 2021 9:22 am 
Offline
User avatar

Joined: Tue Jan 11, 2005 1:40 pm
Posts: 8175
Location: New Jersey
Just subscribed to this topic. Will be watching with great interest!

_________________
Martin

"Tomorrow is the most important thing in life. Comes into us at midnight very clean. It's perfect when it arrives and it puts itself in our hands. It hopes we've learned something from yesterday." John Wayne

Ship Model Gallery


Report this post
Top
 Profile  
Reply with quote  
PostPosted: Thu Jan 21, 2021 9:35 am 
Offline

Joined: Wed Jan 21, 2009 1:51 pm
Posts: 2858
Me two :thumbs_up_1:


Report this post
Top
 Profile  
Reply with quote  
PostPosted: Thu Jan 21, 2021 10:27 am 
Offline

Joined: Tue Feb 06, 2007 10:24 am
Posts: 2495
Location: Belgium
Me three!


Lovely worktable pic by the way! I think I need to steal one of your lamps... :big_grin: :big_grin: :big_grin:


Report this post
Top
 Profile  
Reply with quote  
PostPosted: Thu Jan 21, 2021 1:08 pm 
Offline

Joined: Thu Apr 09, 2009 1:52 pm
Posts: 149
will be watching :thumbs_up_1:


Report this post
Top
 Profile  
Reply with quote  
PostPosted: Fri Jan 22, 2021 2:36 am 
Offline
User avatar

Joined: Mon Nov 11, 2013 11:01 pm
Posts: 1257
Location: Detroit area
Me five!

_________________
Sean Nash, ACG (aircraft camo gestapo)

On the ways:
1/200 Trumpeter HMS Nelson
1/700 Tamiya USS Yorktown CV-5

In the stash:
1/35 Italiari PT-109
1/35 Tamiya "Pibber" Patrol Boat
1/350 Trumpeter USS Yorktown CV-10


Report this post
Top
 Profile  
Reply with quote  
PostPosted: Fri Jan 22, 2021 3:36 am 
Offline
User avatar

Joined: Mon Jan 10, 2005 5:30 pm
Posts: 5386
Location: Nr Southampton England
and so the seating rows fill up.. :thumbs_up_1:
like a virtual cinema.

George -- the Trumpeter kit --does it feature the trench-like butt ends to the planking....?

before you advance tooo far into the build...
consider a cure thereto. :big_grin: ( I know --its my favourite topic!)

I would suggest laying in stretched sprue on CA- or with fast setting poly glue, then pare with blade until flush.
any imperfections will be less of an issue than the butt ends - and can be disguised with a suitable sailor engaged in a suitable task... :heh:

ideally practice first on a spare or old/ discarded plastic deck of that type to perfect the technique.

BEST WISHES

JIm Baumann

_________________
....I buy them at three times the speed I build 'em.... will I live long enough to empty my stash...?
http://www.modelshipgallery.com/gallery ... index.html

IPMS UK SIG (special interest group) www.finewaterline.com


Report this post
Top
 Profile  
Reply with quote  
PostPosted: Fri Jan 22, 2021 4:47 am 
Offline
SovereignHobbies
SovereignHobbies

Joined: Sat Feb 28, 2015 9:09 am
Posts: 1176
Location: Aberdeenshire, Scotland, UK
I too shall be watching this with interest after the beauty that was your HMS Barham build :)

_________________
James Duff
Sovereign Hobbies Ltd
http://www.sovereignhobbies.co.uk

Current build:
HMS Imperial D09 1/350
http://www.shipmodels.info/mws_forum/viewtopic.php?f=59&t=167151


Report this post
Top
 Profile  
Reply with quote  
PostPosted: Fri Jan 22, 2021 9:59 am 
Offline
User avatar

Joined: Sun Jul 11, 2010 6:52 am
Posts: 348
Location: Galicia (Spain)
Another brick in the wall.

I will follow this topic with interest, soon I will start with the Hms Renown.

_________________
On workbench:
LCS-4 Coronado 1/350
IJN Yamato 1/700 Tamiya
Plan Type 039 Yuan Class 1/350

Shipyard:
LCS-4 Coronado


My Galery:
http://www.modelshipgallery.com/gallery ... index.html
Instagram: Tamboshipsmodels


Report this post
Top
 Profile  
Reply with quote  
PostPosted: Fri Jan 22, 2021 12:13 pm 
Offline
User avatar

Joined: Sun Oct 12, 2008 3:55 am
Posts: 593
Location: Budapest, Hungary
I am very satisfied that some of the most respected members on this forum will be following my humble work!
Mind you, this is going to take long!!
Jim, I know that decks can present problems. Thanks for the good advice but I think I will not need that (very ingenious) solution this time (see my upcoming post).


Report this post
Top
 Profile  
Reply with quote  
PostPosted: Fri Jan 22, 2021 12:29 pm 
Offline
User avatar

Joined: Sun Oct 12, 2008 3:55 am
Posts: 593
Location: Budapest, Hungary
Assembling the hull was the first thing that I had to do. That is something you are spared from when you build a resin kit. According to my sources the wooden decks were painted dark grey (AP507A) at the time depicted. This might be a problem if you consider that these decks have scribed detail which is useful when one wants to represent caulking. In reality decks were flush as the caulking was level with the planks, so, when painted over no engraved lines should be visible. One possible solution to this is the one I chose, the application of wood deck which was included in Tetra’s set (I hope I can achieve a special effect when it comes to weathering the decks). I have never used such pre-measured wood decks before because of their thickness. Even the finest ones add about 8” scale thickness to the decking which leads to loss of detail, flat hatches, too low bollards and barbettes, etc. Therefore I decided to cut off and replace all deck clutter, heighten the barbettes and fit the decks lower to compensate for the additional thickness created by the application of wood decks. Please forgive my limited computer skill, but this crude “drawing” might explain how I dealt with the problem.
Attachment:
deck arrangement.png
deck arrangement.png [ 5.15 KiB | Viewed 3812 times ]

In the transverse section the hull side is black, the plastic deck red and the additional layer of wood deck green. It can be seen that if a rebate is cut along the underside edge of the deck (solid red), the deck can be sunk to a proper position. I drilled numerous holes into decks to be able to strengthen the adhesion of the wood deck by filling the holes with superglue from the underside once the wood deck has been attached. Here the modified plastic forecastle deck can be seen with an unmodified quarterdeck alongside for comparison. It looks like a mess but the end result is better.
Attachment:
mws7.jpg
mws7.jpg [ 220.22 KiB | Viewed 3812 times ]

Attachment:
mws8.jpg
mws8.jpg [ 354.9 KiB | Viewed 3812 times ]

The hull sides required some attention before the deck has been permanently glued in. I recognised that the upper row of portholes is too high leaving too little room for the rigols and degaussing cable. Consequently I filled the shallow recesses representing the portholes with superglue and sanded them smooth.
Attachment:
mws9.jpg
mws9.jpg [ 164.29 KiB | Viewed 3812 times ]

Attachment:
mws10.jpg
mws10.jpg [ 188.14 KiB | Viewed 3812 times ]

Attachment:
mws11.jpg
mws11.jpg [ 286.76 KiB | Viewed 3812 times ]

Next I drilled new portholes just under the old ones. I gently pared off two moulded-on boat booms and a strip on the top of the bulge which doesn’t seem to have been present on the original ship. I wasn’t satisfied with the shape of the bulge – the transition between the vertical wall and the oblique “roof” was too soft (soft detail plagues even some of the finer plastic models – one of the reasons why I prefer resin kits). To cure this, I glued an aluminium strip to the sides of the bulge
Attachment:
mws12.jpg
mws12.jpg [ 397.48 KiB | Viewed 3812 times ]

and applied putty to the oblique top. After much sanding a shape I felt more realistic has been obtained.
Attachment:
mws1.jpg
mws1.jpg [ 198.78 KiB | Viewed 3812 times ]

Attachment:
mws2.jpg
mws2.jpg [ 208.32 KiB | Viewed 3812 times ]

There is still some more sanding to do but the primed bulge on the starboard side looks convincing to my eyes.
Attachment:
mws3.jpg
mws3.jpg [ 204.09 KiB | Viewed 3812 times ]


Report this post
Top
 Profile  
Reply with quote  
PostPosted: Fri Jan 22, 2021 12:32 pm 
Offline
User avatar

Joined: Sun Oct 12, 2008 3:55 am
Posts: 593
Location: Budapest, Hungary
I need to fabricate the drainage pipes cut off during the process and attach PE hatch covers the outline of which having been lost during puttying and sanding. If you look carefully it will be apparent that the wooden decks are flush with the hull sides and that the draught plate wasn’t used. I cut a thicker section of the lower hull and used it instead to gain some extra freeboard which will be useful when I mount the ship onto the seascape.
Attachment:
mws4.jpg
mws4.jpg [ 385.54 KiB | Viewed 3810 times ]

Attachment:
mws5.jpg
mws5.jpg [ 396.59 KiB | Viewed 3810 times ]

Attachment:
mws6.jpg
mws6.jpg [ 364.9 KiB | Viewed 3810 times ]


Report this post
Top
 Profile  
Reply with quote  
PostPosted: Sat Jan 23, 2021 7:09 am 
Offline

Joined: Tue Oct 23, 2018 2:00 pm
Posts: 575
Very nice, looking forward to watching this one develop. She will go very well with your H.M.S. Barham. Sisterships, but very different looking by 1941.


Report this post
Top
 Profile  
Reply with quote  
PostPosted: Sun Mar 14, 2021 2:14 pm 
Offline
User avatar

Joined: Sun Oct 12, 2008 3:55 am
Posts: 593
Location: Budapest, Hungary
Mr. Church, thank you very much!


Report this post
Top
 Profile  
Reply with quote  
PostPosted: Sun Mar 14, 2021 2:45 pm 
Offline
User avatar

Joined: Sun Oct 12, 2008 3:55 am
Posts: 593
Location: Budapest, Hungary
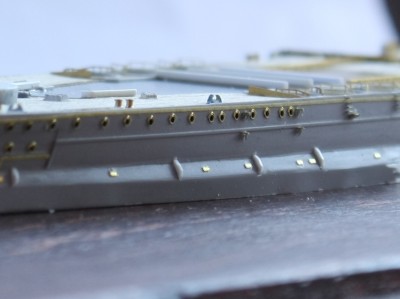
After a month and a half the hull with all its fittings has been completely detailed. This elevation shot shows some of the additional parts that have been added.
Attachment:
mws111.jpg
mws111.jpg [ 280.42 KiB | Viewed 3544 times ]

1. Modified bulge
2. Scratchbuilt drainage pipes
3. PE blast covers (FkyHawk)
4. External degaussing cable (Tamiya masking tape)
5. PE portholes with rigols (Artist Hobby, the finest I know, from their Warspite set)
6. PE ladder rungs (hardly visible in this picture)
Attachment:
mws2.JPG
mws2.JPG [ 215.92 KiB | Viewed 3544 times ]

Attachment:
mws3.JPG
mws3.JPG [ 244.26 KiB | Viewed 3544 times ]

Attachment:
mws9.JPG
mws9.JPG [ 185.22 KiB | Viewed 3544 times ]

The forecastle and quarterdeck has been embellished with quite a few pieces of equipment, some of which is explained in the photograph below.
Attachment:
mws222.jpg
mws222.jpg [ 381.94 KiB | Viewed 3544 times ]

1. Ground tackle with PE, turned brass and scratchbuilt parts (FlyHawk)
2. PE breakwater (Tetra)
3. Elevated barbettes – by gluing a ring of styrene to their top (to compensate for the portion hidden by the wood deck)
4. 3D printed hatches and skylights (by MicroMaster – very well done)
5. PE Railing along the DP turrets (FlyHawk and Tetra)
6. PE catapult (Tetra)
7. Scratchbuilt bulwarks with reinforcing gussets (out of aluminium sheet)
8. PE detail including watertight doors (FlyHawk) and a plate with the ship’s name (Artist Hobby)
9. Brass towing cable wound around barbette Y
10. PE hatch (WEM)
11. PE quarterdeck hatch with frame for canvas cover (Artist Hobby RN deck fittings)
12. Thickened PE fairleads (FlyHawk)
Some details are easier to make out in the detail shots.
Attachment:
mws6.JPG
mws6.JPG [ 395.52 KiB | Viewed 3544 times ]

Attachment:
mws8.JPG
mws8.JPG [ 257.12 KiB | Viewed 3544 times ]

For instance the fairleads have been added some volume by gluing them in pairs to the edge of the deck then filling the space between them with gel type superglue and sanding them smooth. Two examples in various stages of construction can be seen in the picture below.
Attachment:
mws4.JPG
mws4.JPG [ 241.64 KiB | Viewed 3544 times ]


Report this post
Top
 Profile  
Reply with quote  
PostPosted: Sun Mar 14, 2021 2:49 pm 
Offline

Joined: Sun Dec 20, 2020 10:45 am
Posts: 10
Wow! That's amazing :worship_1:
Watching with interest :D


Report this post
Top
 Profile  
Reply with quote  
PostPosted: Sun Mar 14, 2021 2:52 pm 
Offline
User avatar

Joined: Sun Oct 12, 2008 3:55 am
Posts: 593
Location: Budapest, Hungary
Additionally several dozens of mushroom vents in four sizes have been prepared along with washdeck lockers, cordage reels, vents to be attached to barbette B and X in several styles, cranes for accommodation ladders, quarterdeck ladders, aircraft cradles, anchors, etc. Parts to be painted to individual colours have been temporarily attached to different pieces of cardboard. Next I will turn my attention to the detailing of the shelter deck and bridge.
Attachment:
mws11.JPG
mws11.JPG [ 355.92 KiB | Viewed 3542 times ]

Attachment:
mws12.JPG
mws12.JPG [ 396.63 KiB | Viewed 3542 times ]

Attachment:
mws17.JPG
mws17.JPG [ 311.88 KiB | Viewed 3542 times ]

Attachment:
mws20.JPG
mws20.JPG [ 273.64 KiB | Viewed 3542 times ]

Attachment:
mws21.JPG
mws21.JPG [ 265.92 KiB | Viewed 3542 times ]

Attachment:
mws22.JPG
mws22.JPG [ 202.92 KiB | Viewed 3542 times ]

Attachment:
mws15.JPG
mws15.JPG [ 266.84 KiB | Viewed 3542 times ]

Attachment:
mws16.JPG
mws16.JPG [ 188.37 KiB | Viewed 3542 times ]


Attachments:
mws15.JPG
mws15.JPG [ 266.84 KiB | Viewed 3542 times ]
Report this post
Top
 Profile  
Reply with quote  
PostPosted: Sun Mar 14, 2021 2:56 pm 
Offline
User avatar

Joined: Sun Oct 12, 2008 3:55 am
Posts: 593
Location: Budapest, Hungary
An additional picture of the catapult area:
Attachment:
mws10.JPG
mws10.JPG [ 271.71 KiB | Viewed 3541 times ]


Report this post
Top
 Profile  
Reply with quote  
PostPosted: Sun Mar 14, 2021 4:56 pm 
Offline

Joined: Tue Oct 23, 2018 2:00 pm
Posts: 575
Some exquisite detailing work there, lovely.


Report this post
Top
 Profile  
Reply with quote  
PostPosted: Sun Mar 14, 2021 5:01 pm 
Offline
User avatar

Joined: Tue Jan 11, 2005 1:40 pm
Posts: 8175
Location: New Jersey
Wow!

_________________
Martin

"Tomorrow is the most important thing in life. Comes into us at midnight very clean. It's perfect when it arrives and it puts itself in our hands. It hopes we've learned something from yesterday." John Wayne

Ship Model Gallery


Report this post
Top
 Profile  
Reply with quote  
Display posts from previous:  Sort by  
Post new topic Reply to topic  [ 150 posts ]  Go to page 1, 2, 3, 4, 5 ... 8  Next

All times are UTC - 6 hours [ DST ]


Who is online

Users browsing this forum: No registered users and 97 guests


You can post new topics in this forum
You can reply to topics in this forum
You cannot edit your posts in this forum
You cannot delete your posts in this forum
You cannot post attachments in this forum

Jump to:  
Powered by phpBB® Forum Software © phpBB Group